
Street Guardian GPS Plus - Dashcam MIDLAND - Free user manual and instructions
Find the device manual for free Street Guardian GPS Plus MIDLAND in PDF.
| Product type | Dashboard camera (dashcam) |
| Brand | Midland |
| Model | Street Guardian GPS Plus |
| Dimensions | 88 x 48 x 34 mm |
| Weight | 70 g |
| Power supply | 5V 1.5A (cigarette lighter charger included) |
| Built-in battery | Lithium-polymer 130 mAh (for file finalization) |
| Screen | LCD 2.7 inches 16:9 |
| Video resolution | Full HD 1080p (1920x1080) at 30fps |
| Viewing angle | 160° (wide angle) |
| Sensor | 1/3" 3MP |
| Lens | 6G, aperture F2.0 |
| Main functions | Loop recording, G-Sensor, motion detection, HDR, built-in GPS, audio recording, photo mode |
| External memory | microSD card up to 64 GB (Class 10 recommended) |
| Connectivity | Mini USB, mini HDMI, built-in GPS support |
| GPS | Yes (in the suction mount) |
| Care and cleaning | Clean the lens with a soft, damp cloth. Do not use chemicals. |
| Safety | Do not expose to moisture. Do not open the case. Do not throw into fire. |
| Operating temperature | -10°C to 50°C |
| Box contents | Camera, suction mount with GPS, 12V charger, USB cable |
Frequently Asked Questions - Street Guardian GPS Plus MIDLAND
User questions about Street Guardian GPS Plus MIDLAND
0 question about this device. Answer the ones you know or ask your own.
Ask a new question about this device
Download the instructions for your Dashcam in PDF format for free! Find your manual Street Guardian GPS Plus - MIDLAND and take your electronic device back in hand. On this page are published all the documents necessary for the use of your device. Street Guardian GPS Plus by MIDLAND.
USER MANUAL Street Guardian GPS Plus MIDLAND
The multi-language user manual is available on our website
www.midlandeurope.com
The content of this document is for information purpose and is subject to change without prior notice.
We made every effort to ensure that this User Guide is accurate and complete. However, no liability is assumed for any errors and omissions that may have occurred.
The manufacturer reserves the right to change the technical specifications without prior notice.
Introduction
Thank you for purchasing STREET GUARDIAN GPS+, the FULL HD car DVR.
STREET GUARDIAN GPS+ is a robust and compact car camcorder, with a modern design, that is able to record whatever happens while you are driving. A reliable witness in case of accidents or unforeseen events.
This product is based on maintaining the original appearance of the vehicle and does not affect your driving and the view.
If compared to the other car camcorders, STREET GUARDIAN GPS+ stands out for its exclusive design and perfectly fits inside the vehicle.
Main functions
. FULL HD car camcorder
160^ ultra wide angle lens
Super video resolution: HD 1080P
HDR (High Dynamic Range) videos
2.7 inch high resolution LCD
G-Sensor
Motion Detection
- Files protected in case of emergency
Audio data saving
HDMI output, etc.
Warnings
- This manual includes details on how to use the device, its working, technical specifications and precautions. We recommend to carefully read it before using the camera and keep it for the future. We trust that this car dvr will meet your needs for a long time!
- Do not use the camera in damp conditions. STREET GUARDIAN GPS+ is not waterproof, so please do not expose it to water or rain.
- Do not try to open the shell and repair it: this will void the warranty. If you experience problems, go to the professional service centre for repairing.
To clean the camera do not use thrill chemical substances or clean solvents, but only a moist soft cloth. - To avoid affecting the videos, do not use STREET GUARDIAN GPS+ in presence of excessive dust or fog.
At the end of its life, do not discard the camera randomly and do not throw it into the fire, it may explode. - The results of GPS positioning are only for reference, and should not affect the actual driving situation. The feature cannot ensure the location accuracy.
- GPS location accuracy may differ depending on weather and location such as high buildings, tunnels, undergrounds, or forests. GPS satellite signals cannot pass through solid materials (except glass). Tinted window may affect the performance of the GPS satellite reception.
This camera is intended for non-commercial use, within the limits permitted by applicable law. The company is NOT responsible for the loss of any data/content during operation - Due to local laws and vehicles safety considerations, do not manually operate the device while driving
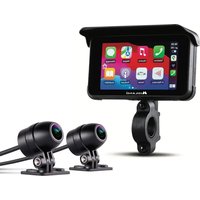
What's in the box
- Street Guardian GPS+ car camcorder
- Suction cup with GPS
- 12V charger with cigarette lighter plug
- Cable for the connection to PC
Notes on Installation
- Install the device near the rear-view mirror to obtain the best open-field view. Do NOT install the camcorder in a location that will obstruct your required driving view.
- Make sure that the lens is within the wiping range of the windscreen wiper to ensure a clear view even when it rains.
- Do not touch the lens with your fingers. Finger grease may be left on the lens and will result in unclear videos or snapshots. Clean the lens on a regular basis.
- Do not install the device on a tinted window. Doing so may damage the tint film.
- Make sure that the installation position is not hindered by the tinted window.
Description of the controls

N. Button/Function Description
| 1 MENU Menu/Photo | 1. while in Recording/Photo/Preview mode, the MENU key is used to enter/exit the menu. 2. while recording is used for taking a photo. |
| 2 POWER Power/IR Led/lock | 1. Short press to power on. Press for 2 seconds to power off. 2. In recording mode, short press to turn on/off the IR LEDs. 3. Under thumbnail mode, short press to lock the current file. |

ENGLISH
| 3. MODE Switch amongst photo /recording/ playback/emergency | 1. In video mode: short press once to switch to photograph mode 2. In photograph mode: short press once to switch to video/pho-to playback mode (thumbnail mode) 3. In video/photo playback mode (thumbnail mode): short press once to switch to video mode 4. While in menu you can toggle between video settings and configuration settings. 5. Lock or unlock files while recording. 6. While in playback mode, press “MODE” key back to thumbnail. |
| 4 REC/PHOTO/OK KEY | 1. While in menu settings press the button to confirm your se-lection. 2. While in Thumbnail mode press REC to confirm playing of the video/photo. 3. While in video playback mode, press to start/pause playing. 4. While in video mode, press REC to start recording. |
| 5 UP Up/Screen | 1. While in MENU mode, this button is used for the menu selection; 2. While in thumbnail mode, press it to select videos/photos; 3. While in video playback mode, press it to rewind 4. While in recording mode, push it to turn on/off audio recording |
| 6 DOWN Down/Audio | 1. While in MENU mode, it is used for the menu selection; 2. While in thumbnail mode, push it to select videos/photos; 3. While in video playback mode, press it to fast forward 4. While in recording mode, push it to turn on/off screen |
| 7 LCD Display | |
| 8 Status LED | 1. Red while battery charging. Turns off when battery fully char-ged 2. Blue while unit turned on. 3. Blue flashing while recording. |
| 9 Micro SD card slot Insert the micro SD card into this slot | |
| 10 Microphone | |
| 11 Mini HDMI interface High definition output | To view videos and photos connect the camera to HD television by HDMI cable |
| 12 Lens | |
| 13 Bracket port Slide the bracket to connect the GPS | |
| 14 Speaker | |
| 15 Reset Short press to reset. The camera turns off. | |
| 16 Mini USB port Storage/charging | 1. Connect the USB cable for auto recording 2. Connect the USB cable for auto charging 3. Connect the USB to PC to download photos/videos |
| 17 GPS mount Mount the support to the camera | |
| 18 Mini USB port of the GPS mount Recording/charging | 1. Connect the USB cable for auto recording 2. Connect the USB cable for auto charging |
Getting Started
Inserting the Memory Card
Insert the memory card with the gold contacts facing the back of the camcorder. Push the memory card until it clicks into place.
To remove the memory card: push to eject the memory card out of the slot.
Note:
- Do not remove or insert the memory card when the device is powered on. This may damage the memory card.
- Use class 10 micro SD cards for this camcorder.
It is recommended to format the micro SD cards before the initial use.
Installing in Vehicles
Mount to Windshield
- Attach the bracket to the device. Slide it into the bracket holder until you hear a click. With the suction-cup laying flat, position the suction-cup on the windshield.
- Fix the DVR nearby the rear view mirror by the supplied bracket, without blocking the line of sight.
- Connect the bracket and DVR, hide the cable into the car ceiling.
- When the cable reaches the top corner of the car door, insert the cable into the split as shown in the picture (A).
- Open the sealing strip on the edge of the car door, insert the cable along the strip (B). Plug in the cigarette lighter as shown in the picture (C).


Charge and power on/off instructions
Charging
Only the car charger included in the box can be used with 5V 1.5A output. If the current is less than 1.5A, or the voltage different from 5V, the device could be damaged or could not work properly.
Connect one end of the car adapter to the USB connector of the camcorder mount.
Plug the other end of the car charger to the cigarette lighter socket of your vehicle. Once the vehicle engine is started, the camcorder automatically powers on.
Attention: in some vehicles the cigarette lighter has no outage after the vehicle turns off, this means that the automatic turning on/off is not possible. Therefore the camera must be manually switched on/off.
Please make sure to charge the device at least two hours before using it: if the battery is completely discharged, the camera will return to default settings.
Note
The red led lights up while the battery is being charged (a complete recharge takes about 120 minutes). Then the led will turn off.
Auto power on/off
When used as driving recorder, it is required to turn ON the "Loop Recording" and "Power ON record".
In this way, if the camera is connected to the car charger when the vehicle engine is turned on, it will start recording video; when the vehicle engine is turned off, the data will be saved, and the device will automatically shutdown.
Attention: in some vehicles the 12V plug does not switch off the power when the engine is turned off, therefore the automatic turning on and off cannot be done. You have to do it manually.
Manual power on/off
Shortly press the Power button to turn on the device: the red led will turn on
Enter the video mode, keep pressed the Power button: the red led will switch off.
Attention: in case of very low battery, the camera will emit an acoustic sound and then switch off.
Recharge
To recharge the car camcorder connect it to the PC with its USB cable.
The camera however, must be always powered while in use: the built-in battery is used only to correctly save the file before turning off the device. In standby conditions the battery life is few minutes, so it must be always used while powered through the cable.
Battery indicators as below:


Full Half Low Empty (unit turns off)
Basic operation instructions about photo/video/playback

- Mode
- Resolution
- IR LED
- REC time
-
Loop REC
-
Motion detection
-
Date
-
HDR
-
Time
-
G-Sensor
-
Battery
-
Exposure compensation
-
Audio REC
-
Memory Card
Video mode and recording
At start-up the unit automatically enters in video mode, there is a video recorder icon shown on the top left corner of the LCD;
Short press the REC button to start recording, the blue led starts flashing, indicating that the DVR is recording. To stop recording, short press again the REC button.
Photo mode
Press the MODE button to switch to photo mode, there is a camera icon shown on the top left corner of the LCD.
Short press REC to take photos. The LCD will be flash one time.
Video/photo playback mode
Press MODE button twice to switch to playback mode. You will find the thumbnails of all recorded videos and photos.
- To select the desired file use the UP/DOWN key.
- Press REC to enter the single file playback.
While in playback mode press:
UP to pass to the previous file
- DOWN to pass to the next file
- MENU to open menu option
- MODE to return to thumbnails view
REC to start playing video
During playing press:
- REC to pause playing
UP to go fast backwards (2x/4x/8x) - DOWN to go fast forwards (2x/4x/8x)
Menu settings
Video settings
While in video mode, press the MENU button to enter the video option (the camera icon on the top left corner is selected).
The following settings options are available:
- Resolution
- Loop Recording
HDR
Motion Detection
Power ON record
Power OFF delay
Power ON delay
Record Audio
G Sensor set
Use the UP/DOWN controls to browse the setting options, press REC to enter the setting, select the desired option with UP/DOWN and confirm with the REC button.
Attention: during the video recording it is not allowed to enter the MENU; first stop recording.
- Resolution: 19201080 30P / 1280720P 30P / 848480 30P / 640480 30P
- Loop Recording: Off / 1 minute / 2 minutes / 5 minutes / 10 minutes / 15 minutes / 20 minutes When this mode is OFF, the camera stops recording when the micro SD card is full. If this function is enabled, the car camcorder continues recording deleting the older videos. The videos protected by overwriting won't be deleted.
HDR (High Dynamic Range): Off / On.
HDR is a technique able to reproduce a greater range of luminosity, it makes your videos brighter and the colors more intense. HDR improves the contrast while shooting a video and is very useful in poor light conditions, for example if a person is located in a dim place or if you are shooting a landscape.
Motion detection: Off / On
With the motion detection feature the camera automatically starts recording every time a movement is picked up: either a person or an object; and will stop recording as soon the motion stops.
This function needs the camera to be continuously power supplied.
Before activating or enabling it, you have to select "Auto Power off" OFF (Automatic switching off).
Important: the motion detection picks up evident movements and not the little ones; therefore this may cause a chopped recording because little motions are not detected.
Power ON record: Off / On.
If ON the unit will automatically start recording when it is power supplied.
- Power OFF delay: Off / 10seconds / 20seconds / 30seconds.
If set, the unit will wait the set value before turning OFF when the car is turned off.
- Power ON delay: Off / 10seconds / 20seconds / 30seconds.
If set, the unit will wait the set value before turning ON when the car is turned on.
Record Audio: Off / On.
Turns Off or On the audio recording.
G Sensor set: Off / Low / Medium / High.
Set the sensitivity of the G-sensor: Low is the least sensitive, High is the most sensitive. When the G sensor is enabled, in case of car collision it will automatically save and lock the file.
System settings
While in video mode, press the MENU button to enter the video option
Then press the MODE key to switch to system settings (the gear icon on the top left corner is selected)
The following settings are available:
- Date/Time
- Car number set
- Stamp
- Auto Power Off
- Auto LCD Off
- Beep Sound
Language
Format
GPS Auto Update
time
- GMT setup
-
TV Mode
Frequency
Volume -
Exposure
White Balance - Default Setting
Time Lapse
Version
Use the UP/DOWN controls to browse the setting options, press REC to enter the setting, select the desired option with UP/DOWN and confirm with the REC button.
Attention: during the video recording it is not allowed to enter the MENU; first stop recording.
- Date/time: set year/month/day and time.
Use the REC button to change field and UP/DOWN to change value. Confirm with the MODE button.
- Car number set: Insert your car number plate or other ID.
Use the REC button to change field and UP/DOWN to change value. Confirm with the MODE button.
- Stamp: date/time / Car Number / Speed / GPS.
Press REC to activate/deactivate fields, UP/DOWN to select field, MODE to confirm
- Auto power off: Off / 3 minutes / 5 minutes / 10 minutes.
If no button is pressed within the set period, the unit will turn off.
- Auto LCD Off: Off / 1 minute / 3 minutes / 5 minutes.
If no button is pressed within the set period, the LCD screen will turn off.
- Beep Sound: Off / On
- Language: select the desired language
- Format: selecting "TF Card" then confirming, will format the SD card
GPS Auto Update Time: Off / On.
The unit will update date and time according to the information coming from GPS.
- GMT setup: set your time zone.
If GPS Auto Update time is set, you need to select the right time zone to have correct time set.
- TV Mode: NTSC / PAL.
Select the preferred TV mode
Frequency: 50Hz / 60Hz
Select the power supply frequency.
Volume: High / Medium / Low.
Set the volume of playback audio and alarm beep.
Exposure: +2.0 / +1.7 / +1.3 / +1.0 / +0.7 / +0.3 / 0.0 / -0.3 / -0.7 / -1.0 / -1.3 / -1.7 /
-2.0. If light source is lower or higher, you can increase or decrease the exposure value to improve the image clearness.
- White Balance: Auto / Daylight / Cloudy / Tungsten / Fluorescent.
Images look differently under different light situations, this function supports choices of reasonable light source to improve image quality.
- Default setting: Select OK to reset to default parameters.
Time Lapse: Off / 1 second / 5 seconds / 10 seconds
The unit records a video taking a frame each set time interval. In this way the time in the video passes faster.
- Version: shows info about the firmware version
Photo setting
Press the MODE button to switch to photo mode, you will see a camera icon shown on the top left corner of the LCD.
While in video mode, press the MENU button to enter the video option o photo.
The following settings are available:
Resolution
Sharpness
- Capture Mode
Color
Sequence
Quick Review
- Quality
Use the UP/DOWN controls to browse the setting options, press REC to enter the setting, select the desired option with UP/DOWN and confirm with the REC button.
Resolution: 12M / 10M / 8M / 5M / 3M / 2M / VGA / 1.3M
- Capture Mode: Single / 2S Timer / 5S Timer / 10S Timer.
When you press REC to take a photo, the photo will be taken after the selected interval is passed.
- Sequence: Off / On.
The camera will shoot 3 pictures quickly.
- Quality: Fine / Normal / Economy
- Sharpness: Strong / Normal / Soft
Color: Normal / Black&White / Sepia
Quick Review: Off / 2 seconds / 5 seconds.
After taking a photo, it will be shown for the selected time.
Playback setting
Press MODE button twice to switch to playback mode. You will find the thumbnails of all recorded videos and photos.
Select a file and then enter in preview mode with REC button.
While in preview mode, press the MENU button to enter the playback option
The following settings are available:
- Delete
- Protect
- Slide Show
Use the UP/DOWN controls to browse the setting options, press REC to enter the setting, select the desired option with UP/DOWN and confirm with the REC button.
Attention: during the video playing is not allowed to enter the MENU; first pause playing.
- Delete: Delete current / Delete All
Delete current file or delete All files on SD card (locked files won't be deleted) - Protect: Lock current / Unlock Current / Lock All / Unlock All.
It is possible to lock or unlock files, you can choose only the selected file or all files on SD card.
- Slide Show: 2 seconds / 5 seconds / 8 seconds.
The camera will preview the files on SD for the selected time.
Player software: installation and use
- If it is needed to check the GPS information, the GPS Player must be installed firstly.
- Download Cardv Player software from www.midlandeurope.com
- Launch Cardv Player.exe and follow the displayed instructions

Using the player software:
- Please open software player

- Click "Import files" choose the desired file, and open the play mode directly, as below.

- Import files button
- Delete playlist button
- Map selection menu
-
Play controls
-
Playlist
- Speedometer
- Accelerometer graphics
- Volume control
FAQ (Frequently Asked Questions)
Under normal operating conditions, if you experience problems with the device, please refer to the following methods to solve.
Cannot take pictures and record
Please check whether there is enough space for the SD card.
Automatic stop while recording
Due to the huge amount of HD video data, please use high-speed 10 Class SD card, SDHC compatible. The SD card must be supplied with Class 10 (C10) indication on it.
- The LCD shows "file error" during the photo/video replay
Uncompleted files because of SD card storage error, please format your SD card.
Fuzzy image
Please check if the lens is dirty and clean it before shooting.
Dark image when shooting the scene of sky or water
Exposure can be wrong when there is big light difference between the scene.
Minimum system requirements
Free space on disk 150 MB (for SW player setup)
Processor Dual core processor
RAM 4 GB
Requirements may vary depending on the Operating System in use.
SD
The high video quality of this camera requires a high data stream, so we recommend the use of Class10 SD card.
Product specifications
| Product Feature HD Camera, HD Recording | |
| G-sensor Built-in (to save locked file when collision happens) | |
| LCD Size 2.7" 16:9 TFT LCD | |
| Lens 6G, 160° wide angle | |
| Sensor 1/3" 3MP | |
| Lens Aperture F=2.0 | |
| Language English Français Italiano Espanol Deutsch Japanese | |
| Video Format MOV | |
| Video Resolution 1920*1080 30P - 1280*720 30P - 848*480 30P - 640*480 30P | |
| Video Codec H.264 | |
| Loop Recording Recording with seamless, no leakage | |
| Auto turn on / off while vehicle power on / off | Support turns on while vehicle starts and turns off while vehicle turns off. |
| Motion Detection Support | |
| Year/Month/Day/Hour/Minute Support | |
| Photo Pixel 12M 10M 8M 5M 3M 2M 1.3M VGA | |
| Photo Format JPEG | |
| Memory card | Micro SD (Support Max 64GB) |
| MIC | Built-in |
| Speaker | Built-in |
| GPS | Yes |
| USB Function | 1: Storage 2: Charging |
| Power Interface | 5V1.5A |
| Battery | Built-in polymer Battery 130mAh (ONLY TO FINA-LIZE FILE) |
| Normal operating temperature range | -10° to 50° |
| Weight | 70gr |
| Size | 88x48x34mm |
To download further upratings and for information about the warranty please visit www.midlandeurope.com
Basculer entrephoto/enregistment/playback/urgence
Allumage/extinction manuel
- Diaporama: 2 seconds / 5 seconds / 8 seconds.
Hereby Cte International Srl declares that this product is in compliance with the essential requirements and other relevant provisions of Directive 2014/53/UE. The declaration of conformity is available on the web site http://www.midlandeurope.com/it/page/10090-certifications
AT/DE/CH/LI
All articles displaying this symbol on the body, packaging or instruction manual of same, must not be thrown away into normal disposal bins but brought to specialised waste disposal centres. Here, the various materials will be divided by characteristics and recycles, thus making an important contribution to environmental protection.
Produced or imported by: CTE INTERNATIONAL s.r.l.
Via. R.Sevardi 7 - 42124 Reggio Emilia Italy
Imported by: ALAN-NEVADA UK
Unit 1 Fitzherbert Spur Farlington Portsmouth Hants. P061TT - United Kingdom
www.nevada.co.uk
Read the instructions carefully before installation and use.
Importé par: ALAN FRANCE S.A.R.L.
- Introduction
- Main functions
- Warnings
- What's in the box
- Notes on Installation
- Description of the controls
- Button/Function Description
- Getting Started
- Inserting the Memory Card
- Note:
- Installing in Vehicles
- Mount to Windshield
- Charge and power on/off instructions
- Charging
- Note
- Auto power on/off
- Manual power on/off
- Recharge
- Basic operation instructions about photo/video/playback
- Video mode and recording
- Photo mode
- Video/photo playback mode
- Menu settings
- Video settings
- System settings
- Photo setting
- Playback setting
- Player software: installation and use
- Using the player software:
- FAQ (Frequently Asked Questions)
- Minimum system requirements
- SD
- Product specifications
- Allumage/extinction manuel
- AT/DE/CH/LI
Brand : MIDLAND
Model : Street Guardian GPS Plus
Category : Dashcam