
GCDRE10S - Dashcam JVC - Free user manual and instructions
Find the device manual for free GCDRE10S JVC in PDF.
| Product Type | Vehicle dashcam |
| Brand | JVC |
| Model | GC-DRE10S |
| Image sensor | CMOS 2.0 megapixels |
| Lens | Fixed focal length, aperture F2.0, viewing angle 145° |
| Screen | LCD 2.0 inches, resolution 960x240 |
| Video resolution | Full HD 1080p (1920x1080) at 30 fps |
| Video format | MP4 (H.264) |
| Photo resolution | 2 megapixels (JPEG) |
| Storage | Micro SD/SDXC Class 10 card, up to 64 GB |
| Connections | WiFi 802.11 b/g/n (2.4 GHz), Micro USB |
| Power | 5V/1A cigarette lighter adapter, built-in lithium-ion battery 470 mAh |
| Shock sensor | 3-axis accelerometer (G-sensor) |
| Main functions | Continuous recording, emergency recording (10s pre + 50s post), time sync via app, mute, automatic screen off |
| Maintenance and cleaning | Clean with a soft lint-free cloth; avoid alcohol and turpentine |
| Safety | Do not use while driving; install without obstructing vision or airbags |
| Spare parts and repairability | Available parts: Micro USB cable, adhesive mount, cigarette lighter charger. No user-serviceable parts |
| General information | Operating temperature: -20°C to 65°C; storage: -20°C to 85°C |
Frequently Asked Questions - GCDRE10S JVC
User questions about GCDRE10S JVC
0 question about this device. Answer the ones you know or ask your own.
Ask a new question about this device
Download the instructions for your Dashcam in PDF format for free! Find your manual GCDRE10S - JVC and take your electronic device back in hand. On this page are published all the documents necessary for the use of your device. GCDRE10S by JVC.
USER MANUAL GCDRE10S JVC
natural_image
Simple icon of a microphone on a gray background (no text or symbols)
natural_image
Icon of a microphone with a diagonal line, representing no text or symbols (no text present)Tonaufnahme Stumm
natural_image
Icon of a laptop with a checkmark inside, no text or symbols presentLCD EIN

natural_image
Simple icon of a computer monitor with an 'X' symbol, no text or numbers presentLCD AUS
natural_image
Gray folder icon with three horizontal lines, no text or symbols presentnatural_image
Generic computer icon with a circular arrow symbol on a screen (no text or symbols)natural_image
Two identical diagrams of a trash bin with crossed arms and a blank rectangular base (no text or symbols)Please read and understand all instructions before you use your device. If you do not use the device properly and follow all instructions, the warranty for this device may be voided.
Using Micro SD Card
(1) Insert Micro SD Card into the Micro SD Card slot.
(2) To remove the SD Card, press the Card lightly and the SD Card will eject for you to take it.
(3) If the Dashcam does not have a Micro SD Card inserted, a warning will pop up in the center of the screen.
Please Note:
(1) The device will format the SD Card automatically the first time it was inserted.
(2) Please use Micro SD Card with Class 10 speed. Capacity 16GB is recommended (support up to 64GB).
(3) Micro SD Card has its read/write lifetime. Please try another Card if the recording has a problem.
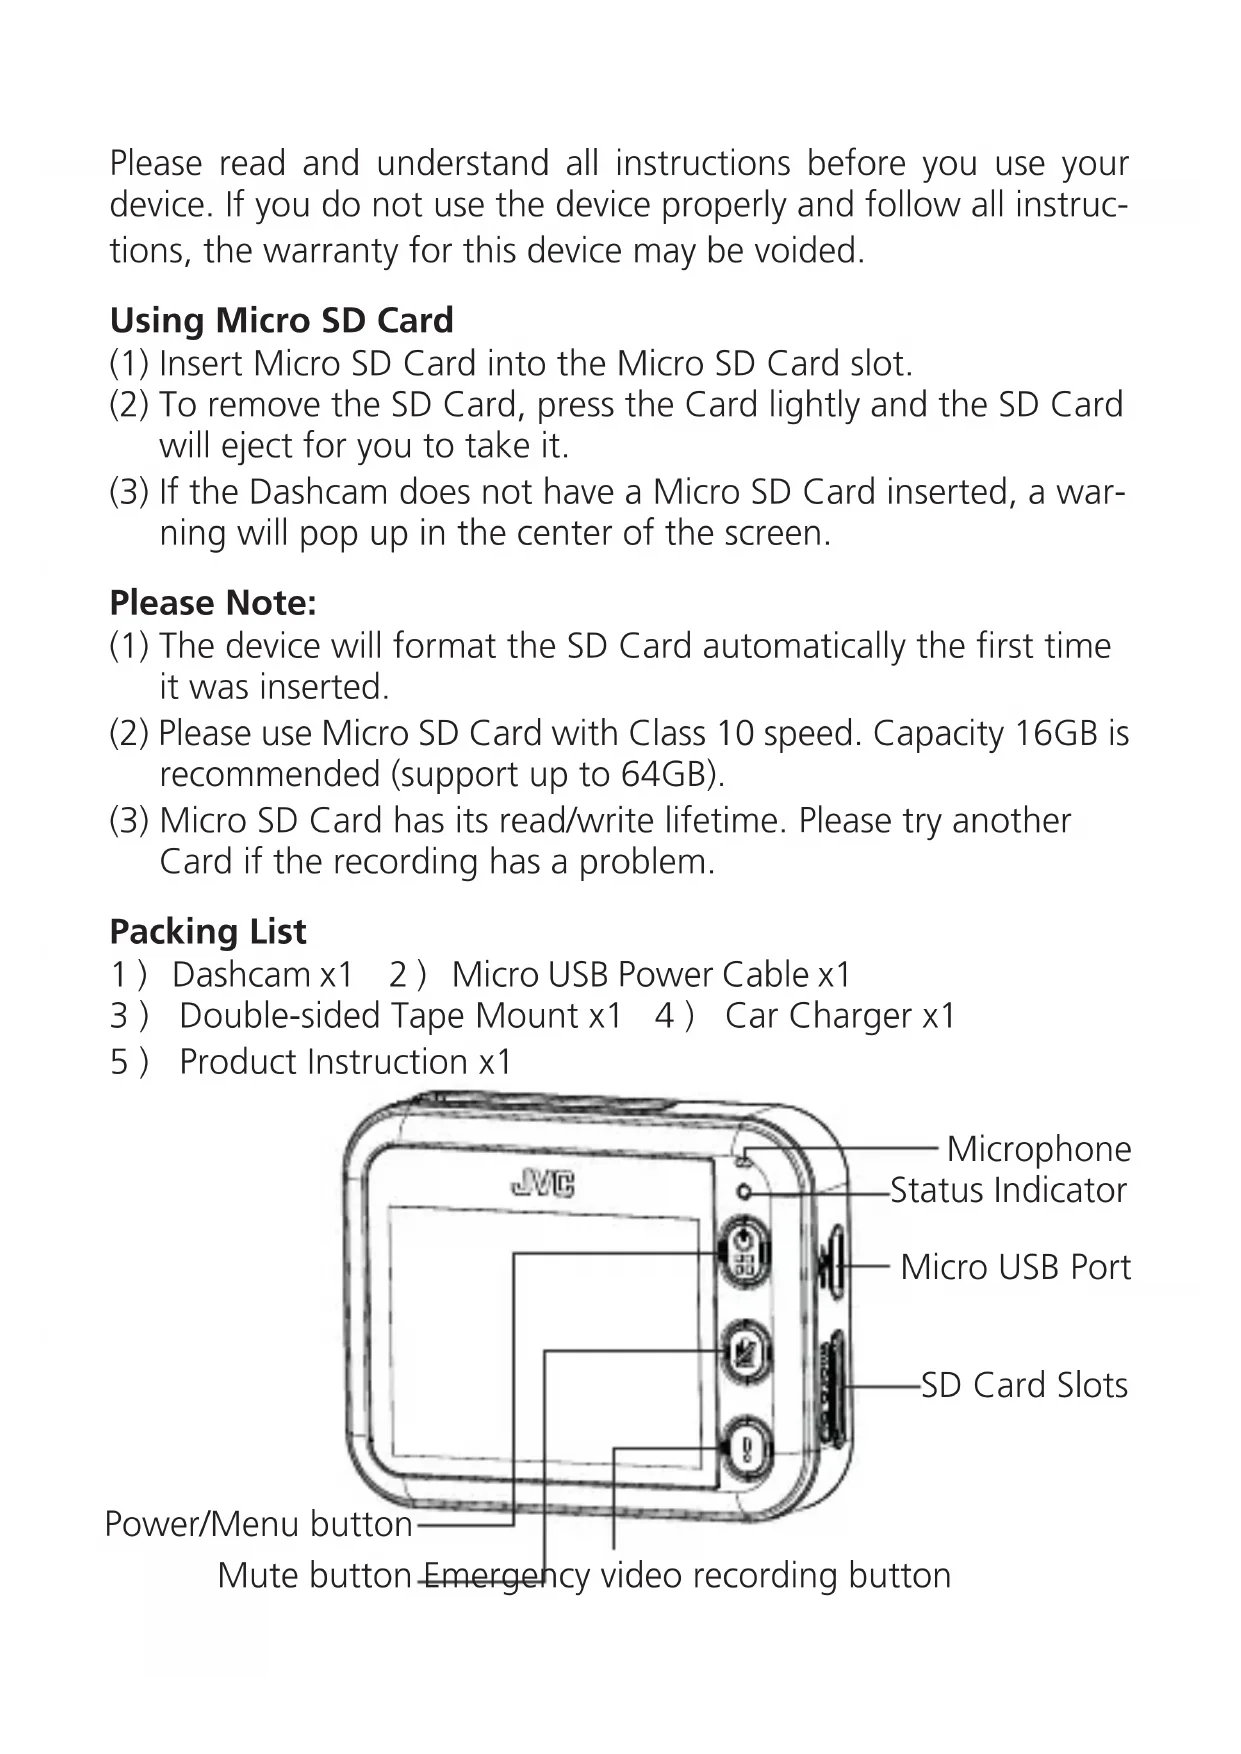
Packing List
1) Dashcam x1 2) Micro USB Power Cable x1
3) Double-sided Tape Mount x1 4) Car Charger x1
5 ) Product Instruction x1
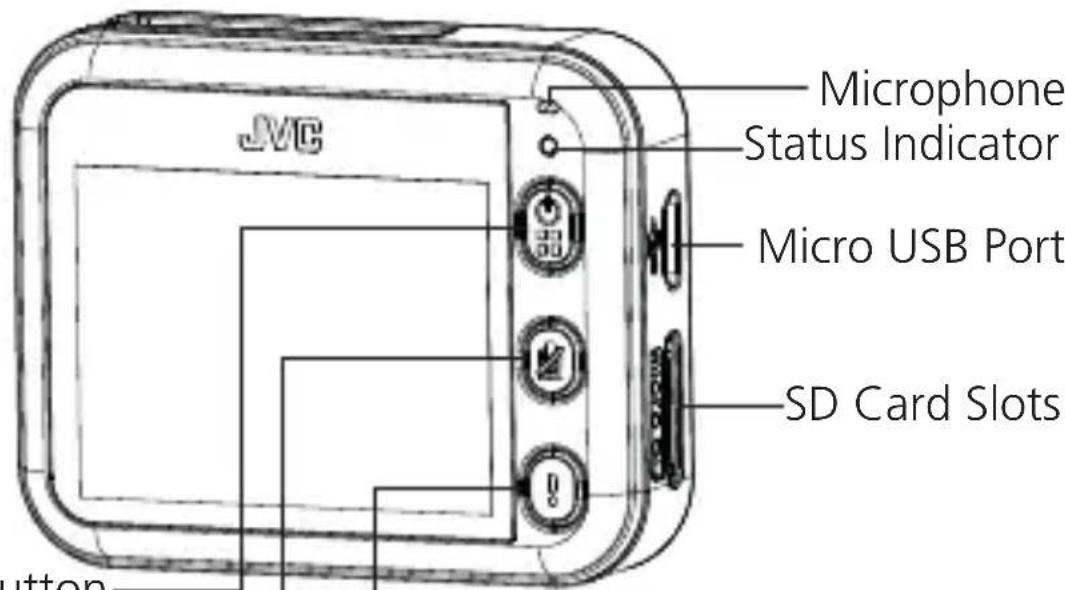
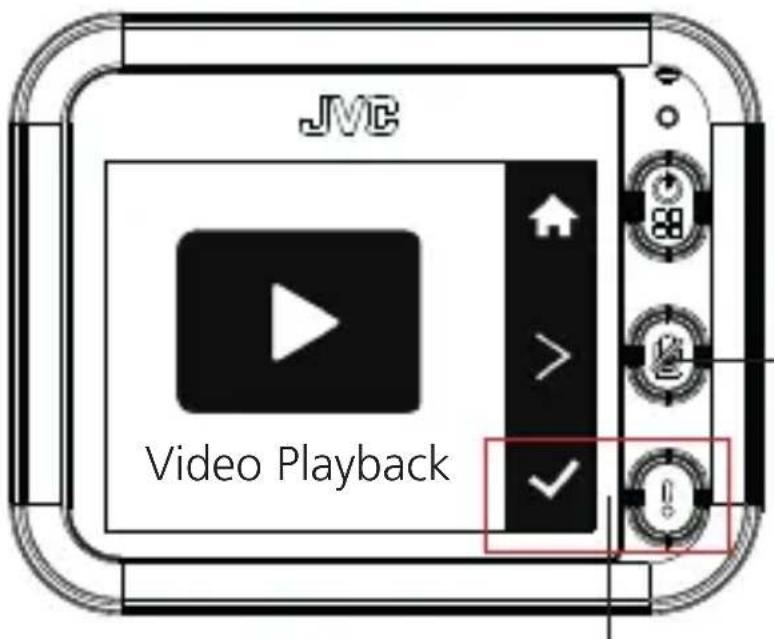
Power/Menu button
Mute button Emergency video recording button
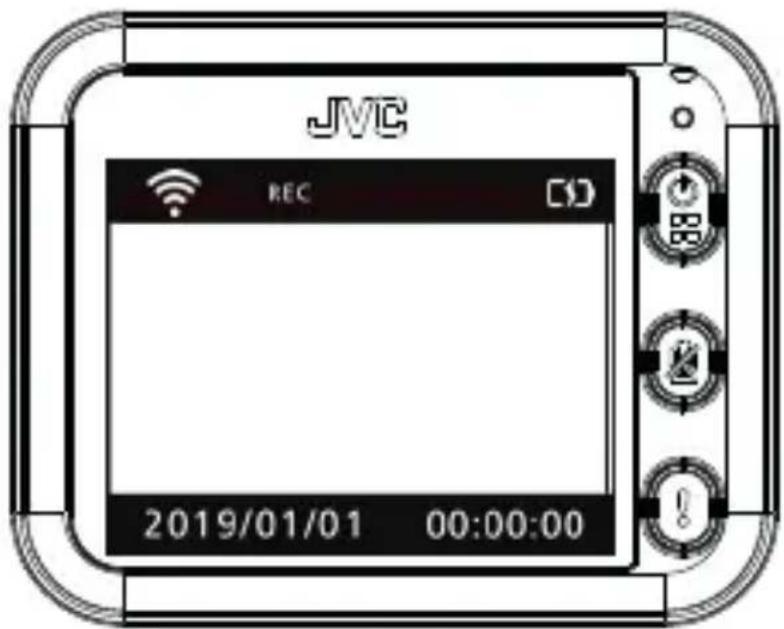
Cycling Recording
Operating temperature: -20°C \~ 65°C
Storage temperature: -20^ C 85^ C
(1) Cycling recording will automatically start after power on.
(2) Cycling recording will stop only when
- Dashcam Power Off 2. Video Playback
- Date / Time Setting 4. Reset
(3) When recording, press this button [ ] to mute. Press it again to unmute.
(4) When SD Card is full, cycling recording will automatically overwrite the oldest cycling recording file.
(5) A rechargeable battery is built-in to ensure the video file won't be damaged when the power is suddenly interrupted.

: Plugged in

natural_image
Icon showing Wi-Fi signal waves above a microphone (no text or symbols): WiFi On

: Battery only

: Audio Record off

REC : Video Recording
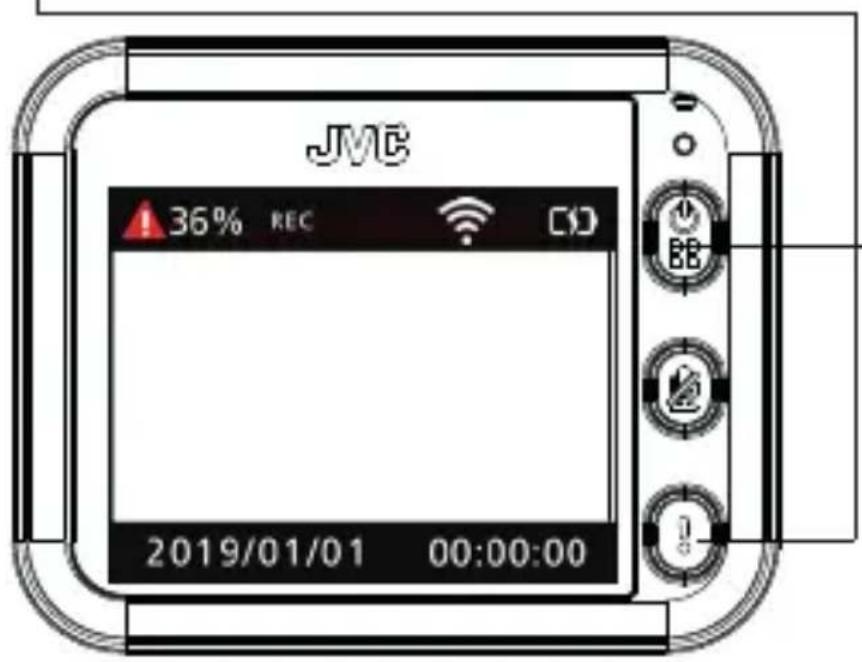
Emergency Recording

(1) During recording, press this button to start Emergency recording. (Emergency video file will not be overwritten by cycling recording)
(2) In the middle of recording emergency video, means “36%” the progress of the video being stored.
(3) When recording, press this button to start the mode of recording emergency video.
(4) If the SD Card is full of Emergency video file, there will be no room for cycling recording. A warning will pop up and ask you to format the SD Card. Before formatting, please back up the files you need to external storage (ex. PC or Smartphone).
Playback / Setup
(1) Press this button to enter Playback / Setup.
(2) If you are in the middle of emergency recording, press this | button to cancel emergency recording first.
1. Video Playback

natural_image
Simple gear icon with no text or symbols, labeled 'Setup' below (no other readable text)Press this button to switch between „Video playback“ and „Setup“.
Press this button to view Video playback.
2. Mute

natural_image
Simple icon of a microphone on a gray background (no text or symbols)
natural_image
Icon of a microphone with a diagonal line, representing no text or symbols (no text present)Unmute Mute
In the mode of Mute, all videos recorded have no sound.
3. LCD Auto Off

natural_image
Simple icon of a laptop with a checkmark inside, no text or symbols present.LCD ON

natural_image
Simple icon of a computer monitor with an 'X' symbol, no text or numbers presentLCD OFF
After turning on the LCD Auto Off function, the screen will turn off automatically with no operation in 60 seconds, but this will not affect the cycling recording.
4. Date / Time Setting
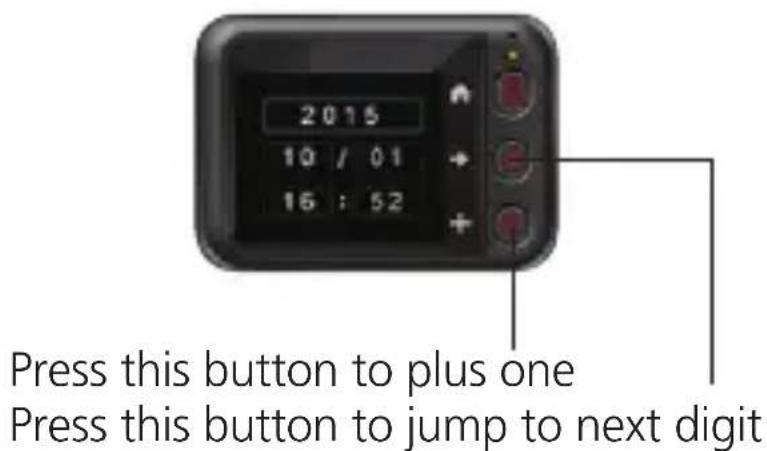
Manual time setting:
Date and time can be adjusted manually by this function.
Automatic time setting:
Every time the Smartphone APP connects the Dashcam, the date and time on the Smartphone will be synchronized to Dashcam automatically.
5. WiFi


Please turn on WiFi before using the Smartphone APP to connect to Dashcam. If you don't want your Dashcam to be detected via WiFi, please turn off WiFi after APP disconnect.
6. Format SD Card

natural_image
Gray folder icon with three horizontal bars, no text or symbols presentFormat SD Card
When formatting the SD Card, please make a backup if there are important video documents on the Card. Factory Reset will not delete recorded videos.
7. Factory Reset

natural_image
Generic computer monitor icon with a circular arrow symbol (no text or numbers)Factory Reset
All Dashcam settings will be reseted to initial status. Factory Reset will not delete recorded videos.
8. About
About this Dashcam GC-DRE10 ____ Firmware Version SN: JXXXXXXXXXXXX ____ Device Serial Number
When a new firmware version is released, JVC will inform you in Smartphone APP. Please connect Dashcam to the APP to upgrade firmware.
Troubleshooting
| SCENE TROUBLES Reasons/Resolutions | ||
| INSTALLATION | Double sided Tape Mount falls off | Remove Dust-proof film and clean the wind shield before sticking to the glass. |
| Image blur Car | windscreen has a reflective effect. Please adjust inclination angle of the Dashcam according to its installation position. | |
| Great difference between recording in daytime and night | Light transmittance of common front glass's heat-insulating film is 68%~80%, resulting in different recording effect between day and night. | |
| Frequent power failure of the Dashcam | Because of different cigar lighter slot design on various automobile, the contact of charger may not be stable. Please rotate the charger to find a best position for stable contact. | |
| Unable to launch | Please check whether the indicator of the car charger is on. If there is no light, please plug in the charger again. The battery may be in low power. Please connect the USB power cable. Press power button for 10 seconds to shut down the Dashcam, and press the power button again to restart. | |
Troubleshooting
| SCENE TROUBLES Reasons/Resolutions | ||
| [460W] | Cycling recording didn't auto start after engine is on | >Check whether SD Card is inserted >Turn off the Dashcam, eject and insert SD Card and turn on again >Format SD Card or try another Card |
| Black screen When recording, with no operation in 60 seconds, the Ddashcam will shut down screen automatically and change into power save mode; press any button, the screen will light up again; this scene is normal. | ||
| Playback no sound | Please check if the Dashcam is mute (a mute icon is shown on the top right corner of the screen) When recording, press  to turn on or turn off the voice recording function. to turn on or turn off the voice recording function. | |
| Video fuzzy Check whether the lens protection film is removed. Check whether the car's windshield or lens of the Dashcam is dirty. | ||
| Video time-stamp error | Connect to the dashcam by APP, the APP will correct the Dashcam's time automatically. | |
 | Cannot find an external storage device | Supplied USB power line can only be used to charge, and cannot be used to connect to the computer; please use other USB data line. |
Troubleshooting
| SCENE TROUBLES Reasons/Resolutions | ||
| WiFi connect to phone process | Smartphone cannot connect to Dashcam | >Check whether Smartphone's WiFi is turned on> iOS users must choose Dash-cam's WiFi SSID in WiFi Settings before entering the APP |
| Video recorded cannot be played on mobile phones | This problem may be related to the media player or system compatibility. Suggest to take out SD Card and read it via Card reader on the computer. | |
| Connection time too long | If there are too many signals in the environment, connection may fail due to signal interference. Using Dashcam in a condition with less interference is suggested. The smartphone's system may be in a busy condition. Turning off other APPs might help. | |
| Forget APP access password | In the setup menu, choose [Factory Reset] to reset. | |
| Hardware Specification | ||
| Image Sensor Type | 2.0 MP CMOS | |
| Lens | Type Fixed focus | |
| Aperture F2.0 | ||
| View Angle 145° | ||
| LCD Monitor | Size 2.0" LCD | |
| Resolution 960*240 | ||
| Storage Media | External Memory Micro SD (SDXC)Class 10 | |
| Interface | USB Micro USB | |
| Power Adapter 5V / 1A | ||
| System Specification | ||
| File Format | Video MP4 (H.264) | |
| Photo JPG | ||
| Photo Resolution 2M | ||
| Movie Resolution | 1920x1080 (FHD1080p/30fps) | |
| Bit rate: 10Mbps | ||
| Emergency Recording | 10 sec (pre-record) + 50 sec (post-record) | |
| Shutter Speed 1/4000~1/30 sec | ||
| Focus Fixed Focus | ||
| Minimum Illumination (only video) | 5 lux | |
| Micro SD Card Capacity | 64GB (SDXC) | |
| G-Sensor 3-axis G-Force Sensor | ||
| Microphone Yes | ||
| Speaker Yes | ||
| WiFi | WiFi 802.11 b g n | |
| Frequency Range 2.4GHz | ||
| Output Power 11b: 14dBm ± 3db | ||
| Output Power 11g: 13dBm ± 3db | ||
| Output Power 11n: 13dBm ± 3db | ||
| Battery Li-Ion Polymer | 470mAh / 1,7Wh | |
Precautions and notices
- Warning! Do not operate the device while driving. Using this product does not change the requirement for a driver to take full responsibility for his or her behavior. This responsibility includes observing all traffic rules and regulations in order to avoid accidents, personal injury or property damage.
- For your own safety, do not operate the controls of the product while driving.
- A window mount is needed when using the recorder in a car. Make sure that you place the recorder in an appropriate place, so as not to obstruct the driver's view or deployment of airbags.
- Make sure that no object is blocking the camera lens and no reflective material is placed near the lens. Please keep the lens clean.
- If the car's windscreen is tinted with a coating, it may impact the recording quality.
- Connect the charger to a proper power source. The voltage requirements are found on the product case and/or packaging.
- Do not use the charger if the cord becomes damaged.
- Do not attempt to service the unit. There are no serviceable parts inside. Replace the unit if it is damaged or exposed to excess moisture.
Caring for your device
• Taking good care of your device will ensure trouble-free operation and reduce the risk of damage.
- Keep your device away from excessive moisture and extreme temperatures.
- Avoid exposing your device to direct sunlight or strong ultraviolet light for extended periods of time.
- Do not place anything on top of your device or drop objects on your device.
- Do not drop your device or subject it to severe shock.
- Do not subject your device to sudden and severe temperature changes. This could cause moisture condensation inside the unit, which could damage your device. In the event of moisture condensation, allow the device to dry out completely before use.
- The screen surface can easily be scratched. Avoid touching it with sharp objects. Nonadhesive generic screen protectors designed specifically for use on portable devices with LCD panels may be used to help protect the screen from minor scratches.
- Never clean your device with it powered on. Use a soft, lint-free cloth to wipe the screen and the exterior of your device.
- Do not use paper towels to clean the screen.
- Never attempt to disassemble, repair or make any modifications to your device. Disassembly, modification or any attempt at repair could cause damage to your device and even bodily injury or property damage and will void any warranty.
- Do not store or carry flammable liquids, gases or explosive materials in the same compartment as your device, its parts or accessories.
- To discourage theft, do not leave the device and accessories in plain view in an unattended vehicle.
• Overheating may damage the device.
Cleaning the Device
When the device is dirty, wipe it with a dry silicone cloth or other soft cloth. If the device is very dirty, remove the dirt with a cloth with neutral cleaner on it and then wipe off the cleaner. Wiping the device with a hard cloth or using a volatile substance such as thinner or alcohol may cause scratches, deformation, deterioration, or other damage. When the lens is dirty, gently wipe it with a soft cloth dampened with water. Rubbing the lens strongly with a dry cloth may cause scratches.
Precautions for Installation
- Install the device in a position where it will not block the front view of the driver (position where hidden by the rear-view mirror).
• Install the device so that it is within the wiping range of the wiper.
- Install the device in a position where it will not interfere with the movement of the rear-view mirror.
• Take care not to install the device over the vehicle inspection sticker or other sticker.
• Take care not to install the device where it will interfere with driving or airbag operation.
- When installing the device in a vehicle equipped with a driving support system, check the instruction manual of the vehicle and then select an installation location that will not interfere with the driving support system.
- If the device is installed incorrectly, event recording or parking recording may not work correctly. Refer to "How to Install" for the loosening of fixing knob, installation orientation, installation angle, and other information and then install the device correctly.
- Do not install the device near a digital terrestrial television antenna or an electrical component. Doing so may reduce television receiver sensitivity or cause flickering and noise.
- Use a commercially available cleaning cloth or the like to wipe off all dirt and grease on the mounting surface and then fix the mount base in place. If the device is re-affixed or mounted using, for example, general-purpose double-sided tape, the adhesion strength may weaken and cause the device to fall.
• After mounting the device, leave it for 24 hours before use to enable the mounting strength of the mount bracket to improve. Failing to do so may result in the adhesion of the mount bracket becoming weak and the device falling.
• Fix the cord in place with tape or the like so that it does not interfere with driving.
Correct use
The Dashcam is solely designed to be used as a Dashcam. It is only suitable for private and not for commercial use. Only use the Dashcam as described in the Operating Instructions. Any other use is deemed to be incorrect and can cause material damage and loss of data. The manufacturers or dealers do not accept any liability for damage resulting from improper or incorrect use.
Read and keep instructions
This Operating Instruction belong to this Dashcam. It contains important information about the start up and handling. Study these Operating Instructions and, in particular the Safety Information in detail prior to using the Dashcam. Non observance of these Operating Instructions can lead to loss of data or damage to the Dashcam. These Operating Instructions are based on valid standards and regulations of the EU. Also observe specific guidelines and laws in other countries! Keep the Operating Instructions for further use. When passing on the Dashcam to third parties please also include these Operating Instructions.
Precautions for Use
Do not block the camera lens, get dirt on it, or place a reflective object near it. When LED traffic lights are recorded, video in which they appear to be flickering or flashing may be recorded. JVCKENWOOD assumes no responsibility with regard to the distinguishing or recording of traffic lights. If coating is used on the windshield of the vehicle, recording quality may be affected. There is no guarantee that the device can record video in all conditions.
Precautions for using SD Cards
When using a commercially available SD Card, also check the instructions supplied with the SD Card.
- Be sure to format (initialize) an SD Card with the device before use.
- SD Cards have a product lifespan, such as the number of times that writing can be performed. It is recommended to replace the SD Card with a new one regularly depending on the usage conditions.
- When inserting and removing an SD Card, confirm the orientation, do not bend it, and do not apply a strong force or impact to it.
- Do not directly touch the contact part with a hand or metal. The stored data may be damaged or lost due to static electricity.
- Be sure to back up (copy) the required files in the SD Card to a PC or other device. The saved data may be lost due to the usage conditions of the SD Card. Please note that JVCKENWOOD cannot compensate for any damages arising from the loss of saved files.
- Format the Memory Card periodically.
- Do not remove the Memory Card while recording or during playback because it may corrupt the data on the Memory Card.
- The device may not operate normally if you use an SD Card that was used by another device, such as a computer or digital camera. Format the Memory Card in the device.
- Depending on the specifications of the Memory Card, the reading and writing speeds for the device's data may differ.
Wireless LAN
- This device is a 2.4 GHz wideband transmission system (transceiver), intended for use in all EU member countries, except in France and Italy where restrictive use applies.
- In Italy the end-user should apply for a license at the national spectrum authorities in order to obtain authorization to use the device for supplying public access to telecommunications and/or network services.
- This device may not be used for setting up outdoor radio links in France and in some areas the RF output power may be limited to 100 mW EIRP in the frequency range of 2454 - 2483.5 MHz. For detailed information the end-user should contact the national spectrum authority in France.
CE
A copy of Declaration of Conformity with regard of the RE Directive 2014/53/EU can be downloaded from the following Web sites. http://www3.jvckenwood.com/ecdoc/
Manufacturer:
JVCKENWOOD Corporation
3-12. Moriyacho, Kanagawa-ku, Yokohama-shi, Kanagawa 221-0022, JAPAN
Representative (EU):
Hereby, JVCKENWOOD Corporation declares that the Radio equipment GC-DRE10 complies with Directive 2014/53/EU and with the RoHS Directive 2011/65/EU.
URL: http://www3.jvckenwood.com/ecdoc/
natural_image
Two identical diagrams of a trash bin with cross lines and a blank rectangular block below (no text or symbols)Information on Disposal of Old Electrical and Electronic Equipment and Batteries (applicable for countries that have adopted separate waste collection systems)
Products and batteries with the symbol (crossed-out wheeled bin) cannot be disposed of as house - hold waste.
Old electrical and electronic equipment and batteries should be recycled at a facility capable of handling these items and their waste by products.
Contact your local authority for details in locating a recycle facility nearest to you.
Proper recycling and waste disposal will help conserve resources while preventing detrimental effects on our health and the environment.
Caution: A built-in lithium-ion battery is inside the unit. When discarding the unit, environmental problems must be considered and the local rules or laws governing the disposal of these batteries must be followed strictly.
JVC
Dashcam Full HD
GC-DRE10
MODE D'EMPLOI
JVCKENWOOD Corporation
Lecture / Installation
natural_image
Simple gear icon with no text or symbols, labeled 'Setup' below (no other readable text)natural_image
Simple icon of a microphone on a gray background (no text or symbols)
natural_image
Simple icon of a microphone with a diagonal line, no text or symbols presentnatural_image
Simple icon of a checkmark inside a rounded rectangle (no text or symbols)LCD ON

natural_image
Simple icon of a computer monitor with an X symbol, no text or numbers presentLCD OFF
natural_image
Gray folder icon with three horizontal lines, no text or symbols presentnatural_image
Generic computer icon with a circular arrow symbol on screen (no text or symbols)natural_image
Two identical diagrams of a trash bin with cross-bracing, one solid black and one crossed (no text or symbols)natural_image
Simple icon of a microphone on a gray background (no text or symbols)
natural_image
Simple icon of a microphone with a diagonal line, no text or symbols presentGeluidsopname Mute
natural_image
Simple icon of a smartphone with a checkmark inside, no text or symbols present.
natural_image
Simple icon of a computer monitor with an 'X' symbol, no text or numbers presentLCD AAN
LCD UIT
natural_image
Gray folder icon with three horizontal lines, no text or symbols presentnatural_image
Generic computer icon with a circular arrow symbol on screen (no text or symbols)natural_image
Two identical diagrams of a trash bin with cross lines and a black rectangular block below (no text or symbols)- Using Micro SD Card
- Please Note:
- Packing List
- Cycling Recording
- Emergency Recording
- Playback / Setup
- Video Playback
- Mute
- LCD Auto Off
- Date / Time Setting
- Manual time setting:
- Automatic time setting:
- WiFi
- Format SD Card
- Factory Reset
- About
- Troubleshooting
- Precautions and notices
- Caring for your device
- Cleaning the Device
- Precautions for Installation
- Correct use
- Read and keep instructions
- Precautions for Use
- Precautions for using SD Cards
- Wireless LAN
- CE
- Manufacturer:
- Representative (EU):
- Information on Disposal of Old Electrical and Electronic Equipment and Batteries (applicable for countries that have adopted separate waste collection systems)
- JVC
- GC-DRE10
- Lecture / Installation
Brand : JVC
Model : GCDRE10S
Category : Dashcam