
Energy Smart 6303DC - Fan Vornado - Free user manual and instructions
Find the device manual for free Energy Smart 6303DC Vornado in PDF.

| Product type | Air circulator fan |
| Brand | Vornado |
| Model | Energy Smart 6303DC |
| Power supply | 220-240 V ~ 50 Hz |
| Power consumption | 30 W (estimated) |
| Number of speeds | 99 (fine adjustment) |
| Timer | 1 to 12 hours |
| Remote control | Yes, with CR2032 button cell |
| Airflow direction | Adjustable (adjustable air jet) |
| Control | Touch |
| Cord management | Integrated cord storage (3 attachment points) |
| Stability | Non-slip silicone feet |
| Removable grille | Yes, for cleaning |
| Removable blades | Yes |
| Cleaning | Damp cloth, no chemicals |
| Intended use | Indoor, air circulation |
| Child safety | Do not let children play, keep battery out of reach |
| Repairability | Vornado authorized service center |
| Warranty | Consult the retailer, general terms and conditions |
| Destination country | France (model 6303DC) |
Frequently Asked Questions - Energy Smart 6303DC Vornado
User questions about Energy Smart 6303DC Vornado
0 question about this device. Answer the ones you know or ask your own.
Ask a new question about this device
Download the instructions for your Fan in PDF format for free! Find your manual Energy Smart 6303DC - Vornado and take your electronic device back in hand. On this page are published all the documents necessary for the use of your device. Energy Smart 6303DC by Vornado.
USER MANUAL Energy Smart 6303DC Vornado
MODELS 5303DC,6303DC,6803DC(-AU)OWNER'SGUIDE
GUIDE D'UTILISATION - MODELES 5303DC, 6303DC, 6803DC (-AU)
GUI DEL PROPIETARIO DE MODELOS 5303DC, 6303DC, 6803DC (-AU)
CONTENTS
Important Instructions 2
Getting Started. 7
Features 9
Controls. 10
How To Use 12
Remote Control. 13
Grille & Blade Removal 14
Cleaning 15
Troubleshooting 16
Francais p.17 Espanol p.35
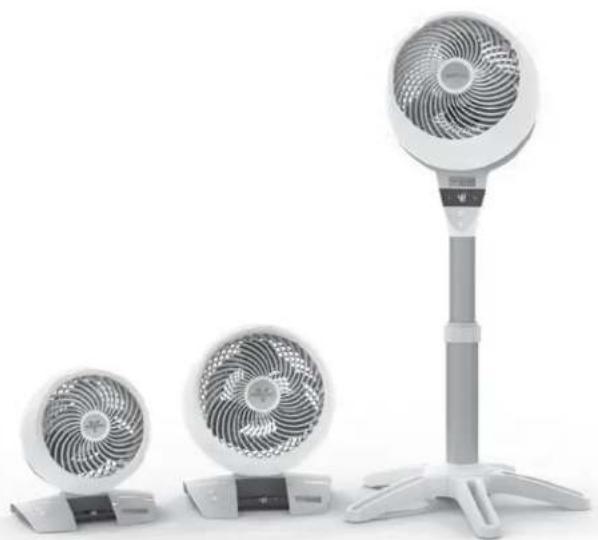
5303DC6303DC6803DC
IMPORTANT INSTRUCTIONS READ ALL INSTRUCTIONS BEFORE USING.
This owner's guide and any additional inserts are considered part of the product. They contain important information about safety, use, and disposal. Before using the product, please familiarize yourself with all operating and safety instructions. Please keep all documents for future reference and pass these documents on, together with the product, to any future owner. Please refer to our website for the most current version of our owner's guide.
The following Warning messages are throughout this owners guide:
DANGER
Indicates a hazard with a HIGH level of risk which, if not avoided, will result in death or serious injury. Please pay special attention to any instructions given to avoid this threateningly dangerous risk.
WARNING
Indicates a hazard with a MEDIUM level of risk which, if not avoided, could result in death, serious injury, minor or moderate injury or potential property damage.
IMPORTANT INSTRUCTIONS
Indicates additional information that will assist in the care of handling of the device.
INTENDED USE: This product is intended to circulate the air in indoor living spaces only. This product is not intended for commercial or industrial uses. The manufacturer assumes no responsibility for damage caused by failure to follow these instructions or improper product use. Any such actions will invalidate the product warranty.
6803DC-AU Only: Risk of fire. Your appliance is equipped with a detachable power supply. Use only the power supply unit provided with the appliance.
WARNING - When using electrical appliances, basic precautions should always be followed to reduce the risk of fire, electric shock and injury to persons, including the following:
WARNING
Risk to Children and Other at Risk Groups of People.
This appliance can be used by children aged from 12 years and above. This appliance is not intended for use by persons (including children) with reduced physical, sensory or mental capabilities, or lack of experience and knowledge, unless they have been given supervision or instruction concerning use of the appliance by a person responsible for their safety. Children should be supervised to ensure that they do not play with the appliance.
Children shall not play with the appliance.
Cleaning and user maintenance shall not be made by children without supervision.
This product and its packaging material are not toys and should be kept out of reach of children.
WARNING: Chemical Burn Hazard. Keep batteries away from children.
WARNING: KEEP NEW AND USED BATTERIES AWAY FROM CHILDREN. This product contains a lithium button/coin cell battery. If a new or used lithium button/coin cell battery is swallowed or enters the body, it can cause severe internal burns and can lead to death in as little as 2 hours. If you think batteries might have been swallowed or placed inside any part of the body, seek immediate medical attention. In the AU call the Australian Poisons Information Centre immediately for 24/7 fast, expert advice at 13 11 26.
WARNING
Risk from Unintended Use and Handling. Please take care to follow these guidelines to avoid risks to people or property.
Do Not use this product outdoors or directly exposed to weather.
Do Not use this device if condensation is present.
If the product is brought in from the cold to a warm area (e.g., during transport), condensation can occur within the unit. Let the device reach room temperature, before using it.
Do Not use this product on wet surfaces. Do not use this product in a bathtub, shower or locate product where it may fall into a bathtub, laundry, swimming pool or other water container.
Do Not immerse this product in water or allow water to drip into the motor housing.
Do Not use near furnaces, fireplaces, stoves or other high-temperature heat sources.
- Do Not position this product too close to draperies or other loose fabrics as they may be drawn into the product, cutting off airflow and damaging the motor
Do Not carry this product by the cord, or use the cord as a handle as it can damage internal wiring. Do not unplug product by pulling on cord or place the cord under strain. To unplug, grasp the plug, not the power cord.
Do Not run cord under carpeting. Do not cover cord with throw rugs, runners, or similar coverings
Do Not route cord under furniture or appliances.
Arrange cord away from traffic area and where it will not be tripped over. To avoid a tripping hazard, safely coil/store the power cord.
Do Not tamper with or modify this product in any way.
Do Not allow the power cord to come in contact with water or wet locations.
Do Not place power cord near heat sources, such as heaters or radiators.
ELECTRICAL CONNECTION: Only a proper 220-240V-50Hz AC outlet may be used to connect to public power supply.
DANGER
Risk from Electrical Shock. Contact with wires or components that are under voltage could be potentially fatal!
Do Not touch the product with wet or damp hands. Do Not operate any product with a damaged card or plug or after the product malfunctions, has been dropped or damaged in any manner. Discard
product, or return to authorized service facility for examination and/or repair in order to avoid a hazard.
If the supply cord is damaged, it must be replaced by the manufacturer or its service agent or a similarly qualified person in order to avoid a hazard.
Do Not stretch the power cord or put the cord under strain.
Ensure that the fan is switched off from the supply mains before removing the guard.
Do Not insert or allow foreign objects to enter any input or output opening as they may cause risk of electric shock or fire, or damage the product.
Turn off all controls before unplugging. Unplug from wall outlet if not in use for extended periods of time.
Do Not open appliance housing while product is plugged in. To avoid risk of shock, all service and/or repairs must be done by a Vornado Authorized Service Center. Only original replacement parts may be used.
For safety reasons, always unplug the unit in the event of a thunderstorm.
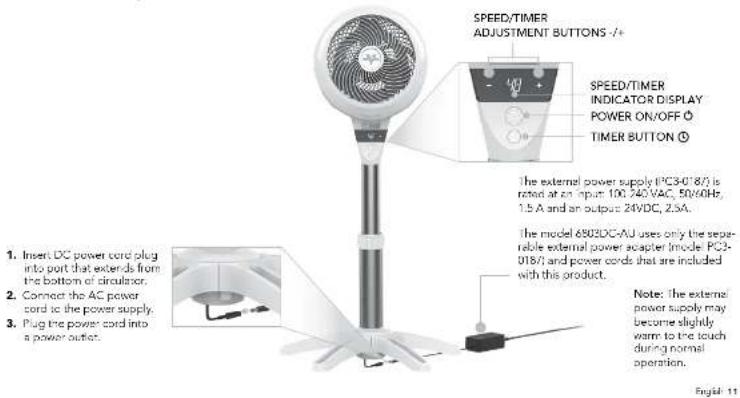
- The model 6803DC-AU uses only the separable external power adapter (model PC3-0187) and power
cords that are included with this product.
WARNING
Risk from Improper Installation. Please take care to follow these guidelines to avoid risks to people or property.
Ensure that wall power outlet is easily accessible so units can be disconnected during an emergency.
To reduce the risk of fire or electrical shock, do not use this product with any external (solid state) speed control device.
To reduce the risk of fire or electric shock and injury to persons, do not use in a window.
WARNING: Batteries may pose a choking hazard. Do not let children handle batteries.
BATTERY DISPOSAL: Please dispose of batteries according to the local laws and regulations of your region, and while keeping them away from children. Some batteries may be recycled and accepted for disposal at your local recycling center. DO NOT
DISPOSE OF BATTERIES IN FIRE. BATTERIES MAY EXPLODE OR LEAK. New and used batteries may cause injury. Keep new and used cells (or batteries) away from children.
PACKAGE RECYCLING: The packaging protects the appliance from transport damage. The packaging materials are selected from the point of view of their environmental friendliness and disposal technology and are therefore recyclable.
Dispose of all packaging materials in an environmentally responsible manner.
SAVE THESE INSTRUCTIONS
6 E
GETTING STARTED
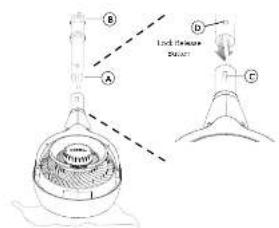
Installing Currator Head Model 8803DC Only! No tools required!
- Gently place the circulator head face down on the ground on a soft cloth to avoid scratches or damages to the unit. Insert power cord into the top of pole (A) and pull through the bottom (B). Align the Lock Release Button (C) on circulator head with the pole (D) located on the pole. Push the pole onto the circulator head until the Lock Release Button snaps into place.
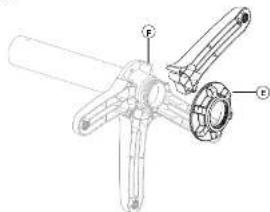
Stand Assembly (Model 803DC Only)
-
The upper pole and lower pole are pre-assembled, with the fastening nut (L) secured on the underside of the base. Rotate fastening nut counter clockwise to remove.
-
The legs are designed to fit into the grooves (F) on the underside of the base cap. Assemble all the legs onto the pole, then replace fastening nut by rotating clockwise to secure all the legs in place.
GETTING STARTED
(Continued)
Cord Management (Models 5303DC, 6903DC Only)
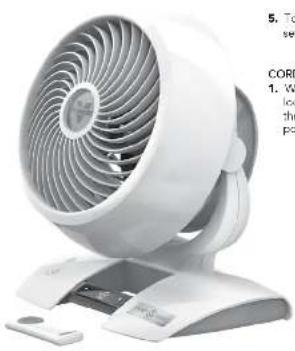
- Wrap cord around Air Accelerator, located on back of unit. Secure cord with three clips (C) located at 2, 6 and 10 o'clock positions.
E
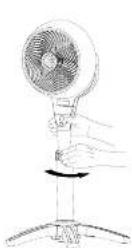
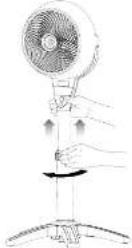
Adjusting Height (Model 6802DC Only)
- Before adjusting the height of the circulator, support the circulator head with one hand, use your other hand to loosen the height adjustment collar by gently rotating it counterclockwise. 2. Slowly raise or lower the pole to the desired height and secure into position by rotating the adjustment collar clockwise until tight
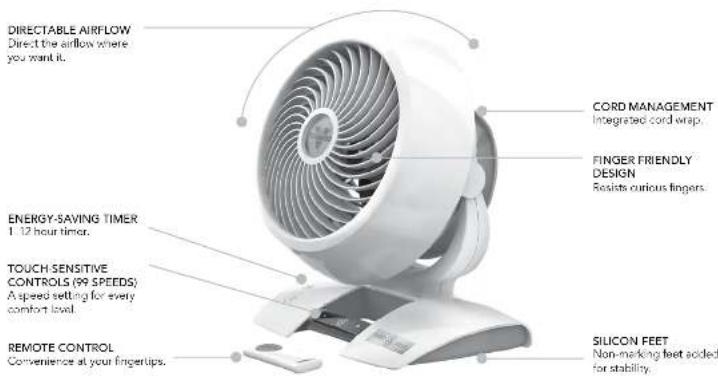
FEATURES
CONTROLS
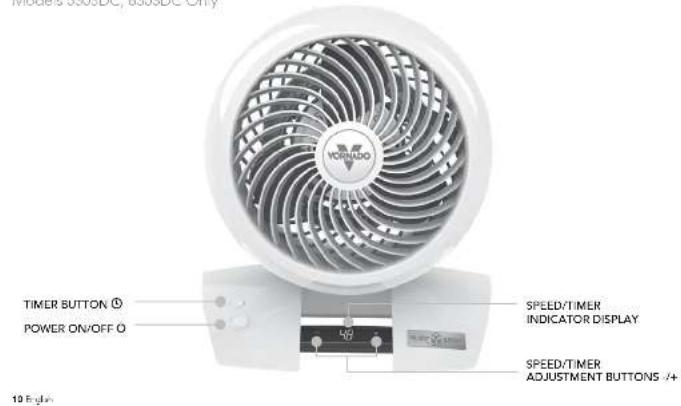
Model's 5303DC, 6303DC Only
CONTROLS
Model 6803DC Only
HOW TO USE
- Touch to power on
10 Your circulator returns to fast save memory settings. - Select desired speed by pressing +/+, Press and hold +/ to adjust speed up or down in 5 space increments. Speed is indicated by number shown on Speed/ Time indicator Display.
- Press to activate timer. The ① illuminates and speed/dimer Indicator Display flashes ② to indicate Timer Adjustment Mode: While in the mode, select amount of time in one-hour intervals by pressing +4. After three seconds, flashing scenes and display shows hours to indicate timer is set. The display returns to the last speed selected. Touch ① to quickly tell how many hours are remaining on the timer.
- To adjust timer, repeat Step Three.
- To cancel timer, repeat Step Three and set timer for 0.
CORD MANAGEMENT
- Wrap cord around Air Accelerator, located on back of unit. Sacra cord with three clips located at 2.6 and 10 o'clock positions.
REMOTE CONTROL
Screwdriver required.
Your circulator remote includes (1) coin style 3V CR2032 battery. Battery comes pre-installed. Remove battery pull tab before first use.
- For battery replacement, the remote requires one coin style 3V CR2032 battery. Always use the correct size and grade of battery for this product.
- To replace battery, open battery door on the back side of the remote control (go will need to loosen the small screw on door using a #1 Phillips screwdriver). If necessary, clean the battery contacts and also those of the device prior to battery installation. Remove any plastic protection from the battery and place it in the remote with the + side facing out. Ensure the battery is installed correctly with regard to polarity. Replace the battery door and screw.
Note: Remove battery from the remote control when not in use for an extended period of time and always remove dead battery immediately and replace with fresh Do not store dead battery in remote.
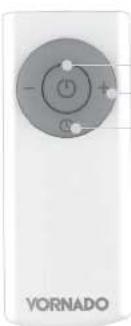
POWER SPEED/TIMER ADJUSTMENT TIMER ①
The remote control functions are the same as the control panel or the oscillator.
The remote requires a line of sight path to allow for the signal to be received by the circulator. Point the remote control at the display panel for better reception.
WARNING: This product contains a button battery. If swallowed, it could cause severe injury or death in just 2 hours. Seek medical attention immediately.
12E
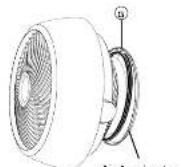
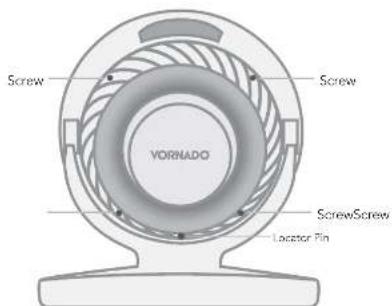
GRILLE & BLADE REMOVAL
WARNING: To reduce the risk of electrical shock and injury to persons, power off and unplug the circulator before removing blade.
REMOVABLE GRILLE
-
Using a phos-foe head screwdriver, remove grille by unscrewing the 4 screws located along the perimeter of the miles grille at roughly 2, 5, 7, and 10' clock positions. This will reduce the grille. To reattach, position grille so the logo in the center of the grille is straight. Align the Locator Pin to reconnect grille. Once aligned replace screws.
-
Dust or wash with a mild dishwashing soap. Do not place grills in the dishwasher. The excessive heat can distort the plastic.
BLADE REMOVAL
-
It is possible to remove the blade should something accidentally get wrapped around the motor shaft. First, remove the nut from the shaft. Turn the nut clockwise to loosen. Pull the blade straight out from the shaft. When replacing, the blade can only go on the shaft one way. Be certain the flat side of the shaft aligns directly with the corresponding flat side on the blade's socket. Push the blade all the way on the shaft until it bottoms out. Do not use a hammer as this could result in hearing damage, thereby stop
-
Wine blade with a dermo cloth. If your Air Circulator is used in a greasy environment, such as a kitchen, mild soap or a common household cleaner may be necessary. Do not use solvents.
14E
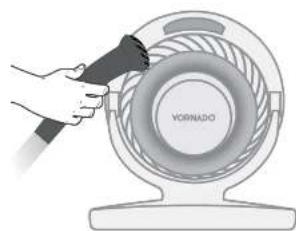
CLEANING
Because your product moves a substantial amount of air, it will need regular cleaning to remove dirt, dust and grime. Never clean the product in any manner other than instructed in this owner's guide.
WARNING
Observe the following safety information to avoid risks and property damage.
Do power off and unplug your product before cleaning Do Not use gasoline, thinners, solvents, ammonia or other chemicals for cleaning.
Do Not attempt to repair or replace parts.

The motor is permanently lubricated and requires no oil.
1.Dust or wipe the circulator with a damp cloth.
- Use the brush attachment on your household vacuum cleaner to vacuum any accumulated dust.
TROUBLESHOOTING
The unit fails to power on.
POSSIBLE CAUSE AND SOLUTIONPROBLEM
Unit is not plugged in. Plug Power Cord into electrical outlet, Model 6803DC Only - Ensure the AC power cord is plugged into the power supply and ensure DC power cord is plugged into the circulator.
Ensure unit fan speed setting is selected.
Unit is damaged or in need of repair. Cause usage and unplug. Contact Consumer Service for assistance.
The bute is worn or damaged. Try another culet or contact a qualifed electrician.
Unit set to a low speed setting. Adjust to a higher speed setting.
Airflow is blocked. Remove obstruction.
Adjust direction of airflow towards the user.
Under certain conditions, it is possible for a reset GFCI (Ground Fault Circuit Interrupter) outlet to trip when the user is charging speeds on a Vodafone circuit. In this event, change to an outlet that is not connected to a GFCI device. It could also indicate a weak or defective GFCI outlet. Contact a qualified technician to check the GFCI outlets.
The battery is dead. Replace with (1) new 3 volt CR2032 battery. Refer to REMOTE CONTROL
The remote requires a single of eight path to allow for the signal to be received by the unit. Position the unit so the receiver lens (located inside the disassembly panel) is visible from the remote control.
TABLE DES MATIÈRES
CAUSE POSSIBLE ET SOLUTIONPROBLÉME
Assure you do not select a new regulation on the website.
POSIBLE CAUSA Y SOLUCIONPROBLEMA
2021VermataA.U. Androw, CSU U.S.A. Pines in China, Impairment of the product 5. Kato and S. A. Prakash, "Wages and risks," Versofoil LLC
5
- MODELS 5303DC,6303DC,6803DC(-AU)OWNER'SGUIDE
- CONTENTS
- IMPORTANT INSTRUCTIONS READ ALL INSTRUCTIONS BEFORE USING.
- DANGER
- WARNING
- IMPORTANT INSTRUCTIONS
- Risk to Children and Other at Risk Groups of People.
- Risk from Electrical Shock. Contact with wires or components that are under voltage could be potentially fatal!
- Risk from Improper Installation. Please take care to follow these guidelines to avoid risks to people or property.
- WARNING: Batteries may pose a choking hazard. Do not let children handle batteries.
- SAVE THESE INSTRUCTIONS
- GETTING STARTED
- FEATURES
- CONTROLS
- HOW TO USE
- CORD MANAGEMENT
- REMOTE CONTROL
- GRILLE & BLADE REMOVAL
- REMOVABLE GRILLE
- BLADE REMOVAL
- CLEANING
- Observe the following safety information to avoid risks and property damage.
- TROUBLESHOOTING
- POSSIBLE CAUSE AND SOLUTIONPROBLEM
- TABLE DES MATIÈRES
- CAUSE POSSIBLE ET SOLUTIONPROBLÉME
- POSIBLE CAUSA Y SOLUCIONPROBLEMA
Brand : Vornado
Model : Energy Smart 6303DC
Category : Fan