
Lono 04.1515.0011 - Croque monsieur clip WMF - Free user manual and instructions
Find the device manual for free Lono 04.1515.0011 WMF in PDF.

User questions about Lono 04.1515.0011 WMF
0 question about this device. Answer the ones you know or ask your own.
Ask a new question about this device
Download the instructions for your Croque monsieur clip in PDF format for free! Find your manual Lono 04.1515.0011 - WMF and take your electronic device back in hand. On this page are published all the documents necessary for the use of your device. Lono 04.1515.0011 by WMF.
USER MANUAL Lono 04.1515.0011 WMF
Important safety information
- The appliance can be used by children older than eight years of age as well as by people with limited physical, sensory or mental capabilities and persons lacking experience and/or lacking knowledge, if they are supervised or have received instructions on how to use the appliance safely and have understood the resulting risks.
Children must not play with the appliance.
Children must not clean or maintain the appliance unless they are older than eight years of age and are supervised. - Keep the appliance and its connection cable out of reach of children under eight years of age.
- The appliance must not be operated via an external timer or remote control.
If the supply cord is damaged, it must be replaced by the manufacturer, its service agent or a similarly qualified person in order to avoid hazards. - After using the appliance, clean all surfaces/parts which have come into contact with food. Follow the instructions in the "Cleaning and care" section.
-
This appliance is designed for use in households and similar environments such as:
-
staff kitchen areas in shops, offices and other working environments:
- farm houses;
- by clients in hotels, motels and other residential facilities;
- bed-and-breakfast establishments.
The appliance is not intended for purely commercial use.
- Please note: When the appliance is plugged in, its touchable surfaces can get very hot and they remain hot even after the appliance has been unplugged!
Before use
The appliance may only be used for the intended purpose according to these instructions for use. Therefore, carefully read the instructions for use before operating the appliance. They contain instructions for using, cleaning and caring for the appliance. We accept no liability for any damages caused in the event of non-compliance. Keep the instructions for use in a safe place and pass them on to any subsequent user together with the appliance. Observe the safety information when using the appliance.
Technical data
Mains voltage: 220 - 240V, 50 - 60Hz
Power consumption: 730 - 870 W
Protection class: I
Additional safety information
Pull the mains plug:
-
if malfunctions occur during use
-
before cleaning
-
after use.
-
Only connect the appliance to earthed wall sockets that have been installed pursuant to regulations. The supply cable and plug must be dry.
-
The connection cable must not come into contact with hot appliance parts.
-
Only use an extension cable that is in perfect condition. Make sure you use enough cable and that it is safely routed.
-
Place the appliance on a flat, solid surface.
-
Make sure sufficient space is left around the appliance.
-
To operate the appliance, it must be positioned unobstructed on a table or work surface and not up against a wall or in a corner.
-
Attention! Do not use the appliance near or under flammable objects (e.g. curtains, wall cupboards) and always supervise.
-
Stop using the appliance and/or pull the mains plug out of the socket immediately if:
-
The appliance or power cord is damaged.
-
You suspect that there is a defect after the appliance has fallen or following a similar incident. In such cases, arrange for the appliance to be repaired.
-
Caution! The appliance gets hot! Risk of burns! Do not transport the appliance when it is hot.
-
Make sure that the drip tray is always correctly inserted during grilling.
-
Fat can spray out when grilling, so protect the table or work surface accordingly.
-
Do not leave the appliance unattended.
-
Do not immerse the appliance in water to clean it.
-
Do not leave the appliance half-open; only open it briefly to add or remove food.
-
Allow the appliance to cool down fully before you remove the plates, clean the appliance and put it away.
-
Make sure that the grill plates are always repositioned correctly after they have been removed.
Getting started
- Clean the toast plates with a damp cloth and some washing-up liquid before using the appliance for the first time.
- Once the toast plates have dried, brush them with a few drops of oil.
- Connect the mains plug to an earthed wall socket.
- Switch the appliance on at the on/off switch to heat it up. The indicator light glows red. (Image)
- The indicator light changes colour from red to white as soon as the optimum temperature is reached.
Note: There may be a slight odour the first time you use your new appliance. This is for technical reasons and is perfectly normal.
Note: When using the appliance for the first time, it is advisable to toast two slices of bread without any ingredients, because the first sandwiches toasted in the new appliance should not be eaten.
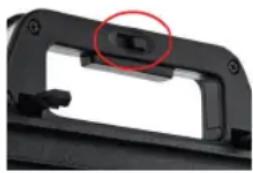
- Press the button on the inside of the handle to open the appliance. (Image)
- Place the sandwiches on the bottom toast plate and close the appliance.
After a short time, the red indicator light comes on again to show that the appliance is heating up. - Open the appliance and remove the sandwiches as soon as they reach the desired browning level.
Tips for a better outcome
- It is advisable to have all the ingredients ready before you begin toasting. You can also add your desired filling to your sandwiches while you wait on the appliance heating up.
- All types of bread, e.g. rye bread or multi-grain bread, can be used as long as it fits on the toast plates.
- Theasting time depends on the moisture content of the bread and the type of filling used.
- Check that the sandwiches are toasting according to your taste.
- Remove the sandwiches using a wooden spatula to protect the coating.
Recipes:
Ham and cheese toastie
Ingredients:
4 slices toasting bread
4 slices cheese
2 slices cooked ham
Pepper
Place a slice of cheese and a slice of ham on the toasting bread. Season the sandwiches with pepper. Place another slice of cheese on top and then another slice of toasting bread to form a sandwich.
Veggie toastie
Ingredients:
4 slices whole-grain toasting bread
4 slices cucumber (thinly sliced)
4 slices onion
4 slices tomato
4 slices boiled potato
1 handful baby spinach
Tomato ketchup
Spread the chopped vegetables over the slices of toasting bread. Add a little baby spinach and tomato ketchup. Add a second slice of toasting bread to form a sandwich.
Cheese and tomato toastie
Ingredients:
4 slices whole-grain toasting bread
4 slices Gouda cheese
4 slices onion
4 slices tomato
Cover the toasting bread with a slice of Gouda cheese and spread the vegetables evenly over both sandwiches. Place another slice of cheese on top and then another slice of toasting bread to form a sandwich.
Tuna toastie
Ingredients:
4 slices toasting bread
1/2 tin tuna
4 slices tomato
4 slices mozzarella
4 slices onion
Pepper
Salt
Cover the toasting bread with tuna, mozzarella and onions. Season the sandwiches with some pepper and salt. Add a second slice of toasting bread to form a sandwich.
Cleaning and care
After use, remove the mains plug and allow the appliance to cool down.
Never immerse the appliance in water or clean it under running water.
Only wipe the casing with a damp cloth and then dry it.
Clean the toasting surfaces with a soft brush or a scrubber.
Under no circumstances should you use sharp or hard objects on the toasting
surfaces with a non-stick coating, as these could damage the coating.
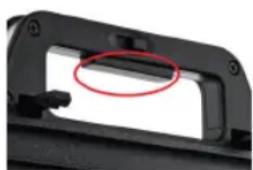
The cable can be wound on the underside of the appliance to save space during
storage. To stop the appliance from being opened inadvertently, it can be sealed
using the lock button. (Image)
For UK use only
- This product is supplied with a 13 A plug conforming to BS 1363 fitted to the mains lead. If the plug is unsuitable for your socket outlets or needs to be replaced, please note the following. If the plug is a non-rewireable one, cut it from the mains lead and immediately dispose of it. Never insert it into a socket outlet as there is a very great risk of an electric shock.
- The replacement of the plug at the mains lead has to be done according to the following instructions:
Warning - This appliance must be earthed
Important: The wires in this mains lead are coloured in accordance with the following code:
green/yellow Earth
blue Neutral
brown Live
As the colours of the wires in the mains lead of this appliance may not correspond with the coloured markings identifying the terminals in your plug, proceed as follows: As the colours of the wires in the mains lead of this appliance may not correspond with the coloured markings identifying the terminals in your plug, proceed as follows:
the wire which is coloured green and yellow must be connected to the terminal which is marked with the letter E or by the earth symbol 12 or coloured green or green and yellow,
- the wire which is coloured blue must be connected to the terminal which is marked the letter N or coloured black,
- the wire which is coloured brown must be connected to the terminal which is marked with the letter L or coloured red.
- If a 13 A (BS 1363) plug is used it must be fitted with a 13 A fuse conforming to BS 1362 and be ASTA approved. If any other type of plug is used, the appliance must be protected by a 10 A fuse either in the plug or adapter or at the distribution board.
If in doubt - consult a qualified electrician.
- Never use the plug without closing the fuse cover.

The appliance complies with European directives 2014/35/EC, 2014/30/EC and 2009/125/EC.
At the end of its life, this product must not be disposed of in normal household waste but must instead be delivered to a collection point for recycling electric and electronic appliances.
The materials are recyclable in accordance with their labelling. The reuse, recycling or other use of old appliances makes an important contribution to protecting our environment.
Please ask your local administration for the appropriate disposal point.
Subject to alterations