X1 S - Microphone SE Electronics - Free user manual and instructions
Find the device manual for free X1 S SE Electronics in PDF.

User questions about X1 S SE Electronics
0 question about this device. Answer the ones you know or ask your own.
Ask a new question about this device
Download the instructions for your Microphone in PDF format for free! Find your manual X1 S - SE Electronics and take your electronic device back in hand. On this page are published all the documents necessary for the use of your device. X1 S by SE Electronics.
USER MANUAL X1 S SE Electronics
We would like to thank you cordially for choosing this sE microphone! This manual contains some important instructions for setting up and operating your new equipment. Please take a few minutes to read the instructions below carefully. We hope you will enjoy working with it as much as we enjoyed designing and building it for you.
Most Sincerely,
Your sE Team
Brief Description
The X1 S is a high-quality condenser microphone intended for a wide range of studio applications, from vocals to drums to acoustic instruments and beyond. Thanks to its custom design and hand-crafted 1" true condenser capsule, it delivers pristine sound quality and an even, well-balanced frequency response.
The electronics and the switchable attenuation pads ensure a high dynamic range, with high sound pressure level (SPL) handling capability and extremely low-noise components. The switchable low cut filters eliminate rumble or footfall noise, and can also compensate for an excess of bass frequencies caused by the proximity effect. This enables the X1 S to close-mic many instruments including electric guitar speaker cabinets, brass instruments and drums.
Reliable operation even in demanding on-stage applications in difficult environments is ensured by the roadworthy all-metal design, robust construction, and high quality manufacturing standards.
What's in the box
Your packaging should contain the follow items. If anything is missing, please contact your sE Electronics dealer and let them know.
- X1 S microphone
- microphone stand clip
- thread adapter
Controls
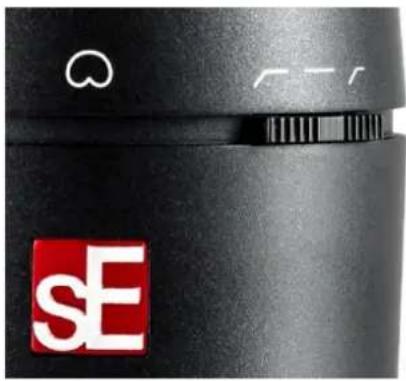
The X1 S features a switch for the attenuation pads and a switch for the low-cut filters.
Attenuation Switch
The Attenuation Switch is located on the front-left side of the microphone. When switched on, the incoming signal is reduced by either 10 or 20 dB for capturing of loud instruments and/or close-miking without distortion. Using the switch also helps prevent overloading the input stage of recording interfaces, mixing desks and microphone preamps.

Low-Cut Switch
The Low-Cut Switch is located on the front-right side of the microphone, and inserts a low-cut filter at 80Hz (left position) or 160Hz (right position). The switch's center position removes the filter for a flat frequency response. Wind noise, plosives, footfall noise or rumble might affect the recorded signal, so enabling the low-cut filters reduces such unwanted noise and prevents distortion. Additionally, the low-cut filters also minimize the proximity effect when recording sound sources at a very short distance.
natural_image
Close-up of a black camera lens with a red 'SE' logo and white circular design (no readable text or symbols)Powering
To ensure proper operation, the microphone requires a phantom power source providing 48 Volts according to IEC 61938.

Risk of damage
Do not connect the microphone to any power supply other than a phantom power source (input with phantom power or external IEC standard phantom power supply) with a floating connector, using a balanced cable with studio grade connectors to IEC 268-12 only. This is the only way to ensure safe and reliable operation.
Safety and maintenance

Risk of damage
Please make sure that the piece of equipment to which your microphone will be connected fulfils the safety regulations enforced in your country and is fitted with a ground lead.
Cleaning the microphone
After every use, clean the microphone with a dry, soft cloth tissue and store it in a solid case or a zipper pouch.
Technical Specifications
| Capsule | Hand-crafted 1" true condenser capsule |
| Polar patterns | Cardioid |
| Frequency range | 20 – 20,000 Hz |
| Sensitivity | 30 mV/Pa (-30.5 dBV) |
| Max. SPL (0.5% THD) | 140 / 150 / 160dB _SPL (0/10/20 dB Attenuation pad) |
| Equivalent noise level | 9 dB(A) |
| Dynamic range | 131 / 141 / 151 dB (0/10/20 dB Attenuation pad) |
| Signal-to-noise ratio | 85 dB |
| Low cut filter | 80 / 160Hz, 6 dB/Oct, switchable |
| Attenuation pad | 10 / 20 dB, switchable |
| Powering | 48 Volts according to IEC 61938 |
| Electrical Impedance | 125 Ohms |
| Recommended load impedance | >1k Ohms |
| Current consumption | 6 mA |
| Connectivity | 3-pin male XLR connector |
| Dimensions | Diameter: 58 mm (2.28 in.) Length 169 mm (6.65 in.) |
| Weight | 440 g (15.52 oz.) |
Frequency response Polar Pattern
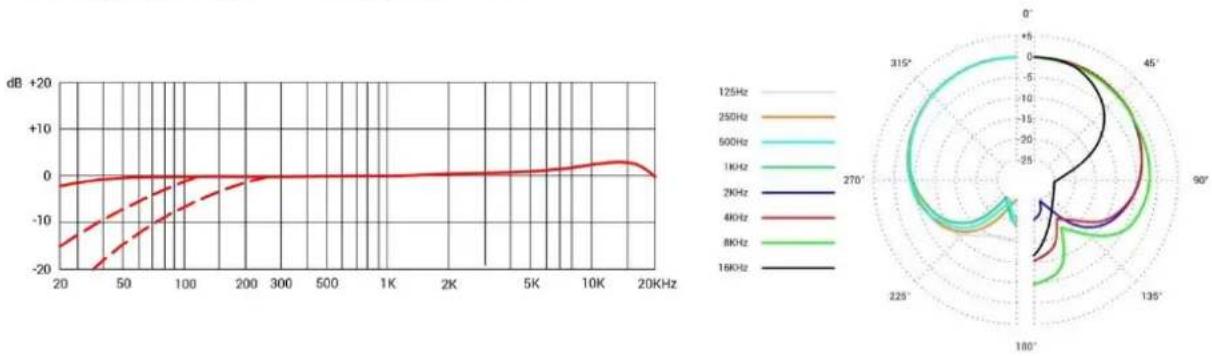
line
| Frequency | Value (dB) | | --------- | ---------- | | 125Hz | -20 | | 250Hz | -10 | | 500Hz | -5 | | 1KHz | 0 | | 2KHz | 5 | | 4KHz | 10 | | 8KHz | 15 | | 16KHz | 20 |Support
In case you are experiencing any problems or have any questions regarding your sE product, please contact your dealer first for the fastest and more direct service. If an authorized service is required, it will be arranged by that dealer: http://www.seelectronics.com/dealers
If you still have difficulties with support or assistance, please do not hesitate to contact us directly: http://www.seelectronics.com/contact-us
Lastly, remember to register your new gear to extend your warranty to a full three years: http://www.seelectronics.com/registration
Contact
Feel free to contact us:
sE Electronics International, Inc. www.seelectronics.com
PO Box 1049 contact@seelectronics.com
6 Beach Road
Tiburon
CA 94920 USA
Our international distributors & sales representatives: http://www.seelectronics.com/contact-us
This product conforms to the standards listed in the Declaration of Conformity. Please contact us if you want to order a free copy of the Declaration of Conformity. Technical data subject to change without notice.
Danke
natural_image
Close-up of a black camera lens with a red SE logo and white abstract symbols (no readable text or numbers)Stromversorgung
Beschädigungsgefahr
Beschädigungsgefahr
http://www.seelectronics.com/registration
Congratulazioni!
natural_image
Close-up of a black camera lens with a red 'sE' logo and white circular symbol on the left (no readable text or symbols beyond branding)Alimentazione
Rischidi infortunio
Rischio di danni
natural_image
Close-up of a black camera lens with a red 'sE' logo and white circular design (no readable text or symbols)Alimentation
Risque de dommages
Risque de dommages
Selector Low-Cut
natural_image
Close-up of a black camera lens with a red 'sE' logo and white circular button (no readable text or symbols)Alimentación
Riesgo de daños
Riesgo de daños
http://www.seelectronics.com/registration
Contacto
sE Electronics International, Inc. www.seelectronics.com
PO Box 1049 contact@seelectronics.com
6 Beach Road
Tiburon
CA 94920
USA
Nuestros distribuidores y representantes locales: http://www.seelectronics.com/contact-us
Thank you for purchasing an sE product! You are automatically entitled to a two-year warranty, but can extend this to a full three years with registration. To register your new equipment and to read the full warranty details, please go here:
http://www.seelectronics.com/registration
Most Sincerely,
Your sE Team
REFLEXION FILTER® X ASSEMBLY + USE
natural_image
Close-up of a metallic door handle with horizontal slats, no visible text or symbolsThank you for purchasing an sE Electronics RF-X! We hope it helps make your tracks sound great - no matter WHERE you're recording.
natural_image
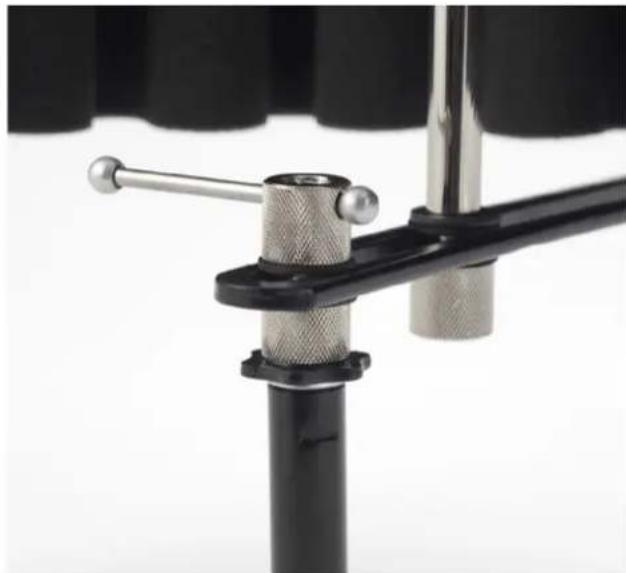
Close-up of a mechanical clamp or lever assembly with black and metallic components (no visible text or symbols)STEP ONE
The first step is to attach the hardware to the stand, which is done by screwing the bracket onto the top of a mic stand, where the mic or shockmount normally attaches.
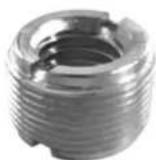
*There's an adapter screwed inside this connector for a European mic thread size - if you remove the adapter, the connector will fit US mic stands.
Use the lever on top of the L bracket to tighten it, but not too tight, as you'll probably need to shift it slightly later.
natural_image
Close-up of a black foam roller with a metallic clip attached, showing no text or symbols.STEP TWO
Next, attach the filter to the vertical portion of the L bracket by inserting the two included screws through the vertical cutout in the L bracket, and into the two screw holes on the back of the RFX.

natural_image
Close-up of a black studio studio studio with foam roller, microphone, and stand (no visible text or symbols)STEP THREE
Your microphone, in a shockmount or a clip, will attach to the hardware with the included standoff.
You can now play with the horizontal positioning of the mic, and the height of the RFX, to get the optimum position for recording.
The ideal placement for your microphone is where the mic's capsule is approximately even with the front edge of the RFX, and centered vertically with the filter – but some mics sound better when pushed a little closer, and some a little further away.
Once you've found a good position for the mic and filter, you can loosen the lever on top of the mic stand mount to move the filter and mic assembly forward or back – this way, you can position it so its center of gravity is balanced directly above the mic stand.
Thank you for being an sE customer - enjoy your new RF-X!
For more information, and to register for your extra year of warranty, please visit seelectronics.com.