
RFX9600 - AV amplifier PHILIPS - Free user manual and instructions
Find the device manual for free RFX9600 PHILIPS in PDF.
User questions about RFX9600 PHILIPS
0 question about this device. Answer the ones you know or ask your own.
Ask a new question about this device
Download the instructions for your AV amplifier in PDF format for free! Find your manual RFX9600 - PHILIPS and take your electronic device back in hand. On this page are published all the documents necessary for the use of your device. RFX9600 by PHILIPS.
USER MANUAL RFX9600 PHILIPS
Mounting the Extender in a Rack 4
Connecting the Extender to External Equipment 5
Attaching the Extender to Infrared Controlled AV-equipment 5
Using the Sensor Inputs 6
Connecting to Relay-controlled Equipment 7
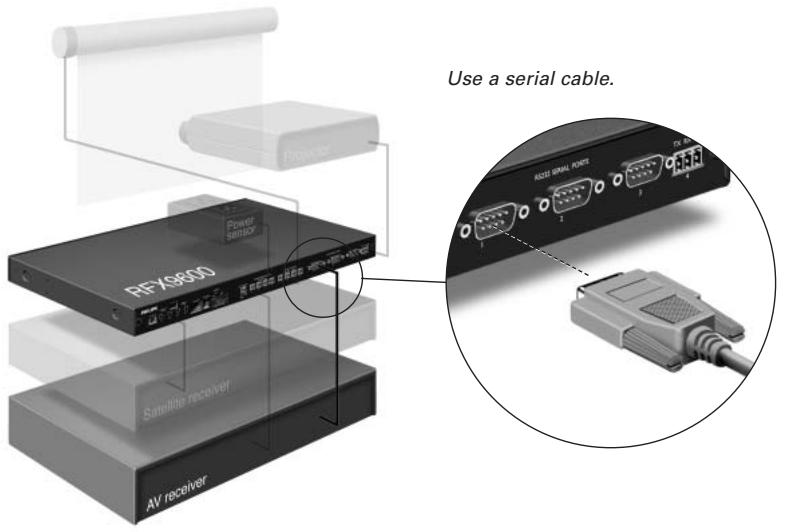
Connecting to Serial Equipment 7
Connecting to a Lutron RadioRa Lighting System 8
Inserting the Escient Fireball Audio Server in the Network 8
Connecting the Extender to the Network 9
Using the Extender 9
Configuring the Extender 9
Support 11
Troubleshooting 11
What Do the LEDs Indicate? 11
Finding the Exact Location of an AV-component's IR Receiver 12
Operating AV-components with the Extender 12
Resetting the Extender 12
Firmware Update. 12
Specifications 14
IFU Approbation / Safety Content RFX9600
FCC Compliancy
Before You Start
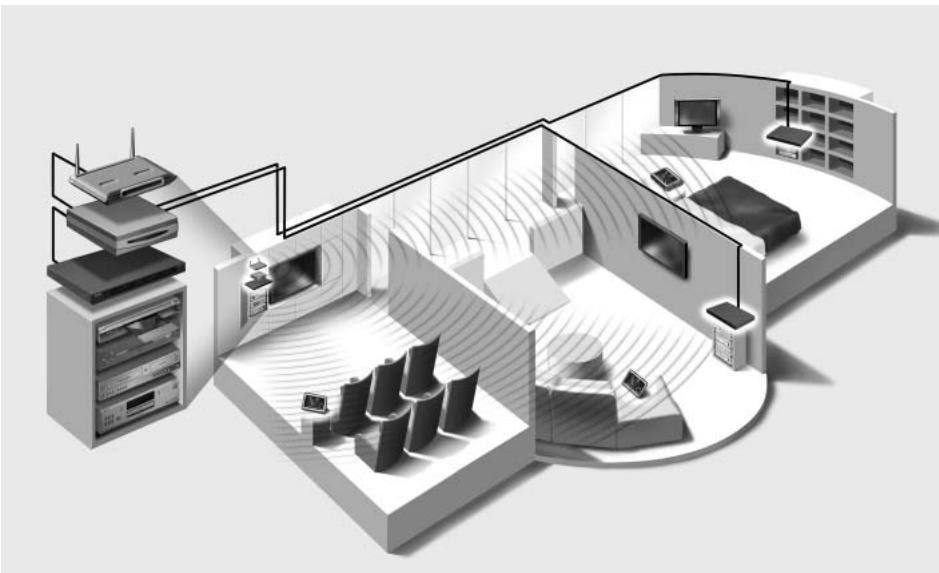
The Pronto Serial Extender is an important element of the Pronto System and makes it possible to control AV-equipment via RF in the entire house. In addition, it can be connected to AV-equipment via RS232 and allows you to use power sensing for reliable power on/off switching. You can also use it to control drapes and projector lifts, for example.
In order to use the Extender in a wireless Pronto Network:
- Install the Extender: connect it to a router and external equipment, like a TV or receiver.
- Configure the Extender: connect it to the PC and use the Configuration Tool.
The Extender is used in a network with a Wireless Access Point and/or a router, as illustrated below.
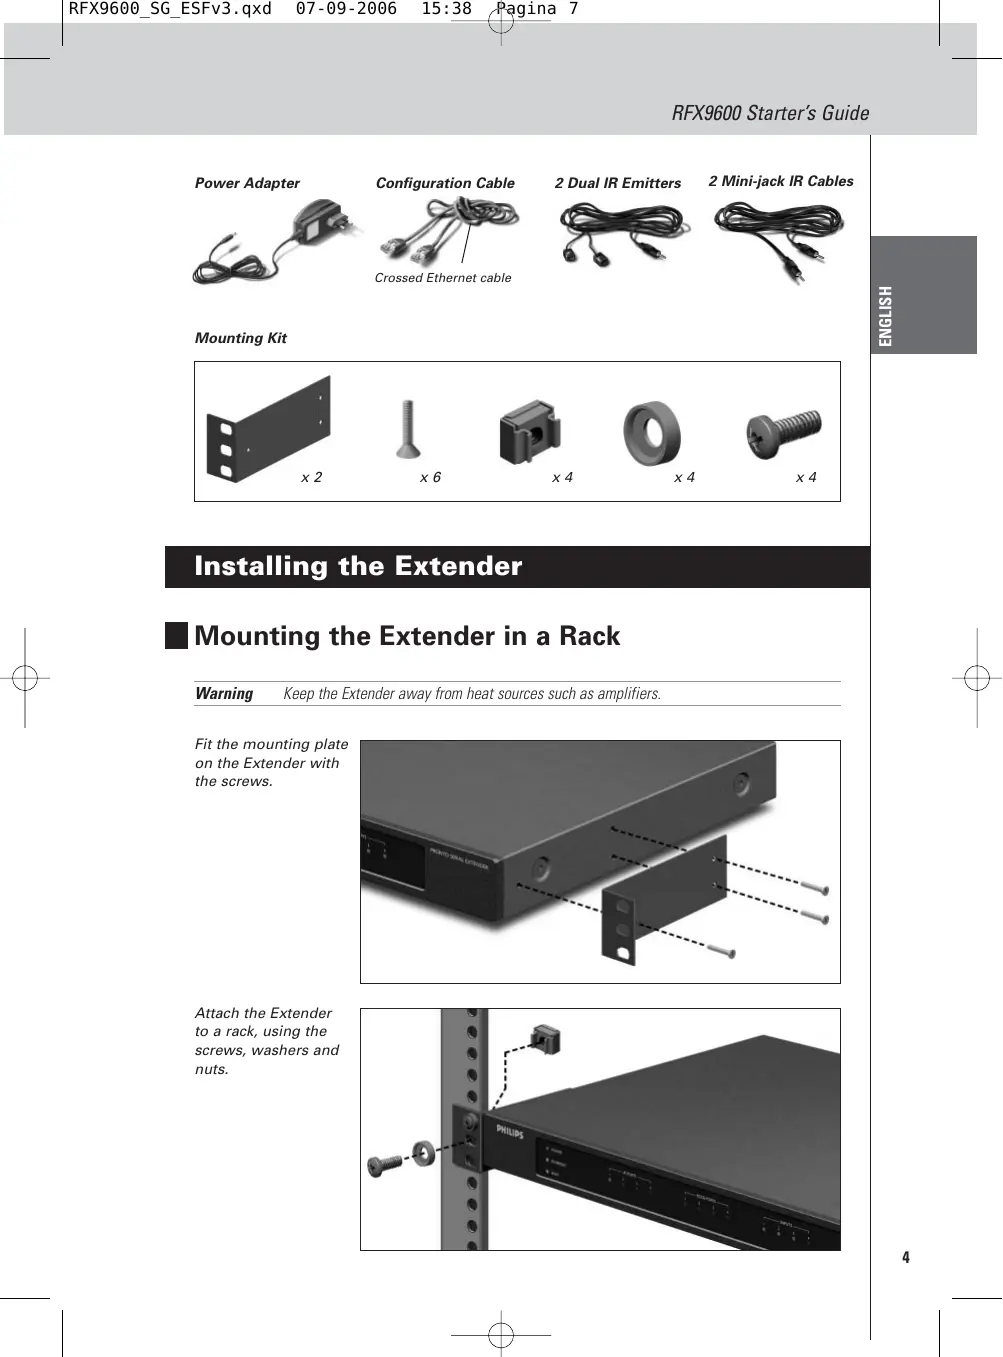
Unpacking the Extender
Pronto Serial Extender
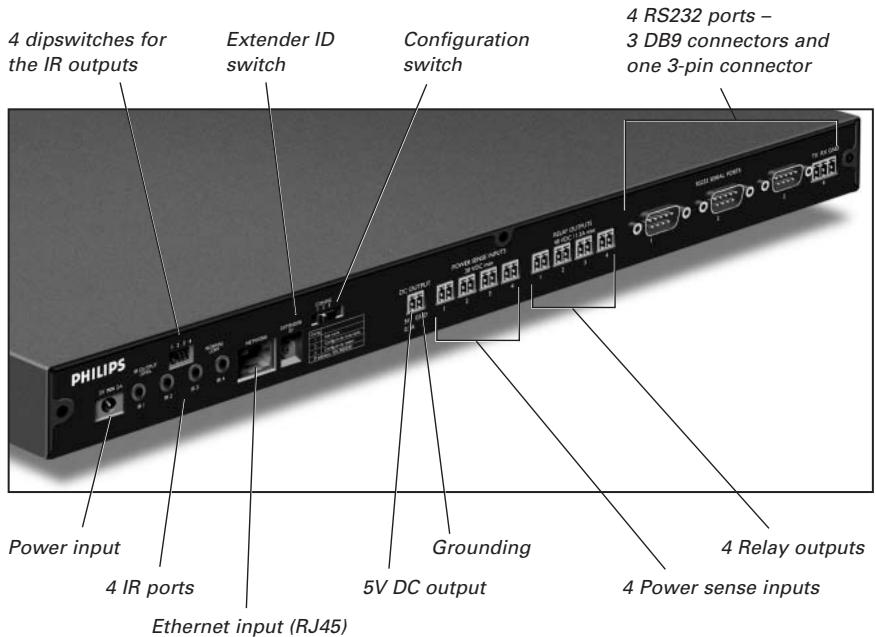
Back Panel
Power Adapter
Configuration Cable
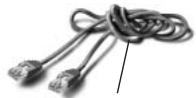
Crossed Ethernet cable
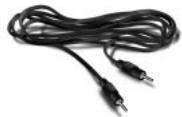
2 Dual IR Emitters
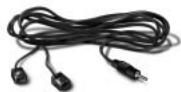
2 Mini-jack IR Cables
Mounting Kit

x6

X4

X4

X4
Installing the Extender
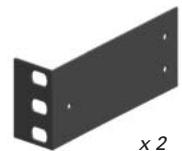
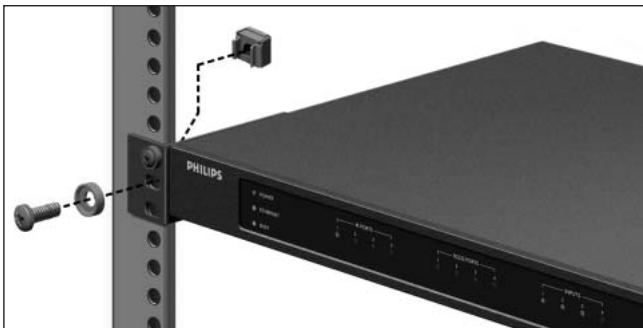
Mounting the Extender in a Rack
Warning Keep the Extender away from heat sources such as amplifiers.
Fit the mounting plate on the Extender with the screws.
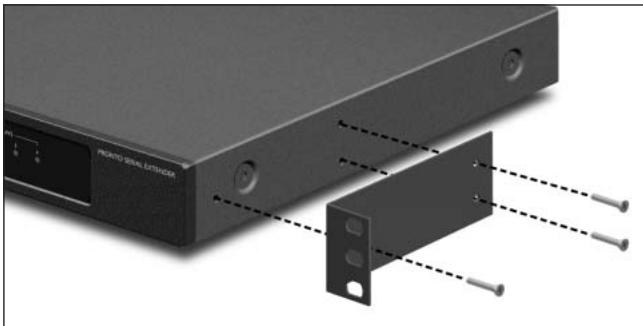
Attach the Extender to a rack, using the screws, washers and nuts.
Connecting the Extender to External Equipment
The Extender can be connected to external equipment through the various outputs on the back panel.
Warning Make sure that the equipment is always turned off before connecting it to the Extender.
Attaching the Extender to Infrared Controlled AV-equipment
To connect the Extender to infrared controlled AV-equipment, use one of the following cables enclosed with the Extender:
- a Dual IR emitter;
-0r- - a mini-jack IR cable.
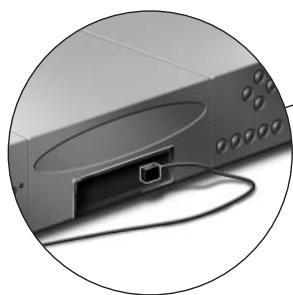
Insert the mini-jack in the Extender and attach an emitter to the infrared display of the infrared controlled device.
Insert one mini-jack in the Extender and the other in the infrared controlled device.
Adjusting the Power Level of the IR Outputs
At the back of the Extender there are 4 dipswitches, one for each IR output. Use these dipswitches to reduce the power level of the Dual IR emitters and the mini-jack cables.
This is useful when you suspect that the IR signal is too strong for the receiving AV-component, or when you connect the IR port to an external IR-bus system.
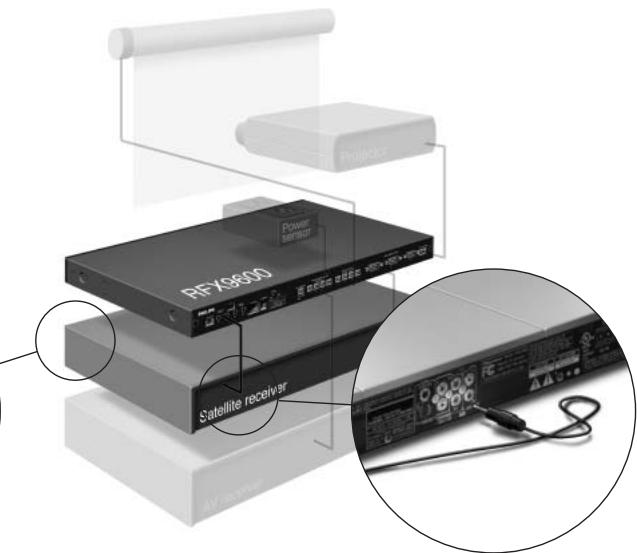
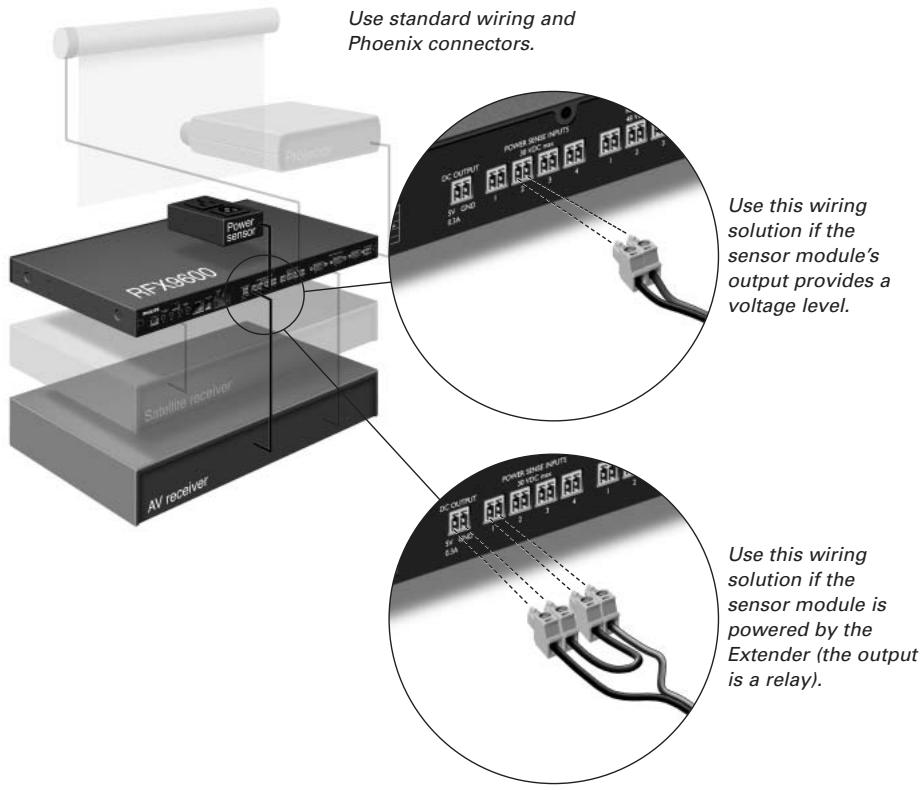
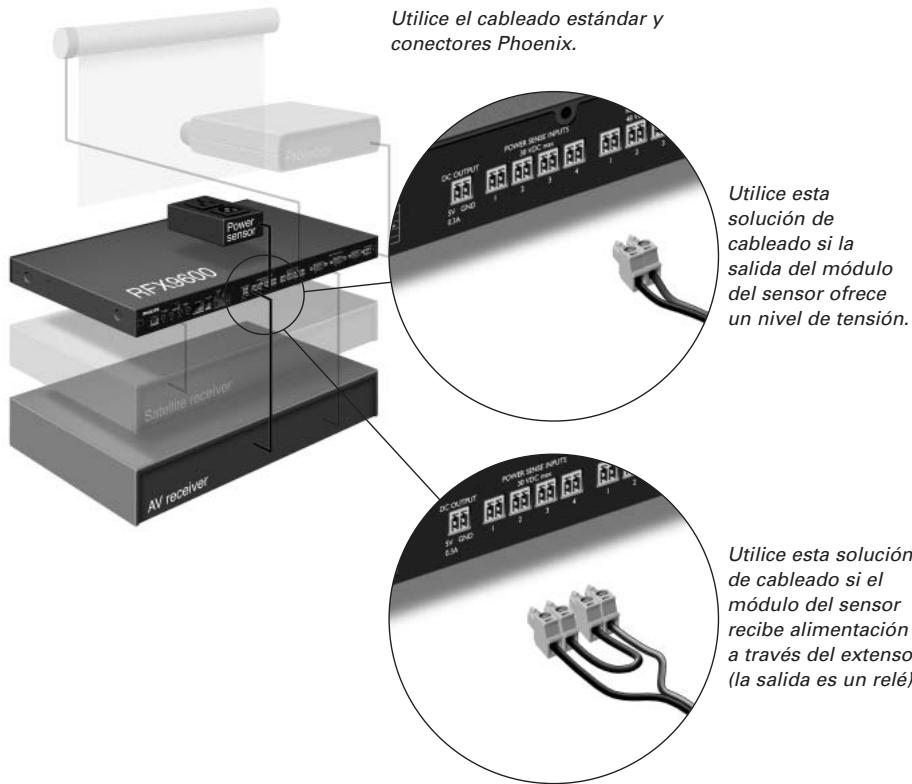
Using the Sensor Inputs
When the Control Panel sends out a macro to switch multiple AV-components on or off, discrete codes are normally used to ensure the state of the component. In some cases, only toggle codes are available: one command toggles between the on and off state, and there is no separate command for switching the component on and switching it off. In this event, the system may get out of sync. This problem can be solved by using power sensing:
- A power sensor connected to an AV-component can detect whether it is switched on or off. By connecting the power sensor to the Extender, this information is subsequently transmitted to the Extender.
- Some AV-components, such as receivers, have mini-jack outputs specifically for this purpose. These mini-jack outputs can be connected to the power sense inputs on the Extender.
- For video sources, video sensor modules can be used.
Make sure that you create the specific power sensing commands in the action list of ProntoEdit Professional.
Note
Sensor modules are not delivered with the Extender, but most available modules are compatible with the Extender. The power sense inputs are triggered by a voltage input between 5V and 30V.
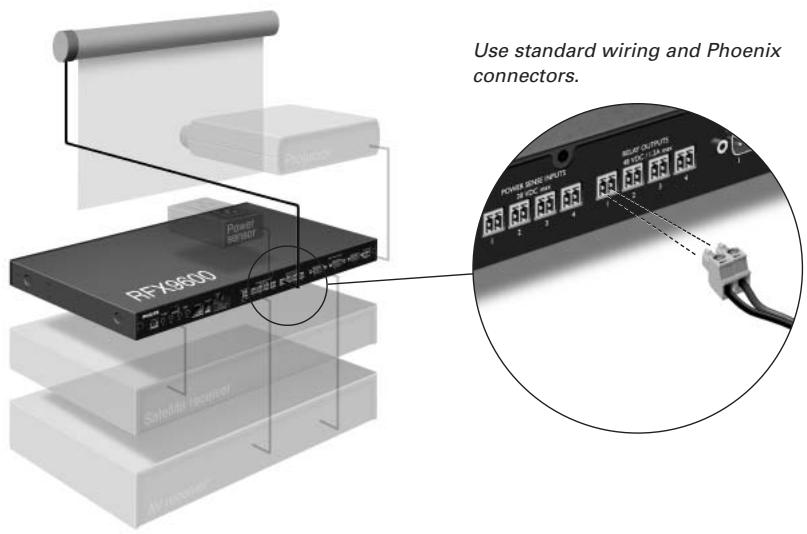
Connecting to Relay-controlled Equipment
Connecting to Serial Equipment
There are two ways to connect serial equipment to the Extender:
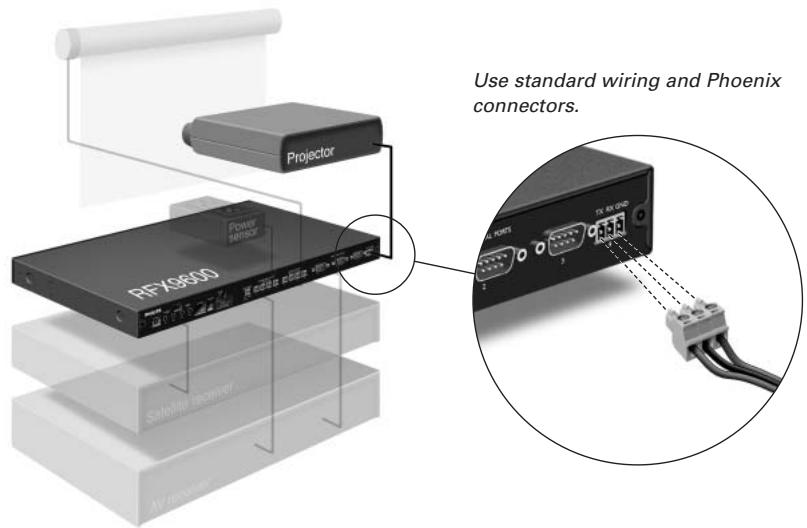
Tip In case you experience communication problems when using the RS232 wiring solution illustrated above, make sure that the GND pin on the Extender is grounded correctly on the side of the AV-component.
Connecting to a Lutron RadioRa Lighting System
1 Connect the Lutron Lighting System to the Extender via the RS232 port. Refer to chapter 'Connecting to Serial Equipment' on page 7.
2 Open ProntoEdit Professional.
3 Open the configuration file.
4 Insert the Lutron Lighting System in the configuration file.
Note If there are multiple Extenders, add these Extenders to the configuration file via the System properties before configuring the Lutron Lighting System.
5 Open the Lutron Lighting System Properties.
6 Adjust the settings of the Lutron Lighting System:
1 Select the Extender to which the Lutron Lighting System is connected.
2 Select the port on the Extender to which it is connected.
Inserting the Escient Fireball Audio Server in the Network
1 Connect the Escient to the router.
2 Open ProntoEdit Professional.
3 Open the configuration file.
4 Insert the Escient Music Server in the configuration file.
5 Open the Escient Music Server Properties.
6 Adjust the settings of the Escient Music Server:
- If the Escient Music Server has a fixed IP-address, fill in that IP-address.
- If it has a dynamic IP-address, fill in its host name.
Connecting the Extender to the Network
The Extender is normally ready for use and does not need to be configured. The settings need only be adjusted in case you wish to operate the Extender with a fixed IP-address, or if there is more than one Extender in the Pronto Network.
| Note | Before you start using or configuring the Extender, check if any firmware updates are available in the Downloads section on www.pronto.philips.com. Refer to the chapter ‘Firmware Update’ on page 12 for further details. |
Using the Extender
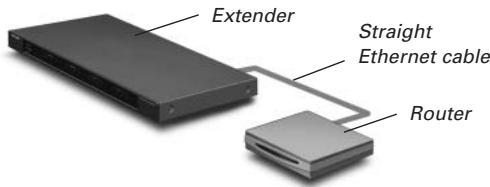
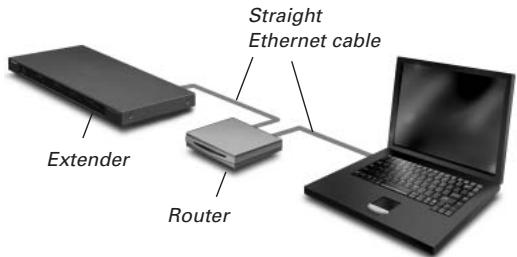
1 Connect the Extender to the router with a straight Ethernet cable.
2 Set the Extender ID switch to 1 or to an ID that is not yet used by another Extender in the Pronto Network.
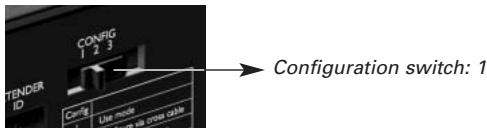
3 Set the Configuration switch to 1 for use:
4 Plug in the Extender's power adapter.
The Extender will start up. After startup, the Power and Ethernet LEDs are green. The Busy LED blinks green when it's processing a code or a macro.
Configuring the Extender
You can connect the Extender directly to the PC for configuration.
If the Extender is already installed and connected to external equipment, it is also possible to configure it through a router. For further instructions, refer to the topic 'Configuration through a router' on page 10.
| Tip | To ensure optimal performance,use a dedicated network for all Pronto communication. This makes the Pronto Network independent of other networks and changes in network settings. |
Configuration with a direct connection to the PC
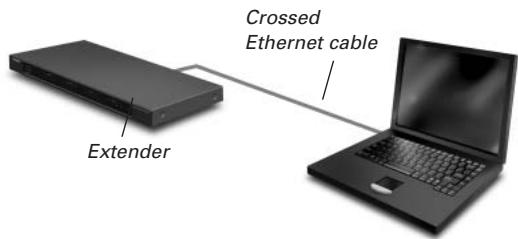
1 Connect the Extender to the PC with the configuration cable (this is the crossed Ethernet cable enclosed).
2 Make sure that the PC is switched to DHCP while the Extender is in configuration (normally, this should already be the case).
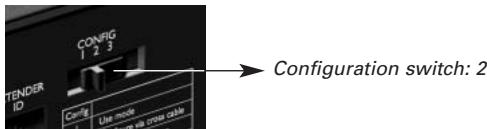
3 Set the Configuration switch to 2 for configuration:
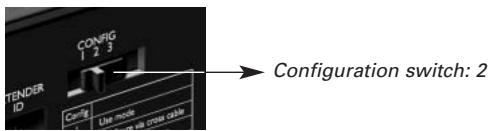
The Extender will restart. After start-up, the Power and Ethernet LEDs are green and the Busy LED is red/green blinking.
4 Open the browser.
5 Type the IP address of the Extender in the address bar of the browser: 192.168.8.80. (This is also printed on the back of the Extender.)
You may have to refresh the browser before the Configuration Tool appears.
6 Make sure you have the IP address and netmask at hand, and follow the onscreen instructions.
7 When the configuration is completed, disconnect the Extender from the computer and reconnect it to the router with a straight Ethernet cable. Set the Configuration switch to 1 for use.
Configuration through a router
1 The Extender is already connected to the router. Connect the router to the PC as well.
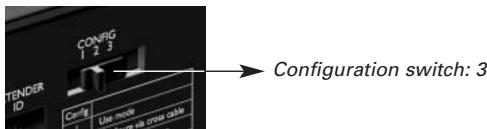
2 Set the Configuration switch to 3 for configuration:

The Extender will restart. After start-up, the Power and Ethernet LEDs are green and the Busy LED is red/green blinking.
3 Open ProntoEdit Professional on the PC.
4 In the Tools menu, select Extender Discovery. The Extender Discovery tool appears, with a list of all the detected Extenders in the Pronto Network.
5 Select the Extender that you want to configure and click on the Configure button. The Configuration Tool opens in the browser.
6 Make sure you have the IP address and netmask at hand, and follow the onscreen instructions.
7 When the configuration is completed, disconnect the Extender from the computer and reconnect it to the router with a straight Ethernet cable. Set the Configuration switch to 1 for use.
Support
Troubleshooting
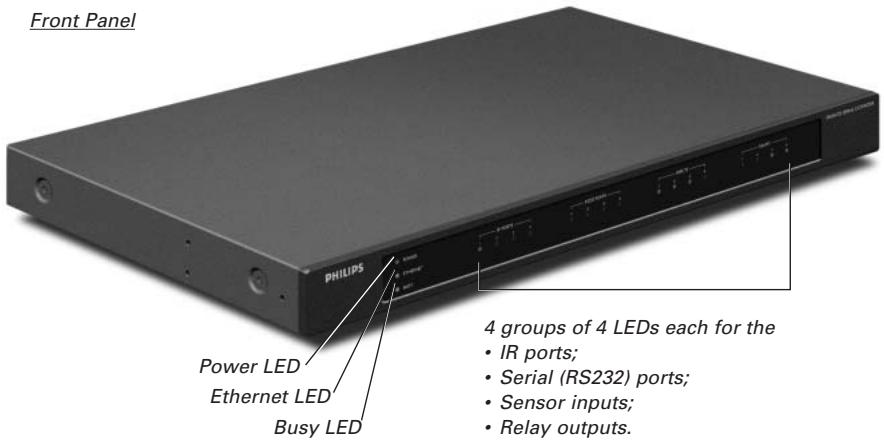
What Do the LEDs Indicate?
| LEDs Colors | Ethernet LED | Busy |
| Green blinking | The Extender's IP address is being determined. | The Extender is busy processing a code or short macro from a Control Panel. |
| Green | The Extender is functioning normally. | The Extender is busy processing a long macro from a Control Panel. |
| Red/green blinking | The Extender is in configuration. | |
| Red | Refer to the topic 'There is an IP conflict' on page 11. | Refer to the topic 'There are duplicate Extender IDs' on page 12. |
| Red blinking | Refer to the Refer to the topic 'The IP address cannot be determined' on page 11. | The Extender is starting up. Wait until startup has finished. |
There is an IP conflict
There is another AV-component in the network that is using the same fixed IP address as the Extender. Change the IP address of the Extender in the Configuration Tool.
If the problem persists, check the router settings.
The IP address cannot be determined
- When using the Extender: make sure that the Extender is connected to the router with a straight Ethernet cable.
- When configuring the Extender: make sure the PC is not using a fixed IP address but is using DHCP instead.
- Make sure the router is switched on. If the router is using DHCP, the Extender's IP address cannot be determined. Make sure to use the correct network settings on the router.
Finding the Exact Location of an AV-component's IR Receiver
1 Remove the protective tape of the Dual IR emitters.
2 Set the Dual IR emitters to the minimal power level, and hold the adhesive side of one of the emitters 0.4 - 0.8 inch / 1 - 2 cm in front of the AV-component.
3 Make sure the Control Panel is configured to operate correctly within the Pronto system (e.g.: configured for WiFi, not for IR).
4 Move the emitter across the front panel of the AV-component, and at the same time, send commands with the Control Panel to the AV-component.
Take note of when the AV-component reacts to the IR signals of the emitter.
5 When the AV-component reacts, position the emitter in that place.
Operating AV-components with the Extender
The AV-components do not respond to commands from the Extender
- Check if the Busy LED blinks green when you send a command with the Control Panel. If the Busy LED does not blink, the Extender is not receiving commands from a Control Panel.
- Make sure that the Control Panel is configured correctly in ProntoEdit Professional;
- Make sure that the Extender is configured correctly in the Configuration Tool and connected properly to the AV-components;
- Make sure that the switches on the Extender are set correctly.
There are duplicate Extender IDs
Using the Extender ID switch, assign a unique ID to each Extender in the same Pronto Network. Make sure the Control Panel is configured accordingly in ProntoEdit Professional.
You can use up to 16 different Extenders in the same Pronto Network.
Resetting the Extender
This is only necessary when the Extender shows unusual behavior.
To perform a reset, unplug the power adapter from the Extender. Wait a few seconds, and plug it in again.
■ Firmware Update
When an update of the Extender firmware is available, this will be announced on the Philips Pronto website: www.pronto.philips.com.
Note You can always see the current version of the firmware in the Configuration Tool.
1 Download the new version of the firmware on the PC and save it in the desired location.
2 Unplug the Extender. You can now update it in one of the ways described below.
Updating the Extender with the Configuration Cable
1 Connect the Extender to the PC with the configuration cable (this is the crossed Ethernet cable enclosed).
2 Make sure that the PC is switched to DHCP while the Extender is in configuration (normally, this should already be the case).
3 Set the Configuration switch to 2 for configuration:
The Extender will restart. After start-up, the Power and Ethernet LEDs are green and the Busy LED is red/green blinking.
4 Open the browser.
5 Type the IP address of the Extender in the address bar of the browser: 192.168.8.80. (This is also printed on the back of the Extender.) You may have to refresh the browser before the Configuration Tool appears.
6 Select Firmware Update in the left navigation pane. The Firmware Update page opens.
7 Follow the onscreen instructions.
Updating the Extender through a Router
If the Extender is already installed and connected to equipment, it may be more convenient to update it through the router.
1 The Extender is already connected to the router. Connect the router to the PC as well.
2 Set the Configuration switch to 3 for configuration:
The Extender will restart. After start-up, the Power and Ethernet LEDs are green and the Busy LED is red/green blinking.
3 Open ProntoEdit Professional on the PC.
4 In the Tools menu, select Extender Discovery.
The Extender Discovery tool appears, with a list of all the detected Extenders in the Pronto Network.
5 Select the Extender that you want to configure and click on the Configure button. The Configuration Tool opens in the browser.
6 Select Firmware Update in the left navigation pane.
The Firmware Update page opens.
7 Follow the onscreen instructions.
Specifications
| General | IP based Extender box for remote Pronto Control Panel operation Dark grey metal housing for 19" rack mounting or free standing position Up to 16 Extenders and 16 Control Panels in a system |
| Connectivity | 5 VDC power input 4 addressable outputs for IR emitters Ethernet RJ45 connection 4 RS232 ports for control 4 power sense inputs: 4-30 VDC or 4-30 VAC rms 4 Relay outputs: 48 VDC or 48 VAC rms, 2 A (max power 60 W) Voltage output for general use: 5 VDC, 0.3 A |
| Settings | Extender ID: 16 positions IR power output: 2 levels (normal, low) Configuration: Use mode, configure with cross cable or via router |
| LED indications | 3 LEDs for Power, Ethernet and Busy 4 LEDs for IR output 4 LEDs for RS232 output 4 LEDs for power sense input 4 LEDs for relay output |
| Dimensions/ Weight | 16.9 x 9.4 x 1.8 inch (428 x 240 x 46 mm) 61.7 oz (1.75 kg) |
| Operating temperature | 32°F to 122°F (0°C to 50°C) |
| Infrared (IR) | IR frequency range: 25 kHz – 1 MHz (including DC/flash codes) IR power out: 2 levels |
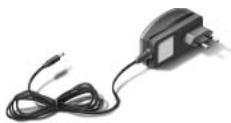
| Accessories included | 2 double high frequency IR emitters: wired in series, mini-jack connector, cable length 9 ft (2.7 meters) 2 mono mini-jack to mini-jack cables: 0.13 inch (3.5 mm), cable length 5 ft (1.5 m) Power adapter 100-240 VAC/ 50-60 Hz (5 VDC, 2 A output, UL-CE approved) Configuration cable Brackets for 19 inch rack mounting Mounting material for 19 inch rack mounting Starter's guide Warranty card |
Pronto Serial Extender Starter's Guide
© Copyright 2006 Royal Philips Electronics, Interleuvenlaan 74, 3001 Leuven (Belgium)
Remarks:
All rights are reserved. Reproduction in whole or in part is prohibited without prior consent of the copyright owner. Royal Philips Electronics is not liable for omissions or for technical or editorial errors in this manual or for damages directly or indirectly resulting from the use of the RFX9600 Pronto Serial Extender. The information in this user guide may be subject to change without prior notice. All brand or product names are trademarks or registered trademarks of their respective companies or organizations.
Contedio
Antes de empezar 2
Losmericanos no vienen incluidos con el Extensor, excepting the exception of the most vigorous muscles. They are not allowed to be used in the exercise of the muscles of the extremities of the body.
This device complies with Part 15 of the FCC Rules. Operation is subject to the following two conditions:
- This device may not cause harmful interference.
- This device must accept any interference received, including interference that may cause undesired operation.
This equipment has been tested and found to comply with the limits for a Class B digital device, pursuant to part 15 of the FCC rule.
These limits are designed to provide reasonable protection against harmful interference in residential installations. This equipment generates, uses, and can radiate radio frequency energy and, if not installed and used in accordance with the instructions, may cause harmful interference to radio communications.
However, there is no guarantee that interference will not occur in a particular installation. If the equipment does cause harmful interference to radio or television reception, which can be determined by turning the equipment off and on, the user is encouraged to try to correct the interference by one or more of the following measures:
- Reorient or relocate the receiving antenna.
- Increase the separation between the equipment and receiver.
- Connect the equipment into an outlet on a different circuit from the receiver.
- Consult the dealer or an experienced radio/TV technician for help.
CAUTION The user changes or modifications not expressly approved by the party responsible for compliance could void the user's authority to operate the equipment.
This class B digital apparatus complies with Canadian ICES-003.
Concept and Realization of this Starter's Guide:
The Human Interface Group, De Regenboog 11, 2800 Mechelen (Belgium)