
Avance Collection HR1899 - Food Processor PHILIPS - Free user manual and instructions
Find the device manual for free Avance Collection HR1899 PHILIPS in PDF.

| Product type | Low-speed juicer |
| Brand | Philips |
| Model | Avance Collection HR1899 |
| Use | Household use only |
| Power | Polarized plug, appropriate mains voltage |
| Main function | Extraction of juice from fresh fruits and vegetables |
| Included filters | Two-piece black filter (clear juice), two-piece gray filter (fiber-rich juice) |
| Maximum continuous use time | 30 minutes |
| Juice carafe | Included (models HR1897/HR1895) |
| Safety | Integrated safety lock (locking arm and safety pins) |
| Anti-drip spout | Yes |
| Cleaning | Removable parts dishwasher safe |
| Warranty | 1 year limited |
| Customer service (USA/Canada) | 1 866 309-8817 |
| Country of origin | Not specified in the manual |
Frequently Asked Questions - Avance Collection HR1899 PHILIPS
User questions about Avance Collection HR1899 PHILIPS
0 question about this device. Answer the ones you know or ask your own.
Ask a new question about this device
Download the instructions for your Food Processor in PDF format for free! Find your manual Avance Collection HR1899 - PHILIPS and take your electronic device back in hand. On this page are published all the documents necessary for the use of your device. Avance Collection HR1899 by PHILIPS.
USER MANUAL Avance Collection HR1899 PHILIPS
HR1899
HR1897
HR1896
HR1895
HR1894
natural_image
Black and white photo of a Philips brand cleaning brush unit (no text or symbols visible on the device body)PHILIPS
natural_image
Diagram of three open panels with grid patterns and curved arrows indicating rotation or movement (no text or symbols)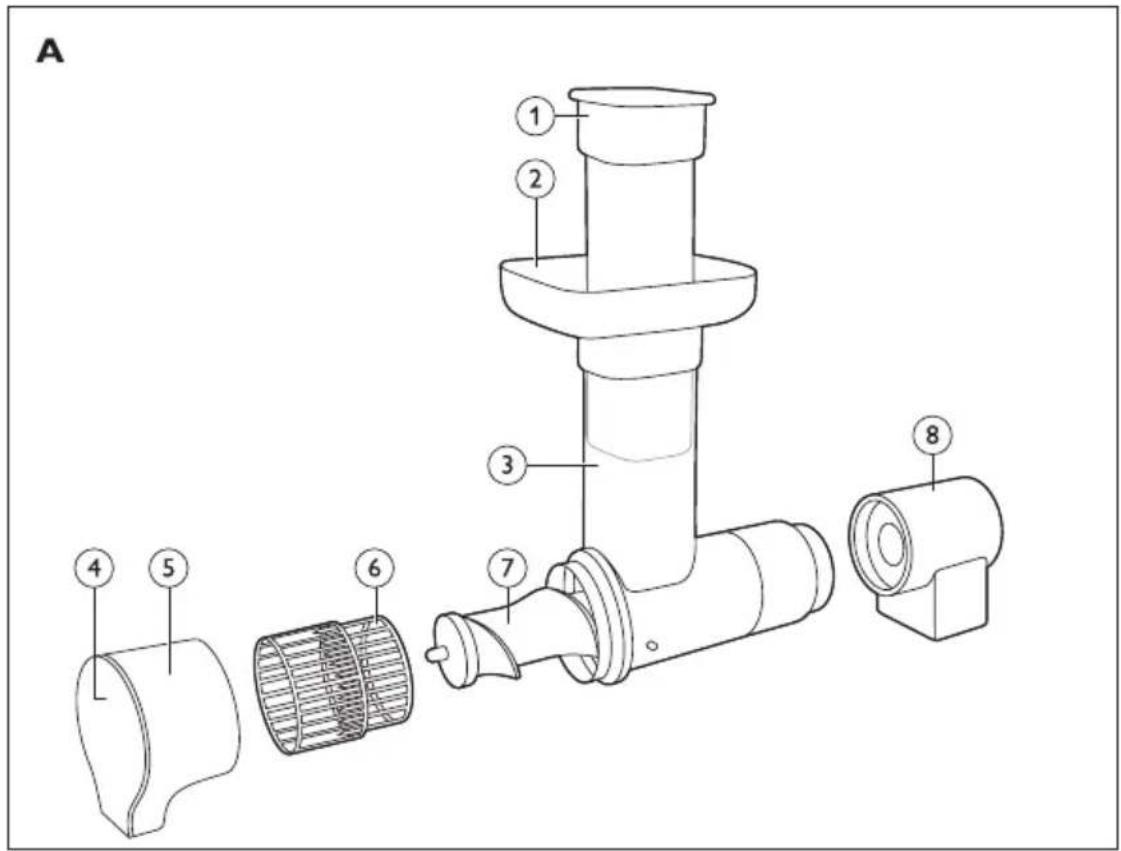
ENGLISH 6
ESPAÑOL 12
FRANÇAIS (CANADA) 19
Important safeguards
When using electrical appliances, basic safety precautions should always be followed including the following:
1 Read all instructions before using the appliance and save it for future reference.
2 To protect against risk of electrical shock, do not put or immerse the motor unit, power cord, or plug in water or any other liquid. Do not rinse it under the tap and do not clean it in the dishwasher.
3 Check if the voltage indicated on the base of the appliance corresponds to the local electrical voltage before you connect the appliance.
4 Do not use the appliance if the plug, power cord or other parts are damaged or after the appliance malfunctions or is dropped or damaged. For assistance in the U.S. or Canada only call 1-866-309-8817.
5 This appliance is intended for household use only. Do not use this appliance for anything other than its intended use as described in this manual.
6 Close supervision is necessary when the appliance is used by, on, or near children or invalids.
7 Children should be supervised by a responsible person to ensure they do not play with the appliance.
8 Do not let the power cord hang over the edge of a table or counter, or touch hot surfaces.
9 Do not place the appliance or power cord near a hot surface, gas or electric burner, or in a heated oven.
10 Always unwind the power cord completely before you switch on the appliance.
11 Never reach into or push food into the feeding tube with your fingers or other utensils or objects. Only use the food pusher provided for this purpose. Do not place fingers or hand into the feeding tube when it is attached to the appliance. If food becomes stuck or lodged in feeding tube, use the food pusher provided or another piece of fruit or vegetable to push it down. Turn motor off, unplug and ensure all moving parts have stopped before disassembling appliance to remove food.
12 Keep hands, fingers, hair, scarves, clothing and utensils away from the appliance while using.
13 Always ensure the appliance is turned off after each use. Always unplug the appliance from the electrical outlet when not in use, before putting on or taking off parts, and before cleaning or attempting to move the appliance.
14 Always unwind the power cord completely before you switch on the appliance.
15 Never leave the appliance unattended while in use.
16 The use of attachments not recommended or sold by the appliance manufacturer may cause fire, electric shock or injury.
17 Always place the appliance on a stable, level and horizontal surface.
18 Do not use the appliance outdoors or in moving vehicles or boats. Misuse may cause injury.
19 Avoid contact with moving parts.
20 Make sure all parts are assembled properly before you switch on the appliance. Do not disassemble while appliance is operating.
21 This appliance has a polarized plug (one blade is wider than the other). To reduce the risk of electric shock, this plug is intended to fit into a polarized outlet only one way. If the plug does not fit fully in the outlet, reverse the plug. If it still does not fit, contact a qualified electrician. Do not attempt to modify the plug in any way.
22 Extension cords may be used if care is exercised in their use. If an extension cord is used: The marked electrical rating of the cord must be as great as the rating of the appliance. sThe cord should be arranged so that it will not drape over the edge of the counter or table top where it could be pulled by children or tripped over unintentionally. If the appliance is of grounded type, the extension cord should be a grounded-type 3-wire cord.
23 Only use the appliance when the locking clamp is in locked position.
24 Only unlock the locking clamp after you have switched off the appliance and the juicing screw has stopped rotating.
25 Do not use the appliance without the pulp container properly attached to the appliance. Do not remove the pulp container when the appliance is operating.
26 Cut large ingredients into pieces that fit into the feeding tube. Remove pits, stones, cores, seeds and thick peels from fruits or vegetables before juicing.
27 Do not exert too much pressure on the pusher to avoid damage.
28 Food pulp and juice color can discolor parts. This is normal and has no impact on the performance of the appliance.
29 To optimize the lifetime of the appliance, do not use it continuously for more than 30 minutes.
SAVE THESE
INSTRUCTIONS
IMPORTANT
1 Vibration may occur while operating appliance which is normal. Ensure the appliance is always operated on a stable, flat surface.
2 If a significant amount of juice or fluid spills onto, around or under the appliance while operating, turn the appliance off, unplug from outlet. Then clean and dry the appliance before continuing to use.
3 This appliance is intended to juice fresh or canned fruits and vegetables. Do not use with frozen fruit or vegetables. Hard fruits and vegetables should not be used.
4 Citrus fruits and bananas should have their rinds or skin removed before juicing.
5 Do not juice stone fruit unless the stones or pits have been removed first.
Built-in safety lock
The appliance is equipped with a built-in safety lock. The two safety pins on the motor unit ensure that you can only switch on the appliance if you have placed the juicing unit and the pulp container on the motor unit correctly.
Introduction
Congratulations on your purchase and welcome to Philips! To fully benefit from the support that Philips offers, register your product at www.philips.com/welcome.
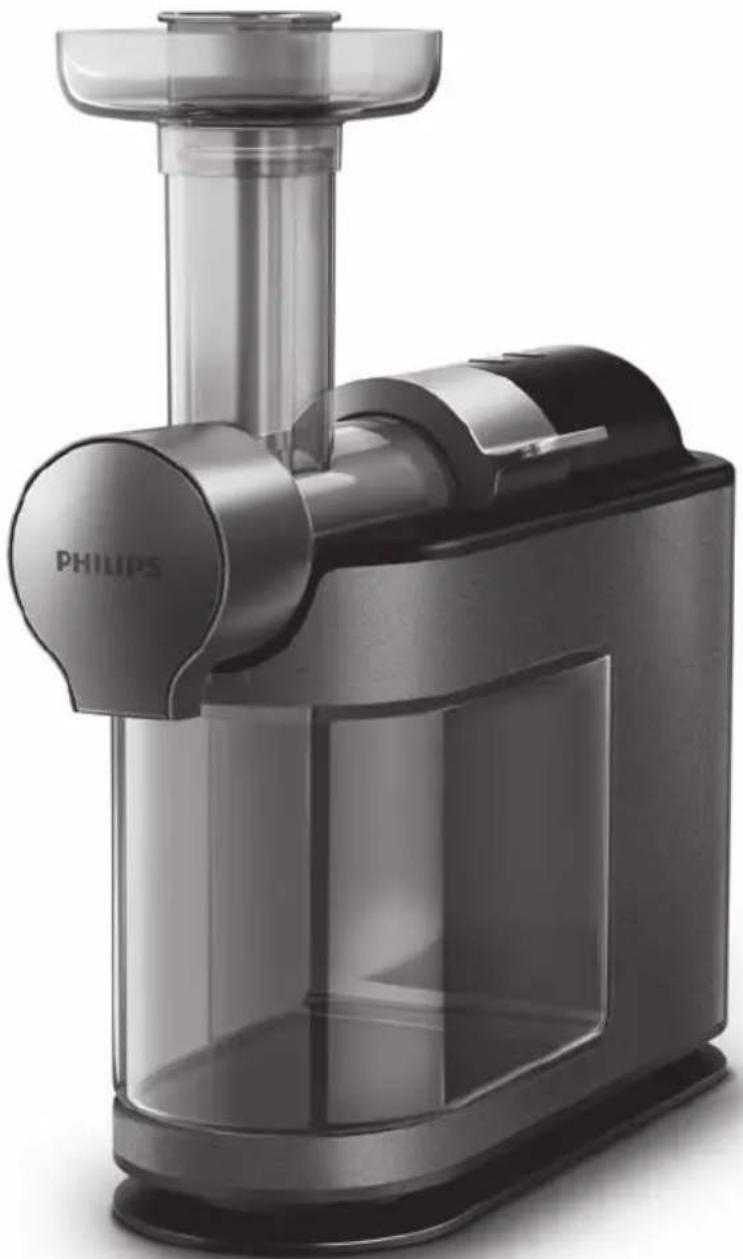
This Philips Avance slow juicer helps you get all the goodness of fruits and vegetables into your glass, so you can enjoy tasty and healthy juices every day. Its innovative technology allows you to extract the maximum amount of juice from fruits and vegetables and to quickly clean the appliance in less than 1 minute. The fully integrated design was developed to take up little space and give you great results.
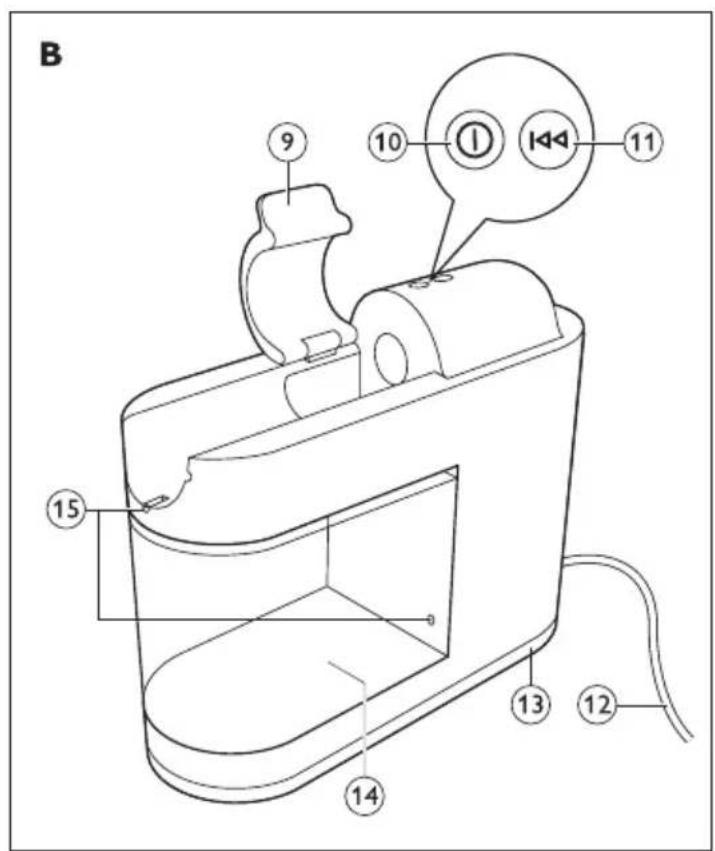
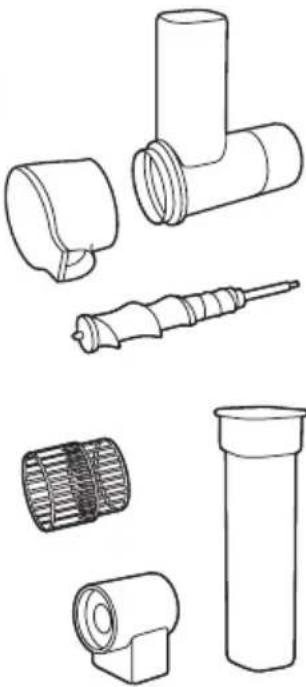
General description (Fig. 1)
A Juicing unit
- 1 Pusher
- 2 Berry tray
- 3 Feeding tube
- 4 Drip stop
- 5 Spout
- 6 Black two-part filter for clear juice
- 7 Juicing screw
- 8 Pulp outlet
ENGLISH8
B Motor unit
- 9 Locking clamp
- 10 On/off button with power-on light
- 11 Reverse/Pre-clean button
- 12 Power cord
- 13 Cord storage wrap
- 14 Pulp container
- 15 Safety pins
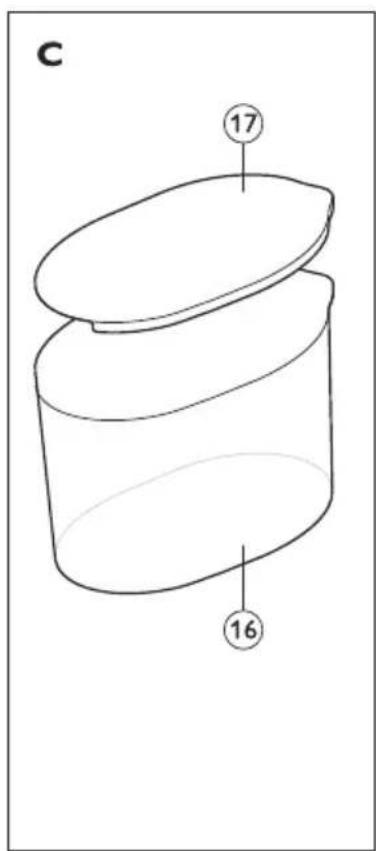
C Jug (HR1897/HR1895 only)
- 16 Juice jug
- 17 Lid of juice jug
Not shown: grey two-part filter for fiber juice (HR1897 only)
Before first use
Thoroughly clean all parts before you use the appliance for the first time (see chapter 'Cleaning').
Note: Make sure all parts are completely dry before you start using the appliance.
Preparing for use
Assembling the juicing unit
Always unwind the power cord completely before you switch on the appliance.
1 Remove all packing material or labels before using.
2 Attach the pulp outlet to the juicing unit and turn it clockwise until the arrow (◀) points to the 'locked' indication. (Fig. 2)
3 Insert the juicing screw into the juicing unit (Fig. 3).
4 Assemble the two parts of the filter (Fig. 4).
5 Place the two-part filter over the juicing screw (Fig. 5).
Tip: Use the black two-part filter for clear juice. If you prefer cloudy juice with more fiber in it, use the grey two-part filter.
6 Attach the spout to the juicing unit and turn it clockwise until the arrow (◀) points to the 'locked' indication. (Fig. 6)
7 Place the berry tray on the feeding tube (Fig. 7).
Placing the juicing unit onto the motor unit
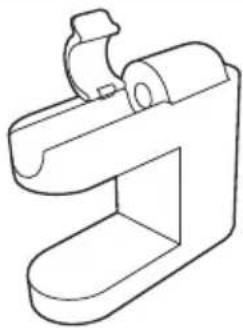
1 Place the assembled juicing unit onto the motor unit, with the pulp outlet fitting into the opening on the motor unit (Fig. 8).
2 Align the projections on the juicing unit with the recesses in the motor unit. Slide the juicing unit onto the motor unit until it locks into place. (Fig. 9)
3 Press the juicing unit onto the motor unit (1) and then close the locking clamp (2). (Fig. 10)
Note: If the locking clamp cannot be closed, check if the juicing unit is positioned properly with the projections on the juicing unit into the recesses of the motor unit.
4 Slide the pulp container into the motor unit (Fig. 11).
Using the appliance
Use this appliance for its intended household use as described in this manual.
1 Wash the fruit and/or vegetables. If necessary, cut them into pieces that fit into the feeding tube.
2 Place a jug or a glass under the spout (Fig. 12).
3 Press the on/off button to switch on the appliance (Fig. 13).
Note: The appliance only functions if the juicing unit and the pulp outlet are assembled correctly and the locking clamp is locked properly.
4 Put the pieces of fruit or vegetables in the feeding tube and gently press them down towards the juicing screw with the pusher (Fig. 14).
Never insert your fingers or any other object into the feeding tube or juicing unit.
5 When the juice flow has stopped, switch off the appliance and wait until the juicing screw has stopped rotating.
6 Press the pre-clean button to remove the last drops of juice from the juicing unit (Fig. 15).
7 Press the drip stop when finished (Fig. 16).
Note: The drip stop will prevent juice from dripping onto the table after you remove the jug or glass.
Tips
- Use fresh fruit and vegetables, as they contain more juice. Pineapples, beetroots, celery stalks, apples, cucumbers, carrots, spinach, melons, tomatoes, pomegranates and grapes are particularly suitable for processing in the juicer.
- You do not have to remove thin peels or skins. Only peel skins or rinds you should not eat such as oranges, pineapples, kiwis, melons, bananas, uncooked beetroots, etc.
- If you want to juice fruits with pits, such as peaches, plums or cherries, remove the pits before juicing.
- When you prepare apple juice, remember that the thickness of the juice depends on the kind of apple you use. The juicier the apple, the thinner the juice. Choose a kind of apple that produces the type of juice you prefer.
- Apple juice turns brown very quickly. To slow down this process, add a few drops of lemon juice.
- You can also juice starchy fruits such as bananas and mangoes. You can add milk or water directly through the feeding tube.
- Citrus fruits can also be processed with the juicer. Always remove the white pith from citrus fruit s before juicing to avoid a bitter taste.
Cleaning (Fig. 17)
- Refer to the cleaning chart to see how all parts can be cleaned.
Never use scouring pads, abrasive cleaning agents or aggressive liquids such as alcohol, gasoline or acetone to clean the appliance.
Never immerse the appliance motor unit in water or any other liquid, or rinse under the tap.
Note: All detachable parts are dishwasher-safe and can be safely cleaned under the tap.
1 Switch off the appliance and remove the plug from the wall outlet.
2 Open the locking clamp (Fig. 18).
3 Slide the juicing unit off the motor unit (Fig. 19).
4 Remove the pulp container from the motor unit (Fig. 20).
5 Empty the pulp container and rinse it under the tap.
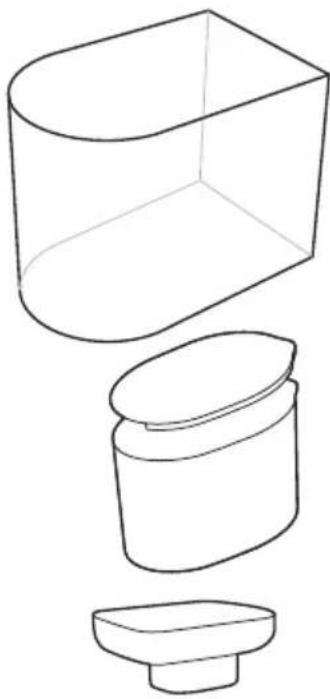
Disassembling and cleaning the juicing unit
1 Remove the pusher from the feeding tube (Fig. 21).
2 Remove the berry tray from the feeding tube (Fig. 22).
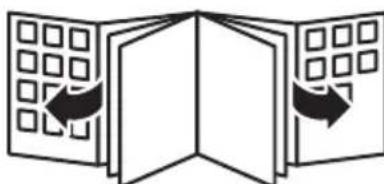
3 Turn the juice collector counterclockwise until the arrow (◀) points to the 'open' indication and remove it from the juicing unit. (Fig. 23)
4 Remove the two-part filter and disassemble it (Fig. 24).
5 Remove the juicing screw (Fig. 25).
6 Turn the pulp outlet counterclockwise until the arrow (◀) points to the 'open' indication and remove it from the juicing unit. (Fig. 26)
7 Rinse all parts under the tap or are also dishwasher-safe. Allow all parts to dry thoroughly before reassembling the juicer.
This appliance has no other user-serviceable parts. For assistance call 1-866-309-8817.
Storage
1 Wind the power cord around the cord storage wrap in the base of the motor unit (Fig. 27).
2 You can store the pusher, the juice jug and lid, and the berry tray in the pulp container (Fig. 28).
Disposal
- For disposal or recycling information, please contact your local authorities or visit www.recycle.philips.com (Fig. 29)
Accessories
Philips accessories may be purchased at a store near you or on our website: www.philips.com/store.
Troubleshooting
This chapter summarises the most common problems you could encounter with the appliance. If you are unable to solve the problem with the information below, visit www.philips.com/support for a list of frequently asked questions or contact the Consumer Care Centre in your country.
Problem Solution
| The appliance does not work. | The appliance is equipped with two safety pins. If either the juicing unit or the pulp container has not been placed on the motor unit properly, the appliance does not work. Check whether these parts have been assembled in the right way (see chapter ‘Preparing for use’), but switch off the appliance before you do so. |
| The motor unit gives off an unpleasant smell the first few times the appliance is used. | This is not unusual. If the appliance continues to give off this smell after a few times, check the quantities you are processing and the processing time. |
Problem Solution
| The juicing unit cannot be placed onto the motor unit. | Check if the spout is properly attached to the juicing unit. Make sure that the projections on the juicing unit are aligned with the recesses in the motor unit (see fig. 9). |
| The juicing unit is blocked. | Press the pre-clean button for a few seconds. If the juicing unit is still blocked, then switch off the appliance, remove the juicing unit and disassemble all parts. Remove the fruit that is blocking the juicing unit. Then process a smaller quantity. |
| HR1899/HR1897/HR1896: The power-on light flashes. | The juicing unit is blocked. Press the pre-clean button for a few seconds. If the juicing unit is still blocked, then switch off the appliance, remove the juicing unit and disassemble all parts. Remove the fruit that is blocking the juicing unit. Then process a smaller quantity. |
Warranty and support
If you need information, support, or if you have a problem, please visit www.philips.com/support or (in the US or Canada only) call 1-866-309-8817 for assistance.
One year limited warranty
Philips warrants that this product shall be free from defects in material, workmanship and assembly, under normal use, in accordance with the specifications and warnings, for a period of one year from the date of purchase. This warranty extends only to the original purchaser of the product, and is not transferable. To exercise your rights under this warranty, you must provide proof of purchase in the form of an original sales receipt that shows the product name and the date of purchase. For customer support or to obtain warranty service, please visit our website www.philips.com/support. THERE ARE NO OTHER EXPRESS OR IMPLIED WARRANTIES.
Philips' liability is limited to repair or, at its sole option, replacement of the product. Incidental, special and consequential damages are disclaimed where permitted by law. This warranty gives you specific legal rights.
You may also have other rights that vary from state to state, province to province or country to country.
In U.S. only
Manufactured for:
Philips Consumer Lifestyle,
A Division of Philips Electronics North America Corporation,
P.O. Box 10313, Stamford, CT 06904
In Canada only
Manufactured for:
Philips Electronics Ltd., 281 Hillmount Road, Markham, ON L6C 2S3
For support, please visit www.philips.com/support
PHILIPS and Philips Shield are Registered Trademarks of Koninklijke Philips N.V.
©2015 Philips Electronics North America Corporation. All Rights Reserved.
ETL logo
This symbol on the products nameplate means it is listed by Underwriters Laboratories Inc.
Philips Electronics Ltd., 281 Hillmount Road, Markham, ON L6C 2S3
Para obtener asistencia, visite www.philips.com/support
natural_image
Diagram of a device with rotating arrows indicating rotation (no text or symbols)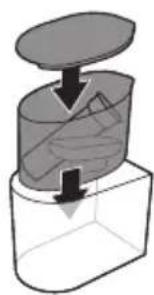
natural_image
Diagram of a mechanical or fluidic component with a downward arrow indicating flow or movement (no text or symbols present)
 |  | ||
 |  |  |  |
  |  |  |  |
natural_image
Diagram showing three open panels with grid patterns and curved arrows indicating rotation or movement (no text or symbols)


- Important safeguards
- SAVE THESE
- INSTRUCTIONS
- IMPORTANT
- Built-in safety lock
- Introduction
- General description (Fig. 1)
- ENGLISH8
- B Motor unit
- Before first use
- Preparing for use
- Assembling the juicing unit
- Placing the juicing unit onto the motor unit
- Using the appliance
- Tips
- Cleaning (Fig. 17)
- Disassembling and cleaning the juicing unit
- Storage
- Disposal
- Accessories
- Troubleshooting
- Warranty and support
- One year limited warranty
- In U.S. only
- In Canada only
- ETL logo
Brand : PHILIPS
Model : Avance Collection HR1899
Category : Food Processor