SLPMTR12BL - Trampoline SereneLife - Free user manual and instructions
Find the device manual for free SLPMTR12BL SereneLife in PDF.
| Product Type | Recreational Trampoline with Safety Enclosure |
| Brand | SereneLife |
| Model | SLPMTR12BL |
| Jumping Mat Diameter | 3.25 meters |
| Overall Dimensions (L x W x H) | 3.65 m x 3.65 m x 2.96 m |
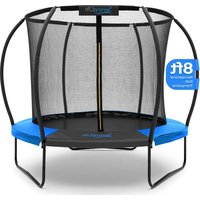
| Safety Net Height | 1.80 meters (70.9 inches) |
| Bed Height (ground to mat) | 0.90 meters |
| Item Weight | 62 kg |
| Maximum User Weight | 140 kg |
| Number of Springs | 72 Heavy-Duty Galvanized Springs |
| Frame Material | Galvanized Steel (inside and outside) |
| Jumping Mat Material | Reinforced Polypropylene (5000-hour UV tested) |
| Padding Material | Waterproof PVC + 15mm EPE foam |
| Safety Net Material | Polyethylene |
| Net Poles | 8 poles (including 1 with basketball hoop bracket) |
| Included Accessories | Ladder, basketball backboard with ball and pump, spring tool |
| Safety | Curved poles, 1.80m enclosure, frame padding, anti-fall design |
| Recommended Use | Outdoor, backyard, children ages 6 and up |
| Number of Simultaneous Users | 1 user only |
| Installation Surface | Stable and flat ground (grass, driveway) |
| Maintenance | Inspect regularly, replace worn parts, tighten bolts, protect from strong winds |
| Certification | Lab tested, compliant with safety standards |
| Warranty | Limited warranty (register at serenelifehome.com/register) |
Frequently Asked Questions - SLPMTR12BL SereneLife
User questions about SLPMTR12BL SereneLife
0 question about this device. Answer the ones you know or ask your own.
Ask a new question about this device
Download the instructions for your Trampoline in PDF format for free! Find your manual SLPMTR12BL - SereneLife and take your electronic device back in hand. On this page are published all the documents necessary for the use of your device. SLPMTR12BL by SereneLife.
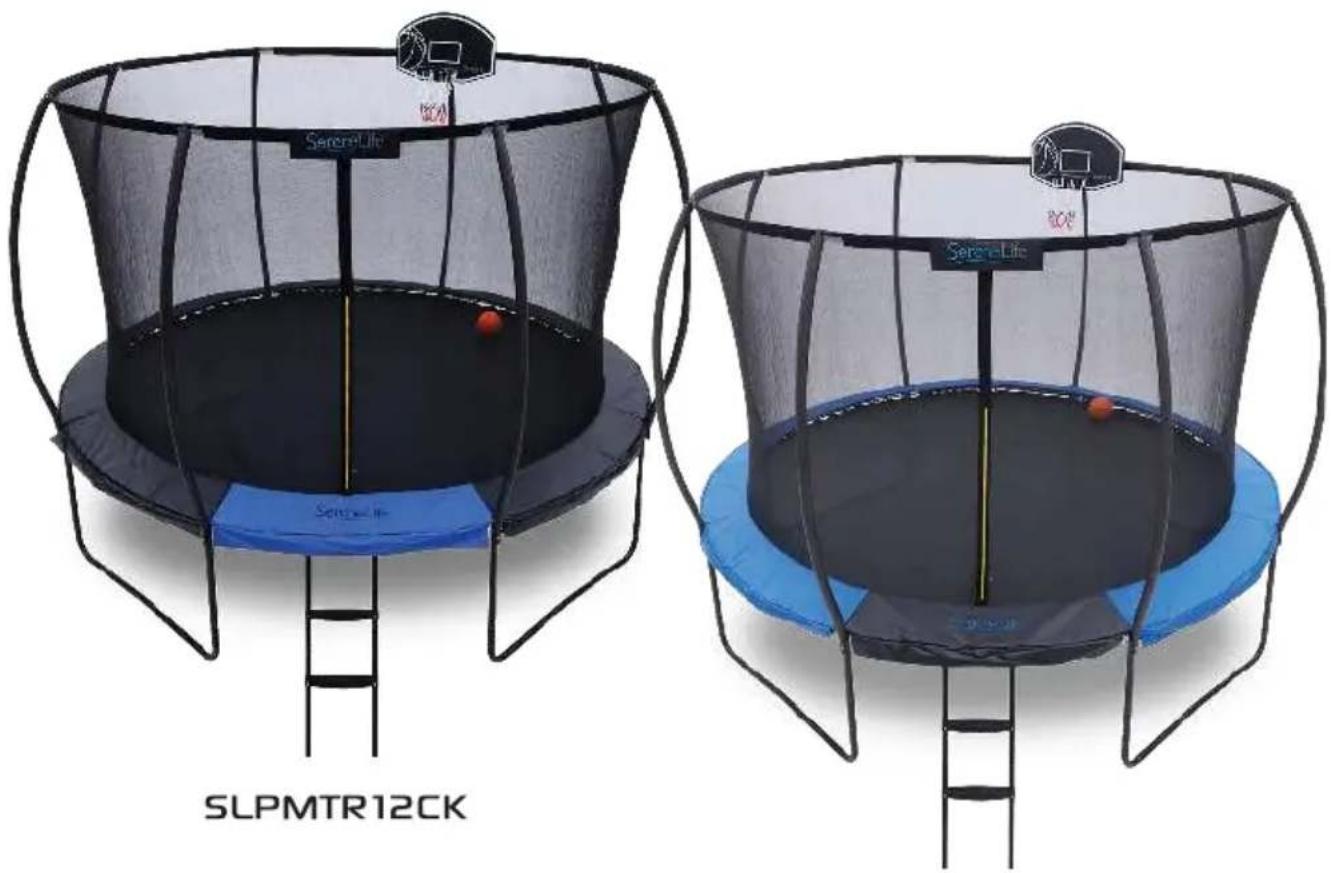
USER MANUAL SLPMTR12BL SereneLife
Recreational Trampoline
USERGUIDE
About SereneLife
SereneLife products are designed to create a more comfortable living space, indoors and out. Our team presents innovative lifestyle solutions throughout the year that promote simplicity and serenity.
We're committed to delivering the most dependable products so you can live a better, more serene life.
CONTENTS
FEATURES AND TECHNICAL SPECS 4
IMPORTANT INFORMATION 5
WARNING 5
ASSEMBLY PARTS: ACCESSORIES LIST 1 8
ASSEMBLY PARTS: ACCESSORIES LIST 2 9
ASSEMBLY INSTRUCTIONS 10
ASSEMBLY PARTS: ACCESSORIES LIST 3 18
ASSEMBLY PARTS: ACCESSORIES LIST 4 19
ASSEMBLYINSTRUCTIONS 20
FUNDAMENTAL SKILLS 23
25
California Prop 65 Warning
WARNING:
This product can expose you to chemicals, which is known to the state of California to cause cancer birth defects and other reproductive harm. Do not ingest.
For more info go to: www.P65 warnings.ca.gov
Features:
- Safe Space Between Net and Curved Poles
- Curved Poles Design to Prevent Injuries and Accidents
- 70.9" Tall Protective Safety Net Enclosure System
- 5000 Hours UV-Tested Reinforced Bouncy Jumping Mat
- Improve Elasticity with 72pcs Heavy Duty Galvanized Springs
Large and Wide-Diameter Jumping Surface - Design with a New No-gap Black Ropes to Isolate Springs from User's Feet
- Waterproof PVC Padding Cover with 0.59'' -inches Thickness of EPE Foam to Provide Extra Protection
- Galvanized Inside-out Frame Helps Trampolines Last
- Anti-Corrosion Resistant Legs
- Family Fun Recommended, Perfect for Kids, Children, Teens & Young Adults
- Suitable for Kids for Exercising Activities, Helping them to prevent Insufficient Exercise and addiction to TV or Phone Games
- Backyard Home Sports Trampoline Style
- Stable Platform Base for Driveway and Grass Placement
Lab-tested and Safety Certified
Technical Specs:
- Construction Material: Heavy Duty Galvanized Steel (Inside-out)
- Trampoline Style: Outdoor, Backyard, Pumpkin-shaped, Inner Enclosure
- Jumping Mat Material: Reinforced Polypropylene
- Padding Cover: Polyvinyl Chloride + 15mm EPE Foam + Polyethylene
- Safety Net: Polyethylene
Spring Quantity: 72pcs. - Spring Steel Quantity: 8 pcs.
- Trampoline Leg Quantity: 4 pcs.
- Safety Net Height: 5.91 feet
- Trampoline Height (from Floor to Trampoline Bed): 35.4" -inches
- Jumping Mat Diameter Size: 128.1" -inches
Maximum User Weight: Up to 308 lbs. - Item Weight: 136.9 lbs.
- Total Assessed Trampoline Size (L x W x H): 144" x 144" x 116.5" - inches
- Basketball Backboard Size: 28.3^ × 18.1^ × 0.8^ -inches
- Rubber Basketball Diameter: 7.1" - inches
- Ladder Step Size: 10.8'' × 2.8'' -inches
IMPORTANT INFORMATION
Prior to using the trampoline, you must read all the instructions contained in this manual. All information, including the warnings, instructions for care, maintenance, and use of the trampoline, is intended to promote safe, enjoyable use of the trampoline.

WARNING - GENERAL
- Overhead clearance is essential. A minimum of 24 feet of overhead clearance from ground level is required.
- Provide clearance for wires, tree limbs, and other possible hazards.
- Lateral clearance is essential. Place the trampoline away from walls, fences, structures, and other play areas.
- Maintain a clear space on all sides of the trampoline.
- Place the trampoline on a stable, level surface before use.
- The area under the trampoline surface should be free and clear of any objects or obstructions.
- Use the trampoline in a well-lit area. Artificial illumination may be required for indoor or shady areas.
- Secure the trampoline against unauthorized and unsupervised use.
- Remove any obstructions from beneath the trampoline.
- The owner and supervisors of the trampoline are responsible for ensuring all users are aware of the practices specified in the use instructions.
- This product is not intended for use by children under 6 years of age. Restrict usage to one person at any time.
Maximum User Weight: 308 lbs. - Prior to each use, inspect the trampoline for any worn, defective, misadjusted, or missing parts.
- Ensure the frame padding is correctly and securely positioned.

WARNING - USAGE
- DO NOT attempt or allow somersaults. Landing on the head or neck can cause serious injury, paralysis, or death, even when landing in the middle of the bed.
- Do not allow more than one person on the trampoline.
Use by more than one person at the same time can result in serious injury.
- Use the trampoline only with mature, knowledgeable supervision at all times.
- Inspect the trampoline before each use.
Make sure the frame padding is correctly and securely positioned.
-
Replace any worn, defective, or missing parts.
-
Climb on and off the trampoline. It is a dangerous practice to jump from the trampoline to the floor or ground when dismounting, or to jump onto the trampoline when mounting. Do not use the trampoline as a springboard to other objects.
- Stop bounce by flexing knees as feet come in contact with the trampoline bed. Learn this skill before attempting others.
- Learn fundamental bounces and body positions thoroughly before trying more advanced skills. A variety of trampoline activities can be carried out by performing the base fundamentals in various series and combinations, performing one fundamental after another, with or without feet bounces between them.
- Avoid bouncing too high. Stay low until bounce control and repeated landing in the center of the trampoline can be accomplished. Control is more important than height.
- While keeping the head erect, focus eyes on the trampoline toward the perimeter. This will help control bounce.
- Avoid bouncing when tired. Keep turns short.
- Properly secure the trampoline when not in use. Protect it against unauthorized use.
- Keep objects away that could interfere with the performer. Maintain a clear area around the trampoline.
- For information concerning skill training, contact a certified trampoline instructor.
- Bounce only when the surface of the bed is dry. Wind or air movement should be calm to gentle.
- The trampoline must not be used in gusty or severe winds.
- Read all instructions before using the trampoline.Warnings and instructions for the care, maintenance, and use of this trampoline are included to promote safe, enjoyable use of the equipment.
- Remove any sharp or loose objects from pockets or on your body prior to use, including items such as glasses, watches, jewelry, chains, ornaments, clasps, and other sharp objects.
- Ensure the trampoline and surrounding areas are properly illuminated.
- Do not put any objects on, under, or around the trampoline.
- Shoes should not be worn while jumping on the trampoline.
- Jumpers should be barefoot or wearing socks or gymnastics shoes.
- Serious injury can occur from misuse or abuse of the trampoline. Bounce in the center of the bed.
CARE, MAINTENANCE, AND USE INSTRUCTIONS MUST BE READ CAREFULLY PRIOR TO USING THE TRAMPOLINE!
This trampoline is constructed of high-quality materials and craftsmanship. For years of exercise, fun, and enjoyment, and to reduce the risk of injury to the user, follow all required care and maintenance instructions closely listed below:
- Only one jumper should use the trampoline at any time.
- Do not allow pets on the trampoline to help prevent cuts, scrapes, tears, or other types of damage to the mat or pad.
- Inspect the trampoline before each use and replace any worn, defective, or missing parts. Any number of issues can raise the risk of injury.
-
The following conditions could represent potential hazards:
-
Missing, improperly positioned, or insecurely attached frame padding
- Punctures, frays, tears, or holes worn in the bed or frame padding
- Deterioration in the stitching or fabric of the bed or frame padding
- Ruptured springs
- Absent or broken frame
- A sagging mat
- Sharp protrusions on the frame or suspension system
IF ANY OF THE PREVIOUS CONDITIONS ARE FOUND, OR ANY OTHER ISSUES YOU FEEL MAY BE HARMFUL TO THE USER, THE TRAMPOLINE SHOULD BE IMMEDIATELY DISASSEMBLED OR SECURED FROM ANY FUTURE USE UNTIL THE ISSUE(S) HAVE BEEN RESOLVED.
You must check all the parts of the trampoline, including the frame, suspension system, mat, pad, and enclosure at regular intervals. If these checks are not carried out, the trampoline could become dangerous. It is of particular importance that these be followed at the beginning of each season, as well as at regular intervals during the usage season.
- Check all nuts and bolts for tightness and tighten as required.
- Check all coverings for bolts and sharp edges and replace when necessary.
- Check for evidence of wear and tear or deterioration and damage.
Replace any parts as needed.
HIGH WIND ADVISORY
Please keep in mind, this trampoline can be blown around by high winds. During times of high winds, the trampoline should be moved indoors to a sheltered location.
ASSEMBLY PARTS
ACCESSORIES LIST 1
- This object is subject to wear and tear. No warranties, whether expressed or implied, are provided.
- Injury will likely occur with the use of a trampoline or any associated product.
- Use with supervision. Use at your own risk.
- Only use in a well-lit, well-secured down area.
Please reference this list of parts for the assembly of the trampoline. Prior to constructing, make sure all parts listed here are accounted for.
| NO. | Part Name | Illustration Quantity | |
| A | Large Top Rail | 4 | |
| B | Small Top Rail | 4 | |
| C | Vertical Leg | 8 | |
| D | W-Shaped Leg Base | 4 | |
| E1 | Upper Net Pole | 7 | |
| E2 | Upper Net Pole (Install basketball board) | 1 | |
| F | Lower Net Pole | 8 | |
| G | Spring | 72 | |
| H | Round Head Bolts | 8 | |
| I | Washer | 8 | |
| J | Nut | 8 | |
| K | M5 Cross Bolt | 16 | |
| L | M5 Nut | 16 |
ASSEMBLY PARTS ACCESSORIES LIST 2
| NO. | Part Name | Pictures Quantity | |
| M | Spring Steel Joint | 8 | |
| N | Safety Net Spring Steel | 8 | |
| O | Rope | 7 | |
| P | Spring Pad Cover | 1 | |
| Q | Jumping Mat | 1 | |
| R | Safety Net | 1 | |
| S | Spring Tool | 1 | |
| T | L-Shaped | 1 | |
| U | Spring Steel Socket Wrench | 1 | |
| V | Socket Wrench | 1 |
ASSEMBLY INSTRUCTIONS

It is highly recommended for two or more people to assemble the trampoline. This package contains small parts that are a choking hazard and may have sharp edges and points. Keep all parts away from children until fully assembled.
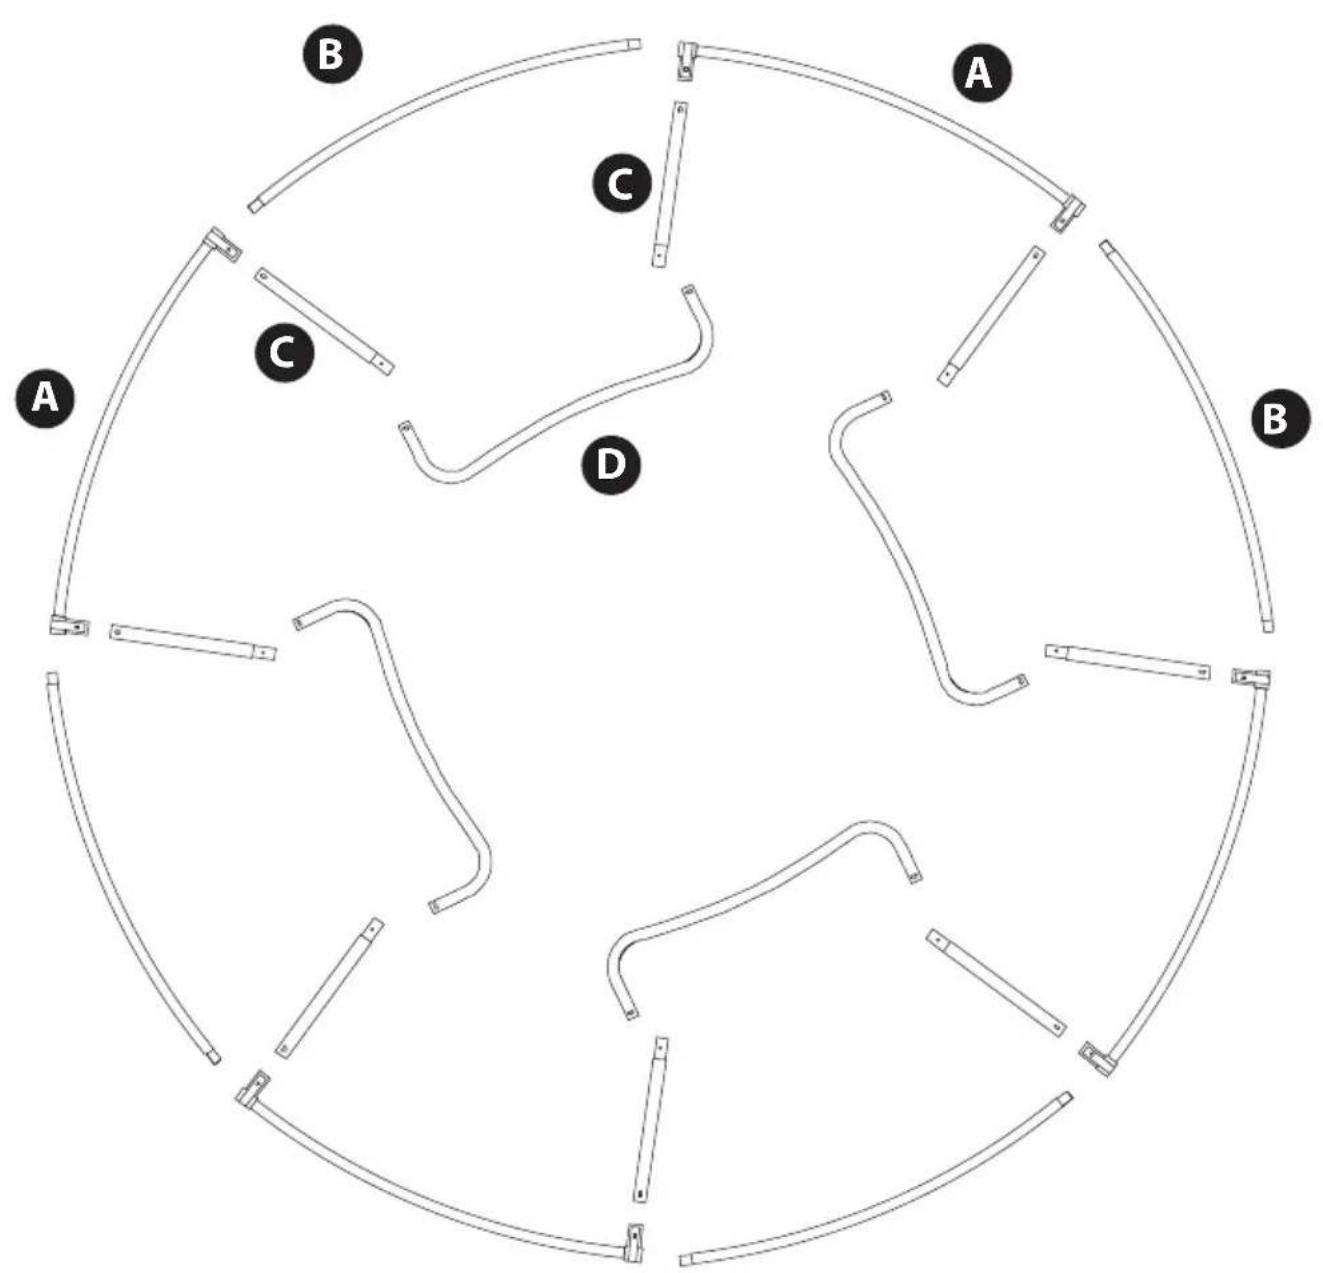
STEP1
Layout Parts A, B, C, & D as shown in the figure.
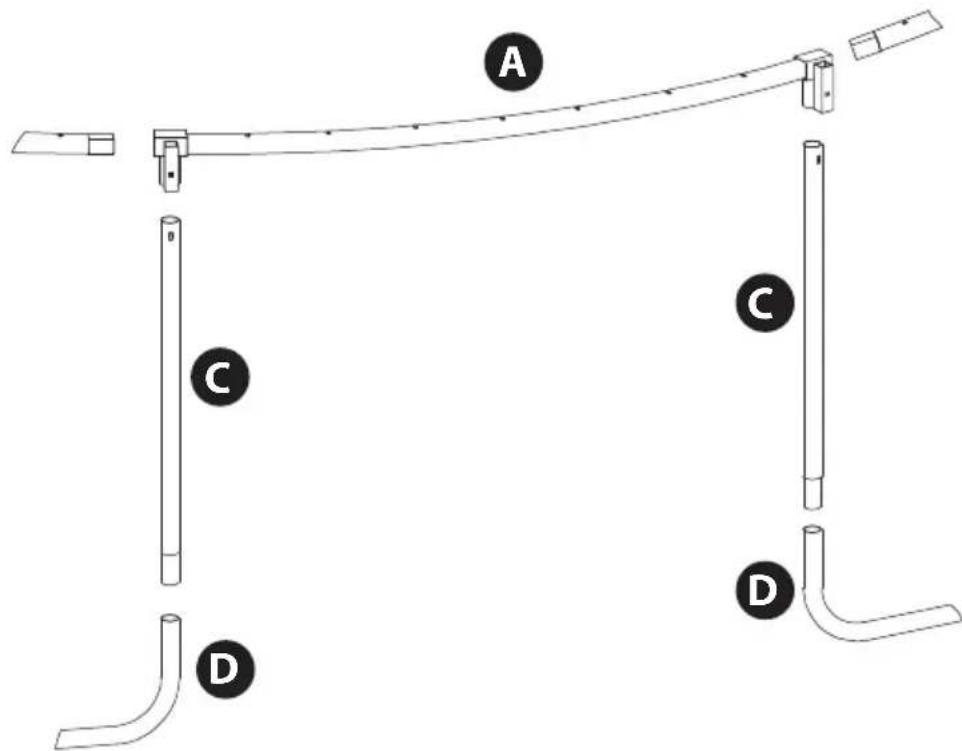
STEP2
Install Part C along with Part D to Part A as shown in the figure below.
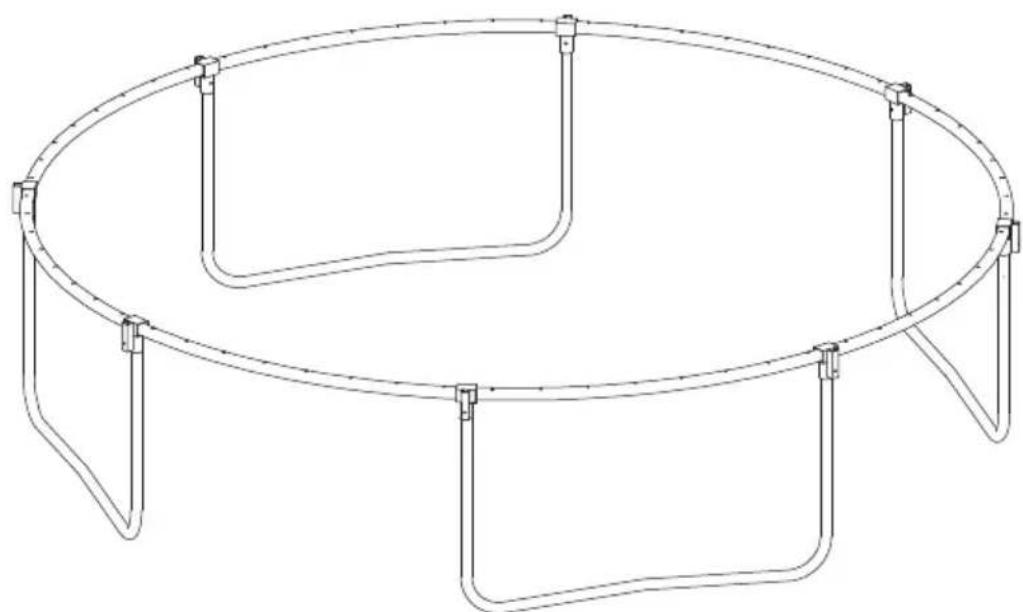
STEP3
Upon completion, it should look like the figure below.

WARNING
Do not lift or move the trampoline during installation!
Doing so may warp the frame, making the rest of the installation process difficult.
STEP4
Install Part G using Part S. Please follow the installation diagram to install springs properly to the frame of the trampoline.
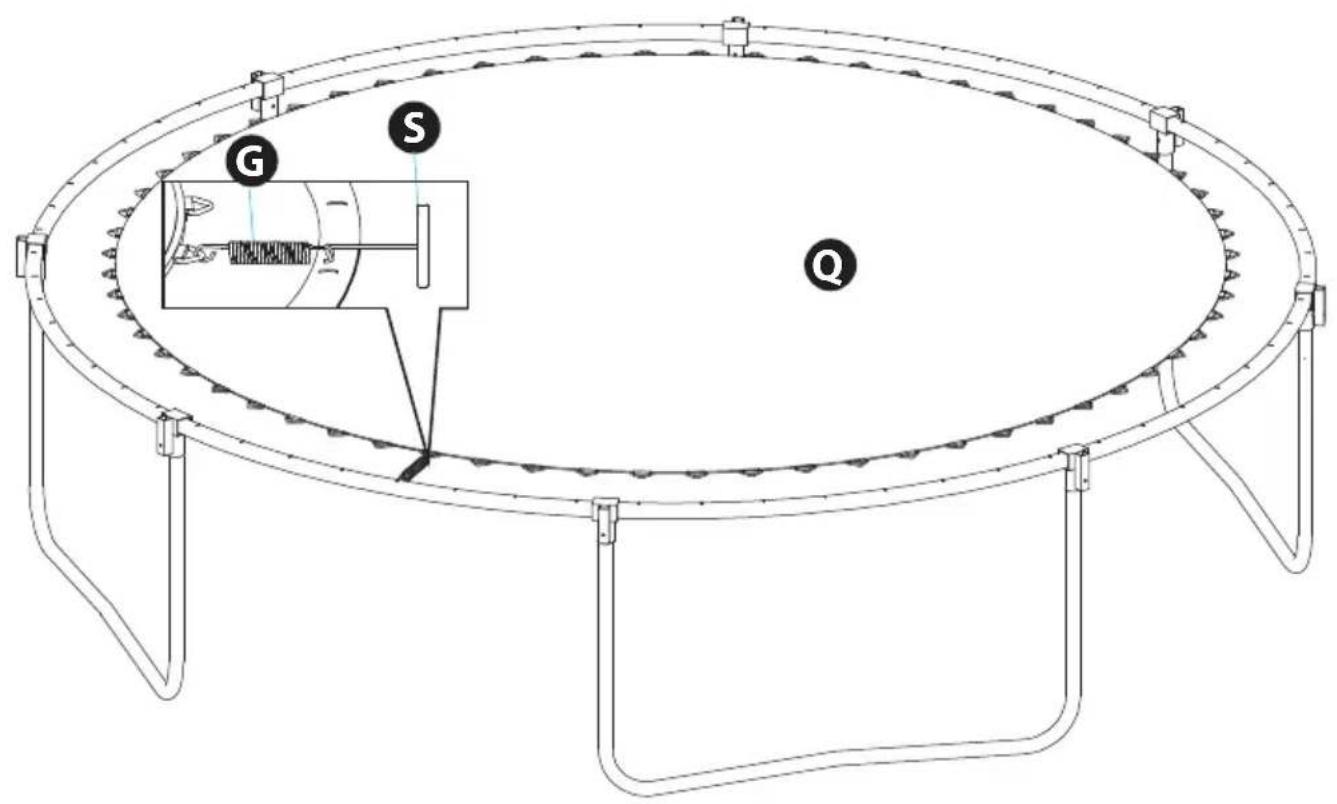
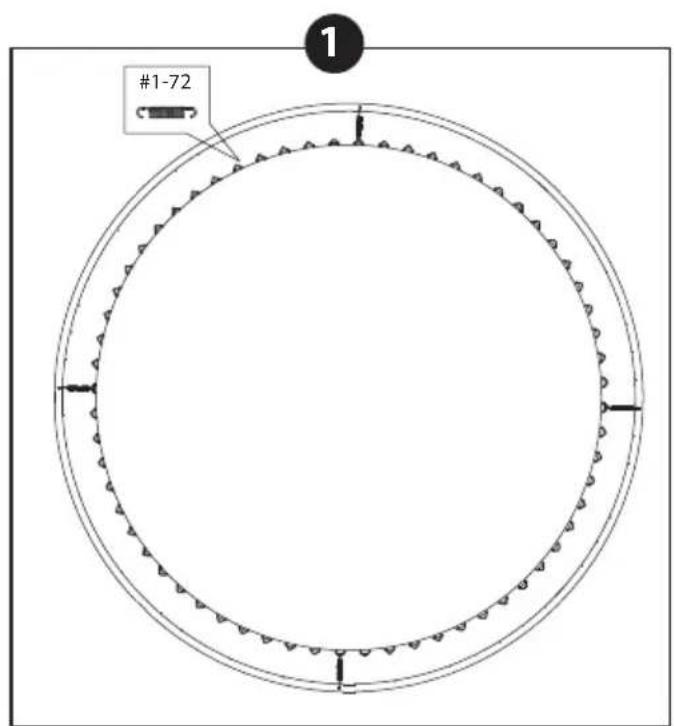
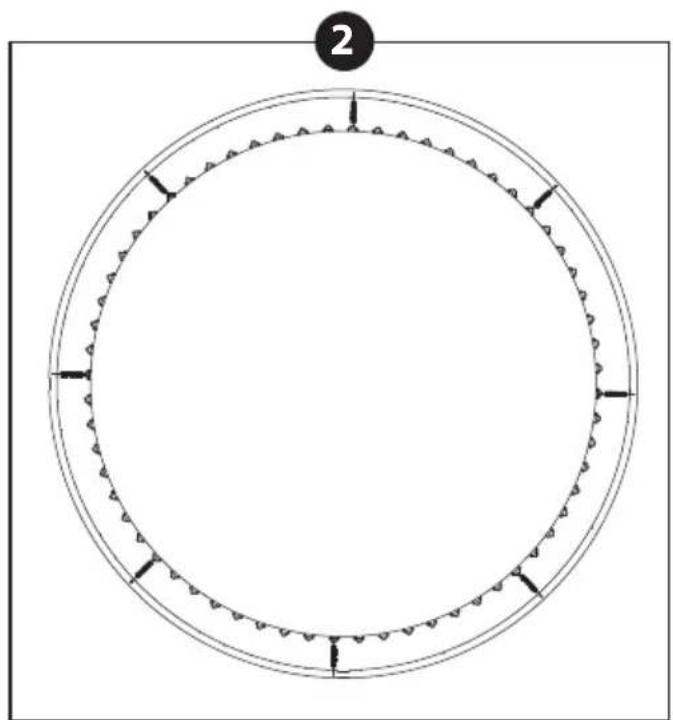
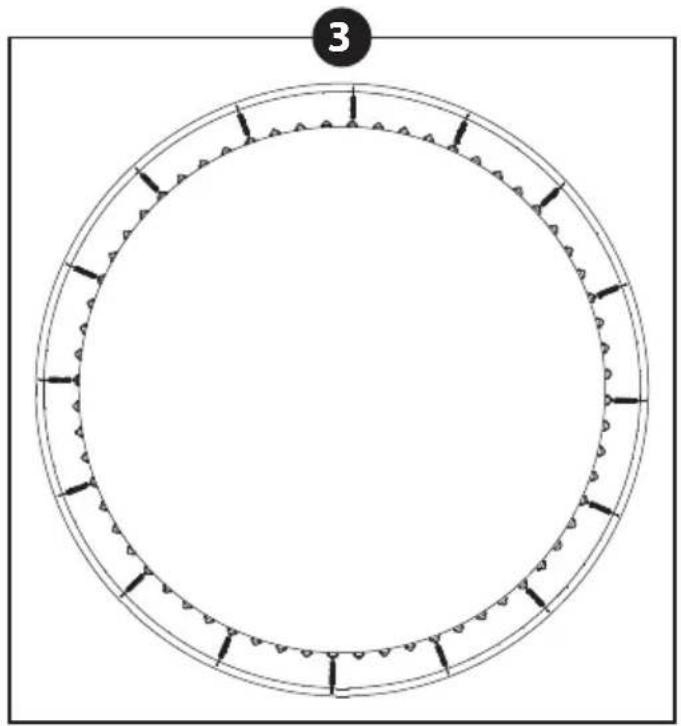
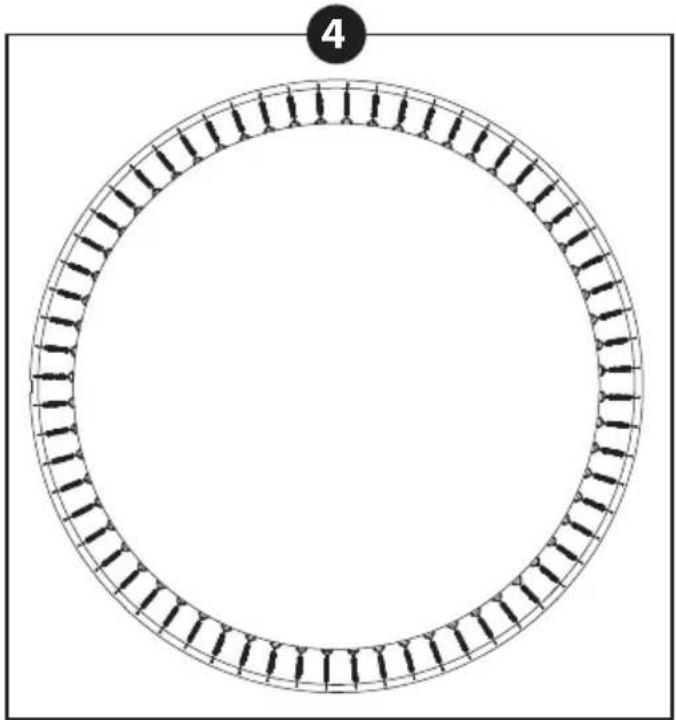
Complete installation drawing of spring

It is highly recommended for two or more people to assemble the trampoline. This package contains small parts that are a choking hazard and may have sharp edges and points. Keep all parts away from children until fully assembled.
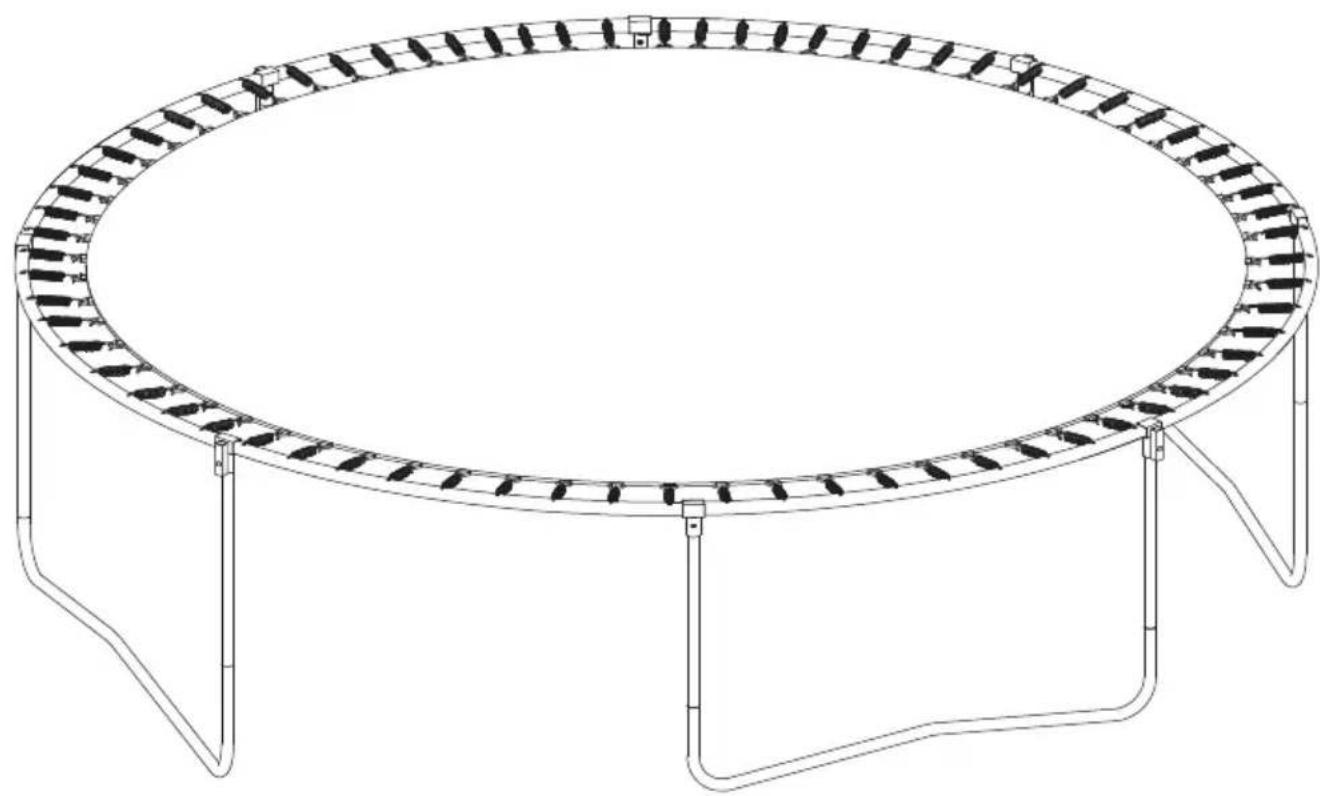
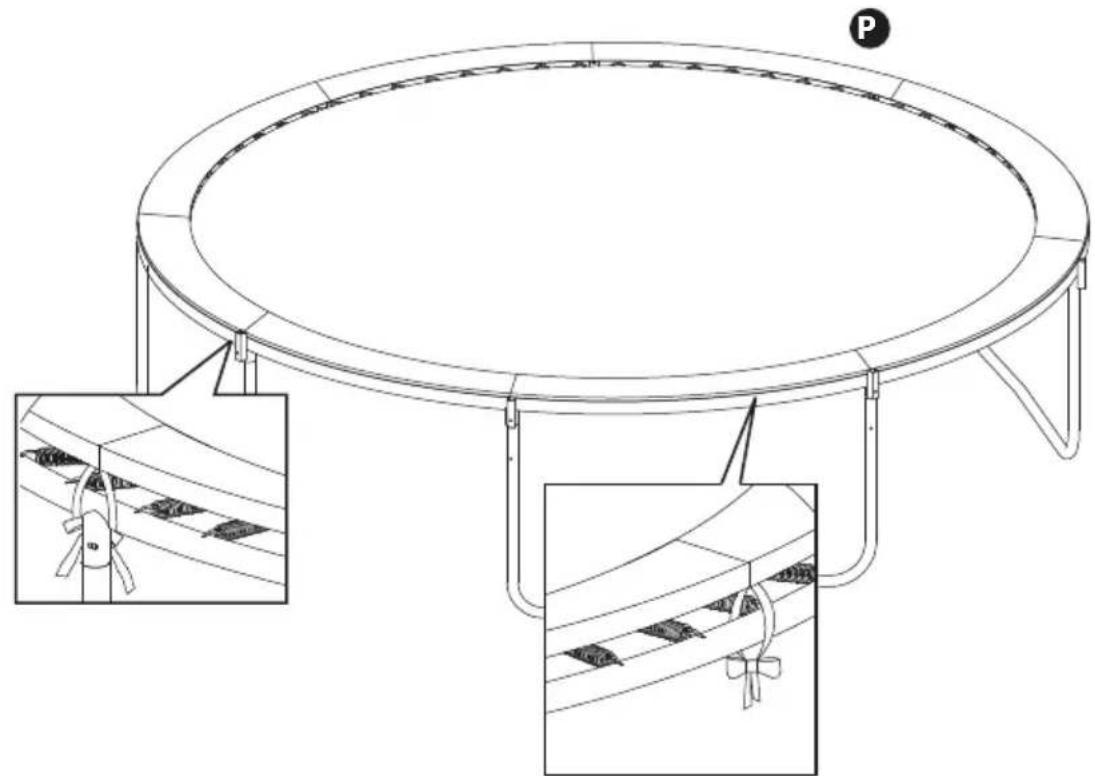
STEP5
Install the spring pad cover and secure attached straps to the top rail of the trampoline as shown in the figure.
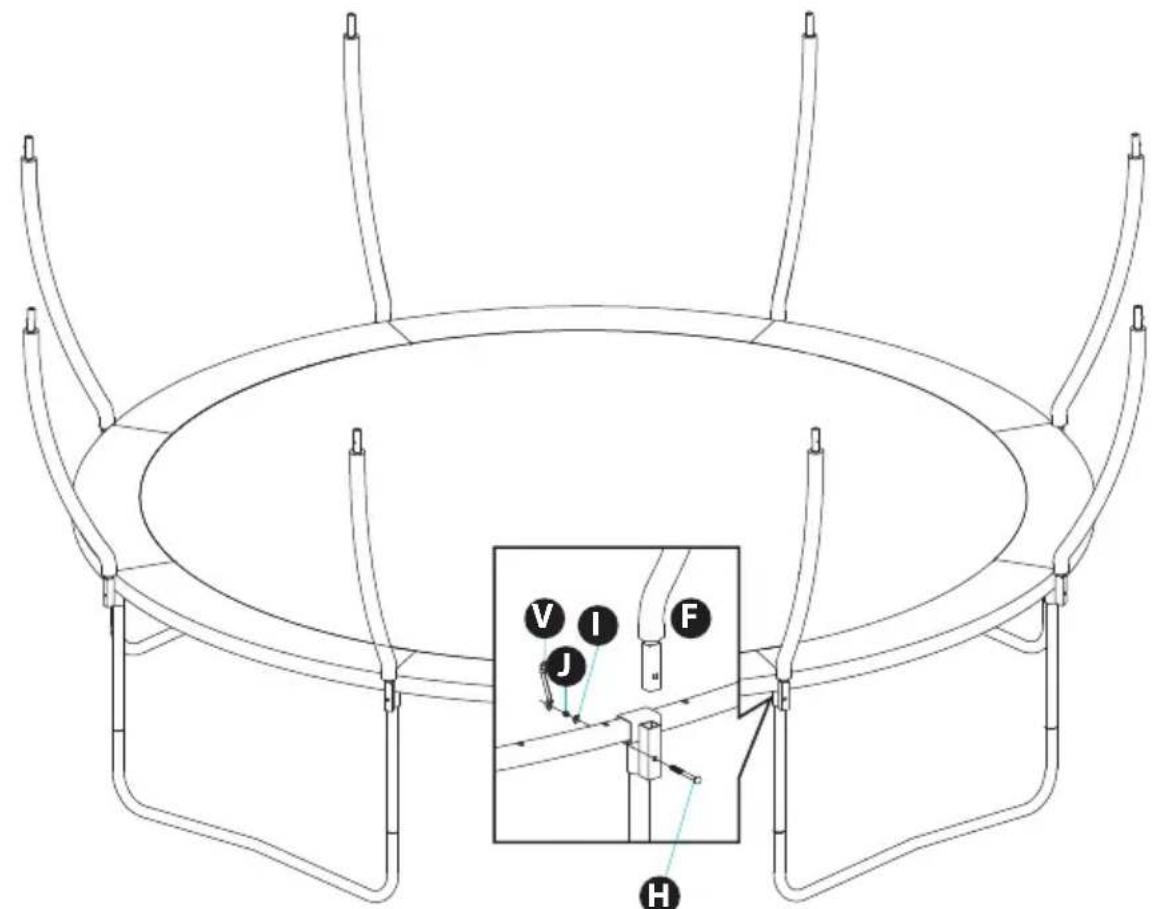
STEP6
Install and secure the trampoline Poles as shown in the figure below.
STEP7
Install two spring steels to connect them together.
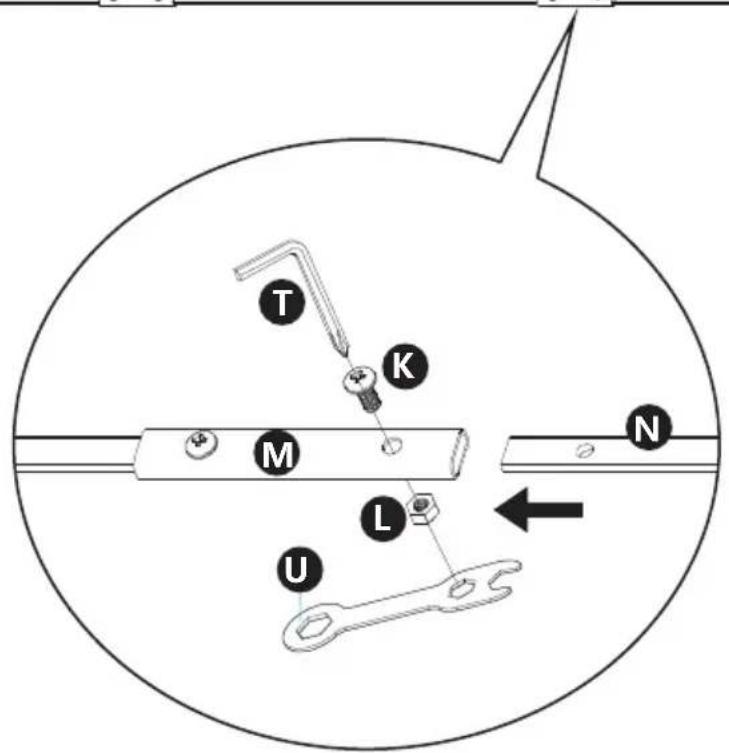
STEP8
Insert the spring steels assembled in Step 7 into the sleeve on the safety net side.
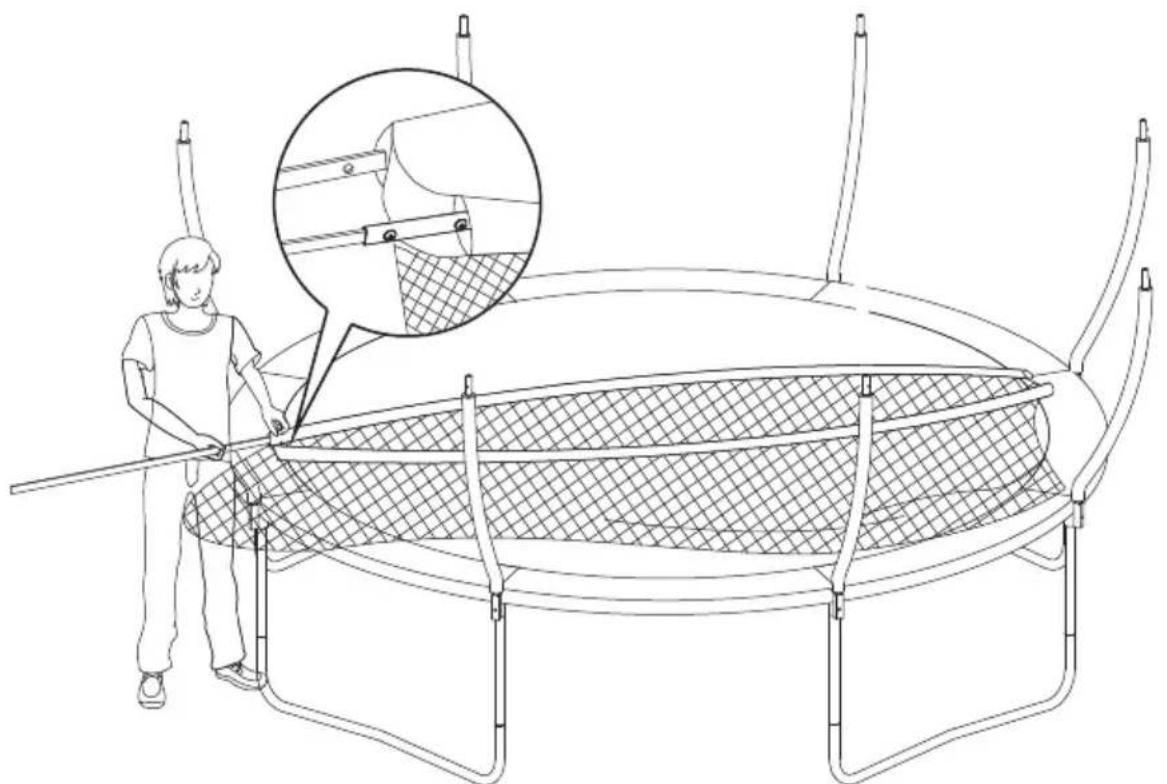
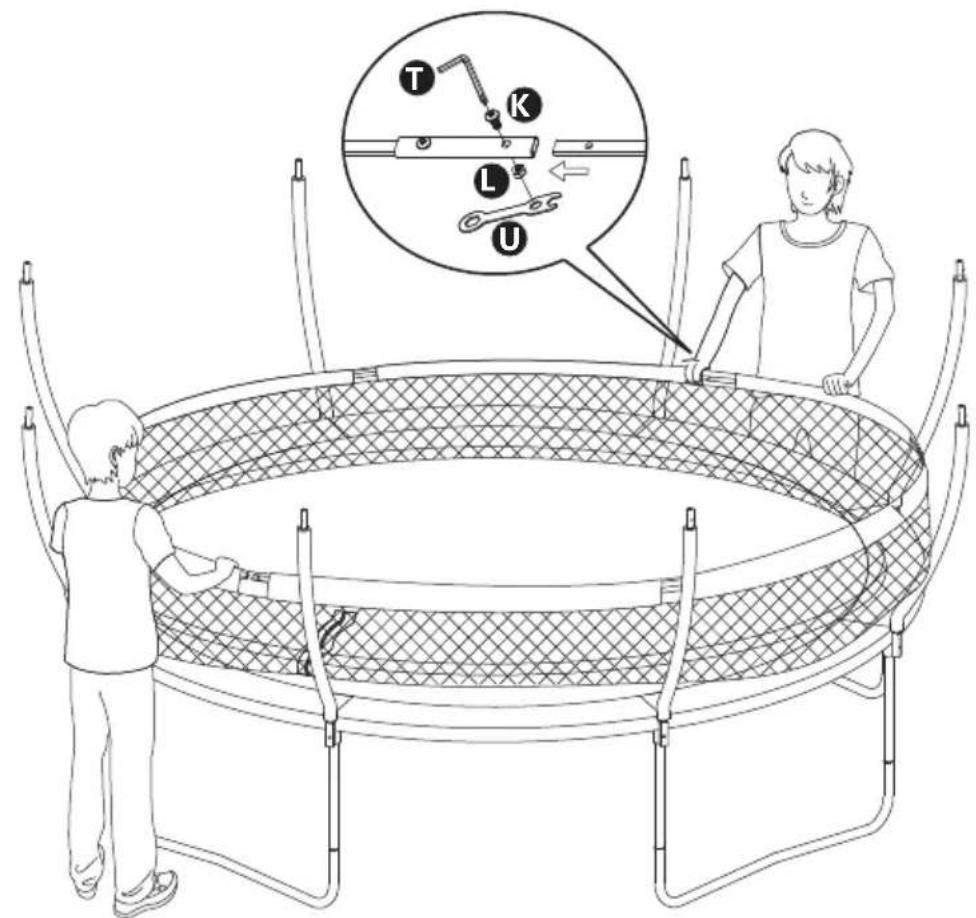
STEP9
Repeat Step 8 until the spring steels form a round shape, as shown in the figure.
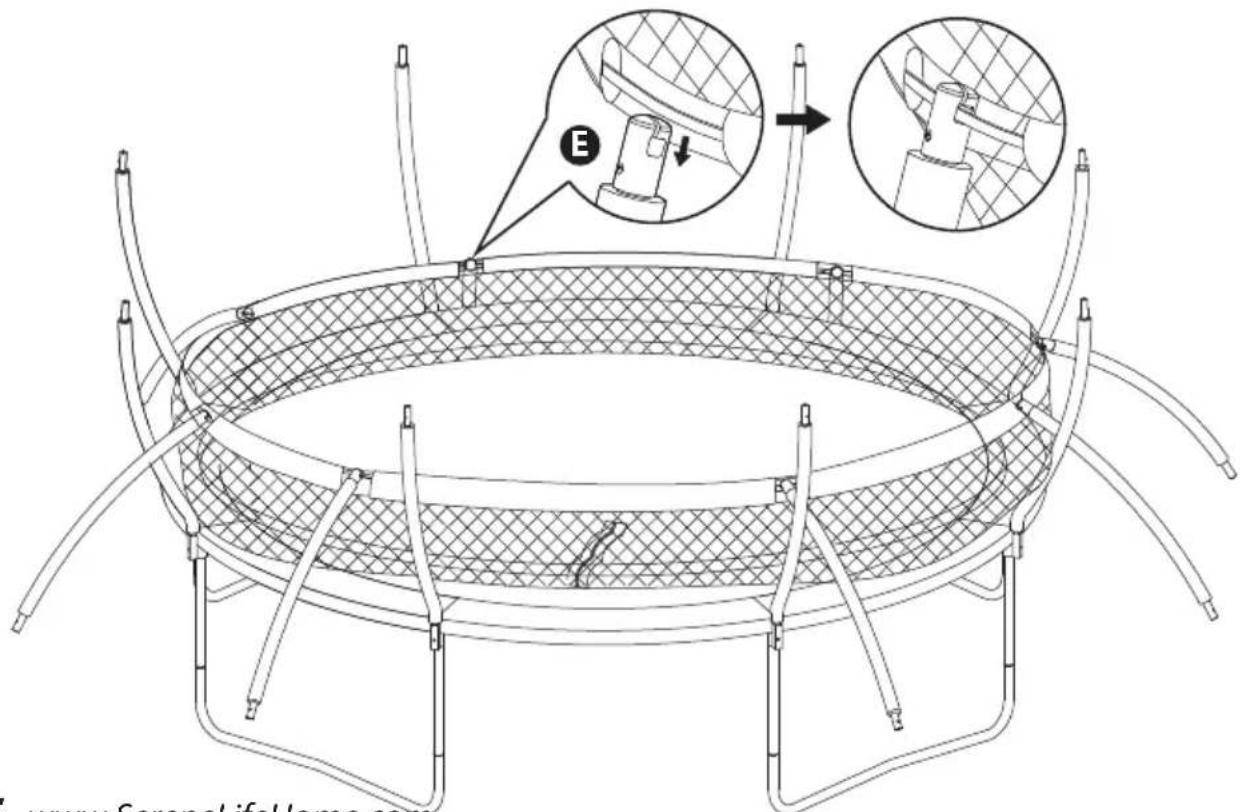
STEP 10
Install the top of the upper rod into the eight corresponding positions of the spring steel and lock it with the buckle, as shown in the figure.
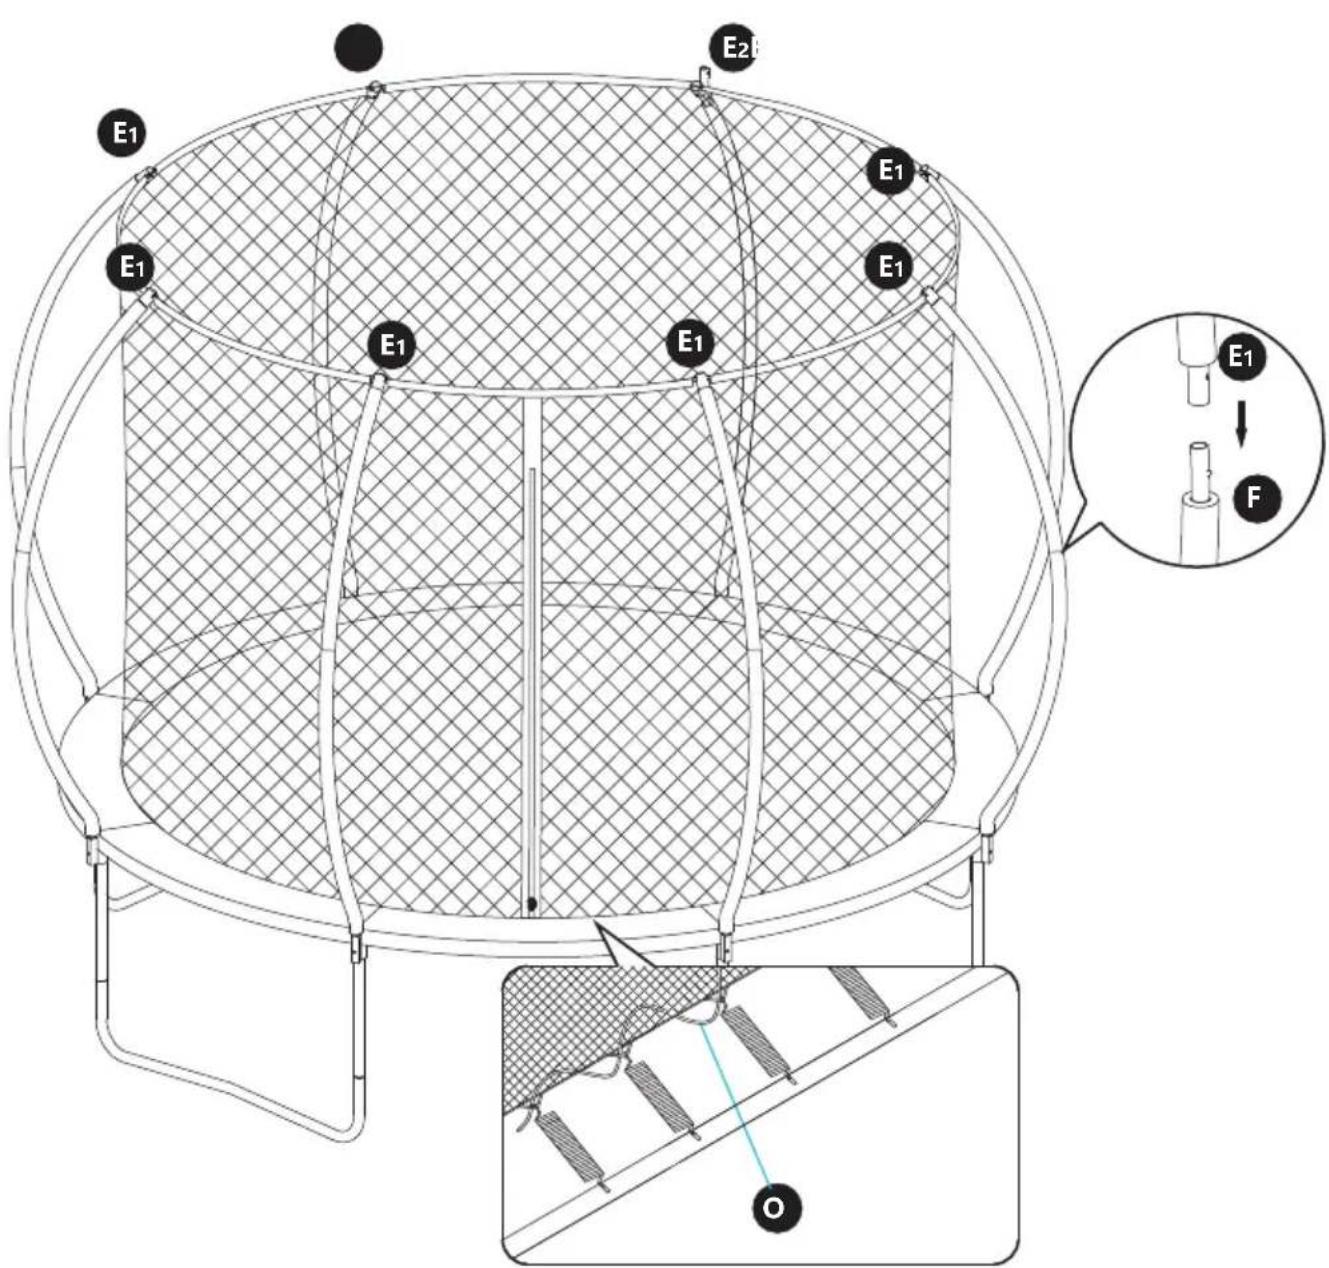
STEP 11
As shown in the figure, connect the upper and lower poles, then install the net and secure it with a rope.
(Note: E2 pole is the location where the basketball rack is installed.)
ASSEMBLY PARTS
ACCESSIONS LIST 3
| NO. | Pictures | Part Name | Quantity |
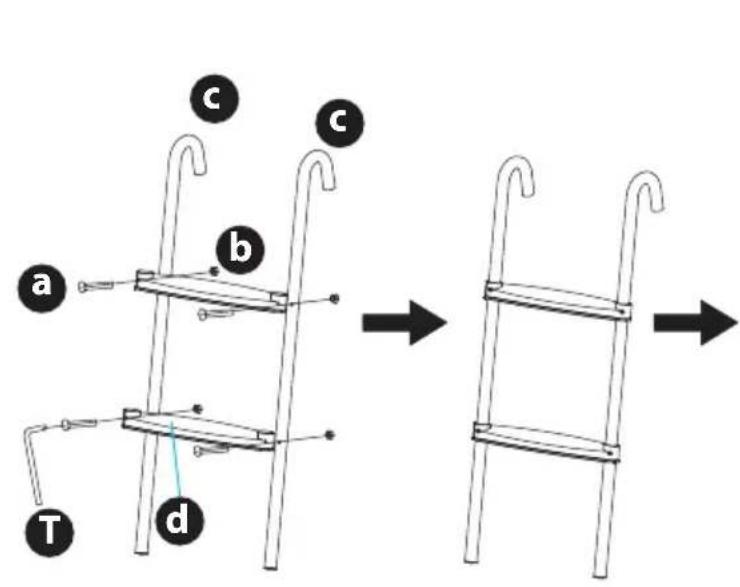
| a | M6 Hexagonal Socket Bolt | 4 | |
| b | M6 Nut | 4 | |
| c | Staircase Bend | 2 | |
| d | Plastic Pedal | 2 |
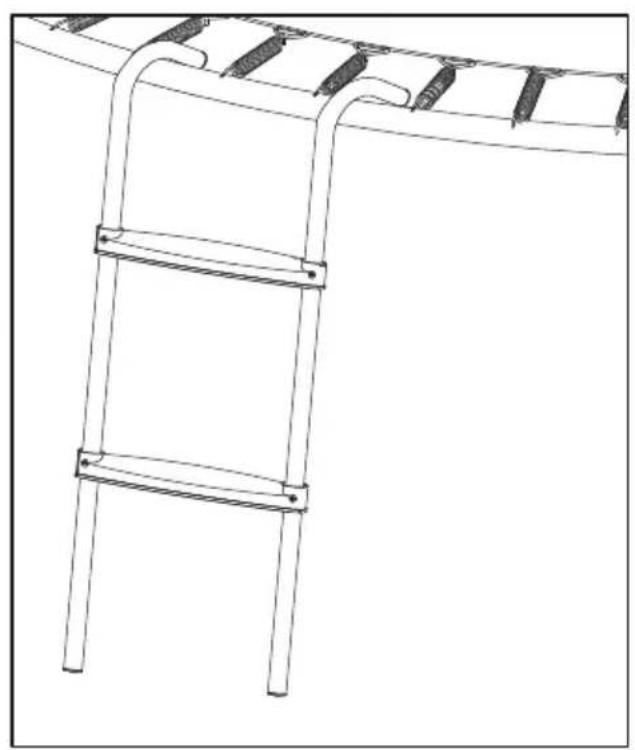
STEP12
Install and secure the ladder as shown in the figure below.
ASSEMBLY PARTS
ACCESSIONS LIST 4
| NO. | Part Name | Pictures Quantity | |
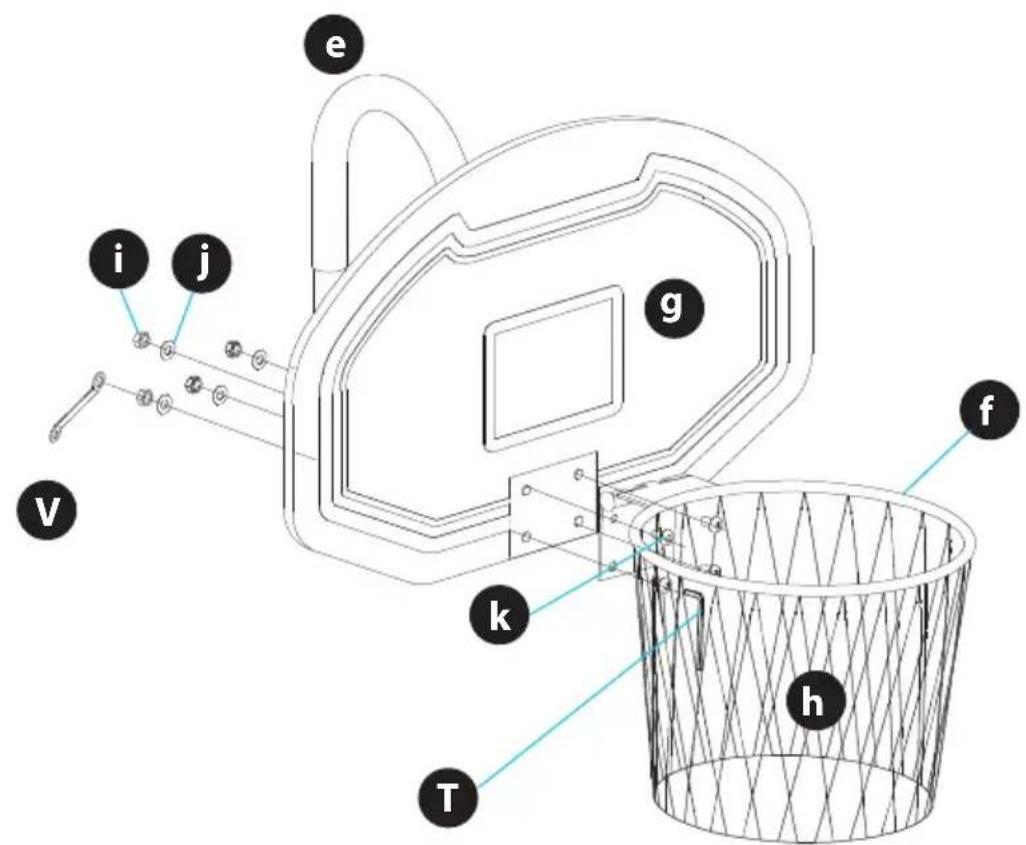
| e | Basketball Frame Connecting Tube | 1 | |
| f | basketball Hoop | 1 | |
| g | Backboard | 1 | |
| h | Basketball Net | 1 | |
| i | M6 Nut | 4 | |
| j | M6 Flat Washer | 4 | |
| k | M6 Bolt | 4 | |
| l | Inflator | 1 | |
| m | Rubber Ball | 1 |
ASSEMBLY INSTRUCTIONS
STEP 13
Install the basketball stand as shown in the figure.
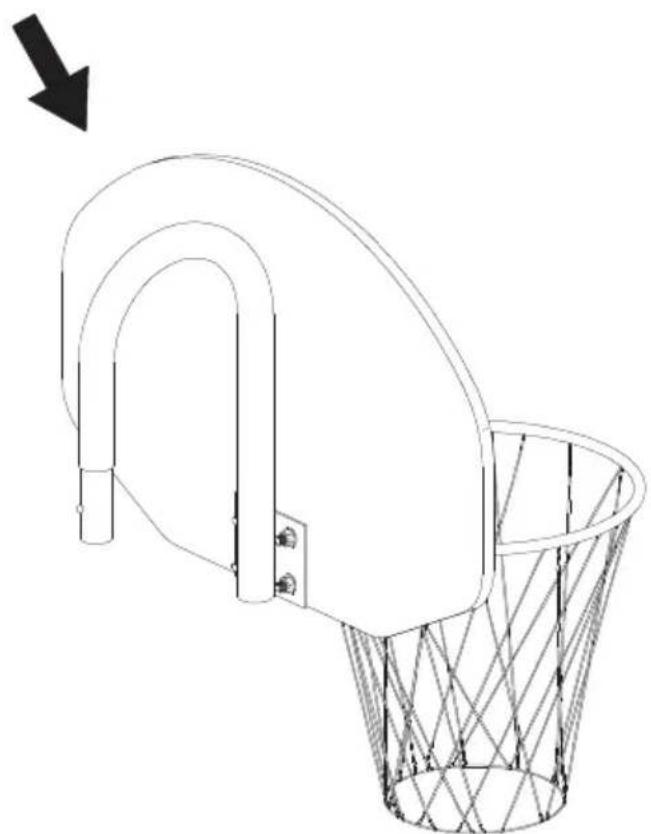
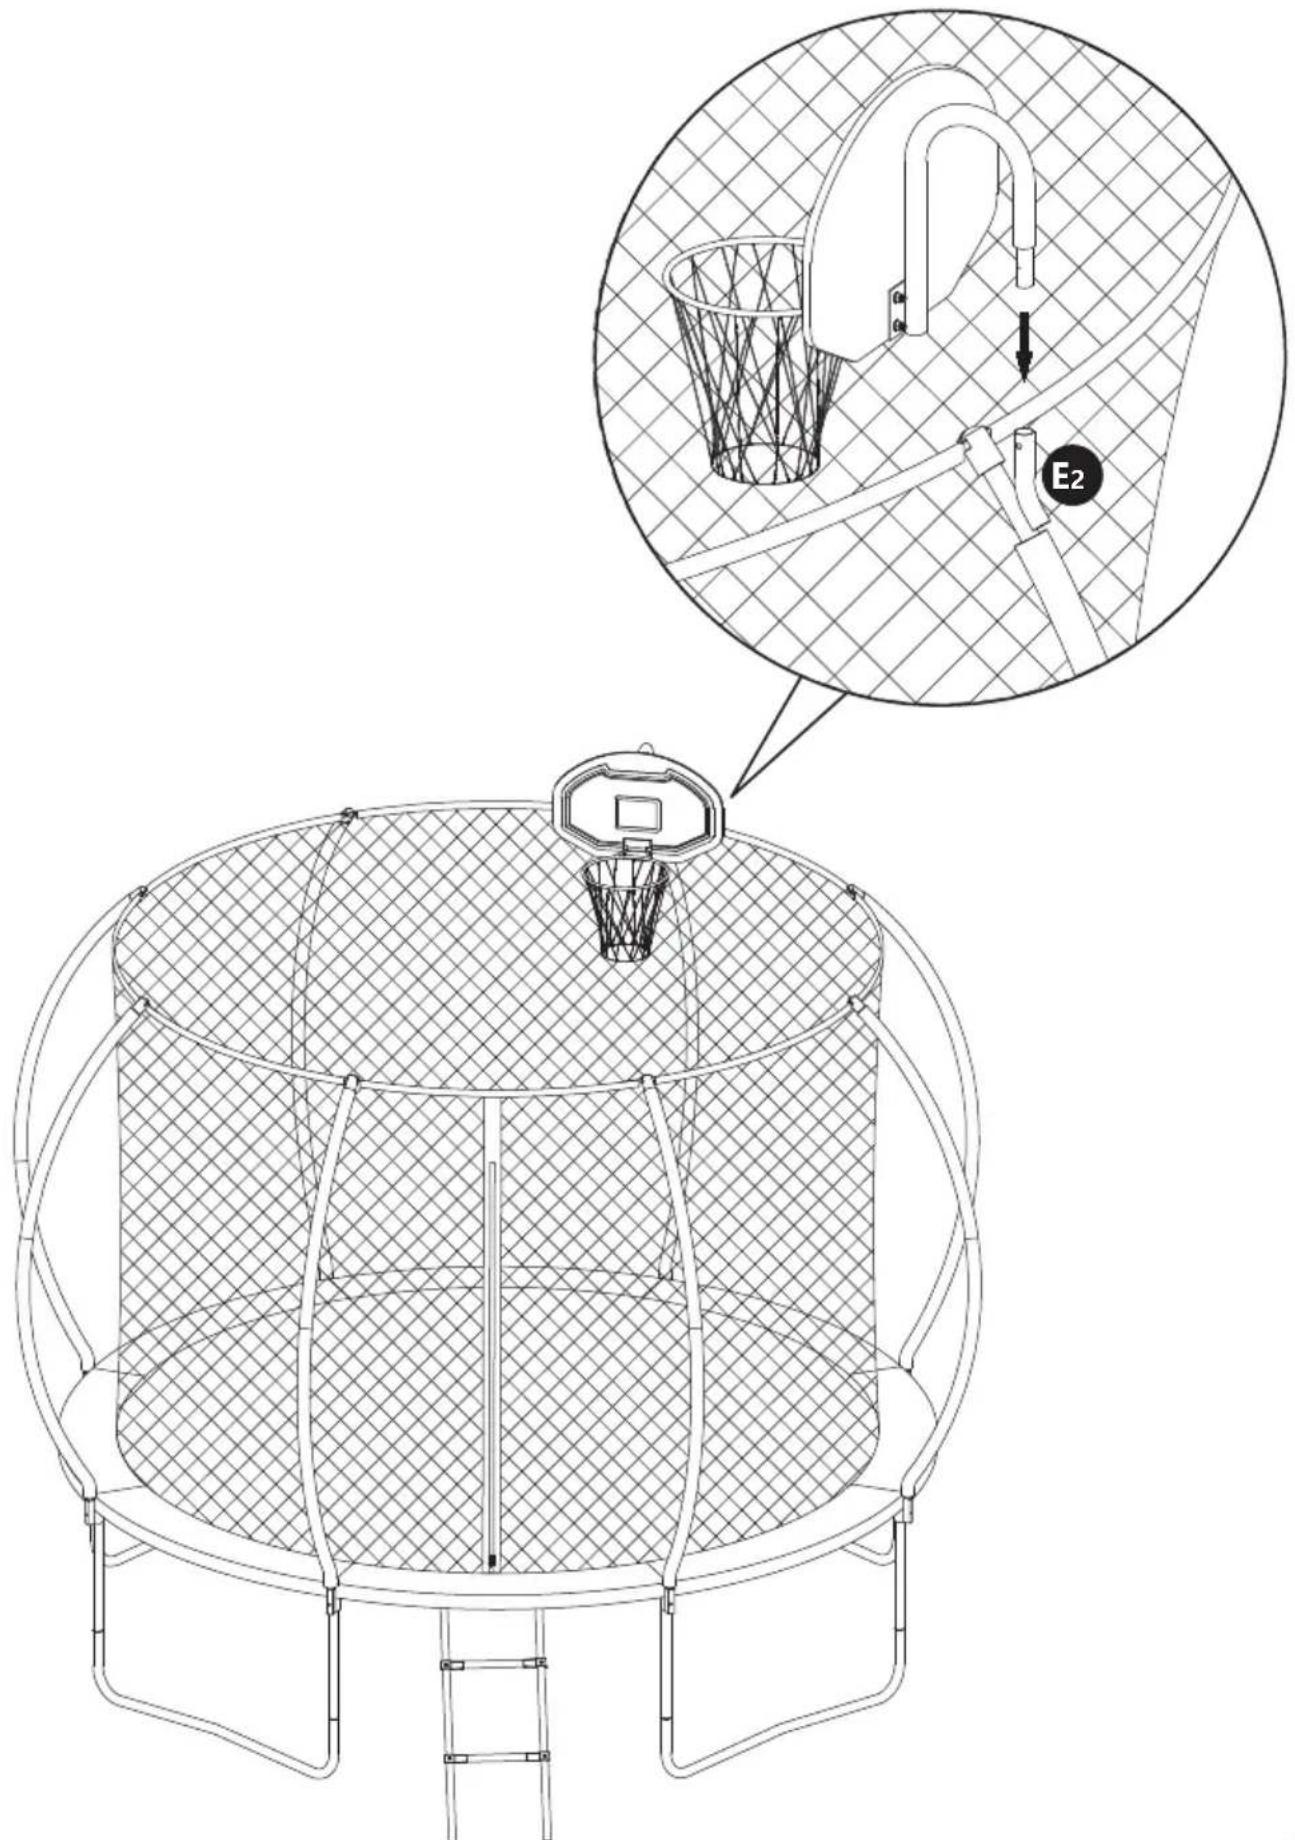
STEP 14
Insert the entire installed basketball stand into the sleeve above rod E2 on the component, as shown in the figure.
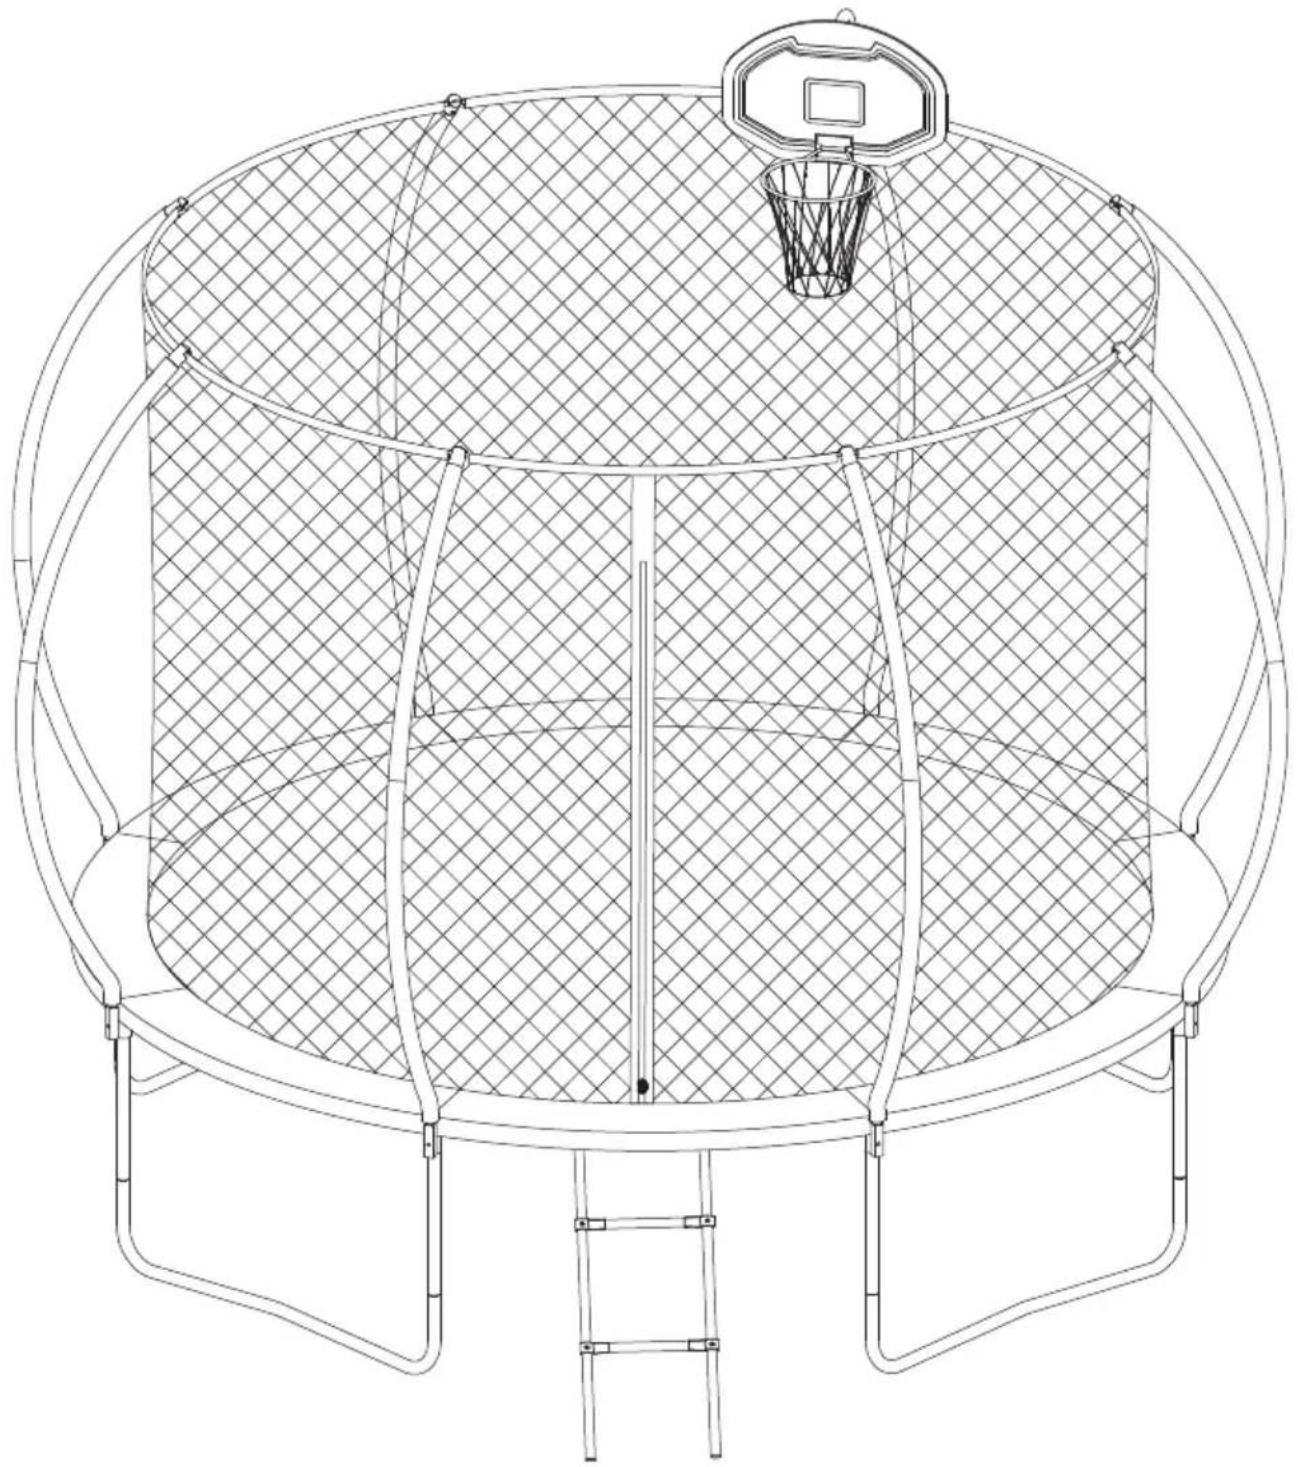
12ft Trampoline
Installation Completion Drawing
FUNDAMENTAL SKILLS
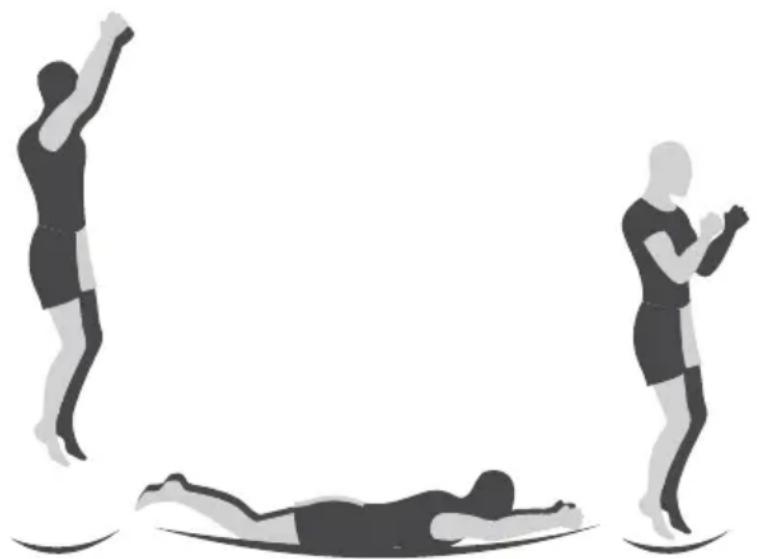
STANDARD JUMP
- Start from a standing position, with head up and eyes on the trampoline pad.
- Swing arms up and forward in a circular motion.
- While mid-air, bring feet closer together and point downward.
- Keep feet shoulder-width while landing.

KNEEDROP
- Start from a Standard Jump.
- Land on knees while keeping your body erect and back straight.
- Bounce back up into a Standard Jump.

FUNDAMENTAL SKILLS
SEATED DROP
- Start from a Standard Jump.
- Land in a sitting position with legs stretched out and hands on the mat without locking elbows.
- Push yourself back into a Standard Jump using your hands.

FLAT DROP
- Start with a low bounce.
- Land in a prone position with arms and hands extended on the mat.
- Push off the mat using your arms and hands to return to an upright position.
Register Product
Thank you for choosing SereneLife. By registering your product, you ensure that you receive the full benefits of our exclusive warranty and personalized customer support.
Complete the form to access expert support and to keep your SereneLife purchase in perfect condition.

serenelife

SPA
SLPMTR12BL