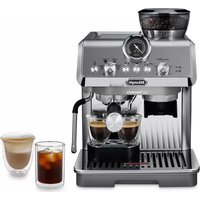
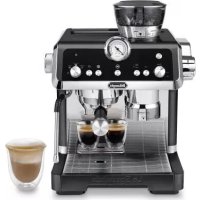
Magnifica Plus ECAM320.70.SB - Coffee machine DELONGHI - Free user manual and instructions
Find the device manual for free Magnifica Plus ECAM320.70.SB DELONGHI in PDF.
Frequently Asked Questions - Magnifica Plus ECAM320.70.SB DELONGHI
User questions about Magnifica Plus ECAM320.70.SB DELONGHI
0 question about this device. Answer the ones you know or ask your own.
Ask a new question about this device
Download the instructions for your Coffee machine in PDF format for free! Find your manual Magnifica Plus ECAM320.70.SB - DELONGHI and take your electronic device back in hand. On this page are published all the documents necessary for the use of your device. Magnifica Plus ECAM320.70.SB by DELONGHI.
USER MANUAL Magnifica Plus ECAM320.70.SB DELONGHI
Instructions for use. Keep these instructions
Visit delonghi.com for a list of service centers near you.
ELECTRIC CHARACTERISTICS
120V 60HZ1450W
MACHINEÀCAFE
2.1 Instruction for Use.. 6
- BEFORE USE.. 6
3.1 Checking the appliance 6
3.2 Installing the appliance.. 6
3.3 Connecting the appliance.. 6
3.4 Setting up the appliance 6
3.5 Cleaning and maintenance of materials in contact with food 6
3.6 Making cappuccinos and milk-based coffees.7
- INTRODUCTION 7
4.1 Letters in brackets 7
4.2 Troubleshooting and repairs.. 7
5.DESCRIPTION. 7
5.1 Description of the appliance (A) 7
5.2 Description of control panel (B)
5.3 Description of homepage (main screen) (C)...7
5.4 Description of accessories (D) (**number and type differ according to model)
5.5 Description of milk carafe (E) 7
-
OPERATING THE APPLIANCE FOR THE FIRST TIME 7
-
TURNING THE MACHINE ON 9
- TURNING THE APPLIANCE OFF 10
8.1 Switching off for extended periods: 10
- MENU SETTINGS 10
9.1 Rinsing 10
9.2 Dcsaling 10
9.3 Water filter 10
9.4 General 10
9.5 Auto-off 11
9.6 Coffee temperature 11
9.7 Support 11
9.8 Cleaning the milk carafe.. 11
9.9 Statistics 11
9.10 Languages. 11
9.11 Coffee grinder settings 11
9.12 Water hardness 11
9.13 Empty circuit 12
9.14 Default values 12
- SELECTION OF DRINKS 12
- PREPARATION OF COFFEE DRINKS 13
11.1 Prepare the machine to make coffee drinks.13
11.2 Directly selected coffee drinks 13
11.3 Customized coffee-based drinks. 13
11.4 Making drinks using pre-ground coffee.....14
11.5 Extra shot (hot drinks only) 14
11.6 General indications for making coffee-based drinks 15
11.7 Tips for a hotter coffee.. 15
- MAKING CAPPUCCINOS AND MILK BASED COFFEEES 15
12.1 Preparing the milk carafe (E) 15
12.2 What milk to use? 15
12.3 Filling and attaching the milk carafe... 15
12.4 Adjusting the amount of froth.. 16
12.5 Making milk-based drinks 16
12.6 Cleaning the milk carafe after use 16
- PREPARING HOT WATER 17
- "MY" FUNCTION (hot drinks only) 17
-
SELECTING YOUR PERSONAL PROFILE .......17
-
CLEANING 18
16.1 Cleaning the machine 18
16.2 Cleaning the internal circuit 18
16.3 Cleaning the coffee grounds container.....18
16.4 Cleaning the drip tray and drip tray grille....19
16.5 Cleaning the inside of the machine 19
16.6 Cleaning the water tank 19
16.7 Cleaning the pre-ground coffee funnel ....20
16.8 Cleaning the coffee spouts 20
16.9 Cleaning the removable infuser 20
16.10 Cleaning the control panel (B) 20
16.11 Cleaning the milk carafe (E) 20
- DESCALING 21
18.WATER SOFTENER FILTER 22
18.1 Installing the filter 22
18.2 Replacing or removing the filter 23
- TIPS FOR ENERGY SAVING 23
- MESSAGES SHOWN ON THE DISPLAY.....23
- TROUBLESHOOTING 26
IMPORTANTSAFEGUARDS
When using electrical appliances, basic safety precautions should always be followed, including the following.
- Read all instructions carefully.
- Make sure the voltage of your electrical system corresponds to the voltage shown on the bottom of the machine.
- Do not touch hot surfaces. Use handles or knobs.
- To protect against fire, electrical shock and personal injury, do not immerse cord, plug or appliance in water or other liquid.
- Keep the appliance out of the reach of children and do not leave appliance unattended while in operation.
- Unplug from the outlet when not in use and before cleaning.
- Do not operate with a damaged cord or plug, or after the appliance malfunctions, or has been damaged in any manner. Return the appliance to the nearest authorized service facility for examination, repair or adjustment.
- The use of accessory attachments not recommended by the manufacturer may result in fire, electrical shock, or personal injury.
- Do not use outdoors.
- Make sure the power cord does not hang over the edge of the table or counter-top to avoid getting accidentally caught or entangled.
Do not place the appliance or its electrical parts on or near electric stoves, cooking surfaces, or gas burners.
- Plug cord into the wall outlet. To disconnect, first turn machine "off", then remove plug from wall outlet.
- Do not use the appliance for other than the intended use. This appliance is to be utilized for domestic use only. The manufacturer declines all responsibility for any damage caused by improper, incorrect, or irresponsible use.
WARNING: To reduce the risk of fire or electric shock, do not remove the cover or the exterior of the unit. Don't attempt to repair or modify the machine, doing so will void the warranty. Repair should be done by authorized service personnel only!
SAVETHESEINSTRUCTIONS
THIS APPLIANCE IS FOR HOUSEHOLD USE ONLY
SHORT CORD INSTRUCTIONS
- A short power cord is provided to reduce risks resulting from becoming entangled in or tripping over a longer cord.
- Longer, detachable power supply cords or extension cords are available and may be used if care is exercised in their use.
- If an extension cord is used, the marked electrical rating should be at least as great as the electrical rating of the appliance. If the appliance is provided with 3- wire, grounding type cord, the extension should be a GROUNDING TYPE 3 - WIRE CORD. The longer cord should be arranged so that it will not drape over the counter-top or table top where it can be pulled on by children or tripped over.
- Your product is equipped with a polarized alternating current line plug (a plug having one blade wider than the other). This plug will fit into the power outlet only one way. This is a safety feature. If you are unable to insert the plug fully into the outlet, try reversing the plug. If the plug should still fail to fit, contact your electrician to replace your obsolete outlet. Do not defeat the safety purpose of the polarized plug.
1. SAFETYWARNINGS
Danger!
This is an electrical appliance and may cause electric shock.
You should therefore follow these safety warnings:
- Never touch the appliance with damp hands or feet.
- Never touch the plug with damp hands.
- Make sure the socket used is freely accessible at all times, enabling the appliance to be unplugged when necessary.
- Unplug directly from the plug only. Never pull the cord as you could damage it.
- To disconnect the appliance completely you must unplug it from the mains socket.
- If the appliance is faulty, do not attempt to repair. Turn it off, unplug from the mains socket and contact Customer Services.
- Before cleaning the appliance, turn it off, unplug from the mains socket and allow to cool.
Important!
Keep all packaging (plastic bags, polystyrene foam) away from children.
CHOKING HAZARD. The appliance might contain small parts.
Some of those small parts might be required to get disassembled during cleaning and maintenance operations. Handle with care and keep small parts out of reach of children.
Danger of burns!
This appliance produces hot water and steam may form while it is in operation.
During operation (automatic rinsing, hot beverage delivery, steam delivery, cleaning), avoid contact with splashes of hot water or steam.
When the appliance is in operation, the cup shelf could become very hot.
2. GENERAL INFORMATION
2.1 Instruction for Use
Read all the Instruction for Use carefully before using the appliance. Failure to follow this Instruction for Use may result in burns or damage to the appliance.
The manufacturer is not liable for damage deriving from failure to respect this Instruction for Use.
Please note:
These safety warnings are valid for all De'Longhi coffee machines.
Keep this leaflet together with the instructions accompanying the appliance.
If the appliance is passed to other persons, they must also be provided with this Instruction for Use.
3. BEFOREUSE
3.1 Checking the appliance
After removing the packaging, make sure the product is complete and undamaged and that all accessories are present. Do not use the appliance if it is visibly damaged. Contact De'Longhi Customer Services.
3.2 Installing the appliance
When you install the appliance, you should respect the following safety warnings:
- The appliance gives off heat. After positioning the appliance on the worktop, leave a space of at least 1.18 in / 3 cm between the surfaces of the appliance and the side and rear walls and at least 5.9 in / 15 cm above the coffee maker.
- Water penetrating the appliance could cause damage. Do not place the appliance near taps or sinks.
- The appliance could be damaged if the water it contains freezes. Do not install the appliance in a room where the temperature could drop below freezing point.
- Arrange the power cord in such a way that it cannot be damaged by sharp edges or contact with hot surfaces (e.g. electric hot plates).
3.3 Connecting the appliance
Check that the mains power supply voltage corresponds to that indicated on the rating plate on the bottom of the appliance.
Connect the appliance to an efficiently earthed and correctly installed socket with a minimum current rating of 13A only.
If the power socket does not match the plug on the appliance, have the socket replaced with a suitable type by a qualified professional.
3.4 Setting up the appliance
The first time you use the machine, the water circuit is empty and the appliance could be very noisy. The noise becomes less as the circuit fills.
3.5 Cleaning and maintenance of materials in contact with food
- When used for the first time, or after 3 or 4 days without use, clean the appliance and the removable accessories that come into contact with water, coffee and milk, as indicated in the instructions for use. Check in the instructions which accessories are dishwasher safe.
- If the appliance is not used for more than 3 or 4 days, before making the first beverage, rinse the water circuit as described in this Instruction for Use.
- Be certain to take maximum care when carrying out all cleaning and maintenance operations described in the instructions for use and/or prompted by the display or warning lights of the appliance itself.
3.6 Making cappuccinos and milk-based coffees
- The appliance has been tested for use with cow's milk and the following plant-based drinks: soy, rice and almond. No other type of milk or plant-based drink may be used.
- To clean the system, following use with any type of milk, please follow the standard procedures described in the instruction manual
- The cleaning methods provided by the manufacturer and described in the instructions do not guarantee the complete removal of allergens.
- In the case of confirmed or suspected allergies and intolerances, make sure that your machine has not been previously used with any milk or plant-based drink containing the allergens you are allergic or the substances you are intolerant to.
4. INTRODUCTION
Take a few minutes to read these Instructions for Use. This will avoid all risks and damage to the appliance.
4.1 Letters in brackets
The letters in brackets refer to the description of the appliance on pages 2-3.
4.2 Troubleshooting and repairs
In the event of problems, first try and resolve them by reading the information given in sections "20. Messages shown on the display" and "21. Troubleshooting".
If this does not resolve the problem or further information is required, consult the customer services department at the numbers indicated on the website delonghi.com.
If repairs are required, contact De'Longhi customer services only.
Addresses can be found on the website delonghi.com.
5.DESCRIPTION
5.1 Description of the appliance (A)
A1. Bean container lid
A2. Coffee grinder adjustment dial
A3. Pre-ground coffee funnel flap
A4. Bean container
A5. Infuser flap
A6. Removable infuser
A7. Power cord
A8. Water tank lid
A9. Water tank
A10. Coffee grounds container
A11. Cup tray
A12. Drip tray grille
A13. Drip tray water level indicator
A14. Drip tray
A15. Condensate tray
A16. Height-adjustable coffee spout
A17. Accessories connector flap
A18. Cup shelf
5.2 Description of control panel (B)
B1. ON/standby button
B2. "Coffee" drinks menu with LEDs
B3. "Milk" drinks menu with LEDs
B4. Profile selection button
5.3 Description of homepage (main screen) (C)
C1. Selected profile
C2. Filter spent indicator
C3. Dscaling required indicator
C4. Mink carafe cleaning required indicator
C5. Egy saving ON indicator
C6. Appliance settings menu
C7. Direct selection of drinks (*number and type differ according to model)
C8. Drink settings customization bar
5.4 Description of accessories (D) (*number and type differ according to model)
D1. "Water Hardness Test" strip
D2. Pre-ground coffee measure
D3. Descaler
D4. Water softener filter
D5. Hot water spout
5.5 Description of milk carafe (E)


E1. Milk carafe lid
E2. Milk container
E3. Froth adjustment/Clean dial
E4. Milk carafe connector (removable for cleaning)
E5. Milk spout (height-adjustable)
E6. Adjustable milk spout extension
E7. Milk intake tube (silicone)
6. OPERATING THE APPLIANCE FOR THE FIRST TIME
Please note:
-
When using the machine for the first time, all components that make contact with water or milk should be rinsed with hot water. It is advisable to wash the milk carafe (E) in the dishwasher (see section "16.11 Cleaning the milk carafe (E)").
-
Any traces of coffee that may be found in the grinder are left by the factory tests carried out on the machine before it goes on sale — evidence of the meticulous care we have for the product.
-
The first time the machine is used, the water circuit will be empty and operation could be very noisy. The noise becomes less as the circuit fills.
-
Connect the appliance to the mains supply (fig. 1).

Now follow the instructions indicated on the display of the appliance:
Select the language
- Press the flag corresponding to the desired language and confirm the selection by pressing "Done".
Fill the water tank
- Remove the water tank (A9) (fig. 2), and fill to the MAX line with fresh drinking water (fig. 3);
- Reposition the tank, then confirm by pressing "Next";
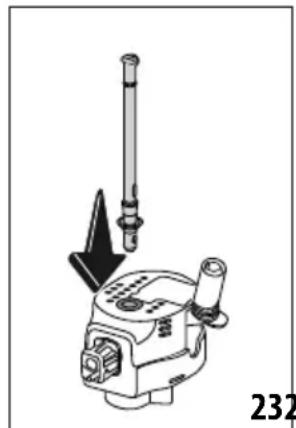
Fit the hot water spout
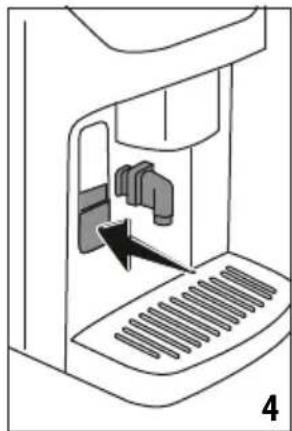
- Lower the flap and fit the hot water spout (D5) to the accessories connector (A17) (fig.4): Press "Next";
Fill the bean container
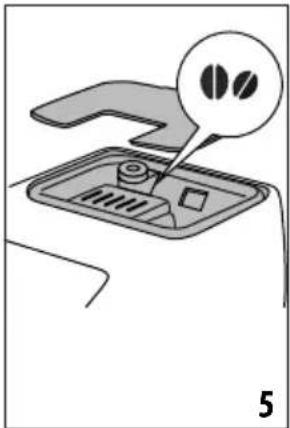
- Fill the bean container (A4) (fig. 5), then confirm by pressing "Next";
Filling the water circuit and rinsing
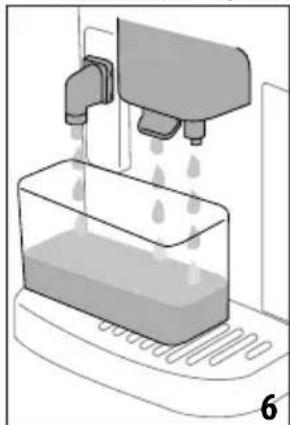
- Position a container of at least 200ml/6.76 fl oz capacity under the coffee spout (A16) and the hot water spout (fig. 6);
-
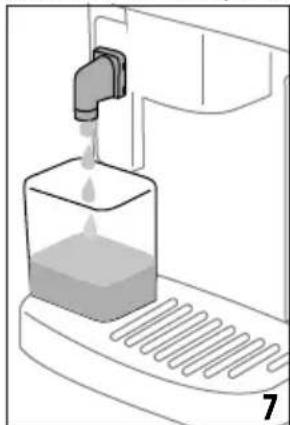
Press "Yes" to fill the water circuit: the appliance delivers water from the hot water spout (fig. 7);
-
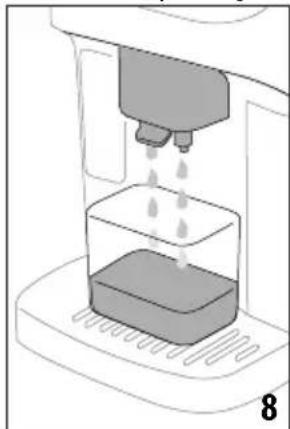
At the end of delivery, the machine proceeds with heating and terminates the procedure with a rinse cycle, delivering hot water from the coffee spout (fig. 8).
Measuring water hardness
- Take out the test strip (D1): press "Start" to proceed.
- Immerse the strip completely in a glass of water for about one second.
- Remove the strip from the water and shake lightly. Press "Next".
- After about a minute, 1, 2, 3 or 4 red squares appear, depending on the hardness of the water.
Please note:
- The descending alarm is displayed after a period of time established according to water hardness. The machine can also be programmed according to the actual hardness of the local water supply, so that the descending procedure will be required less frequently. Accordingly, it is advisable to set the correct value without delay, following the machine's step by step guide:
Each red square corresponds to one level.
Setting water hardness
- Select the water hardness level on the display according to the result of the measurement procedure described above, and press "Ok";
- The water hardness selected will be saved in the machine settings.
Please note:
The water hardness can be changed directly from the settings menu (see "9.12 Water hardness").
Installing the water softener filter
- The machine prompts for installation of the water softener filter (D4): press "Start" to proceed (to postpone the operation, press "Later" instead).
- Remove the water tank (A9) (fig. 2), fill to the MAX line with fresh drinking water (fig. 3) and press "Next".
- Remove the filter from the packaging and turn the date indicator so that it shows the next 2 months (fig. 9). Press "Next";
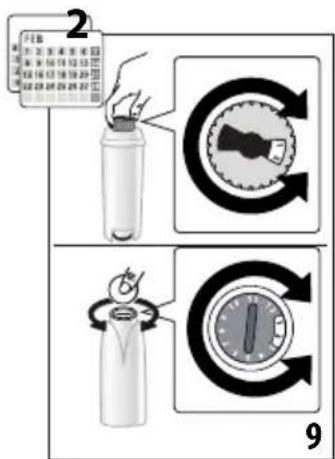
Please note:
The filter lasts about two months assuming normal use of the machine; if on the other hand the machine remains idle with the filter installed, it will not last more than three weeks, at most.
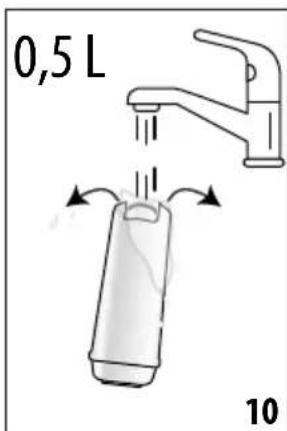
- To activate the filter, run tap water through the hole in the center of the filter until water comes out of the openings at the side for more than a minute (fig. 10); Press "Next".
-
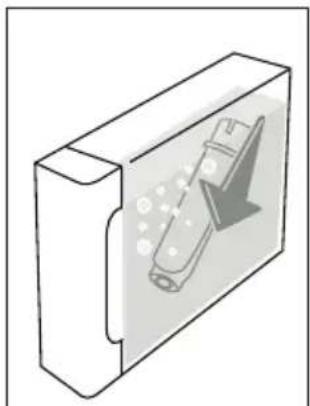
Insert the filter in the water tank and immerse it completely for about ten seconds, angling and pressing it lightly so that the air bubbles can escape (fig. 11). Press "Next".
-
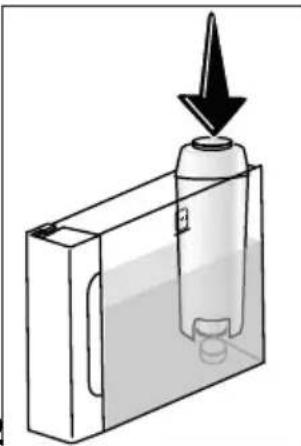
Insert the filter in the filter hous ing (fig. 12) and press fully home. Press "Start";
1112
- Close the tank with the lid (A8);
- Reposition the water tank in the machine and press "Next".
- Position an empty container of at least 0.5 liters capacity under the hot water spout (fig. 7) and press "Yes" to activate the filter;
- The machine delivers hot water, then stops automatically.
- The filter is now active and the machine can be used.
- Now that all the technical aspects have been covered, press "Start" to get to know the machine.
Setting of profiles
- Select the number of people who will be using the machine. Press "Next".
- The machine automatically creates a profile for each user: to customize the profile, press (press the "Change" or "Profile" button). Having made the desired changes, press "Sae".
- Press "Next".
- Press "Start" to run an introductory video.
- At the end of the video, a QR code appears: scan this to access manuals/support services. Press "Next".
- Press "Start": the machine is now ready for use.
Please note:
The first time the machine is used, it will be necessary to make
4-5 cappuccinos before the drink in the cup tastes as it should.
7. TURNING THE MACHINE ON
Please note:
Each time the machine is turned on, it performs an automatic preheat and rinse cycle which cannot be interrupted. The machine is not ready for use until the cycle has been completed.
- To turn the machine on, press (E1)(fig. 13): the machine will switch on;
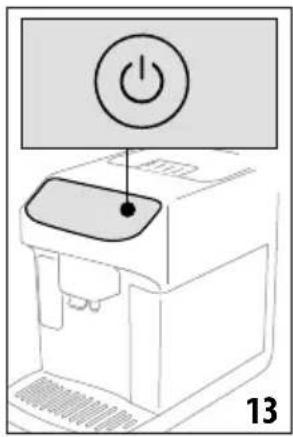
- Once preheated to a preset temperature, a rinse cycle takes place and hot water flows from the coffee spouts (A16); in addition to heating the boiler, this has the effect of heating the internal circuits by circulating hot water through them.
8. TURNING THE APPLIANCE OFF
Whenever the machine is turned off after being used to make coffee, it performs an automatic rinse cycle.
- To turn the machine off, press (B1) (Fig. 13).
- If envisaged, the machine runs a rinse cycle, delivering hot water from the coffee spout(A16), before switching off (stand-by).
8.1 Switching off for extended periods:
If the machine is not going to be used for any length of time (e.g. before going on holiday):
- turn the appliance off, pressing (Fig. 13).
- empty out and clean the grounds container (A10) and the water tank (A9);
- remove the plug (A7) from the power socket. (Important! Never unplug the machine while is it still switched on)
Please note:
When turning the machine on again, fill the water tank and, before making any kind of drink, run 3 rinse cycles as indicated in section "9.1 Rinsing"
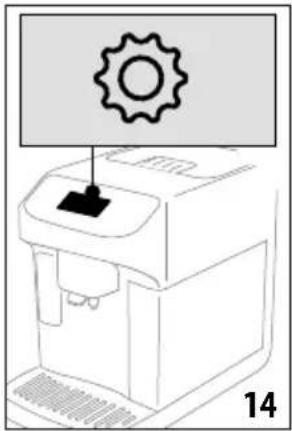
9. MENU SETTINGS
9.1 Rinsing
Using this function, hot water can be delivered from the coffee spouts (A16) (and, if fitted, the hot water spout (D5)) to clean and heat the appliance's internal circuit.
Place a container of at least 200ml/6.76 fl oz capacity under the spouts (fig. 6).
To activate the function:
- Press the settings menu (C6) (fig. 14);
- Select the item "Rinse";
- Press "Yes" to start the rinse cycle: after a few seconds, hot water is delivered to clean and heat the internal circuit of the machine (fig. 8);
- To stop rinsing, press "Stop" or wait for rinsing to stop automatically.
Please note:
If the machine is not used for more than 3-4 days, it is highly advisable, when turning it on again, to run 2-3 rinses before use;
Water may find its way into the grounds container (A10) during the rinse procedure: this is quite normal.
9.2 Deducing
For instructions on descending, see section "17. Descaling".
9.3 Water filter
For instructions on the filter (D4), see section "18. Water softener filter".
9.4 General
- Press the settings menu (C6) (fig. 14);
- Scroll through the menu pages until "General" is displayed; In this section of the menu, the following functions can be activated or deactivated with a simple tap:
"Audible warning": when enabled, the machine beeps whenever an operation is performed.
- "Energy saving": use this function to activate or deactivate energy saving mode. When activated, the function reduces energy consumption in compliance with European regulations. is displayed on the homepage to show it is active.
- Press "X" to save the new selections and go back to the homepage (C).
The screen also shows the serial number of the machine, which is an essential item of information should it be necessary for customer service to identify the machine precisely.
9.5 Auto-off
Auto-off can be set so that if the appliance is not being used, it will switch off after 15 or 30 minutes or after 1 or 3 hours have elapsed.
To program Auto-off, proceed as follows:
- Press the settings menu (C6) (fig. 14);
- Scroll through the menu pages until "Set Auto-off" is displayed;
- Select the desired time interval (15 or 30 minutes, or 1 or 3 hours).
- Press "X" to save the new selection and go back to the homepage (C).
9.6 Coffee temperature
To change the temperature of the water used to make coffee, proceed as follows:
- Press the settings menu (C6) (fig. 14);
- Scroll through the pages until the item "Coffee temperature" is displayed;
- Press "Set";
- Select the required temperature from those suggested;
- Press ^ < ^ to go back to the settings menu.
Please note:
The effect of varying the temperature is most noticeable with long drinks.
9.7 Support
- Press the settings menu (C6) (fig. 14);
- Scroll through the menu pages until the item "Support" is displayed;
- Scan the QR code to see the manual and access support services;
- Press "X" to go back to the homepage (C).
9.8 Cleaning the milk carafe
The machine offers a tutorial on thorough cleaning of the milk carafe (E), which will ensure smooth operation of the Lattecrema system over time.
- Press the settings menu (C6) (fig. 14);
- Scroll through the pages until the item "Cleaning the milk carafe" is displayed;
- Press "Next" or "Back" to read the sequence of steps;
- At the last step, press "Done" to go back to the settings menu;
- Press "X" to go back to the homepage (C).
Please note:
The procedure is illustrated in section "Cleaning the milk carafe (E)".
9.9 Statistics
This function displays statistics relating to the machine. To view the statistics, proceed as follows:
- Press the settings menu (C6) (fig. 14);
- Scroll through the pages until the item "Statistics" is displayed along with the main statistical data: to view more data, press "Read more";
- Press << to go back to the settings menu.
- Press "X" to go back to the homepage (C).
9.10 Languages
To change the language on the homepage, proceed as follows:
- Press the settings menu (C6) (fig. 14);
- Scroll through the pages until the item "Languages" is displayed;
- Press "Set";
- Press the flag corresponding to the desired language (scroll through the pages to see all the languages available). the display updates immediately and shows the selected language;
- Press << to save the new selection and go back to the settings menu.
9.11 Coffee grinder settings
The machine offers a tutorial on how to adjust the grinding and ensure the best results:
- Press the settings menu (C6) (fig. 14);
- Scroll through the pages until the item "Coffee grinder settings" is displayed;
- Press "Read more" to view the tutorial on how to adjust for finer or coarser grinding. Press "Next" or "Back" to read the advice;
- When at the final page, press "Ok" to go back to the settings menu;
- Press "X" to go back to the homepage (C).
Please note:
- After completing the above procedure, at least 3 coffees should be made before making any further adjustment. If coffee delivery is still not correct, repeat the procedure.
- The adjustment dial (A2) must be turned only when the coffee grinder is in operation, during the initial step of preparing the coffee.
9.12 Water hardness
To change the default water hardness setting when the machine is used for the first time, proceed as follows:
- Repeat the hardness test as indicated in the section "Measuring water hardness";
- Press the settings menu (C6) (fig. 14);
- Scroll through the pages until the item "Water hardness" is displayed.
- Press "Set".
-
Select the water hardness level on the display according to the result of the test: the new setting will be stored.
-
Press << to go back to the settings menu;
- Press "X" to go back to the homepage (C).
9.13 Empty circuit
To avoid the water in the circuit freezing if the machine is to be left idle for an extended period, or before taking it to a service center, it is advisable to drain the water circuit.
- Press the settings menu (C6) (fig. 14);
- Scroll through the menu pages until "Empty circuit" is displayed:
- Press "Ok" to start the guided procedure;
- Remove, empty and refit the grounds container (A10) and the drip tray (A14) (fig. 15), then press "Next";
- Attach the spout (D5) to the connector (A17) (fig. 4);
- Position a container of 200ml/6.76 floz capacity under the spouts (fig. 6). Press "Next";
- The machine runs a rinse cycle, releasing hot water from the spouts;
- Once rinsing is complete, remove the water tank (A9) (fig. 2) and empty it: Press"Next";
- Remove the water softener filter (if installed) (D4) from the water tank, and press "Next";
- Reposition the water tank (empty) and press "Yes";
- Wait for the machine to begin emptying the circuit; (Caution: beware of hot water coming from the spouts!). As the water circuit gradually empties, the machine could become noisier: this is a normal aspect of operation.
- Once the circuit has emptied, remove, empty and reposition the drip tray, then press "Yes";
- Press "Ok": the machine switches off (standby).
- Unplug the machine from the mains power supply.
The next time the machine is turned on, follow the instructions in section "6. Operating the appliance for the first time".
9.14 Default values
This function resets all menu settings and all user customizations, restoring the factory default values (with the exception of the language, which remains as set, and the statistics).
-
Press the settings menu (C6) (fig. 14);
-
Scroll through the menu pages until the item "Default values" is displayed;
- Press "Read more":
- Select the items you want to reset: machine or individual profile, then press "Next";
- Follow the instructions until prompted to confirm, and press "OK": the homepage (C) will reappear.
Please note:
Whenever the machine (not the individual profile) is reset to the factory default values, it will automatically prompt the first time start-up sequence, from "Installing the water softener filter".
10. SELECTION OF DRINKS
Your machine can be used to make a great variety of drinks*. (*Number and type of drinks differ according to model).
| Hot Cold | ||
| Espresso | ✓ | × |
| 2X Espresso | ✓ | × |
| Coffee | ✓ | ✓ |
| Doppio+ | ✓ | × |
| Long | ✓ | × |
| Americano | ✓ | ✓ |
| Cappuccino | ✓ | × |
| Latte Macchiato | ✓ | × |
| Latte | ✓ | × |
| Cappuccino Mix | ✓ | × |
| Espresso Macchiato | ✓ | × |
| Flat White | ✓ | × |
| Cappuccino+ | ✓ | × |
| Cortado | ✓ | × |
| Milk | ✓ | × |
| Hot water | ✓ | × |
From the panel (B), access the type of drink desired (Milk (B3): milk based drinks; Coffee (B2): coffee based drinks), ensuring the machine is equipped with the necessary accessories.
11. PREPARATION OF COFFEE DRINKS
11.1 Prepare the machine to make coffee drinks Important!
Do not use green, caramelized or candied coffee beans as they could stick to the coffee grinder and render it unusable.
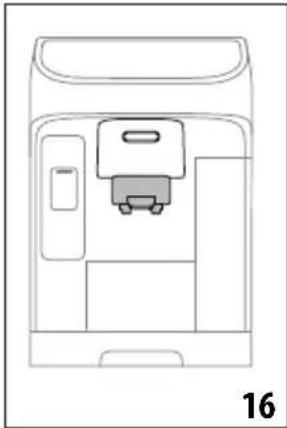
- Place 1 or 2 cups under the coffee spout (A16);
- Bring the spout down as close as possible to the cup (fig. 16): this makes a creamier coffee.
11.2 Directly selected coffee drinks
- Press the image on the homepage (C) that corresponds to the desired coffee (C7) (e.g. Espresso, fig. 17);

- Hot coffee-based drink: the machine proceeds with preparation.
Cold coffee drink:
make the selection between "Iced" or "Extra iced" drink: press "Next";
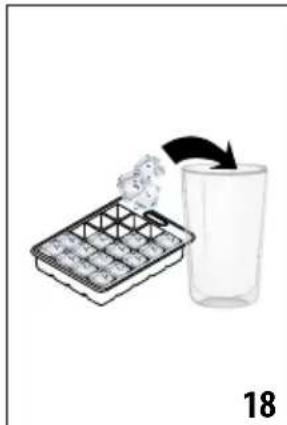
- depending on the selection made, the machine will suggest the amount of ice to add to the drink before proceeding with preparation: place the recommended number of ice cubes in the glass (fig. 18), and press "Deliver".
-
The machine proceeds with the preparation.
-
A description of each single step (grinding, delivery of coffee) appears on the display.
- Once the preparation has been completed, the machine is ready for use again.
11.3 Customized coffee-based drinks
To make coffee-based drinks with customized parameters, proceed as follows:
- Press the customization bar (C8) at the bottom of the image corresponding to the desired coffee (e.g. espresso, fig. 19): the parameters that can be selected according to personal preference appear on the display:

| Quantity | |
| Intensity |
- Hot coffee drink: After setting the parameters, press "Deliver": the machine proceeds with preparation and a description of each single step (grinding, delivery of coffee) appears on the display;
Cold coffee drink: After setting the parameters, press "Start" and proceed as follows:
- Select either an "Ice" drink or an "Extra ice" drink: press "Next";
- depending on the selection made, the machine will suggest the amount of ice to add to the drink before
proceeding with preparation: place the recommended number of ice cubes in the glass (fig. 18), and press "Deliver".
-
The machine proceeds with preparation, and the display shows the description of each single step (grinding, delivery of coffee).
-
When delivery has ended, press "Save" to store the new settings or "Cancel" to retain the previous parameters.
Please note:
If saved, the new settings will be stored ONLY in the selected profile.
- To go back to the homepage (C), wait a few moments or press "X".
The machine is ready to be used again.
11.4 Making drinks using pre-ground coffee Important!
- Never add pre-ground coffee when the machine is off, or it could spread through and soil the inside of the machine. This could damage the machine.
- Never use more than 1 level measure (D2) as it could soil the inside of the coffee machine or block the funnel (A3).
- When using pre-ground coffee, only one cup can be made at a time.
- Making Long coffee: halfway through preparation, when prompted by the machine, add one level measure of pre-ground coffee and press "OK".
-
Certain drinks cannot be prepared using pre-ground coffee: Doppio+, 2x Espresso, Cappuccino+
-
Press the customization bar (C8) at the bottom of the image corresponding to the desired coffee (e.g. espresso, fig. 19): the parameters that can be selected according to personal preference appear on the display:
-
Select the quantity, and select pre-ground coffee;
- Press "Deliver";
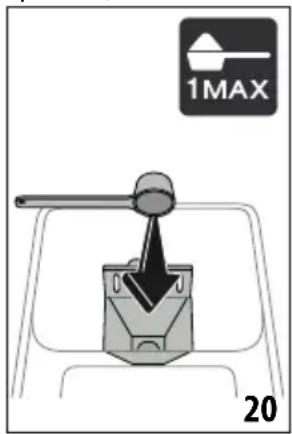
- Lift the lid of the pre-ground coffee funnel (A3), make sure the funnel is not blocked, then put in one level measure (D2) of pre-ground coffee (fig. 20) and press "OK" to proceed with preparation;
- The machine proceeds with preparation and a description of each single step (water heating, delivery of coffee) appears on the display.
Once the preparation has been completed, the machine is ready for use again.
11.5 Extra shot (hot drinks only)
In certain cases, another Espresso (30 cc) can be added to give an extra 'kick'. The Extra Shot option is available with the following drinks*:
(*Number and type of drinks differ according to model).
| Espresso | ✓ |
| Espresso | ✓ |
| Espresso Macchiato | ✓ |
| Long | ✓ |
| Coffee | ✓ |
| Doppio+ | ✓ |
| Americano | ✓ |
| Cappuccino | ✓ |
| Latte Macchiato | ✓ |
| Latte | ✓ |
| Cappuccino Mix | ✓ |
| Cortado | ✓ |
| Flat White | ✓ |
| Cappuccino+ | ✓ |
Proceed as follows:
- Press the customization bar (C8) at the bottom of the image corresponding to the desired coffee (e.g. espresso, fig. 19).
- The first time you select this function, make sure the cup being used is large enough: press "Extra Shot" then press "Ok".
- Select the desired quantity and intensity. Press "Deliver".
- When using this function for the first time, the machine will wait for confirmation: press "0k".
- The machine proceeds with preparation and a description of each single step (grinding, delivery of coffee + extra grinding and delivery) appears on the display.
- When done, press "Save" to store the new settings, or "Cancel" to retain the previous parameters.
The machine is ready to be used again.
Please note:
- If saved, the new settings will be stored ONLY in the selected profile.
- If Extra Shot has been selected, it will not be possible to change the quantity setting or use pre-ground coffee.
- When "Extra Shot" is selected, the symbol appears on the customization bar.
- To deselect the function, press "Extra shot" a second time.
11.6 General indications for making coffee-based drinks
- When the machine is making coffee, delivery can be interrupted at any moment by pressing "Stop" or "Cancel".
- As soon as delivery has ended, to increase the quantity of coffee, just press "Extra". Once the required quantity is reached, press "Stop" or "Cancel".
- Certain alarm messages could be displayed while using the machine ("Fill tank with fresh water up to MAX level", etc.); their meaning is explained in section "20. Messages shown on the display".
- If the coffee emerges drop-by-drop, too weak and not creamy enough or too cold, refer to the tutorial on adjusting the coffee grinder (see heading "9.11 Coffee grinder settings") and section "21. Troubleshooting".
- If "Energy Saving" mode is enabled, there may be a few seconds delay before the first coffee is delivered.
11.7 Tips for a hotter coffee
To make a hotter coffee, proceed as follows:
- run a rinse cycle before brewing coffee (heading "9.1 Rins-ing" in the settings menu);
warm the cups with hot water using the hot water function (see section "13. Preparing hot water"); - increase the coffee temperature setting (section "9.6 Coffe temperature" in the settings menu).
12. MAKING CAPPUCCINOS AND MILK BASED COFFEEES
12.1 Preparing the milk carafe (E)
Please note:
To avoid the preparation of milk with insufficient froth or large bubbles, always clean the milk carafe as described in section "12.6 Cleaning the milk carafe after use" and "16.11 Cleaning the milk carafe (E)".
12.2 What milk to use?
The quality of the froth will vary depending on:
- the temperature of the milk or plant-based drink used (for best results, always use milk or vegetable drink straight from the fridge, 5^ );
- type of milk or vegetable drink;
the brand used;
- ingredients and nutritional values.
| LatteCrema HOT | |
| Cow's milk | |
| Whole (fat >3,5%) | ✓ |
| Semi-skimmed (fat between 1.5 and 1.8%) | |
| Skimmed (fat <0.5%) | |
| Vegetable drinks | |
| Soya | ✓ |
| Almond | ✓ |
| Oatmeal | ✓ |
12.3 Filling and attaching the milk carafe
- Lift the lid (E1) (fig. 21);
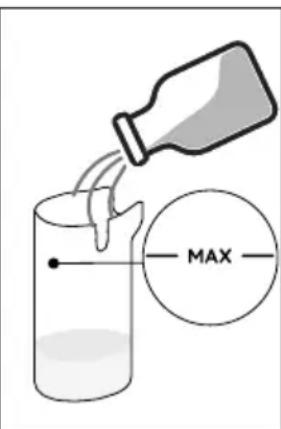
- Fill the milk container (E2) with a suitable quantity of milk, not exceeding the MAX level marked on the container (fig. 22).
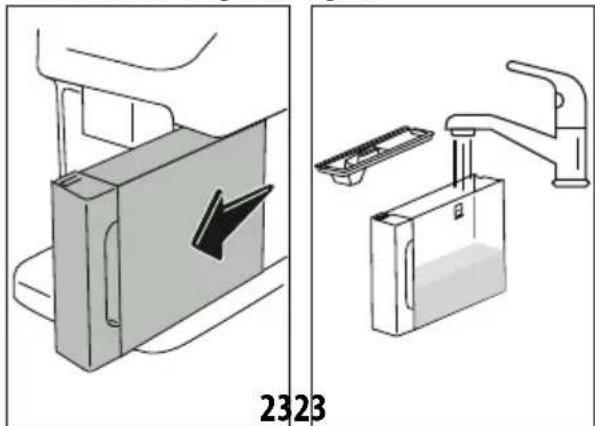
- Make sure the milk intake tube (E7) is secured correctly to the socket on the underside of the milk carafe lid (fig. 23);
-
Reposition the lid on the milk container;
-
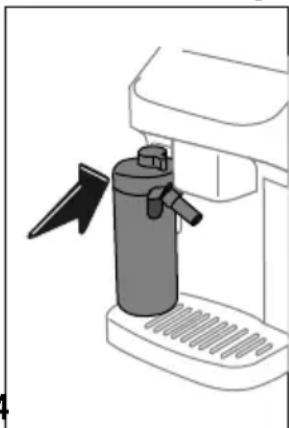
Lower the flap, then attach the carafe to the connector (A17) and push fully home (fig. 24): the machine emits a beep (if the function is enabled);
- Place a sufficiently large cup under the coffee spouts (A16) and under the milk spout (E5). It is possible to extend the milk spout only by adjusting the extension(E6);
- Select the desired drink as described in the following sections.
Please note:
If "Energy Saving" mode is enabled (see section "9.4 General"), there may be a few seconds delay before the drink is delivered.
12.4 Adjusting the amount of froth
Turn the froth adjustment dial (E3)to select the amount of milk froth delivered when making milk based drinks.
| Dial position Recommended for... | |
| Delicate | · Latte · Hot milk (not frothed) |
| Creamy | · Latte Macchiato · Flat White · Cortado |
| Dense | · Cappuccino · Cappuccino Mix · Espresso Macchiato · Cappuccino+ · Hot milk (frothed) |
12.5 Making milk-based drinks
On the homepage (C), press directly on the image corresponding to the required drink (C7).
As in the case of coffee drinks, a drink can be customized by pressing on the customization bar (C8) at the bottom of the image on the homepage.
12.6 Cleaning the milk carafe after use
After each delivery of a milk drink, the machine will prompt the user to run the CLEAN function to clean the milk carafe lid (E1). To start cleaning, proceed as follows:
- Leave the milk carafe in the machine (there is no need to empty the container);
- Place a cup or other recipient under the milk spout (E5) (fig. 25);
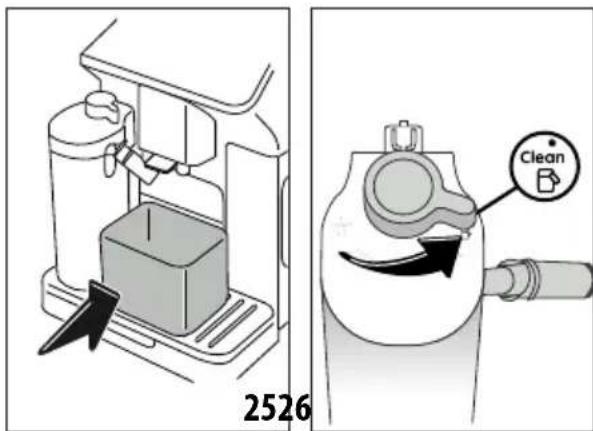
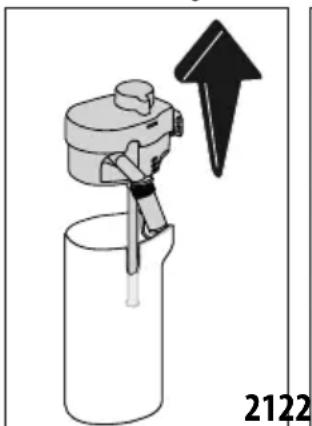
- Turn the froth adjustment/clean dial (E3) to "Clean" (fig. 26): hot water and steam are delivered from the milk spout. Cleaning stops automatically;
- Turn the dial back to one of the froth selections;
Where several drinks are prepared in succession:
To proceed with further preparations, when the message to clean the carafe appears (dial positioned on "Clean"), press "Cancel". Proceed with cleaning of the carafe after the final preparation.
After multiple preparations, the milk container is empty or the milk that remains is not enough to make further drinks
- Having run the cleaning operation on the milk carafe (dial positioned on "Clean"), disassemble the milk carafe and clean all components, proceeding as described in section "16.11 Cleaning the milk carafe (E)"
After multiple preparations, there is enough milk left in the container to make further drinks
- run the cleaning operation on the milk carafe (dial positioned on "Clean"), remove the milk carafe and put it straight in the refrigerator. The Hot Milk carafe can be kept in the refrigerator for no more than 2 days, after which time all components should be cleaned, proceeding as described in the section "16.11 Cleaning the milk carafe (E)".
Important:
If the milk carafe is left out of the refrigerator for more than 30 minutes, disassemble and clean all components, proceeding as described in the section "16.11 Cleaning the milk carafe (E)".
Following preparation of milk-based drinks — general notes:
If the milk carafe is not cleaned, the symbol appears on the homepage as a reminder that cleaning is required.
- In certain cases, the machine will need to heat up before cleaning can take place.
To ensure correct cleaning, wait for the CLEAN function to end. The function is automatic. It must not be stopped while in progress.
13. PREPARING HOT WATER
- Attach the hot water spout (D5) to the machine (fig. 4);
- Place a cup under the spout;
Direct selection:
- On the homepage (C), press directly on the image corresponding to hot water: delivery begins, and will stop automatically.
Customization of quantity:
- Press the customization bar (C8) at the bottom of the image corresponding to hot water: the display shows the quantity to be selected;
- Press"Deliver": delivery begins and will stop automatically.
Please note:
- To stop delivery manually, press "Stop" or "Cancel".
- Immediately after delivery has stopped automatically, it can be prolonged by pressing "Extra".
14. "MY" FUNCTION (hot drinks only)
With the "my" function, you can select the quantity of each ingredient used to prepare the hot drink you want to make.
- Ensure the intended profile (C7) for customization of the drink is active;
- Press the customization bar (C8) at the bottom of the image corresponding to the desired drink;
- Press ; my
- Press "Start" and follow the guided procedure;
- Select the desired intensity, if envisaged for the drink, and press "Next";
- Make sure the cup placed under the coffee spout (A16) is the right size, and press "Deliver" to start dispensing;
- As the drink is delivered, a progress bar will fill up gradually. Once the minimum programmable quantity is reached, the "Stop" button will be enabled. The symbol indicates the factory default setting.
- When the desired quantity has been delivered into the cup, press "Stop".
- If the drink in the cup is as desired, press "Save" to store the new setting in the selected profile, or "Cancel" to retain the previous parameters.
- Press "X" to go back to the homepage.
Please note:
- If saved, the new settings will be stored ONLY in the selected profile.
- When customizing a single drink, the corresponding double version is customized likewise, automatically, and the machine displays the message "Settings saved for both double and single recipe";
-
It is possible to exit programming mode at any given moment by pressing "X": the values will not be saved.
-
To disable the function and prepare the drink using other parameters, press the customization bar relative to the drink: press my on the page to disable the function (my) and revert to the factory default values.
- To reprogram the my drink, the parameters must be reset to the factory default values: press the customization bar of the drink and check that the function is enabled (my). Press "Reset" to restore the factory default values for the drink. The drink can now be reprogrammed.
| Drink quantities table | ||
| Drink Standard | quantity | Programmable quantity |
| Espresso 40ml/1.35 | fl oz 20-180 ml/ | 0.07-6.09 fl oz |
| 2X Espresso 40ml/ | 1.35 fl oz + 40ml/1.35 fl oz | 20-180 ml/0.07-6.09 fl oz + 20-180 ml/0.07-6.09 fl oz |
| Coffee 180ml/ 6.09 | fl oz 100-240 ml/ | 3.38 - 8.11 fl oz |
| Long 160ml/ 5.41 | fl oz 115-250 ml/ | 3.89 - 8.45 fl oz |
| Doppio+ | 120ml/ 4.06 fl oz 80 | -180 ml/2.70 - 6.09 fl oz |
| Americano | 150ml/ 5.07 fl oz 70 | -480 ml/2.37 - 16.23 fl oz |
| Hot water | 250ml/ 8.45 fl oz 20 | -420 ml/0.07 - 14.20 fl oz |
15. SELECTING YOUR PERSONAL PROFILE
The machine allows multiple profiles to be saved, each one associated with a different icon.
The customized drink settings are saved in each profile. The order in which all the drinks are displayed is based on the frequency of selection.
To select a profile, proceed as follows:
- From the homepage (C), press the profile currently in use (C1): the list of selectable profiles will appear;
- Now select the required profile.
To add a new profile:
- From the homepage (C), press the profile currently in use (C7): the list of selectable profiles will appear;
- Press " ^+ Add" and create the new profile
-
Press "Change" to change the image and color of the profile;
-
To rename the profile, press on the existing name at the bottom of the profile: the keypad will pop up. Type the new name and press Ok.
- Press "Save".
- The new profile has been created. Press "X" to go back to the homepage.
To edit an existing profile:
- From the homepage (C), press the profile currently in use (C1): the list of selectable profiles will appear;
- Press on the profile to be edited.
- Press "Change" to change the image and color of the profile;
- To rename the profile, press on the existing name at the bottom of the profile: the keypad will pop up. Type the new name and press Ok.
- Having made the desired changes, press "Save".
To delete an existing profile:
- From the homepage (C), press the profile currently in use (C1): the list of selectable profiles will appear;
- Press on the profile to be deleted.
- Press "Delete".
- Confirm the operation by pressing "Yes".
- Press "X" to go back to the homepage.
Please note:
Once a selection has been made, the colored bars of the drink settings will all appear in the same color as the profile;
16. CLEANING
16.1 Cleaning the machine
The following parts of the machine must be cleaned periodically:
- internal circuit;
- coffee grounds container (A10);
- drip tray (A14) and drip tray grille(A12);
- inside of the machine
-water tank (A9);
-pre-ground coffee funnel (A3); - coffee spout (A16);
- removable infuser (A6), accessible after opening the relative service flap (A5);
-control panel (B). - milk carafe (E)
Important!
- Do not use solvents, abrasive detergents or alcohol to clean the machine. With De'Longhi superautomatic coffee machines, no chemical additives are required for cleaning purposes.
- Do not use metal objects to remove encrustations or coffee deposits as they could scratch metal or plastic surfaces.
| dishwasher safe hand | wash only |
| drip tray grille (A12) drip tray | (A14) |
| milk carafe (E) coffee grounds | container (A10) |
| cup tray (A11) | |
| water tank (A9) | |
| removable infuser (A6) |
16.2 Cleaning the internal circuit
If the machine is not used for more than 3/4 days, it is strongly advisable, before using it after such a break, to empty the tank (A9) and refill it with fresh drinking water, then switch on and run 2/3 rinse cycles selecting the "Rinse" function (section "9.1 Rinsing").
Please note:
It can happen, during the rinse procedure, that water will find its way into the grounds container (A10): this is quite normal.
16.3 Cleaning the coffee grounds container
When prompted by the machine, this must be emptied and cleaned. The machine cannot make coffee again until the grounds container (A10) has been cleaned. The machine will display the message indicating the need to empty the grounds container 72 hours after the first coffee has been prepared, even if the container is not full (for the 72 hours to be calculated correctly, the machine must never be disconnected from the mains power supply).
Important! Danger of scalding
If you make a number of milk-based drinks one after the other, the metal cup tray (A11) becomes hot. Wait for it to cool down before touching it and handle it from the front only.
To clean (with the machine on):
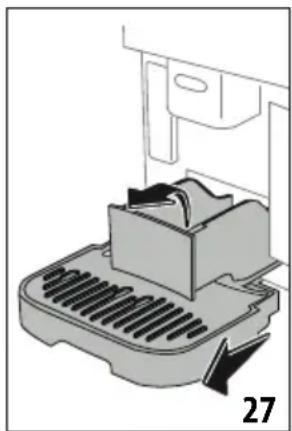
- Remove the drip tray (A14) and grounds container (A10) (fig. 27);
- Empty the drip tray and the grounds container and clean thoroughly with a brush to remove all residues that may have collected on the bottom.
- Reposition the drip tray in the machine, complete with grille (A12) and grounds container.
Important!
- When removing the drip tray, the coffee grounds container must always be emptied, even if it has not filled up noticeably. If this is not done, it can happen that when further coffees are prepared, the grounds container will fill up more than expected and clog the machine.
16.4 Cleaning the drip tray and drip tray grille Important!
The drip tray (A14) is fitted with a level indicator (A13) (red) showing the amount of water it contains (fig. 28).
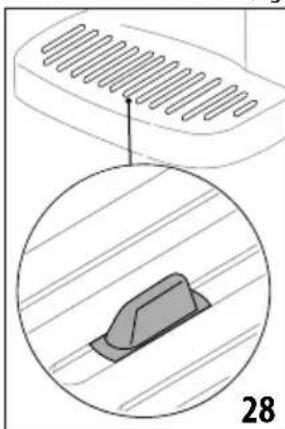
Before the indicator protrudes from the cup tray (A11), the drip tray must be emptied and cleaned, otherwise the water may overflow the edge and damage the appliance, the surface it rests on or the surrounding area. To remove the drip tray, proceed as follows:
- Remove the drip tray complete with grille (A12) and tray, and the grounds container (A10) (fig. 27);
- Check the condensate drip tray, which is colored red (A15) and empty if necessary. Check the red-colored condensate tray;
- Remove the cup tray and the drip tray grille, then empty the drip tray and the grounds container, and wash all of the components;
- Reposition the drip tray in the machine, complete with grille, tray and grounds container.
Important!
When removing the drip tray, the coffee grounds container must always be emptied, even if it has not filled up noticeably. If this is not done, it can happen that when further coffees are prepared, the grounds container will fill up more than expected and clog the machine.
16.5 Cleaning the inside of the machine Danger of electric shock!
Before cleaning internal parts, the machine must be turned off (see section "8. Turning the appliance off") and unplugged from the mains power supply. Never immerse the machine in water.
-
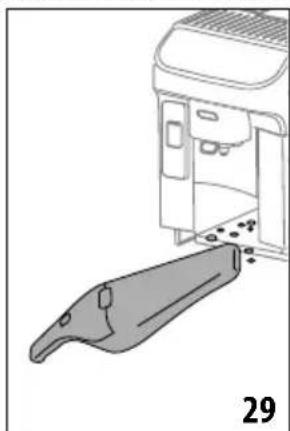
Check regularly (about once a month) that the inside of the appliance (accessible after removing the drip tray (A14)) is not dirty. If necessary, remove coffee deposits with a brush and a sponge.
-
Remove all residues with a vacuum cleaner (fig. 29).
16.6 Cleaning the water tank
Periodically (about once a month) and whenever the water softener filter (D4) is replaced, clean the water tank (A9).
- Take out the water tank (fig. 2), remove the water softener filter (if installed) and rinse under running water:
- Empty the water tank and clean with warm water (40^ approx), wiping if necessary with a clean cloth. Rinse thoroughly with drinking water.
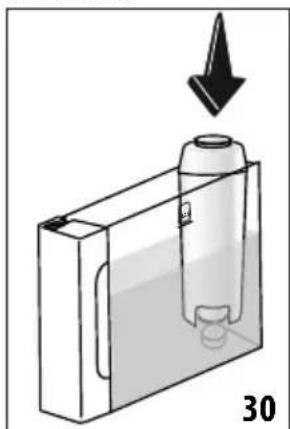
- If previously removed, reinstall the filter (fig. 30), then fill the tank with cold water up to the MAX level (fig. 3) and return it to the machine:
- (Only if a water softener filter is installed): release 100ml/ 3.38 f oz of hot water to reactivate the filter.
Please note:
If the machine is not used for more than 3 days, it is advisable to clean the tank as described above.
16.7 Cleaning the pre-ground coffee funnel
Clean the pre-ground coffee funnel (A3) regularly (about once a month) with a damp cloth. Proceed as follows:
- Turn the machine off (see section "8. Turning the appliance off");
- Open the funnel flap;
- Clean the funnel with a brush;
- Close the flap.
Important!
After cleaning, make sure that no object or accessory has been left in the funnel: the presence of foreign matter in the funnel during operation could cause damage to the machine.
16.8 Cleaning the coffee spouts
- Clean the coffee spout(A16) regularly with a sponge or cloth (fig. 31);
- Check that the holes in the coffee spout are not blocked. If necessary, remove coffee deposits with a toothpick (fig. 32).

16.9 Cleaning the removable infuser
The infuser (A6) must be cleaned at least once a month. Important!
The infuser cannot be removed while the machine is on.
- Make sure the machine is correctly turned off (see section "8. Turning the appliance off");
- Remove the water tank (A9) (fig. 2);
- Open the infuser door (A5) (fig. 33) on the right side of the appliance;
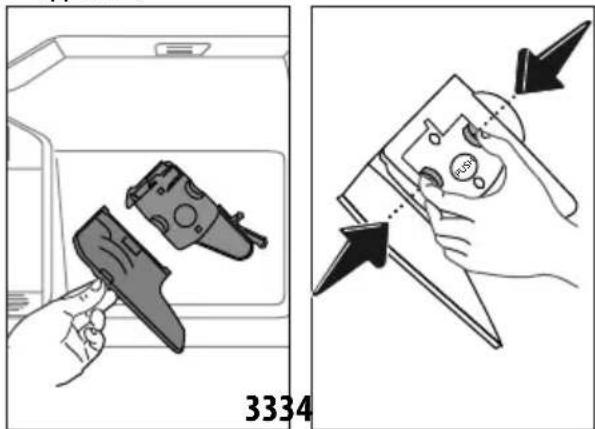
- Press the two colored release buttons inwards and at the same time pull the infuser outwards (fig. 34);
- Immerse the infuser in water for about 5 minutes, then rinse under the tap;
Important!
RINSE WITH WATER ONLY
NO DETERGENTS - NO DISHWASHER
- Do not use detergents when cleaning the infuser, as they could damage it.
- Use a brush to remove any coffee residues left in the infuser housing, which can be seen through the infuser flap (A5);
- After cleaning, replace the infuser by sliding it into its housing, then apply pressure to the PUSH symbol until it clicks into place:
Please note:
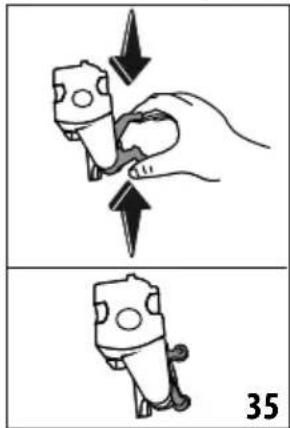
If the infuser is difficult to insert, before insertion, adapt it to the right size by pressing the two levers (fig. 35).
-
Once inserted, make sure the two colored buttons have snapped out;
-
Close the infuser flap;
- Reposition the water tank in the machine.
16.10 Cleaning the control panel (B)
- Turn the machine off by pressing the button (B1);
- Wipe with a soft, non-abrasive cloth;
- Apply firm pressure to remove persistent fingerprints, without ever using excessive force.
16.11 Cleaning the milk carafe (E)
This operation will guarantee optimum results over time. Proceed as follows:
- Remove the lid of the milk carafe (E1) (fig. 21);
- Detach the milk spout (E5), the milk spout extension (E6) and the milk intake tube(E7) (fig. 36);
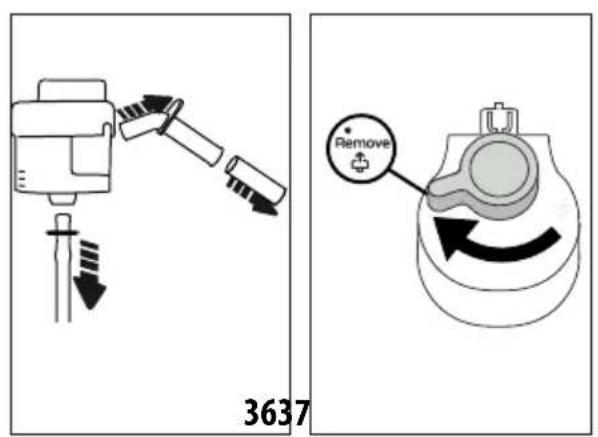
- Turn the froth adjustment dial (E3) clockwise to the
position (fig. 37) and pull;
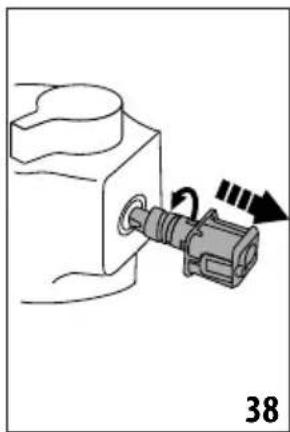
- Turn the milk carafe connector (E4) anticlockwise and pull out (fig. 38).
-
Wash in a dishwasher (recommended) or by hand as indicated below:
-
In a dishwasher: Rinse all components thoroughly with hot drinking water (at least 40^ ), then place them in the top basket of the dishwasher and run a wash program at 50 °C, e.g. ECO standard.
-
By hand: R. Inse all components thoroughly with hot drinking water (at least 40^ ) to remove all visible milk residues, making sure to direct the water through all the holes in the lid (fig. 39): next, immerse all the components (including the milk container (E2)) in a solution of hot drinking water (at least 40^ ) and washing up liquid for at least 30 minutes. Rinse all the components described above thoroughly under hot drinking water, rubbing each one individually between fingers and thumbs.
-
Check carefully that no milk residues have been left in the recess and the channel on the underside of the dial (fig.40): if necessary, scrape the channel clean with a toothpick;


- Check that the intake tube and spout are not clogged with milk residues;
- Dry all the components with a clean dry cloth;
- Reassemble all the lid components;
- Refit the lid to the milk container.
Please note:
The machine will periodically remind you of the need for thorough cleaning of the milk carafe, indicating the correct procedure.
17. DESCALING
Important!
- Before use, read the instructions and the labeling on the descaler pack.
- Use only descaler supplied by De'Longhi. Using unsuitable descaler and/or performing descaling incorrectly may result in faults not covered by the manufacturer's guarantee.
- Descaler could damage delicate surfaces. If the product is accidentally spilt, dry immediately.
| To descale | |
| Descaler De'Longhi descaler | |
| Container Recommended capacity: 2l | |
| Time ~25min | |
Descale the appliance when the corresponding message appears on the homepage (C); to proceed immediately with descending, press "Yes" and follow the instructions from point (8).
To delay descending until later, press "Cancel": the homepage will continue to show the corresponding symbol (C3) as a reminder that descending needs to be carried out. (The message reappears every time the machine is turned on).
To access the descending menu:
- Press the settings menu icon (C6) on the homepage;
- Scroll through the pages until the item "Descale" appears;
-
Press "Yes" to initiate the guided descale procedure (or "Read more" for additional information);
-
Attach the water spout (D5) (fig. 4);
- Remove and empty the drip tray (A14) and the coffee grounds container (A10) (fig. 24), then reposition both and press "Next";
- Remove the water tank (A9), lift the lid (A8), remove the filter (if installed) (D4) and press "Next";
- Empty the tank completely and press "Next";
- Pour the descaler into the tank up to the level A marked inside the tank (equal to one 100ml/3.38 FL OZ packet), then add water (1 liter/ 33.81 FL OZ) up to level B (fig. 41). Reposition the water tank (with lid) in the machine and press "Next",
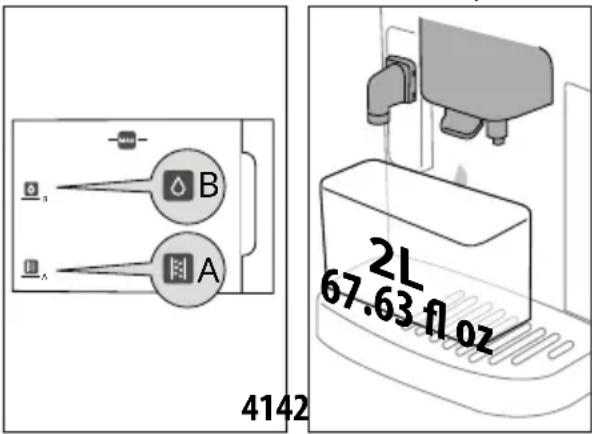
- Place an empty container of at least 2 liters/67.23 fl oz capacity under the spouts (fig.42). Press "Done" to start the procedure;
Important! Danger of scalding
Hot water containing acid flows out of the spouts. Accordingly, take care to avoid contact with this solution.
- The descale program starts and the descaler solution comes out of the hot water spout and the coffee spout; a succession of rinses is performed automatically at set intervals to remove the scale residues from inside the coffee machine; After about 15 minutes, the descending action ceases;
- The machine is now ready to be rinsed out with cold water. Empty the container used to collect the descaler solution. Remove the water tank from the machine, empty it and rinse under running water, then fill with clean water up to the MAX level and reposition it in the machine (fig. 43). Press "Next";

- Having emptied the container used previously to collect the descaler solution, reposition it under the spouts and press "Yes" to start the rinse sequence;
- Hot water is released both from the hot water spout and from the coffee spout;
- When the water in the tank has run out, empty the container used to collect the rinsing water;
- Take out the water tank and reposition the water softener filter, if removed previously. Press "Next" to continue;
- Fill the tank with cold water up to the MAX level, return it to the machine and press "Yes" to continue;
- Having emptied the container used previously to collect the descaler solution, reposition it under the spouts and press "Yes" to start another rinsing cycle;
- When the water in the tank has run out, empty the container used to collect the rinsing water, then remove, empty and reposition the drip tray (A14) and the grounds container (A10) and press "Next";
- Take out the water tank, top up to the Max level and reposition in the machine;
- The descending procedure is now complete: press "OK". The machine performs a rapid preheat cycle and then goes back to the homepage.
Please note:
- If the descending cycle is not completed successfully (e.g., due to a power outage), the machine will prompt you to repeat the entire procedure.
- Water may find its way into the grounds container (A10) during the descale cycle: this is quite normal.
- If the water tank has not been refilled to the MAX level, the machine prompts for a third rinse to ensure that the descaler solution has been completely eliminated from the internal circuits. Before starting the rinse, remember to empty the drip tray.
18. WATER SOFTENER FILTER
18.1 Installing the filter
To install the filter, proceed as follows:
- Press the settings menu (C6);
- Scroll through the pages until the item "Water filter" is displayed;
- Press "Yes" to initiate the guided procedure
- Proceed from point (17) of heading "Installing the water softener filter" in the section "Operating the appliance for the first time".
Please note:
The filter lasts about two months assuming normal use of the machine; if on the other hand the machine remains idle with the filter installed, it will not last more than three weeks, at most.
18.2 Replacing or removing the filter
Replace the filter (D4) when the corresponding message appears on the homepage (C): to replace the filter immediately, press "Yes" and follow the instructions from point (17). To delay replacement of the filter until later, press "Cancel": the display will continue to show the corresponding symbol as a reminder that the filter needs replacing.
To replace, proceed as follows:
- Press the settings menu (C6);
- Scroll through the pages until the item "Water filter" is displayed, and press "Read more";
- Press "Yes" to initiate the guided procedure;
-
Remove the water tank (A9) and the spent filter.
-
To remove the filter, press "Ok";
- To install a new filter, press "Yes". Proceed with the operations illustrated under heading "Installing the water softener filter" in section "Operating the appliance for the first time" from point (17).
Please note:
After two months (see date indicator), or after 3 weeks if the machine has not been used, the filter should be replaced even if the warning message has not yet been displayed.
19. TIPS FOR ENERGY SAVING
- To reduce energy consumption, after delivering one or more drinks, remove the milk carafes or accessories.
- Set auto-off to 15 minutes (see section "9.5 Auto-off");
- Enable Energy Saving (see paragraph "9.4 General");
- When prompted by the machine, perform the descaling cycle and/or replace the water softener filter.
20. MESSAGES SHOWN ON THE DISPLAY
| DISPLAYEDMESSAGE MEANING | REMEDY | |
| The water tank needs filling with fresh water. | Insufficient water in the tank (A9). Remove | the tank, fill with cold water to the MAX level (fig. 41), and return it to the machine. |
| Can you fit the water tank? | The tank (A9) is not correctly in place. | Reposition the tank in the machine correctly, and press fully home. |
| Can you empty the drip tray and the grounds container? Fill the water tank with cold water | Insufficient water in tank (A9) or grounds container full (A10). | Remove the tank, fill with cold drinking water to the MAX level (fig. 41), and return it to the machine. Clean the grounds container as described in section “16.3 Cleaning the coffee grounds container”. |
| Can you fit the infuser? The infuser (A6) has not been replaced after cleaning. | Insert the infuser as described in section “16.9 Cleaning the removable infuser” | |
| The grounds container and the drip tray need emptying. Empty them regularly, even if they are not full | The grounds container (A10) is full. | Clean as described in section “16.3 Cleaning the coffee grounds container” |
| Fit grounds container and drip tray | Grounds container (A10) and/or drip tray (A14) not correctly in place, or missing. | Refit the drip tray complete with grounds container and press fully home. |
| → | ||
| Have you added pre-ground coffee? Add it now One measure only! | Preparation of a drink using pre-ground coffee has been selected, but the amount of pre-ground coffee inserted is not sufficient | Ensure the funnel (A3) is not blocked, then add one level measure (D2) of pre-ground coffee, press "0k" on the display and follow the instructions in section "11.4 Making drinks using pre-ground coffee". |
| Oops! Looks as if the coffee beans have run out. Time to add more beans. | The coffee beans have run out. Fill the bean | container (A4) and press "Done", then follow the instructions on the display to resume delivery. |
| Fit the water spout Spout (D5) not correctly in place, or missing. | Fit the spout and push fully home (fig. 4). The machine emits a beep (if the beep function is enabled). | |
| Can you fit the LatteCrema Hot carafe? | Milk carafe (E) not positioned correctly, or missing. | Position the milk carafe and push fully home: the machine emits a beep (if the beep function is enabled). |
| Cleaning in progress. Back in a moment | The machine has detected impurities in its internal circuits. | Wait until the machine is ready for use again and reselect the required drink. Contact an authorized Service Centre if the problem persists. |
| The new settings have not been saved | In the course of customizing a drink (see section "14. "My" function (hot drinks only)), preparation has been deliberately interrupted by pressing "Cancel", or an alarm has been tripped. | Press "X" to go back to the homepage (C) and view the alarm that has caused the interruption. Follow the instructions corresponding to the alarm displayed (see section "20. Messages shown on the display") |
| Sorry, not able to complete the drink. Reduce the intensity and try again | The grinding is too fine, so that the coffee is delivered too slowly or not at all. | Press "OK" to go back to the homepage. Select a lower intensity (see "11.3 Customized coffee-based drinks") and try delivering the drink again |
| Impossible to complete the drink. Adjust the coffee grinder by turning the dial to give a finer setting, 1 step at a time (+1) | The beans are too finely ground, so that the coffee is delivered too slowly or not at all. | Press "OK" and adjust the coffee grinder as appropriate (see section "9.11 Coffee grinder settings") |
| Impossible to complete the drink. Reduce the amount of pre-ground coffee and try again. | Too much pre-ground coffee has been used | Reduce the amount of pre-ground coffee (one measure, maximum). Press "OK" to go back to the homepage (C). |
| Impossible to complete the drink. Reduce the amount of pre-ground coffee and try again | Too much pre-ground coffee has been used | Select a milder intensity (see "11.3 Custom-ized coffee-based drinks") or reduce the quantity of pre-ground coffee (maximum 1 measure). Press "OK to go back to the homepage or wait until the message disappears. |
| Place a container under the milk spout. Turn the dial to Clean | A milk-based drink has been prepared, and the milk carafe (E) needs cleaning | Clean the carafe, following the instructions in section "12.6 Cleaning the milk carafe after use". |
| DISPLAYEDMESSAGE MEANING | REMEODY | |
| Remember to put the milk carafe in the refrigerator | A milk-based drink has been prepared and the milk carafe (E) is still on the machine | Remove the milk carafe and put it in the refrigerator. |
| Descaling is required. Ready to start? (~30 min) | Indicates that the machine needs descaling. If the intention is to proceed with descaling, press "Yes" and follow the guided procedure, otherwise press "Cancel": in this case, the homepage (C) continues to display the corresponding symbol (C3) as a reminder that descaling is required (see section "17. Descaling"). | |
| The water filter needs to be replaced. Ready to start? | The water softener filter (D4) is spent. Press | "Yes" to replace/remove the filter, or "Cancel" if the intention is to replace it later. Follow the instructions in section "18. Water softener filter". |
| Something is not right: have a look at the instruction manual to improve things | The inside of the machine is very dirty. Clean | the inside of the appliance thoroughly, as described in section "16. Cleaning". If the message is still displayed after cleaning, contact De'Longhi Customer Services and/or an approved Service Centre |
| Oops, something went wrong Descaling | ling interrupted or not completed correctly | Press "Ok" to continue (see section "17. Descaling". |
| The water circuit is empty. Ready to fill? | The water circuit is empty Press "Yes" to fill | the circuit: the flow of water will stop automatically. It is normal for there to be water in the drip tray (A14) after filling. If the problem persists, make sure the water tank (A9) is fully inserted. |
| A new water softener filter has been inserted (D4) | Make sure the instructions for inserting the new filter have been followed correctly (section "18.1 Installing the filter" and "18.2 Replacing or removing the filter"). If the problem continues, remove the filter (section "18.2 Replacing or removing the filter"). | |
| Energy saving is activated. To disable energy saving, proceed as described in section "9.4 General". | ||
| Remember that the machine needs descaling. | The descaling procedure described in section "17. Descaling" needs to be performed. | |
| The filter must be replaced (D4) Replace the filter or remove it as described in section "18. Water softener filter". | ||
| Remember that the milk carafe (E) must be cleaned | Clean the carafe following the instructions in section "12.6 Cleaning the milk carafe after use". | |
21. TROUBLESHOOTING
Possible malfunctions of the machine are listed below.
If the problem cannot be resolved as described, contact Customer Service.
| PROBLEM POSSIBLE CAUSE REMEDY | ||
| The appliance does not come on The cord is not plugged into the mains socket. | Plug into the mains socket (fig. 1). | |
| Coffee not hot The internal circuits of the appliance have cooled down because 2-3 minutes have elapsed since the last coffee was made. | Before making the coffee, heat the internal circuits by rinsing, using the rinse function (see section "9.1 Rinsing"). | |
| Coffee temperature setting too low. | Set a higher coffee temperature in the settings menu (C6) (see section "9.6 Coffee temperature"). | |
| The cups were not preheated. Warm the cup's cups by rinsing them with hot water (Please note: the hot water function can be used). | ||
| The machine needs descaling. | Proceed as described in section "17. Descal-ing". Next, check the water hardness ("Meas-uring water hardness") and make sure the machine setting matches the local water supply hardness ("Setting water hardness"). | |
| The coffee is weak or not creamy enough. | Coffee ground too coarsely. Access the setting menu (C6) and follow the instructions for adjusting the coffee grinder. The effect is visible only after 3 further coffees have been made (see section "9.11 Coffee grinder settings"). | |
| Coffee not suitable. Use coffee for espresso machines. | ||
| Coffee not fresh. The coffee pack has been opened for too long and has lost its taste. | ||
| The coffee emerges too slowly or drop-by-drop. | Coffee ground too finely. Access the settings menu (C6) and follow the indications to adjust grinding level. The effect is visible only after 3 further coffees have been made (see section "9.11 Coffee grinder settings"). | |
| Coffee does not come out of one or both spouts. | The coffee spouts (A16) are blocked. Clean the coffee spout with a sponge or a toothpick. | |
| The coffee delivered is watery. | The funnel (A3) is clogged. Clean the funnel with the aid of a brush as described in section "16.7 Cleaning the pre-ground coffee funnel". | |
| Delivery of the drink short of measure | Not enough water in the tank (A9) Always fill the tank at least to the MAX level | |
| The machine does not deliver coffee. | Impurities have been detected internally of the machine: the message "Cleaning in progress" appears in the display. Wait until the machine is ready for use again and reselect the required drink. Contact an au-thorized Service Centre if the problem persists. | |
| The infuser (A6) cannot be removed. | The appliance has not been turned off correctly | Turn the machine off by pressing the button (B1) (see section “8. Turning the appliance off”). |
| On completion of the descale cycle, the machine calls for a third rinse. | During the two rinse cycles, the water tank (A9) has not been filled to the MAX level | Follow the procedure indicated by the machine, but first empty the drip tray (A14)to avoid water overflowing. |
| Milk not flowing from the milk spout (E5). | The lid (E1) of the milk carafe is dirty Clean | the lid as described in section “16.11 Cleaning the milk carafe (E)”. |
| The lid (E1) is not correctly assembled. | properly assemble all the various components as indicated in section “12.1 Preparing the milk carafe (E)”. | |
| The milk presents large bubbles, or splashes from the milk spout (E5), or is under-frothed. | The milk is not cold enough, or the type of milk not suitable for the drink requested | To ensure optimum results, check that the right type of milk is being used (see section “12.2 What milk to use?”). Use drinks at refrigerator temperature (about 5°C). |
| The lid (E1) of the milk carafe is dirty Clean | the milk container as described in section “12.6 Cleaning the milk carafe after use” | |
| There is water in the channel located on the underside of the froth adjustment dial (E3) | Detach the dial and dry thoroughly. | |
| Vegetable drinks are being used. | For best results, use drinks at refrigerator temperature (about 5°C). Adjust the amount of froth as described in section “12.4 Adjusting the amount of froth” | |
| The cup shelf (A11) is hot. Several drinks have been prepared in rapid succession | ||
| After cleaning, there is difficulty repositioning the drip tray in the machine | Make sure the condensate tray is inserted correctly | |
| The appliance emits puffs of steam from the drip tray (A14) and/or there is water on the surface the appliance rests on. | Reposition the grille in the drip tray. | |
De'Longhi reserves the right to modify the technical specification and styling of its products at any moment, without compromising their functionality and quality.
TABLE DES MATIÈRES
-
MISES EN GARDE DE SECURITE 30
-
INFORMATIONS GÉNÉRALES 30
2.1 Notice 30
| Boisson chaude | Boisson froide | |
| Café | ✓ | ✓ |
| Doppio+ | ✓ | × |
| Long | ✓ | × |
| Americano | ✓ | ✓ |
| Cappuccino | ✓ | × |
| Latte Macchiato | ✓ | × |
| Latte | ✓ | × |
| Cappuccino Mix | ✓ | × |
| Espresso Macchiato | ✓ | × |
| Flat White | ✓ | × |
| Cappuccino+ | ✓ | × |
| Cortado | ✓ | × |
| Lait | ✓ | × |
| Eau chaude | ✓ | × |
9.2 Descalcification
| Hot Cold | ||
| Espresso | ✓ | × |
| 2X Espresso | ✓ | × |
| Café | ✓ | ✓ |
| Doppio+ | ✓ | × |
| Long | ✓ | × |
| Americano | ✓ | ✓ |
| Cappuccino | ✓ | × |
| Latte Macchiato | ✓ | × |
| Latte | ✓ | × |
| Cappuccino Mix | ✓ | × |
| Espresso Macchiato | ✓ | × |
| Flat White | ✓ | × |
| Cappuccino + | ✓ | × |
| Cortado | ✓ | × |
| Leche | ✓ | × |
| Agua caliente | ✓ | × |