
EFIC452SS - Ice Maker FRIGIDAIRE - Free user manual and instructions
Find the device manual for free EFIC452SS FRIGIDAIRE in PDF.
| Product Type | Ice Maker |
| Brand | Frigidaire |
| Model | EFIC452SS |
| Power Supply | 110-120 V ~ 60 Hz |
| Rated Power | 150 W (estimated) |
| Dimensions (Length × Depth × Height) | Approximately 30 × 25 × 35 cm |
| Weight | Approximately 12 kg |
| Water Tank Capacity | Approximately 2 L |
| Ice Production | Approximately 12-15 kg per day |
| Ice Cycle Time | 13 to 25 minutes |
| Main Functions | Ice making, timer, ice cube size adjustment, automatic stop when basket is full |
| Refrigerant Type | R600a (flammable) |
| Safety | Grounding required, do not use extension cord, keep away from children, do not use flammable liquids |
| Maintenance and Cleaning | Clean interior with mild detergent and hot water every 3 days; change water every 24 hours; clean water separator pipe periodically |
| Drainage | Drain plug at the back to drain water |
| Warranty | See manual or contact customer service |
| Spare Parts and Repairability | Repair by qualified personnel only due to flammable refrigerant; some parts like the sensor can be replaced by the user |
| Error Code E1 | Ambient temperature sensor failure |
| Error Code E2 | Refrigerant tube sensor failure |
Frequently Asked Questions - EFIC452SS FRIGIDAIRE
User questions about EFIC452SS FRIGIDAIRE
0 question about this device. Answer the ones you know or ask your own.
Ask a new question about this device
Download the instructions for your Ice Maker in PDF format for free! Find your manual EFIC452SS - FRIGIDAIRE and take your electronic device back in hand. On this page are published all the documents necessary for the use of your device. EFIC452SS by FRIGIDAIRE.
USER MANUAL EFIC452SS FRIGIDAIRE
IMPORTANT SAFETY INSTRUCTIONS 2
PREPARINGYOURICEMAKERFORUSE 3
IMPORTANT SAFETY TIPS. 3
CLEANING AND MAINTAINING YOUR ICE MAKER. 6
USING YOUR ICE MAKER 8
TROUBLESHOOTING 10
FRIGIDIRE is a pending or registered trademark used under license from
Electrolux Home Products, Inc.
Made In China
IMPORTANTSAFETYINSTRUCTIONS
Yoursafetyandthesafetyofthersareveryimportant.
We have provided many important safety messages manual and your appliance.
Always read and obey all safety messages.
Thisisthesafetayalertsymbol:

All safety messages will follow the safety alert symbol and the word "DANGER" or "WARNING".

DANGER

WARNING
Thesewordsmean:
You can be killed or seriously injured if you don't immediate followinstructions.
All safety messages will tell you what the potential hazard is, tell you how to reduce the chance of injury, and tell you what can happen if the instructions are not followed.
PREPARING YOUR ICE MAKER FOR USE
IMPORTANT SAFETY TIPS
When using electrical appliances, basic safety precautions should be followed to reduce the risk of fire, electric shock, and injury to persons or property. Read all instructions before using any appliance.
- Do not operate this, or any other appliance with a damaged cord.
Connect to properly polarized outlets only. No other appliance should be plugged into the same outlet. Be sure that the plug is fully inserted into the receptacle. - Do not run the power cord over carpeting or other heat insulators. Do not cover the cord. Keep cord away from traffic areas, and do not submerge in water.
- We do not recommend the use of an extension cord, as it may overheat and become a ris fire. If you must use an extension cord, use No.14 AWG minimum size and rated no less 1875 watts.
- Unplug the ice maker before cleaning or making any repairs or servicing.
- Exercise caution and use reasonable supervision when appliance is used near children.
- Do not use your ice-maker outdoors. Place the ice-maker away from direct sunlight and make sure that there is at least 6 inches of space between the back of your unit and wall. Keep a minimum distance of 6 inches on each side of your unit free.
- Do not use other liquid to make the ice-cube other than water.
- Do not clean your ice maker with flammable fluids. The fumes can create a fire hazard or explosion.
- Do not tip over.
- If the ice maker is brought in from outside in wintertime, give it a few hours to warm up the room temperature before plugging it in.
WARNING: This appliance must be earthed.
- DANGER - Risk Of Fire or Explosion. Flammable Refrigerant Used. Do Not Use Mechanical Devices To Defrost Ice Maker. Do Not Puncture Refrigerant Tubing.

DANGER - Risk Of Fire Or Explosion. Flammable Refrigerant Used. To Be Repaired Only By Trained Service Personnel. Do Not Puncture Refrigerant Tubing.
- CAUTION - Risk Of Fire Or Explosion. Flammable Refrigerant Used. Consult Repair Manual/Owner's Guide Before Attempting To Install or Service This Product. All Safety Precautions Must be Followed.
- CAUTION - Risk Of Fire Or Explosion. Dispose Of Property In Accordance With Federal O Local Regulations. Flammable Refrigerant Used .
- CAUTION-Risk Of Fire Or Explosion Due To Puncture Of Refrigerant Tubing;Follow Handling Instructions Carefully. Flammable Refrigerant Used.
- The ice maker should be installed in accordance with the safety standard for Refrigeration Systems, ASHRAE15. The ice maker shall not be installed in corridors or hallways of public buildings.
- If the unit is with problem need to be maintained, that replacing with like components and that servicing shall be done by factory authorized service personnel, so as to minimize the risk of possible ignition due to incorrect parts or improper service.
IMPORTANT:
The wires in this mains lead are colored in accordance with the following code:
Green or Green with a strip yellow: Grounding
White: Neutral
Black: Live
To avoid a hazard due to instability of the appliance, it must be placed at a even or flat s
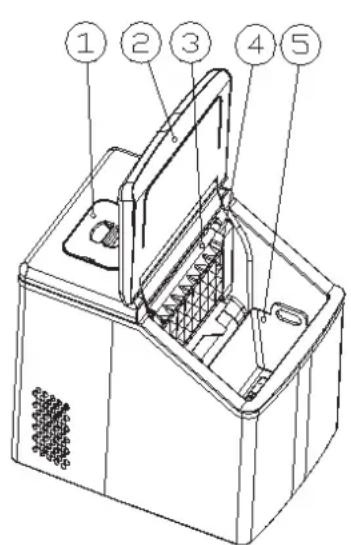
- Water reservoir cover
- Unit top cover
- Water separator pipe
- Evaporator
- Ice basket
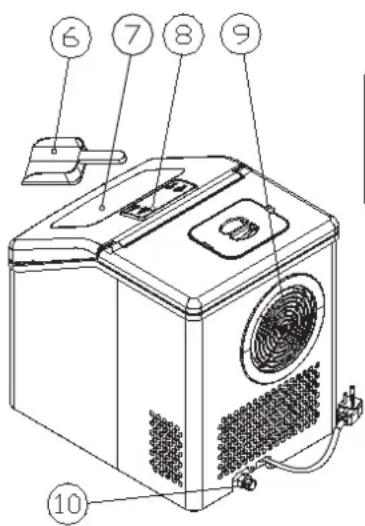
- Ice scoop
- Transparent window
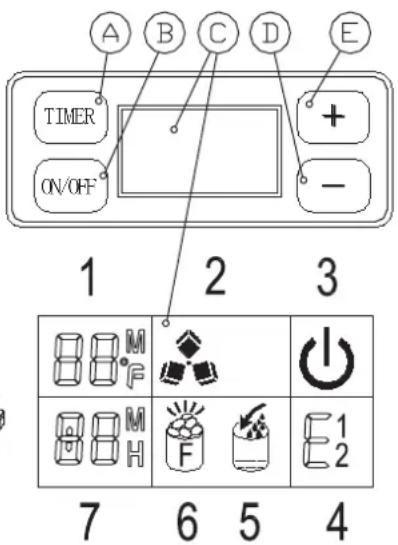
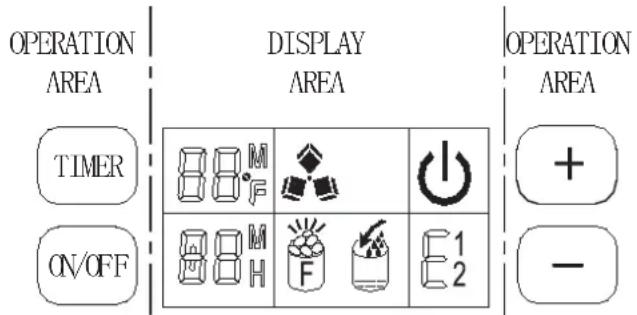
- Control Panel:
A. Timer button
B. Power button
C. LCD Display area
- Ambient temp and ice making countdown symbol: when display show <M> , ice making countdown, when display show <F> , means ambient temp.
- Ice making and Ice harvest symbol: when the symbol is running, the unit is making ice cube, when the symbol flash, the unit is ice harvest.
- ON/OFF symbol.
- Error code E1-Ambient temp senor breakdown.E2-refrigerating tube sensor breakdown
- Lack water warning symbol.
- Ice full warning symbol.
- Time setting display area. When show <H> , timer unit ON/OFF, when show <M> , setting ice making time.
D. Ice making and timer reduce.
E. ice making and timer increase.
-
Hot Air Outlet
-
Water draining port: To draining out the water from unit.
- Remove the exterior and interior packaging. Check that ice basket and ice scoop is included. If any parts are missing, please contact our customer service.
- Clean the interior with lukewarm water and a soft cloth. Take out the ice basket and clean
- Find a location for your ice maker that is protected from direct sunlight and other sources of heat (i.e.: stove, furnace, radiator). Place the ice maker on a level surface. Maker sure that there is at least 6 inches of space between the back and sides of your ice maker and the
- Allow one hour for the refrigerant fluid to settle before plugging ice maker in.
- The appliance must be positioned so that the plug is accessible.
CONNECTING YOUR ICE MAKER

DANGER
-
Improper use of the grounded plug can result in the risk of electrical shock. If the power cord is damaged please call our customer service.
-
This unit should be properly grounded for your safety. The power cord of this appliance is equipped with a three-prong plug which mates with standard three prong wall outlets to minimize the possibility of electric shock.
- Plug your appliance into an exclusive, properly installed, grounded wall outlet. Do not under any circumstances, cut or remove the third (ground) prong from the power cord. Any questions concerning power and/or grounding should be directed toward a certified electrician.
- This appliance requires a standard 110-120volt, 60Hz electrical outlet with three-prong ground.
CLEANING AND MAINTAINING YOUR ICE MAKER
Before using your ice maker, it is strongly recommended to clean it thoroughly
- Take out the ice basket.
- Clean the interior with diluted detergent, warm water and a soft cloth.
- Then use the water to rinse the inside parts, and drain out the water from the draining point unplugging the drain cap on the back.
- The outside of the ice maker should be cleaned regularly with a mild detergent solution and warm water.
- Dry the interior and exterior with a soft cloth.
- When the machine is not in use for a long time, open the water drain cap to drain water completely out from the water reservoir.
After using your ice maker for a long time, we also suggest you should clean your unit. Especially to the water separator pipe and the water filters, you must clean them periodically.
- If the water separator pipe is blocked and there is no water flowing down when you listen the compressor and the water pump inside are still working, please turn off the unit first and disassemble this pipe down, and clean it. Clean the each hole on the pipe wall displayed in following picture. After cleaning, install back the water separator pipe and be sure the right terminal of the pipe connect to the silicone pipe well and as original.

- For both of the water tank and the big water reservoir, clean them with diluted detergent, warm water and a soft cloth. Then use the water to rinse the inside, and drain out the water from the draining port by unplugging the drain cap on the back. It will help you keep the unit and ice-cube hygienically, and also make the unit work normally.
- When cleaning, if find that the ice cube left on the evaporator and can not be taken out easily, you can turn on the unit to let the unit enter the ice making process, then press "ON/OFF" button for more than 5 seconds to let the unit start ice harvest process to melt the ice cube. It will help you remove the hard ice cube.
Howtodrainoutthewaterfromtheinternaltankandbigwaterreservoir completely
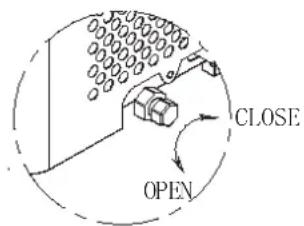
Because the water in the big water reservoir is stop to drain port by the water valve, if you want to drain away all the water, please plug in the unit but don't start the unit, then remove the drain port cap at the back. Wait 3-5minutes, all of the water will flow out.
USINGYOURCEMAKER
Operation panel and display area
- Remove the cover of the water reservoir and pour potable water into water reservoir.
And be sure to keep water level below the max. level with FULLmark displayed in following picture. Then move back the cover.
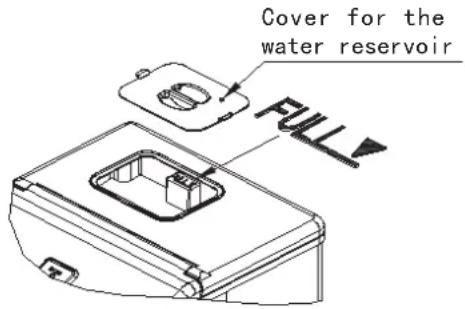
Warning: Do not pour the water into the internal water tank located underneath the ice basket. This tank is not big enough and will effect the ice making performance.
- When you plug the unit, the power symbol < will flash. Press the
button, the
unit will start making ice cube, ice making symbol< > will keep running. The left up corner of display area will show the ambient temp,i.e:80°F means the ambient temp is 80°F. After several mins, this area will show flash number, the ice making will countdown,i.e:10M means the ice making will finish 10 mins later.
- When ice maker harvest, symbol< >flash, the water will flow from top water reservoir to
bottom water tank through solenoid valve, the symbol < will be on , when the water in the bottom water tank is full, the symbol < will be off, then the next ice making cycle start
again. When there is no water in the water reservoir, the symbol < will keep on. Turn off the unit and fill water again, then restart the unit to make ice cube. Or fill water directly and wait 20mins, the unit will restart.
Remark: The ice making cycle lasts about 13 to 25 minutes,depending on the ambient temperature. And for the first time, according to the initial water temperature, ice-making
last time will be a little longer. In the extreme hot room temperature, ice-making time maybe vary a lot, but it will not exceed 35 minutes.
If you think the ice cube is not thick enough, during ice making, press the < + > and < -> to set the ice making lead time. Press one time and the ice making cycle will increase or reduce one min, 6min most. This can only start from the new cycle.
- When Ice Full symbol< start working again.
is on, the unit will stop, take out the ice cube inside, the unit will
If press the button <ON/OFF> more than 5s, when the ice maker is working, the unit will start harvest. Press button <ON/OFF> , the unit will turn off.
Timer setting. Unit on timer setting, When the unit is working, timer setting the unit off. Unit off timer setting, When the unit is off, timer the unit on.
Press the
- WaterDrain:takeoffthedrainplugcaponthebackofunit, takeoutthesilicon plug, thendrainthewaterinside.
It is better that exchange water every 24hours, and clean unit every 3days.
Warning
A. make sure the water tank ,water filter and the water separator pipe is not blocked, clean them
B. The water temp will effect the ice making capacity. The lower temp, the more ice cubes will produce.
C. The cooler ambient temp, the more ice cubes will produce.
D. always use good quality water to make sure the pump work well. Bad quality water will cause pump noise, but doesn't effect the unit working.
E. The compressor will restart 3mins later if you turn off the unit.
| problemreasonsolution | ||
| <>ison | Lackofwater | Turnofftheunitandaddwaterto<FULL>level,thenre-starttheunit. |
| <>ison | Toomanyicecubeinthebasket | Removetheicecubeinthebasket |
| Thewaterreservoirhaswater,but<>ison | Theinletsolenoidvalvebreakdown | Need the technical service person tomaintain |
| <E1>ison | Ambient temp sensorbreakdown | Theunitcanstillwork,changeanewsensor |
| <E2>ison | Refrigerating tube sensorbreakdown | Theunitcanstillwork,changeanewsensor |
| No water in the waterseparatorpipe | Theholesareblocked | Use slim wire to prick each hole,tillthewatercanflowouteasily. |
| Waterfilterblock | Cleanthewaterfilter | |
| Icecubethick andcann'tdropdown | Icemakingcycletoolong | Press<-toreducetheicemkingtime. |
| Icecubethin | Ambienttemptoohigh | Movetheunittocoolplace |
| Watertemptoohigh | The water temp should be no moremorethan77°F | |
| Icemakingshort | Press<++toincreaseetheicemakingtime。 | |
| Unitworkbutnoicecube | Ambienttempishighorthewatertempishigh | Movetheunit tosomewhereambienttemplowerthan86°F,fillcoolwater. |
| Refrigerant systemleakage | Need the technical service person tomaintain | |
| Refrigerantsystemblock | Need the technical service person tomaintain |
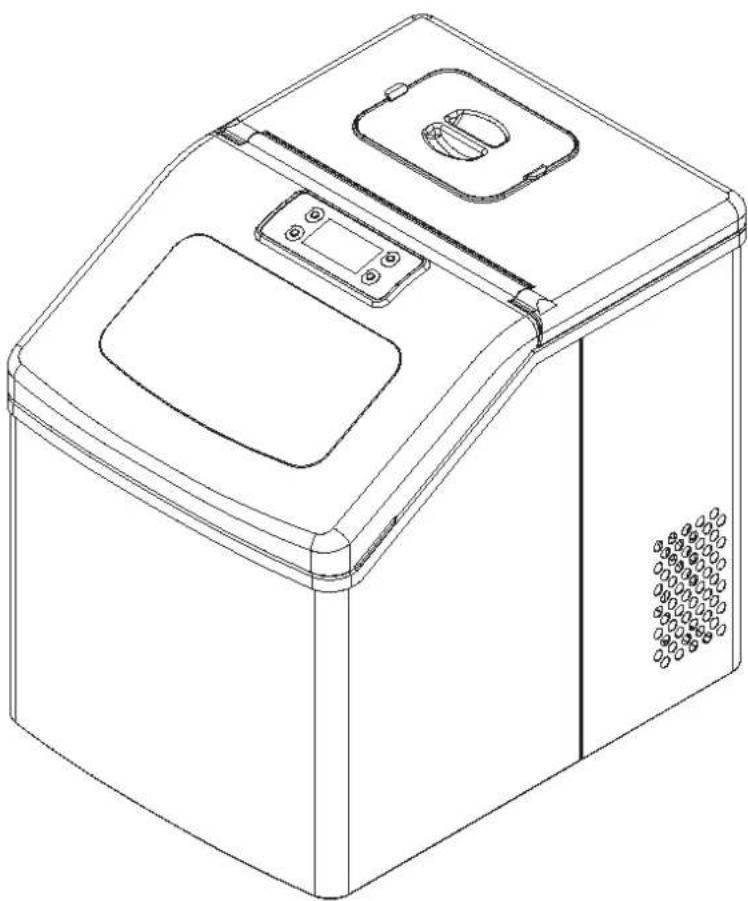
TABLE DES MATIERES
LES INSTRUCTIONS DE SECURITE IMPORTANTES 2
PREPARER VOTRE MACHINE A GLAÇONS POUR L'UTILISER 3
LES CONSEILS DE SECURITE IMPORTANTS 3
APPRENDRE A CONNAITRE VOTURE UNIT 5
PROCÉDURES D'EXPLOITATION ET MAINTENANCE 6
DEBALLER VOTRE MACHINE A GLAÇONS. 6
CONNECTER VOTRE MACHINE A GLAÇONS 6
CLEANNETTOYERETENTRETENIRVOTREMACHINEAGLAÇONS 6
UTILISER VOTRE MACHINE A GLAÇONS 8
DEPANNAGE 11
- IMPORTANTSAFETYINSTRUCTIONS
- Yoursafetyandthesafetyofthersareveryimportant.
- PREPARING YOUR ICE MAKER FOR USE
- IMPORTANT SAFETY TIPS
- IMPORTANT:
- CONNECTING YOUR ICE MAKER
- DANGER
- CLEANING AND MAINTAINING YOUR ICE MAKER
- Before using your ice maker, it is strongly recommended to clean it thoroughly
- Howtodrainoutthewaterfromtheinternaltankandbigwaterreservoir completely
- USINGYOURCEMAKER
- Warning
- TABLE DES MATIERES
Brand : FRIGIDAIRE
Model : EFIC452SS
Category : Ice Maker