
APE508CE - Air Conditioning AireMax - Free user manual and instructions
Find the device manual for free APE508CE AireMax in PDF.

| Product Type | Portable or window air conditioner (model APE508CE) |
| Dimensions (approx.) | Height: 70 cm, Width: 45 cm, Depth: 35 cm |
| Weight (approx.) | 25 kg |
| Power supply | Single phase, 220-240 V, 50 Hz, 3-prong grounded plug |
| Refrigerant | R32 (flammable), charge: 11.46 oz (325 g) |
| Minimum recommended area | 4 m² |
| Main functions | Cooling, ventilation, dehumidification, adjustable thermostat |
| Filter | Washable air filter, remove and clean regularly |
| Noise level (approx.) | 55 dB |
| Energy class | A (estimated) |
| Cooling capacity | 9000 BTU/h (estimated) |
| Maintenance | Clean filter every 2 weeks; automatic defrost; maintenance by qualified professional |
| Safety | Overload protection, automatic shutdown in case of fault, mandatory grounding |
| Spare parts | Filter, remote control, exhaust hose, window kit (depending on model) |
| Repairability | Repairability index: 7.5/10 (estimated); repair by certified technician required for refrigerant circuit |
| Warranty | 2 years (standard) |
| Included accessories | Remote control, installation guide, user manual |
Frequently Asked Questions - APE508CE AireMax
User questions about APE508CE AireMax
0 question about this device. Answer the ones you know or ask your own.
Ask a new question about this device
Download the instructions for your Air Conditioning in PDF format for free! Find your manual APE508CE - AireMax and take your electronic device back in hand. On this page are published all the documents necessary for the use of your device. APE508CE by AireMax.
USER MANUAL APE508CE AireMax
Read all the instructions carefully before setting up and operating the unit. Keep this instruction manual for future reference.
Contents
AIR CONDITIONER SAFETY 1
PARTS AND FEATURES 7
INSATALLATION REQUIREMENTS 8
INSTALLATION INSTRUCTIONS 9
STEP 1 - UNPACK AIR CONDITIONER
STEP 2 - TWIST THE EXHAUST HOSE CONNECTOR ONTO EXHAUST HOSE
STEP 3 - CONNECT EXHAUST HOSE TO THE AIR CONDITIONER 10
STEP 4 - INSTALL WINDOW PANELS 10
STEP5-COMPLETE INSTALLATION 11
CONTROL PANEL 13
BUTTIONS 13
REMOTE CONTROL 14
SAFETY PROTECTIONS 15
AIR CONDITIONER USE 15
DRAIN THE INTERNAL WATER 15
MANUAL DRAINAGE. 15
CONTINUOUS DRAINAGE 16
CARE AND MAINTENANCE 16
SURFACE CLEANING 16
FILTER CLEANING 17
INTERNAL WATER TANK 17
STORAGE 17
TROUBLESHOOTING 18
WARRANTY. 19
Your safety and the safety of others are very important.
We have provided many important safety messages in this manual and on your appliance. Always read and obey all safety messages.

This is the safety alert symbol.
This symbol alerts you to potential hazards that can kill or hurt you and others. All safety messages will follow the safety alert symbol and either the word "DANGER," "WARNING" or "CAUTION."
These words mean:
| DANGER | An imminently hazardous situation. You could be killed or seriously injured if you don’t immediately follow instructions. |
| WARNING | A potentially hazardous situation which, if not avoided, could result in death or serious bodily injury. |
| CAUTION | A potentially hazardous situation which, if not avoided, may result in moderate or minor injury. |
All safety messages will tell you what the potential hazard is, tell you how to reduce the chance of injury, and tell you what can happen if the instructions are not followed.
IMPORTANT SAFETY INSTRUCTIONS
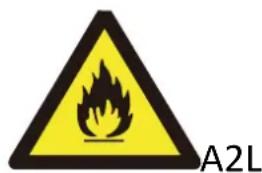
Caution: risk of fire warning;
Flammable materials
Read operator' Manual
service indicator; read technical manual indicateur de service; litre technique Manuel
WARNING: To reduce the risk of fire, electrical shock, injury to persons, or damage when using the air conditioner, follow basic precautions, including the following:
- Appliance shall be stored in a well-ventilated area where the room size is not less than 4m^2
- Read all of the instructions before using this appliance.
Plug into a grounded 3 prong outlet. - Do not remove ground prong.
- Do not use an adapter
- Do not use an extension cord.
-
Do not operate the air conditioner if it has a damaged cord or plug, if it is not working properly, or if it has been damaged or dropped.
The air conditioner should be serviced only by qualified service personnel. Call an authorized service company for examination, repair, or adjustment. -
Disconnect power before servicing.
- Disconnect power before cleaning.
NOTE: Turning off power by pressing the Power button does NOT disconnect the appliance from the power supply.
- Do not install or use the air conditioner in any area where the atmosphere contains combustible gases or where the atmosphere is contaminated. Avoid any chemicals coming in contact with your air conditioner.
- Do not store anything directly on top of the air conditioner.
- The appliance can be used by children aged from 8 years and above and persons with reduced physical, sensory or mental capabilities if they have been given supervision or instruction concerning use of the appliance in a safe way and understand the hazards involved. Children shall not play with the appliance. Cleaning and maintenance shall not be made by children without supervision.
This appliance is not intended for people (including children) with reduced physical, sensory or mental capabilities, or lack of experience and knowledge, unless they have been given supervision or instruction concerning use of the appliance by a person responsible for their safety. Children should be supervised to ensure that they do not play with the appliance.
Use two or more people to move and install air conditioner. - Never operate the air conditioner without the filters in place.
- Do not use the air conditioner near a bathtub, shower or wash basin or other wet area.
- Do not use means to accelerate the defrosting process or to clean, other than those recommended by the manufacturer.
The appliance shall be stored in a room without continuously operating ignition sources (for example: open flames, an operating gas appliance or an operating electric heater. Do not pierce or burn. - Be aware that refrigerants may not contain an odor.
the maximum refrigerant charge amount: APE508CH-11.46Oz
the maximum refrigerant charge amount: APE508CE-11.46Oz
The appliance shall be stored so as to prevent mechanical damage from occurring.
- Any person who is involved with working on or breaking into a refrigerant circuit should hold a current valid certificate from an industry-accredited assessment authority, which authorizes their competence to handle refrigerants safely in accordance with an industry recognized assessment specification. Servicing shall only be performed as recommended by the equipment manufacturer. Maintenance and repair requiring the assistance of other skilled personnel shall be carried out under the supervision of the person competent in the use of flammable refrigerants.
- Prior to beginning work on systems containing flammable refrigerants, safety checks are necessary to ensure that the risk of ignition is minimized. Work shall be undertaken under a controlled procedure so as to minimize the risk of a flammable gas or vapor being present while the work is being performed. All maintenance staff and others working in the local area shall be instructed on the nature of work being carried out. Work in confined spaces shall be avoided. The area around the workspace shall be sectioned off. Ensure that the conditions within the area have been made safe by control of flammable material.
- The area shall be checked with an appropriate refrigerant detector prior to and during work, to ensure the technician is aware of potentially flammable atmospheres. Ensure that the leak detection equipment being used is suitable for use with flammable refrigerants, i.e. no sparking, adequately sealed or intrinsically safe.
- If any hot work is to be conducted on the refrigeration equipment or any associated parts, appropriate fire extinguishing equipment shall be available to hand. Have a dry powder or CO^2 fire extinguisher adjacent to the charging area.
- No person carrying out work in relation to a refrigeration system which involves exposing any pipe work that contains or has contained flammable refrigerant shall use any sources of ignition in such a manner that it may lead to the risk of fire or explosion. All possible ignition sources, including cigarette smoking, should be kept sufficiently far away from the site of installation, repairing, removing and disposal, during which flammable refrigerant can possibly be released to the surrounding space. Prior to work taking place, the area around the equipment is to be surveyed to make sure that there are no flammable hazards or ignition risks. "No Smoking" signs shall be displayed.
- Ensure that the area is in the open or that it is adequately ventilated before breaking into the system or conducting any hot work. A degree of ventilation shall continue during the period that the work is carried out. The ventilation should safely disperse any released refrigerant and preferably expel it externally into the atmosphere.
- Do not apply any permanent inductive or capacitance loads to the circuit without ensuring that this will not exceed the permissible voltage and current permitted for the equipment in use. Intrinsically safe components are the only types that can be worked on while live in the presence of a flammable atmosphere. The test apparatus shall be at the correct rating. Replace components only with parts specified by the manufacturer. Other parts may result in the ignition of refrigerant in the atmosphere from a leak.
- Check that cabling will not be subject to wear, corrosion, excessive pressure, vibration, sharp edges or any other
adverse environmental effects. The check shall also take into account the effects of aging or continual vibration from sources such as compressors or fans.
- Under no circumstances shall potential sources of ignition be used in the searching for or detection of refrigerant leaks. A halide torch (or any other detector using a naked flame) shall not be used.
- Electronic leak detectors shall be used to detect flammable refrigerants, but the sensitivity may not be adequate, or may need re-calibration. (Detection equipment shall be calibrated in a refrigerant-free area.) Ensure that the detector is not a potential source of ignition and is suitable for the refrigerant used. Leak detection equipment shall be set at a percentage of the LFL of the refrigerant and shall be calibrated to the refrigerant employed and the appropriate percentage of gas (25% maximum) is confirmed. Leak detection fluids are suitable for use with most refrigerants but the use of detergents containing chlorine shall be avoided as the chlorine may react with the refrigerant and corrode the copper pipe-work. If a leak is suspected, all naked flames shall be removed/extinguished. If a leakage of refrigerant is found which requires brazing, all of the refrigerant shall be recovered from the system, or isolated (by means of shut off valves) in a part of the system remote from the leak. Oxygen free nitrogen (OFN) shall then be purged through the system both before and during the brazing process.
-
When breaking into the refrigerant circuit to make repairs – or for any other purpose – conventional procedures shall be used. However, it is important that best practice is followed since flammability is a consideration. The following procedure shall be adhered to:
-
remove refrigerant;
purge the circuit with inert gas; - evacuate;
purge again with inert gas; - open the circuit by cutting or brazing.
The refrigerant charge shall be recovered into the correct recovery cylinders. The system shall be "flushed" with OFN to render the unit safe. This process may need to be repeated several times. Compressed air or oxygen shall not be used for this task. Flushing shall be achieved by breaking the vacuum in the system with OFN and continuing to fill until the working pressure is achieved, then venting to atmosphere, and finally pulling down to a vacuum. This process shall be repeated until no refrigerant is within the system. When the final OFN charge is used, the system shall be vented down to atmospheric pressure to enable work to take place. This operation is absolutely vital if brazing operations on the pipe-work are to take place. Ensure that the outlet for the vacuum pump is not close to any ignition sources and there is ventilation available.
In addition to conventional charging procedures, the following requirements shall be followed.
- Ensure that contamination of different refrigerants does not occur when using charging equipment. Hoses or lines shall be as short as possible to minimize the amount of refrigerant contained in them.
Cylinders shall be kept upright. - Ensure that the refrigeration system is earthed prior to charging the system with refrigerant.
- Label the system when charging is complete (if not already).
Extreme care shall be taken not to overfill the refrigeration system.
Prior to recharging the system it shall be pressure tested with OFN. The system shall be leak tested on completion of charging but prior to commissioning. A follow up leak test shall be carried out prior to leaving the site.
- Before carrying out this procedure, it is essential that the technician is completely familiar with the equipment and all its detail. It is recommended good practice that all refrigerants are recovered safely. Prior to the task being carried out, an oil and refrigerant sample shall be taken in case analysis is required prior to re-use of reclaimed refrigerant. It is essential that electrical power is available before the task is commenced.
a) Become familiar with the equipment and its operation.
b) Isolate system electrically.
c) Before attempting the procedure ensure that: --mechanical handling equipment is available, if required, for handling refrigerant cylinders; --all personal protective equipment is available and being used correctly; --the recovery process is supervised at all times by a competent person; --recovery equipment and cylinders conform to the appropriate standards.
d) Pump down refrigerant system, if possible.
e) If a vacuum is not possible, make a manifold so that refrigerant can be removed from various parts of the system.
f) Make sure that cylinder is situated on the scales before recovery takes place.
g) Start the recovery machine and operate in accordance with manufacturer's instructions.
h) Do not overfill cylinders. (No more than 80% volume liquid charge).
i) Do not exceed the maximum working pressure of the cylinder, even temporarily.
j) When the cylinders have been filled correctly and the process completed, make sure that the cylinders and the
equipment are removed from site promptly and all isolation valves on the equipment are closed off.
k) Recovered refrigerant shall not be charged into another refrigeration system unless it has been cleaned and checked.
Equipment shall be labelled stating that it has been de-commissioned and emptied of refrigerant. The label shall be dated and signed. Ensure that there are labels on the equipment stating the equipment contains flammable refrigerant.
- When removing refrigerant from a system, either for servicing or decommissioning, it is recommended good practice that all refrigerants are removed safely. When transferring refrigerant into cylinders, ensure that only appropriate refrigerant recovery cylinders are employed. Ensure that the correct number of cylinders for holding the total system charge are available. All cylinders to be used are designated for the recovered refrigerant and labelled for that refrigerant (i.e. special cylinders for the recovery of refrigerant). Cylinders shall be complete with pressure relief valve and associated shut-off valves in good working order. Empty recovery cylinders are evacuated and, if possible, cooled before recovery occurs. The recovery equipment shall be in good working order with a set of instructions concerning the equipment that is at hand and shall be suitable for the recovery of flammable refrigerants. In addition, a set of calibrated weighing scales shall be available and in good working order. Hoses shall be complete with leak-free disconnect couplings and in good condition. Before using the recovery machine, check that it is in satisfactory working order, has been properly maintained and that any associated electrical components are sealed to prevent ignition in the event of a refrigerant release. Consult manufacturer if in doubt.
The recovered refrigerant shall be returned to the refrigerant supplier in the correct recovery cylinder, and the relevant Waste Transfer Note arranged. Do not mix refrigerants in recovery units and especially not in cylinders. If compressors or compressor oils are to be removed, ensure that they have been evacuated to an acceptable level to make certain that flammable refrigerant does not remain within the lubricant. The evacuation process shall be carried out prior to returning the compressor to the suppliers. Only electric heating to the compressor body shall be employed to accelerate this process. When oil is drained from a system, it shall be carried out safely.
READ AND SAVE THESE INSTRUCTIONS
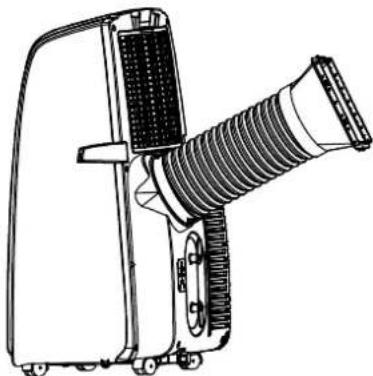
- Control Panel
- Air Outlet
- Display window
- Front shell
- Caster
- Handle
- Universal socket
- Winding pillar
- Chassis
-
Back shell
-
Filter
- Filter
- Drain port
- Remote Control
- Connector
- Exhaust Hose
- Adapter
- Window kits
- Window kits screw (butterfly nut)
INSATALLATION REQUIREMENTS
TOOLS AND PARTS
Gather the required tools and parts before starting installation.
TOOLS NEEDED
- Flat-blade Screwdriver
- Phillips Screwdriver
LOCATION REQUIREMENTS
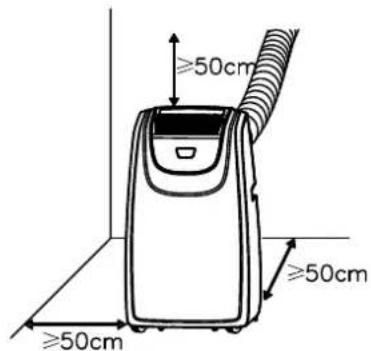
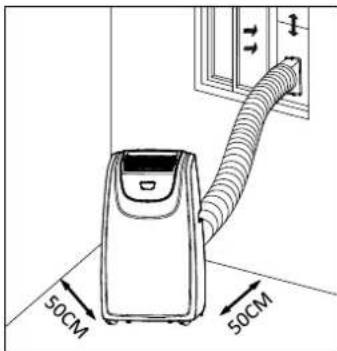
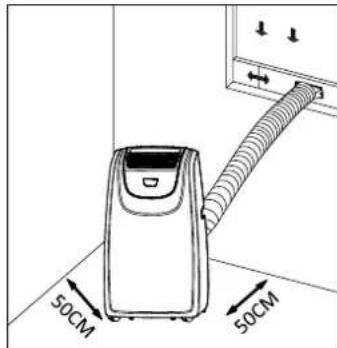
Place the air conditioner on a flat, level surface in a location that is at least 50cm from any wall.
NOTE: A minimum clearance of 50cm from the air conditioner to the wall must be maintained to ensure proper airflow.
Maintain a minimum 50cm clearance around the air conditioner to not block airflow.
Keep the air conditioner free of any obstructions such as drapes, curtains, blinds, etc.
The exhaust hose should be free of any obstructions.
Do not place the air conditioner on an unstable or raised surface because it could fall and cause damage or injury.
Do not place the air conditioner in direct sunlight or near a heat source such as baseboard heaters, stoves, etc.
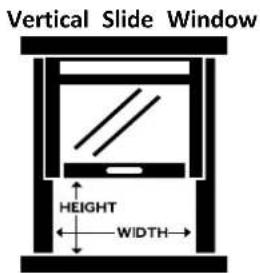
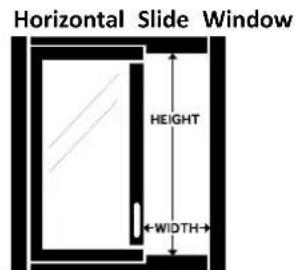
The window panel can be installed in a window with a minimum 50 cm to a maximum 102 cm opening.

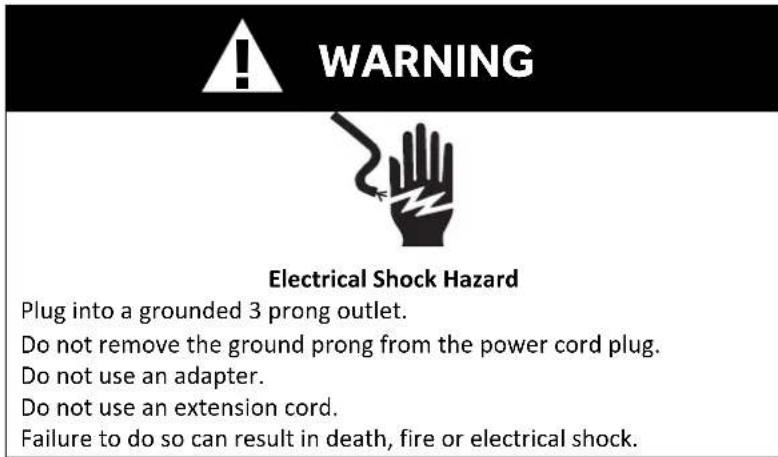
WARNING

Electrical Shock Hazard
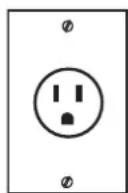
Plug into a grounded 3 prong outlet.
Do not remove the ground prong from the power cord plug.
Do not use an adapter.
Do not use an extension cord.
Failure to do so can result in death, fire or electrical shock.
POWER SUPPLY CORD
Wiring Requirements
-
115 Volt, 60Hz, 15-amp fused grounded 3 prong outlet
-
The use of a time-delay fuse or time-delay circuit breaker is recommended.
-
Use a dedicated circuit only.
NOTE: Do not operate any other electrical appliances on this circuit or you may trip the circuit breaker/fuse.
If this power supply cord is damaged, it cannot be repaired. It must be replaced with a cord from the product manufacturer.
If the power supply cord is damaged contact Customer Service.
To test the power supply cord before operation:
- Plug the power cord into a grounded 3 prong outlet.
- Press the Test button, and then press and release the Reset button to restore power.

REQUIRED GROUNDING METHOD
This air conditioner must be grounded.
The air conditioner is equipped with a power supply cord that has a 3 prong grounding plug.
The power supply cord must be plugged into a mating, grounded 3 prong outlet, and grounded in accordance with all local codes and ordinances.
115V
15 Amp
INSTALLATION INSTRUCTIONS
STEP 1 - UNPACK AIR CONDITIONER

WARNING

Excessive Weight Hazard
Use two or more people to move and install air conditioner.
Failure to do so can result in back or other injury.
Remove packaging materials. Save the carton and the foam packaging for storing the air conditioner when not in use.
NOTE: There are NO packing materials inside the air conditioner to remove—Do Not open the cabinet.
Properly dispose of/recycle all packing material.
Handle the air conditioner gently.
Keep the air conditioner upright and level. Do not set the air conditioner on its side, front, back or upside down.
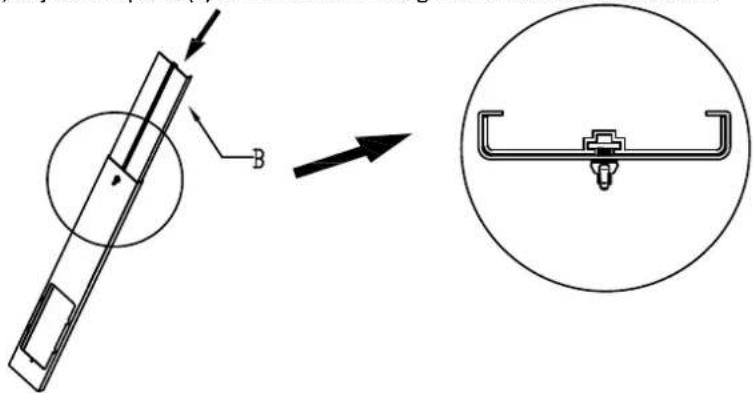
STEP 2 - TWIST THE EXHAUST HOSE CONNECTOR ONTO EXHAUST HOSE
A. Grasp both ends of the exhaust hose and gently pull to expand the hose.
NOTE: Do not attach additional hoses to extend the length. This would decrease cooling efficiency and may damage the air conditioner.
B. Using a counterclockwise motion, attach the open end of the exhaust hose to the exhaust nozzle.

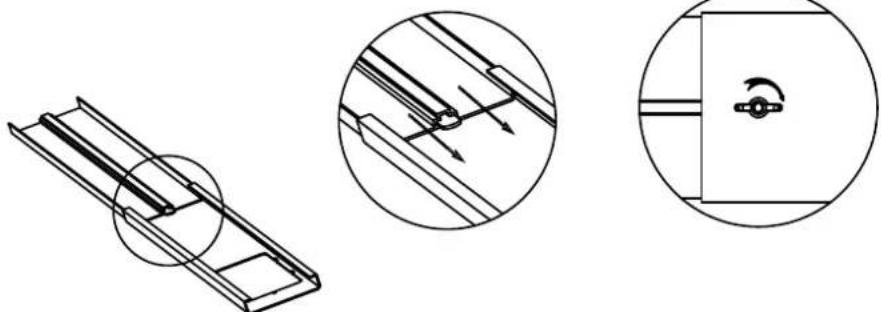
STEP 3 - CONNECT EXHAUST HOSE TO THE AIR CONDITIONER
IMPORTANT: When connecting the hose, the air conditioner must be close enough to the window that you will not dislodge the window seal plate. Once the hose is connected, move the air conditioner 50~cm from the wall.
A. Slide the exhaust hose assembly from the outer air outlet to the right
B. The assembly is completed until the convex point of the inner joint and the concave point of the air outlet are stuck.
STEP4-INSTALL WINDOW PANELS
Depending on the size of your window opening, use the main panel and one or both of the extension panels.
A. Open the window and place the main window panel into the window.
NOTE: The window assembly is designed to accommodate either a vertical slide or horizontal slide window.
B. Take out the butterfly nut from the user manual's bag, and disassemble the screws in the following directions.
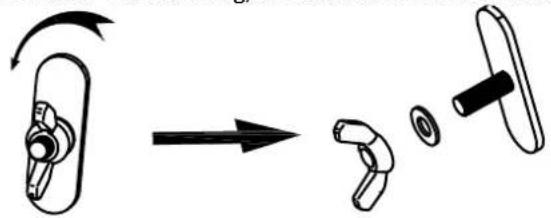
C. Lock the butterfly nut on panel A, and do not lock the butterfly nut tightly, keeping the spacing of 2.5 ~mm .
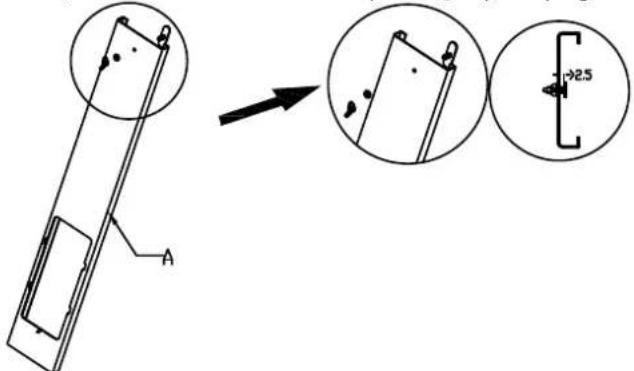
D. Connect with panel B, adjust the panel(s) to the width or height of the window as shown.
E. Fasten the butterfly nut to fix the window slide set.
STEP 5 - COMPLETE INSTALLATION
Close the window as far as the window slide set, so this covers the window opening completely. Place the device at least 50 cm away from walls and other objects.
NOTE:
Some window installations may require the extension panels to be trimmed.
Slide the adapter downwards and assure adapter installed in good position.
Assure the slant panel direction to match seal-plate direction.
Exhaust hose cannot be bent or with flexure higher than 45^ , in order to keep good ventilation of exhaust hose.
- Plug the power cord into a grounded 3 prong outlet.
- Press the Reset button on the power cord to ensure the safety plug is providing power to the air conditioner.
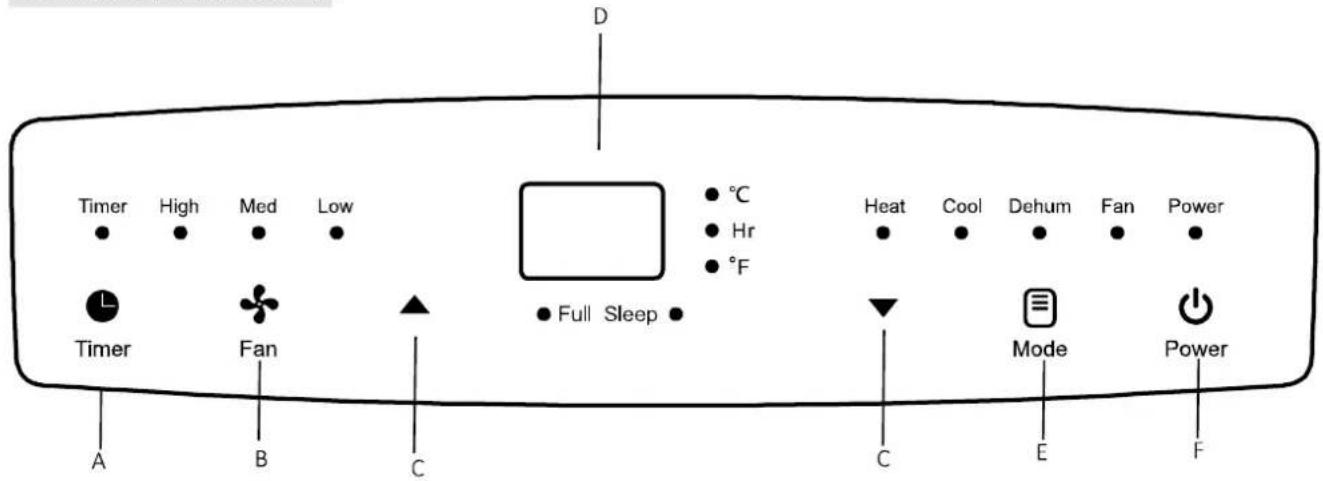
CONTROL PANEL
BUTTONS
A. TIMER BUTTON
Program a time from (1-hour to 24-hours) for the air conditioner to turn Off or On. When a Time Delay is programmed, the Timer indicator light will illuminate.
While the air conditioner is operating:
- Press the Timer button.
- Press the Up/Down arrow buttons to select the number of hours you want the air conditioner to continue to operate before turning Off.
While the air conditioner is off:
- Press the Timer button.
- Press the Up/Down arrow buttons to select the number of hours you want the air conditioner to remain off before turning On.
NOTE: Wait approximately 5 seconds for the Turn-On time to be saved.
To cancel the timer:
- Press the Timer button once, the hours remaining will flash, press the timer button again and the timer will be canceled.
B. FAN SPEED BUTTON
The fan speed can be adjusted from Low speed to High speed when the air conditioner is in operation.
NOTE: The fan speed cannot be adjusted when the unit is in Dehum mode.
- Press the Fan Speed button to toggle among the two speeds. The corresponding fan speed indicator will illuminate.
C. UP AND DOWN ARROW BUTTONS
Adjusts the Temperature or Hours in Time Delay.
To Set the Temperature:
The temperature can be set between 62^ and 86^ (17°C and 30°C) when the air conditioner is in Cool mode.
-
Press the Mode button until the Cool mode is selected.
-
Press the Up Arrow or Down Arrow buttons to select the Temperature.
NOTE: The temperature cannot be set when the air conditioner is in either Fan or Dehum mode.
NOTE: The Up Arrow and Down Arrow buttons, when pressed at the same time, allow you to select between displaying the temperature in ^ C or ^ F .
D. CONTROL PANEL DISPLAY
Displays the Set Temperature in degrees Fahrenheit or degrees Celsius, or the hours remaining in a Time Delay.
E. MODE BUTTON
Press the Mode button to toggle among the operating options. The corresponding indicator will illuminate:
Cool - Cools the room to the set temperature
Heat (on some models) - Heats the room to the set temperature
Dehum - Reduces the humidity in the room
Fan - Circulates the air in the room without cooling
F. POWER BUTTON
Turns ON/OFF power to the air conditioner.
NOTE: Turning off power by pressing the Power button does NOT disconnect the appliance from the power supply.
G. SLEEP MODE BUTTONS
The Timer and Down Arrow buttons, when pressed at the same time, allow you to select Sleep mode.
REMOTE CONTROL
1) Power On and Off - When the unit is plugged in, press the POWER button to turn on the unit. Press the POWER button once more to turn the unit off.
2) Mode Selection
Press the Mode Button to toggle among the operating options. The corresponding indicator will illuminate:
Heat (on some models) - Heats the room to the set temperature
Cool - Cools the room to the set temperature
Dehum -Reduces the humidity in the room
Fan - Circulates the air in the room without cooling
3) Fan Speed - Press the Fan button to adjust the fan speed. When the unit is in Dehumidifier mode, the fan speed cannot be changed.
4) Temperature Setting - When the unit is in cool mode, you can select your desired temperature.
Press the or to select your desired temperature setting.
5) SLEEP MODE - When in air conditioning mode, press the SLEEP Button on the remote control.
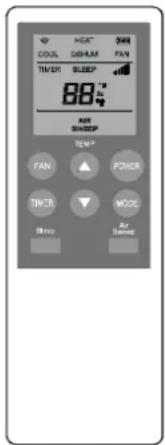
6) TIMER
Auto-On: Press the TIMER button when the unit is off to set up the Auto-on timer. Press the or to set timer within 1-24 hours.
Auto-Off: Press the TIMER button when the unit is On to set up the Auto-off timer. Press the or to set timer within 1-24 hours. To cancel the timer, press the TIMER button until the timer mode is turned off.
7) Air Sweep
Opens and closes the louvers to direct the airflow.
NOTE:
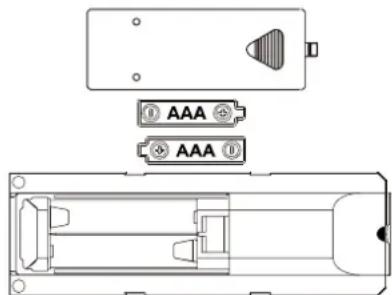
- Insert the two AAA batteries.
- Do not use rechargeable batteries.
- When replacing the battery, please replace the 2 batteries at the same time. Do not mix old and new batteries.
If you do not use this unit for a long time, please take out the battery of the remote control and store it properly.

WARNING
If the battery liquid of the remote control leaks on your skin or clothes, please rinse with plenty of water as soon as possible; if you find a leak, please do not use the remote control.
If you swallow the battery liquid, rinse your mouth and seek medical attention as soon as possible. The chemical substances in the battery may burn or cause other health hazards.
SAFETY PROTECTIONS
1. Water-full safety alarm and shut-off protection function
When the water volume exceeds its alarm level in chassis, warning sounds automatically and water-full icon is lighting in display, you need to drain the water and re-start the unit. (For more information about how to drain, refer to the "Drainage Instruction" please). If the unit is not shut down manually, the unit will recover to the original operating status automatically once the water is fully drained. Or connect the power to re-start the unit again.
2. Anti-frozen protection function (Optional)
Under COOLING mode, when the compressor continuously runs over 10 minutes, if tube temperature is ≤ 2^ / 36^ for 20 seconds, the anti-frozen protection function will be on, E4 will be shown on LED display, compressor and water wheel motor will stop working, but upper fan remains running; If tube temperature ≥ 8^ / 46^ , the unit will stop anti-frozen protection and recover to the original working condition. Compressor will re-start working with 3 minutes delay for protection.
3. Delay protection function of compressor
This unit offers restart protection to compressor. Except that the compressor may start immediately when the unit is energized first time, there is 3-minute delay re-start protection after compressor is shut down.
4. Coil and room temperature sensor failure:
1) Detect sensor failure at the beginning of power-on or power-on state
2) When a sensor failure is detected at the beginning of power-on, it will immediately enter the failure state. If it returns to normal at this time, it will enter the standby state;
AIR CONDITIONER USE
IMPORTANT: If the air conditioner has been tilted on its side, wait 24 hours before turning on the air conditioner to allow the oil to return to the compressor. This will prevent the air conditioner from failing prematurely. Hold handles on side panels to move the unit in upright position.
NOTE:
Do not hold the louver.
Make the unit in the upright position whatever handling or moving it.
Drain the water in the unit completely to prevent water leakage and wet the floor or carpet before handling or moving the unit.
DRAIN THE INTERNAL WATER
You will need a small pan to catch the water coming out of the water tank. Once the water tank is empty, the unit will resume operation within a few minutes.
MANUAL DRAINAGE
- Once the unit shuts down upon water-full, turn off the unit and then unplug.
- Put the tray below the water outlet at the back of the unit.
- Screw off the drain cover, unplug the water stopper for water flow into the tray.
- Plug in stopper and screw the drain cover tightly onto water outlet after drainage.

Notes:
- Protect the drain cover and water stopper properly.
- Move the unit carefully to avoid the leakage it is necessary.
- Tilt the unit slightly backwards when draining.
- Block the drain hole as soon as possible before the tray is full if it cannot hold all water in the unit to prevent the water leakage and wet the floor or carpet.
Water stopper and drain cover must be tightly installed, to avoid new condensate to wet the floor or carpet when the unit re-starts working.
CONTINUOUS DRAINAGE
- Screw off the drain-cover & unplug the water stopper.
- Connect drain-hole with 13mm drain hose (If you need the plastic drainage pipe, please purchase it with outer diameter 13mm and length according to the drainage distance), as deep as possible to avoid leakage.
- Pull the drain hose to bathroom or outdoor.

Notes:
- Drain hose must be installed when there's no water in the tray.
It is suggested that not to use continuous drainage when unit is in COOL mode, to ensure enough water recycle in the unit to enhance the system cooling effects.
It is suggested that to adopt continuous drainage when unit is in HEAT mode, to avoid frequent drainage. - Put the drain hose in an inaccessible place, not higher than drainage hole and keep drain hose straight without any flexure.
- Keep the drain cover and its stopper properly when continuous drainage is adopted.
CARE AND MAINTENANCE

WARNING
Be sure to turn off the unit and pull out the plug before maintain or send to service center.
SURFACE CLEANING
- Unplug the appliance before cleaning.
- Clean the unit surface with wet soft cloth and do not use chemical solvents such as alcohol and gasoline to avoid any damage to unit. Any thinner, alcohol-glazer or other similar solvents is prohibited for unit cleaning.
- Clean the dirty air outlet or louver with wet soft cloth and detergent. Any chemical solvent is prohibited to use for unit cleaning or put such things near the unit for a long time.
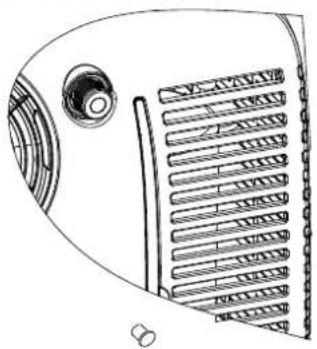
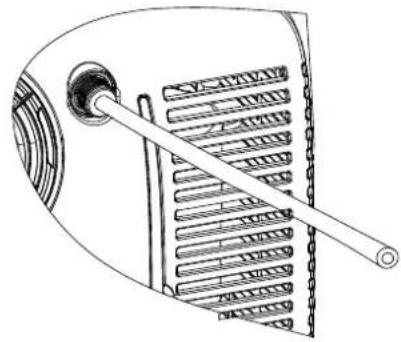
FILTER CLEANING
-
Clean the filter once every two weeks, or it would influence the unit function if filter clogged with dust.
-
Grip the filter handle and pull it out gently in correct direction. Clean the dirty particles in filter by cleaner if it is necessary. Immerse and wash the filter gently into warm water (about 40^ ) mixed with neutral cleaner, and then rinse and dry them thoroughly in the shade.
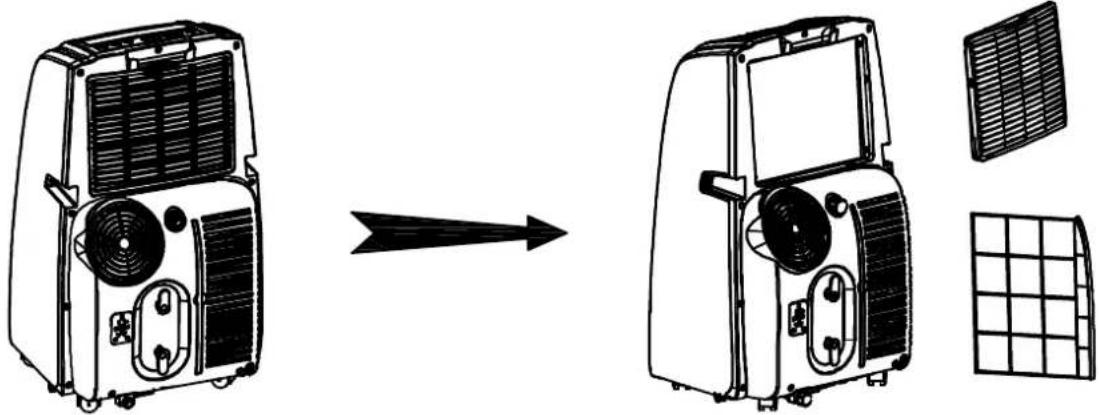
Notes:
- Pull out the filter gently.
- Removal of filter at back panel is at priority then for the filter at side panel, to avoid any twist or damage to filter.
- Do not squash or hit the mesh with sharp objects or brush.
- Do not use the appliance without installing the filter.
INTERNAL WATER TANK
The Water Full indicator illuminates, when the internal water has filled with condensate water.
To Empty the Internal Water Tank:
- Unplug or disconnect power.
- Place a shallow 1 quart or larger pan (not included) below the lower drain located on the back (near the bottom) of the air conditioner.
- Remove the cap and the rubber plug and drain the water tank.
- Re-insert the drain plug and screw the cap snugly into place.
- Plug in or reconnect power.
STORAGE
Please store the air conditioner properly if not in use.
- Screw off the drain cover and pull out the stopper to drain condensate water completely. Or tilt the unit to drain water.
- Keep unit running in fan mode for half day to dry inside of unit completely to prevent from going moldy.
- Turn off the unit, pull out plug then wrap the power cord around the wire-winding pillar, insert the plug into the universal fixing hole at the back panel of the unit, install the water stopper and drain cover.
- Remove the heat exhaust hose to assembly, clean and keep it properly.
- Take out the batteries from remote controller and place it in the remote control box.
Note:
Assure the unit is stored in a dry place. All accessories of the unit shall be protected together properly. Keep the unit away from children.
TROUBLESHOOTING
First try the solutions suggested here to possibly avoid the cost of a service call.
| Trouble | Cause | Solution |
| The unit fails to start up | Power supply failure | Connect the unit to a live socket and turn it on. |
| Water-full and its icon lighting | Drain the water stored in the unit. | |
| Ambient temperature too low or low high | It is recommended to use this unit between 5-35℃ | |
| The room temperature is lower than the set temperature in cooling mode or higher temperature in heating mode | Change the set temperature | |
| Bad cooling or heating effects | There is direct sunlight | Close the window curtain |
| The doors and windows are open, the room is crowded or there are other heat sources | Close the door and window, remove other heat sources, and add new air-conditioners | |
| Dirty filter | Clean or replace the filter mesh | |
| Air inlet or air outlet clogged | Remove the obstruction | |
| High noise level | The unit is being placed at uneven surface. | Put the unit at a flat and firm place (may reduce noise) |
| The compressor does not work | Initiation of overheat protection | Wait for 3 minutes until the temperature decrease, the unit will re-start automatically |
| The remote control does not work | Too long distance | Bring the remote control close to the Air conditioner and ensure air at signal receptor on unit. |
| The remote control didn’t aim at signal receptor on unit. | ||
| The batteries have no electricity | Replace the batteries | |
| “E1” code displays | Room temperature sensor failure | Contact customer service & repair center |
| “E2” code displays | Tube temperature sensor failure | Contact customer service & repair center |
| Water full displays | Water tank in chassis is full | Drain the condensate and re-start the unit |
Note:
- Do not dismantle or repair the unit without authorization, improper repair will void the warranty card and cause harm to you and your property.
WARRANTY
Portable air conditioner limited warranty
Any repair, replacement, or warranty service, and all questions about this product should be directed to customer service center.
The warranty commences the day the product is purchased and covers up to a period of 1 year (12 months) for parts (manufacturing defects only).
Exclusions: This warranty does not apply to the below:
- If the appearance or exterior of products has been damaged of defected, altered or modified in design or construction.
- If there is damaged due to power line surge, user damage to the AC power cord or connection to an improper voltage source.
If the damage is due to general misuse, accidents. - Damages caused by unauthorized repair and using of non-genuine parts.
- On products that have been purchased as refurbished, like new, second-hand.
Unit used in a commercial or rental setting. - Damages caused by improper installations.
We promise to answer your inquiry within 24 hours (working day) and provide you an amicably happy solution.
Email: support@airemaxusa.com
Website: www.iremaxusa.com
All the technical and specific parameters, please refer to product nameplate.
Due to continuous improvement, we reserve the right to change some design without timely notice.
Electrical products should be properly disposed.
Please recycle where facilities exist.
Check with your local authority or retailer for recycling.