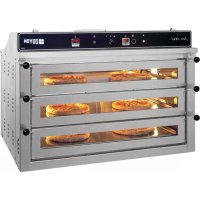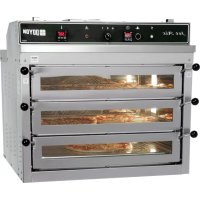
PIZ3 - Pizza oven Doyon - Free user manual and instructions
Find the device manual for free PIZ3 Doyon in PDF.


| Technical specifications | Doyon PIZ3 pizza oven, capacity of 3 pizzas of 12 inches, power of 3000 W, maximum temperature of 500C, external dimensions: 90 x 60 x 40 cm. |
|---|---|
| Usage | Designed for baking pizzas, ideal for restaurants and pizzerias, electric operation, easy to use with an adjustable thermostat. |
| Maintenance and repair | Regular cleaning of the cooking chamber recommended, checking heating elements, replacement of worn parts by a qualified technician. |
| Safety | Equipped with overheating protection, thermal insulation to prevent burns, compliant with electrical safety standards. |
| General information | 1-year warranty, after-sales service available, user manual included, weight: 70 kg. |
Frequently Asked Questions - PIZ3 Doyon
User questions about PIZ3 Doyon
0 question about this device. Answer the ones you know or ask your own.
Ask a new question about this device
Download the instructions for your Pizza oven in PDF format for free! Find your manual PIZ3 - Doyon and take your electronic device back in hand. On this page are published all the documents necessary for the use of your device. PIZ3 by Doyon.
USER MANUAL PIZ3 Doyon
IMPORTANT SAFETY INSTRUCTIONS SAVE THESE INSTRUCTIONS
TABLE OF CONTENTS
How to cook your favorite pizza A-4
Installation warnings A-6
Distances to respect A-10
Installation A-12
Operation of the oven A-14
Instructions for oven A-16
Troubleshooting A-18
Oven maintenance and cleaning A-20
Bake chart A-22
Component parts B-1
PIZ3 Front B-2
PIZ3Back B-4
PIZ6 Front B-6
PIZ6 Back B-8
Control Panels C-1
PIZ31PH 120/208V 120/240V 60HZ C-2
PIZ3 3PH 120/208V 120/240V 220-380V 60HZ C-3
PIZ3 3PH1208-240V60HZ C-4
PIZ31PH208-240V50/60HZ C-5
PIZ61PH 120/208v 120/240V 60HZ C-6
PIZ63PH120/208v120/240V60HZ C-7
PIZ6 3PH 208-240V 60HZ C-8
Warranty 1
IMPORTANT INSTRUCTIONS DE SECURITE CONSERVEZ CE MANUEL D'INSTRUCTIONS
TABLE DES MATIÈRES
Description A-1
Introduction A-3
Construction A-3
Expédition A-3
The manufacturer suggests to read this manual carefully.
This equipment is manufactured with first quality material by experienced technicians. Proper installation and maintenance will guarantee a reliable service for years to come.
A nameplate fixed to the front or right side of the oven specifies the model number, serial number, voltage and amperage.
Drawings and replacement parts numbers are included in this manual. The electrical diagram is affixed in the control panel at the back of the oven.
ATTENTION
DOYON is not responsible for damages to the property or the equipment caused by personnel who is not certified by known organisations. The customer is responsible for finding qualified technicians in electricity and plumbing for the installation of the oven.
CONSTRUCTION
You just bought the most advanced oven in the world, "DOYON" technology at it's best. This oven is manufactured using the highest quality components and material.
The oven gives a perfect uniform baking with its unique Jet Air convection system. The DOYON oven is designed with parts that are easy to find.
SHIPPING
For your safety, this equipment has been verified by qualified technicians and carefully crated before shipment. The freight company assumes full responsibility concerning the delivery in good condition of the equipment in accepting to transport it.
IMPORTANT
RECEPTION OF THE MERCHANDISE
Take care to verify that the received equipment is not damaged before signing the delivery receipt. If a damage or a lost part is noticed, write it clearly on the receipt. If it is noticed after the carrier has left, contact immediately the freight company in order that they do their inspection.
We do not assume the responsibility for damages or losses that may occur during transportation.
INTRODUCTION
(Pan pizza or regular)
How to cook pan pizza in ovens:
Models:PIZ3,PIZ3G,PIZ6,PIZ6G
(Pizza Hut style)
-
Mix your favorite pizza dough formula.
-
When mixing is done:
A. Cut dough in pieces and make balls.
B. Put the dough balls in a plastic basket with a cover.
C. Place in a cooler or refrigerated room for 12 hours.
D. After 12 hours:
1) Remove dough balls from cooler or refrigerated room.
2) Spray the pizza pan with vegetable oil or olive oil.
3) Shape and set pizza dough in the pan.
4) Transfer pizza pan to proofer unit for 45 to 60 minutes.
Proofer set at: 100^ heat, 85% humidity.
5) When pizza dough is ready, put pizza pan with the cover on, back in the cooler.
6) When ready to bake:
- Take the pizza dough from the cooler;
- Put topping on pizza dough;
- Place the pizza in the oven without cover.
Important: If you cook your pizza in a pan or on a screen, the bottom crust will not bake properly. If you use them, remove the pizza from the pan or the screen after 3 minutes and finish baking it directly on the oven deck.
Oven baking instructions:
-Preheat at 465^
Baking time:
5-6 mins: 6^ 9^ 12^
6-8 mins: 16" 18"
Special notice: If you bake only pan pizza or bake on a screen, we recommend using the following with the oven:
3 grills (optional): Ask your sale representative.
How to cook regular pizza:
(No pan or screen)
-
Preheat oven at 465^ .
-
Remove dough balls from cooler one hour before using.
-
For better results:
Dough must be 50^ to 80^ .
Bake directly on perforated nickel plate.
Baking time at 465^
5-6 mins: 6''9''12''
6-7 mins: 16" 18"
Important: Do not cook with screens.
Cook directly on the perforated nickel deck of the oven.
Cleaning:
We recommend to clean the oven every day.
1) Remove the lower shelf and clean the bottom of the oven with dry cloth and cleaner supplied with the oven.
2) Glass doors: During working hours, clean glass with dry cloth (paper towel). At the end of the day, clean with glass cleaner (Windex and paper towel).
NOTICE:
Never put aluminum foil on top of the shelves. This will affect the air circulation and the oven will not bake properly.
INSTALLATIONWARNINGS
POWER FAILURE WARNING
WHEN YOU HAVE A POWER FAILURE, SHUT OFF THE OVEN POWER SWITCH TO PROTECT THE ELECTRONIC COMPONENTS WHEN THE POWER COMES BACK.
FOR YOUR SAFETY
DO NOT STORE OR USE GASOLINE OR OTHER FLAMMABLE VAPORS AND LIQUIDS IN THE VICINITY OF THIS OR ANY APPLIANCE.
INSTALLATION AND SERVICE
WARNING
IMPROPER INSTALLATION, ADJUSTMENT, ALTERATION, SERVICE OR MAINTENANCE CAN CAUSE PROPERTY DAMAGE, INJURY OR DEATH. READ THE INSTALLATION, OPERATING AND MAINTENANCE INSTRUCTIONS THOROUGHLY BEFORE INSTALLING OR SERVICING THIS EQUIPMENT.
Installation and service must be done by specialised technicians. Contact a certified electrician and plumber for set up.
The oven must be connected to the utility and electrically grounded in conformity to the effective local regulations. If these are not established, the oven must be connected according to the Canadian Electrical Code (CSA-C22.1-XX) or National Electrical Code (NFPA 70-XX). Refer to last edition year for XX. Installation must also allow proper access for service (24 inches each side and back).
The ovens must be installed with a proper ventilation according with the local building code.
COMMENT FAIRE CUIRE FACILEMENT DE LA PIZZA
A) Back and sides of the oven: 4 pouces.
B) Top of the oven: a clearance of 12 inches to the ceiling must exist to permit adequate venting of the exhaust pipe and hot parts and to give proper access to a technician. The draft hood must have a clearance of 2 inches minimum all around.
C) Floor: on it's legs 4 inches minimum.
D) Sides of the oven: do not install other than easily removable equipment for service and maintenance (not closer than 4 inches).
E) It is recommended to have a certain length of electric cable between oven and wall to help gain access for service.
DISTANCES A RESPECTER
Take off the packaging material with care. Take off all the material used for packing and accessories.
If the equipment is delivered with casters, always lock the wheels after installation and use flexible wire. It must also be installed with restraining device (chain comes with the oven) to guard against transmission of strain to the gas supply and connectors.
1. To the electrician
Electrical supply installation must be in accordance with the electrical rating on the nameplate.
WARNING
The electrician must make sure that the supply cable does not come in contact with the oven top which becomes hot.
INSTALLATION
EN GÉNÉRAL
-
Turn the switch to the "ON" position.
-
The light inside the oven must light up.
-
Adjust the thermostat at the desired setting (see THERMOSTAT INSTRUCTIONS below).
N.B. The red light must be "ON" (If not, press the breaker on the front).
- Heat the unit until you reach the baking temperature.
When the desired temperature is reached, the red light goes out and turns green.
If the light is still "ON" and the oven does not produce heat, call for service.
- Load the oven as fast as possible to avoid letting out too much heat.
- Set the timer to the desired value and start it. (See page A-16.)
NOTE: The timer does not shut the oven off at the end of its cycle. It simply activates the buzzer.
- Wait until the product is ready. Do not open the doors until the product is done.
VERY IMPORTANT
This oven has an overheat warning alarm to protect the electrical components against overheating. If the red pilot light (OVERHEAT WARNING) is lit and you hear a buzzer, see Troubleshooting.
THERMOSTAT INSTRUCTIONS
To obtain a very good thermal stability, we use a digital temperature controller with thermocouple. The Omron E5CS thermostat controls the heat of every element at the SP (set point).
The temperature of the oven is always shown on the display of the thermostat and an arrow indicates if the temperature is over or below the SP. When the green light is lit, it indicates that the temperature is at the SP ± 1% .
To adjust the SP (set point) value, you just have to press the key on the left and use the up and down keys to set the temperature. Press the left key to return to run mode.
STEAM TIMER H3DE (OPTIONAL)
VERY IMPORTANT STEAM INJECTION WILL ONLY WORK WHEN THE VENTILATOR OF THE OVEN IS WORKING.
To inject steam in the oven, press and release the STEAM TIMER button. The light comes on inside the steam button during the steam injection. Steam injection has been factory preset. To have more steam, press steam button a second time, after the light is off.
P.S. Do not inject steam more than once each time you bake. Wait at least 10 minutes before retiming the steam injection system.
OPÉRATION DU FOUR
Set the baking time required with the small push button on the timer. The yellow display is the setting time and the red display is the countdown time (Ex: 25 minutes = set 2500 on green display).
After setting: Push the START/STOP button then, when the time is expired, the buzzer will rings. Push the START/STOP button again to stop the buzzer.
If you want to restart the time in the middle of the countdown, press on the yellow RST button on the timer.
P.S. The timer is simply a reminder for the approximate duration of the baking time.
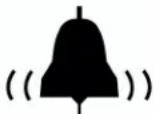
FRONT CONTROL PANEL SYMBOL SIGNIFICATION

Cooking timer
On/Off cooking timer switch

Breaker
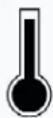
Temperature control
告(A)
0
1 OFF/ON main power switch

Overheat alarm
INSTRUCTIONS POUR FOUR
MINUTERIE DE CUISSON
ANSWERS TO MOST FREQUENT QUESTIONS
Always cut off the main power before replacing any parts. Take care of the electric wire supply system when pulling the oven.
Control parts on the front control:
Remove the side panels of the oven and the proofer by screwing out the screws.
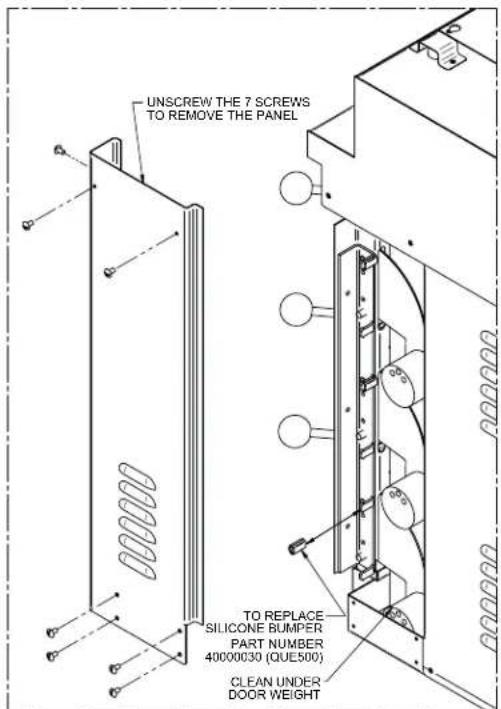
Motor system on the back of the oven:
Pull the oven and screw out the panels.
| Questions Solutions | |
| The oven does not turn on. | Check the breakers on the front panel. Check the breakers of the building. Check if the doors are tightly closed. |
| Uneven baking. | Make sure that the grills don.t obstruct the air flow. Do not use foil on the grills. Verify if the rack inside the oven rotates. Verify the temperature of the oven by using an oven thermometer and make sure that it is even with the thermostat setting. |
| The oven does not produce heat. | 1. If the oven blowers are on •Make sure: the thermostat is adjusted to a temperature high enough to turn on the pilot light. 2. If the oven blowers are not on •Check the overload relays located in the control compartment. If anyone of these is disengaged, call for a qualified technician. |
| If the OVERHEAT WARNING light is on, and you hear the warning buzzer. | Check if the cooling fan airflow is not obstructed. Check the cooling fan if it is running. If the malfunction light goes on, or if the audible sound, appliance is malfunctioning. TURN OFF or disconnect appliance from power supply and have serviced by a electrician. |
DéPANNAGE
AVANT D'APPELER LE DÉPARTEMENT DE SERVICE
SOLUTION AUX PROBLEMES LES PLUS FREQUENTS
| Questions Solutions | |
| Clean the inside of the oven and the profoer with water and soap. Take out the grills (the grills of the oven could be cleaned with "Easy-Off"). | We recommend and sell: Dirt Buster III: Action foam cleaner CHEMCO Part number: NEB201 |
| After cleaning the inside of the oven, apply a silicone base oven protector. It avoids food from sticking to the metal. | We recommend and sell: 316 Silicone base protector and lubricant for oven Dow Corning Part number: EXS400 |
| Clean the oven windows with products like Brasso or equivalents. They are copper cleaners but good for this use | We recommend and sell: Wright's: Cream copper cleaner J.A. Wright & Co. Part number: EXC300 |
| Clean the oven exterior with a stainless steel cleaner. | We recommend and sell: Stainless steel cleaner SANY or CURTIS (comestible) Part number: NES201 |
| Clean the Check and clean regularly the filter on the top of the oven. The filter may be cleaned with water and soap. | Do not obstruct the airflow on the top of the oven. Do not place pizza boxes or other objects over the filter. |
ENTRETIEN ET NETTOYAGE DU FOUR
PIZZA OVENS (Table as reference only)
| Menu item State | Bake Time Minutes | Bake Temp °F | Bake Temp °C | |
| 6" Traditional pizzas Fresh 5 480 249 | ||||
| 9" Traditional pizzas Fresh 5 480 249 | ||||
| 12" Pizza Parbaked 4 465 241 | ||||
| 14" Deep Dish Pizza Fresh 7 480 249 | ||||
| Italian sub 6 inches | Prepaked bread | 3 480 249 | ||
| Mexican Platter Heated 2 425 | 218 | |||
| Nachos 3 oz of chips | Fresh 2 500 | 260 | ||
| Biscuits Refrigerated | 6/pan | 6 1/2 400 | 204 | |
| Chicken Breast 6 oz | Boneless,refriger. | 6 1/2 450 | 232 | |
| Chicken Quarters pre cooked | Refrigerated 9 | 480 249 |
TABLEAU DE CUISSON
Note: As of April 2010, parts ELD088 (#5) will replace parts ELD050 & ELA275.
Note: As of April 2010, parts ELD088 (#7) will replace parts ELD050 & ELA275.
(Continental United States Of America And Canada Only)
Doyon Equipment Inc. guarantees to the original purchaser only that its product are free of defects in material and workmanship, under normal use.
This warranty does not cover any light bulbs, thermostat calibration or defects due to or resulting from handling, abuse, misuse, nor shall it extend to any unit from which the serial number has been removed or altered, or modifications made by unauthorised service personnel or damage by flood, fire or other acts of God. Nor will this warranty apply as regards to the immersion element damaged by hard water.
The extent of the manufacturer's obligation under this warranty shall be limited to the replacement or repair of defective parts within the warranty period. The decision of the acceptance of the warranty will be made by Doyon Equipment service department, which decision will be final.
The purchaser is responsible for having the equipment properly installed, operated under normal conditions with proper supervision and to perform periodic preventive maintenance.
If any parts are proven defective during the period of one year from date of purchase, Doyon Equipment Inc. hereby guarantees to replace, without charge, F.O.B. Linière, Quebec, Canada, such part or parts.
Doyon Equipment Inc will pay the reasonable labour charges in connection with the replacement parts occurring within one year from purchase date. Travel over 50 miles, holiday or overtime charges are not covered. After one year from purchase date, all labour and transportation charges in connection with replacement parts will be the purchaser's responsibility.
Doyon Equipment Inc. does hereby exclude and shall not be liable to purchaser for any consequential or incidental damages including, but not limited to, damages to property, damages for loss of use, loss of time, loss of profits or income, resulting from any breach or warranty.
In no case, shall this warranty apply outside Canada and continental United States unless the purchaser has a written agreement from Doyon Equipment Inc.