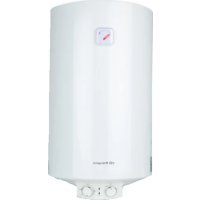
USER MANUAL TRM 83 Orbegozo
Read this manual carefully before running this appliance and save it for reference in order to obtain the best results and ensure safe use.
- This appliance can be used by children aged from 8 years and above and persons with reduced physical, sensory or mental capabilities or lack of experience and knowledge if they have been given supervision or instruction concerning use of the appliance in a safe way and understand the hazards involved. Children must never play with the appliance. Cleaning and user maintenance must never be carried out by children without supervision.
- Children should be supervised to ensure that they do not play with the appliance.
- Keep the appliance and the cable cord out of the reach of children less than 8 years old.
- WARNING: In order to ensure your children's safety, please keep all packaging (plastic bags, boxes, polystyrene etc.) out of their reach.
- If the supply cord is damaged it must be repaired by the Authorized Service Agent.
- Never pull on the cord when unplugging.
- Do not use the unit with a damaged cord or plug, or if it is not working properly.
-
Do not handle the appliance with wet hands.
-
Never immerse the appliance in water or any other liquid.
- Make sure the appliance has been unplugged before cleaning.
- This appliance must be installed following the national regulations for electrical installations.
- This appliance is for household use only .
- In case that you need a copy of the instruction manual, you can ask for it writing an email to sonifer@sonifer.es.
- WARNING: In case of misuse, there is a risk of possible injury.
SPECIFIC SAFEGUARDS
- Water can leak from the discharge tube pressure limiting device, and this tube should be kept open to the atmosphere.
- The pressure limiting device must run regularly in order to remove lime deposits and to verify that it is not locked.
- The discharge pipe connected to the pressure relief device must be installed in a frost free environment and continuous slope downward.
-
Our company won't load any responsibilities to this electric water heater's inappropriate installations.
-
Before installing and using the new brand's electrical water heater, please carefully read the entire instructions. If not following the required methods in this instruction brochure to make installations or use it, it may cause the severe hazard accidents and the property losses.
- All interventions and the maintenance operations must be conducted by professionals (in possession of the requirements requested by the standards prevailing in the area).
- Before operating it each time, you must all make the electrical water heater fully fill first. After that, it can permit you to put through the power source.
- When no tap water provides, you mustn't use the water in the tank of electrical water heater.
- For the cold and frozen regions in winter, when not using it for a longer period of time, you should make the water in the tank of electrical water heater emptily occupy. The emptiness-making methods can be seen the Security Characteristics in this instructions brochure.
- When the electric water heater in normal work, the leakage pressed mouth of the security valve may exit the water drops to drip out. This belongs to the normal conditions. Take care not to enable to block this leakage pressed exit. You can use the plastic
pipes to lead flowing. However, you must keep it through with atmosphere.
- The power-source outlet must have the reliable ground connections for the use.
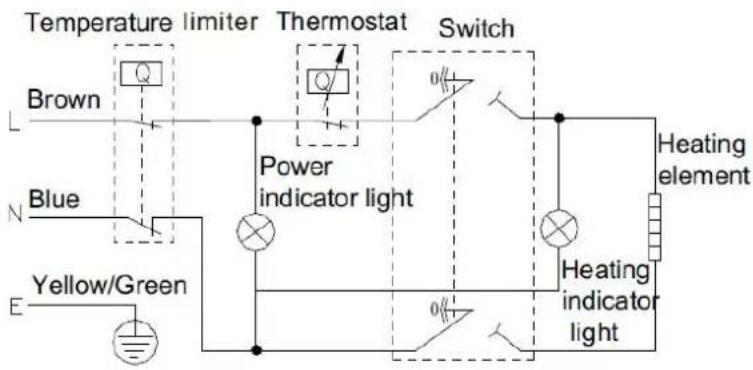
- Double-level Temperature-limiting Protection Switch: This electric water heater possesses one required artificial position-resetting double-level temperature-limiting protection switch. Enabling to automatically cut off the power sources when the electrical water heater is over-heat by the accidents or the water temperature is too- high. Guaranteeing the two poles are cut off that ensures to be safe.
- The Position-resetting Methods of the Double-Position Temperature-limiting Device:
1) Pull down the power-source plug
2) Make the plastic lid on the bottom side of the electrical water-heater to be opened with tools.
3) Press down the white-color position resetting button on the two-position temperature limiter.
4) Close the plastic cover.
5) Slightly reduce the temperature-setting value.
6) Reinsert the plug of the power source and put through the power source.
If the above-mentioned operations still can't still let the whole unit put through the power and work normally, which indicates the water temperature in the tank is still over-high. Please open the water exiting valve and pour out the heat water for several minutes, then repeat the above mentioned procedures after waiting the water temperature reduces.
- In order to ensure the efficiencies of electricity-leakage protection function, you can press the testing button once every week. At this time, the position resetting button will skip up. Then make the position-recovery button press down, it will immediately resume the normal operations.
- Completely automatic control: automatic addition of cold water, automatic heating.
- Four-fold safety protection: multiple safety protection devices, such as dry heating protection, extra-temperature protection, electric leakage protection, high hydraulic pressure protection, etc., safe and reliable.
- Sapphire enamel inner container: manufactured by using advanced electrostatic dry method enamel technique, antitrust, corrosion-proof, incrustation-resistant, leak-prevention with longer lifetime.
- Heating pipes designed with low thermal load: safe and reliable, with longer lifetime.
- Equipped with corrosion-proof and incrustation-retardant equipment: durable products.
- Thickened urethane integral foaming: good thermal insulation effect energy efficient and electricity saving.
- Imported temperature controller; accurate and reliable control of temperature.
- Adjustable range of water temperature from 30^ to 75^ .
- Simple operation and easy use.
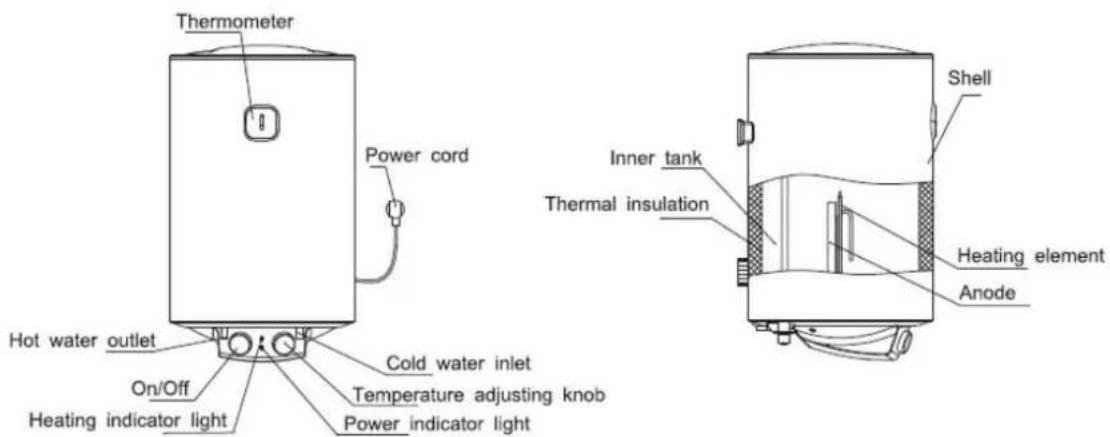
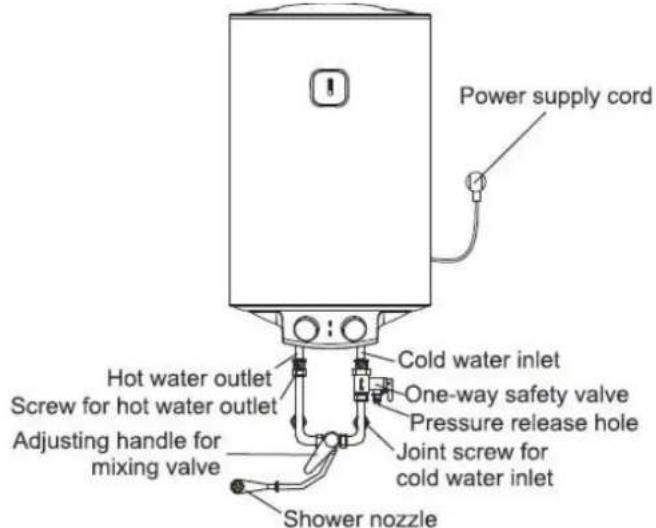
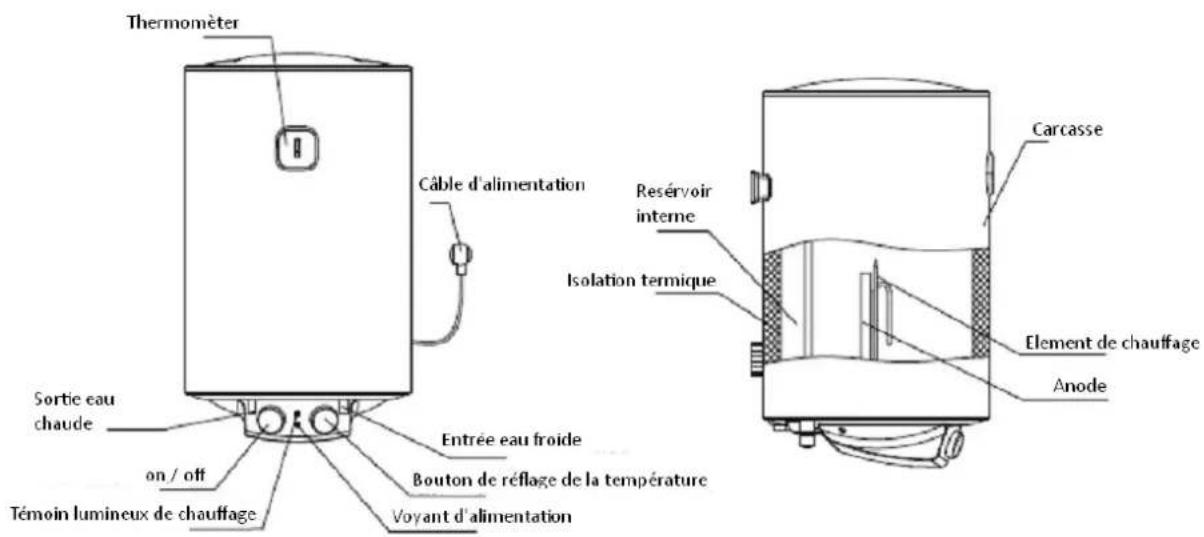
BRIEF INTRODUCTION OF PRODUCT STRUCTURE
| Model | Volume (L) | Rated Power (W) | Rated Pressure (Mpa) | Max Temp. Water (℃) | Waterproof grade |
| TRM 16 | 15 | 1500 | 0,75 | 75 | IPX4 |
| TRM 33 | 30 | 1500 | 0,75 | 75 | IPX4 |
| TRM 53 | 50 | 1500 | 0,75 | 75 | IPX4 |
| TRM 83 | 80 | 1500 | 0,75 | 75 | IPX4 |
| TRM 103 | 100 | 1500 | 0,75 | 75 | IPX4 |
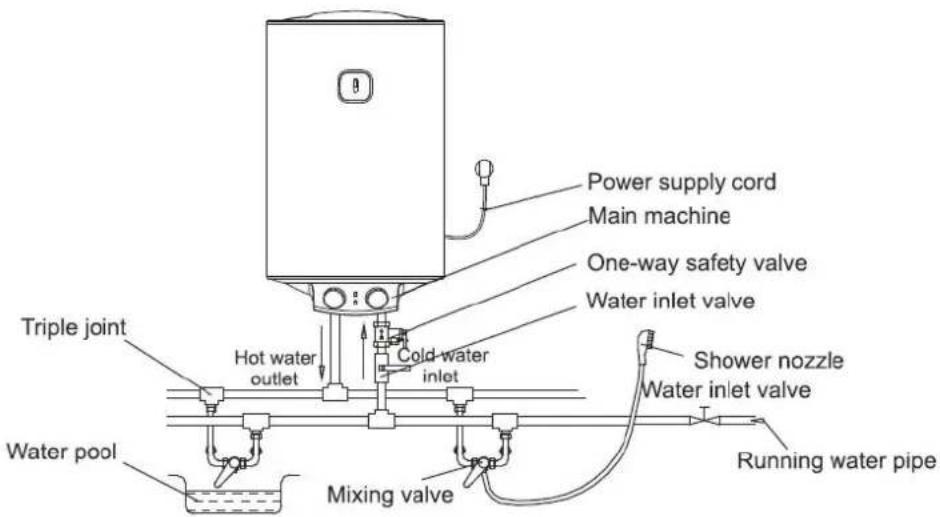
METHODS OF INSTALLATION
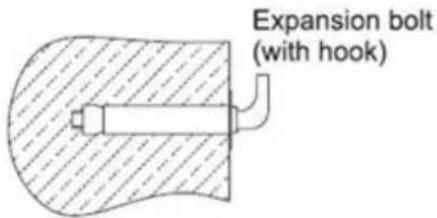
Note: Please be sure to use the accessories provided by our company to install this electric water heater. This electric water heater cannot be hung on the support until it has been confirmed to be firm and reliable. Otherwise, the electric water heater may drop off from the wall, resulting in damage of the heater, even serious accidents of injury. When determining the locations of the bolt holes, it shall be ensured that there is a clearance not less than 0.2mm on the right side of the electric heater, to convenient the maintenance of the heater if necessary.
1. Installation of the main machine:
a. This electric water heater shall be installed in the solid wall. If the strength of the wall cannot bear the load equal to two times of the total weight of the heater fully with water, it is necessary to install a special support.
b. After selecting a proper location, determine the positions of the two install holes used for expansion bolts with hook (determined according to the specification of the product you select). Make two holes in the wall with the corresponding depth by using a chopping bit with the size matching the expansion bolts attached with the machine, insert the screws, make the hook upwards, tighten the nuts to fix firmly, and then hang the electric water heater on it.
| MODEL | TRM 15 | TRM 33 | TRM 53 | TRM 83 | TRM 103 |
| Distance between holes (mm) | 198 |
c. Install the supply socket in the wall. The requirements for the socket are as follows: 250V/10A, single phase, three electrodes. It is recommended to place the socket on the right above the heater. The height of the socket to ground shall not be less than 1.8m .
d. If the bathroom is too small, the heater can be installed at another place without sunscorched and rain-drenched. However, in order to reduce the pipeline heat losses, the installation position of the heater shall be closed to the location for use of water as near as possible.
2. Connection of pipelines:
a. The dimension of each pipe part is G1/2.
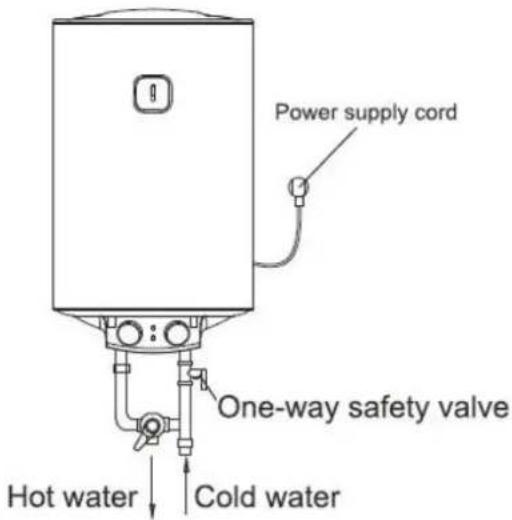
b. Connection of one-way safety valve: install the one-way safety valve attached with the machine at the water inlet of the main machine. (Pay attention to keep the installed drainage flexible pipes of the safety valve sloping downward and connected with the atmosphere.
c. In order to avoid leakage when connecting the pipelines, the rubber seal gaskets provided with the machine must be added at the end of the threads.
d. If then users want to realize a multi-way supply system, refer to the method shown for connection of the pipelines.
METHODS OF USE
- First, open any one of the outlet valves at the outlet of the water heater, then, open the inlet valve. The electric water heater begins to be filled with water. When there is water coming out of the outlet valve normally, it implies that the heater has been filled fully with water, and the outlet valve can be closed.
Note: During normal operation, the inlet valve shall be sent in status of "open".
-
Insert the supply plug into the socket, the two indicator lights are on at this time.
-
This machine can automatically control the temperature. When the water temperature inside the machine has reached the set temperature (it is set to 75^ ), it will be turned off automatically, and step into the status of thermal insulation; when the water temperature is decreased to a certain point, it will be turned on automatically to restore the heating, and the use of hot water will not be interrupted. When the heater is switched off automatically, the heating indicator will turn off.
CAUTIONS
- The supply socket must be earthed reliably. The rated current of the socket shall not be lower than 10A. The socket and plug shall be kept dry to prevent electric leakage. Inspect frequently whether the plugs contact well with the socket. Inspect method is as follows: insert the power supply plug into the socket, after using for half an hour, shut down the unit and pull the plug out, and inspect the plug whether it scalds hand. If it scalds (over 50^ ), please change another well contacted socket to avoid the plug being damaged, fire or other personnel accidents results from the bad contacting.
- For the places or the wall where the water may splash, the installation height of the socket shall not be lower than 1.8m .
- The wall in which the electric water heater is installed shall be able to bear the load more than two times of the heater filled fully with water without distortion and cracks. Otherwise, other strengthening measures shall be adopted.
- The one-way safety valve attached with the machine must be installed at cold water inlet of this machine.
-
For the use of the first time (or the first time use after maintenance or clean), the heater cannot be switched on until it has been filled fully with water. When filling the water, at least one of the outlet valves at the outlet of the heater must be opened to exhaust the air. This valve can be closed after the heater has been filled fully with water.
-
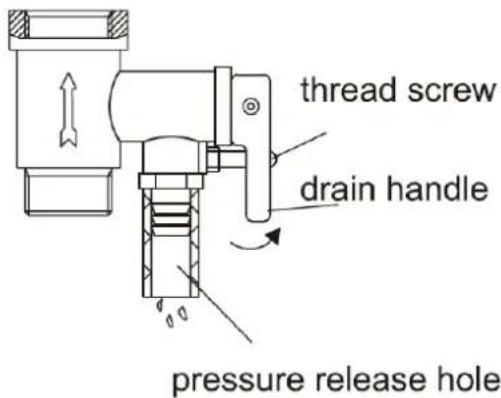
During heating, there may be drops of water dripping from the pressure release hole of the one-way safety valve. This is a normal phenomenon. If there is a large amount of water leaked, please contact with professional maintenance personnel for repair. This pressure release hole shall, under no circumstances, be locked; otherwise, the heater maybe damaged, even resulting in safety accidents.
-
The drainage pipe connected to the pressure release hole must be kept sloping downwards.
-
Since the water temperature inside the heater can reach up to 75^ , the hot water must not be exposed to human bodies when it is initially used. Adjust the water temperature to a proper point to avoid scald.
-
In order to drain away the water inside the inner container, it can be drained away from the exit port (twist the thread screw of the exit port off), and it also can be drained away from the one-way safety valve (twist the thread screw off the one-way safety valve, and lift the drain handle upwards).
-
If the flexible power supply cord is damaged, the special supply cord provided by the manufacturer must be selected, and replaced by the professional maintenance personnel.
-
If any parts and components of this electric water heater are damaged, please, contact with the professional maintenance personnel for repair, and use the special spare parts and components provided by our company.
DAILY AND COMMON MAINTENANCES
- For optimum performance of the device are advised to proceed with the scaling of resistance every two years.
- The deal, if you want to use the appropriate acids, can be made by crumbling limestone crust, taking care not to damage the armor of resistance.
To ensure efficient water heater performance it is advisable to descale the resistance every year.
- The operation, if you don't want to use any acids, can be performed by removing the limescale by hand, taking care not to damage the resistance.
- The magnesium anode should be replaced every year, but in the case of hard waters or those rich in chlorides, the state of the anode should be checked every six months.
- To replace the anode, dismount the resistance and unscrew it from the clamp. Maintenance tasks must be performed by an authorised technical service.
ELECTRICITY DIAGRAM
TROUBLE CAUSES &TREATING METHODS
| Trouble Circumstances | Obstacle Causes | Dealing Methods |
| The failure of indicator lighting | 1. The power-source no power or bad contacts. | Inspect Whether it exist the power and the touches between the socket and plug must be good. |
| 2.The interior wire materials damaged. | Adjust the temperatura control to be the highest temperature. |
| 3. Indicator Damaged. | Invite the professional menders to repair it. |
| 4. The overheating protector making functions. |
| 5. The electricity-Leakage protection plug isn't set the position. |
| Low water-exiting Temperature | 1.Dificient heating time. | Await the heating time. |
| 2. The mixed water valve's temperatura adjustment is over low. | Adjust the mixed water exiting temperature to be high. |
| 3. The electricity-leakage protection plug isn't set the position. | Invite the professional mender to mend it by inspections. |
| 4. The heating tube damaged. |
| No water coming out at the hot water mouth | 1. Dificient heating time. | Awaiting the tap water to provide the water. |
| 2. Too low tap water pressure. | When awaiting the water pressure to raise high,re-use it. |
| 3. The temperatura-controller is in mal-functions. | Changing it. |
| 4. The mixer water valve broken. |
| 5. The pipe connections are connected improperly. | Correctly connect it according to the diagram's requirements. |
| Water leakage | 1. The various pipe mouth's connection positions are not hermetically sealed. | Hermetically seal the connection mouth well. |
| 2. The tank leaks the water | Hire the professional mender to check and mend it. |

Disposal of old electrical appliances.
The European directive 2002/96/EC on Waste Electrical and Electronic Equipment (WEEE), requires that old household electrical appliances must not be disposed of in the normal unsorted municipal waste stream. Old appliances must be collected separately in order to optimize the recovery and recycling of the materials they contain, and reduce the impact on human health and the environment.
The crossed out "wheeled bin" symbol on the product reminds you of your obligation, that when you dispose of the appliance, it must be separately collected.
Consumers should contact their local authority or retailer for information concerning the correct disposal of their old appliance.
This device complies with the requirements of the Low Voltage Directive 2006/95/EC and the requirements of the EMC directive 2004/108/EC.
PRINCIPES BASIQUES POUR L'UTILISATEUR
BREVE INTRODUCTION DE LA STRUCTURE DU PRODUIT
| Model | Volume (L) | Rated Power (W) | Rated Pressure (Mpa) | Max Temp. Water (℃) | Waterproof grade |
| TRM 16 | 15 | 1500 | 0,75 | 75 | IPX4 |
| TRM 33 | 30 | 1500 | 0,75 | 75 | IPX4 |
| TRM 53 | 50 | 1500 | 0,75 | 75 | IPX4 |
| TRM 83 | 80 | 1500 | 0,75 | 75 | IPX4 |
| TRM 103 | 100 | 1500 | 0,75 | 75 | IPX4 |
METHODE D'INSTALLATION