
BV 9600 - Blender Orbegozo - Free user manual and instructions
Find the device manual for free BV 9600 Orbegozo in PDF.

| Product Type | Blender |
| Brand | Orbegozo |
| Model | BV 9600 |
| Bowl Capacity | 2.2 L |
| Bowl Material | BPA-free Tritan |
| Number of Blades | 6 blades |
| Blade Material | Stainless steel |
| Variable Speed | Yes, with rotary speed control |
| Pulse Function | Yes, pulse switch |
| Power Supply | 220 V AC |
| Power | Not specified |
| Weight | Not specified |
| Dimensions | Not specified |
| Color | Not specified |
| Safety | Automatic shut-off in case of overheating, reset button, non-slip feet |
| Cleaning | Manual cleaning, removable blades with specific tool |
| Spare Parts Available | Bowl, lid, cap, pusher, blades, locking tool |
| Usage | Household use only |
| Warranty | Not specified |
Frequently Asked Questions - BV 9600 Orbegozo
User questions about BV 9600 Orbegozo
0 question about this device. Answer the ones you know or ask your own.
Ask a new question about this device
Download the instructions for your Blender in PDF format for free! Find your manual BV 9600 - Orbegozo and take your electronic device back in hand. On this page are published all the documents necessary for the use of your device. BV 9600 by Orbegozo.
USER MANUAL BV 9600 Orbegozo
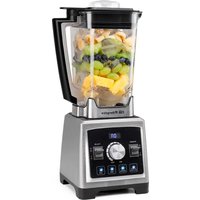
natural_image
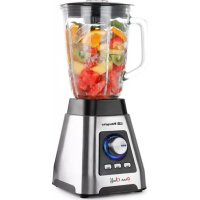
Red blender with fruit salad inside, no visible text or symbols on the device bodyBV 9600
Sonifer, S.A.
Read this manual carefully before running this appliance and save it for reference in order to obtain the best results and ensure safe use.
natural_image
Close-up of a hand holding a small metal tool interacting with a transparent plastic kitchen appliance (no visible text or symbols)When using electrical appliances, basic safety precautions should always be followed, including the following:
- This appliance can be used by children aged from 8 years and above and persons with reduced physical, sensory or mental capabilities or lack of experience and knowledge if they have been given supervision or instruction concerning use of the appliance in a safe way and understand the hazards involved. Children must never play with the appliance. Cleaning and user maintenance must never be carried out by children without supervision.
- Children should be supervised to ensure that they do not play with the appliance.
- Keep the appliance and the cable cord out of the reach of children less than 8 years old.
- WARNING: In order to ensure your children's safety, please keep all packaging (plastic bags, boxes, polystyrene etc.) out of their reach.
- If the supply cord is damaged it must be repaired by the Authorized Service Agent.
- Never pull on the cord when unplugging.
- Do not use the unit with a damaged cord or plug, or if it is not working properly.
- Do not handle the appliance with wet hands.
- Never immerse the appliance in water or any other liquid.
- Make sure the appliance has been unplugged before cleaning.
- This appliance must be installed following the national regulations for electrical installations.
-
This appliance is for household use only.
-
In case that you need a copy of the instruction manual, you can ask for it writing an email to sonifer@sonifer.es
-
WARNING: In case of misuse, there is a risk of possible injury.
Important safeguards:
- This appliance can be used by people with reduced physical, sensory or mental capabilities or lack of experience and knowledge if they have been given supervision or instruction concerning use of the appliance in a safe way and understand the hazard involved.
- Children must not play with the appliance.
• Always disconnect the power if left unattended and before assembling, disassembling or cleaning. - Disconnect the appliance and unplug from power supply if machine is left unattended, of before changing the accessories or nearest parts that move when machine is used, assembled, disassembled or during cleaning,
• Always use the blender on a flat, level work surface. Never insert metal utensils, such as knives or forks, into the inside of the jug while the appliance is operating. - The use of accessories not supplied by the manufacturer may cause accidents.
- Never try to fit or remove the jug on the blender while the appliance is still running.
- Do not open the lid on the blender until the motor has stopped.
-
The appliance is at risk for injury in the event of misuse. Care should be taken when handling the cutting blades when the glass is empty and during cleaning.
-
Do not use the blender more than 3 non-stop minutes. Alternate 3 minutes working with 1 minute stopped.
- This appliance cannot be used by children. Keep the appliancie and its cord out of reach of children
- Avoid contacting moving parts.
- Do not operate this appliance when it is malfunctions or has been dropped or damaged in any manner.
- Do not use outdoors.
- Do not let cord hang over the edge of a table or counter or touch hot surfaces, including the stove.
- Keep hands and utensils out of container while blending to reduce the risk of severe personal injury and/or damage to blender. A rubber spatula may be used but must be used only when blender is not running.
- Do not use a broken, chipped or cracked blender jar.
- Do not use broken, cracked or loose cutting blades.
- Cutting blades are sharp .Handle carefully.
- Always operate blender with cover in place.
- If the jar turns when the motor is switched ON, switch OFF immediately and tighten jar assembly. Close supervision is necessary when this appliance is used by or taking off part and before cleaning.
- Do not use your fingers to press the food, always use the plunger.
- Do not place blender filled with food or liquid in the freezer. This will freeze and damage the blade assembly, jar and motor.
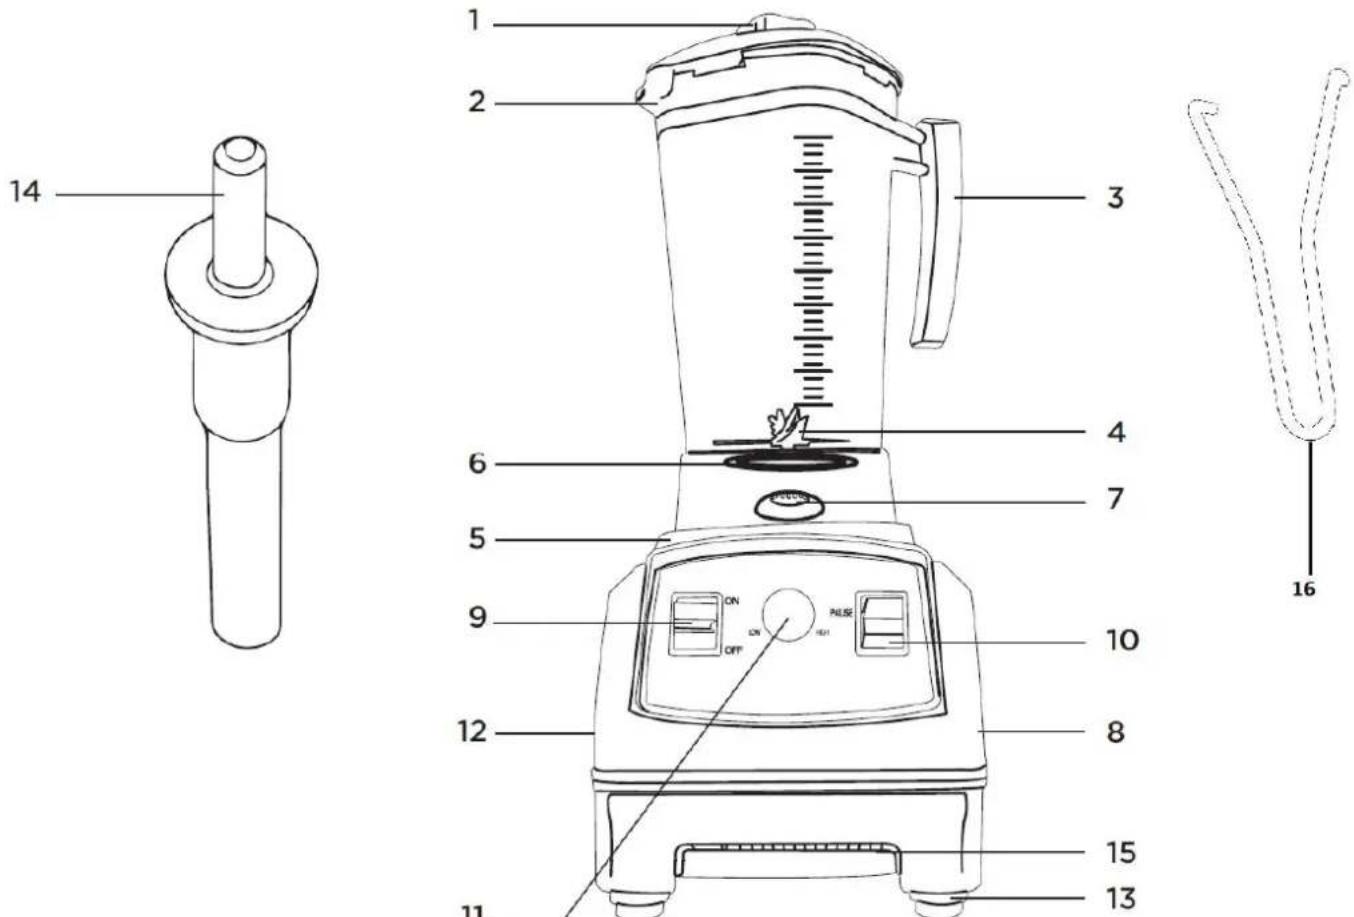
DESCRIPTION AND ASSEMBLY OF THE PARTS
-
FILLER CAP. Insert cap into lid by aligning tabs and slots. Turn clockwise to lock. Turn counter-clockwise to remove.
-
LID. Push lid onto jar until upper lid ledge is flush with upper lip of jar. Ensure that the lid is securely positioned before operating the blender. Extra care must be taken especially when handling hot liquids.
-
JAR. 2.200 L jar made from durable BPA free triton with cup and milliliter markings. Place jar on centering platform, ensuring that it is well seated.
-
BLADES. 6 stainless steel blades.
-
CENTERING PLATFORM. Pad which hold the jar in place on the blender base. It can be removed for cleaning but must be repositioned before using the blender.
-
LOCKING NUT. Fastens blades securely to jar, it can be remove for cleaning with supplied tool.
-
DRIVE SOCKET. Hardened metal socket where jar connects with motor base to turn the blades.
-
BLENDER BASE. Where it is the motor and knobs of the blender.
-
ON/OFF SWITCH. The blender is off when the switch is in down position (OFF). It works in up position (ON).
-
PULSE SWITCH. Keep pushing this switch to the blender works in max power momentarily, when you leave pushing it the blender will stop or return to initial speed. This function can be use when on/off switch is in ON or OFF position.
-
SPEED CONTROL. Turn the switch to the right to increase the speed of the blender and to the left to reduce the speed.
-
POWER CORD AND PLUG.
-
RUBBER FEET. 4 rubber anti-slip feet.
-
TAMPER. It allows moving ingredients to be well blended safety. It only can be used throw the lid's hole so it cannot touch the blades. If you need to move food at the jar's bottom, switch off the blender, unplug it, remove the lid and introduce the tamper for moving the food.
-
OVERLOAD RESET BUTTON. To protect the motor from the overheat, the blender will stop automatically before it overheats. If it happens return the ON/OFF switch to OFF position, remove the jar and wait for the motor cool down. After 5-20 minutes the blender will reset automatically. If not, press this button under the blender base.
-
TOOL FOR LOCKING NUT. It helps you to disassemble the locking nut for cleaning the blades.
BEFORE FIRST USE
- Read all instructions carefully and keep them for future reference.
- Remove all packaging.
- Place jar on blender base and wash the jar by following the directions in the CLEANING section. Wash the lid, cap and tamper in warm soapy water. WARNING: use extreme caution when handling the jar, the blades are very sharp.
- Rinse, dry and reassemble.
- Wipe the blender base with a damp cloth. Do not immerse the blender base in water or any other liquid. Do not use harsh detergents or abrasive cleaners on any part of the appliance.
GENERAL USE
- Place the blender on a clean, flat, dry and level surface.
- NEVER run the blender when the jar is empty.
- Add ingredients to jar and push the lid securely in place before positioning on blender base. Unless instructed otherwise, load first with wet ingredients and then dry ingredients. Always add ice and larger, harder ingredients last. Make sure that the cap is locked in position by turning it clockwise in the lid. WARNING: when adding warm liquids take care to prevent splashing and allow the liquid to stand for a few minutes with lid off to permit steam to escape.
- Plug into a 220V AC grounded wall outlet. NEVER attempt to set the jar on or remove it from the blender base while the motor is running.
- Set the speed control to minimum and turn on the blender. Slowly increase speed as required. The jar may move slightly as it locates on the centering platform. Let the blender run until the desired consistency or temperature has been reached.
- If the contents stop circulating, DO NOT rock or shake the jar while the motor is running. Using the PULSE function or the tamper will help. First, switch the ON/OFF button to OFF position. Then either:
a. Pulse on and off by pressing and releasing the pulse switch or;
b. Remove the filling cap and insert the tamper through the lid opening. Hold the jar handle with one hand and with the other move the tamper to unblock the contents.
- If it does not work, press ON/OFF switch to the off position to stop the motor. Once the blades stop turning, remove the jar from the blender base and move the contents around with a rubber spatula. Return the jar to the blender base, replace the lid/cap and continue blending.
- When blending is complete move switch to the off position. WARNING: rotating can cause severe injury. Wait until the blades have completely stopped rotating before removing or reaching into the jar.
- Unplug from the wall outlet and remove the jar by lifting up. WARNING: the drive socket, locking nut and blades may become very hot after extended use. DO NOT touch. Allow to cool down before handling or cleaning.
BLENDING DRY INGREDIENTS
- Always review all the general use instruction above.
- DO NOT operate the blender continuously for more than 90 seconds when processing dry ingredients.
- When chopping nuts or other dry mixtures, ensure even chopping by adding more than enough ingredients to cover the blades.
USE OF THE BLENDER WITH HOT LIQUIDS
- Always check the general use section when using the mixer.
- CAUTION: Be careful when filling the jug with hot liquids, it may burn with splashes.
- Leave the hot liquids for a while in the glass, letting the steam out before mixing.
- Before placing the carafe in the base, make sure that the cap is properly placed in the lid and place it in the carafe. NEVER add ingredients while mixing hot liquids.
- Use caution when moving the jug with hot liquids.
- Place the carafe on the base, set the speed selector to the minimum and connect the mixer with the power button. Slowly increase speed until desired. Wait until it has the necessary consistency.
- When removing the carafe from the base, open the cap or cover carefully, hot steam may escape. Be careful the lid may be hot.
HELPFUL HINTS
- While the motor is running, ingredients can be added, with care, through the filler cap opening in the center of the lid, except when hot liquids, they can splash and burn.
- To crush ice, place the ice cubes into the jar. Close the lid and place on the blender place. Press and release the PULSE switch some times until the desired consistency is reached.
CARE AND CLEANING
Before first and after each use, clean it following these instructions.
Jar, lid and tamper cleaning
- Remove the plug from the wall outlet.
- Remove the jar from the blender base and empty the jar. Rinse the inside with warm water.
- Then add 2 drops of liquid dishwashing soap and 1L of warm water to the jar.
- Lock the cap into the lid and push the lid tightly onto the jar. Place the jar on the base.
- With ON/OFF switch in OFF position, plug the blender.
-
Rotate the speed control to the lowest setting, place ON/OFF switch in ON position and increase the speed slowly to maximum. Keep the high speed for 30-60 seconds.
-
Switch off the blender and unplug it.
-
Remove the jar from the base, empty and rinse it with clear water to remove all the soap from the jar.
-
Wipe the base with a damp cloth. If necessary, you can use a little mild detergent on the cloth.
-
Clean the tamper, lid and cap with warm soapy water.
-
Dry the jar and the other accessories with a soft cloth, place on the base and you can save it.
WARNING: use extreme caution when handling the jar, the blades are very sharp.
Base cleaning
- Unplug from the wall outlet. Wipe exterior housing with soft damp soapy cloth. Take care any liquid enters to interior of motor. Never use stiff brushes or abrasive cleaners.
- Lift the centering platform off the base and wash it in warm soapy water. Rinse and dry.
- When the switches become sticky, clean them with a cotton swab dampened with mild liquid detergent.
Dry them immediately.
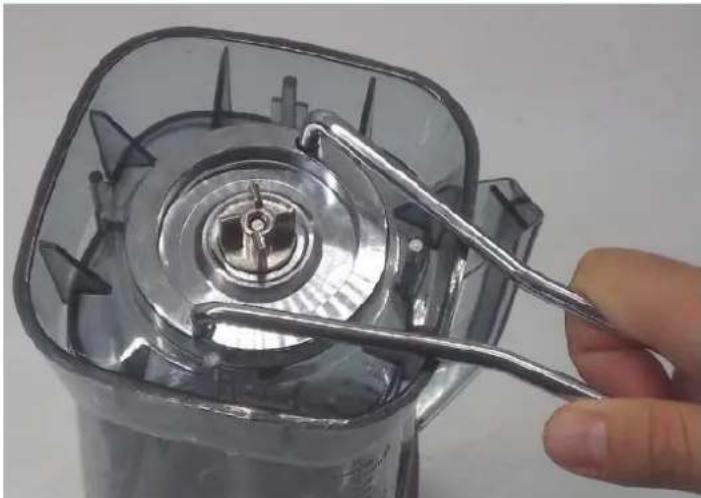
Blades cleaning
-
Remove the blades with provided tool. Snap the hooks into the nut's holes; hold the jar with the other hand and turn the nut clockwise with the tool.
-
Grasp the blades carefully, they are very sharp. Clean them and put them back into position.
-
Tighten the nut with the tool turning to the left. Make sure that it is tightly tightened to prevent the blades dismounting and that the jar loses liquid.
TROUBLESHOOTING
natural_image
Close-up of a hand holding a metal tool interacting with a transparent plastic kitchen appliance (no visible text or symbols)Blender does not operate (no power)
- Ensure the plug is plugged and the plug works.
- Unplug the base, remove the jar and press the overload reset button under the base.
My blender stops while blending
-
The blender is equipped with a resettable fuse, so if it has been running for a long time, it may have warmed up. Unplug it, remove the jar and wait for the engine to cool down (5-20 minutes). After that time it should work again, if not, press the reset button.
-
Check consistency and size of ingredients and reduce it if possible.
- To avoid overheating: make sure that nothing blocks the air inlet below the base; do not use it for a long time; use the pusher to help with the wedges.
Results are uneven
- Reduce the amount of ingredients.
- Ensure that all ingredients are about the same size.
Results are too watery or fine
- Use the PULSE function to prevent over processing.
Liquid is spilling out of the jar
- Reduce the volume of ingredients in the jar.
- Ensure that the lid and cap are securely in place.
- Ensure the blender is on a clean, flat, dry and level surface.
- Switch off the blender, wait for blades stop rotating and unplug the cord. Check the jar is properly placed and there isn't undesired object inside the jar.
- Never move, rock or remove the jar while the blade are turning. This will damage your blender.
- Ensure the jar is not overloaded.
- The noise level will vary depending on the size, hardness and kind of ingredients, the noise will change during blending process.
- Check to ensure that the locking nut is tight.
Unusual noise or vibration
Locking nut is loose
- If the locking nut becomes loose, stop the blender immediately.
- If you cannot screw it again, contact with technical service before use it.
RECIPES
Chocolate and banana smoothie
Ingredients:
1 banana
400 ml cold milk
2-3 tablespoons of chocolate syrup
4 scoops of chocolate ice cream
Preparation: Peel the banana, cut it into small pieces and fry it with the milk. Add the chocolate syrup and the ice cream and mix until it reaches the required consistency.
Watermelon Gazpacho
Ingredients:
300 g of watermelon
1 tomato
2 small red peppers (1 to crush, 1 to serve)
1 small onion
100 ml of tomato juice
1 tablespoon olive oil
1 tablespoon syrup (grenadine)
1 clove garlic
3 thin strips of chili
Salt and pepper
Preparation:
Peel the watermelon, remove the seeds and cut the pulp into thick piece. Stir in 1 pepper and 1 tomato and place in the blender jar along with chopped onion and chili slices. Add the olive oil and tomato juice and mash everything. Season with grenadine syrup, salt and pepper, and store the gazpacho 2 hours in the refrigerator. To give consistency and variety to the gazpacho, cut the second pepper into small pieces and add them before serving.
Blackberry and Banana Smoothie
Ingredients:
200 g of blackberries (frozen or fresh)
100 g of banana
500 ml of skim milk
1 tablespoon lemon juice
1 tablespoon honey
50 ml buttermilk
Preparation:
Put the milk, buttermilk and lemon juice in the
blender jar. Then add the blackberries, the honey and the banana. Shred everything.
Strawberry milkshake
Ingredients:
150 g of strawberries (frozen or fresh)
400 ml cold milk
3 tablespoons of cream
2 tablespoons of sugar
Preparation:
Put the cream, milk and sugar in the blender jar and then add the strawberries. If frozen strawberries are used, allow them to defrost briefly. Shred everything.

Disposal of old electrical appliances.
The European directive 2002/96/EC on Waste Electrical and Electronic Equipment (WEEE), requires that old household electrical appliances must not be disposed of in the normal unsorted municipal waste stream. Old appliances must be collected separately in order to optimize the recovery and recycling of the materials they contain, and reduce the impact on human health and the environment. The crossed out “wheeled bin” symbol on the product reminds you of your obligation, that when you dispose of the appliance, it must be separately collected. Consumers should contact their local authority or retailer for information concerning the correct disposal of their old appliance.
DECLARATION OF CONFORMITY: This device complies with the requirements of the Low Voltage Directive 2006/95/EC and the requirements of the EMC directive 2004/108/EC.
FRANÇAIS
MESURES DE SÉCURITÉ GENERAUX. VEUILLEZ LIRE CES INSTRUCTIONS AVANT TOUTE UTILISATION.
natural_image
Close-up of a hand using tweezers to handle a transparent plastic appliance with internal components (no visible text or symbols)natural_image
Close-up of a hand holding a metal tool interacting with a transparent plastic kitchen appliance (no visible text or symbols)Limpeza de lâminas

- Important safeguards:
- DESCRIPTION AND ASSEMBLY OF THE PARTS
- BEFORE FIRST USE
- GENERAL USE
- BLENDING DRY INGREDIENTS
- USE OF THE BLENDER WITH HOT LIQUIDS
- HELPFUL HINTS
- CARE AND CLEANING
- Jar, lid and tamper cleaning
- Base cleaning
- Blades cleaning
- TROUBLESHOOTING
- Blender does not operate (no power)
- My blender stops while blending
- Results are uneven
- Results are too watery or fine
- Liquid is spilling out of the jar
- Unusual noise or vibration
- Locking nut is loose
- RECIPES
- Chocolate and banana smoothie
- Ingredients:
- Watermelon Gazpacho
- Preparation:
- Blackberry and Banana Smoothie
- Strawberry milkshake
- Disposal of old electrical appliances.
- FRANÇAIS
- Limpeza de lâminas
Brand : Orbegozo
Model : BV 9600
Category : Blender