
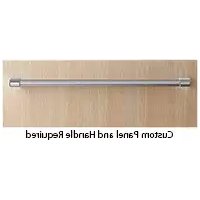
OD30WDX2UB - Warming drawers and cabinets Fisher & Paykel - Free user manual and instructions
Find the device manual for free OD30WDX2UB Fisher & Paykel in PDF.

| Product Type | Heating drawer and cabinet (food warmer) |
| Brand | Fisher & Paykel |
| Model | OD30WDX2UB |
| Minimum cabinet dimensions (H x W x D) | 33.5 cm x 76 cm x 61 cm (13-1/4 in x 30 in x 24 in) |
| Electrical supply | 120 V AC, 5 A min., 15 A max. |
| Appliance weight | 90 lb (40.8 kg) |
| Temperature range | 32°C – 121°C (90°F – 250°F) |
| Temperature settings | Proof, Low, Medium, High |
| Warming capacity | Up to 2 hours |
| Front material | Stainless steel |
| Tray included | Yes, stainless steel |
| Special function | Bread dough proofing |
| Recommended cleaning | Sponge or warm soapy cloth; polish with stainless steel cleaner |
| Safety device | Anti-tip brackets, avoid hot surface |
| Warranty | 1 year limited (parts and labor) |
| Installation | Built-in, requires cabinet with minimum dimensions as indicated |
| Control type | Thermostatic rotary knob |
| Required electrical outlet | 120 V AC outlet located within 92 cm (36 in) of rear center |
Frequently Asked Questions - OD30WDX2UB Fisher & Paykel
User questions about OD30WDX2UB Fisher & Paykel
0 question about this device. Answer the ones you know or ask your own.
Ask a new question about this device
Download the instructions for your Warming drawers and cabinets in PDF format for free! Find your manual OD30WDX2UB - Fisher & Paykel and take your electronic device back in hand. On this page are published all the documents necessary for the use of your device. OD30WDX2UB by Fisher & Paykel.
USER MANUAL OD30WDX2UB Fisher & Paykel
The warming drawer is not intended to be used in conjunction with water. DO NOT fill the drawer or warming cavity with water. Doing so could create a shock hazard, resulting in a possible injury.
DO NOT use water on grease fires. Turn OFF the warming drawer, then smother the fire with baking soda or use a dry chemical or foam-type fire extinguisher.
TO REDUCE THE RISK OF INJURY TO PERSONS AND PROPERTY DAMAGE IN THE EVENT OF A FIRE IN THE WARMING DRAWER, OBSERVE THE FOLLOWING: SMOTHER FLAMES with a large lid that will fit flat on the drawer bottom. Using hand protection, turn the unit OFF. In case of grease fire, use hand protection and turn unit OFF and keep drawer tightly closed until extinguished. If the flames do not go out immediately, EVACUATE AND CALL THE FIRE DEPARTMENT. NEVER PICK UP A FLAMING PAN - You may be burned. DO NOT USE WATER, including wet dishcloths or towels - a violent steam explosion will result. Use an extinguisher ONLY if:
- You know you have a Class ABC extinguisher, and you already know how to operate it.
- The fire is small and contained in the area where it started.
- The fire department is being called.
- You can fight the fire with your back to an exit.
SAFETY PRACTICES & PRECAUTIONS 3-4
FEATURES 5
INSTALLATION INSTRUCTIONS
Specifications 6
Base Cabinet Installation 6
Wall Cabinet Installation 7
Step 1 - Removing the Printer 8
Step 2 - Mounting Installation of Chassis 9-10
Step 3 - Replacing the Printer 11
OPERATING INSTRUCTIONS
Operational Guide 12
Preheat Time and Temperature Selector 12
Proofing Yeast Dough 12
CARE AND MAINTENANCE
Cleaning the Warming Printer 13
TEMPERATURE SETTINGS 14
SERVICE 15
WARRANTY 16-18
Read and Understand these Precautions
- Read this Installation Guide thoroughly before installation. This will help to reduce the risk of fire, electric shock, or injury to persons.
- Remove all packaging materials from your appliance.
Install according to instructions. See page 5-9 to insure proper installation and servicing. - Be sure to have a qualified service technician install and ground this appliance.
Plug into rated outlet: 120 Volts AC, 5 Amp min., 15 Amp maximum circuit requirement.
Preheating Instructions
The Warming Printer is designed to keep cooked foods warm for extended periods of time. The printer must be pre-heated before use on high (see Use and Care Guide). If the warming printer isn't pre-heated, the internal temperature of the food being warmed could fall below the minimum safe level and bacteria could develop. Always preheat the printer according to the instructions described in the Operating Instructions (page 11).
Children should not be left alone or unattended in an area where appliances are in use. They should never be allowed to turn knobs, push buttons, sit or stand on any part of an appliance.
Children in walkers, or children crawling can be attracted to the door handle and may grab and open the warming drawer. This can result in injury from the door being pulled open on a child, or severe burns if it is in use and hot.

WARNING:
Do not store items of interest to children in, above or around any appliance. Children could be seriously injured if they should climb onto the appliance to reach these items.
Be certain to use only dry pot holders: Moist or damp pot holders on hot surfaces may cause burns from steam. Do not use a towel or other bulky cloth in place of pot holders.
- Never store anything in the warming drawer. Flammable materials can catch fire, plastic items may melt or ignite and other types of items could be ruined.
- Do not hang articles from any part of the appliance or place anything against the drawer. Some fabrics are quite flammable and could catch on fire.
- For safety reasons and to avoid damage to the appliance, never sit, stand, or lean on the warming drawer door.
- For personal safety, wear proper apparel. Loose fitting garments or hanging sleeves should never be worn while using this appliance. Some synthetic fabrics are highly flammable and should not be worn while using this appliance.
- Do not use aluminum foil to line any part of the warming drawer. Using a foil liner could result in a fire hazard, or the obstruction of the flow of heat and ventilation air. Foil is an excellent heat insulator and heat will be trapped underneath it. This trapped heat can upset the performance of the warming drawer parts.

WARNING:
Do not store or use gasoline or other flammable items in or around unit.

WARNING:
This appliance is designed for warming food. Based on safety considerations, never use the warming drawer to warm or heat a room.
As with any cooking or heating appliance, never leave the warming drawer unattended when warming food, this could be a fire hazard.
- Only certain types of glass, heat proof glass-ceramic, ceramic, earthenware or glazes are suitable for use in this warming drawer. Utensils that are not thermally heat safe may break with sudden temperature changes.
- Never heat unopened containers, a build up of pressure may cause the container to burst.
Grease is flammable, avoid letting grease deposits collect in the warming drawer, clean up spillage.
120 Volts AC, 5 Amp min., 15 Amp maximum circuit requirement.
DO NOT use water on grease fires. Turn OFF the warming drawer, then smother the fire with a dry chemical or foam-type fire extinguisher.
- When opening the drawer while keeping sauces warm, tomato sauce, etc., the drawer must be opened slowly to avoid spillage.
Use care when opening a hot warming drawer; to avoid severe burns, open slowly, allow the hot air or steam to escape before reaching in to remove or replace any foods.
- Do not repair or replace any part of this appliance unless it is specifically recommended in this manual. All other servicing should be referred to a qualified Service Technician. Service Technicians must disconnect the power supply before servicing this appliance.
- When using the warming drawer: DO NOT TOUCH THE INTERIOR SURFACES or the exterior area immediately surrounding the door until it has had sufficient time to cool to avoid burn injuries.
- Clean the warming drawer with caution. Avoid steam burns; do not use a wet sponge or cloth to clean the appliance while it is hot. Some cleaners produce noxious fumes if applied to a hot surface. Follow directions provided by the cleaner manufacturer.
- Be sure all the controls are turned off and the appliance is cool before using any type of aerosol cleaner on or around the appliance. The chemical that produces the spraying action could, in the presence of heat, ignite or cause metal parts to corrode.
- Do not touch the heating element or interior surfaces of the warming drawer, even if they appear dark in color. They may still be hot enough to cause burn injury. Allow sufficient time to cool.
- Do not allow flammable materials which may ignite to come in contact with the hot heating element or the interior surface of the warming drawer until the unit has had a sufficient time to cool.
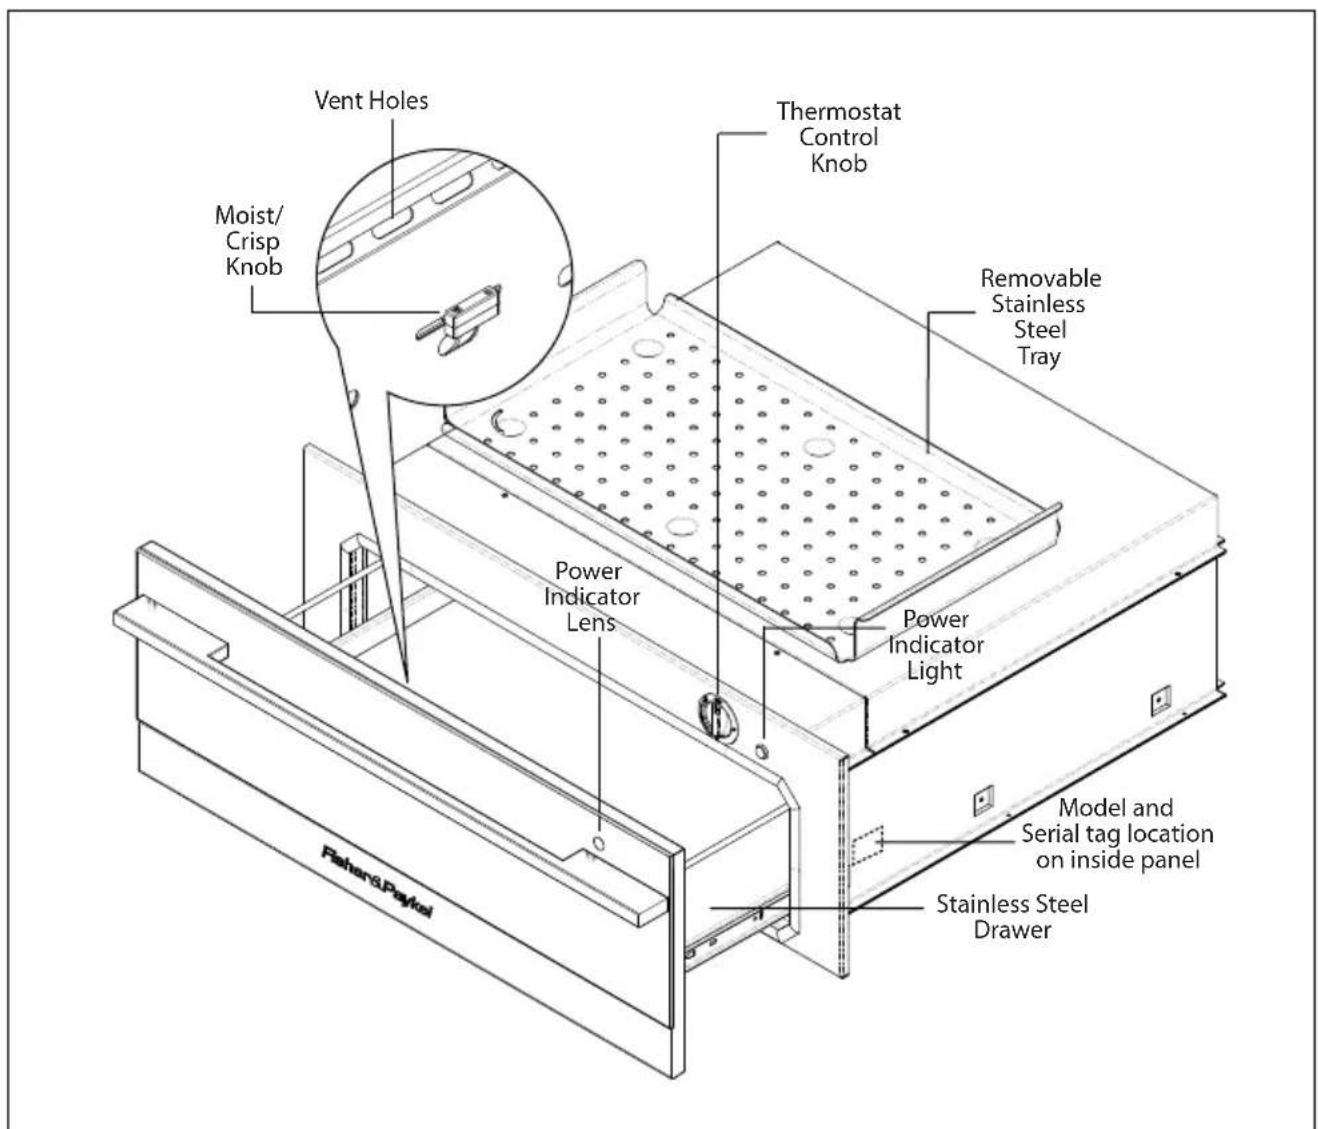
Fig. 01
Specifications
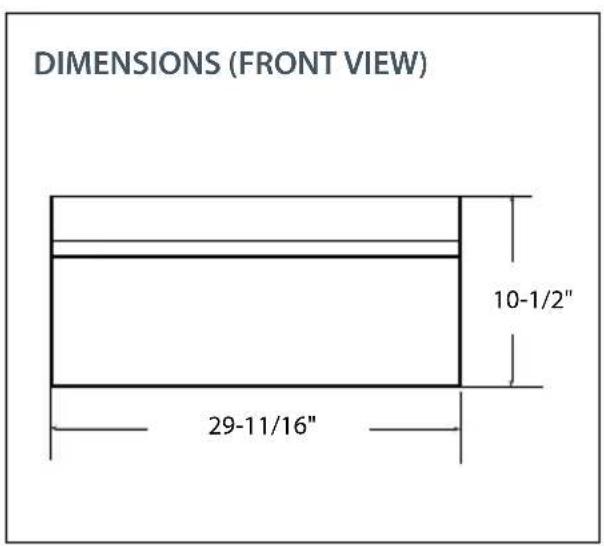
Fig. 02
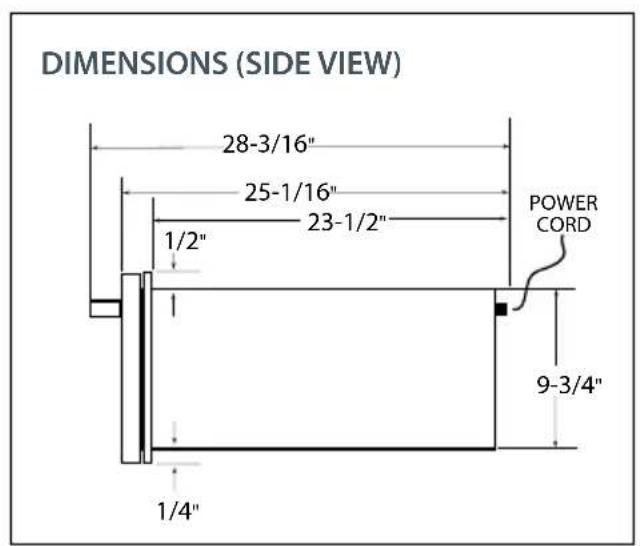
Fig. 03
Base Cabinet Installation
The cabinet depth from the outer edge of the face frame to the inside back of the cabinet or wall should be at least 24^ (see Fig. 04).
The Warming Printer should be installed into a base cabinet with minimum outside dimensions of 13 - 1 / 4'' high by 30'' wide by 24'' deep.
Power supply required: 120Volts AC; 5 Amp min., 15 Amp maximum circuit requirement.

Fig. 04
Wall Cabinet Installation
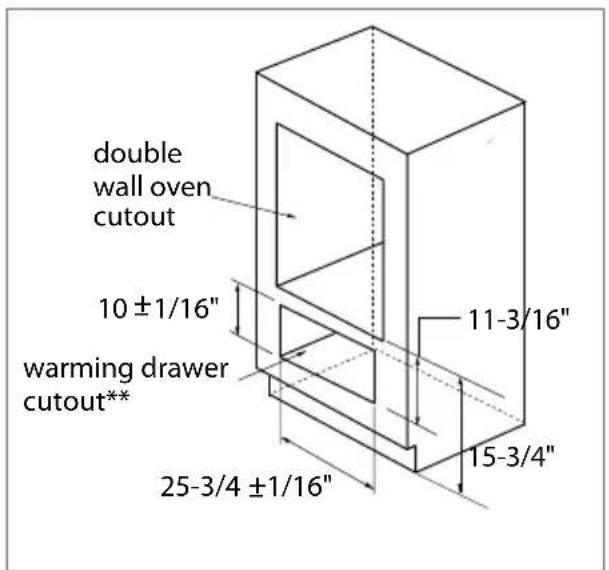
DOUBLE Wall Oven and Warming.
Drawer Installation
Fig.05
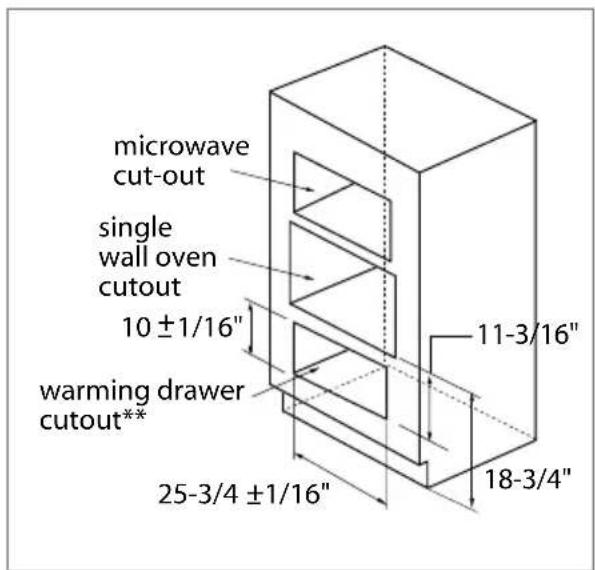
SINGLE Wall Oven and Microwave and Warming Printer Installation
Fig. 06
**The floor of the opening should be constructed of plywood strong enough to support the weight of the Warming Printer (or use 2x4 construction - see fig. 04)
STEP 1 Removing the drawer
Turn the unit off. Be sure the drawer is cool and no food items or trays are in the drawer. Never attempt to remove the drawer while the unit is on or warm.
- To remove the drawer, first remove plates, trays, etc., from the drawer.
- Pull the drawer open towards you all the way until it reaches the stop position (Fig. 07).
- Unlock the drawer by lifting up the tab on the left hand side (Fig. 08) and pressing down the tab on the right hand side (Fig. 09) while pulling the drawer open at the same time (Fig. 10).
Note: Removing the drawer for the very first time does require extra force.
- Keep pulling the drawer open until the slides are separated.
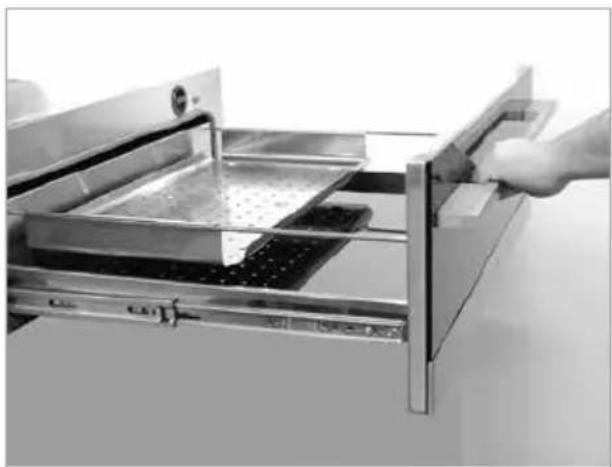
Fig. 07
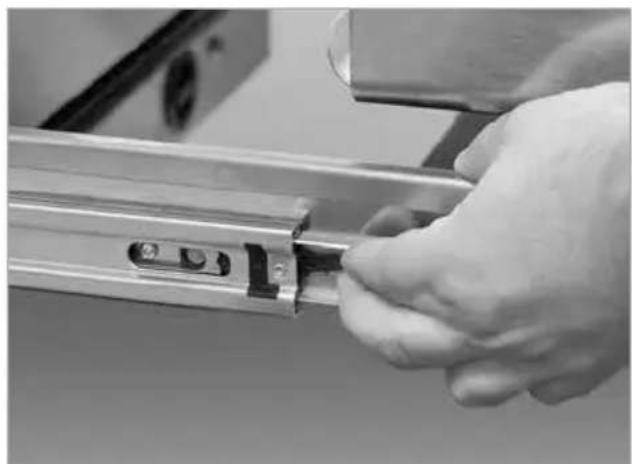
Fig. 08
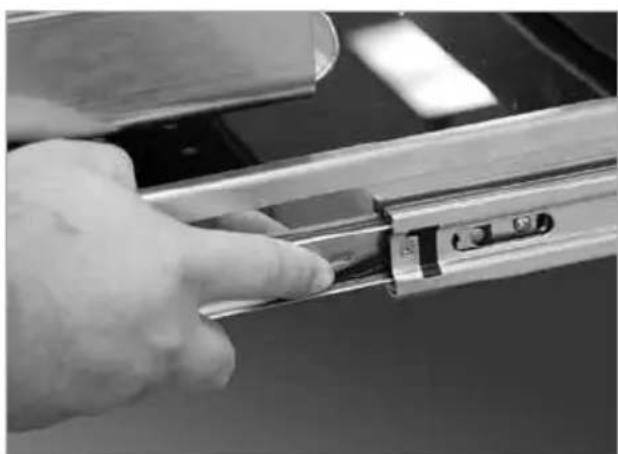
Fig. 09
Fig. 10
STEP 2 Mounting Installation of Chassis
The lower rear corners of the cabinet need to provide proper support to the back of the Warming Printer and the anti-tip mounting clips. A 120 volt AC outlet should be located no further than 36 inches from the back right corner of the Warming Printer.
The bottom rear section of the cabinet should be made of solid plywood or two 2x4 beam. It holds the anti-tip mounting clips and supports the weight of Warming Printer, which is 90 lbs. (see Fig. 11 and 12). If two 2x4 beams are used, the distance between their centers must be 20^ to be able to secure the Warming Printer.
- Use the screws provided and attach the mounting clips. They must be installed for anti-tip safety to the bottom support at the back. See placement dimensions in figure below (see Fig. 11).
- Plug power cord into AC outlet. Slide the body onto the anti-tip mounting clips (see Fig. 12).
- Use the two supplied 1-1/2" long screws through the two embossed holes (see Fig. 13) to secure the front of the Warming Printer.
Fig. 11
Fig. 12
Fig. 13
STEP 3 Replacing the drawer

WARNING!
With the drawer removed, the heating element is exposed. Never turn the unit on while the drawer is removed. Never let children play near or touch the warming drawer while it is not safely installed. Push the slides back into the cabinet while the drawer is removed to prevent accidents.
- To reinstall the drawer, push the slides fully inside.
- Position the drawer in front of the cavity and align the slides (Fig. 14).
- With the slides aligned, push the drawer all the way inside (Fig. 15).
NOTE: When the drawer is re-installed, the slides may feel stiff and hard to push in. This is normal. Pull the drawer back out to realign the rollers. The drawer should now feel smooth and free.
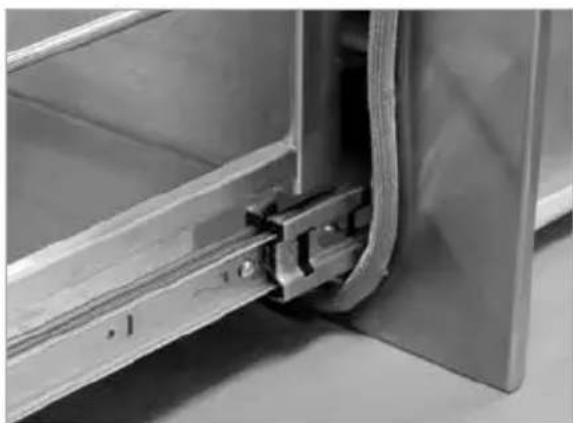
Fig. 14
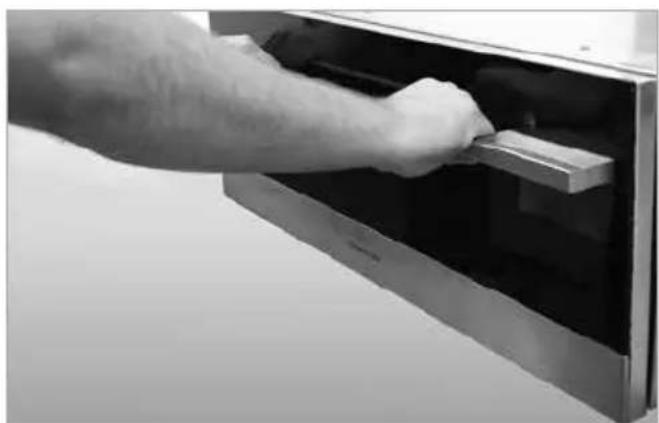
Fig. 15
Adjusting the latch
The latch can be repositioned vertically by adjusting the two torx screws. The force necessary to open and close the drawer can be changed by adjusting the two flathead screws (Fig. 16).
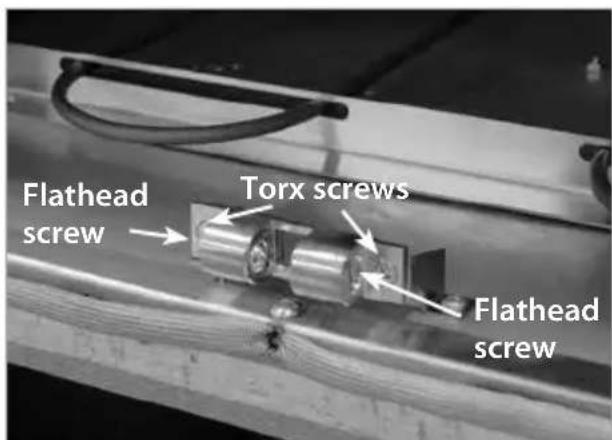
Fig. 16
Operational guide
The Warming Printer is designed to keep previously cooked foods at a safe, warm temperature, for extended periods of time, when operated correctly. It is not designed to cook or reheat food. The Warming Printer should be pre-heated according to the chart below prior to inserting the food to be warmed. Food may be kept up to two hours in the warming printer. Failure to pre-heat could result in unsafe food temperatures, which could accelerate the formation of bacteria in the
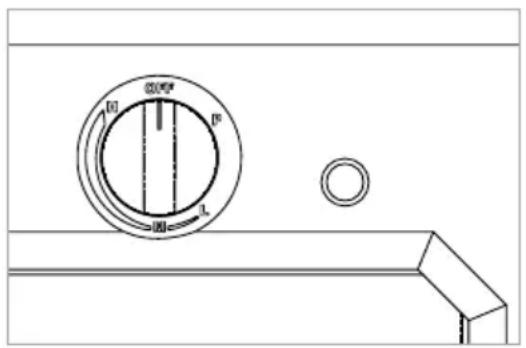
Fig. 17
food being kept warm. The dial on the top right corner of the unit is the on/off and temperature control adjustment. When the dial is turned clockwise from the off position to the proof position, the unit will maintain a temperature of approximately 100^ . By rotating the dial clockwise to the high position, the drawer will reach a temperature of approximately 250^ .
To Use: Turn the thermostat dial to a temperature setting;
H-High M-Medium L-Low P-Proofing
If you will be using the tray, preheat it while preheating the warming drawer.
Preheat any empty serving dishes to be used, while preheating the drawer.
Add cooked, hot food in its cooking container or heat-safe container.
Aluminum foil may be used to cover food containers.
Caution
Do not use plastic containers or plastic wrap. They can melt if in direct contact with the drawer or a hot utensil and if these items melt, they may adhere to the drawer and may be unremovable. Use only heat-safe dishes.
Preheat time and temperature selector:
Proofing.... Do not preheat 90^ - 110^
Low. Preheat 10 min. 140^ - 170^
Medium .... Preheat 15 min. 170^ - 200^
High. Preheat 20 min. 200^ - 250^
Always preheat on high, then turn the knob to the desired setting.
- To keep several different foods hot together, set the temperature to the food needing the highest setting. Place items needing highest setting on the bottom of the drawer and food needing less heat on the tray.
Proofing Yeast Dough
Place dough in a greased jelly roll or half sheet pan or oiled bowl, no taller than five inches in height. Turn dough over to grease all areas of the dough, cover with a damp clean cloth. Place in the center of warming drawer and turn the control knob to proofing (P). Check at 45 minutes to one hour. Dough should double in size. Shape dough, place in baking pan, and put in warming drawer for second rising, about 30 to 45 minutes; add extra time if needed.
Cleaning the warming drawer
- Be careful cleaning any part of this appliance, particularly the drawer box and back of the drawer face. All parts of the drawer can be cleaned with a hot soapy damp cloth, rinsed, dried and buffed with a heavy pile cloth. Always try this first, as it is the mildest cleaning procedure.
- Be sure the Warming Printer is turned off and the appliance is cool before using any type of aerosol cleaner on or around the appliance. The chemical that produces the spraying action could, in the presence of heat, ignite or cause metal parts to corrode.
Use the mildest cleaning procedure first. Some brands of cleaners are harsher than others, read their directions. Try on a small area first. - To avoid marring the surface always rub the metal finishes in the direction of the polish grain lines. The cleaner will be more effective when used in the direction of the polish lines.
- Use only clean sponges, soft cloths, paper towels, plastic or non-metal soap pads for cleaning or scouring, as recommended in this section. (Caution: some soap pads can scratch).
- Be sure to rinse all parts thoroughly and to wipe dry to avoid water marks.
-
Remove food particles after every use.
-
Drawer: Clean the drawer with warm soapy damp sponge or cloth.
- Drawer Front: Shine with stainless steel cleaner in direction of grain. Clean glass with glass cleaner.
- Gasket: Clean with with hot water only. Do not rub. Press a dry towel on the gasket to dry. Do not remove or damage the mesh.
- Knobs: The on/off temperature knob may be removed to be cleaned. The moist/crisp knob, however, should never be removed. Be aware that the pull off force of the knobs will decrease and a loose knob could become a choking hazard for small children.
- Light: Clean with damp cloth or sponge.
- Element: Care should be taken when cleaning the heating element. Only clean the element when the unit is cool. Use warm soapy water on damp cloth.
- Stainless Steel tray: Can be removed and cleaned with hot soapy water at sink.
Suggested temperatures to keep foods hot
FOOD TEMPERATURE SLIDE KNOB COVERED/ POSITION UNCOVERED
Beef**
Rare Low Moist Covered
Medium Med Moist Covered
Well Done Med Moist Covered
Bacon High Crisp Uncovered
Bread Dough Proofing Moist Covered
Casseroles Med Moist Covered
Chips High Crisp Uncovered
Cooked Cereal Med Moist Covered
Eggs Med Moist Covered
Fish, Seafood Med Moist Covered
Fried Foods (all) High Crisp Uncovered
Fruit Med Moist Covered
Garlic Bread, Rolls Low Moist Covered
Gravy, Cream Sauces Med Moist Uncovered
Ham Med Moist Covered
Lamb Med Moist Covered
Meat Loaf Med Moist Covered
Pancakes, Waffles High Moist Uncovered
Pies, one crust Med Moist Uncovered
Pies, two crust Med Crisp Uncovered
Pizza Med Crisp Uncover
Pork Med Moist Covered
Potatoes, baked High Crisp Uncovered
Potatoes, hash browns High Crisp Uncovered
Potatoes,mashed Med Moist Covered
Poultry High Moist Uncovered
Vegetables Med Moist Covered
How To Obtain Service:
Before you call for service:
Is the circuit breaker tripped or the fuse blown?
Is there a power outage in the area?
For warranty service, please contact your local service provider or Fisher & Paykel Customer Care Representative at (888) 936.7872 or go to our website at www.dcsappliances.com and choose "customer care" to find your nearest Authorized Service Center. Before you call, please have the following information ready:
Model Number (located at the front right hand side of the body of the drawer)
Serial Number (located at the front right hand side of the body of the drawer)
Code (located at the front right hand side of the body of the drawer)
Date of installation
A brief description of the problem
Your satisfaction is of the utmost importance to us. If a problem cannot be resolved to your satisfaction, please write or email us at:
Fisher & Paykel Appliances, Inc.
5900 Skylab Road
Huntington Beach, CA 92647
email: Customer.Care@fisherpaykel.com
Limited warranty
When you purchase any new Fisher & Paykel whiteware product for personal or consumer use you automatically receive a one year limited warranty covering parts and labor for servicing within the 48 mainland United States, Hawaii, Washington DC and Canada. In Alaska the limited warranty is the same except that you must pay to ship the product to the service shop or the service technician's travel to your home. Products for use in Canada must be purchased through the Canadian distribution channel to ensure regulatory compliance.
If the product is installed in a motor vehicle, boat or similar mobile facility, you receive the same one year limited warranty, but you must bring the vehicle, boat or mobile facility containing the product to the service shop at your expense or pay the service technician's travel to the location of the product.
Fisher & Paykel undertakes to:
Repair without cost to the owner either for material or labor any part of the product, the serial number of which appears on the product, which is found to be defective. In Alaska, you must pay to ship the product to the service shop or for the service technician's travel to your home. If the product is installed in a motor vehicle, boat or similar mobile facility, you must bring it to the service shop at your expense or pay for the service technician's travel to the location of the product. If we are unable to repair a defective part of the product after a reasonable number of attempts, at our option we may replace the part or the product, or we may provide you a full refund of the purchase price of the product (not including installation or other charges).
This warranty extends to the original purchaser and any succeeding owner of the product for products purchased for ordinary single-family home use.
All service under this limited warranty shall be provided by Fisher & Paykel or its Authorized Service Agent during normal business hours.
How long does this limited warranty last?
Our liability under this limited warranty expires ONE YEAR from the date of purchase of the product by the first consumer.
Our liability under any implied warranties, including the implied warranty of merchantability (an unwritten warranty that the product is fit for ordinary use) also expires ONE YEAR (or such longer period as required by applicable law) from the date of purchase of the product by the first consumer. Some states do not allow limitations on how long an implied warranty lasts, so this limit on implied warranties may not apply to you.
This warranty does not cover:
A. Service calls that are not related to any defect in the product. The cost of a service call will be charged if the problem is not found to be a defect of the product. For example:
- Correct faulty installation of the product.
- Instruct you how to use the product.
- Replace house fuses, reset circuit breakers, correct house wiring or plumbing, or replace light bulbs.
- Correct fault(s) caused by the user.
- Change the set-up of the product.
- Unauthorized modifications of the product.
- Noise or vibration that is considered normal, for example, drain/fan sounds, regeneration noises or user warning beeps.
- Correcting damage caused by pests, for example, rats, cockroaches etc.
B. Defects caused by factors other than:
- Normal domestic use or
- Use in accordance with the product's user guide.
C. Defects to the product caused by accident, neglect, misuse, fire, flood or Act of God.
D. The cost of repairs carried out by non-authorized repairers or the cost of correcting such unauthorized repairs.
E. Travel fees and associated charges incurred when the product is installed in a location with limited or restricted access. (eg airplane flights, ferry charges, isolated geographic areas).
F. Normal recommended maintenance as set forth in the product's user guide.
If you have an installation problem contact your dealer or installer. You are responsible for providing adequate electrical, exhausting and other connection facilities.
We are not responsible for consequential or incidental damages (the cost of repairing or replacing other property damaged if the product is defective or any of your expenses caused if the product is defective). Some states do not allow the exclusion or limitation of incidental or consequential damages, so the above limitation or exclusion may not apply to you.
You may be required to provide reasonable proof of the date of purchase of the product before the product will be serviced under this limited warranty.
Commercial use
If you are using the product in a commercial setting (any use other than a single family dwelling), we agree to repair or replace, without cost to you for parts only, any defective parts, the serial number of which appears on the product. Our liability for these repairs expires ONE YEAR from the date of original purchase.
At our option we may replace the part or the product, or we may provide you a full refund of the purchase price of the product (not including installation or other charges). All service under this limited warranty shall be provided by Fisher & Paykel or its Authorized Service Agent during normal business hours.
No other warranties
This limited warranty is the complete and exclusive agreement between you and Fisher & Paykel regarding any defect in the product. None of our employees (or our Authorized Service Agents) are authorized to make any addition or modification to this limited warranty.
Warrantor: Fisher & Paykel Appliances, Inc.
If you need further help concerning this limited warranty, please contact us at:
Fisher & Paykel Appliances, Inc.
5900 Skylab Road
Huntington Beach
CA 92647
This limited warranty gives you specific legal rights, and you may also have other rights which vary from state to state.
AVERAGEMENT!
Fisher & Paykel Appliances, Inc.
Attention: DCS Customer Care
5900 Skylab Road
Huntington Beach, CA 92647
U.S.A.
Garantie limitée
Fisher & Paykel Appliances, Inc.
5900 Skylab Road
Huntington Beach
CA 92647
Fisher & Paykel Appliances 2017. All rights reserved.
The product specifications in this booklet apply to the specific products and models described at the date of issue. Under our policy of continuous product improvement, these specifications may change at any time. You should therefore check with your Dealer to ensure this booklet correctly describes the product currently available.

- Read and Understand these Precautions
- Preheating Instructions
- WARNING:
- Specifications
- Base Cabinet Installation
- Wall Cabinet Installation
- STEP 1 Removing the drawer
- STEP 2 Mounting Installation of Chassis
- STEP 3 Replacing the drawer
- WARNING!
- Adjusting the latch
- Operational guide
- Caution
- Preheat time and temperature selector:
- Proofing Yeast Dough
- Cleaning the warming drawer
- Suggested temperatures to keep foods hot
- How To Obtain Service:
- Limited warranty
- Fisher & Paykel undertakes to:
- How long does this limited warranty last?
- This warranty does not cover:
- Commercial use
- No other warranties
- AVERAGEMENT!
- Garantie limitée
Brand : Fisher & Paykel
Model : OD30WDX2UB
Category : Warming drawers and cabinets