
WB30SCX3 - Warming drawers and cabinets Fisher & Paykel - Free user manual and instructions
Find the device manual for free WB30SCX3 Fisher & Paykel in PDF.

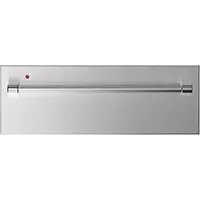
| Product type | Warming drawer |
| Brand | Fisher & Paykel |
| Model | WB30SCX3 |
| Dimensions (W x H x D) | 76.2 x 14.0 x 55.9 cm (30 x 5.5 x 22 inches) |
| Maximum capacity | 25 kg (55 lb) |
| Power supply | Electric, 220-240 V, 50/60 Hz |
| Power | 1500 W (estimated) |
| Heating functions | Cups, Plates, Warm, Quick proof, Dehydrate, Slow cook |
| Temperature setting | Yes, via + and - keys |
| Timer | Yes, adjustable, automatic stop at end of cycle |
| Delayed start | Yes, up to 12 hours |
| Control type | Touch electronic |
| Material | Stainless steel |
| Color | Stainless steel |
| Removable shelf | Yes, can be inserted on left or right |
| Automatic standby | After 12 hours of continuous use |
| Safety | Automatic stop, pause on opening |
| Cleaning | Soft cloth and mild detergent, do not use steam cleaners |
| Repairability index | Not communicated, but parts available via after-sales service |
| Warranty | 2 years (estimated) |
Frequently Asked Questions - WB30SCX3 Fisher & Paykel
User questions about WB30SCX3 Fisher & Paykel
0 question about this device. Answer the ones you know or ask your own.
Ask a new question about this device
Download the instructions for your Warming drawers and cabinets in PDF format for free! Find your manual WB30SCX3 - Fisher & Paykel and take your electronic device back in hand. On this page are published all the documents necessary for the use of your device. WB30SCX3 by Fisher & Paykel.
USER MANUAL WB30SCX3 Fisher & Paykel
Get to know your appliance 3
Load the drawer 5
Set a function 7
Set delayed start 9
Functions
Clean and maintain your appliance 11
PREMIÈRE UTILISATION | FR 13
PRIMER USO | SP 25
10
WARMING DRAWER
WB30SDEI3, WB30SMG3, WB30SMB3, WB30SCX3, WB30SPEX3

How to get the best results from your warming drawer
- Keep the control panel clean and dry.
• Use clean, dry hands to operate the controls. - Leave dishes in the drawer until you need them as they can cool down quickly.
• Always use oven mitts or potholders when removing hot dishes. - Register your product to get streamlined service support.
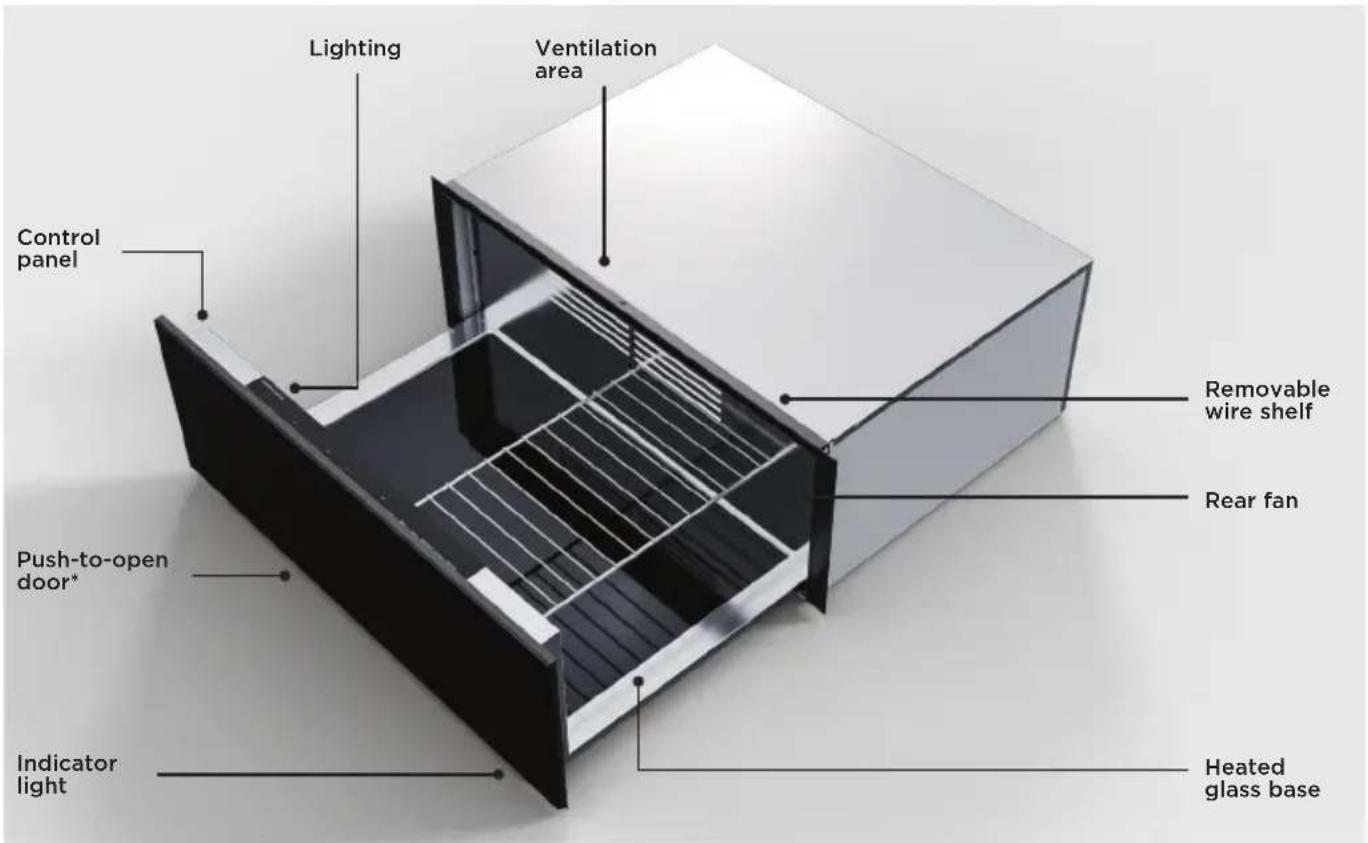
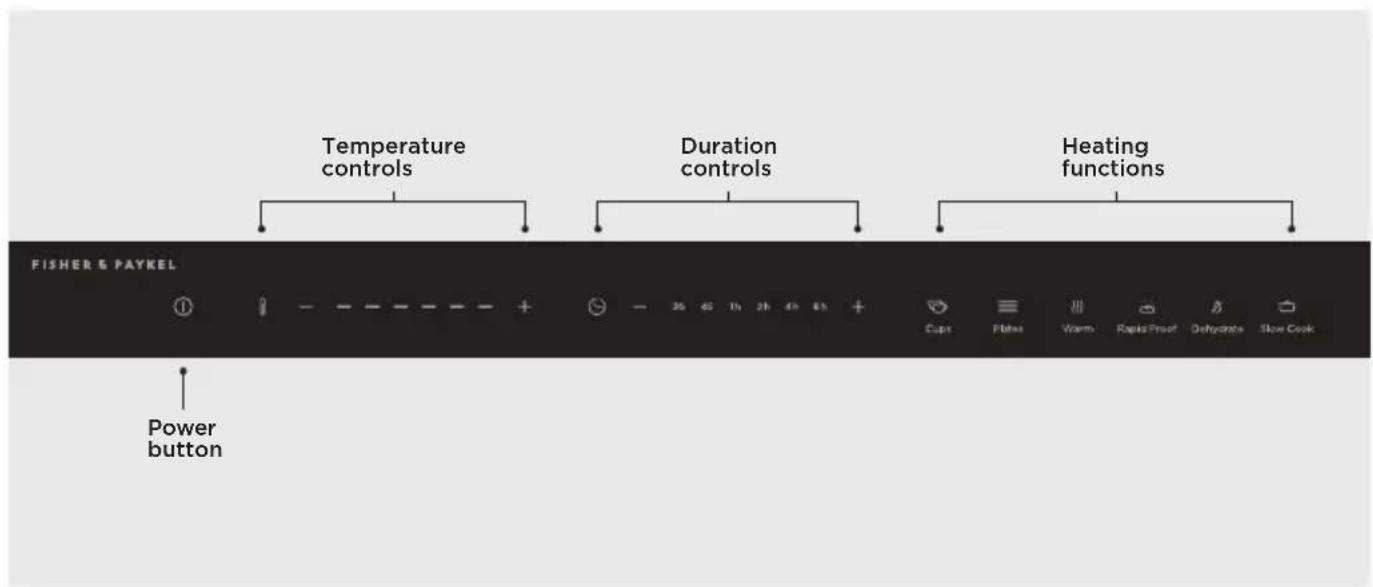
| Power button Press to turn the drawer on or to cancel heating. Press and hold to turn the drawer off. | |
| Temperature controls Press | the plus + or minus - buttons to adjust the drawer temperature. |
| Duration controls Press the | plus + or minus - buttons to adjust the heating time. |
| Heating functions Press to select the required heating function. | |
LOAD THE DRAWER
- Take care not to block the rear ventilation or overfill the drawer when loading. The maximum capacity is 55lb (25kg).
- Use the wire shelf to increase the available loading area. The shelf can be inserted on either the left or right side of the drawer.
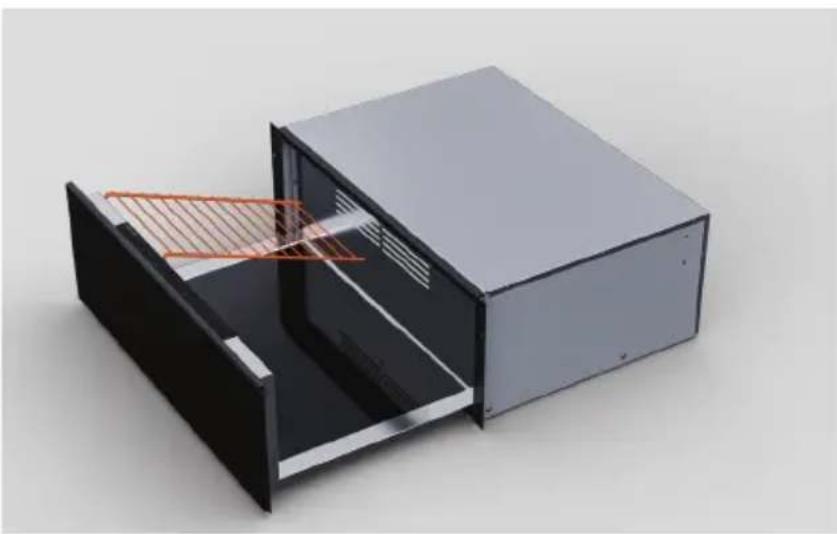
INSERTING THE WIRE SHELF
natural_image
3D rendering of a black rectangular electronic device with internal structure and orange measurement lines (no text or symbols)Slot the shelf into place at the rear and front of the drawer.
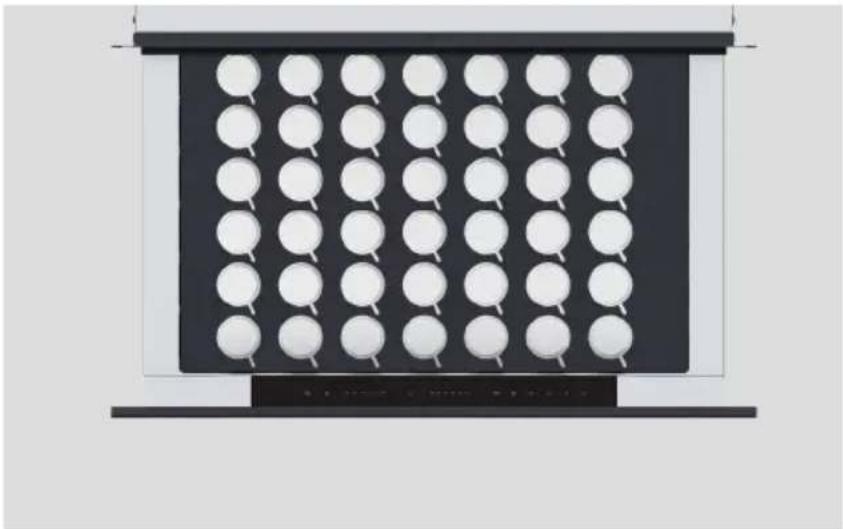
LOADING SUGGESTIONS

natural_image
Abstract 3D rendering of white spheres on a dark panel with a horizontal bar at the bottom (no text or symbols)Plate settings
Diameter guide
16x ∅9 13/16" (250mm) Dinner
16x ∅9 1/16" (230mm) Soup
16x ∅7 1/16" (180mm) Bread & Butter
16x ∅6 1/2" (165mm) Saucer
natural_image
Black panel with white circular indentations arranged in a grid pattern (no text or symbols)Espresso cups
Diameter guide
54x ∅2 1/4" (58mm)
natural_image
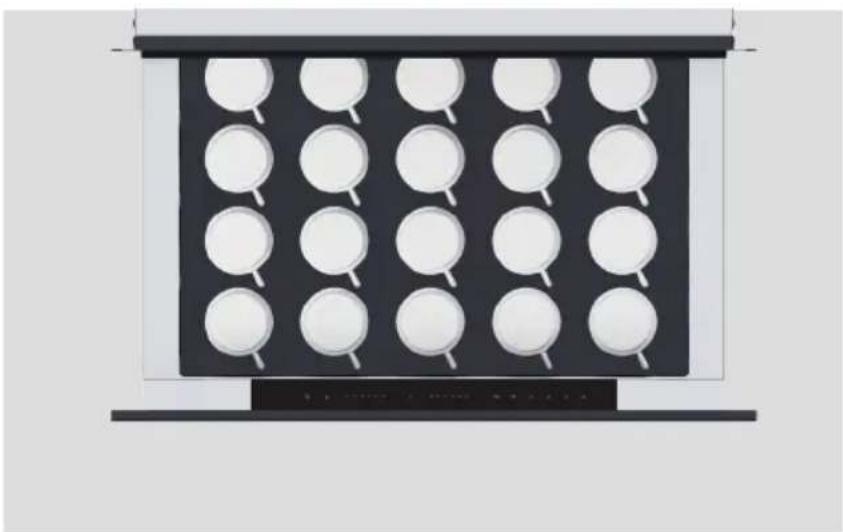
Diagram of a black tray with white circular indentations, no text or symbols presentCappuccino cups
Diameter guide
24x ∅3 5/8" (92 mm)
SET A FUNCTION
Each function has a default temperature and duration setting. These settings can be customised by manually adjusting the duration and temperature controls after selecting a function.
natural_image
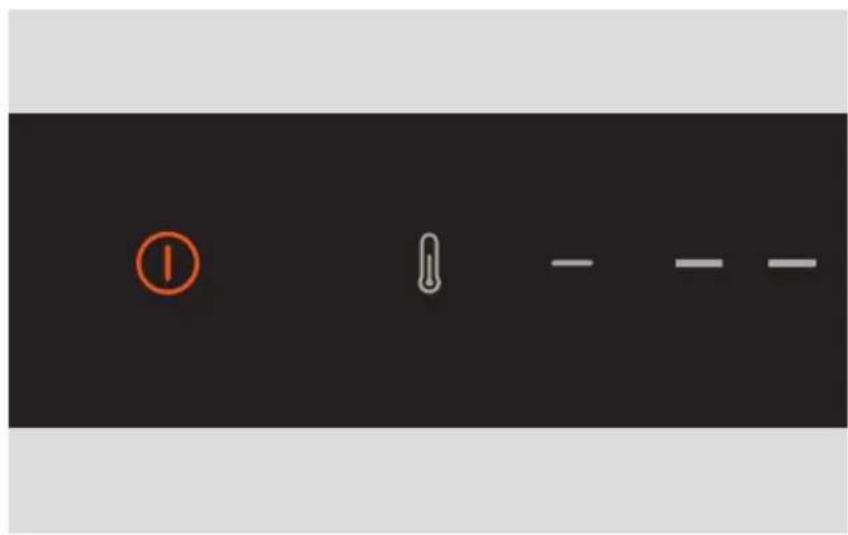
Simple diagram with a numbered circle, a thermometer, and two horizontal lines on a black background (no text or symbols)- Open the drawer and press the power button to turn on the drawer.
- Select a heating function.

natural_image
Simple diagram with a horizontal line, two colored lines (orange and gray), and a plus sign on the right (no text or symbols)- Use the temperature controls to adjust the temperature as required.

- Use the duration controls to adjust the heating time as required.
The drawer will begin heating once it is closed.
At the end of the cycle
The drawer will heat for the set duration and then automatically turn off. Take care when unloading the drawer as the contents will be hot.
Pausing or cancelling
Opening the drawer at any point will pause heating. To cancel, press the power button.
Standby mode
After 12 hours of continuous use, the drawer will automatically switch to standby mode. Press the power button to resume using the drawer. We do not recommend leaving the drawer unattended for long periods of continuous use.
Use Delayed Start to automatically turn on the drawer at a set time and turn off after the set duration. When Delayed Start is set the indicator light will flash until the drawer begins heating.

- After setting a function, temperature and duration, press and hold the duration plus + button for five seconds.

- Press the plus + or minus - buttons to adjust the delay time. The countdown will start once the drawer is closed.
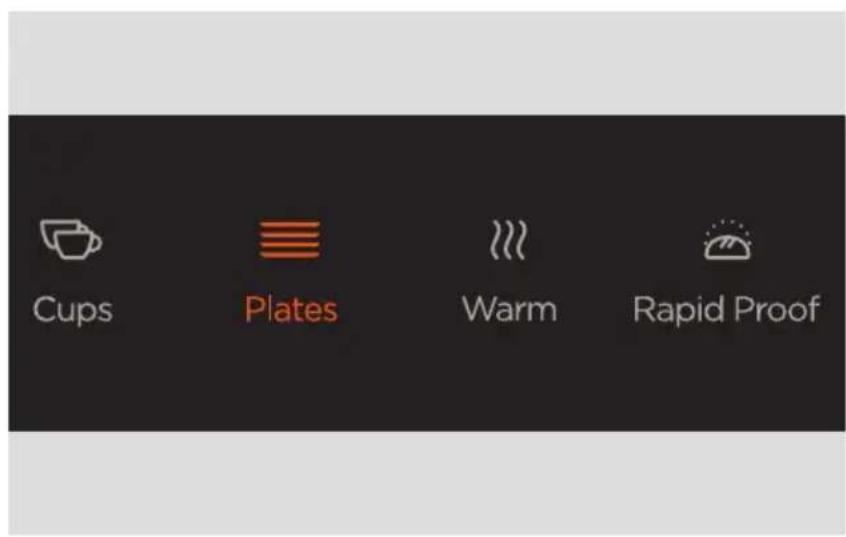
Your warming drawer has a range of heating functions for food and dishes, with recommended default settings for optimal performance. Do not place any large plates or serveware directly in front of the ventilation area. This will block airflow and cause uneven heating.
CUPS
Generates heat from the base of the drawer. Provides a constant low heat warm cups and glasses. The time needed to heat items will vary depending on their material and size, how many items are in the drawer, and how they are arranged.
PLATES
Heat circulates from the base of the drawer and the rear fan. Provides a constant low heat to warm plates and serveware. The time needed to heat items will vary depending on their material and size, how many items are in the drawer, and how they are arranged.
WARM
Heat circulates from the base of the drawer and the rear fan. Provides a constant low heat to keep cooked food hot. Preheat the drawer for at least 15 minutes before use and cover food to prevent it drying out. Not suitable for reheating cold food.
RAPID PROOF
Generates gentle heat from the base of the drawer. Provides an optimal environment for proving bread or pizza dough.
DEHYDRATE
Heat circulates from the base of the drawer and the rear fan. Provides a constant low heat for drying food. Ideal for drying meat, fruit, vegetables and herbs. For best results, lay food flat on a wire shelf and make sure items are not overlapping. When drying meat, turn over halfway through to ensure even drying. Store dehydrated food in an airtight container once it's completely cooled.
SLOW COOK
Heat circulates from the base of the drawer and the rear fan. Ideal for slowcooked dishes such as casseroles, stews and braised meat.
Make these steps a regular part of your cleaning routine to get the best results from your appliance.
Clean the drawer after every use
Use a soft, damp cloth and mild detergent to clean inside and outside the drawer. Do not use steam or high pressure cleaners. For stainless steel models, rub in the direction of the polish lines when cleaning the door and dry immediately with a soft cloth.
Wipe up any spills immediately
Do not allow spills to sit in the drawer or to spill over the sides.
Ensure the drawer is turned off and allow to cool before cleaning

Care, maintenance and troubleshooting information
Scan the QR code or visit fisherpaykel.com and search for your model code.
WB30SDEI3, WB30SMG3, WB30SMB3, WB30SCX3, WB30SPEX3
TIROIR CHAUFFANT
PREMIÈRE UTILISATION
natural_image
3D rendering of a black and silver electronic device with internal structure and orange measurement lines (no text or symbols)natural_image
Abstract 3D rendering of white spheres on a dark panel with a flat top (no text or symbols)Couverts
Guide de diamètre
16x ∅9 13/16 po (250 mm)
Souper 16x ∅9 1/16 po
(230 mm) Soupe 16x ∅7 1/16 po
natural_image
Black panel with circular cutouts and a white top, no visible text or symbolsTasses à espresso
Guide de diamètre
54x ∅2 1/4 po (58 mm)

natural_image
Diagram of a black tray with white circular indentations, no text or symbols presentTasses à cappuccino
Guide de diamètre
24x ∅3 5/8" (92 mm)
DÉFINISSEZ UNE FONCTION
natural_image
Simple diagram with a numbered circle, a thermometer, and two horizontal lines on a black background (no text or symbols)natural_image
Simple diagram with a horizontal line, two colored lines (orange and gray), and a plus sign on the right (no text or symbols)natural_image
3D rendering of a black rectangular electronic device with internal structure and orange wire mesh overlay (no text or symbols)natural_image
Abstract 3D rendering of white spheres on a dark panel with a flat top (no text or symbols)natural_image
Black panel with white circular cutouts arranged in a grid pattern (no text or symbols)natural_image
Diagram of a black tray with white circular indentations, no text or symbols presentTazas de capuchino
Guía de diámetros
24 de ∅3 5/8" (92 mm)
natural_image
Simple diagram with a numbered circle, a thermometer, and two horizontal lines on a black background (no text or symbols)natural_image
Simple diagram with a horizontal line, two horizontal gray lines, and one plus sign on a black background (no text or symbols)© Fisher & Paykel Appliances 2025. All rights reserved.
The models shown in this guide may not be available in all markets and are subject to change at any time.
The product specifications in this guide apply to the specific products and models described at the date of issue. Under our policy of continuous product improvement, these specifications may change at any time.
For current details about model and specification availability in your country, please go to our website or contact your local Fisher & Paykel dealer.
433159A 09.25

- WARMING DRAWER
- How to get the best results from your warming drawer
- LOAD THE DRAWER
- INSERTING THE WIRE SHELF
- LOADING SUGGESTIONS
- Plate settings
- Espresso cups
- Cappuccino cups
- SET A FUNCTION
- At the end of the cycle
- Pausing or cancelling
- Standby mode
- CUPS
- PLATES
- WARM
- RAPID PROOF
- DEHYDRATE
- SLOW COOK
- Clean the drawer after every use
- Wipe up any spills immediately
- Care, maintenance and troubleshooting information
- TIROIR CHAUFFANT
- PREMIÈRE UTILISATION
- Couverts
- Tasses à espresso
- Tasses à cappuccino
- DÉFINISSEZ UNE FONCTION
- Tazas de capuchino
Brand : Fisher & Paykel
Model : WB30SCX3
Category : Warming drawers and cabinets