USER MANUAL Perfect Mix LM811D10 MOULINEX
natural_image
Line drawing of a blender with handle and control panel (no text or symbols)

natural_image
Illustration of a hand using a mechanical device to lift a component, with an arrow indicating motion (no text or symbols)
natural_image
Illustration of a hand holding a ball bearing and a lid, with a downward arrow indicating a process (no text or symbols present)
natural_image
Diagram of a mechanical component with rotating arrows indicating motion (no text or symbols)
CONSIGNES DE SÉCURITÉ
natural_image
Illustration of a hand adjusting a component with warning symbol (no text or labels)
natural_image
Hand holding a speaker with a warning symbol above, no text or labels present
NL
natural_image
Illustration of a hand adjusting a component with warning symbol (no text or labels)
CAUTION: the safety precautions are part of the appliance. Read them carefully before using your new appliance for the first time. Keep them in a place where you can find and refer to them later on.
DESCRIPTION
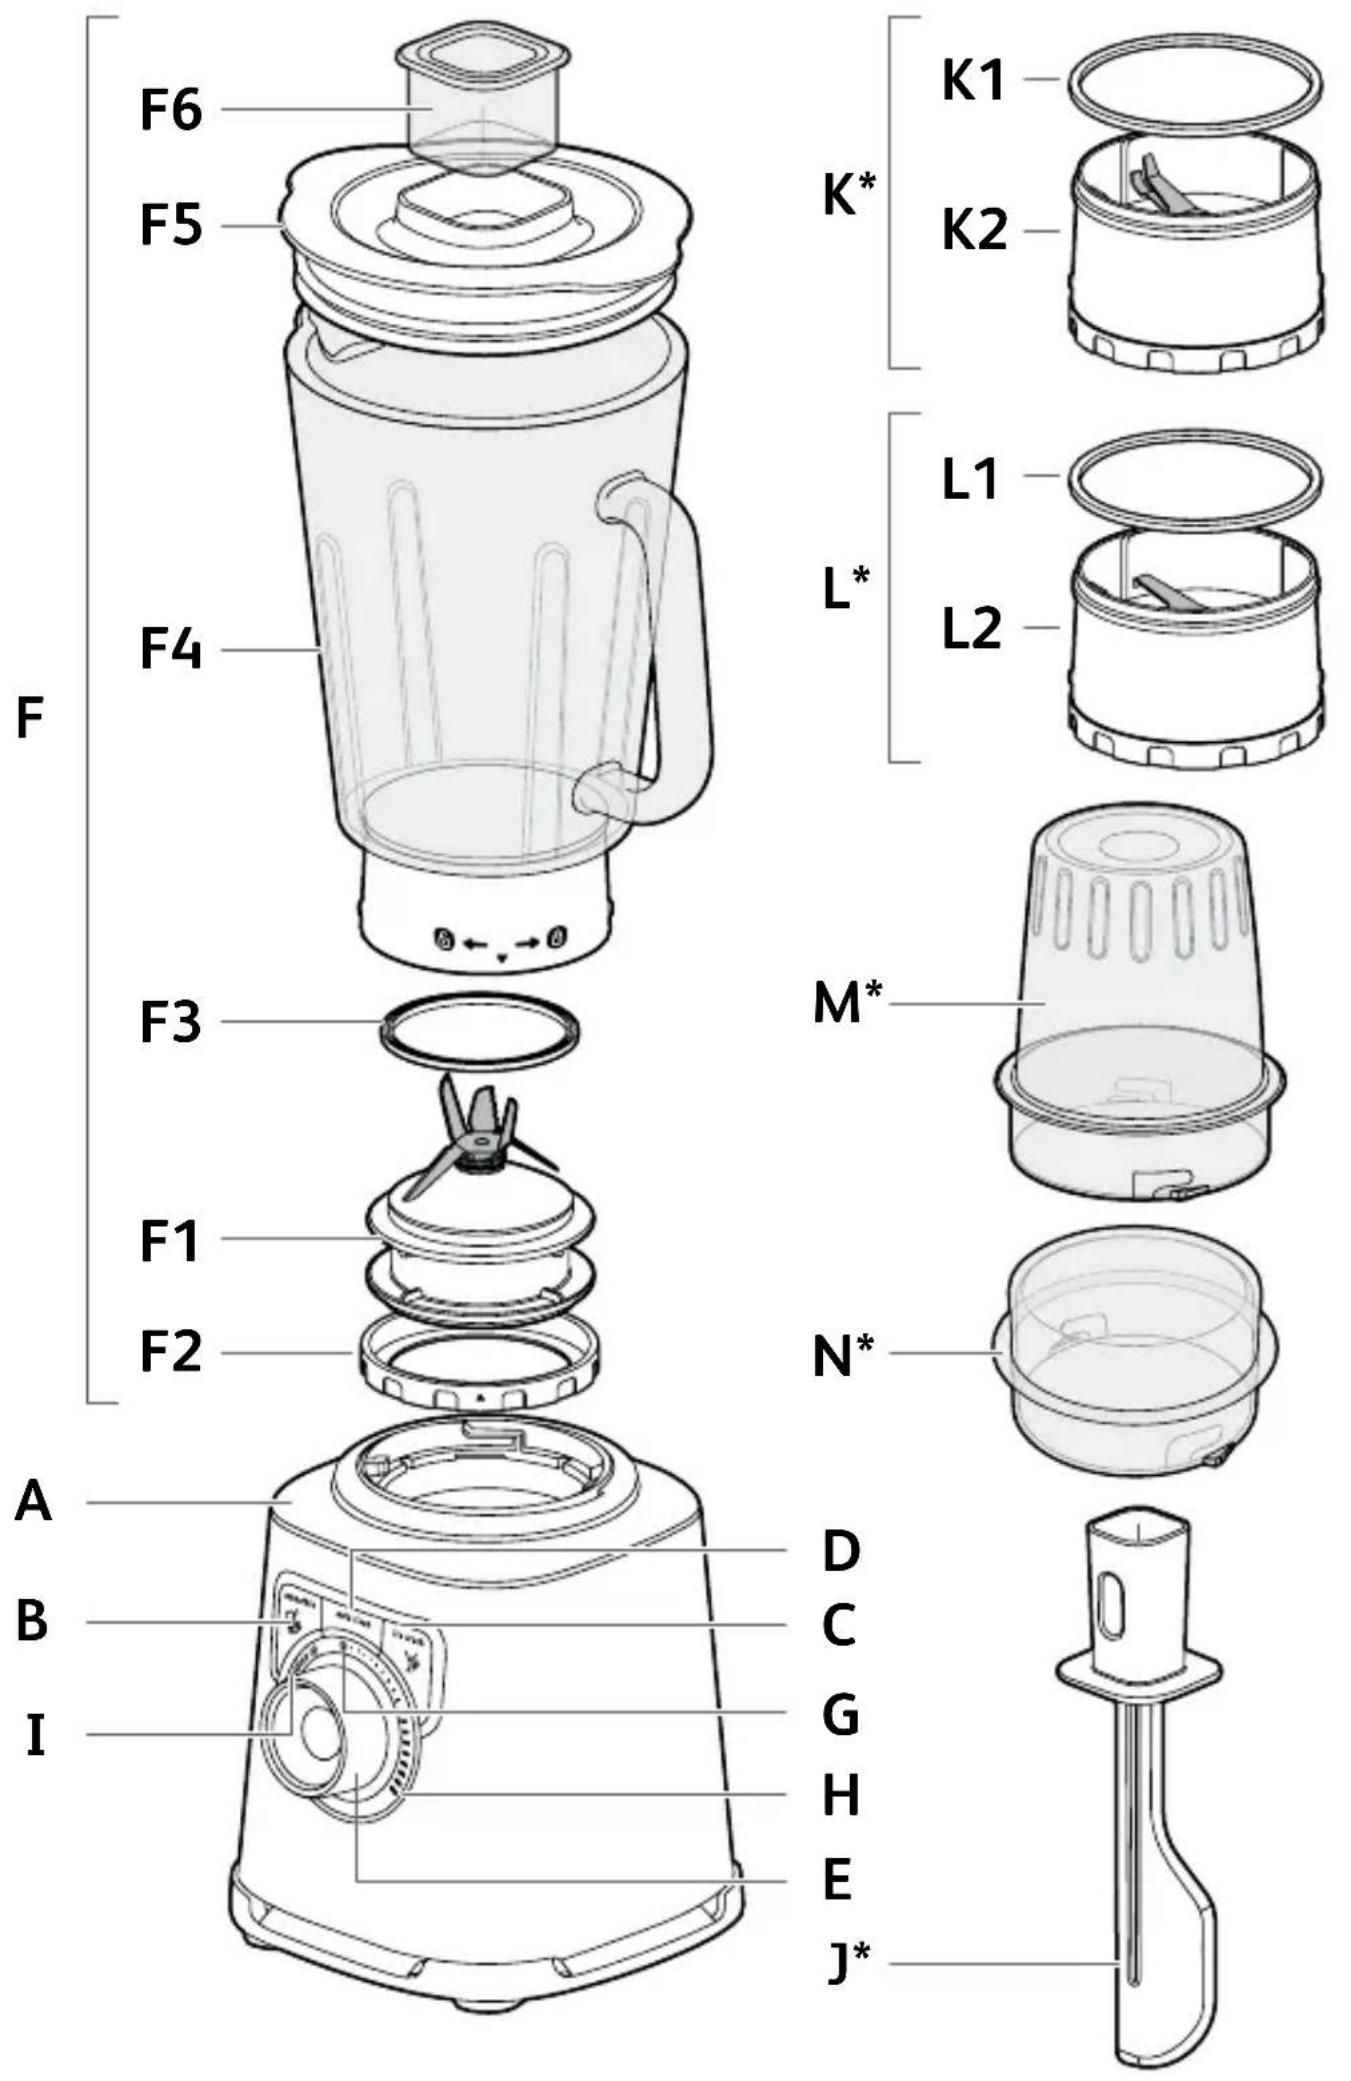
A Motor unit
B "Smoothie" button
C "Ice crush" button
D "Auto clean" button
E Control knob
F Blender jug assembly
F1 Blade unit
F2 Locking ring
F3 Seal
F4 Graduated blender jug
F5 Lid
F6 Lid cap
G Min speed
H Max speed
I Pulse button
J Spatula* (accessory depending on model)
K Herb chopper* (accessory depending on model)
K1 Seal
K2 Herb chopper blade unit
L Spice grinder* (accessory depending on model)
L1 Seal
L2 Spice grinder blade unit
M Herb chopper and Spice grinder bowl* (accessory depending on model)
N Mini chopper* (accessory depending on model)
BEFORE THE FIRST USE
- Clean all the parts (F, J, K, L, M, N) with warm water and washing up liquid except for the motor unit (A) which must never be immersed in water or placed under running water (see section Cleaning).
CAUTION: The blades are extremely sharp; handle them with caution when using or cleaning the appliance.
- Make sure all the packaging has been removed before operating the appliance.
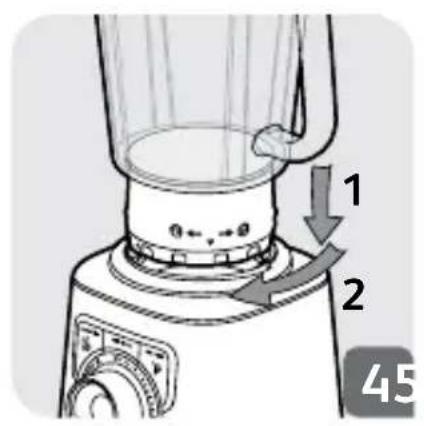
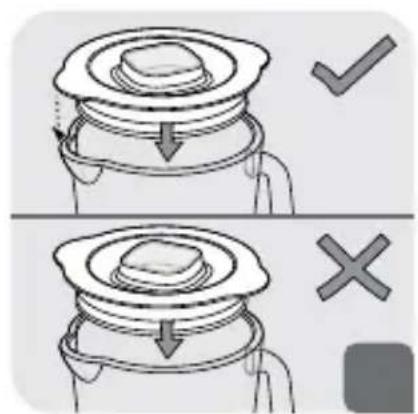
- Important note: Turn the control knob (E) to Ⓞ before placing the blender jug (F) on the motor unit (A).
- The appliance will start only if the blender jug is locked correctly on the motor unit.
- Do not operate the appliance if the lid is not in place.
ASSEMBLING AND FITTING THE JUG
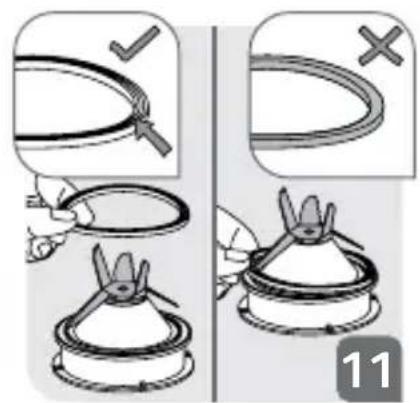
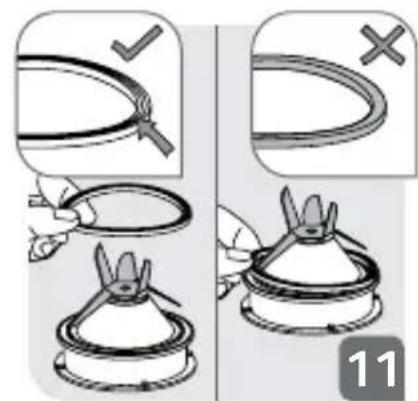
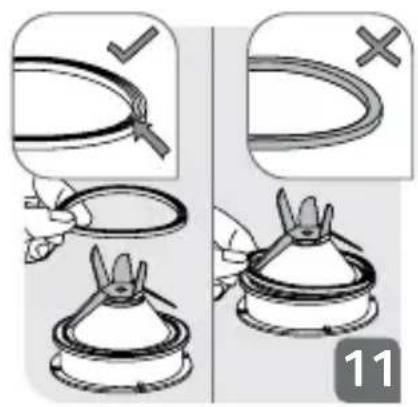
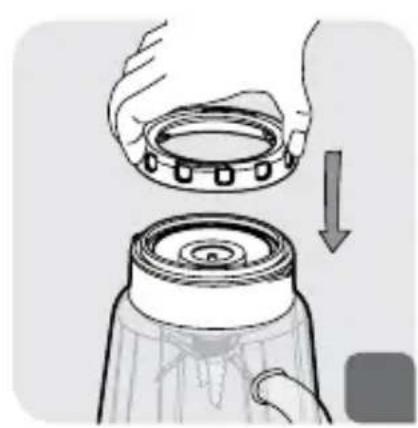
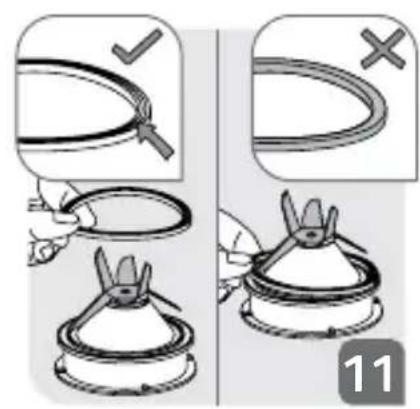
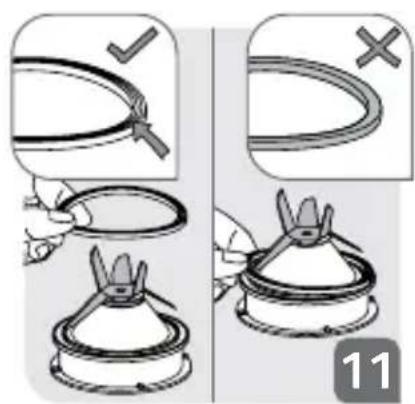
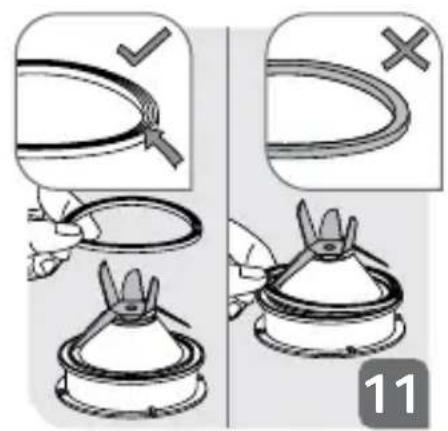
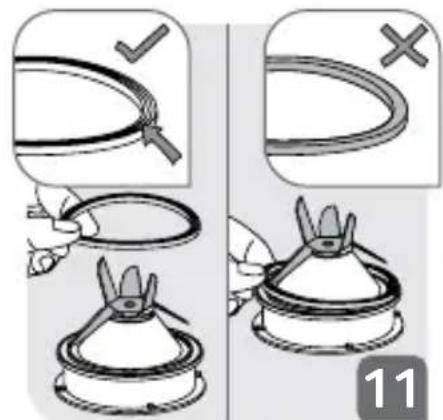
Moisten the seal (F3) (even if already fitted on the blade unit (F1)). Be careful to correctly fit the seal (F3) back onto the blade unit (F1) the correct way up (Fig 11).
- Check the seal is in place on the blade unit.
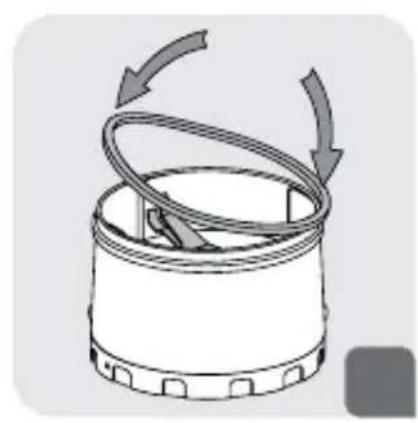
- Turn the jug upside down and place the blade unit on the base of the jug (Fig 1).
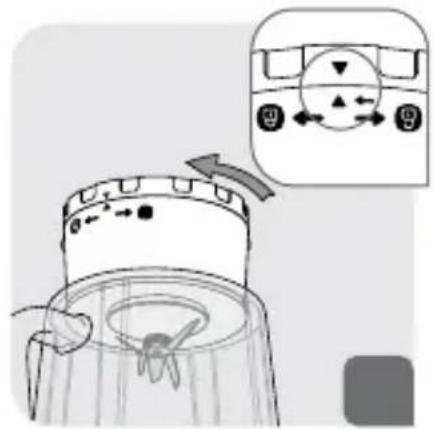
- Fit the locking ring (Fig. 2) and lock it by rotating it through a quarter turn in the clockwise direction.
- Make sure the locking ring is locked correctly: the two arrows must be aligned (Fig 3).
- Add the ingredients to the assembled jug without exceeding the maximum level indicated:
* 1.5 L for thick mixtures
* 1.25 L for liquid preparations
Warning : Do not pour boiling liquids (over 80°C/176°F) into the jug.
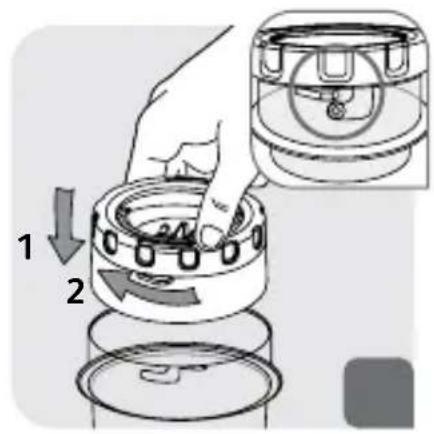
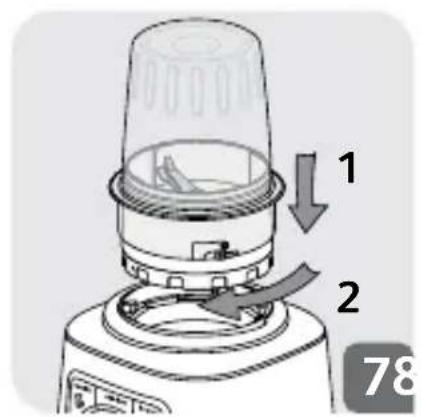
- Fit the lid (F5) on the jug (Fig. 8). To avoid any splashes during blending make sure that the curved tabs on the lid are aligned with the spout and handle (Fig. 9). Fit the measuring cap (F6) in the hole on the lid (Fig. 8)
USING YOUR BLENDER
- Once the blender jug is locked correctly on the motor unit, plug in the appliance. The lights on the appliance flash twice and you hear a beep. Turn it on using the desired function.
- Speed selection: Turn the control knob (E) to choose the desired speed; the speed increases gradually between min and max. The intensity of the lights on the appliance increase gradually as the speed increases. You can change the speed as required during preparation.
- “Pulse” function: Turn the control knob (E) to the “Pulse” position. Using a succession of pulses gives finer control for precise preparations. In this position, the appliance starts directly on maximum speed. It stops as soon as you release the knob. The light remains on when the pulse function is in use.
- Function "Smoothie"
This function is used to prepare smoothies, milkshakes and fruit cocktails. The speed is pre-programmed for best results. To use this function, press the “Smoothie” button (B). The light remains on during this cycle and switches off when the cycle is finished. The program stops automatically and beeps 4 times. You can stop it before the end by pressing the “Smoothie” button (B) again.
- Function “Ice crush”
You can use this function to crush ice finely with pre-programmed operating cycles and speed. To use this function, press the “Ice crush” button (C). The light remains on during this cycle and switches off when the cycle is finished. You hear 4 beeps. The program stops automatically but you can stop it before the end by pressing the “Ice crush” button (C) again.
- Function "Auto clean":
This function is used to automatically clean your appliance. Press the “Auto clean” button (D). Do not exceed 1 litre of hot water (maximum temperature of 80^ C / 176^ F). At the end of the program, the appliance stops automatically and you hear 4 beeps.
- WARNING: If the load becomes too high, your appliance will stop automatically for safety reasons (if the motor runs for more than 3 minutes or if you have used too much ingredients). To restart your appliance, turn the control knob to ⓄThe overall cooling time may vary and can be up to 30 minutes. Before restarting your appliance, adapt the quantity of ingredients or blending time to avoid any overload. You can then select the desired speed or function to complete your preparation.
- WARNING : Do not use the program functions smoothie, ice crush and auto clean with the herb chopper (K) and spice grinder (L).
These programs can only be used with the blender jug (F). Do not perform ice crush with the herb chopper (K) and spice grinder (L).
USING THE HERB CHOPPER (K) AND SPICE GRINDER (L) (DEPENDING ON MODEL)
Warning : you can use the accessories with solid ingredients only. You can pour liquid ingredients in the blender jug (F) only.
ADVICE
- Depending on the nature of the ingredients, you can use the blender jug to prepare up to
* 1.5 L for thick mixtures.
* 1.25 L for liquid preparations.
Warning : Do not pour boiling liquids (over 80°C/176°F) in the jug.
- You can prepare finely blended soups, cream soups, stewed fruit, light batter (pancakes, fritters, Yorkshire pudding batter, etc.), milkshakes, smoothies, cocktails, etc.
- If ingredients stick to the sides of the jug when blending, stop the appliance. Remove the blender jug from the motor unit, and push the food down onto the blades using a spatula and put your blender jug back to continue your preparation.
- Always pour the liquid ingredients into the blender jug first, before adding the solid ingredients, without exceeding the maximum level.
- To add ingredients while blending, remove the lid cap (F6) from the lid (F5) and add the ingredients through the feeder hole.
- For finely crushed ice, use a maximum of 6 small ice cubes using “Ice crush” function. There is no need to add water.
RECIPE
Cold carrot soup:
600g carrots + 900g water : Put the carrot pieces in the blender jug and add the water. Mix on max speed for 3 minutes.
Mixed figs (with mini chopper accessory (N), depending on model)
70g figs : Put figs in mini chopper (N). Mix on max speed for 3 seconds.
CLEANING
Do not immerse the appliance in water. Never put the motor unit (A) under running water.
- Clean the jug immediately after use.
-
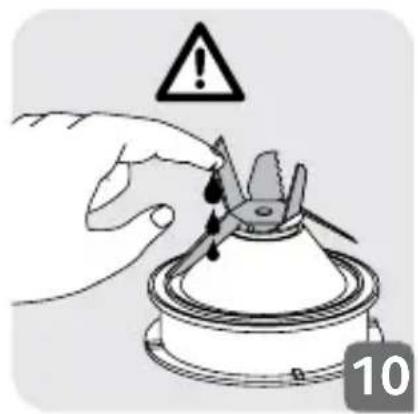
Fill up the jug with 1 litre of hot water along with 2 or 3 drops of washing up liquid. Only use the recommended amount of water and washing up liquid. An excess of washing up liquid creates more foam and consequently can lead to overflowing.
-
Use the automatic auto clean program to carry out a prewash of the jug.
- Once the program has stopped, unplug the appliance.
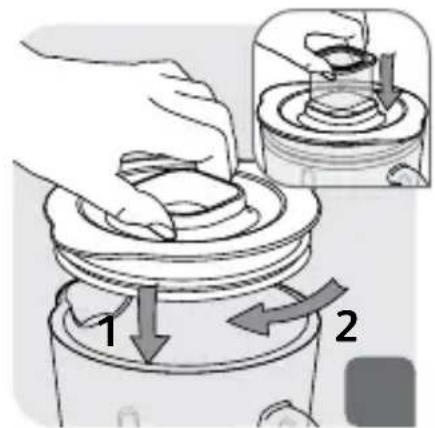
- Remove the blender jug (F4)
- Place the jug on a flat surface.
- Unlock the lid and remove it with care. Pour out the water.
- Remove the blade unit (F1+F3) and clean them under running water. The blades are very sharp, handle them with caution to avoid injury (Fig. 10).

natural_image
Hand holding a tool near a mechanical component with warning symbol (no text or labels)
EN
- After cleaning, remember to correctly fit the seal (F3) back onto the blade unit (F1) (Fig. 11). Please be careful to avoid any damage to the seal by touching the blades.
Note: Incorrectly fitting the seal can result in ingredients leaking from the base of the blender jug.
- Finish cleaning the jug with a damp cloth or sponge.
- Rinse the inside of the jug and the lid under running water.
• Take care when cleaning the blades in the blender jug and when you empty the jug as they are sharp.
- Use a damp cloth to clean the motor unit (A). Dry it carefully.
- The detachable parts (lid, blade unit, locking ring,) can be cleaned with a sponge and hot soapy water.
- The jug (F4), blade unit (F1) (but not the seal (F3)), locking ring (F2) can be cleaned in the dishwasher on the upper rack - use the ‘ECO’ or ‘LOW SALT’ program.
- Caution: The jug (F4), blade unit (F1) and locking ring (F2) must be disassembled and placed separately in the dishwasher. Please do not put the seal (F3) in the dishwasher.
WHAT TO DO IF YOUR APPLIANCE DOES NOT WORK
| PROBLEMS CAUSES SOLUTIONS | |
| Appliance does not work | The plug is not connected | Connect the appliance to a socket with the same voltage as that on the rating plate of the appliance. |
| The blender jug is not positioned correctly on the motor unit | Check that the blender jug is positioned properly on the motor unit as explained in the instructions. |
| The appliance stopped while in use | Overload | Follow the instructions in section USING YOUR BLENDER.The cooling time is variable and can last up to 30 minutes |
| Excessive vibrations | The product is not placed on a flat, stable surface | Place the appliance on a flat surface. |
| Volume of ingredients is too high | Reduce the quantity of ingredients processed. |
| Leak from the lid | Volume of ingredients is too high | Reduce the quantity of ingredients processed. |
| The lid is not correctly positioned | Place the lid correctly on the blender jug. |
| Leak at the bottom of the blender jug | The blender seal (F3) is not positioned correctly or is absent | Reposition the seal with the correct side uppermost (Fig. 11) and lock the assembled blade unit (F1+F2+F3) onto the blender jug correctly (Fig. 1, Fig. 2 & Fig. 3) |
| The blade does not turn easily | Pieces of food are too large or too hard. Liquid has been blended that was too hot and has distorted the seal | Replace the seal with a new one. Reduce the size or quantity of ingredients processed. Add liquid. |
YOUR APPLIANCE STILL DOES NOT WORK?
Contact an approved service centre (see list in service booklet).
natural_image
Illustration of a hand holding a small mechanical component with warning symbol above (no text or labels)

natural_image
Hand holding a small mechanical component with warning symbol above (no text or labels)