
IDC 75 B - Tumble drier INDESIT - Free user manual and instructions
Find the device manual for free IDC 75 B INDESIT in PDF.

| Brand | Indesit |
| Model | IDC 75 B |
| Product type | Condenser tumble dryer |
| Maximum load capacity (cotton) | 7 kg |
| Maximum load capacity (synthetics) | 3 kg |
| Approximate dimensions (H x W x D) | 85 cm x 60 cm x 60 cm |
| Approximate weight | 40 kg |
| Power supply | 220-240 V, 50 Hz, earthed plug |
| Maximum power consumption | 2500 W (estimated) |
| Drying programmes | Cotton, Synthetics, Acrylic, Refresh |
| Options | High temperature (for cotton), drying timer |
| Display / Indicators | "Empty water" indicator light |
| Filter maintenance | Clean after each cycle |
| Condenser maintenance | Monthly cleaning under running water |
| Water tank emptying | After each cycle, or direct drain possible |
| Safety | Automatic stop when tank full, child safety (supervision recommended) |
| Spare parts | Original Indesit parts, replacement by authorised technician |
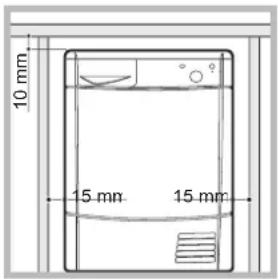
| Installation | Requires ventilation, do not place in a cupboard, minimum clearance 10 mm above, 15 mm sides |
Frequently Asked Questions - IDC 75 B INDESIT
User questions about IDC 75 B INDESIT
0 question about this device. Answer the ones you know or ask your own.
Ask a new question about this device
Download the instructions for your Tumble drier in PDF format for free! Find your manual IDC 75 B - INDESIT and take your electronic device back in hand. On this page are published all the documents necessary for the use of your device. IDC 75 B by INDESIT.
USER MANUAL IDC 75 B INDESIT
! Keep this manual at hand for immediate reference whenever necessary. Always store this manual close to the tumble dryer and remember to pass it on to any new owners when selling or transferring the appliance, so they may familiarise with the warnings and suggestions herein contained. ! Read these instructions carefully: the following pages contain important information on installation and useful suggestions for operating the appliance.
indesit
Contents
Important information, 2-3
Installation, 4
Where to install the tumble dryer
Ventilation
Electrical connections
Preliminary information
Description of the tumble dryer, 5
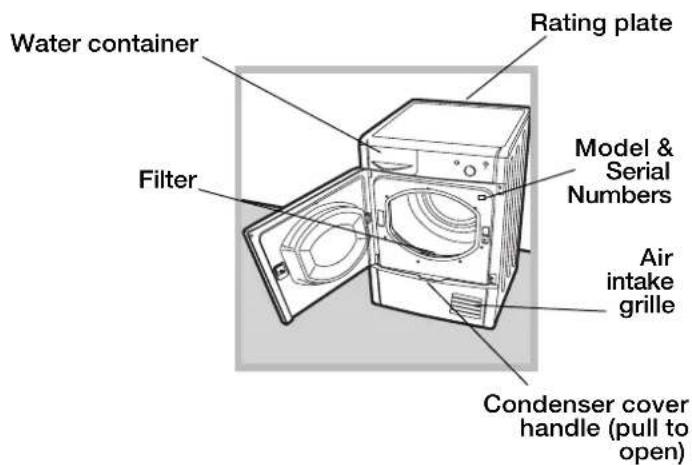
Features
Control panel
How to carry out a drying cycle, 6
Starting a drying programme
Drying settings, 7
Drying times
Drying programmes and options
Laundry, 8
Sorting laundry
Care labels
Special items
Warnings and suggestions, 9 General safety
Information on recycling and disposal
Saving energy and respecting the environment
Care and maintenance, 10
Disconnecting the power supply
Cleaning the filter after each cycle
Checking the drum after each cycle
Emptying the water container after each cycle
Cleaning the condenser unit
Cleaning the tumble dryer
Troubleshooting, 11
Assistance, 12
Spare parts
EN
Important information
EN
To ensure that the condenser dryer functions efficiently, the following routine maintenance procedures must be carried out:
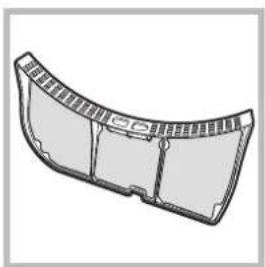
Fluff filter - CLEAN off any fluff build-up on the filter after each drying cycle.
natural_image
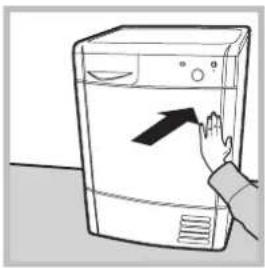
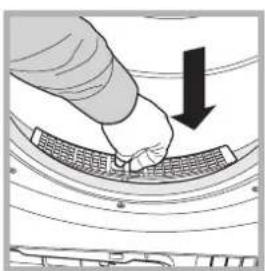
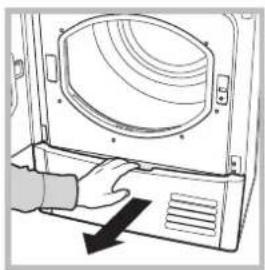
Line drawing of a hand pressing down on a front-loading washing machine (no text or symbols)Step 1
Open the dryer door by pressing it as shown in the picture.
natural_image
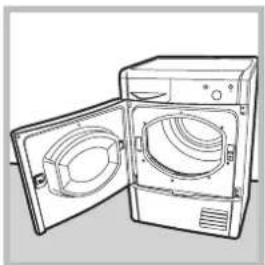
Line drawing of an open refrigerator with two doors open (no text or symbols)Failure to clean the filter after each drying cycle will reduce drying performance. The machine will take longer to dry and it will consume more energy.
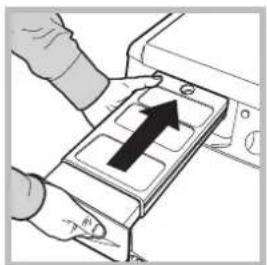
Water container – empty the water container after each drying cycle.
natural_image
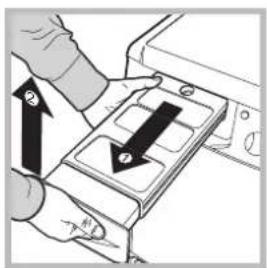
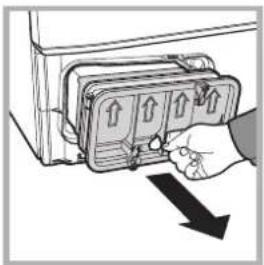
Illustration of a hand pressing down on a device with arrows indicating motion (no text or symbols)Step 1
Pull the water container towards you and remove it completely from the dryer.
natural_image
Illustration of hands installing or adjusting a mechanical component (no text or symbols visible)Step 2
Empty all the water in the water container.

natural_image
Illustration of a hand pressing down on a curved mechanical component with an upward arrow (no text or symbols)Step 2
Pull out the filter (using two fingers).
natural_image
Technical illustration of a curved mechanical component with internal channels (no text or symbols)Step 3
Clean off any fluff build-up on the internal surface of the filter net.
natural_image
Illustration of a hand pressing down on a curved surface with a downward arrow (no text or symbols)Step 4
Replace the filter – never operate the dryer without the filter in place.
natural_image
Illustration of a hand inserting a device into a tray with an upward arrow (no text or symbols)Step 3
Replace the water container making sure that it is securely fixed.
Failure to empty the water container may cause the following:
- The dryer stops heating (thus the load may still be damp at the end of the drying cycle).
- The "Empty water container" light lights up to signal that the water container is full.
Filling of the Water Container
When the dryer is first used water will not immediately enter the water container as the pump needs to be primed. This is done automatically and will take a few minutes, during this period the efficiency of the drying process is not affected.
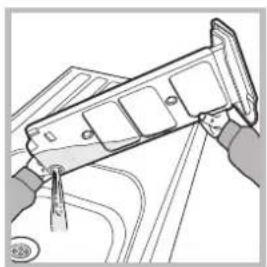
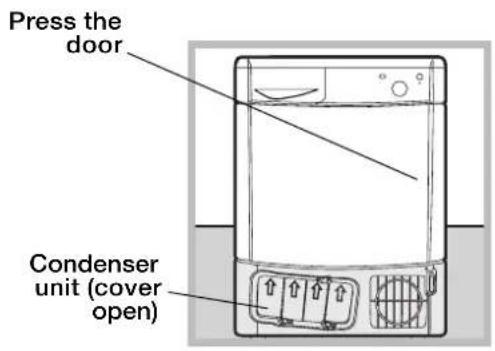
Condenser unit - remove any fluff build-up from the condenser on a monthly basis.
natural_image
Illustration of a hand pressing down on a computer monitor with a black arrow indicating press direction (no text or symbols)Step 1
Open the condenser cover - grip the handle and pull towards you.
natural_image
Illustration of a hand inserting a device into a box with arrows indicating direction (no text or symbols)Step 2
Remove the condenser by turning the 3 catches, then pull the condenser towards you. (It is normal for some residual water to be left in the tubes).
natural_image
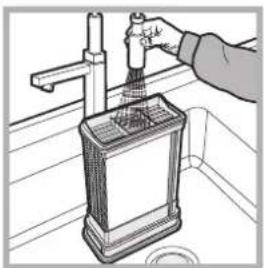
Illustration of a hand using a tool to clean or wash a trash bin (no text or symbols visible)Step 3
Clean the condenser with running water over the rear side to remove any fluff deposits.
natural_image
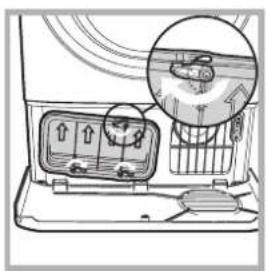
Diagram of a refrigerator interior with a highlighted refrigerator and directional arrows (no text or symbols)Step 4
Replace the condenser unit; make sure that the unit is securely in place, that all 3 catches are fixed and that the position arrows on the front end of the condenser are pointing upwards.
Failure to clean the condenser unit may cause premature faults to the dryer.
Where to install the tumble dryer
• Install the dryer far from gas ranges, stoves, radiators or hobs, as flames may damage it. If the dryer is installed below a worktop, ensure there are 10 mm between the upper panel of the dryer and any objects above it, and 15 mm between the sides of the machine and the walls or furniture units adjacent to it. This ensures adequate air circulation.
Ventilation
- The room must be adequately ventilated while the dryer is running. Make sure that the dryer is installed in a room free of humidity and with adequate air circulation. The flow of air around the dryer is essential to allow water to condense during drying; the dryer will not function properly if it is placed in an enclosed space or inside a cabinet.
! Some condensation may form if the dryer is used in a small or cold room.
! We do not recommend that the dryer is installed in a cupboard but the dryer must never be installed behind a lockable door, a sliding door or a door with a hinge on the opposite side to that of the dryer door.
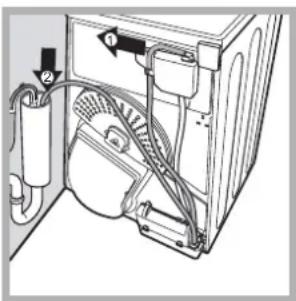
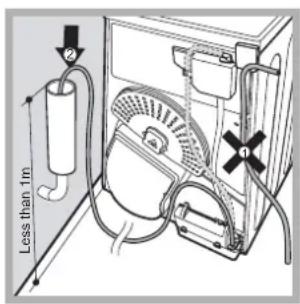
Water drain
If your dryer is installed next to a drain the water can be plumbed into this drain. This does away with the need to empty the water container. If the dryer is stacked onto or installed next to a washing machine it can share the same drain. The height of the drain must be less than 3' (1 m) from the bottom of the dryer.
Remove existing hose from position shown in picture A and fit a suitable length of hose and connect as shown in picture B.
! Make sure that the hose is not squashed or kinked when the dryer is in its final location.
Picture A Picture B
Electrical connections
Before plugging the appliance into the socket, check the following:
• Make sure your hands are dry.
- The socket must have an earth connection.
- The socket must be able to withstand the machine's maximum power output as indicated on the data plate (see Description of the tumble dryer).
- The power supply voltage must fall within the values indicated on the data plate (see Description of the tumble dryer).
- The socket must be compatible with the machine's plug. If not, either the socket or the plug must be replaced.
! Do not use extension cords.
! The tumble dryer must not be installed in outdoor spaces, even if sheltered. It may be very dangerous to expose this appliance to rain and thunderstorms.
! Once dryer installation is complete, the electric cord and plug must be at hand.
! The electric cord must not be bent or crushed.
! If the plug to be replaced is of the moulded-on type, it must be disposed of in a safe way. DO NOT leave it where it can be plugged into a socket and cause electric shocks.{}
! The electric cord must be regularly checked and replaced with a cord specifically designed for this dryer; it must then be installed by an authorised technician only (see Assistance). New or longer electric cords are supplied by authorised dealers at a supplementary cost.
! The manufacturer declines all responsibility for failure to observe these instructions.
! When in doubt about the above indications, contact a qualified electrician.
Preliminary information
Once the tumble dryer is installed, clean the inside of the drum before operating it and remove any dirt accumulated during transportation.
Opening the door
Features
Control panel
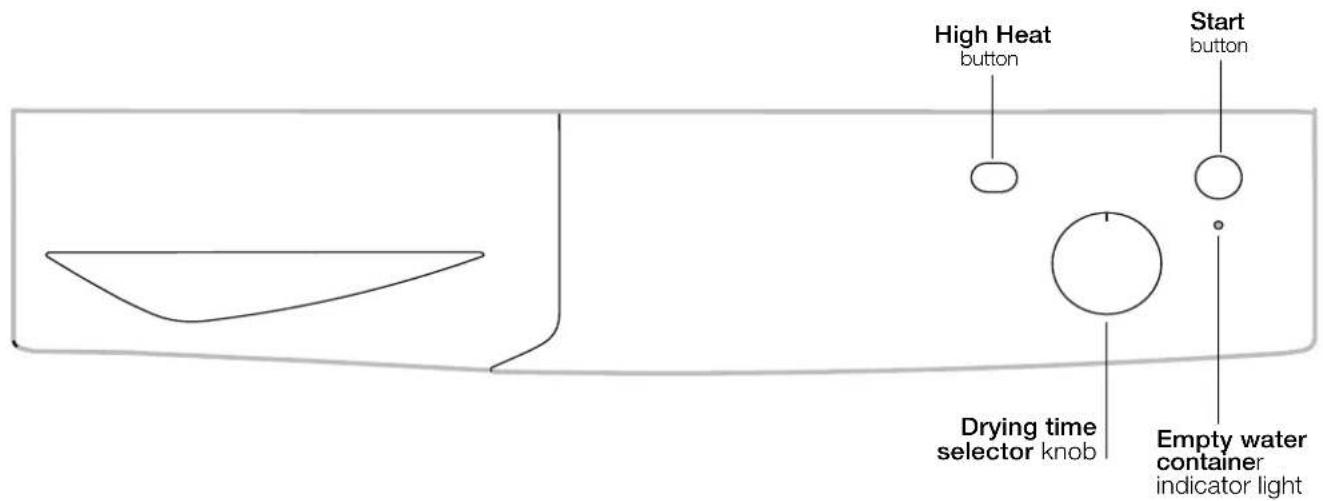
Drying time selector knob
This is used to set the drying time: turn the knob in a clockwise direction until the indicator is set to the desired drying time (see Drying settings). Do not attempt to turn the knob anticlockwise.
High Heat button
It can be used to customise the selected programme in accordance with your own requirements.
START button
Press the button to begin drying.
Empty water container indicator light
The "Empty water container" indicator light signals that the water container must be emptied. If the container becomes full during the programme, the tumble dryer will automatically start the cold air cycle. In order to avoid this procedure, always empty the water container after using the tumble dryer (see Care and maintenance).
How to carry out a drying cycle
EN
Starting a drying programme
- Plug the dryer into the power supply socket.
- Select a suitable drying programme for the type of laundry (see Laundry).
- Open the door, ensure that the filter is clean and securely placed and that the water container is empty and correctly slotted (see Care and maintenance).
- Load the machine, making sure that no piece of laundry gets between the door and the relative seal. Close the door.
- Turn the "Drying time selector" knob until the indicator is pointing towards the most suitable drying time for the type of fabric in that load. Use the table to check the relationship between fabric type and load capacity (see Drying settings), and make sure you are familiar with the instructions provided for each type of fabric (see Laundry). Do not attempt to turn the knob anticlockwise.
- If necessary, set the temperature using the HIGH HEAT button.
- Press the START button to start the drying cycle.
Laundry can be checked while the drying programme runs and any garments already dry can be removed, while drying continues for the remaining items. After closing the door, press the START button to resume machine operation. - The final COLD DRYING phase (i.e. the fabrics are cooled) activates during the last few minutes of the drying programme; always allow this phase to terminate.
- Open the door, remove the laundry then clean the filter and replace it. Empty the water container and put it back in its slot (see Care and maintenance).
- Disconnect the dryer from the power supply.
Drying times
The drying time depends on the size of the load and on the type of fabric it contains (see Table).
The cold drying cycle runs during the final 10 minutes of the programme.
! For large loads, select the High Heat option if available.
| Fabric | Load | ||||||
| 1 kg | 2 kg | 3 kg | 4 kg | 5 kg | 6 kg | 7 kg | |
| Cotton – high heat | 30 - 40 minutes | 40 - 55 minutes | 55 - 70 minutes | 70 - 80 minutes | 80 - 90 minutes | 95 - 120 minutes | 120 - 140 minutes |
| Synthetics – high heat | 40 - 50 minutes | 50 - 70 minutes | 70 - 90 minutes | - | - | - | - |
| Acrylics – low heat | 40 - 60 minutes | 55 - 75 minutes | -- | - | - | - | |
Drying times are approximate and may vary depending on the following:
- Amount of water retained by items after the spin cycle: towels and delicate items retain a lot of water.
- Fabrics: items of the same fabric, but with different texture and thickness may have different drying times.
- Amount of laundry: single items and small loads will take a short time to dry.
- Drying: if items are to be ironed, they can be removed from the dryer while still slightly damp. Items that require complete drying can be left longer.
- Temperature of the room: the lower the temperature of the room, the longer it will take for the dryer to dry clothing.
- Bulk: certain bulky items require special care during the drying process. We suggest removing these items and replacing them in the dryer once they have been shaken out: repeat this procedure several times during the course of the drying cycle.
! Do not over-dry items.
All fabrics contain natural dampness which helps to keep them soft and fluffy.
Drying programmes and options
Refresh
A short programme suitable for refreshing fibres and garments through the emission of cool air. It lasts about 10 minutes.
! As this is not a drying programme, it is not to be used for garments that are still wet.
High Heat button
The high heat button selects the drying temperature. When the button is out low heat is selected and when it is pushed in high heat is selected.
Sorting laundry
- Check the symbols on the care labels of the various garments to verify whether the garments can be safely tumble dried.
- Sort laundry according to the type of fabric.
• Empty all pockets and check for loose buttons.
- Close zips and hooks and fasten belts and strings without tightening them.
- Wring out garments to remove the maximum amount of water possible.
! Do not load the dryer when garments are dripping wet.
Maximum load sizes
Do not overload the drum.
The following values indicate the weight of dry garments:
Natural fibres: maximum 7 kg
Synthetic fibres: maximum 3 kg
! Do not overload the dryer as this may result is reduced drying performance.
Typical weights
Note: 1 kg = 1000 g
| Garments | ||
| Blouse | CottonOther | 150 g100 g |
| Dress | CottonOther | 500 g350 g |
| Jeans | 700 g | |
| 10 Nappie | 1,000 g | |
| Shirt | CottonOther | 300 g200 g |
| T-shirt | 125 g | |
| Household linen | ||
| Duvet cover (double bed) | Cotton Other | 1,500 g 1,000 g |
| Large tablecloth | 700 g | |
| Small tablecloth | 250 g | |
| Tea cloth | 100 g | |
| Bath towel | 700 g | |
| Hand towel | 350 g | |
| Double bed sheet | 500 g 350 g | |
| Single bed sheet | ||
When mixing synthetic fibres with cotton garments, the latter may still be damp at the end of the drying cycle. If this happens, simply put them through a short drying cycle. Note: when setting the duration of the drying cycle, remember that the cold drying phase runs during the last 10 minutes, during which the dryer does not dry the garments.
Care labels
Always check the care labels, especially when placing garments in the tumble dryer for the first time. Below are the most commonly used symbols:
May be tumble dried.
Do not tumble dry.
Tumble dry – high heat.
Tumble dry – low heat.
Items not suitable for tumble drying:
- Items containing rubber parts or similar materials, or plastic film covering (pillows, cushions or PVC sports jackets), any type of inflammable object or objects containing inflammable substances (used towels containing hairspray).
• Glass fibres (certain types of draperies). - Items which have been previously dry cleaned.
- Items marked with the ITLC symbol ("Special garments") ☒, which may be washed using special household products. Follow instructions carefully.
- Large bulky items (duvets, sleeping bags, pillows, cushions, etc.) that expand when dried and hamper air circulation inside the tumble dryer.
Special items
Blankets and bedcovers: acrylic items (Acilian, Courtelle, Orion, Dralon) must be dried with great care at low heat. Avoid drying for long periods.
Creased or pleated garments: read the drying instructions supplied by the manufacturer.
Starched garments: do not dry together with non-starched items. Remove the maximum amount of starch solution possible before placing these items in the dryer. Do not over-dry: starch turns powdery leaving garments limp – this defeats its purpose.
! This appliance was designed and manufactured in compliance with current international safety standards. The following information is provided for safety reasons and must be read carefully.
General safety
- This tumble dryer must not be used by persons (including children) with physical, sensory or mental impairments or with little experience and knowledge of the appliance, unless they are supervised or have been adequately instructed on its use by the person responsible for their safety.
- This tumble dryer is designed for domestic and non-professional use.
- Do not touch the appliance while barefoot or with wet hands or feet.
- Unplug the appliance by pulling on the plug, not the cord.
- Do not allow children near the appliance while it is in function. After use, switch the appliance off and unplug it. Keep the appliance door closed to prevent children using it as a toy.
- Children must be supervised to ensure that they do not play with the appliance.
- The appliance must be correctly installed and receive adequate ventilation. The air intake on the front part of the dryer and the air vents on the rear must never be obstructed (see Installation).
- Never use the dryer on carpeting with high pile as this may prevent air from entering the dryer from the base.
- Check whether the dryer is empty before loading it.
- The rear part of the dryer may become very hot: do not touch it while the appliance is in function.
- Do not use the dryer unless the filter, water container and condenser are properly positioned (see Maintenance).
- Do not use liquid fabric softener in the dryer; add it to the final rinse of the wash cycle.
- Do not overload the dryer (see Laundry for the maximum load sizes).
- Do not add items that are dripping wet.
- Tumble dry items only if they have been washed with water and detergent, and have been rinsed and put through a spin cycle. Drying items that have NOT been washed with water may cause the risk of fire.
• Always read the instructions on the care label carefully (see Laundry). - Do not tumble dry items that have been treated with chemical products.
- Never tumble dry items that are contaminated with inflammable substances (cooking oil, acetone, alcohol, petrol, kerosene, stain removers, turpentine, waxes, wax removers and hairspray), unless they have been washed in hot water with an extra amount of detergent.
- Do not tumble dry rubber, rubber-backed articles and garments, cushions with foam rubber padding, latex foam, rubber, plastic, shower caps, water-resistant fabrics, nappy pants or liners, polyethylene and paper.
- Remove all objects from pockets, particularly lighters (risk of explosion).
- Do not tumble dry large, excessively bulky items.
-
Do not tumble dry acrylic fibres at high temperatures.
-
Complete each programme with the relative cold drying phase.
- Do not switch the tumble dryer off if items that are still warm are inside it.
- Clean the filter after each use (see Care and maintenance).
- Empty the water container and put it back in place after each use (see Care and maintenance).
- Clean the condenser unit regularly (see Care and maintenance).
- Do not allow lint to build up around the tumble dryer.
- Avoid climbing on the top of the dryer as this may damage the appliance.
- Always comply with electrical regulations and requirements (see Installation).
- Always purchase original accessories and spare parts (see Assistance).
! WARNING: Never stop the dryer before the end of the drying cycle unless all items have been quickly removed and hung in order to dispel heat.
Information on recycling and disposal
As part of our continual commitment towards environmental protection, we reserve the right to use recycled quality components to reduce costs for our customers and to minimise materials wastage.
- Disposing of the packaging materials: follow local regulations to allow for recycling of packaging materials.
- In order to minimise the risk of injury to children, remove the door and plug, then cut the power supply cord flush with the appliance. Dispose of these parts separately to prevent the appliance from being connected to a power supply socket.
Disposal of old household appliances

European Directive 2002/96/EC concerning Waste Electrical and Electronic Equipment (WEEE) states that household appliances should not be disposed of using the normal solid urban waste cycle. Exhausted appliances should be collected separately in order to optimise the cost of re-using and recycling materials comprising the machine, while preventing potential damage to public health and the environment. The crossed-out wheeled bin symbol appears on all products to remind owners of the obligations regarding separate waste collection.
Owners should contact their local authorities or appliance dealers for further information concerning the correct disposal of household appliances.
Saving energy and respecting the environment
- Wring out items before tumble drying them to remove the maximum amount of water possible (if they are previously washed in a washing machine, select a spin cycle). This ensures that energy is saved during tumble drying.
• Always use the tumble dryer at full load to save energy: single items and small loads may take longer to dry. - Clean the filter at the end of each cycle to reduce energy consumption costs (see Care and maintenance).
EN
Disconnecting the power supply
! Disconnect the dryer when not in use or during cleaning and maintenance operations.
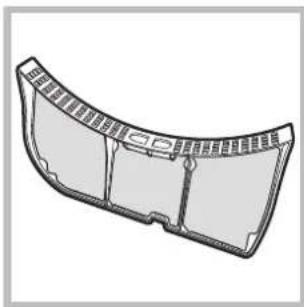
Cleaning the filter after each cycle
The filter is a fundamental component of the dryer: its function is to collect lint and fluff that form during drying. Clean the filter once drying is completed, by rinsing it under running water or cleaning it with a vacuum cleaner. Should the filter become clogged, the flow of air inside the dryer will be seriously hampered: drying times becomes longer and more energy is consumed. Moreover, the dryer may become damaged. The filter is located in front of the dryer seal (see Picture). Removing the filter:
natural_image
3D rendering of a curved mechanical component with internal grooves and mounting holes (no text or symbols)- Pull the filter's plastic handle upwards (see Picture).
- Clean the fluff off the filter and replace it correctly. Ensure that the filter is pushed fully home.
! Do not use the dryer unless the filter has been replaced in its holder.
Checking the drum after each cycle
Rotate the drum manually to remove smaller items (handkerchiefs) that could have been left inside the dryer.
Cleaning the drum
! Avoid using abrasives, steel wool or stainless steel cleaning agents to clean the drum. A coloured film may appear on the stainless steel drum surface: it may be caused by a combination of water and/or cleaning agents such as wash-softeners. This coloured film does not affect the dryer's performance.
Emptying the water container after each cycle
Remove the water container and empty it into a sink or other suitable drain outlet, then replace it correctly. Always check the water container and empty it before starting a new drying cycle.
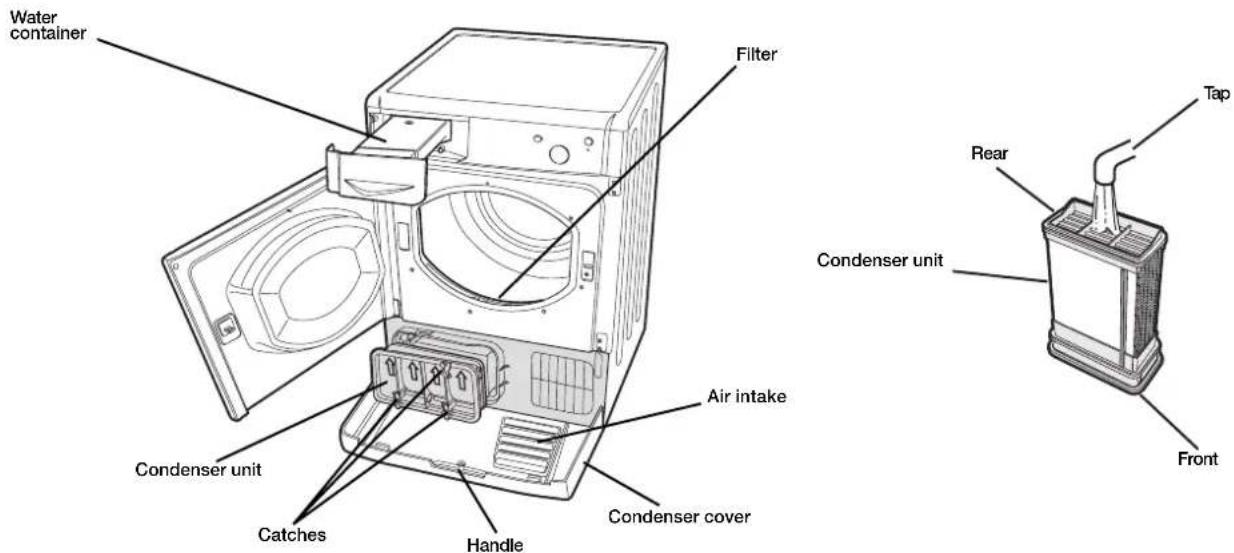
Cleaning the condenser unit
- Remove the condenser (see Picture below) unit regularly (monthly) and clean off any fluff deposits from the plates by rinsing it with cold water running on the rear end of the condenser.
Removing the condenser: - Disconnect the dryer from the power supply and open the door.
- Open the condenser cover (see Picture below), unlock the three catches by turning them 90° anti-clockwise, then pull on the grip to remove the condenser.
- Clean the surface of the seals and replace the unit with the arrows pointing upwards, while making sure that the catches are securely fixed.
Cleaning the tumble dryer
- The external metal, plastic and rubber parts can be cleaned with a damp cloth.
- Clean the front air intake grille regularly (every 6 months) with a vacuum cleaner to remove any lint, fluff or dust deposits. Furthermore, remove any lint deposits from the front part of the condenser and from the filter area, using a vacuum cleaner every so often.
! Do not use solvents or abrasives.
! Have the dryer checked regularly by authorised technical personnel in order to ensure that the electrical and mechanical parts work safely (see Assistance).
If you feel that the dryer is not working properly, consult the following troubleshooting suggestions before contacting the Technical Assistance Centre (see Assistance).
Problem:
The dryer does not start.
Possible causes / Solutions:
- The plug has not been inserted far enough into the socket to make contact.
• There has been a power cut. - The fuse has blown. Try connecting another appliance to the same socket.
- If an extension cord is used, try connecting the dryer plug directly into the socket.
- The door has not been closed properly.
- The programme has not been set correctly (see How to carry out a drying cycle).
- The START button has not been pressed (see How to carry out a drying cycle).
Drying times are too long.
- The filter has not been cleaned (see Care and maintenance).
- The water container must be emptied? The “Empty water container” indicator light is on (see Care and maintenance).
- The condenser needs to be cleaned (see Care and maintenance).
- An incorrect drying time was selected for the type of load (see Laundry).
- The air intake grille is blocked (see "Installation" and "Care and Maintenance").
• The items are too wet (see Laundry). - The dryer is overloaded (see Laundry).
The dryer is noisy during the first few minutes of operation.
- This is normal, especially if the dryer has not been used for a long time. If the noise persists during the entire cycle, contact the Technical Assistance Centre.
Before contacting the Technical Assistance Centre:
- Follow the troubleshooting guide to check whether problems can be solved personally (see Troubleshooting).
- If not, switch the dryer off and contact the Technical Assistance Centre closest to you.
Provide the following data when contacting the Technical Assistance Centre:
• name, address and postal code
- telephone number
- type of malfunction
- date of purchase
• the appliance model (Mod.)
- the dryer's serial number (S/N)
This information can be found on the data plate located behind the door.
Spare parts
This dryer is a complex machine. Attempting to repair it personally or with the aid of an unqualified personnel may put the safety of people at risk, damage the machine or invalidate the spare parts guarantee.
Always contact a qualified technician when experiencing problems with this machine. The spare parts were designed exclusively for this machine and should not be used for any other purpose.

This appliance conforms to the following EEC directives:
- 2006/95/EC (Low Voltage Directive)
- 89/336/EEC, 92/31/EEC, 93/68/EEC (Electromagnetic Compatibility Directive).

Italiano
IDC 75
natural_image
Line drawing of a hand pressing down on a washing machine (no text or symbols)Fase 1
natural_image
Line drawing of an open refrigerator with two doors open (no text or symbols)natural_image
Illustration of a hand pressing down on a device with arrows indicating motion (no text or symbols)Fase 1
natural_image
Illustration of hands holding a mechanical device with wires and components (no text or symbols visible)Fase 2
natural_image
Illustration of a hand pressing down on a curved surface with a black arrow indicating upward motion (no text or symbols)Fase 2
natural_image
Technical line drawing of a curved mechanical component with internal brackets (no text or symbols)Fase 3
natural_image
Illustration of a hand pressing down on a curved surface with a downward arrow (no text or symbols)Fase 4
natural_image
Hand inserting a device into a control panel with an arrow indicating the insertion (no text or symbols present)Fase 3
natural_image
Illustration of a hand pressing down on a computer monitor with a black arrow indicating press direction (no text or symbols)natural_image
Illustration of a hand inserting a wall-mounted device into a cabinet (no text or symbols visible)natural_image
Illustration of a hand using a tool to clean or wash a trash bin (no text or symbols visible)natural_image
Interior view of a refrigerator with air conditioner unit and a magnified inset showing a person inside (no text or symbols visible)natural_image
Diagram of an open refrigerator with visible air ducts and ventilation system (no text or labels)Fig. A
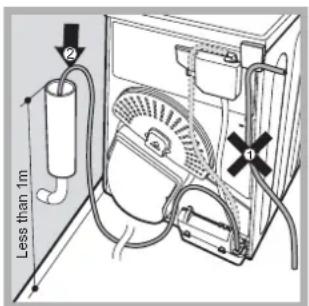
Fig. B
natural_image
Technical line drawing of a curved mechanical component with internal brackets (no text or symbols)natural_image
Line drawing of a hand pressing down on a washing machine (no text or symbols)Étape 1
natural_image
Line drawing of an open refrigerator with two doors open (no text or symbols)[Non-Text]

natural_image
Completely blank white image with no visible content, text, or symbols.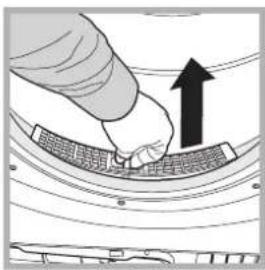
natural_image
Illustration of a hand pressing down on a curved surface with an upward arrow (no text or symbols)Étape 2
natural_image
3D rendering of a curved mechanical component with internal ribs and mounting holes (no text or symbols)Étape 3
natural_image
Illustration of a hand pressing down on a curved surface with a downward arrow indicating compression or dislocation (no text or symbols present)Étape 4
Étape 1
natural_image
Illustration of hands holding a mechanical component with wires and connectors (no text or symbols visible)Étape 2
natural_image
Illustration of a hand pressing a device into a tray with an arrow indicating motion (no text or symbols present)Étape 3
natural_image
Line drawing of a hand pressing down on a computer monitor with a scroll wheel (no text or symbols)Étape 1
natural_image
Hand inserting a device into a rack with arrows indicating direction (no text or symbols)Étape 2
natural_image
Illustration of a hand using a tool to clean or wash a trash bin (no text or symbols visible)Étape 3
Étape 4
Fig. A
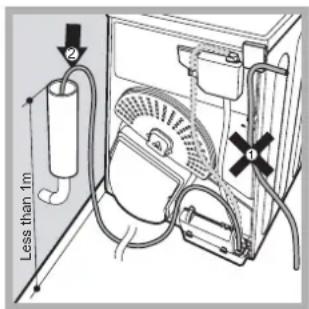
Fig. B
natural_image
Technical line drawing of a curved mechanical component with internal brackets and mounting holes (no text or symbols)natural_image
Line drawing of a hand pressing down on a washing machine (no text or symbols)natural_image
Line drawing of an open refrigerator with two doors showing internal compartments (no text or symbols)natural_image
Illustration of a hand pressing down on a curved surface with a black upward arrow (no text or symbols)natural_image
3D rendering of a curved mechanical component with internal grooves and mounting holes (no text or symbols)natural_image
Illustration of a hand pressing down on a curved surface with a downward arrow (no text or symbols)natural_image
Illustration of a hand pressing down on a device with arrows indicating motion (no text or symbols)natural_image
Illustration of hands holding a mechanical device with wires and components (no text or symbols visible)natural_image
Illustration of hands pressing a device into a tray with an upward arrow (no text or symbols)natural_image
Illustration of a hand pressing down on a computer monitor with a black arrow indicating compression (no text or symbols present)Phase 1
natural_image
Hand inserting a device into a rack with directional arrows (no text or symbols)Phase 2
natural_image
Illustration of a hand pouring liquid into a container on a surface (no text or symbols)Phase 3
Phase 4
natural_image
Diagram of a refrigerator interior showing internal components and airflow direction (no text or labels)Abb. A
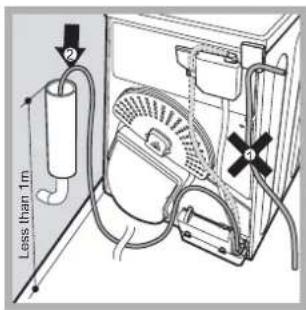
Abb. B
Elektroanschluss
natural_image
Technical line drawing of a curved mechanical component with internal ribs and mounting holes (no text or symbols)natural_image
Illustration of a hand pressing down on a washing machine with an arrow indicating the motion (no text or symbols present)Fase 1
natural_image
Line drawing of an open refrigerator with two doors open (no text or symbols)Fase 2
natural_image
Illustration of a hand pressing down on a curved surface with an upward arrow (no text or symbols)Fase 3
natural_image
3D rendering of a curved mechanical component with internal grooves and mounting holes (no text or symbols)Fase 4
natural_image
Illustration of a hand pressing down on a curved surface with a downward arrow indicating compression or damage (no text or symbols present)natural_image
Illustration of a hand pressing down on a device with arrows indicating motion (no text or symbols)Fase 1
natural_image
Illustration of hands using a tool to adjust or install a mechanical component (no text or symbols visible)Fase 2
natural_image
Illustration of hands inserting a device into a machine (no text or symbols visible)Fase 3
natural_image
Illustration of a hand pressing down on a computer monitor with a black arrow indicating compression (no text or symbols present)Fase 1
natural_image
Hand inserting a device into a box with an arrow indicating direction (no text or symbols)Fase 2
natural_image
Illustration of a hand pouring liquid into a container on a shelf (no text or symbols visible)Fase 3
natural_image
Diagram of a refrigerator interior with a window and fan, showing airflow direction (no text or symbols)Fase 4
Fig. A

Fig. B
Mag in de wasdroger.
natural_image
Technical line drawing of a curved mechanical component or bracket (no text or symbols)natural_image
Line drawing of a hand pressing down on a washing machine (no text or symbols)natural_image
Line drawing of an open refrigerator with two doors showing internal compartments (no text or symbols)natural_image
Illustration of a hand pressing down on a curved surface with an upward arrow (no text or symbols)natural_image
Technical illustration of a curved mechanical component with internal channels and mounting holes (no text or symbols)natural_image
Illustration of a hand pressing down on a curved surface with a downward arrow indicating compression (no text or symbols)natural_image
Illustration of a hand pressing down on a device with arrows indicating motion (no text or symbols)natural_image
Illustration of hands holding a device with wires and components (no text or symbols visible)natural_image
Illustration of a hand pressing a component with an arrow indicating direction (no text or symbols)natural_image
Illustration of a hand pressing down on a computer monitor with a black arrow indicating press direction (no text or symbols)natural_image
Illustration of a hand inserting a device into a box with arrows indicating direction (no text or symbols)natural_image
Illustration of a hand using a tool to clean or wash a trash bin (no text or symbols visible)natural_image
Interior view of a refrigerator with a highlighted interior area showing a person inside (no text or symbols visible)natural_image
Diagram of an appliance interior showing internal components and airflow paths (no text or labels)Fig. A

Fig. B
Conexión eléctrica
natural_image
3D technical illustration of a curved mechanical component with internal brackets and mounting holes (no text or symbols)natural_image
Line drawing of a hand pressing down on a washing machine (no text or symbols)Fase 1
natural_image
Line drawing of an open refrigerator with two doors open (no text or symbols)Fase 2
natural_image
Illustration of a hand pressing down on a curved surface with an upward arrow (no text or symbols)Fase 3
natural_image
3D rendering of a curved mechanical component with internal ribs and mounting holes (no text or symbols)Fase 4
natural_image
Illustration of a hand pressing down on a curved surface with a downward arrow indicating compression (no text or symbols)natural_image
Illustration of a hand pressing down on a device with arrows indicating motion (no text or symbols)Fase 1
natural_image
Illustration of hands holding a device with cables and connectors (no text or symbols visible)Fase 2
natural_image
Illustration of a hand inserting a device into a tray with an upward arrow (no text or symbols)Fase 3
natural_image
Illustration of a hand pressing down on a computer monitor with a black arrow indicating press direction (no text or symbols)natural_image
Illustration of a hand inserting a device into a box with arrows indicating direction (no text or symbols)natural_image
Illustration of a hand using a tool to clean or wash a trash bin (no text or symbols visible)natural_image
Diagram of a car air conditioner unit with a magnified inset showing airflow direction (no text or symbols)natural_image
Diagram of a refrigerator interior showing internal components and airflow direction (no text or labels)Fig. A

Fig. B
Ligação eléctrica
Antes de introduzir a ficha na tomada eléctrica, verifique o seguinte:
natural_image
3D rendering of a curved mechanical component with internal ribs and mounting holes (no text or symbols)- Contents
- Important information, 2-3
- Installation, 4
- Description of the tumble dryer, 5
- How to carry out a drying cycle, 6
- Drying settings, 7
- Laundry, 8
- Warnings and suggestions, 9 General safety
- Care and maintenance, 10
- Troubleshooting, 11
- Assistance, 12
- Important information
- EN
- Condenser unit - remove any fluff build-up from the condenser on a monthly basis.
- Where to install the tumble dryer
- Ventilation
- Water drain
- Electrical connections
- Preliminary information
- Drying time selector knob
- START button
- Empty water container indicator light
- How to carry out a drying cycle
- Starting a drying programme
- Drying times
- Drying programmes and options
- Refresh
- High Heat button
- Sorting laundry
- Maximum load sizes
- Typical weights
- Care labels
- Items not suitable for tumble drying:
- Special items
- General safety
- Information on recycling and disposal
- Disposal of old household appliances
- Saving energy and respecting the environment
- Disconnecting the power supply
- Cleaning the filter after each cycle
- Checking the drum after each cycle
- Cleaning the drum
- Emptying the water container after each cycle
- Cleaning the condenser unit
- Cleaning the tumble dryer
- Problem:
- The dryer does not start.
- Possible causes / Solutions:
- Drying times are too long.
- The dryer is noisy during the first few minutes of operation.
- Before contacting the Technical Assistance Centre:
- Provide the following data when contacting the Technical Assistance Centre:
- Spare parts
- Elektroanschluss
- Conexión eléctrica
- Ligação eléctrica
Brand : INDESIT
Model : IDC 75 B
Category : Tumble drier