Enthoo Evolv ATX - Desktop Computer Phanteks - Free user manual and instructions
Find the device manual for free Enthoo Evolv ATX Phanteks in PDF.

User questions about Enthoo Evolv ATX Phanteks
0 question about this device. Answer the ones you know or ask your own.
Ask a new question about this device
Download the instructions for your Desktop Computer in PDF format for free! Find your manual Enthoo Evolv ATX - Phanteks and take your electronic device back in hand. On this page are published all the documents necessary for the use of your device. Enthoo Evolv ATX by Phanteks.
USER MANUAL Enthoo Evolv ATX Phanteks
TEMPERED GLASS EDITION
PHANTeks
DESIGNED IN THE NETHERLANDS
INTRODUCTION
Congratulations on your purchase of the Phanteks Enthoo Series Case and welcome to the User's Guide. Phanteks believes that meaningful designs are created through the fusion of form and function.
Caution
Please take a moment to carefully go through the installation guide. Phanteks will not take responsibility for any damages incurred due to incorrect installation and incorrect usage of this product. Thank you.
Designed based on the EVOLV line, the Enthoo EVOLV ATX Tempered Glass Edition combines sandblasted aluminum with tempered glass panels. System builders and watercooling enthusiasts can now present their build with a premium touch. The EVOLV ATX Tempered Glass Edition is equipped with innovative features, amazing (water)cooling potential, and RGB illumination.

TABLE OF CONTENTS
- SPECIFICATIONS 5
- EXPLODED VIEW 6
3 ACCESSORIES & BRACKETS 8 - FRONT I/O 9
- CONNECTIONS 10
- PANEL REMOVAL 11
- MOTHERBOARD INSTALLATION 13
- POWER SUPPLY INSTALLATION 14
- FILTERS REMOVAL 15
- FANS COMPATIBILITY 16
- RADIATOR BRACKET INSTALLATION 17
- HARD DRIVE INSTALLATION 19
- HARD DRIVE CAGE 20
14.DROP-N-LOCK SSD BRACKET 22
15.WATERCOOLING INSTALLATION 23 - PWM HUB INSTALLATION 27
- UPGRADE OPTIONS 30
- SUPPORT AND SERVICES 31
1. SPECIFICATIONS
CASE SPECIFICATIONS
Dimension
9.25 in x 19.5 in x 20.1 in
Form Facto
Full Tower
230 mm x 495 mm x 510 mm (W x H x D)
Mid Tower
Aluminum (3mm), Tempered Glass, Steel chassis
E-ATX * (Lupled 244mm wideA, ATX, Micro ATX, Micro ATX, Mini ATX
2x USB 3.0, Mic, Headphone, RGB LED control Yes
EXPANSION & DRIVE BAYS
Expansion slots 7
Internal 3.5^
Internal 2.5"
8 (5x included)
3 (2x included)
COOLING
Front
Top
Rear
120mm
3x
3x
1x
140 mm
2x (2 included)
2x
1x (1 included)
LIQUID COOLING
Front
Top
Rear
120 mm radiator
Up to 360
Up to 360
140 mm radiator
Up to 280
Up to 280
PH-F140SP (included)
Speed (rpm)
1200±250 rpm
82.1 CFM
1.33mm H2O
Acoustical Noise 19dB
CLEARANCE
Graphic card
420 mm (16.54 in) No HDD brackets
300 mm (11.8 in) HDi
CPU cooler 194 mm (7.6 in)
Cable Management 35 mm (1.38 in)
Memory Clearance 120 mm form factor: 68 mm (2.68 in)
(motherboard - fan) 140 mm form factor: 48 mm (1.89 in)
Warranty 5 Years#
2. EXPLODED VIEW
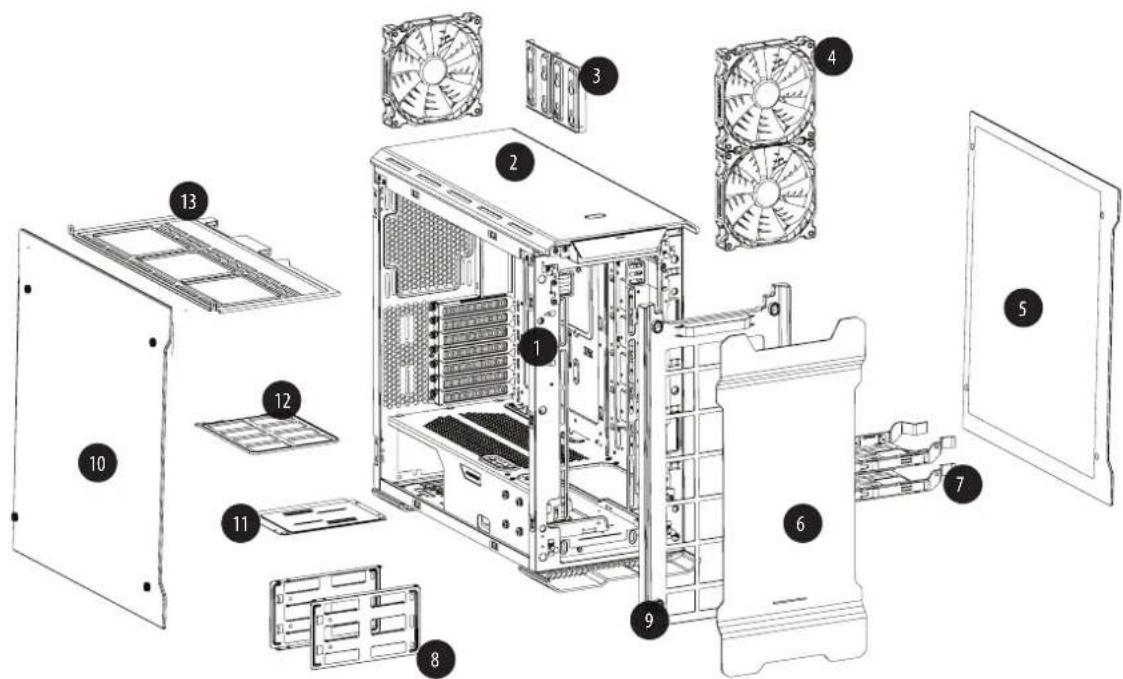
1. Chassis
- Top Panel
3.SSD Bracket - PH-140SP
- Right Side Panel
- Front Panel
7.HDD Tray - Hard Drive Cage
- Front Mesh cover
- Left Side Panel
- Multifunctional mid-plate
- Rear Dust Filters
-
Radiator Bracket
-
Chassis
-
Filtres de poussière inférieurs
-
Support SSD
-
PH-F140SP
-
Panneau l'etal croit
-
Panneau frontal
-
Bacs HDD
-
Enclos du disque dur
-
Couvercle de grille du
panneau frontal
- Panneau latorial gauche
- Plaque centrale multifonctions
- Panneau supérieur
-
Support de radiateur l'etaléral
-
Telao
-
Filtri antipolvere inferiori
- Staff SSD
- PH-F140SP
- Pannello laterale destro
- Pannello frontale
- Vassoi per disco rigido
- Cage disco rigido
- Copertura di rete frontale
- Pannello laterale sinistro
- Piastra centrale multifunzione
- Pannello superiore
-
Staffa radiatore laterale
-
Chassi
- Painel Superior
- Suporte do SSD
- PH-F140SP
- Painel Lateral Direito
- Paine frontal
- Tabuleiros de HDD
- Berço do Disco Rígido
- Tampa de malha frontal
- Paine Lateral Esquero
- Placa media multifuncional
- Filtros de Pó Inferiores
-
Suporte do Radiador Lateral
-
Chasis
- Panel superior
- Soporte de unidad de estadoSolido
- Panel lateral derecho
- Panel frontal
- Bandejas de unidad de disco duro
- Compartimento de disco duro
- Cubierta de malla frontal
- Panel lateral izquierdo
- Placa central multifuncional
- Filtros de polvo inferiores
-
Soporte del radiador lateral
-
Gehäuse
- Untere Staubfilter
- SSD-Halterung
- Rechte Seitenblende
- Frontblende
- Festplatteneinsätze
- Festplattenkäufig
- Vordere Gitterabdeckung
- Linke Seitenblende
- Multifunktionale Platte in der Mitte
- Unterte Staubfilter
-
Seitliche Kühlkörperhalterung
-
Behuizing
- Toppaneel
- SSD beugel
- Rechter ijpaneel
6.Voorpaneel - Harde schijf houder
- Harde schijf kooi
- Voorzijde mesh deksel
- Linker ijpaneel
- Multifunctional mid-plate
- Bodem stofffilter
- Zij radiator beugel
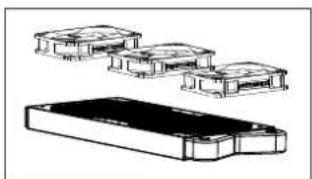
3. ACCESSORIES & BRACKETS
| ITEM | DESCRIPTION | USE | QTY |
| Screw M3 x 5mm | Motherboard/SSD | 26 | |
| Stand Off Screws | Motherboard | 1 | |
| Thumb Screws 9*15mm | HDD Bracket, Side Panel | 12 | |
| Thumb Screws 9*20mm | HDD tray | 2 | |
| Screw 5 x 10KT | Fan installation (top/rear) | 12 | |
| Screw 6-32 x 31mm | Fan installation (front) | 4 | |
| Screw M4 x 8mm | Reservoir | 8 | |
| CM6 #5 | Pumpbracket upgrade | 5 | |
| Screw 6-32 x 6mm | PSU | 5 | |
| Screw 6-32 x 9mm | HDD Bracket | 12 |
| ITEM | DESCRIPTION | USE | QTY |
| 150mm | Zip Tie | 6 |
| Pump Bracket | |
| Support de pompé | |
| Pumpenhalterung | |
| Staffa della pompà | |
| Suporte da Bomba | |
| Soporte de bomba | |
| Pomp beugel | |
| SSD Bracket (2x) | |
| Support SSD (2x) | |
| SSD-Halterung (2x) | |
| Staffa SSD (2x) | |
| Suporte do SSD (2x) | |
| Soporte de unidad de estado sólico (2x) | |
| SSD beugel (2x) | |
| HDD Bracket (3x) | |
| Support du disque dur (3x) | |
| Festplattenhalterung (3x) | |
| Staffa HDD (3x) | |
| Suporte de HDD (3x) | |
| Soporte de unidad de disco duro (3x) | |
| HDD beugel (3x) | |
| PWM Hub | |
| Le hub PWM | |
| PWM-Hub | |
| L'hub PWM | |
| O PWM Hub | |
| El conductor de modulación | |
| PWM Hub |
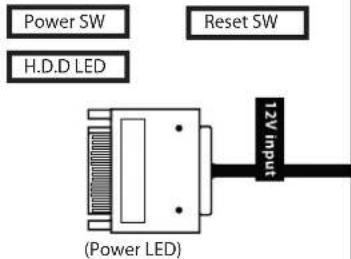
4. FRONT I/O
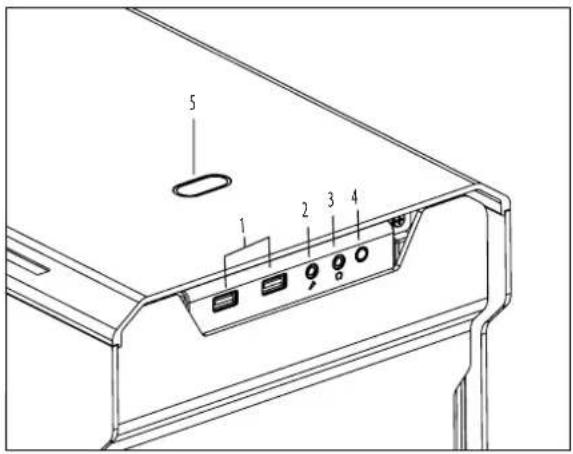
| 1. USB 3.0 2. Microphone 3. Headphone 4. LED Switch 5. Power Button | 1. USB 3.0 2. Microphone 3. Casque 4. Interrupteur LED 5. Bouton d'alimentation | 1. USB 3.0 2. Microfono 3. Cascos 4. Interruptor LED 5. Botón de alimentación. |
| 1. USB 3.0 2. Microfone 3. Fone de ouvido 4. Chave de LED 5. Botão de Alimentação | 1. USB 3.0 2. Microfono 3. Cuffie 4. Interruttore LED 5. Tasto d'alimentazione | 1. USB 3.0 2. Mikrofon 3. Kopfhörer 4. LED-Schalter 5. Ein-/Austaste |
RGB LED Control (4) Instructions:
HOLD
Long Press: On/Off
<1sec
Short Press (<1sec): Choose LED Color (10 colors)
2 sec
2 Sec Press: Choose Mode
Mode 1:Static Mode 2:Breathing Mode 3:Color Cycle
5. CONNECTIONS
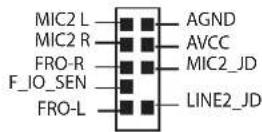
AUDIO
PANEL
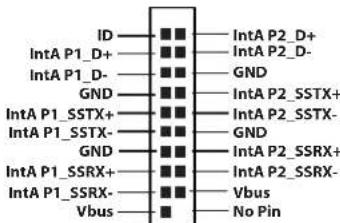
USB3.0
RGB LED STRIP
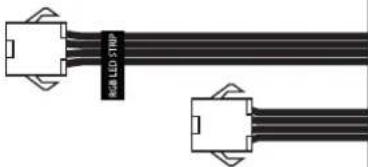
Connects Phanteks' mulicolor LED strip for interior lighting, PH-LEDKT_M1 (not included) / PH-LEDKT_M2 (not included)
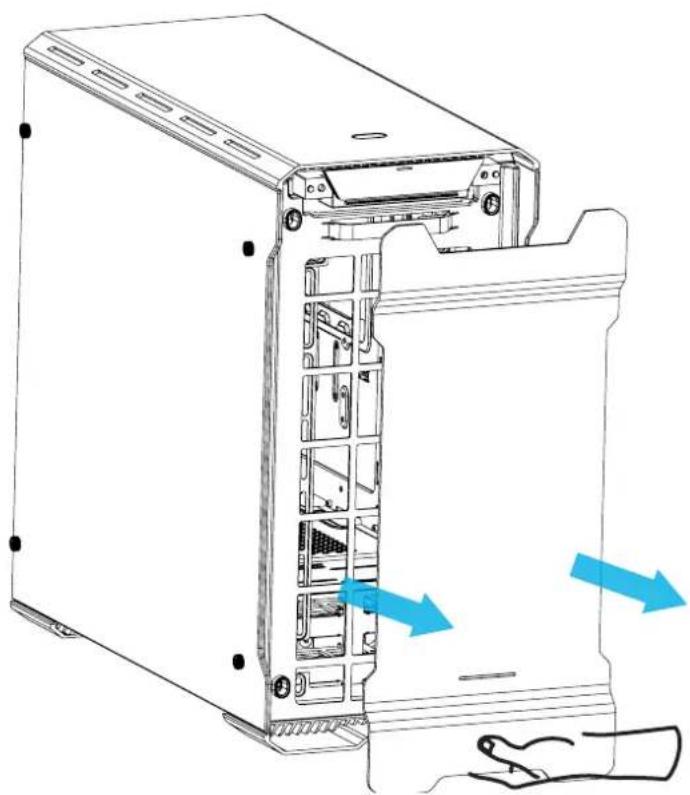
6. PANEL REMOVAL
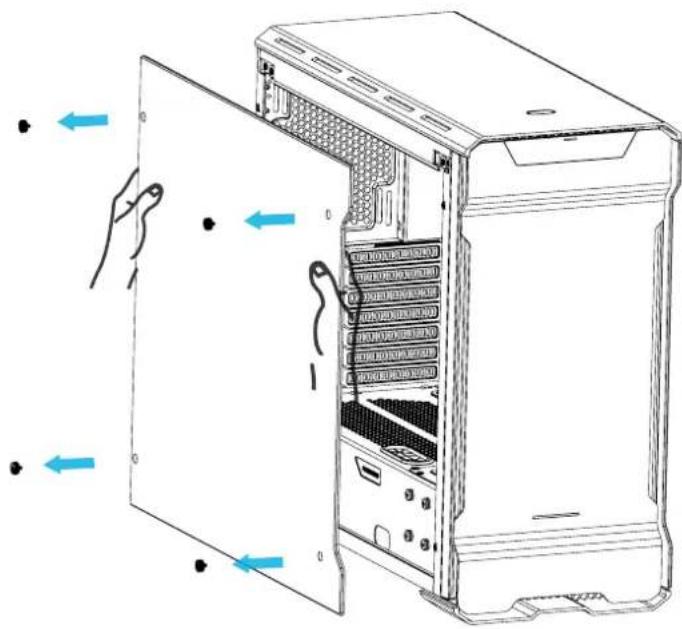
Unscrew the 4 thumb screws to remove the side panels.
Repeat the same steps for the other side.
6.PANEL REMOVAL
For the front panel, place your hands on the area shown and pull outward.
Standoff screws are pre-installed.
Install the motherboard with the provided M3 screws.
Use the provided screws to secure the PSU in place.
To clean the dust filters, run slow moving water through the filters. Dry filters before reinstalling.
To remove the bottom and front filter pull out. Mesh cover on top panel can also be cleaned.
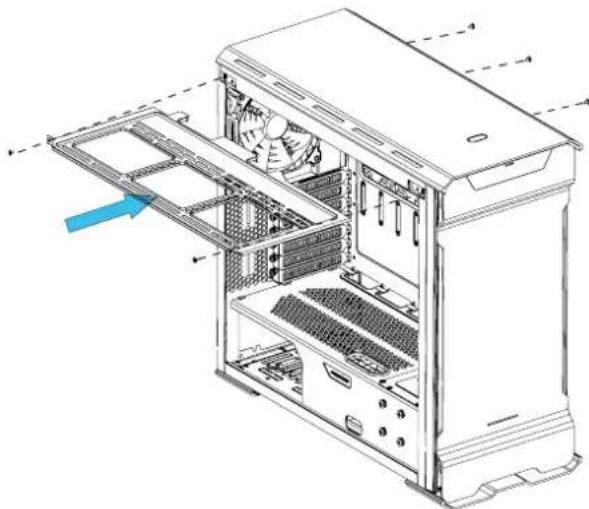
To install, align the bracket and slide in. Use the 5x silver screw to lock in place.
*For radiator and fans installation, please check compatibility table.
| BRACKET COMPATIBILITY TABLE | |
| Radiator Fans | |
| up to 360mm | up to (3x) 120mm up to (2x) 140mm |
To install, align the bracket and slide in. Use the 4x silver screw to lock in place.
Requires 4x 6-32x5mm screws
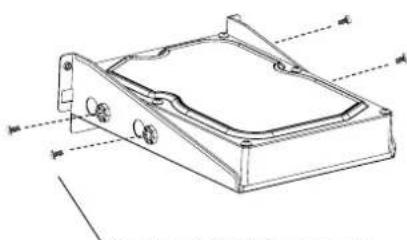
Align the HDD onto the mounting holes and screw in.
Step 1. Remove the HDD cover by removing the m3 Screw
Step 2: Align the HDD bracket to the slot and drop in.
Step 3: Screw in from the back with thumb screws to lock the bracket in place.
To remove, unscrew the 4x screws on the midplate and the 4x screws on the bottom of the case.
Slide in the SSD and screw in from the side to lock in place.
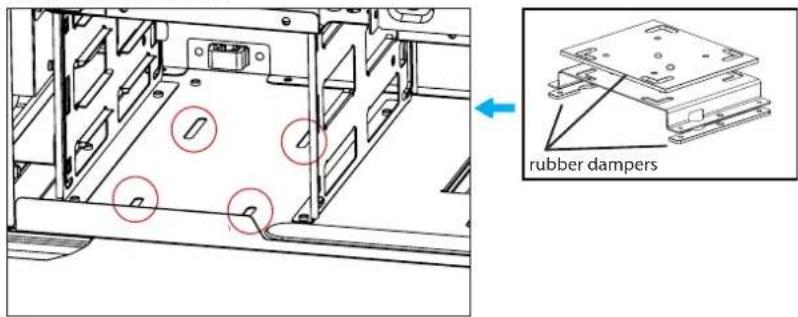
Align the bracket to the rubber and drop down to lock.
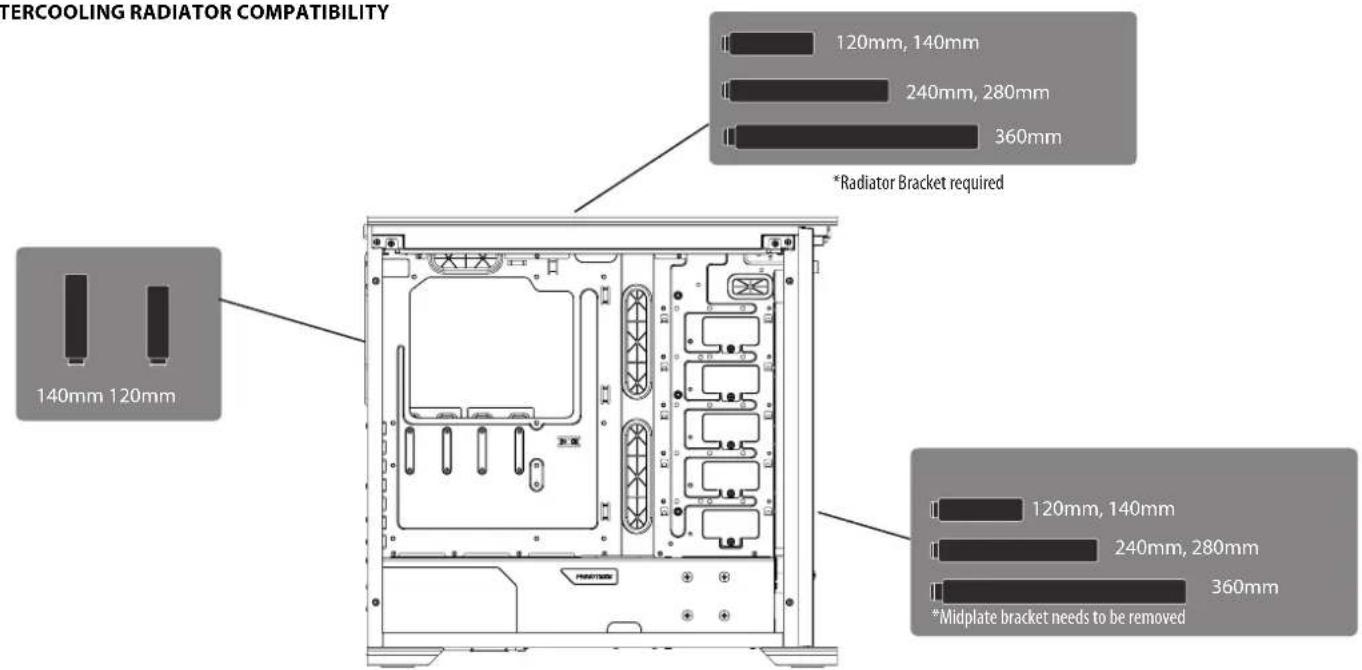
WATERCOOLING RADIATOR COMPATIBILITY
15. WATERCOOLING INSTALLATION
120 MM FORM FACTOR RADIATORS
| Radiator Size | Front | Rear | Top |
| Taille de radiateur Kühlkörpergroße Dimensioni del radiatore Tamanho do radiador Tamaño del radiador Radiator lenghte | Avant Vorderseite Parte frontale Frente Frontal Voorkant | Arriere Rückseite Parte posteriore Traseira Posterior Achterkant | Dessus Oberseite Parte superiore Topo Superior Bovenkant |
| 120mm | ✓ ✓ | ✓ | |
| 240mm | ✓ | ✓ | |
| 360mm | ✓ | ✓ |
140 MM FORM FACTOR RADIATORS
| Radiator Size | Front | Rear | Top |
| Taille de radiateur Kühlkörpergroße Dimensioni del radiatore Tamanho do radiador Tamaño del radiador Radiator lenghte | Avant Vorderseite Parte frontale Frente Frontal Voorkant | Arriere Rückseite Parte posteriore Traseira Posterior Achterkant | Dessus Oberseite Parte superiore Topo Superior Bovenkant |
| 140mm | ✓ ✓ | ✓ | |
| 280mm | ✓ | ✓ |
*Caution: Supported Radiator size and thickness varies depending on your setup.
- Avertissement : Les tailles de radiateur et les épaissieurs supportées varient en fonction de leur configuration.
*Achtung: Unterstutzte KuhlkorpergroBe und -dicke variieren je nach Aufbau. - Attenzione: Le dimensioni e lo spessore supportati per il radiatore dipendono alla configurazione.
Atença: 0 tamanho e espessura do Suporte do Radiador variam dependendo da configuração.
Precaución: el grosor y el taman del radiador compatibles varian segun la instalacion que realice.
*Let op : Ondersteunde radiator grootte en dikte varieert afhankelijk van de opstelling.
15. WATERCOOLING INSTALLATION
PUMP INSTALLATION
Location 1
Flexible mounting points for pump installation.
Location 2 (Pump bracket required)
Pump bracket with universal mounting allows for multiple pumps to be installed.
Evolv ATX Tempered Glass has three types of mounting for different reservoir types. The highlighted circles (blue, red and green) are the location of mounting. Please check first if your reservoir is compatible based on the mounting hole distance.


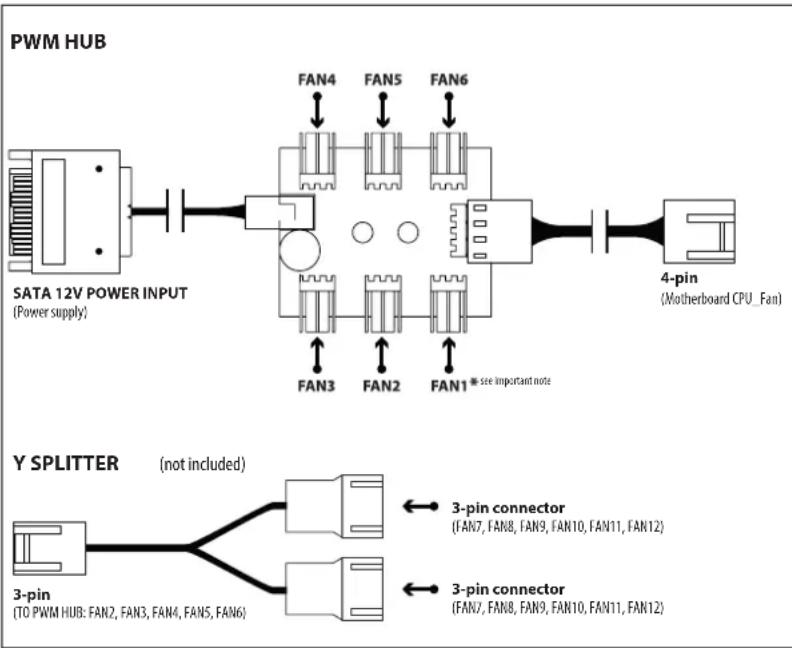
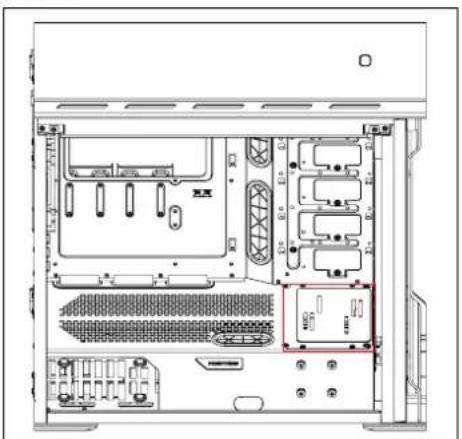
Please visit our website for multi-language instructions regarding PWM Hub at www.phanteks.com.
The PWM hub functions optimally when modulated by a PWM signal from the motherboard, which will allow the greatest control range. However, not all 4-pin motherboard connectors implement true PWM signal modulation.
Connecting the 4-pin to CPU_FAN
For full PWM functionality, Phanteks' PWM hub requires users to connect the 4-pin connector to the "CPU_Fan" connector of the motherboard, because all motherboard manufacturers implements a PWM signal modulation on this connector. Connect the SATA 12V power to power the PWM hub. Not all motherboards have their CPU_Fan connector set on PWM signal modulation by default. Please consult your motherboard documentation for this matter.
Connecting the 4-pin to other 4-pin header (besides the CPU_Fan) Other 4-pin connectors can be found on modern motherboards besides the "CPU_Fan" connector (e.g. "CPU_Fan2", "CHA_Fan", "OPT_Fan"), however not all motherboard manufacturers implement a true PWM signal modulation onto these connectors. These type of 4-pin connectors modulate the RPM by voltage, which has a smaller control range compared to modulation by true PWM signal.
The 12V SATA power cable can not be used to power the PWM hub if connecting to these types of 4-pin connectors, due to the interference with the RPM regulation by voltage (resulting in the fans running on full RPM). The PWM hub will draw its power from the 4-pin connector, which is limited to a total device consuming 30W in total.
Important Note:
1 motherboard connector can only read 1 RPM signal. Therefore, the motherboard will only read the RPM signal from 1 device connected to Fan 1. The RPM form all other devices will be regulated according to FAN 1. Y-splitter should not be connected to FAN 1.
16. PWM HUB INSTALLATION
All accessories can be purchased at www.phanteksusa.com
18. SERVICES AND SUPPORT
If you have any questions or concerns, please visit Phanteks' website for technical support. We consider customer support, satisfaction and feedback an essential element of our overall marketing effort. Please feel free to contact our support team. Thank you!
Contact Us at:
www.phanteks.com
www.phanteksusa.com
www.phanteks.cn
For Warranty Information, please visit Phanteks' website.