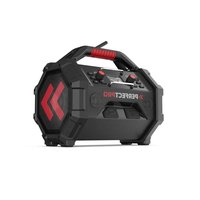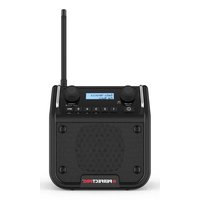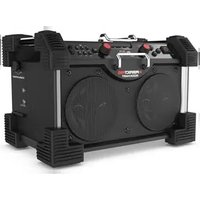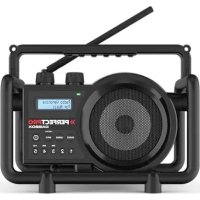
Toughbox 2 - Radio PerfectPro - Free user manual and instructions
Find the device manual for free Toughbox 2 PerfectPro in PDF.


| Technical Features | FM radio, Bluetooth, AUX input, 20W power output |
|---|---|
| Dimensions | Compact dimensions for easy transport |
| Power Supply | Operates on mains power and rechargeable battery |
| Usage | Ideal for construction sites, outdoor events, and home use |
| Maintenance | Regular cleaning with a soft cloth, checking connections |
| Safety | Use in a dry environment, avoid strong shocks |
| General Information | 2-year warranty, technical support available |
Frequently Asked Questions - Toughbox 2 PerfectPro
User questions about Toughbox 2 PerfectPro
0 question about this device. Answer the ones you know or ask your own.
Ask a new question about this device
Download the instructions for your Radio in PDF format for free! Find your manual Toughbox 2 - PerfectPro and take your electronic device back in hand. On this page are published all the documents necessary for the use of your device. Toughbox 2 by PerfectPro.
USER MANUAL Toughbox 2 PerfectPro
DO NOT EXPOSE TO RAIN OR MOISTURE
WORNGING ME, FROM DRAFT, SUPPLY OR ELECTRONICS SCHLAG, NICTY REGEN ORDER FEUCHTICKET AUSSETZEN
PERFECTPRO
Operating instruction
Mode d'emploi
Gebruiksaanwijzng
Bedienungsanleitung
GB
F
NL
D
TOUGHBOX2
WARNING! WARRANTY BECOMES VOID ONCE THE DEVISE CABINET HAS BEEN OPENED OR ANY MODIFICATIONS TO THE ORIGINAL DEVICE HAVE BEEN MADE.
- Never open the device casing. The manufacturer will not accept any liability for damage resulting from improper handling. The type plate is located on the back of the device.
Important safety instructions
-
Read these instructions.
-
Keep these instructions.
-
Heed all warnings.
-
Follow all instructions.
-
Do not use this apparatus near water.
-
Clean only with dry cloth.
-
Do not install near any heat sources such as radiators, heat registers, stoves, or other apparatus (including amplifiers) that produce heat.
-
Do not defeat the safety purpose of the polarized or grounding-type plug. A polarized plug has two blades with one wider than the other. A grounding type plug has two blades and a third grounding prong. The wide blade or the third prong are provided for your safety. If the provided plug does not fit into your outlet. Consult an electrician for replacement of the obsolete outlet.
-
Protect the power cord from being walked on or pinched particularly at plugs, convenience receptacles, and the point where they exit from the apparatus.
-
Only use attachments/accessories specified by the manufacturer.
-
Use only with the cart, stand, tripod, bracket, or table specified by the manufacturer or sold with the apparatus. When a cart is used, use caution when moving the cart/ap paratus combination to avoid injury from tip-over.

-
Unplug this apparatus during lightning storms or when unused for long periods of time.
-
Refer all servicing to qualified service personnel. Servicing is required when the apparatus has been damaged in any way, such as power-supply cord or plug is damaged. liquid has been spilled or objects have fallen into the apparatus, the apparatus has been exposed to rain or moisture, does not operate normally, or has been dropped.
-
To Reduce the Risk of Fire or Electric Shock, Do not Expose This Appliance To Rain or Moisture.
-
The Shock Hazard Marking and Associated Graphical Symbol is provided on the rear of unit.
-
The power plug should be close to the radio, and easy to be approached that during the emergency, to disconnect the power from the radio, just unplug the power plug from the AC power slot.
-
For outdoors use, to avoid electric shock, use battery only during a raining day or the weather is wet.
-
This apparatus is provided with protection against splashing water and dust ingress (IPX4).
-
The batteries shall not be exposed to excessive heat such as sunshine, fire or the like.
-
To prevent possible hearing damage, do not listen at high volume levels for long periods.
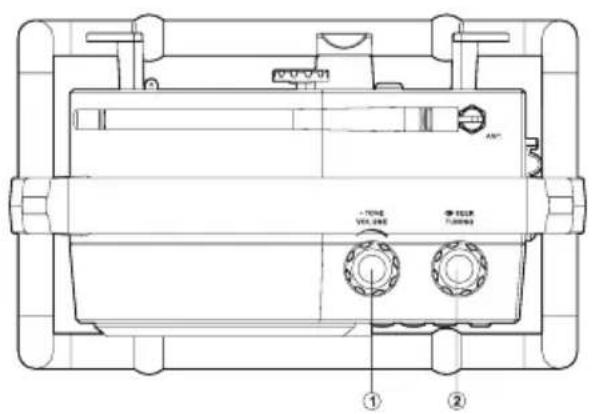
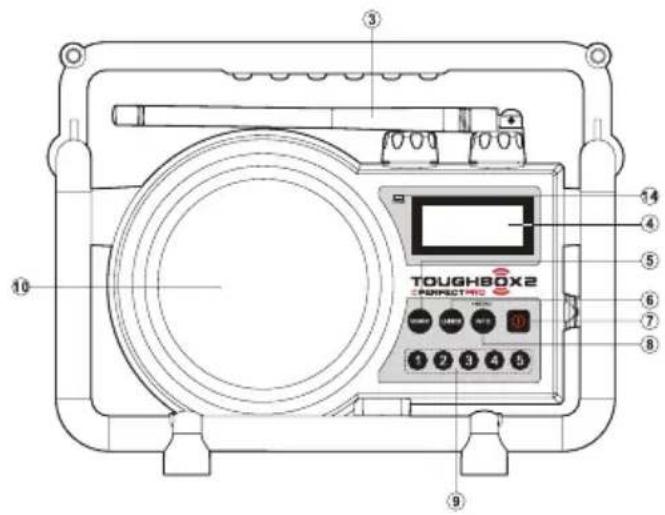
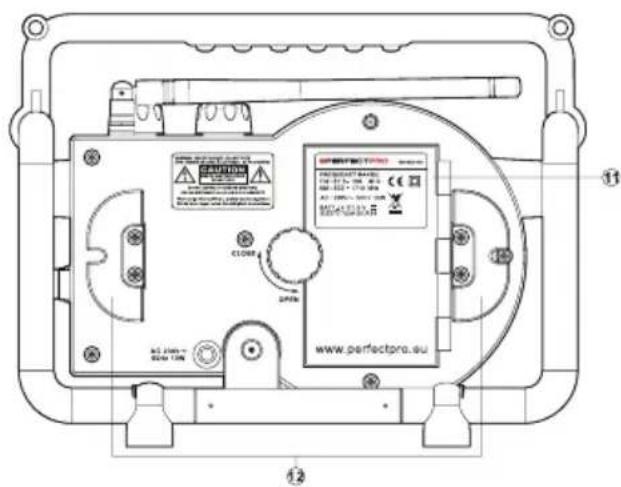
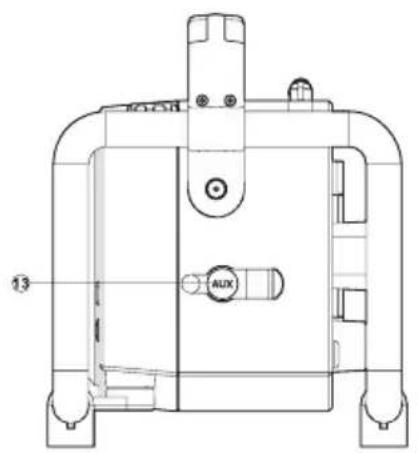
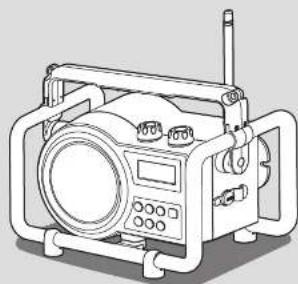
Control
Volume control/Tone control
② Tuning control/Auto-tune control
③ FM rubber antenna
④ LCD display
⑤ Source button
⑥ Loudness button
⑦ Power button
⑧ Info button/Menu button
⑨ Preset button
Speaker
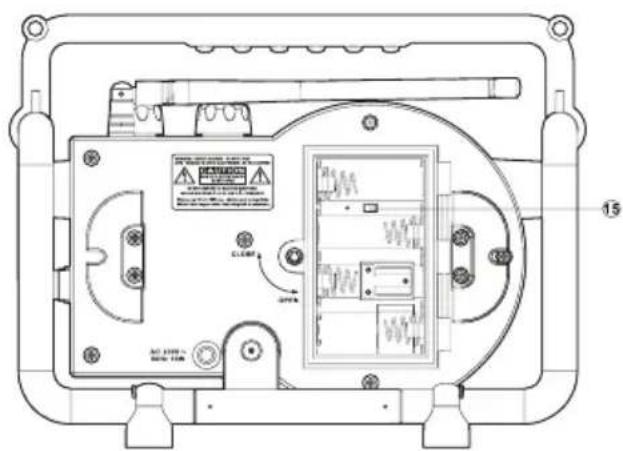
1 Battery compartment
② AC cord storage
3 Aux-in socket
14 Battery charging indicator LED
15 NiMH/Alkaline switch
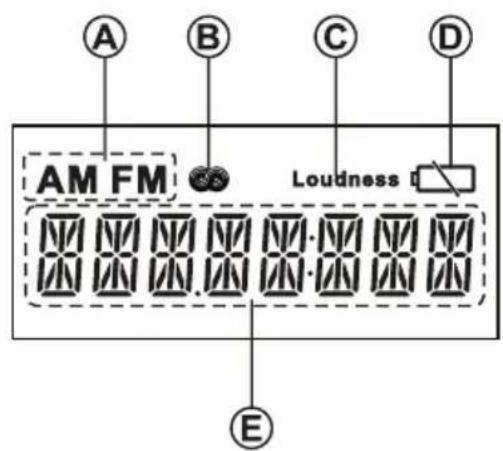
LCD Display
AM/ FM band indicator
RDS indicator
Loudness indicator
Low battery indicator
E Text display
Power the radio
1. Battery operation
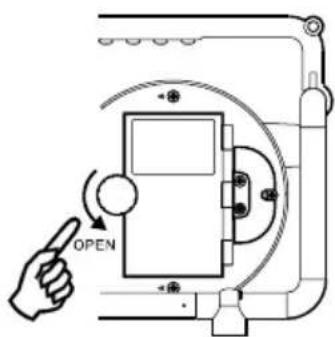
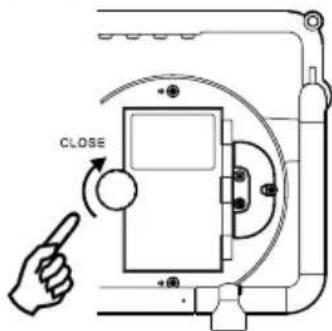
- Installing the batteries, first turn battery cover fixture anti-clockwise to loosen and open the battery cover. Note:
Before you insert the batteries, if you use non-rechargeable batteries, make sure the Charger/ Batteries switch which located inside the battery compartment is switched to Batteries position. If you use rechargeable batteries, make sure to switch Charger/Batteries switch to Charger position.
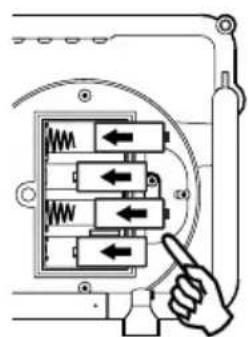
- Insert 4 X C size (UM-2) battery into the compartment. Ensure the batteries are inserted in accordance with the diagram shown. Close the battery cover and fasten the fixture by turning clockwise.
If the radio is not to be used for any extended period of time, it is recommended that the batteries are removed from the radio.
Reduced power, distortion and a "stuttering sound" or low battery sign is flashing on the display are all signs that the batteries need replacing or recharged. (see below information on charging the batteries)
When playing on (rechargeable) batteries the output power is less compared to the output power when playing on AC mains power. Because of this the sound can be somewhat distorted at the higher volume settings.
1.
2.
3.
CHARGING THE BATTERIES
Make sure the radio is switched off and connected to the AC mains socket. When the battery charge indicator LED flashes green. This indicates the batteries are charging. Batteries will be fully charged in around 4-5 hours. The battery charge indicator LED shows steady green light when the battery charging process is complete.
Note: Duration for charging your batteries fully can vary according to the mAh capacity of the batteries. Higher mAh batteries require longer charging time.
Important:
Under some conditions the charging LED indicator may switch off after flashing briefly. This may happen if the batteries are already freshly charged, or if the radio detects that you may be attempting to recharge alkaline batteries or mixed different types or capacity of rechargeable battery. In these cases the charging will be stopped.
IMPORTANT INFORMATION ON CHARGING AND USING RECHARGEABLE BATTERIES
- Recharge the batteries in any case at least every 2 months.
- Make sure the Battery Select switch next the battery compartment is set to the "CHARGER" position.
- Put the batteries in the compartment whilst paying attention to the correct polarity of the batteries (+ and-).
- First use: Charge new batteries in one continuous, uninterrupted, charge until they are full. This first charge may take longer than normal. For longer battery life it is advised to always recharge in one continuous, uninterrupted charge until batteries are full and to not recharge again whilst the batteries are still full.
- New batteries will only reach their full capacity after some time of use (several charge-discharge cycles).
- Leave the complete group of batteries in place inside the radio and do not use these batteries or a few of them for other purposes. This will result in a mix of (fully) charged and (partly) empty batteries. This can seriously damage the batteries and radio when recharged.
- It is advised to only charge batteries at room temperatures between 5 degrees C-35 degrees C. In lower or higher temperatures full charge cannot be achieved.
- Depending on the capacity of the batteries, charging from "empty" to "full" can take several hours, even up to 5 hours or more.
- Do not charge batteries when the radio is hot or exposed to heat or heat sources.
- t is advised to clean the metal contacts of the batteries and of the charger inside the radio e.g. with a contact-spray from time to time.
- Do not use a mix of old and new rechargeable batteries.
- Do not use a mix of rechargeable and non-rechargeable batteries.
- Do not use a mix of full and empty rechargeable batteries.
- Do not use batteries that have a different mAh capacity.
- Do not use damaged, deformed or leaking batteries.
- Battery level indication is an approximate indication only and can vary with battery type used.
- Batteries can become hot during charging.
- In cold conditions the capacity of batteries will be much lower than when used at normal room temperature
- Batteries (even when supplied with the radio), as being consumables, do not fall under the warranty conditions of the radio.
- It is advised to use Perfectpro rechargeable batteries as the radio and its charger were developed for use with these batteries.
- Batteries should not be disposed of by incineration and with household waste.
- Disposable batteries should be taken to a suitable recycling centre if possible.
2.ACoperation
Before you plug the AC cord into the AC socket, be sure the voltage is correct. If you have batteries in the radio and use the AC power cord, the batteries will automatically be disconnected. AC cable hook is designed to store the cord when the radio is not in use.
Setting the clock time
Setting the clock automatically-Radio Data System (RDS)
When you set the clock time using the RDS function, your radio will synchronize its clock time whenever it tunes to a radio station using RDS with CT signals.
- When tuning to a station transmitting RDS data, press and hold the Menu button to enter the setting menu.
- Rotate the Tuning control until "RDS CT" shows on the display. Press the Tuning control to enter the setting.
- Rotate the Tuning control until "CT ON" shows on the display. Press the Tuning control to confirm the selection. The clock time of the radio will be set up automatically according to the RDS data received.
- If you want to disable the clock time (CT) automatic adjustment function. Rotate the Tuning control to select "CT OFF" and press the Tuning control to disable the function. Now the clock time can be set manually, please follow the steps described in the section of "Setting the clock manually."
Setting the clock manually
- Clock can be set either the radio is power on or off.
- Display will show "-:-" when the batteries are installed or when the radio is connected to the mains supply.
- Press and hold the Menu button to enter the setting menu. Rotate the Tuning control until "TIME SET" shows on the display. Press the Tuning control to enter the setting.
- Rotate the Tuning control to set the desired hour. Then press the Tuning control to confirm the setting. The minute digit will flash on the display.
- Rotate the Tuning control to set the desired minute. Then press the Tuning control to confirm the setting. Press the menu button to exit.
12/24 hour clock format
- Press and hold the Menu button to enter the setting menu. Rotate the Tuning control until 'CLOCK 24H (or 12H)' shows on the display. Press the Tuning control to enter the setting.
- Rotate the Tuning control to choose between 12 or 24 hour clock format. Press the Tuning control to confirm the setting.
Operating your radio-FM/AM auto-tune
- Straighten up the antenna.
- Press the Power button to switch on your radio.
- Press the Source button until the FM/AM band is selected.
- Rotate the Tuning control in a clockwise direction. The displayed frequency will increase. Then press the Tuning control to carry out an auto-tune. Your radio will scan up the FM/AM band from the currently displayed frequency and will stop scanning when it finds a station of sufficient strength. To scan down in frequency, rotate the Tuning control in an anticlockwise direction first and then press the Tuning control. Your radio will scan down the FM/AM band from the currently displayed frequency and will stop scanning when it finds a signal of sufficient strength.
- After a few seconds the display will update. The display will show the frequency of the signal found.
- To find other stations press the Tuning control as before. When the end of the waveband is reached, your radio will recommence tuning from the opposite end of the waveband.
- Adjust the Volume to the required setting.
- To switch off your radio, press the Power button.
Note:
If you find the reception is poor, try repositioning the antenna.
Manual Tuning-FM/AM
- Press the Power button to turn on the radio.
- Select the required waveband by pressing the Source button.
- Be sure to screw in the rubber FM antenna properly to get best reception. For AM (MW) band, rotate the radio to get best signal.
- Rotate the Tuning Control knob will change the frequency in the following increments FM: 50 or 100kHz
AM (MW): 9 or 10kHz (10 kHz setting for AM band in North America)
- Rotate the Volume Control knob to get required sound level.
- To turn off the radio, press the Power button. Display will show OFF.
Memory resets stations-FM/AM
Storing stations in preset memories, please follow below step. There are 5 memory presets for each waveband.
- Press the Power button to turn on the radio.
- Tune to required station by pressing the Source button and the Tuning control.
- Press and hold down the required preset until the preset number stops flashing until the radio beeps. The preset number will appear in the display and the station will be stored under chosen preset button.
- Repeat this procedure for the remaining presets.
- Stations stored in preset memories can be over written by following above procedures.
Recall stations from preset memories-FM/AM
- Press the Power button to turn on the radio.
- Select the required waveband.
- Momentarily press the required Preset button, the preset number and station frequency will appear in the display.
Display modes-FM
Your radio has six display modes for FM radio. These use data provided by broadcasters which is commonly known as RDS. The Radio Data System (RDS) is a system in which inaudible digital information is transmitted in addition to the normal FM radio programme.
RDS offers several useful features. The following are available on your radio:
- Press the Info button to cycle through the various modes.
a. Frequency Displays the frequency of the station being listened to.
b. Station name Displays the name of the station being listened to.
c. Programme Type Displays the type of station being listened to e.g. Pop, Classic, News, etc.
d. Radio text Displays radio text message such as, new item etc.
e. Signal strength Displays a graph showing the signal strength for the station being received.
f. Time Displays the current time.
Note:
If there is no RDS data available (or if the signal is too weak), all display option will revert back to the frequency display after 10 seconds. If RDS information of station name is available, on the other hand, all display option will return to the station name display.
Bandwidth narrowing-AM
In order to obtain better reception of weaker AM stations, your radio has a function to narrow the AM bandwidth to reduce high frequency noise.
- Press and hold the Menu button to enter the setting menu.
- Rotate the Tuning control until "AM B.W." is shown on the display. Press the Tuning control to enter the setting.
- Rotate the Tuning control to select "WIDE", "NORMAL" or "NARROW", then press the Tuning control to confirm the setting.
Setting tuning step-FM/AM
- Press and hold the Menu button to enter the menu setting.
- Rotate the Tuning control until "FACTORY" shows on the display. Press the Tuning control to enter the setting menu.
- Rotate the Tuning control until 'FM X K' or 'AM X K' shows on the display. Press the Tuning control to enter the setting.
- Rotate the Tuning control to choose the desired FM tuning step (50 kHz or 100 kHz) or AM tuning step (9 kHz or 10 kHz). Press the Tuning control to confirm the setting.
Note:
Re-setting the AM tuning step will erase all the preset AM stations.
Soft Mute (S-MUTE)
Soft Mute is to reduce background noise during weak signal, however it will also reduce radio reception. The initial setting for Soft Mute is ON. Soft Mute can be set either radio is on or off.
- Press and hold the Menu button to enter the setting menu.
- Rotate the Tuning control until "SOFTMUTE" is shown on the display. Press the Tuning control to enter the setting.
- Rotate the Tuning control to select "ON" or "OFF", then press the Tuning control to confirm the setting.
Treble/Bass control
You may set up a custom treble and bass as following.
- Press and hold the Tone control until "TREBLE" appears on the display.
- Rotate the Tone control to adjust the treble level (between-5 and+5). The sound will change as you adjust the level. Press the Tone control to confirm the setting. Now you can adjust Bass control.
- Rotate the Tone control until the desired bass level (between -5 and +5) is displayed. The sound will change as you adjust the level. Press the Tone control to confirm the setting.
Loudness
The Loudness function enables to get compensation on lower and higher frequency. The effect will be more audible when the radio is in a lower volume level (Dynamic Loudness).
- Press the Loudness button to turn on the loudness function. In the display the "Loudness" indicator will be shown.
- To turn off the loudness function, press the Loudness button again. The "Loudness" indicator will not be shown anymore.
Auxiliary input socket
A 3.5mm Auxiliary Input socket is provided on the right side of your radio to permit an audio signal to be fed into the unit from an external audio device such as iPod, MP3 or CD player.
1. Repeatedly press and release the Source button until "AUX IN" is shown on the display.
2. Connect an external audio source (for example, iPod, MP3 or CD player) to the Auxiliary Input socket.
3. Adjust the volume setting on your iPod, MP3 or CD player to ensure an adequate signal level from the player, and then rotate the Volume control on the radio as needed for comfortable listening.
Note: Never use the Aux-In socket in rainy or moist conditions to prevent moist from entering the radio. Always keep the rubber cover on the side well closed under these conditions.
Factory reset
If you wish to completely reset your radio to its initial state this may be performed by following this procedure. By performing a factory reset, all user entered settings will be erased.
- Press and hold the Menu button to enter the setting.
- Rotate the Tuning control until 'FACTORY' shows on the display. Press the Tuning control to enter the setting menu.
- Rotate the Tuning control until "RESET" shows on the display. Press the Tuning control to enter the setting menu.
- Rotate the Tuning control to select 'YES' and press the Tuning control to confirm the setting. A full reset will be performed. Presets will be erased. All the setting will be set to their default values. If you do not wish to carry out a system reset, select 'No' and then press the Tuning control. The display will revert back to the previous display.
In case of malfunction due to electrostatic discharge, reset the product using the above procedure. In some circumstances it may be necessary to disconnect and then reconnect the mains power in order to resume normal operation.
Software version
The software display cannot be altered and is just for your reference.
- Press and hold the Menu button to enter the setting
- Rotate the Tuning control until "FACTORY" shows on the display. Press the Tuning control to enter the setting menu.
- Rotate the Tuning control until 'P X' (e.g.P01) appears. Current software version is shown on the display.
- Press and release the Menu button to exit the software version display.
Backlight timeout
Your radio allows you to adjust the length of time that the backlight stays on when you are not operating your device.
This feature can be adjusted when the radio is on or off.
- Press and hold the Menu button to enter the setting
- Rotate the Tuning control until "LIGHT" shows on the display. Press the Tuning control to enter the setting.
- Rotate the Tuning control to select your desired backlight timeout option (10 seconds/20 seconds/ 30 seconds/remain backlight ON), then press the Tuning control to confirm the setting.
Note: If you select backlight ON, the display backlight will remain illuminated when the radio is turned on, but when the radio is switched off, the backlight will dim after 30 seconds.
WARRANTY
This radio has a 2 year limited warranty.
WARNING! Warranty becomes void once the radio cabinet has been opened or any modifications or alterations to the radio have been made!
The terms of the warranty of this radio do not cover the following:
- Damage caused by misuse, abuse, neglect, alterations, accidents or unauthorized repair.
- Normal wear and tear.
- Batteries
Never open the device casing. The manufacturer will not accept any liability for damage resulting from improper handling. The type plate is located on the back of the device.
Specifications
Frequency Coverage:
FM 87.50-108MHz
AM (MW) 520-1710 kHz (10 kHz) (For North America)
522-1710 kHz (9 kHz)
AC Power:
AC 230V/50Hz/10W (Europe)
Batteries: 4xC Size (UM-2) (recommend to use 4000 mAh)
Output Power:
2 Watt 10% T.H.D. @ 100 Hz @ DC battery 6V
4.5 Watt 10% T.H.D. @ 100 Hz @ AC 230V
The company reserves the right to amend the specification without notice.
If at any time in the future you should need to dispose of this product please note that: Waste electrical products should not be disposed of with household waste. Please recycle where facilities exist. Check with your Local Authority or retailer for recycling advice. (Waste Electrical and Electronic Equipment Directive)
AVERTISSEMENT : LA GARANTIE PREND FIN LORSQUE LE BOITIER DE LA RADIO A ETE OUVERT OU LORSQUE LA RADIO A ETE MODIFIEE DE QUELQUE MANIÈRE QUE CE SOIT PAR L'UTILISATEUR FINAL.
Réglage manuel-FM/AM
522-1710 kHz (9 kHz)
2 Watt 10% T.H.D. @ 100 Hz @ DC battery 6V
4.5 Watt 10% T.H.D. @ 100 Hz @ AC 230V
HANDMATIG AFSTEMMEN-FM/AM
AFSTEMSTAP INSTELLEN-FM/AM
AM (MW) 520 - 1710 kHz (10 kHz)
522-1710kHz(9kHz)
Voeding:
Wisselstroom 230V/50Hz/10W (Europa)
Batterijen: 4xC-cel (UM-2) (4000 mAh aanbevolen)
Uitgangsvermogen:
AM (MW) 520 - 1710 kHz (10 kHz)
522-1710 kHz (9 kHz)
Netzspannung:
AC 230V/50Hz/10W (Europa)