Slim 2 - Radio PerfectPro - Free user manual and instructions
Find the device manual for free Slim 2 PerfectPro in PDF.
| Features | Details |
|---|---|
| Product type | Radio |
| Dimensions | Compact and lightweight, ideal for mobile use |
| Power supply | Operates on mains and rechargeable battery |
| Reception range | FM and AM with good sensitivity |
| Connectivity | AUX input for external connection |
| Usage | Easy to use with intuitive controls |
| Maintenance | Clean regularly with a soft cloth |
| Safety | Do not expose to water or extreme temperatures |
| Warranty | Check warranty conditions with the seller |
Frequently Asked Questions - Slim 2 PerfectPro
User questions about Slim 2 PerfectPro
0 question about this device. Answer the ones you know or ask your own.
Ask a new question about this device
Download the instructions for your Radio in PDF format for free! Find your manual Slim 2 - PerfectPro and take your electronic device back in hand. On this page are published all the documents necessary for the use of your device. Slim 2 by PerfectPro.
USER MANUAL Slim 2 PerfectPro
IMPORTANT SAFETY INSTRUCTIONS 3
CONTROLS 4
POWER SUPPLY 6
Battery operation 6
AC operation 6
GENERAL FUNCTIONS 7
USING THE DEVICE FOR THE FIRST TIME 7
DAB RADIO MODE 8
Operating the radio - DAB 8
Selecting a station - DAB 8
Secondary services - DAB 8
Display modes - DAB 9
Finding new stations - DAB 9
Manual tuning - DAB 9
Dynamic Range Control (DRC) settings - DAB 10
Prune stations - DAB 10
FM MODE 11
Operating the radio - FM seek station 11
Manual tuning - FM 11
RDS station service - FM 12
Scan sensitivity setting - FM 12
PRESET STATIONS 13
Storing preset stations 13
Recalling preset stations 13
USING BLUETOOTH 13
Pairing Bluetooth with your mobile phone 13
Playing music from your mobile phone 14
Display modes - Bluetooth 14
Restart Bluetooth pairing 14
AUX IN MODE 15
SETTING THE CLOCK 15
CONTENTS
SETTING THE ALARM 16
Setting the alarm clock 16
Switching on/off the alarm 16
LOUDNESS 16
TONE 17
LANGUAGE SETTING 17
SOFTWARE VERSION 17
SYSTEMRESET 18
BACKLIGHT 18
BLUETOOTH LED 19
NAME 19
WARRANTY 20
SPECIFICATIONS 21
GB
WARNING! WARRANTY BECOMES VOID ONCE THE DEVISE CABINET HAS BEEN
OPENED OR ANY MODIFICATIONS TO THE ORIGINAL DEVICE HAVE BEEN MADE
IMPORTANT SAFETY INSTRUCTIONS
- Read these instructions.
- Keep these instructions.
- Heed all warnings.
- Follow all instructions.
- Clean only with dry cloth.
- Do not block any ventilation openings. Install in accordance with the instructions.
- Do not install near any heat sources such as radiators, heat registers, stoves or other apparatus (including amplifiers) that produce heat.
- Do not defect the safety purpose of the polarized or grounding - type plug. A polarized plug has two blades with one wider than the other. A grounding type plug has two blades and a third grounding prong. The wide blade or the third prong is provided for your safety. If the provided plug does not fit into your outlet, consult an electrician for replacement of the obsolete outlet.
- Protect the power cord from being walked on or pinched particularly at plug, convenience receptacles, and the point where they exit from the apparatus.
-
Only use attachments/accessories specified by the manufacturer.
-
Use only with the cart, stand, tripod, bracket, or table specified by the manufacturer, or sold with the apparatus. When a cart is used, use caution when moving the cart/ apparatus combination to avoid injury from tip-over.
- Unplug this apparatus during lightning storms or when unused for long periods of time.
- Refer all servicing to qualified service personnel. Servicing is required if the apparatus has been damaged in any, such as power-supply cord or plug is damaged, liquid has been spilled or objects have fallen into the apparatus, the apparatus has been exposed to rain or moisture, does not operate normally, or has been dropped.
- To reduce the risk of fire or electric shock, do not expose this appliance to rain or moisture.
- Do not remove the cover; there are no user-serviceable parts inside.
- No naked flame sources shall be placed on the apparatus.
- For outdoors use, to avoid electric shock, use battery only during a raining day or the weather is wet. To prevent electric shock, if the radio has been exposed to rain or water, the power supply cord and plug must be completely dried before plugging into the mains socket outlet.
- The power plug should be close to the apparatus, and easy to be approached that during emergency, to disconnect the power from the apparatus, just unplug the power plug from the AC power slot.
- The marking information is located at the bottom of the apparatus.
- This apparatus is provided with protection against splashing water (IP65).
- In case of malfunction due to electrostatic discharge or fast transient (burst), remove and reconnect the power supply.
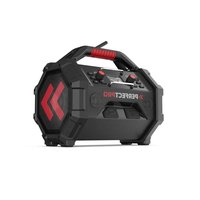
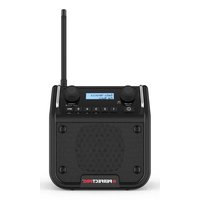
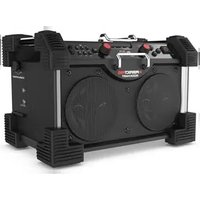
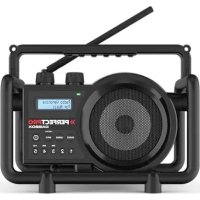
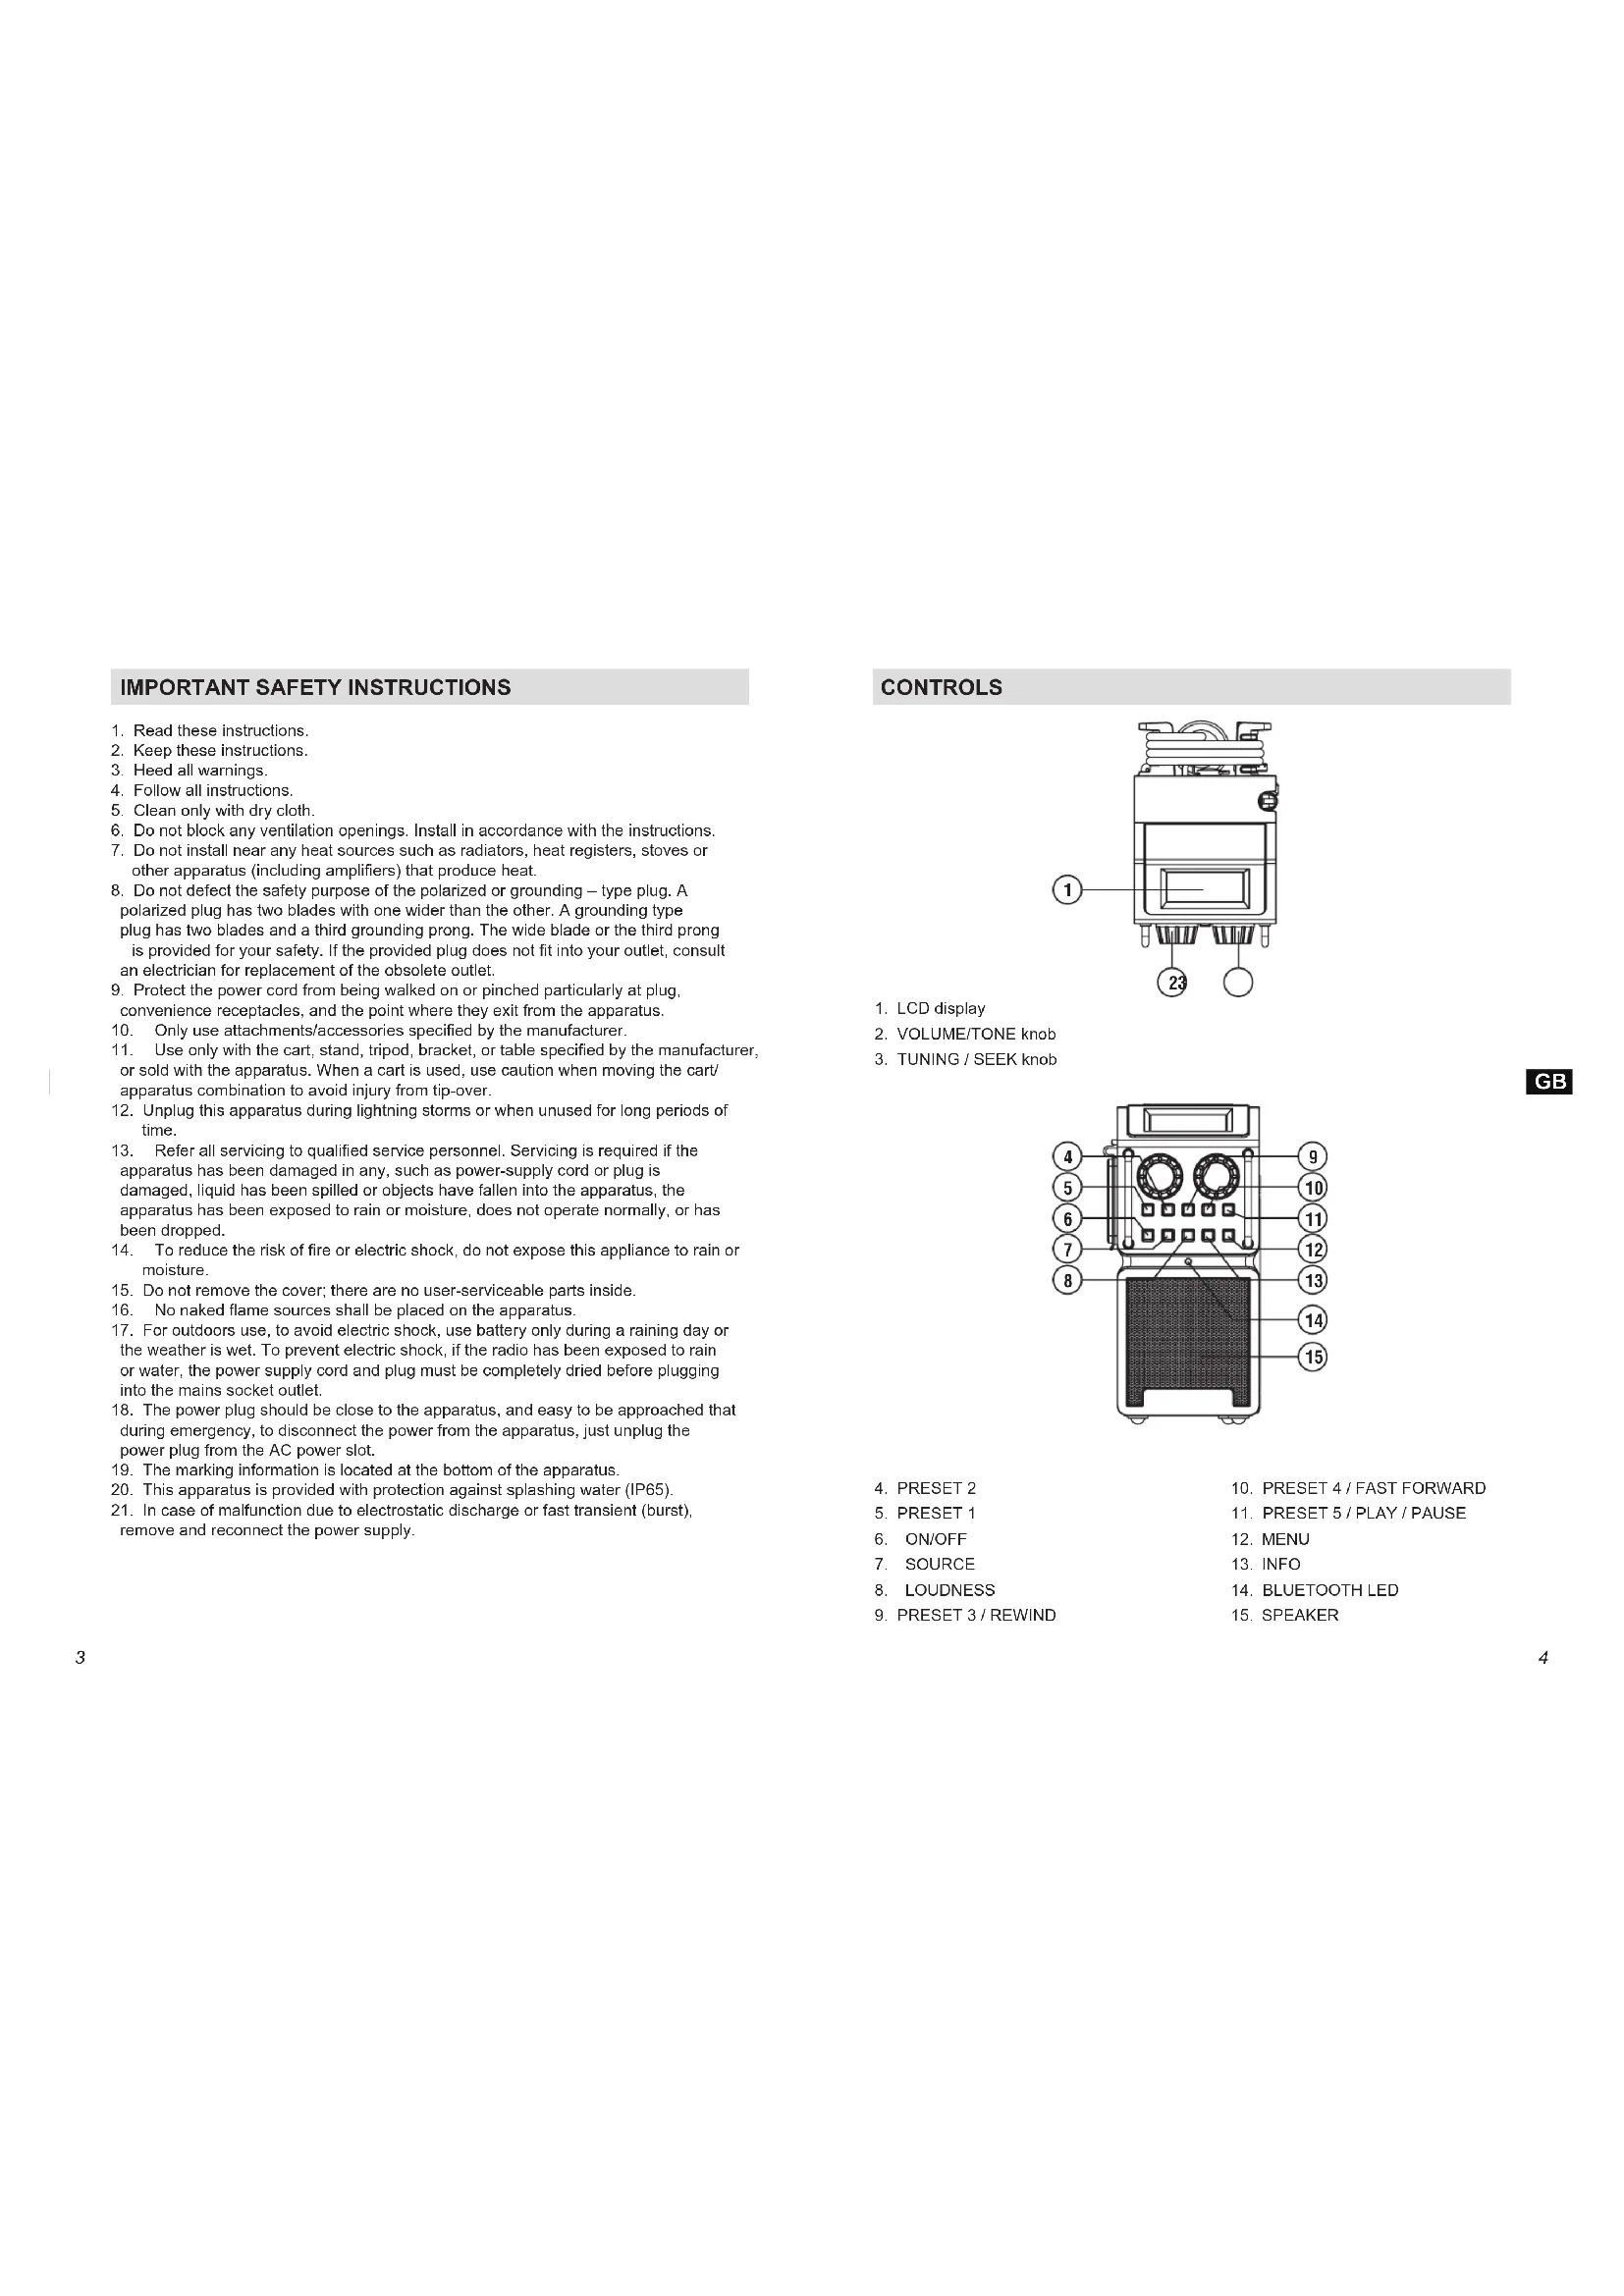
CONTROLS
- LCD display
- VOLUME/TONE knob
- TUNING / SEEK knob
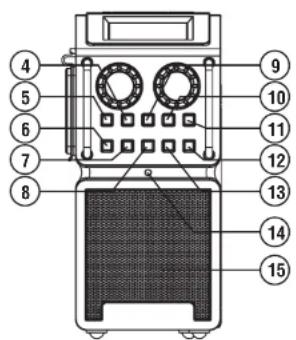
- PRESET 2
- PRESET 1
- ON/OFF
- SOURCE
- LOUDNESS
-
PRESET 3/REWIND
-
PRESET 4/FAST FORWARD
- PRESET 5/PLAY/PAUSE
- MENU
- INFO
- BLUETOOTH LED
- SPEAKER
CONTROLS

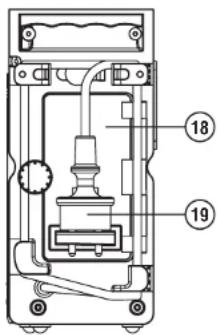
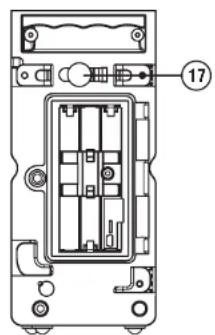
16.ANTENNA
17. AUX-IN
18. BATTERY COMPARTMENT
19. POWER CORD / PLUG STORAGE
POWER SUPPLY
Battery operation
- To open the battery compartment, first turn the battery cover fixtures anti-clockwise to loosen and open the battery cover.
- Insert 6 x AM3/AA/LR6 NiMH or alkaline batteries with the correct polarity into the compartment. Close the battery cover and fasten the fixtures by turning clockwise. Close well to prevent moist or dust from entering the compartment.
- If the unit is not to be used for any extended period of time, it is recommended to remove the batteries from the radio.
The approximate power level of the batteries is displayed in the LCD display of the radio. When the power level is very low the battery symbol flashes on the display.
The batteries should then be replaced soon to continue normal operation of the radio.
Notes:
Danger of explosion if battery is incorrectly replaced. Replace only with the same or equivalent type.
Do not expose the batteries to excessive heat such as sunshine, fire or the like.
Batteries should not be disposed of by incineration and with household waste
Disposable batteries should be taken to a suitable recycling centre if possible.
AC operation
Before plugging the AC power cord into the AC socket, be sure the voltage is correct. If you have batteries in the radio and using the AC power supply, the batteries will automatically be disconnect.
AC power cord and plug storage are designed to store the cord and plug when the radio is not in use or playing on batteries.
Note:
In order to disconnect the unit from the AC mains completely, the AC power cord should be removed from the mains socket completely. The AC power cord shall remain readily operable and should not be obstructed during intended use.
In case of malfunction due to electrostatic discharge or fast transient (burst), remove the power supply and all the batteries then reinstall the batteries and reconnect the power supply.
GENERAL FUNCTIONS
- Switching on and off
Press the ON/OFF button to turn the radio on or in standby. - Switching among DAB / FM / Bluetooth / AUX IN modes Press the SOURCE button to switch between modes.
- Tuning the Radio
Tune the radio using the TUNING/SEEK knob on the right.
4. Adjusting the Volume
Adjust the volume with the VOLUME/TONE knob on the left.
- Adjusting the Tone
Press and hold the VOLUME/TONE knob on the left for about 3 seconds and rotate it to adjust the Bass and Treble.
- Bluetooth pairing
Press the SOURCE button to Bluetooth mode. Then open the Bluetooth setup menu in mobile phone, search and connect to the Bluetooth device name "PP Slim 2". Once the mobile phone name is showed on the LCD, you can start streaming music to mobile phone.
- Playing music stored in a paired mobile phone from the Slim 2 radio in Bluetooth mode
Press the REWIND, FAST FORWARD and PLAY/PAUSE buttons (Preset buttons 3, 4 and 5)
USING THE DEVICE FOR THE FIRST TIME
- Place the radio on a flat surface.
- Carefully extend the antenna located on the top of the radio. Adjust the antenna so it is vertically extending above the radio.
- Plug the AC power cord into the AC socket. The radio will start up and the display will show "WELCOME TO DIGITAL RADIO" for a few seconds. Then the radio will automatically perform an auto scan of the Band III DAB channels and the FM band in the background.
- When the scan is completed, the 5 strongest FM stations and the first 5 DAB stations will be stored as presets. The radio will switch to standby with the updated clock and date showing on the display.
- If no signals are found, the clock will not be updated. It may be necessary to relocate the radio to a position giving better reception.
DAB RADIO MODE
Operating the radio - DAB
- Carefully extend the antenna. Press the ON/OFF button to switch on the radio.
- Select the DAB waveband by pressing the SOURCE button.
- The first station (in numeric-alpha order 0...9...A...Z) in the list of stations found will be played. The display will show the station name. If the radio has been used before, the last used station will be selected.
- If no signals are detected, "No stations available" will be displayed. It may be necessary to relocate the radio to a position giving better reception.
You should then carry out an auto scan to find stations, please refer to the section "Find new stations - DAB".
Selecting a station - DAB
- Press the ON/OFF button to switch on the radio.
- Select DAB waveband by pressing the SOURCE button. The display will show "Now tuning" for a few seconds.
- The display shows the name of the radio station currently selected.
- Rotate the TUNING/SEEK knob to scroll through the list of available stations.
- When the desired station name appears on the display, press the TUNING/SEEK knob to select the station. The display will show "Now tuning" while the radio finds the new station.
Note: If after selecting a station the display shows "No stations available", it may be necessary to relocate the radio to a position giving better reception.
Secondary services - DAB
- Certain radio stations have one or more secondary services associated with them. If a station has a secondary service associated with it, then the secondary service will appear immediately after the primary service as you turn the TUNING/SEEK knob.
- Press the TUNING/SEEK knob to select the secondary service. Most of secondary services do not broadcast continually and if the selected service is not available, the radio will re-tune to the associated primary service.
Display modes - DAB
In DAB mode, the radio can display a range of information on the display.
- Press the INFO button to cycle through the various modes.
a. Scrolling text Displays scrolling text message such as artist/track name, phone in number, etc.
b. Signal strength Displays the signal strength of radio reception. The clear unfilled rectangle indicates minimum signal level required for satisfactory reception.
c. Program type Displays type of station being listened to e.g. Pop,
classic, News, etc
d. Multiplex name Displays name of multiplex to which the current station belongs.
e. Channel & frequency Displays channel number and frequency for the currently tuned DAB station.
f. Bit rate & audio type Displays the digital audio bit rate.
g. Time & date Displays the current time (24 hour clock) and date.
Finding new stations - DAB
From time to time, new stations may become available. You may proceed to find new stations as follows:
- Press the MENU button, "Full scan" shows on the display.
- Press the TUNING/SEEK knob, the radio will perform a scan of the Band III DAB channels.
As new stations are found, the station counter on the right-hand side of the display will increase and stations will be added to the list.
Manual tuning - DAB
Manual tuning allows you to tune the radio directly to various DAB Band III channels.
- Press the MENU button, the display shows "Full scan".
- Rotate the TUNING/SEEK knob until the display shows "Manual tune". Press the TUNING/SEEK knob.
- Rotate the TUNING/SEEK knob to select the desired DAB channel. Press the TUNING/SEEK knob to tune the chosen frequency.
- The signal strength display with an open bar shows the minimum signal strength needed for good DAB reception. The signal strength bars will go up or down showing the changing signal strength as you adjust the antenna or the radio position.
- When a DAB signal is found, the display will show the name of the station. Any new radio stations found will be added to the list stored in the radio.
- Repeat step 1 to step 5 for other channels with new stations if available.
- Press the TUNING/SEEK knob to return to normal DAB service.
Dynamic Range Control (DRC) settings - DAB
DRC can make quieter sounds easier to hear when the radio is used in a noisy environment.
-
In DAB mode, press the MENU button, the display shows "Full scan".
-
Rotate the TUNING/SEEK knob until the display shows "DRC value". Press the TUNING/SEEK knob.
-
Rotate the TUNING/SEEK knob to select required DRC setting (default is Off). DRC Off DRC is switched off. Broadcast DRC will be ignored.
DRC Low DRC level is set to low that sent by broadcaster.
DRC High DRC is set as sent by broadcaster.
- Press the TUNING/SEEK knob to confirm the setting. The display will return to normal radio display.
Note: Not all DAB broadcasts use the DRC function. If the broadcast does not provide DRC information, the DRC setting in the radio will have no effect.
Prune stations - DAB
If you move to a different part of the country, some of the stations which were listed may no longer be available. Also, from time to time, some DAB services may stop broadcasting, or may change location or frequency. The Prune stations function will delete the unavailable DAB stations from your station list.
- In DAB mode, press the MENU button, the display shows "Full scan".
- Rotate the TUNING/SEEK knob until the display shows "Prune".
- Press the TUNING/SEEK knob to enter the setting.
- Rotate the TUNING/SEEK knob to select between "Yes" or "No" (default is No).
Select "Yes" to enable this function if required, otherwise, select "No" - Press the TUNING/SEEK knob to confirm your setting. The display will return to normal radio display.
Note: If you have moved the radio to a different part of the country, you should also carry out a search for new stations (please see the section "Finding new stations - DAB").
FM MODE
Operating the radio - FM seek station
- Press the ON/OFF button to turn on the radio.
- Select the FM waveband by pressing the SOURCE button.
- If this is the first time to switch to FM mode, the station in preset 1 will be played. If the radio has been used before, the last listened station will be played.
- To seek a station, press the TUNING/SEEK knob. The scan stops automatically when it finds a station of sufficient strength.
- After a few seconds, the display will update and show the station name if RDS information is being received.
- To find other stations, press the TUNING/SEEK knob again.
- To seek station in an opposite direction, rotate the TUNING/SEEK knob clockwise (to scan from low frequency to high frequency) or rotate anti-clockwise (to scan from high frequency to low frequency), and press the TUNING/SEEK knob.
- When the waveband end is reached, the radio will recommence tuning from the opposite waveband end.
Manual tuning - FM
- Press the ON/OFF button to turn on the radio.
- Select the FM band by pressing the SOURCE button.
- Rotate the TUNING/SEEK knob to reach the required FM station. The radio will change the frequency in steps of 50kHz
- Rotate the rubber antenna to get the best reception. If the radio is tuned to a station of sufficient signal strength with RDS information present, the display may change to show the station name.
- When the waveband end is reached, the radio will recommence tuning from the opposite waveband end.
RDS station service - FM
RDS (Radio Data System) is an information system which inaudible digital information is transmitted in addition to the normal FM radio program. When the radio is receiving a RDS station and the reception strength is sufficient, the station name will appear in the display. It may take some time before the RDS information is available.
Calling up RDS information
When you are listening to a FM station with RDS system, repeatedly press the INFO button to cycle through the information. This will only function if the reception level is sufficient and clear.
a. Radio text (RT) Displays the message about the station being listened to as ticker text.
b. Program type (PTY) Displays the type of station being listened to, e.g. Pop, Classic, News, etc.
c. Frequency Displays the frequency of the station being listened to.
d. Signal level Displays the signal strength.
e. Time & date Displays the current time (24 hour clock) and date.
Scan sensitivity setting - FM
The radio will normally scan all stations from FM broadcasts including the weaker signals. However, you may wish the Auto-scan to find only those stations with strong enough signals to give good reception.
- Press the ON/OFF button to turn on the radio.
- Select the FM band by pressing the SOURCE button.
- Press the MENU button, the display shows "Scan setting".
- Press the TUNING/SEEK knob
- Rotate the TUNING/SEEK knob to select between "All stations" or "Strong station" (default is Strong stations).
The "Strong station" option will allow the radio to find strong signals only when scanning.
- Press the TUNING/SEEK knob to confirm your setting. The display will return to normal radio display.
PRESET STATIONS
Storing preset stations
There are 5 memory presets in the radio, 5 for DAB and 5 for FM. Presets are remembered by the radio in the event of a power failure.
- Press the ON/OFF button to turn on the radio.
- Press the SOURCE button to select the desired waveband.
- Tune to the required station
- Press and hold the required PRESET button until the radio beeps and shows for example "Preset 01 Stored".
- Repeat step 3 and 4 for the remaining presets.
- Stations stored in the preset memories can be over-written by following the above procedure.
Recalling preset stations
- Press the ON/OFF button to turn on the radio.
- Press the SOURCE button to select the desired waveband.
- Briefly Press the required PRESET button, the display will show, e.g. "P1", in the first line.
USING BLUETOOTH
Pairing Bluetooth with your mobile phone
- Press the ON/OFF button to turn on the radio.
- Select Bluetooth mode by pressing the SOURCE button.
- The LCD display will show "Not connected" when radio is not yet paired with your mobile phone. Also the blue Bluetooth LED on the front panel will be blinking at this moment.
- In your mobile phone open the Setting menu and select Bluetooth, then select "PP Slim 2" in the Bluetooth devices list (Bluetooth pairing instructions may vary per type of mobile phone, please check your mobile phone manual).
- When Bluetooth pairing is successful, the LCD display will show "Bluetooth Connected" in the 1st line, and your mobile's name in the 2nd line for about 2 seconds.
And the blue Bluetooth LED on the front panel will stop blinking when the radio is connected to a mobile phone. - After all, the LCD display will show the connected mobile phone's name in the 1st line to indicate the connected device to the radio.
Playing music from your mobile phone
- Press the ON/OFF button to turn on the radio.
- Select Bluetooth mode by pressing the SOURCE button.
- Start playing music by using the media players in the paired mobile phone.
- Playback can be controlled from the mobile phone or by pressing the REWIND, FAST FORWARD, and PLAY/PAUSE buttons (preset buttons 3, 4 and 5) on the radio.
- After music playback starts, the name of the song will be displayed in the LCD.
Display modes - Bluetooth
In Bluetooth mode, the radio can display a range of information of the current playing music on the display. Press the INFO button to cycle through the various types.
a. Title Displays scrolling song's name of the current playback music.
b. Artist Displays the artist's name of the current playback music.
c. Album Displays the album name of current playback music.
d. Status Displays the playback status. E.g. playing or stopped.
e. Music info Displays the music format and sampling rate of current playing song. E.g. "AAC" is the format of the song; "44100Hz" is the sampling frequency of the song.
f. Time & date Displays the current time and date.
Restart Bluetooth paring
The Bluetooth function can be set to operate in different ways as below:
- In Bluetooth mode, press the MENU button to enter the system setting.
- Rotate the TUNING/SEEK knob to select "Disconnect BT" options, and press the TUNING/SEEK knob to select the setting.
- The LCD display will show "Please wait" for a few seconds in order to disconnect the current connection with the mobile phone device.
- The LCD display will show "Not connected" and the radio's Bluetooth is free for any mobile phone connection as it is in discoverable mode now.
The blue Bluetooth LED on the front panel will be blinking at this moment.
Note: "Disconnect BT" is the option that forcing the Bluetooth of this radio to disconnect from your mobile phone and enter the "discoverable mode". This is the way to allow the Bluetooth pairing to another device. If no new device is paired, the Bluetooth will automatically try to connect to the last device when it is switched off and on again.
The Auto-Power management function will be activated in Bluetooth mode. If there is no signal from Bluetooth for a period of over 15 minutes, the radio will automatically switch to standby mode. Pressing the ON/OFF button will wake up the unit.
Also when the incoming signal from the external device is too low and cannot be detected for a period of over 15 minutes by the Auto-Power management, the radio will switch to standby mode.
To prevent this raise the output level of the external device enough to be detected.
AUX IN MODE
A 3.5mm stereo Aux In socket is provided on the side behind the rubber cover, for connecting an external audio device such as MP3 player or CD player (not included with this radio).
- Connect an audio SOURCE to the Aux In socket on the backside of the radio.
- Press the SOURCE button to select AUX input. Display will show "AUX IN".
- Play the external player.
- Adjust the volume of both the radio and the player for comfortable listening.
- After use, close the rubber cover to prevent moist or dust from entering into the sockets and radio.
Notes: Never use the AUX-IN socket in rainy or moist conditions to prevent moist from entering the radio. Keep the rubber cover closed under these conditions.
The Auto-Power management function will be activated in AUX mode. If there is no signal from the AUX input jack for a period over 15 minutes, the unit will automatically switch to standby mode. The operation indicator and the LCD will go off in such case. Pressing the ON/OFF button will wake up the unit.
- Also when the incoming signal from the external device is too low and cannot be detected for a period of over 15 minutes by the Auto-Power management, the radio will switch to standby mode.
To prevent this raise the output level of the external device enough to be detected.
SETTING THE CLOCK
The clock can only be set when the radio is in standby mode. If no buttons are pressed for 5 seconds, the radio will exit the clock setup and the setting is cancelled.
- Press and hold the TUNING/SEEK knob for 12 seconds until the hour digits flash on the display.
- Rotate the TUNING/SEEK knob to set the hour.
- Press the TUNING/SEEK knob to confirm, the minute digits flash.
- Rotate the TUNING/SEEK knob to set the minute.
- Press the TUNING/SEEK knob to confirm, the day flashes on the display.
- Rotate the TUNING/SEEK knob to set the current day.
- Press the TUNING/SEEK knob to confirm, the month flashes.
- Rotate the TUNING/SEEK knob to set the current month.
- Press the TUNING/SEEK knob to confirm, the year will then flash on the display.
- Rotate the TUNING/SEEK knob to set the current year.
- Press the TUNING/SEEK knob to confirm, "SYNCLOCK ON" flashes.
- Rotary the TUNING/SEEK knob to select "SYNCLOCK ON" or "SYNCLOCK OFF".
- Press the TUNING/SEEK knob to confirm and finish the clock setting.
SETTING THE ALARM
The alarm can only be set when the radio is in standby mode. If no buttons are pressed for 10 seconds, the radio will exit the alarm setup and the setting is cancelled. Or press the MENU button during alarm setup, the radio will also return to standby mode without saving the adjusted alarm settings.
Setting the alarm clock
- Press the MENU button for about 3 seconds, the display shows "ALARM SET" and the hour digits flash on the display.
- Rotate the TUNING/SEEK knob to set the hour.
- Press the TUNING/SEEK knob to confirm. The minute digits flash.
- Rotate the TUNING/SEEK knob to set the minute.
- Press the TUNING/SEEK knob to confirm.
- The display will then show "ALARM SOURCE". You may choose "BUZZER", "DAB" or "FM RADIO". Rotate the TUNING/SEEK knob to select. If "DAB" is selected, the last listened station will be played when the alarm fires.
- Press the TUNING/SEEK knob to confirm.
- The display will then show "VOL XX". Rotate the TUNING/SEEK knob to change the alarm volume.
- Press the TUNING/SEEK knob button to confirm.
Switching on/off the alarm
To switch the alarm on, press the MENU button briefly. The alarm icon will be shown at the top left corner. To switch the alarm off, press the MENU button briefly again. The alarm icon will be disappeared.
Press the ON/OFF button to turn off the alarm when it is firing.
LOUDNESS
The Loudness function enables to get compensation on lower and higher frequency. The effect will be more audible when the radio is in a lower volume level (Dynamic Loudness).
- Press the LOUDNESS button to enable the loudness, the display shows "Loudness On".
- Press the LOUDNESS button again to disable the loudness, the display shows "Loudness Off".
TONE
The Tone function enables the user to adjust the lower and higher sound frequencies.
- Press the ON / OFF button to turn on the radio.
- Press and hold the VOLUME/TONE knob for about 3 seconds, the display shows "BASS 0".
- Rotate the VOLUME/TONE knob to set the desired Bass level.
- Press the VOLUME/TONE knob to confirm, the display shows "TREBLE 0".
- Rotate the VOLUME/TONE knob to set the desired Treble level.
- Press the VOLUME/TONE knob to confirm and return to normal display.
LANGUAGE SETTING
The radio can be configured to a different language.
- Press the ON/OFF button to turn on the radio.
- Press the MENU button, and then rotate the TUNING/SEEK knob until the display shows "System".
- Press the TUNING/SEEK knob; rotate the TUNING/SEEK knob until the display shows "Language".
- Press the TUNING/SEEK knob to enter the language adjustment menu.
- Rotate the TUNING/SEEK knob until the desired language appears on the display (default is English).
- Press the TUNING/SEEK knob to confirm your choice. The display will change to the chosen language.
SOFTWARE VERSION
The software display cannot be altered and is just for your reference. You can only view the software version in DAB, FM or Bluetooth mode.
- Press the ON/OFF button to switch on the radio.
- Press the SOURCE button to select FM or DAB, or Bluetooth mode.
- Press the MENU button until the display shows "Full Scan" at DAB, or "Scan setting" at FM, or "Disconnect BT" at Bluetooth mode, and then rotate the TUNING/SEEK knob until the display shows "System".
- Press the TUNING/SEEK knob; rotate the TUNING/SEEK knob until the display shows "SW version".
- Press the TUNING/SEEK knob to view the software version.
- Press the TUNING/SEEK knob back to the last menu, and press the TUNING/SEEK knob again to return to the normal radio display.
Notes: USB socket inside battery compartment is for upgrading the software of the device.
SYSTEMRESET
If the radio fails to operate correctly, or some digits on the display are missing or incomplete, carry out the following procedure.
- Press the ON/OFF button to switch on the radio.
- Press the MENU button,
- Rotate the TUNING/SEEK knob until the display shows "System". Press the TUNING/SEEK knob.
- Rotate the TUNING/SEEK knob until the display shows "Factory reset". Press the TUNING/SEEK knob.
- Rotate the TUNING/SEEK knob to select between "Yes" or "No".
- Select "Yes" if you wish to reset the radio; otherwise, select "No" to cancel the selection.
- Press the TUNING/SEEK knob to cause the factory reset.
- A full reset will be performed. All presets and the station list will be erased. All settings will be set to the default values.
The display will show "WELCOME TO DIGITAL RADIO" for a few seconds, and then the radio will automatically perform an auto scan of the Band III DAB channels and the FM band.
In case of malfunction due to electrostatic discharge; reset the product as above to resume normal operation. If you are not able to perform the reset operation as above, remove and reconnect the power supply.
BACKLIGHT
LCD backlight configuration
- Press the ON/OFF button to turn on the radio.
- Press the MENU button, and then rotate the TUNING/SEEK knob until the display shows "System".
- Press the TUNING/SEEK knob; rotate the TUNING/SEEK knob until the display shows "LCD backlight".
- Press the TUNING/SEEK knob to enter the LCD backlight adjustment menu.
- Rotate the TUNING/SEEK knob to select "on" in order to keep backlight always lightened when the radio is turned on with AC power supply;
- Or rotate the TUNING/SEEK knob to select "off" (by default) so that the backlight will be lightened for about 10 seconds whenever a button is pressed with AC power supply.
- Press the TUNING/SEEK knob to confirm your choice.
Note: The LCD backlight option "on" is only functional when the radio is powered by AC power supply. When the radio is powered by battery power supply, the LCD backlight is switched to option "off" - 10 seconds lightened when a button is pressed. When the radio is connected to mains AC power again, the last user setting will be applied again.
BLUETOOTH LED
Bluetooth LED configuration
Press the ON/OFF button to turn on the radio.
Press the MENU button, and then rotate the TUNING/SEEK knob until the display shows "System".
Press the TUNING/SEEK knob; rotate the TUNING/SEEK knob until the display shows "Bluetooth LED".
Press the TUNING/SEEK knob to enter the Bluetooth LED adjustment menu.
Rotate the TUNING/SEEK knob to select "on" in order to keep backlight always lightened when the radio is turned on with AC power supply;
Or rotate the TUNING/SEEK knob to select "off" (by default) so that the backlight will be lightened for about 10 seconds whenever a button is pressed with AC power supply.
Press the TUNING/SEEK knob to confirm your choice.
Note: The Bluetooth LED option "on" is only functional when the radio is in Bluetooth mode. If the Bluetooth LED option is set to "off", this blue LED will be turned off either mobile phone is connected (not blinking) or not connected (blinking).
NAME
This radio is supporting users to customize the radio's name. If the radio has been renamed, the new name of the radio will be shown when the radio is turning off or entering to standby.
- Press the ON/OFF button to turn on the radio.
- Press the MENU button, and then rotate the TUNING/SEEK knob until the display shows "System".
- Press the TUNING/SEEK knob; rotate the TUNING/SEEK knob until the display shows "Name". Press the TUNING/SEEK knob.
- Rotate the TUNING/SEEK knob to select the letters. The maximum length of new name is 16 letters' long.
- Press the TUNING/SEEK knob to confirm the current selection. By pressing this TUNING/SEEK knob, the cursor will be moved to next position for selection.
- Press the P3/ 4 to move the cursor to left or right cyclically.
- Repeat step 4 to step 6 to edit the new radio name.
- To complete editing the new radio name, you can either edit all the 16 letters or press the MENU button.
- When finishing editing the radio name, the LCD will display "Confirm changes" in the first line, and display "OK" to save the changes or "Cancel" to discard the changes.
- To confirm the changes, rotate the TUNING/SEEK knob until "OK", and then press the TUNING/SEEK knob to exit. After this action, the radio will save the new name
-
To cancel the changes, rotate the TUNING/SEEK knob until "Cancel", and then press the TUNING/SEEK knob to exit. After this action, the radio will discard the changes and keep the current radio name as for display.
-
When next time the radio is turning off, the LCD will show "Welcome" in the first line and the new name in the second line.
-
When the radio is turning off, the LCD will show "Goodbye" in the first line and the new name in the second line.
If there were no user operating by the panel buttons for more than 20 seconds during editing, the radio would automatically exit the rename function without saving any of the changes.
Note: The default radio name is empty. And the new edited name will be lost and back to default after executing factory reset in the menu.
Note: The radio is supporting maximum 16 letters as the new name of the radio.
WARRANTY
This radio has a 2 year limited warranty.
WARNING! Warranty becomes void once the radio cabinet has been opened or any modifications or alterations to the radio have been made!
The terms of the warranty of this radio do not cover the following:
- Damage caused by misuse, abuse, neglect, alterations, accidents or unauthorized repair.
- Normal wear and tear.
- Batteries
SPECIFICATIONS
Technical data
This device is noise-suppressed according to the applicable EU directives.
This product fulfills the European directives 2006/95/EC, 2005/32/EC and 2004/108/EC.
This device conforms to the safety regulation DIN EN 60065 (VDE 0860) and therefore the international safety regulation IEC 60065.
Never open the device casing. The manufacturer will not accept any liability for damage resulting from improper handling. The type plate is located on the bottom of the device.
Environmental note

This product has been manufactured with high quality parts and materials which can be reused and recycled.
Therefore, do not throw the product away with normal household waste at the end of its service life. Take it to a collection point for the recycling of electrical and electronic device. This is indicated by this symbol on the product, in the operating manual and on the packaging.
Please find out about collection points operated by your local authority. Help protect the environment by recycling used products.
Power supply
Mains operation: AC 230 V ~ 50/60Hz
Battery operation: 6 x AM3/AA/LR6
(Batteries of PerfectPro brand are highly recommended to be used)
Power consumption (mains supply)
Operation: < 14 W (MAX)
Standby: <1 W
Frequency coverage
FM 87.50MHz - 108.00 MHz
DAB 174.928MHz - 239.200MH
Speaker
Size 1x77mm
Impedance 8 ohms
Output Power
Nominal 1x7W
Aux in socket
03.5mm
TABLE DE MATIÈRES
TABLE DE MATIÈRES 1
INSTRUCTIONS DE SECURITE IMPORTANTES 3
COMMANDES 4
ALIMENTATION ELECTRIQUE 6
FONCTIONS PRINCIPALES 7
PREMIERE UTILISATION DE LA RADIO 7
MODE DAB 8
Suppression de stations "Prune" - DAB 10
MODE FM 11
Dimensions: 1 x 0.77mm
Resistance: 8 ohms
Puisance de sortie
Nominate: 1 x 7W
Entrée Aux-in
03.5mm
INNHOLD
INNHOLD 1
VIKTIGE SIKKERHETSINSTRUKSER 3
KONTROLLER 4
STRØMTILFØRSEL 6
Batteridrift 6
Vekselstrømsdrift 6
GENERELLE FUNKSJONER 7
FORSTEGANGSBRUK AV RADIOEN 7
DAB-RADIOMODUS 8
Bruk av radioen - DAB 8
Valg av kanal - DAB 8
Displaymodus - DAB 8
Finn nye kanaler - DAB 9
Manuelt sok - DAB 9
Dynamic Range Control (DRC)-innstlinger - DAB 9
Fjerning av kanaler - DAB 10
FM-MODUS 10
Bruk av radioen - FM finn kanaler 10
Manuelt sok - FM 11
RDS-FM 11
Folsomhetsinnstlinger for sak - FM 11
FORHANSINNSTILTE KANALER 12
Lagring av forhandsinnstilte kanaler 12
Hente frem en forhandsinnstilt kanal 12
BRUK AV BLUETOOTH 12
Paring med mobiltelefon via Bluetooth 12
Spille av musikk fra mobiltelefonen din 13
Display-modus - Bluetooth 13
Start Bluetooth-paring pa nytt 13
AUX IN-MODUS 14
STILLING AV KLOKKEN 14
INNNHOLD
STILLING AV ALARMEN 15
Dynamic Range Control (DRC)-innstillinger - DAB
DRC kan gjore del lettere a hore lave lyder nar radioen brukes i brakte omgivelser.
- Trykk pa MENY-knappen i DAB-modus, det vil sta "Full skann" i displayet.
- Vri pada TUNING/SØK-knotten til det stär "DRC-verdi" i displayet. Trykk pada TUNING/SØK-knotten.
- Vri pā TUNING/SØK-knotten for à velge den ønskede DRC-instillingen (standardinstillingen er Av).
DRC Av DRC er avslatt. Kringkastings-DRC blir ignorert.
DRC Lav DRC-niváet er satt til lavt, som sendt av kringkasteren.
DRC Hoy DRC er satt som sendt av kringkasteren.
- Trykk på TUNING/SØK-knotten for a bekrefte innstillingen. Displayet vil gå tilbake til normal radiodisplay.
Notis: Ikke alle DAB-sendinger bruker DRC-funksjorden. Hvis sendingenIkke gir DRC-informationen, vii instillingen til radioen ikke ha noen effekt.
FM 87.50MHz - 108.00 MHz
DAB 174.928MHz - 239.200MH
Hoyttaler
Slorrelse: 1 x 0 77mm
Impedans: 8 ohms
Utgangsstrom
Nominell 1x7W
Aux in-kobling
03.5mm
INHOU
INHOUD 1
BELANGRIJKE ALGEMENE VEILIGHEIDSINSTRUCTIES 3
BEDIENINGSELEMENTEN 4
STROOMBRONNEN 6
ALGEMENE FUNCTIONS 7
EERSTE GEBRUK VAN DE RADIO 7
DAB MODUS 8
Dynamic Range Control (DRC) installingen - DAB 9
Zenders snoeien "Prune" - DAB 10
FM MODUS 10
FM 87.50MHz - 108.00 MHz
DAB 174.928MHz - 239.200MH
Speaker
Grootte 1x077mm
Weersland 8 ohms
Uitgangsvermogen
Nominal 1x7W
Aux in ingang
03.5mm
INHALTVERZEICHNIS
INHALTVERZEICHNIS 1
Sender loschen "Prune" - DAB
FM 87.50MHz - 108.00 MHz
DAB 174.928MHz - 239.200MH
Laatsprecher
GroBe 1x077mm
Impedanz 8 Ohm
Ausgangsleistung
Nominal 1x7W
Aux-eingang
03.5mm
Perfectpro B.V.
Everdenberg 9A
4902TT Oosterhout
The Netherlands
www.perfectpro.eu