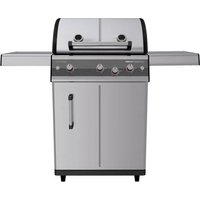
Hamilton 3+G - Oven Outdoorchef - Free user manual and instructions
Find the device manual for free Hamilton 3+G Outdoorchef in PDF.

Frequently Asked Questions - Hamilton 3+G Outdoorchef
User questions about Hamilton 3+G Outdoorchef
0 question about this device. Answer the ones you know or ask your own.
Ask a new question about this device
Download the instructions for your Oven in PDF format for free! Find your manual Hamilton 3+G - Outdoorchef and take your electronic device back in hand. On this page are published all the documents necessary for the use of your device. Hamilton 3+G by Outdoorchef.
USER MANUAL Hamilton 3+G Outdoorchef
text_image
EUROPEAN OUTDOORCHEF
text_image
GASAUSTRALIAN BARBECUE MANUAL
CAIRNS 3 G | HAMITON 3+ G | CANBERRA 4 G | PERTH 4+ G | AUCKLAND 4+ G
4
Lesen Sie diese Anleitung sorgfältig durch, bevor Sie Ihren OUTDOORCHEF Gasgrill in Betrieb nehmen.
Please read these instructions carefully before using your OUTDOORCHEF Gas Barbecue.
Avant la première mise en service de votre barbecue à gaz OUTDOORCHEF, lisez les informations suivantes attentivement.
31
Lees deze handleiding zorgvuldig door voordat u uw OUTDOORCHEF gasbarbecue in gebruik neemt.
Leggere attentamente le presenti istruzioni in tutte le loro parti prima di mettere in funzione il grill a gas OUTDOORCHEF.
Lea con atención estas instrucciones antes de encender su barbacoa de gas OUTDOORCHEF.
Leia com atenção estas instruções antes de utilizar o barbecue a gás OUTDOORCHEF.
67
Læs denne vejledning omhyggeligt igennem, før du tager din OUTDOORCHEF gasgrill i brug.
76
Lue tämä käyttöohje huolellisesti läpi ennen OUTDOORCHEF-kaasugrillin käyttöönottoa.

BEDIENUNGSANLEITUNG

USER GUIDE 11

MODE D'EMPLOI 22

GEBRUIKSAANWIJZING

ISTRUZIONI PER L'USO 40

GUÍA DEL USUARIO 49

MANUAL DO UTILIZADOR 58

BRUGSANVISNING

KÄYTTÖOHJE

BRUKSANVISNING
85
Les denne bruksanvisningen grundig før du tar i bruk gassgrillen OUTDOORCHEF.

BRUKSANVISNING
94
natural_image
Diagram of a mechanical device with arrows indicating motion or force direction (no text or symbols present)
natural_image
Diagram of a mechanical or electrical component with labeled parts and directional arrows indicating movement (no text or symbols present)
natural_image
Technical line drawing of a mechanical assembly with no visible text or symbolsnatural_image
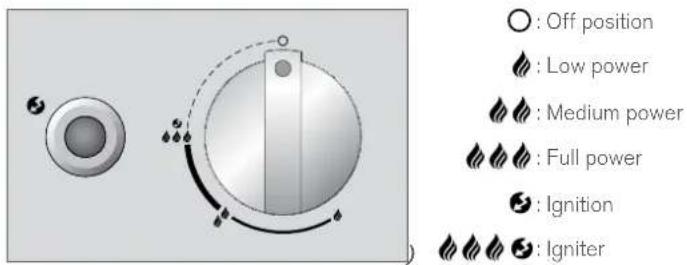
Diagram of a rotary knob with a dial and pointer, showing motion paths (no text or labels): Aus Position
: niedrige Leistung
: mittlere Leistung
: hohe Leistung
: Zündung
: Zünder
VOR DEM ERSTGEBRAUCH
natural_image
Diagram showing three upward-pointing arrows above three circular icons below (no text or symbols)DKB Household Switzerland AG
Eggbühlstrasse 28
Postfach
8052 Zürich – Switzerland
www.dkbrands.com
| I3B/P (30 mbsr) | DK, FI, NL, NO, SE, LU |
| I3B/P (50 mbsr) | CH, AT, DE |
| I3+(28/30/37 mbsr) | BE, CH, ES, FR, GB, IT, PT |
ELEKTRISCHE ZÜNDUNG
Please read these instructions carefully before using your OUTDOORCHEF gas barbecue.
text_image
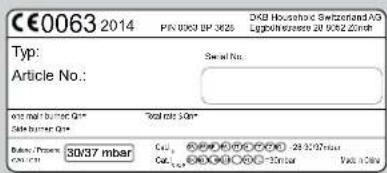
CE0063 2014 PIN 0083 BY-3625 2GB Household Switzerland AG Logistics on: 91.962 Czech Typ: Article No.: Serial No.: Excl. mail/burner Qtr Total net $mn 2014-burner Qtr Balance Sheet 30/37 mbar Cml. Cml. Cml. Cml. Cml. Cml. Cml. Cml. Cml. Cml. Cml. Cml. Cml. Cml. Cml. Cml. Cml. Cml. Cml. Cml. Cml. Cml. Cml. Cml. Cml. Cml. Cml. Cml. Cml. Cml. Cml. Cml. Cml. Cml. DCA DCA DCA DCA DCA DCA DCA DCA DCA DCA DCA DCA DCA DCA DCA DCA DCA DCA DCA DCA DCA DCA DCA DCA DCA DCA DCA DCA DCA DCA DCA DCA DCA DCA BDA BDA BDA BDA BDA BDA BDA BDA BDA BDA BDA BDA BDA BDA BDA BDA BDA BDA BDA BDA BDA BDA BDA BDA BDA BDA BDA BDA BDA BDA BDA BDA BDA BDAIMPORTANT:
First of all, make a note of the serial number of your gas barbecue on the back of this user guide. Depending on the barbecue model, you will find the number on the data sticker that is either on the barbecue frame or the base plate.

text_image
EUROPEAN OUTDOORCHEF LOGIN CARDThe article number and name of your gas barbecue are printed on the welcome card included in the document folder.
The serial number and article number are important to allow straightforward handling of inquiries, spare part orders and any warranty claims. Keep the user guide in a safe place. It contains important information about safety, operation and maintenance.
Read this user guide before starting to use the device. Keep the user guide in a safe place. It contains important information about safety, operation and maintenance.
IMPORTANT FOR YOUR SAFETY
Anyone who operates the barbecue must know and follow the ignition process precisely. Children are not allowed to use the barbecue.
Follow the assembly instructions in the set-up instructions precisely. Incorrect assembly can have dangerous consequences.
Do not position any flammable liquids, materials or spare gas bottles in the vicinity of the barbecue. Never set up the barbecue or the gas bottle(s) in enclosed rooms without ventilation.
Please read these instructions carefully before using your gas barbecue. The barbecue is only allowed to be used outdoors, and it is necessary to maintain a safety clearance of at least 1.5 m from flammable objects.
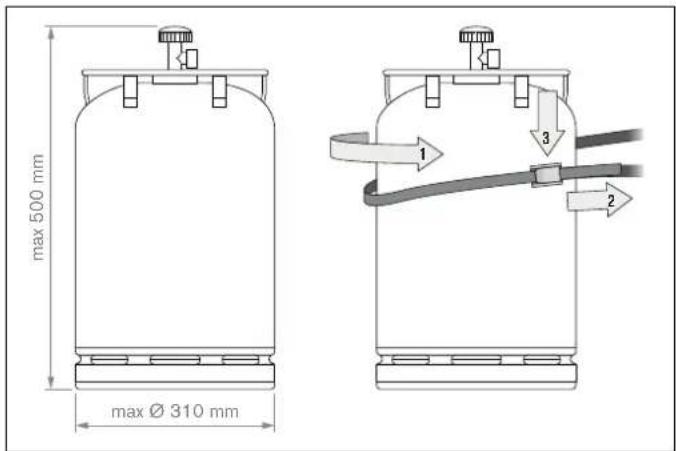
GAS BOTTLES
Only gas bottles with a maximum net weight of 7.5 kg are allowed to be placed on the base plate. Position the bottle in the place provided, see set-up instructions. Please make sure there are no leaking screw connections.
CHECK FOR LEAKS before use and after each gas bottle change.
Gas bottles are not allowed to be exposed to a temperature of more than 50^ C, and must never be stored in an enclosed room or basement. Comply with and follow the safety regulations that are indicated on the gas bottles used.
text_image
max 500 mm max Ø 310 mm 1 2 3SAFETY NOTES
This user guide must be kept by the owner and be close at hand at all times.
Take the barbecue into operation in accordance with the INSTRUCTIONS FOR LIGHTING chapter.
- Only use outdoors.
- Never use the barbecue under a canopy.
- Never leave the barbecue unsupervised while it is in use.
- CAUTION: Accessible parts can get very hot. Keep children away.
- Do not move the device while it is in use.
- Devices equipped with castors are not allowed to be pushed across uneven floors or steps.
- Make sure that the drip drawer is always fully closed and engaged during operation.
- The device must be kept away from flammable materials during operation. Keep a distance of 1.5 m.
- Wear protective gloves when you touch hot parts.
- After grilling, always turn the gas regulating knob to the ○ position and close the gas supply at the gas bottle.
- When changing the gas bottle, make sure that the gas regulating knob is in the O position and the gas supply is closed at the gas bottle. IMPORTANT: No sources of ignition are permitted to be in the vicinity.
- After connecting a new gas bottle, check the connection parts in accordance with the instructions in CHECKING FOR LEAKS.
- If you suspect that parts are leaking, turn the gas regulating knob to the ○ position and close the gas supply at the gas bottle. Have the parts that carry gas checked at a specialist gas equipment retailer.
- Renew the gas hose immediately if it is damaged or displays signs of wear. The hose must be free from kinks and must not have any cracks. Do not forget to switch off the gas regulating knob and the gas supply before you remove the hose.
- Renew the hose and the gas pressure regulator after it has been in use for 3 years from the date of purchase. Make sure that the gas pressure regulator and the hose are in accordance with the corresponding EN standards.
- The recommended length of the gas hose is 90 cm, and it must not be longer than 150 cm.
- Never block the air intake slots in the housing or the air slots in the lid. The ventilation openings in the gas bottle compartment must never be closed or covered.
- Do not make any modifications to the device. In particular, never modify the gas tap, the safety pilot, the burner or other parts of the barbecue. Contact a specialist if you suspect there is a malfunction.
- The barbecue is supplied with the appropriate gas hose and gas pressure regulator. It is essential to keep the gas hose away from the hot outside surfaces of the barbecue. The hose is not allowed to be twisted. On barbecue models that have a hose guide, it is essential for the hose to be secured in this guide.
- The hose and regulator are in accordance with the particular national regulations and EN standards.
- Contact a specialist gas equipment retailer if full power is not achieved and you suspect there may be a blockage in the gas supply.
- Only use the barbecue on firm, secure ground. Never place the barbecue on wooden floors or other flammable surfaces while it is in use. Keep the barbecue away from flammable materials.
- In devices with granite work surfaces, avoid exposing the surface to a temperature shock.
- Do not store the barbecue in the vicinity of highly inflammable liquids or materials.
- If you store the barbecue indoors over winter, it is essential for the gas bottle to be removed. It should always be stored in a well ventilated location which is inaccessible to children.
Before using the barbecue, make sure you select a location that affords the greatest possible protection against the wind. - When the barbecue is not in use, and once it has cooled down fully, protect it against the effects of the weather using a cover. Covers can be purchased from your barbecue retailer.
- Remove the cover after heavy rain in order to avoid condensation build-up.
CHECKING FOR LEAKS
WARNING: No sources of ignition are permitted to be in the vicinity during the leak test. This also includes smoking. Never check for leaks with a burning match or a naked flame, and always do this task outdoors.
- The gas regulating knob must be in the ○ position.
- Open the gas supply at the bottle and brush a soap solution comprising 50 % liquid soap and 50 % water onto all parts that carry gas (connection at the gas bottle / gas pressure regulator / gas hose / gas inlet / connection on the valve). You can also use a leak spray.
- Bubbles forming in the soap solution indicate there are leaks. IMPORTANT: Do not use the barbecue before all leaks have been eliminated. Close the gas supply at the gas bottle.
- Eliminate the leaks by retightening the connections if possible, or else renew the defective parts.
- Repeat steps 1 and 2.
- Contact your specialist gas equipment retailer if the leaks cannot be eliminated.
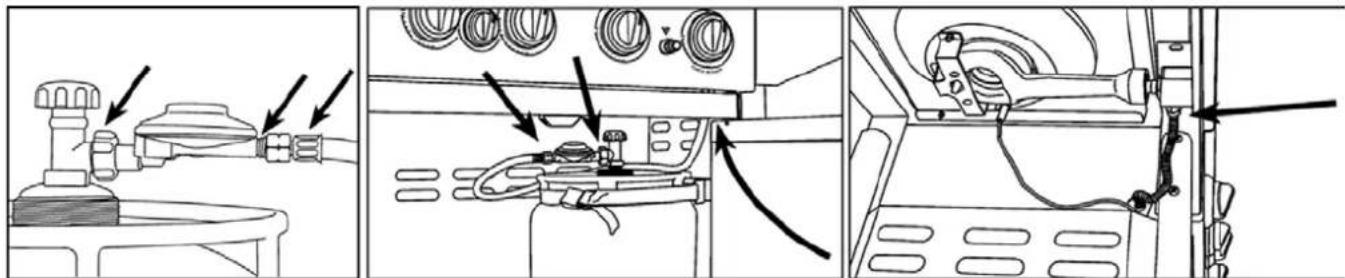
text_image
Technical diagram showing three-step assembly of a mechanical device with labeled components and directional arrows indicating assembly steps.NOTE: Carry out the CHECK FOR LEAKS each time after the gas bottle is connected or changed, and also at the start of the barbecue season.
Heat settings and lighting
text_image
Off position Low power Medium power Full power Ignition IgniterBEFORE FIRST USE
- Clean all parts that come into contact with foodstuffs.
- Check all parts that carry gas, as described in the CHECKING FOR LEAKS chapter. Also do this if your gas barbecue was delivered already assembled by the retailer.
- Let the barbecue burn for about 20–25 minutes at the 🔊 🔊 🔊 setting.
- Make sure that the drip collector tray has been pushed in fully. This also applies to normal use of the barbecue.
INSTRUCTIONS FOR LIGHTING
NOTE: It is not always necessary to use all burners. This depends on the type of cooking and the amount of food.
IGNITING THE MAIN BURNERS
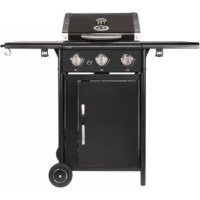
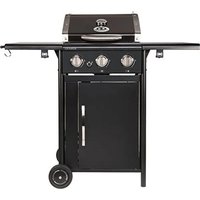
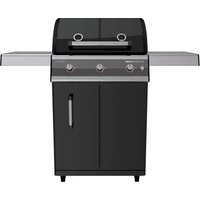
(CAIRNS 3 G / HAMILTON 3+ G / CANBERRA 4 G / PERTH 4+ G / AUCKLAND 4+ G)
- Make sure that all connections between the gas hose, the gas pressure regulator and the gas bottle are firmly tightened. (Follow the instruction in the CHECKING FOR LEAKS chapter.)
- Open the barbecue lid. CAUTION: Never light the barbecue when the lid is closed.
- Open the gas supply at the gas bottle.
- Press the gas regulating knob and turn it anticlockwise to the 🔍 🔍 🔍 setting. Press the black ignition button and hold it until the spark catches and the gas is burning.
- If the gas does not light within 3 seconds, set the gas regulating knob to ☐ Wait 2 minutes to allow the uncombusted gas to dissipate. Then repeat points 2 to 4.
- If it is not possible to light the barbecue after 3 attempts, check the causes (as described in the TROUBLESHOOTING section).
- The burners must be taken into operation from left to right
- Make sure that all connections between the gas hose, the gas pressure regulator and the gas bottle are firmly tightened. (Follow the instruction in the CHECKING FOR LEAKS chapter.)
- Remove the granite cover from the side burner in the AUCKLAND 4+ G and place it in the holder provided under the right-hand side shelf, or open the cover plate at the side burner in the HAMILTON 3+ G or PERTH 4+ G.
- CAUTION: Never light the barbecue when the granite cover or the cover plate is closed.
- Open the gas supply at the gas bottle.
- Press the gas regulating knob marked SIDE BURNER and turn it anticlockwise to the 🔊 🔊 🔊 setting. Press the ignition button and hold it until the spark catches and the gas is burning.
- If the gas does not light within 3 seconds, set the gas regulating knob to ☐ Wait 2 minutes to allow the uncombusted gas to dissipate. Then repeat points 2 to 4.
- If it is not possible to light the side burner after 3 attempts, search for the causes (as described in the TROUBLESHOOTING section).
- Do not cover the side burner with the granite cover until it has completely cooled down (only AUCKLAND 4+ G model), and do not close the cover plate until it has completely cooled down (only HAMILTON 3+ G or PERTH 4+ G models).
IGNITING THE INFRARED BURNER (POWER BURNER OF THE AUCKLAND 4+ G)
CAUTION: Do not use the infrared burner when the lid is closed.
- Make sure that all connections between the gas hose, the gas pressure regulator and the gas bottle are firmly tightened. (Follow the instruction in the CHECKING FOR LEAKS chapter.)
- Open the barbecue lid. CAUTION: Never ignite the barbecue with the lid closed, and never place the griddle over the infrared burner. The results could be discolouration of the lid and deformation of the griddle.
- Open the gas supply at the gas bottle.
- Press the gas regulating knob marked POWER BURNER and turn it anticlockwise to the 🔊 🔊 🔊 setting. Press the ignition button and hold it until the spark catches and the gas is burning.
- If the gas does not light within 3 seconds, set the gas regulating knob to ☐. Wait 2 minutes to allow the uncombusted gas to dissipate. Then repeat points 2 to 4.
- If it is not possible to light the infrared burner after 3 attempts, search for the causes (as described in the TROUBLESHOOTING section).
THE AUSTRALIAN BARBECUE SYSTEM FROM OUTDOORCHEF
Australia is famous for its magnificent barbecues. The AUSTRALIAN LINE from OUTDOORCHEF is equally magnificent. It offers high-quality and reliable products.
A large working area is provided on a robust, easily manoeuvrable chassis. The indestructible cast-iron burners store the heat and distribute it evenly within the grilling chamber. Thanks to an integrated thermometer, it is possible to check the temperature at any time, while flame hoods specially developed for this barbecue system protect the food to be grilled against flare-ups.
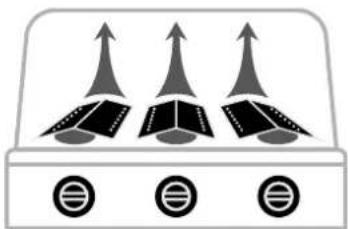
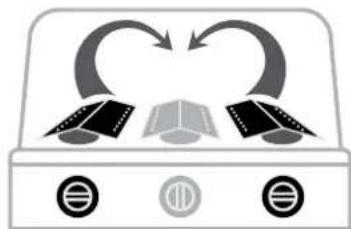
DIRECT HEAT INDIRECT HEAT
natural_image
Three identical abstract geometric shapes with upward arrows above circular symbols below (no text or labels)For direct grilling and cooking: Place the food to be grilled over the switched-on burners.
flowchart
graph TD
    A["Device 1"] --> B{Decision}
    B --> C["Device 2"]
    C --> D["Output 1"]
    style A fill:#f9f,stroke:#333
    style B fill:#ccf,stroke:#333
    style C fill:#cfc,stroke:#333
    style D fill:#fcc,stroke:#333
For indirect grilling, cooking and baking: Place the food to be grilled in the middle, close the lid and only ignite the two outer burners.
INSTRUCTIONS FOR USING THE AUSTRALIAN BARBECUE WITH GAS
It couldn't be simpler:
- Preheat the barbecue with its lid closed for about 10-15 minutes at the 🔊 🔊 🔊 setting.
- Place the food to be grilled on the grilling rack or the griddle and adjust the temperature as required
- RECOMMENDATION: Only use one burner if there is only a small amount of food to be grilled. Grilling with the lid closed reduces the grilling time and gas consumption.
- After grilling, always set the gas regulating knob to the ○ position. Then close the gas supply at the gas bottle. The bottle tap must be closed even on empty bottles.

GRILLING WITH THE INFRARED BURNER
- Preheat the barbecue with its LID OPEN for about 5 minutes at the
- Place the food to be grilled on the grilling rack. The infrared burner is suitable for flash-grilling.
- CAUTION: Do not use the infrared burner with the lid closed, and do not place the griddle over the infrared burner. The results could be discolouration of the lid and deformation of the griddle.
- After grilling, always set the gas regulating knob to the ○ position. Then close the gas supply at the gas bottle. The bottle tap must be closed even on empty bottles.

The right accessories make your OUTDOORCHEF even more enjoyable. Give free rein to your creativity and flair for experimentation.
You can find all the accessory products for your barbecue at OUTDOORCHEF.COM
AFTER GRILLING
- Set the gas regulating knob of each burner to
- Close the gas supply at the gas bottle.
- Allow the barbecue to cool down fully and clean it.
- Protect the barbecue with the corresponding cover.
CLEANING
Only very minor cleaning is required between uses of the barbecue, because most of the grease either evaporates or is gathered in the collecting tray. For cleaning the grilling rack and the griddle, use a barbecue brush with brass bristles (not steel bristles).
For the remaining parts, and for more thorough cleaning, use the OUTDOORCHEF BARBECUE-CLEANER. Alternatively, you can use a nylon kitchen sponge and soapy water in order to remove all loose residues.
Remove the grilling rack and the griddle, and clean the cast-iron burners.
There is no need to clean the infrared burner, because the grease vaporises immediately during grilling.
At the end, you can pull out the collecting tray, empty it and clean it with the OUTDOORCHEF BARBECUE-CLEANER.
IMPORTANT: If you use cleaning agent for cleaning, you must allow the barbecue to dry out correctly after cleaning. To accelerate the drying procedure, you can switch on the barbecue and let it operate for a few minutes at stage (insert graphic 3 flames) with the lid open
USING THE OUTDOORCHEF BARBECUE-CLEANER
IMPORTANT: The barbecue is not allowed to be operating while the OUTDOORCHEF BARBECUE-CLEANER is being used. Wear gloves to protect your hands and, if possible, glasses to shield your eyes. Thoroughly spray the barbecue or accessories while they are still slightly warm, and allow the product to work for 15–30 minutes. Spray dirty surfaces again, thoroughly rise with water and allow to dry.
MAINTENANCE
Regular maintenance of your barbecue will ensure it functions correctly. At least twice a year, check all parts that carry gas; also check them after long periods of storage. Spiders and other insects can cause blockages that must be cleared before use.
If the barbecue is regularly pushed across uneven ground, check from time to time whether all screws are still tight.
If you have not used the barbecue for a long period, you should carry out a CHECK FOR LEAKS before using it again. If you have any doubts, please contact your gas supplier or the retailer.
To prevent damage due to corrosion, oil all metal parts before lengthy storage.
Following lengthy storage, and at least once a year during the barbecue season, you should check the gas hose for cracks, kinks and other damage. A damaged gas hose must be renewed immediately, as described in the SAFETY NOTES chapter.
To allow you to enjoy using your barbecue for as long as possible, protect it from the effects of the weather using a suitable OUTDOORCHEF cover once it has cooled down completely.
Remove the cover after rain in order to prevent condensation build-up. Covers can be purchased from your barbecue retailer.
TROUBLESHOOTING
The burner does not light:
- Check if the gas supply is open at the gas bottle.
- Make sure there is enough gas in the bottle.
- Check if sparks are passing between the electrode and the burner.
No spark:
- Make sure that the battery has been inserted correctly (in barbecues with electric ignition).
- The distance between the burner and electrode is only allowed to be 5–8 mm.
- Check whether the cables of the electric ignition and the electrode are plugged in and firmly connected.
- Insert a new battery (type AA, LR02, 1.5 volts) in the electric ignition (in barbecues with electric ignition).
Please contact the retailer if you cannot get the barbecue to operate with reference to the measures above.
TERMS AND CONDITIONS OF WARRANTY
1. Warranty
In purchasing this OUTDOORCHEF product from an authorised retailer, you have obtained not only the product warranty but also a manufacturer's warranty from DKB Household Switzerland AG ("DKB") according to the present conditions, for a period of up to 3 years.
The warranty exclusively covers the rectification of defects that are demonstrably attributable to faults in material and/or manufacture, subject to the designated use.
2. Procedure
Check the product for defects and function immediately after receiving it. If, contrary to expectations, the purchased product has a defect then please comply with the following procedure (bring-in warranty):
- Within 30 days of the defect being discovered, contact your retailer*, providing information about the product / product part, purchase receipt, serial number and article number**.
- Describe the situation with reference to the product / product part you are complaining about, or a photo
- The free warranty shall come into force once the defect has been checked by the retailer or DKB (transport and shipping costs will only be paid to the first private buyer)
3. Scope of warranty
DKB's manufacturer's warranty starts from the date of purchase, and applies to the first private buyer. The warranty can only be claimed subject to presentation of the original receipt.
The warranty may be fulfilled at DKB's discretion by repair, exchange of defective parts, renewal of the product or price reduction, if the functions of the product are unaffected. There is no right of withdrawal from the purchase contract due to warranty cases. There is no right to receive a replacement product during the repair.
Undertaking warranty services does not mean that the warranty period is extended or restarted. Exchanged parts become the property of DKB.
The warranty period does start again if the product is renewed.
The warranty periods are:
• 3 years on the enamelled kettle (bottom part and lid) against corrosion perforation
• 3 years on the enamelled grilling rack against corrosion perforation or burn-through
- 3 years on all stainless steel parts against corrosion perforation or burn-through
- 2 years on all remaining manufacturing/material defects
- The warranty for damage to the enamelling only applies if reported within 30 days starting from the date of purchase. It only applies to new devices that have not been used before.
4. Exclusion
There is no defect, i.e. no material or manufacturing fault within the meaning of these provisions, or no valid warranty claim, under the following circumstances:
• Usual wear and tear during designated use.
- Defects and/or damage due to wrong, incorrect use or use not in accordance with the designated use, as well as due to incorrect installation, assembly and attempted repairs by unauthorised persons.
- Defects and/or damage due to failure to comply with the user guide or the operating/maintenance instructions (such as damage due to faulty assembly or incorrect cleaning of the enamelled surface of the funnel or grilling rack, failure to carry out the leak test, etc.).
- Unevenness, colour differentiations in the enamelling as well as minor defects (such as points of contact on the bottom edge of the lid or at suspension points which are a feature of the production process).
- Discolourations and damage to the product (e.g. the painted surface) due to the effects of weather (incl. hailstones), incorrect storage of the product (without weather protection) or incorrect use of chemicals.
- Formation of rust and a rust film due to the effects of weather or incorrect use of chemicals.
- Faults which do not noticeably impair the designated use or function of the product.
- In general for wearing parts such as the grilling rack, funnel, burner, thermometer, ignition and battery, electrode, ignition cables, gas hose, gas pressure regulator, heating element, reflector, aluminium protection foil or charcoal grate
- Defects and/or damage due to modifications, use for a non-designated purpose or deliberate damage.
- Defects and/or damage due to incorrect maintenance and repair work.
• Defects and/or damage due to failure to carry out routine maintenance.
- Defects and/or damage which was caused during the original transport.
- Defects and/or damage due to force majeure.
- Defects and/or damage due to wear and tear in professional use (hotels, restaurants, events, etc.).
* A dealer directory can be found on our website at OUTDOORCHEF.COM
** The serial number and article number can be found on the data slicker on your barbecue (see THE GAS KETTLE BARBECUE for information)
DKB excludes any customer claims other than those expressly named in these warranty conditions, unless a mandatory legal obligation or liability applies. In particular, this applies with regard to claims for compensation in damages due to failure of fulfilment, refunding of losses incurred as the consequence of a defect, loss of profits and transport damage that is not notified to the retailer within 30 days of receipt of the product.
OUTDOORCHEF products are subject to continuous further development. As a result, modifications to products may be introduced without prior notice.
The registered brand OUTDOORCHEF is represented by the following enterprise:
DKB Household Switzerland AG
Eggbühlstrasse 28
Postfach
8052 Zürich – Switzerland
www.dkbrands.com
TECHNICAL INFORMATION
CAIRNS 3 G / HAMILTON 3+ G
| CE | 0063 |
Gas Propane/butane 30/31
Power 7.50 kW
Gas consumption 546 g/h
Nozzle (28–30/37 mbar) 0.78 mm / Marking: BD
Nozzle (50 mbar) 0.85 mm / Marking: AD
Gas pressure Butane 28 mbar Propane 37 mbar
Recommended gas bottles Butane max. 13 kg Propane max. 10.5 kg
Maximum permitted gas bottles Butane max. 7.5 kg on the barbecue frame Propane max. 7.5 kg
CANBERRA 4 G / PERTH 4+ G
| CE | 0063 |
Gas Propane/butane 30/31
Power 12.80 kW
Gas consumption 932 g/h
Nozzle (28–30/37 mbar) 0.86 mm / Marking: BE
Nozzle (50 mbar) 0.74 mm / Marking: AE
Gas pressure Butane 28 mbar Propane 37 mbar
Recommended gas bottles Butane max. 13 kg Propane max. 10.5 kg
Maximum permitted gas bottles Butane max. 7.5 kg on the barbecue frame Propane max. 7.5 kg
AUCKLAND 4+ G
| CE | 0063 |
Gas Propane/butane 30/31
Power 9.60 kW
Gas consumption 699 g/h
Nozzle (28-30/37 mbar) 0.86 mm / Marking: BE
Nozzle (50 mbar) 0.74 mm / Marking: AE
Gas pressure Butane 28 mbar Propane 37 mbar
Recommended gas bottles Butane max. 13 kg Propane max. 10.5 kg
Maximum permitted gas bottles Butane max. 7.5 kg on the barbecue frame Propane max. 7.5 kg
SIDEBRÆNDER (HAMILTON 3+ G / PERTH 4+ G / AUCKLAND 4+ G)
| CE | 0063 |
Gas Propane/butane 30/31
Power 3.80 kW
Gas consumption 276 g/h
Nozzle (28–30/37 mbar) 0.98 mm / Marking: BK
Nozzle (50 mbar) 0.85 mm / Marking: AG
Gas pressure Butane 28 mbar Propane 37 mbar
INFRARED BURNER (AUCKLAND 4+G)
| CE | 0063 |
Gas Propane/butane 30/31
Power 6.20 kW
Gas consumption 451 g/h
Nozzle (28-30/37 mbar) 1.16 mm / Marking: BP
Nozzle (50 mbar) 1.00 mm / Marking: AP
Gas pressure Butane 28 mbar Propane 37 mbar
CATEGORIES
| I3B/P(30 mba) | DK, FI, NL, NO, SE, LU |
13B/P_(50 mbar) CH, AT, DE
13 + (26/30/37 mbs) BE, CH, ES, FR, GB, IT, PT
Electric ignition
A battery (type AAA, LR02, 1.5 volts) is required for operating the electric ignition.
Note on the temperature display
The thermometer display is subject to a +/-10 % fluctuation.
Web page
More information, tips and tricks, recipes and all kinds of useful information about OUTDOORCHEF products can be found at OUTDOORCHEF.COM
User guide gas kettle barbecue
2014_Art.no.19.120.10
text_image
Technical diagram showing three-step assembly of a mechanical device with labeled components and directional arrows indicating assembly steps.natural_image
Diagram of a mechanical component with circular and radial features, no visible text or symbols: position OFF
: puissance basse
: puissance moyenne
: puissance haute
: allumage
: allumeur
AVANT LA PREMIÈRE UTILISATION
natural_image
Diagram showing three upward-pointing arrows above three circular icons below (no text or symbols)DKB Household Switzerland AG
Eggbühlstrasse 28
Postfach
| I3B/P(30 mbsr) | DK, FI, NL, NO, SE, LU |
I3B/P _(50 mbar) CH, AT, DE
13 + (28/30/37 mbsr) BE, CH, ES, FR, GB, IT, PT
Allumage électrique
text_image
Technical diagram showing three-step assembly of a vehicle's air vent system with labeled components and directional arrows indicating connection or movement.natural_image
Diagram of a mechanical component with circular and radial features, no text or symbols present: Uit poste
:laag vermogen
: matig vermogen
: vol vermogen
: Ontsteking
: Ontsteker
natural_image
Diagram showing three upward-pointing arrows above three circular symbols below (no text or labels)natural_image
Diagram of a device with three circular icons and curved arrows indicating rotation or interaction (no text or symbols)DKB Household Switzerland AG
Eggbühlstrasse 28
Postfach
I3B/P (30 mbar) DK, FI, NL, NO, SE, LU
I3B/P (50 mbar) CH, AT, DE
13+ (28/30/37 mbar) BE, CH, ES, FR, GB, IT, PT
ELEKTRISCHE ONTSTEKING
text_image
CE0063 2014 PIN 0063 BY-3625 24GB Household Switzerland AG Logistics Service 28.9/2.2 CAGR Typ: Article No.: Serial No.: Last mail: Buried Qtr Total mail: 2014 Balance: 30/37 mbar Curl: 📄ØØØØØØØ 28.9/2.2 mbar Curl: 📄ØØØØØØ 28.9/2.2 mbar Val: €/mbarIMPORTANTE:
text_image
Technical diagram showing three-step assembly of a mechanical device with labeled components and directional arrows indicating assembly steps.natural_image
Diagram of a mechanical component with circular and radial features, no text or symbols present: Posizione Off
: bassa potenza
: media potenza
: massima potenza
: accensione
: Accenditore
PRIMA DEL PRIMO UTILIZZO
natural_image
Three identical rocket launchers with upward arrows above three ground stations, each marked with a small circle below (no text or symbols on the rockets)DKB Household Switzerland AG
Eggbühlstrasse 28
Postfach
I3 + (28/30/37 mbsr) BE, CH, ES, FR, GB, IT, PT
ACCENSIONE ELETTRICA
text_image
Technical diagram showing three-step assembly of a mechanical device with labeled components and directional arrows indicating assembly steps.natural_image
Diagram of a rotary knob with a dial and pointer, showing motion paths (no text or labels): Posición apagada
: potencia baja
: potencia media
: potencia máxima
: Encendido
: Encendedor
natural_image
Three identical rocket launchers with upward arrows above three circular icons below (no text or symbols)DKB Household Switzerland AG
Eggbühlstrasse 28
Postfach
8052 Zúrich – Suiza
www.dkbrands.com
text_image
CE0063 2014 PIN 0063 BP 3625 DKB Houseboro Switzerland AB Logitkreisser 2014/2014 Typ: Article No.: Serial No.: Total number of Date number of Basis: Present 30/37 mbar Cui: 🕒️ 🕒️ 🕒️ 🕒️ 🕒️ 🕒️ 🕒️ 🕒️ 🕒️ 🕒️ 🕒️ 🕒️ 🕒️ 🕒️ 🕒️ 🕒️ 🕒️ 🕒️ 🕒️ 🕒️ 🕒️ 🕒️ 🕒️ 🕒️ 🕒️ 🕒íIMPORTANTE:
natural_image
Diagram of a mechanical device with arrows indicating assembly or connection points (no text or symbols present)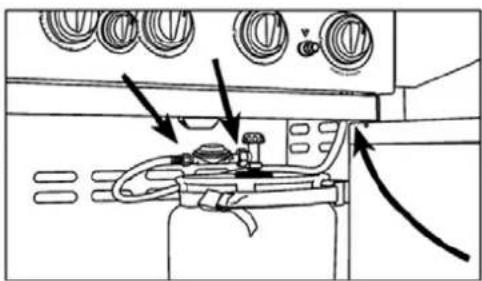
natural_image
Diagram of a mechanical or electrical component with no visible text, numbers, or symbols
natural_image
Technical line drawing of a mechanical assembly with no visible text or symbolsnatural_image
Diagram of a rotary knob with a dial and pointer, showing mechanical components without any text or labels: Posição OFF
: potência baixa
: potência média
: potência máxima
: ignição
ignição
natural_image
Three identical rocket launchers with upward arrows above three ground stations, each marked with a small circle below (no text or symbols on the rockets)DKB Household Switzerland AG
Eggbühlstrasse 28
Postfach
8052 Zürich – Switzerland
www.dkbrands.com
ESPECIFICAÇÕES TÉCNICAS
CAIRNS 3 G / HAMILTON 3+ G
CE 0063
Gás Propano/Butano 30/31
Potência 7.50 kW
Consumo de gás 546 g/h
I3+ (28/30/37 mbar) BE, CH, ES, FR, GB, IT,
PT
IGNIÇÃO ELÉTRICA
2014_N.° ref. 19.120.10
text_image
CE0063 2014 PIN 0003 BY-3625 24GB Household Switzerland AG Logistics Service 28.9/2.2 Month Typ: Article No.: Serial No.: Total rate: 20.0% Date: June 2014 30/37 mbar Cul. ©PDC©COC© 28.9/2014 Cul. ©PDC©COC© 28.9/2014 Val. € 2014VIGTIGT:
natural_image
Diagram of a mechanical device with arrows indicating motion or force direction (no text or symbols present)
natural_image
Technical diagram of a device's front panel with cables and control buttons (no text or labels)
natural_image
Technical line drawing of a mechanical assembly with no visible text or symbolsnatural_image
Diagram of a mechanical component with circular and radial features, no text or symbols present: Off position
: lav styrke
: middel styrke
: fuld styrke
: Tænding
: Tænder
INDEN F∅RSTE BRUG
natural_image
Three identical abstract geometric shapes with upward arrows above three circular icons below (no text or symbols)DKB Household Switzerland AG
Eggbühlstrasse 28
Postboks
13 + (26/30/37 mbs) BE, CH, ES, FR, GB, IT, PT
Elektrisk tænding
text_image
Technical diagram showing three stages of a mechanical or electrical device with labeled components and directional arrows indicating movement.natural_image
Diagram of a mechanical component with circular and radial features, no text or symbols present: Asennosta
: alhainen teho
: keskiteho
: korkein teho
: sytytys
: Sytytin
ENNEN ENSIMMÄISTÄ KÄYTTÖÄ
natural_image
Three identical rocket launchers with upward arrows above three circular base icons (no text or symbols)natural_image
Diagram of a device with three circular buttons and two curved arrows forming a heart shape (no text or symbols)DKB Household Switzerland AG
Eggbühlstrasse 28
Postfach
8052 Zürich – Switzerland
www.dkbrands.com
CAIRNS 3 G / HAMILTON 3+ G
| CE | 0063 |
Kaasu Propaani/butaani 30/31
Teho 7.50 kW
Kaasunkulutus 546 g/h
I3 _+ (28/30/37 mbs) BE, CH, ES, FR, GB, IT, PT
SÄHKÖSYTYTYS
text_image
Technical diagram showing three-step assembly of a mechanical device with labeled components and directional arrows indicating assembly steps.natural_image
Diagram of a mechanical knob with a circular dial and a rotating knob, showing motion paths (no text or labels):AV
: Lav effekt
: Middels effekt
: Full effekt
: Tenning
: Tenner
F∅R F∅RSTEGANGSBRUK
natural_image
Diagram showing three upward-pointing arrows above three circular icons below (no text or symbols)For direkte grilling og koking: Slå på brennerne og legg over grillmaten.
flowchart
graph TD
    A["Input Device 1"] --> B{Heart Shape}
    B --> C["Output Device 2"]
    C --> D["Feedback Loop"]
    D --> A
DKB Household Switzerland AG
Eggbühlstrasse 28
Postboks
8052 Zürich – Sveits
www.dkbrands.com
TEKNISK INFORMASJON
CAIRNS 3 G / HAMILTON 3+ G
CE 0063
Gass Propan/Butan 30/31
Effekt 7.50 kW
Gassforbruk 546 g/h
Dyse (28–30/37 mbar) 0.78 mm / merke: BD
Dyse (50 mbar) 0.85 mm / merke: AD
13 + (28/30/37 mbs) BE, CH, ES, FR, GB, IT, PT
ELEKTRISK TENNING
Den elektriske tenningen drives med et 1.5-volts AA-batteri (LR02).
MERKNAD OM TEMPERATURVISNINGEN
Den viste termometertemperaturen har et slingringsmonn på +/- 10 %.
NETTSIDE
text_image
Technical diagram showing mechanical assembly steps with labeled components and directional arrows indicating movement or force.natural_image
Diagram of a mechanical component with circular and radial features, no text or symbols present: Av position
: låg värme
: medelhög värme
: maximal värme
: Tändning
: Tändare
natural_image
Diagram showing three upward-pointing arrows above three circular symbols below (no text or labels)DKB Household Switzerland AG
Eggbühlstrasse 28
Postfach
text_image
CE0063 2014 PEN ISO 89 BP 3625 DKB Household Switzerland AG Ligodiniessenz AG W/RZ 2004 Typ: Serial No. Article No.: 30/37 mbar Dialysis: 30/37 mbar Cul. ©DID©DC©D 28/30/2014 Gul. ©DID©DC©D 28/30/2014 Val. 100% Vail. 100%DÜLEŽITÉ:
text_image
Technical diagram showing three-step assembly of a mechanical device with labeled components and directional arrows indicating assembly steps.natural_image
Diagram of a mechanical component with circular and radial features, no text or symbols present: Z polohy
: nízký výkon
: střední výkon
: plný výkon
: zapálení
: Zapalovač
PŘED PRVNÍM POUŽITÍM
natural_image
Three identical rocket launchers with upward arrows above three circular base icons (no text or symbols)DKB Household Switzerland AG
Eggbühlstrasse 28
Poštovní schránka
8052 Zürich – Switzerland
www.dkbrands.com
TECHNICKÉ INFORMACE
CAIRNS 3 G / HAMILTON 3+ G
| CE | 0063 |
Plyn Propan/Butan 30/31
Výkon 7.50 kW
| I3B/P(30 mbars) | DK, FI, NL, NO, SE, LU |
| I3B/P(50 mbs/4) | CH, AT, DE |
| I3+(26/30/37 mbars) | BE, CH, ES, FR, GB, IT, PT |
text_image
CE0063 2014 PIN 0063 BP 3625 DKB Houseshore Switzerland AG Logitkreisser 2014/2014 Typ: Article No.: Serial No.: Total number of Date number of Basis: Present 30/37 mbar Cui: 🕒️ 🕒️ 🕒️ 🕒️ 🕒️ 🕒️ 🕒️ 🕒️ 🕒️ 🕒️ 🕒️ 🕒️ 🕒️ 🕒️ 🕒️ 🕒️ 🕒️ 🕒️ 🕒️ 🕒️ 🕒️ 🕒️ 🕒️ 🕒️ 🕒️ 🕒íWAŻNE:
text_image
Technical diagram showing three-step assembly of a mechanical device with labeled components and directional arrows indicating assembly steps.natural_image
Diagram of a mechanical component with circular and radial features, no text or symbols presentnatural_image
Three identical rocket launchers with upward arrows above three circular base markers (no text or symbols)natural_image
Diagram of a device with three circular icons below, showing a heart-shaped connection between two devices (no text or symbols)DKB Household Switzerland AG
Eggbühlstrasse 28
Postfach
13 + (28/30/37 mbsr) BE, CH, ES, FR, GB, IT, PT
ZAPŁON ELEKTRYCZNY
IMPORTANT PENTRU SIGURANTA DVS.
natural_image
Diagram of a mechanical device with arrows indicating assembly or connection points (no text or symbols present)
natural_image
Technical diagram of a mechanical or electrical component with no visible text, numbers, or symbols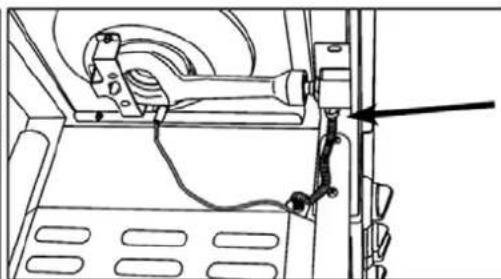
natural_image
Technical line drawing of a mechanical assembly with no visible text or symbolsnatural_image
Diagram of a mechanical component with circular and radial features, no text or symbols present: Din poziția
: putere mică
: putere medie
: putere maximă
: aprindere
: Electrod de aprindere
ÎNAINTE DE PRIMA UTILIZARE
natural_image
Three identical rocket launchers with upward arrows above three ground stations, each marked with a euro symbol below (no text or labels)DKB Household Switzerland AG
Eggbühlstrasse 28
Postfach
8052 Zürich – Elvetia
www.dkbrands.com
CAIRNS 3 G / HAMILTON 3+ G
CE 0063
Gaz Propan/Butan 30/31
Putere 7.50 kW
Consum de gaz 546 g/h
Duză (28-30/37 mbari) 0.78 mm / marcaj: BD
Duză (50 mbari) 0.85 mm / marcaj: AD
Presiune gaz Butan 28 mbari
Propan 37 mbari
I3B/P _(80 mbsn) DK, FI, NL, NO, SE, LU
13B/P CH, AT, DE
13 + (28/30/37 mbsr) BE, CH, ES, FR, GB, IT, PT