
WPO700 - Oven Waring Commercial - Free user manual and instructions
Find the device manual for free WPO700 Waring Commercial in PDF.

| Product Type | Professional pizza oven |
| Brand | Waring Commercial |
| Model | WPO700 |
| Dimensions (approx.) | 46 cm (width) x 46 cm (depth) x 30 cm (height) - stone included |
| Weight (approx.) | 30 kg (estimated) |
| Power supply | 208-240 V, 50/60 Hz, single phase |
| Temperature range | 65 °C to 425 °C (350 °F to 800 °F) |
| Capacity | One cooking chamber with two levels (ceramic stone 46x46 cm) |
| Material | Stainless steel, tempered glass door |
| Main functions | Adjustable thermostat, 30 min timer, interior light, individual top/bottom heating element control |
| Safety | Automatic shutdown in case of overheating, mandatory grounding |
| Care and cleaning | Pizza stone: dry brush, never wash with water. Interior: damp cloth. Exterior: stainless steel cleaner. |
| Spare parts and repairability | Replaceable G9 120V/25W halogen bulb, adjustable feet, brush included. Authorized service center. |
| General information | Commercial use only. 1-year warranty on parts and labor on site. |
Frequently Asked Questions - WPO700 Waring Commercial
User questions about WPO700 Waring Commercial
0 question about this device. Answer the ones you know or ask your own.
Ask a new question about this device
Download the instructions for your Oven in PDF format for free! Find your manual WPO700 - Waring Commercial and take your electronic device back in hand. On this page are published all the documents necessary for the use of your device. WPO700 by Waring Commercial.
USER MANUAL WPO700 Waring Commercial
natural_image
Line drawing of a Waring kitchen oven with control panel and side-mounted gauges (no text or symbols on the main body)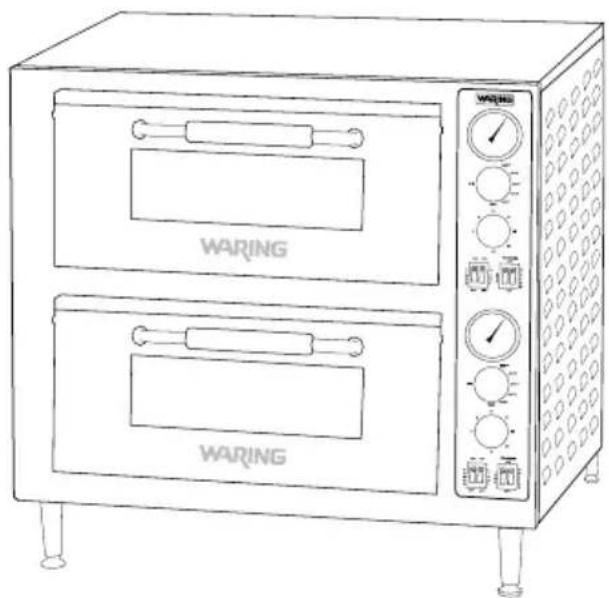
natural_image
Line drawing of a two-tiered Waring oven with control knobs and doors (no text or symbols on the main body)WPO700/WPO750
For your safety and continued enjoyment of this product, always read the instruction book carefully before using.
When using electrical appliances, basic safety precautions should always be followed, including those listed below:
- To protect against electrical hazards, do not immerse oven in water or other liquids.
- NEVER clean with water jets, which can result in critical bodily injury or death.
- DO NOT USE if cord or plug is damaged or if machine has malfunctioned, been dropped or damaged. Return appliance to the nearest authorized service facility for examination, repair or electrical or mechanical adjustment.
- Do not use outdoors.
- Do not let cord hang over edge of table or counter, or touch hot surfaces.
- Improper installation or use can result in electrical shock, injury, or damage to your oven or property.
- Your pizza oven is a heavy-duty appliance designed for commercial use, and intended to be operated by trained professionals only.
- To prevent risk of fire, oven should be installed in a noncombustible environment. Any combustible materials must be at least 18 inches away from sides, front and back of oven, and at least 40 inches from top.
- Oven must be thoroughly cleaned before first use and after all uses (see USE AND CARE).
- Always be sure to disconnect oven from power source when not in use and before cleaning or servicing.
- Always allow oven to cool before moving or servicing. Surfaces are hot during use and remain hot for a while, even after power is off.
- Do not allow insertion of any foreign object into any ventilation or exhaust opening; this can cause electric shock, fire or damage to the oven.
-
Never block air intakes or exhaust openings, or use on cushioned surfaces where blockage may occur.
-
This appliance is not intended for use by persons (including children) with reduced physical, sensory or mental capabilities, or lack of experience and knowledge, unless they have been given supervision or instruction concerning use of the appliance by a person responsible for their safety.
-
Extreme caution should be exercised when using containers constructed of the following materials in the oven: paper, cardboard, plastic or similar products.
-
CAUTION – To reduce the risk of fire, the appliance is to be installed in noncombustible surroundings only, with no combustible material within 18 inches of all sides, front or rear of the appliance, or within 40 inches above the appliance. The appliance is to be mounted on floors of noncombustible construction with noncombustible flooring and surface finish, and with no combustible material against the underside. Such construction shall in all cases extend not less than 12 inches beyond the equipment on all sides.
SAVE THESE INSTRUCTIONS
APPROVED FOR COMMERCIAL USE
CONTENTS
Important Safeguards 2
Grounding Instructions....4
Introduction 5
Parts and Accessories 6
Oven Installation....9
Pizza Ceramic Deck Installation & Conditioning 9
Before Using Your Pizza Oven 10
Baking Instructions.... 10
Tips and Hints ......11
Use and Care 12
Installing and Replacing Oven Light.... 13
Safety Feature 14
Warranty 14
GROUNDING INSTRUCTIONS
For your protection, the Waring® Commercial Pizza Ovens are supplied with a molded 3-prong grounding-type plug and should be used in combination with a properly connected grounding-type outlet. Use of any other voltage or altering of the plug or cord may damage the unit, will void the warranty and may cause injury.
Caution: Before using an adapter, it must be determined that the outlet cover plate screw is properly grounded. If in doubt, consult a licensed electrician. Never use an adapter unless you are sure it is properly grounded.
Note: Use of an adapter is not permitted in Canada and Europe.
EXTENSION CORDS
Use only 3-wire extension cords that have 3-prong grounding-type plugs and 3-pole cord connectors that accept the plug from the appliance. Use only extension cords that are intended for indoor use. Use only extension cords having an electrical rating not less than the rating of the appliance. Do not use damaged extension cords. Examine extension cord before using and replace if damaged. Do not abuse extension cord and do not yank on any cord to disconnect. Keep cord away from heat and sharp edges.
NOTE: This appliance is for 240 volts only and should not be used with a converter.
INTRODUCTION
The Waring® Commercial Pizza Ovens duplicate the ideal baking environment of traditional Italian brick pizza ovens. Ceramic pizza deck measures 18" x 18" and can accommodate large pies while maintaining consistent temperatures to ensure that pizza cooks from the bottom as well as the top. A major benefit of a pizza stone over a pizza pan is the way that the ceramic stone drives moisture away from the crust, resulting in extra crispness.
Adjustable temperature controls from 350^ F to over 800^ F allow you to cook a wider variety of items, and bake pizza fast whether using fresh, frozen or par-baked dough. Pizza oven controls are designed for simplicity, with quick-touch switches and indicator lights for Power, Interior Oven Light, and Top and Bottom Elements. Superior heat technology ensures quick heat-up and recovery, for consistent oven temperatures that guarantee great results.
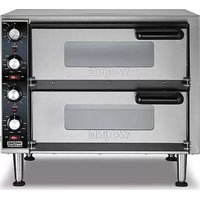
WPO700
This unit offers independent On/Off switches for top and bottom heating elements while the center element remains constantly on. One set of controls is used for both chambers and only a single temperature setting may be used.
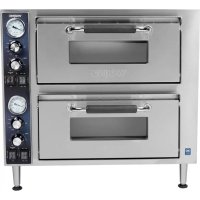
WPO750
This unit provides two independent chambers with their own deck controls that can operate at different temperatures simultaneously, independent On/Off controls for top and bottom elements and separate 30-minute timers.
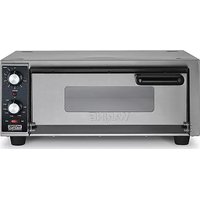
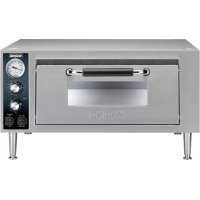
PARTS AND ACCESSORIES
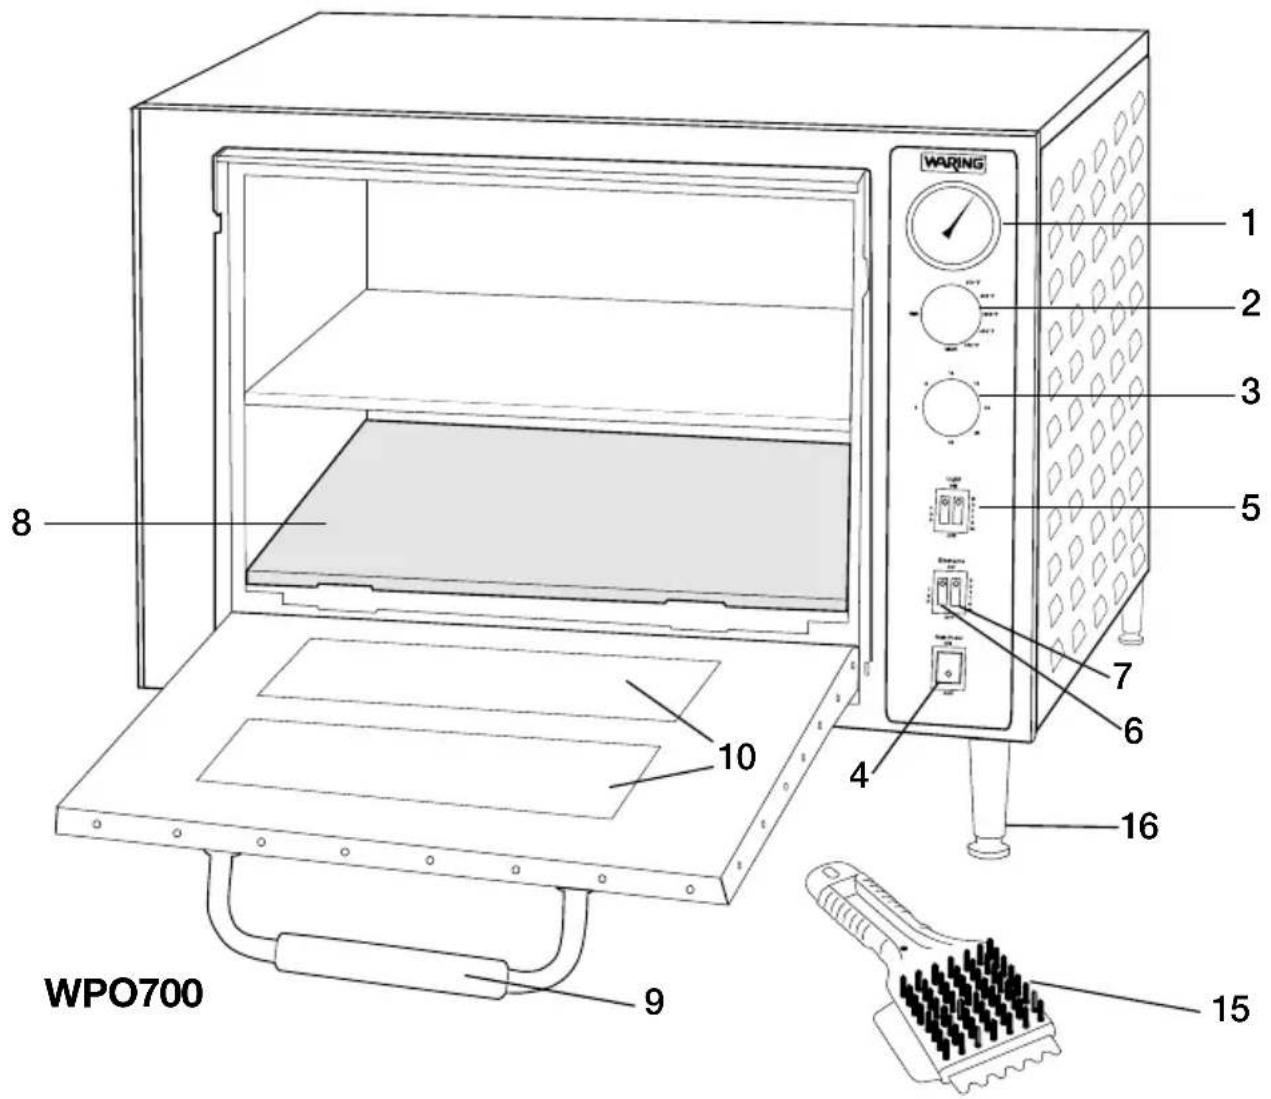
- Temperature Gauge
- Temperature Control Knob
- Manual Timer (30 minutes)
- Main Power On/Off Switch
- Oven Light On/Off Switch (one per chamber)
- Top Element On/Off Switch
- Bottom Element On/Off Switch
- Ceramic Pizza Deck (packed separately)
- Door Handle
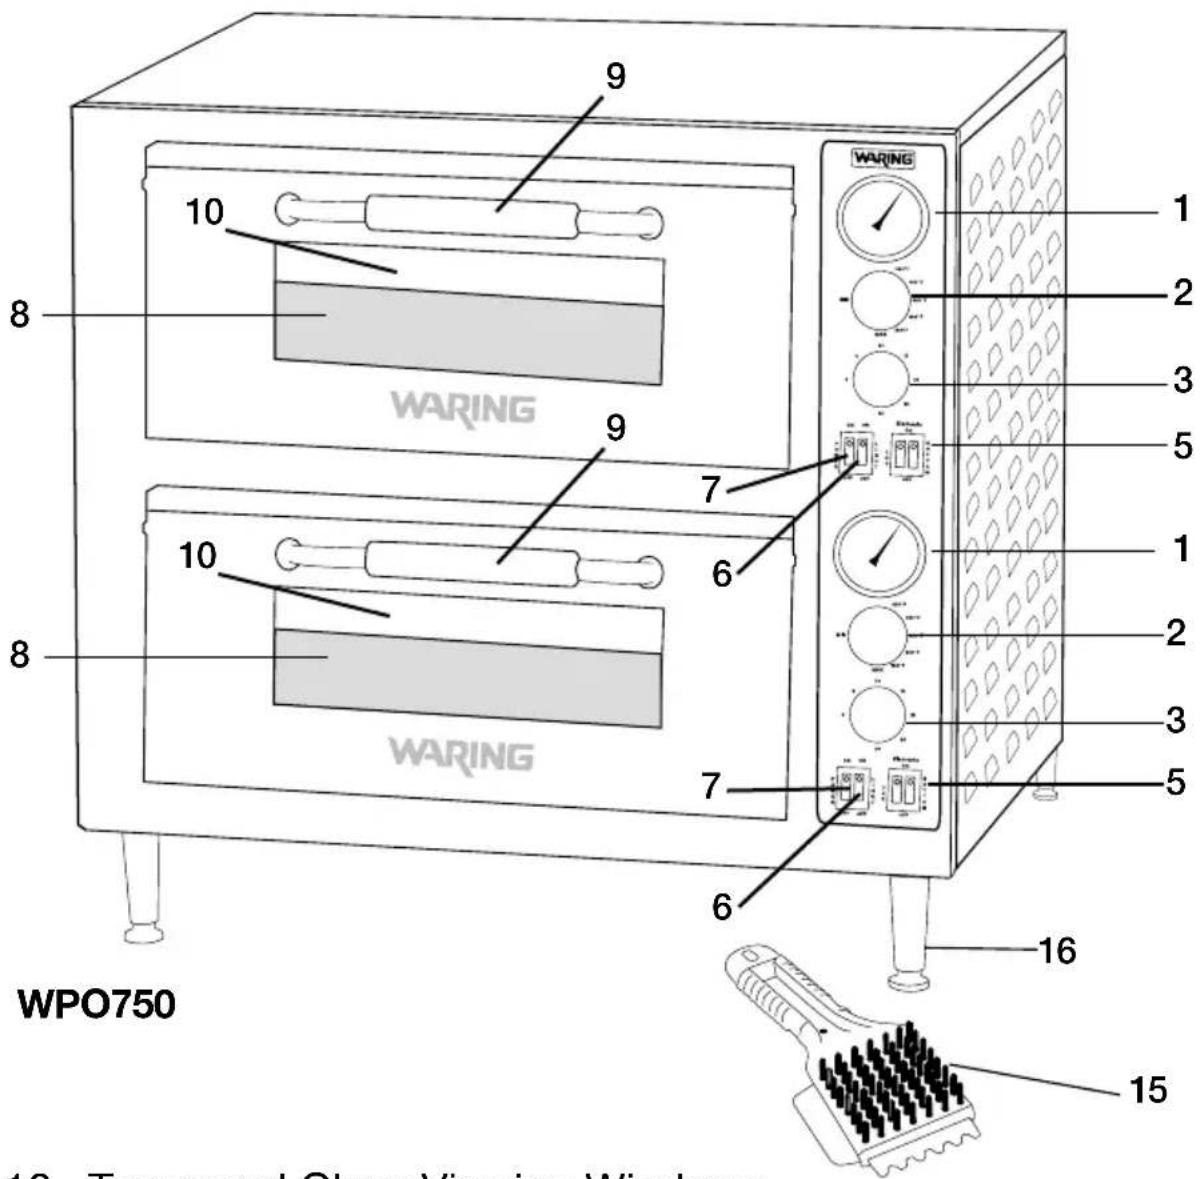
- Tempered Glass Viewing Windows
- Interior Light (not shown)
- Top Heating Element (not shown)
Available only on WPO750
- Bottom Heating Element (not shown)
- Rear Exhaust Vent (not shown)
- Deck Cleaning Brush
- Adjustable Legs (packed separately in styrofoam)
-
Power Cord (not shown)
-
Temperature Gauge
Lets you visually monitor oven temperature.
- Temperature Control Knob
Simple dial knob to select temperature settings.
- Manual Timer
Timer range is 30 minutes. An audible signal (single chime) indicates selected time has elapsed.
NOTE: TIMER DOES NOT TURN OVEN ON OR OFF.
- Power On/Off Switch with Indicator Light
Main power control for oven.
- Oven Light On/Off Switch with Indicator Light (one per chamber)
Turns interior light on/off.
- Top Element On/Off Switch with Indicator Light
(Turn off for items that do not require full direct top heat.
- Bottom Element On/Off Switch with Indicator Light
Turn off for items that do not require full direct bottom heat.
- Ceramic Pizza Deck (one per chamber)
18" x 18" Pizza Deck fits into base of oven's interior – maintains temperature very well and ensures that pizza cooks from the bottom as well as the top. Pizza or bread can be placed directly on deck.
- DoorHandle
Heavy-duty, insulated, easy-to-grip design.
- Tempered Glass Door
Lets you monitor the cooking process.
- Interior Light (one per chamber)
Replaceable bulb, removable heatproof glass bulb cover.
- Top Heating Element (not shown)
(feature available only on WPO750) Ideal for top browning; turn off when top heat is not required.
- Bottom Heating Element (not shown)
(feature available only on WPO750) Sits directly below pizza deck; turn off when bottom heat is not required.
- Rear Exhaust Vent (not shown)
Directs any exhaust from cooking process to the side of unit and away from walls.
- Deck Cleaning Brush
Features heavy-duty bristles and a scraper for cleaning the deck without damaging the ceramic.
- Adjustable Legs
Four legs must be attached to oven before using (see Before Using Your Pizza Oven, page 9).
- Power Cord (not shown)
OVEN INSTALLATION
• After removing the outer shipping carton and packaging material, place the oven on the floor or other flat surface.
- Open oven and remove any instructions or packaging material shipped in the unit.
- With sufficient help, lift up the front of the oven and attach the two front legs (packed separately in styrofoam), carefully twisting each one into a corner and hand tighten. Lift the back of the oven approximately 5 inches and block into position using a piece of wood or other solid object. Then, attach the two back legs and hand tighten.
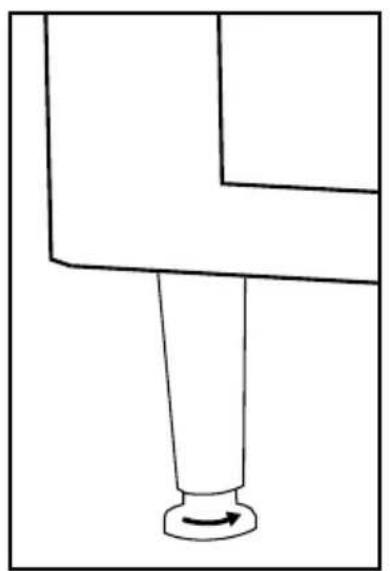
- Move the oven to its final location. Adjust the bottom portion of the legs to level the unit. (fig. 1, page 6)
PIZZA CERAMIC DECK INSTALLATION & CONDITIONING
Read these instructions carefully before installing or conditioning the ceramic deck. New deck must be conditioned (pre-dried) prior to first use.
- Handling the Ceramic Deck: If deck is struck against hard surface before, during or after installation, it can develop a full or hairline crack which may expand over time and require you to replace it.
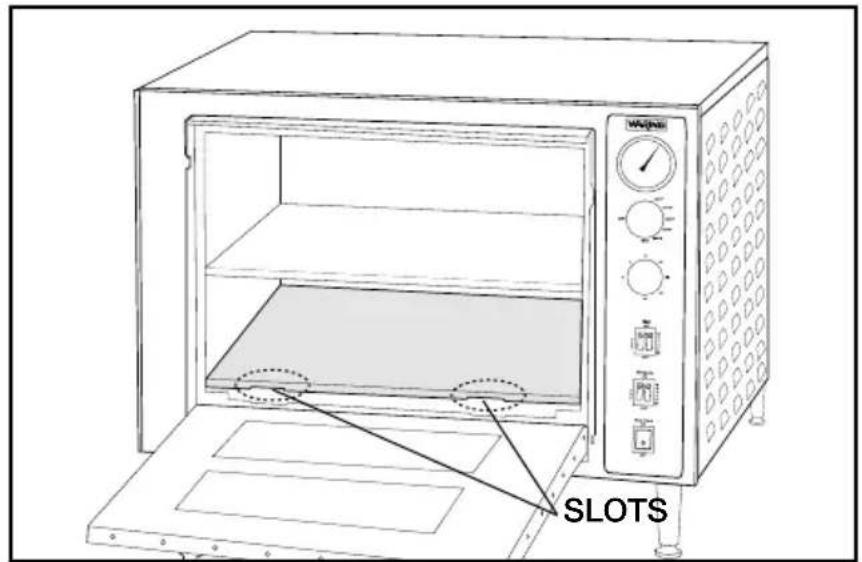
- Installing the Deck: Open the oven door and place ceramic pizza deck into the bottom with the slots on front of deck facing front of oven. Be sure the deck is firmly set in place. Do not force or wedge it. (fig. 2, page 6)
- Conditioning the Deck: Pre-dry ceramic deck by carefully following instructions in the following section, BEFORE USING YOUR PIZZA OVEN. NOTE: Failure to follow conditioning instructions will cause deck to crack or warp and will void warranty.
natural_image
Pure mechanical diagram showing a lever and pivot point without any text or symbols(fig. 1)
(fig. 2)
- With ceramic deck inserted, place oven in a well-ventilated area to burn off any residual dust from manufacturing.
- Plug unit in, open door and set Temperature Control to 400°F (205°C). After one hour, close door and increase temperature to 500°F (260°C) for at least 1½ hours.
Note: The oven may emit an odor during this process; this is normal and not harmful, and should quickly dissipate.
- Turn off the oven and allow it to cool completely. Remove any smoke residue from the interior with a damp cloth.
- Place clean, cool oven in the area where it will be used. Be sure there is at least 6 inches' clearance between sides and top of oven and any wall or cabinet.
- Check to ensure nothing is blocking the exhaust vent on back of unit.
BAKING INSTRUCTIONS
NOTE: Only pizza and breads can be placed directly on the pizza deck. All other food items must be put onto a tray or into a container rated for high temperature use.
Set the Temperature Control Knob to the desired temperature to preheat oven. Watch the Temperature Gauge; when it reaches the temperature selected, the oven is ready to use.
The Pizza Oven can be used to bake both fresh and frozen products. Frozen items should go right from the freezer into the pre-heated oven. Cooking time will vary depending on the consistency and weight of the product.
The temperature range for baking fresh pizza is usually between 500^ F ( 260^ C) and 575^ F ( 300^ C), depending on the individual product. Generally, frozen items are cooked at a lower temperature, but always follow recommended cooking instructions.
Bake pizza until the cheese bubbles and the bottom is evenly browned, rotating it during the baking process if necessary.
Open and close door quickly when putting pizza in oven to prevent heat from escaping, which can slow down cooking time.
TIPS AND HINTS
- Be sure ceramic pizza deck is dry. Wet spots or spills will cause food to stick.
- Never season the ceramic pizza deck with any type of cooking oil.
- Increase temperature during heavy production times to maintain ideal baking temperature. Be sure to decrease it when rush slows to prevent burning.
- If toppings need more time to cook, a piece of screen placed under pizza can prevent bottom from overcooking.
- Pizza with heavy toppings requires a lower temperature and longer baking time.
- Scrape off burnt residue from pizza deck daily with deck brush provided. Buildup can cause an “off” flavor and increase bake time.
- Frozen items cannot be placed directly on hot deck to thaw. Place food onto a screen or into a pan.
- When using two different temperature settings (available on WPO750 only) on the top and bottom chambers, set the top chamber to the higher temperature. This will ensure there is no fluctuation in temperature in the lower chamber.
USE AND CARE
Daily cleaning is suggested to keep oven performing at its best. ALLOW OVEN TO COOL COMPLETELY BEFORE CLEANING.
- Always unplug the oven from the power source.
- Do not use any sharp or hard kitchen utensils on the oven as this could damage the surface of the appliance.
- To clean ceramic pizza deck, remove deck from cool oven. With the provided deck brush, scrape off hardened spillage. To clean heavily soiled decks, return deck to oven and run at highest temperature in a well-ventilated area for 12 hour. When oven and deck are cool, remove deck and brush off residue. NOTE: Never use high-abrasion brushing or water to clean deck, or immerse or let any water or any other liquids come into contact with the ceramic deck. Any of these can cause deck to crack.
- Wipe interior of oven with damp cloth, avoiding heating elements.
- When cleaning stainless steel exterior, use stainless steel cleaner and wipe in the direction of the grain.
- To clean the glass door, use a glass cleaner or damp cloth and dry with clean cloth.
- When opening oven door, be sure to guide the door while lowering it. Doing so will prevent possible damage to the door jamb after an extended period of time.
- For further information or to purchase additional accessories, please phone Waring Customer Service at 1-800-492-7464.
If there is something wrong with this product, please contact Ecolab Equipment Care (EEC/GCS) service call center at 1-800-822-2303 or email servicerequest@ecolab.com.
INSTALLING AND REPLACING OVEN LIGHT
(Bulb Type: G9 120V/25W Halogen – Can be purchased at local retail/home improvement stores)
A. Be Sure Oven Is Completely Cool and Unplugged
B. Remove the Glass Bulb Cover
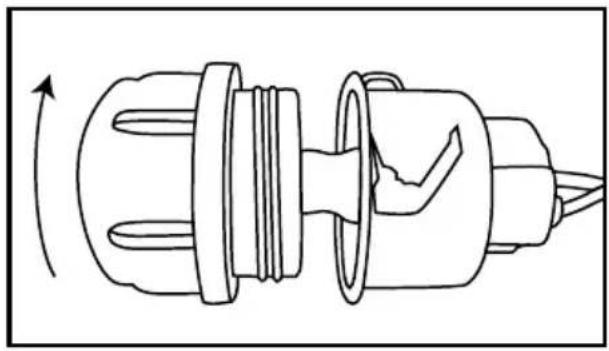
Locate bulb cover in back right corner. Carefully twist counterclockwise and remove.
natural_image
Technical line drawing of a mechanical component with internal parts and directional arrow (no text or symbols)C. Remove Bulb
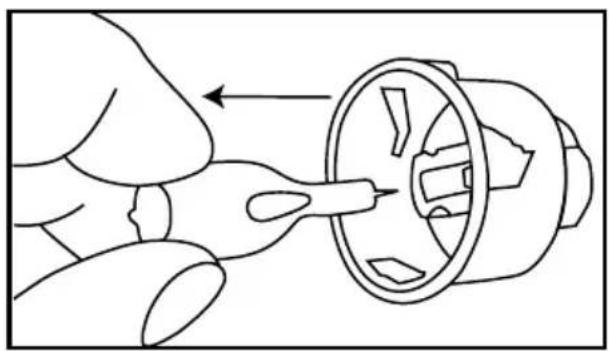
Grasp bulb and gently pull straight out to remove.
natural_image
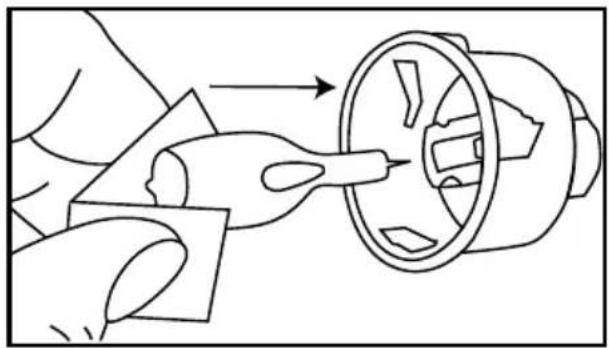
Line drawing of a hand using a tool to adjust or install a mechanical component (no text or symbols present)D. ReplaceBulb
Without touching the bulb with bare hands (as this will reduce the life span), use a clean tissue or cloth glove to position new bulb carefully and push in to engage.
natural_image
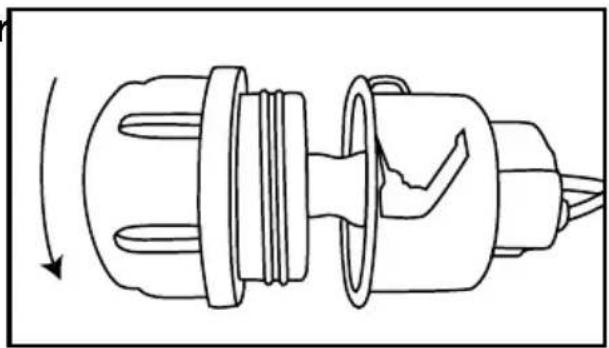
Diagram of a hand operating a mechanical component with a circular housing (no text or symbols)E. Re-Attach Glass Bulb Cover
Twist bulb cover clockwise to secure.
natural_image
Technical line drawing of a mechanical connector assembly with no visible text or symbolsSAFETY FEATURE
The Waring® Commercial Pizza Ovens are equipped with the following feature to ensure safety:
Thermostat Overload Protection
If the unit heats up beyond the recommended temperature level, the oven will automatically turn off. To reset, turn main power switch to the OFF position, unplug the unit from the wall outlet and allow it to cool down. Once fully cooled down, plug the unit back into the wall outlet and turn main power on. If the unit will not turn back on, or continues to heat beyond the recommended temperature level, repeat steps above or call a Waring Certified Customer Service Center for assistance.
LIMITED ONE YEAR WARRANTY
Waring warrants every new Waring Commercial Product to be free from defects in material and workmanship for a period of one year from the date of purchase when used with foodstuffs.
This warranty covers on-site labor, parts and reasonable travel time and travel expenses of the authorized service representative up to (100) miles, round trip, and (2) hours' travel time.
This warranty does not: a) apply to any product that has become worn, defective, damaged or broken due to use or due to repairs or servicing by other than the Waring Factory Service Center or an Authorized Service Representative, or due to abuse, misuse, improper installation, overloading or tampering: b) cover consequential damages of any kind.
The one-year warranty is applicable only to equipment used in the United States; this supersedes all other express product warranty or warranty statements.
Warning: This warranty is void if equipment is used on Direct Current (DC).
Waring Commercial 314 Ella T. Grasso Ave., Torrington, CT 06790 www.waringcommercialproducts.com
For additional assistance and replacement parts for out-of-warranty repairs, contact:
Waring Factory Service Center 314 Ella T. Grasso Ave., Torrington, CT 06790 (800) 269-6640 www.waringcommercialproducts.com
natural_image
Pure mechanical diagram showing a lever and pivot point without any text or symbols(Fig. 1)
(Fig. 2)
natural_image
Technical line drawing of a mechanical connector assembly with no visible text or symbolsnatural_image
Line drawing of a hand using a tool to adjust or install a mechanical component (no text or symbols present)natural_image
Diagram of a mechanical assembly with a tool interacting with a circular component (no text or symbols)natural_image
Technical line drawing of a mechanical connector assembly with no visible text or symbolsMECANISMO DE SEGURIDAD
Waring Factory Service Center
314 Ella T. Grasso Ave., Torrington, CT 06790
(800) 269-6640
www.waringcommercialproducts.com
IMPORTANTES CONSIGNES DE SÉCURITÉ
LIRE TOUTES LES INSTRUCTIONS
INSTALLATION DU FOUR
natural_image
Pure mechanical diagram showing a lever and pivot point without any text or symbols(fig. 1)
(fig. 2)
AVANT LA PREMIÈRE UTILISATION
natural_image
Technical line drawing of a mechanical component with no visible text or symbolsC. Retirer l'ampoule
natural_image
Line drawing of a hand using a tool to adjust or install a mechanical component (no text or symbols present)natural_image
Line drawing of a hand using a tool to adjust or install a mechanical component, with no visible text or symbols.natural_image
Technical line drawing of a mechanical connector assembly with no visible text or symbolsDISPOSITIF DE SÉCURITÉ
Protection anti-surchauffe
GARANTIE LIMITÉE D'UN AN
Waring Factory Service Center
314 Ella T. Grasso Ave., Torrington, CT 06790
(800) 269-6640
www.waringcommercialproducts.com
NOTES
NOTES
Trademarks or service marks of third parties used herein are the trademarks or service marks of their respective owners.
©2014 Waring Commercial
314 Ella T. Grasso Ave.
Torrington, CT 06790
1-800-4-WARING
www.waringcommercialproducts.com
Printed in China
Impreso en la China
Imprimé en Chine
WPO700/WPO750 IB
14WC004847

- SAVE THESE INSTRUCTIONS
- APPROVED FOR COMMERCIAL USE
- CONTENTS
- GROUNDING INSTRUCTIONS
- EXTENSION CORDS
- INTRODUCTION
- WPO700
- WPO750
- PARTS AND ACCESSORIES
- OVEN INSTALLATION
- PIZZA CERAMIC DECK INSTALLATION & CONDITIONING
- BAKING INSTRUCTIONS
- TIPS AND HINTS
- USE AND CARE
- INSTALLING AND REPLACING OVEN LIGHT
- SAFETY FEATURE
- Thermostat Overload Protection
- LIMITED ONE YEAR WARRANTY
- MECANISMO DE SEGURIDAD
- IMPORTANTES CONSIGNES DE SÉCURITÉ
- LIRE TOUTES LES INSTRUCTIONS
- INSTALLATION DU FOUR
- AVANT LA PREMIÈRE UTILISATION
- DISPOSITIF DE SÉCURITÉ
- Protection anti-surchauffe
- GARANTIE LIMITÉE D'UN AN
- NOTES
Brand : Waring Commercial
Model : WPO700
Category : Oven