MX1000XTX - Blender Waring Commercial - Free user manual and instructions
Find the device manual for free MX1000XTX Waring Commercial in PDF.

| Product Type | Professional Blender |
| Brand | Waring Commercial |
| Model | MX1000XTX |
| Container Material | BPA-Free Copolyester |
| Container Capacity | 48 oz (1.4 L) or 64 oz (1.9 L) depending on model |
| Control Type | Touch electronic with digital display |
| Speeds | Variable from 5% to 100% (1,000 to 20,000 rpm) |
| Pulse Function | Normal pulse (100%) and Max pulse (150%) |
| Preprogrammed Programs | 4 programs (liquid drinks, ice-based, ice cream, smoothies) |
| Program Customization | Reprogrammable (speed 5-100%, duration 5-90 s, up to 3 phases) |
| Timer | Built-in, adjustable from 5 to 30 seconds in 5-second increments |
| Slow Start System | Gradual start over 2 seconds |
| Motor Protection | Thermal protection device (automatic shut-off in case of overheating) |
| Drink Counter | Displays daily and total drink count |
| Sound Enclosure | Optional (can be installed and removed) |
| Blades | Stainless steel (replaceable blade assembly) |
| Cleaning and Sanitizing | Wash with non-foaming detergent, rinse, sanitize with bleach (100 ppm) |
| Warranty | 2 years on unit, 3 years on motor |
| Country of Use | United States and Canada (warranty); use elsewhere at importer's responsibility |
Frequently Asked Questions - MX1000XTX Waring Commercial
User questions about MX1000XTX Waring Commercial
0 question about this device. Answer the ones you know or ask your own.
Ask a new question about this device
Download the instructions for your Blender in PDF format for free! Find your manual MX1000XTX - Waring Commercial and take your electronic device back in hand. On this page are published all the documents necessary for the use of your device. MX1000XTX by Waring Commercial.
USER MANUAL MX1000XTX Waring Commercial
For your safety and continued enjoyment of this product, always read the instruction book carefully before using.
When using electrical appliances, basic safety precautions should always be taken, including the following:
- READ ALL INSTRUCTIONS.
- Always unplug from outlet when not in use, prior to handling, before putting on or taking off parts, and before cleaning.
- To protect against electrical hazards, do not immerse the blender base in water or other liquids.
- This appliance is not intended for use by persons (including children) with reduced physical, sensory or mental capabilities, or lack of experience and knowledge. Children should be supervised to ensure they do not play with the appliance.
- Avoid contact with moving parts.
- Do not operate any appliance with a damaged cord or plug or after the appliance malfunctions or is dropped or damaged in any manner. Return appliance to the nearest authorized service facility for examination, repair, or electrical or mechanical adjustment.
- The use of attachments, including canning jars, not recommended by the appliance manufacturer, may cause hazards.
- Do not use outdoors.
- Do not let cord hang over edge of table or counter, or touch hot surfaces.
- Keep hands and utensils out of container while blending to prevent the possibility of severe personal injury and/or damage to the blender. A rubber scraper may be used, but must be used only when the blender is not running.
- Blades are sharp. Handle carefully.
- Always operate blender with cover in place.
- When blending hot liquids, remove the center piece of the two-piece cover. See Hot Blending Instructions.
- The use of ear protection is recommended during extended operating periods.
- Before First Use: Clean blender and jar per cleaning and sanitizing instructions, pages 11-12.
- The appliance must be positioned so that the plug is accessible.
- DO NOT use carbonated liquids in the blender jar or any blending container. Using carbonated liquids in the blender jar or any blending container may result in injury.
- DO NOT blend oil or oil-based products such as peanut butter for longer than 5 minutes.
- Never remove blender jar from base unit until the blade and coupling have completely stopped.
SAVE THESE INSTRUCTIONS
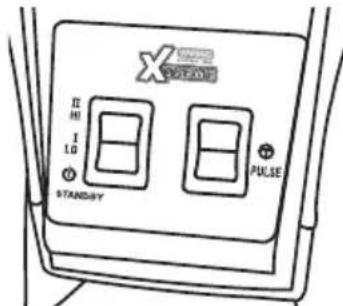
MX MECHANICAL SWITCHES
- Before starting, make sure that the blender is unplugged and container is not positioned on the blender.
- Put ingredients into container and cover it. Do not fill above MAX fill line.
- With the unit in STANDBY position, place container on blender base. Be sure container is fully seated and that drive coupling is properly engaged. Plug blender cord into outlet.
- This blender has 2 speed settings: HI II and LO IPress paddle switch to desired position. To crush ice quickly, use HIII speed setting.
- When finished blending, set paddle switch to STANDBY position.
- This blender is equipped with a PULSE option. Hold paddle switch down to engage PULSE function. Unit will run on HI II speed until the paddle switch is released.
- Allow motor to come to a complete stop before removing container from blender base. Never place the container on the motor base or remove it from the motor base while motor is running.
- Always hold container with one hand when starting and while blending. Never operate without jar lid.
- Wash and dry container after each use. See Cleaning and Sanitizing Instructions.
MX ELECTRONIC TOUCHPAD SWITCHES WITHOUT SOUND ENCLOSURE
-
Before starting, make sure that the blender is unplugged and container is not positioned on the blender.
-
Put ingredients into container and cover it. Do not fill above MAX fill line.
-
Place container on blender base. Be sure container is fully seated and that drive coupling is properly engaged. Plug blender cord into outlet.
-
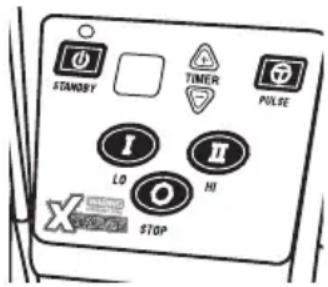
This blender is equipped with an electronic membrane keypad. The keypad has a main power STANDBY button, plus HI ,LO , STOP and PULSE buttons.
-
Press the STANDBY button to turn on the blender. Green LED will illuminate. For continuous operation, press either LO I or HI button. When finished blending, press STOP O. For momentary operation, press the PULSE button; motor will run on HI II speed until the button is released.
NOTE: Your MX Electronic Blender uses a Slow Start™ feature. When pressing HI II the unit will start in the LO Ispeed for 2 seconds and then switch to HI II speed. This allows for a more even blending of ingredients in container.

- Allow motor to come to a complete stop before removing container from blender base. Never place the container on the motor base or remove it from the motor base while motor is running.
- Always hold container with one hand when starting and while blending. Never operate without jar lid.
- Wash and dry container after each use. See Cleaning and Sanitizing Instructions.
- To turn unit off, press STANDBY button. Green LED light will go off.
MX ELECTRONIC TOUCHPAD SWITCHES WITH TIMER
- Before starting, make sure that the blender is unplugged and container is not positioned on the blender.
- Put ingredients into container and cover it. Do not fill above MAX fill line.
- Place container on blender base. Be sure container is fully seated and that drive coupling is properly engaged. Plug blender cord into outlet.
- This blender is equipped with an electronic membrane keypad. The keypad has a main power STANDBY button, plus HI II, LO ISTOP O and PULSE buttons and a 30-second countdown timer with up + and down arrows to set time.
- Press the STANDBY button to turn on the blender. Green LED will illuminate. The electronic timer will indicate 10 seconds (default). Press the up or down arrow to set the desired time. The electronic timer will indicate run time in 5-second intervals up to a maximum of 30 seconds. After the desired time is set, press HI or LO to start the blender. The timer will count down to 0 in 1-second intervals and blender will shut off. Pressing the PULSE button, the STOP button or the STANDBY button will override the timer and the blender will stop regardless of time left on timer.
NOTE: If you want to increase or decrease time while timer is counting down, press up or down arrows. Time will increase or decrease in 5-second intervals.
- If the blender is not used for 5 seconds, the timer function will turn off and return to manual mode. To reactivate timer, press up or down arrows. When using the electronic timer again, the initial time will be the last time set. Note: If unit has been turned off or unplugged, the timer will default back to 10 seconds.
- For continuous operation, press either LO Ior HI I button. When finished blending, press STOP OFor momentary operation, press the PULSE button. Motor will run on HI speed until the button is released.
NOTE: Your MX Electronic Blender uses a Slow Start™ feature. When pressing HI II the unit will start in the LO I speed for 2 seconds and then switch to HI II speed. This allows for a more even blending of ingredients in container.
- Allow motor to come to a complete stop before removing container from blender base. Never place the container on the motor base or remove it from the motor base while motor is running.
- Wash and dry container after each use. See Cleaning and Sanitizing Instructions.
- To turn the unit off, press STANDBY button. Green LED light will go off.
Warning - This is a Class A product. In a domestic environment this product may cause radio interference, in which case the user may be required to take adequate measures.
- Before starting, make sure that the blender is unplugged and container is not positioned on the blender.
- Put ingredients into container and cover it. Do not fill above MAX fill line.
- With the unit in STANDBY position, place container on blender base. Be sure container is fully seated and that drive coupling is properly engaged. Plug blender cord into outlet.
- This blender has variable speed controls. Set blender to desired speed between 1 and 10.
- The left paddle switch defaults to the VARIABLE setting in order to use the speed adjustment option. Press right paddle switch up to the ON position.
- When finished blending, set paddle switch to STANDBY position.
- This blender is equipped with a PULSE option. Holding left paddle switch in down position will activate VARIABLE PULSE function (Pulse speed controlled by knob). If ON/STANDBY switch is set to the ON position and PULSE switch is activated, then PULSE will operate at maximum speed of 30,000 RPM. Once PULSE paddle switch is released, speed will continue to run at variable speed setting.
- Allow motor to come to a complete stop before removing container from blender base. Never place the container on the motor base or remove it from the motor base while motor is running.
- Always hold container with one hand when starting and while blending. Never operate without jar lid.
- Wash and dry container after each use. See Cleaning and Sanitizing Instructions.
MX REPROGRAMMABLE CONTROL SETTINGS
- Before starting, make sure that the blender is unplugged and container is not positioned on the blender.
- Put ingredients into container and cover it. Do not fill above MAX Fill line.
- Place container on blender base. Be sure container is fully seated and that drive coupling is properly engaged. Plug blender cord into outlet.

- The motor speed can be adjusted by pressing the or Speed buttons. Speed ranges from 5% to 100% .
100% 20,000 RPM
50% 10,000 RPM
5% 1,000 RPM
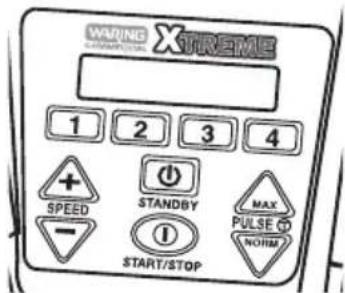
The Speed Up button will increase the motor speed display in 1% increments and the Speed Down button will decrease the motor speed display in 1% increments. Holding down either button will quickly scroll through speeds.
Using the Speed Up and Speed Dow buttons, set desired motor speed. If no speed is selected, motor will default to 100% .
NOTE: The motor does not run at the newly set speed until the START/ STOP button is pressed. If START/STOP button is not pressed within 5 seconds, the new speed setting will be stored for next use and the blender will return to STANDBY mode; the display will once again read “PRESS ANY BUTTON TO BLEND.”
- Press START/STOP ⑥ button to run the blender. Blender will run continuously at the set speed. The LCD will display the motor speed in percentage. Default speed (percentage) is at 100 % . Motor speed can be changed while blender is running by simply pressing Speed Up or Speed Down button.
- To stop continuous blending operation, press START/STOP button or press any of the program buttons.
PULSE FEATURES
Your unit comes equipped with two PULSE options: Normal Pulse and Maximum Pulse Note: The Pulse buttons are momentary switches - once released, the unit will shut off.
- To use Max Pulse option, press the button. This will run the motor at 150% speed. The LCD will read "MAX PULSE SPEED: 150% ."
- To use Normal Pulse option, press the button. This will run the motor at 100% speed. The LCD will read "NORM PULSE SPEED: 100% ."
- The blender allows you to set the pulse to your desired speed. While blending at Normal Pulse speed, the motor can be adjusted. To do this, hold the Normal Pulse button and press Speed Up or Speed Down button to adjust the blending speed. The LCD will show the setting speed and motor speed will change.
NOTE: The speed can be set from 5% to 100% . Once the Pulse button is released, the motor will shut off and the blender will return to STANDBY mode. The changed pulse speed will be stored in memory to replace the default speed off 100% .
REPROGRAMMABLE STATIONS
- There are 4 Program buttons for four programmable beverage stations for easy operation and consistent results. The factory-set stations are programmed as listed below:
1 Liquid drinks
2 Frozen drinks
3 Ice cream drinks
4 Smoothies
- To run any of the above preset programs, blender must be in STANDBY mode.
- Press desired Program button to start the blender. The motor will run at the preset speed within the preset blending time. The LCD will show time remaining. Once the blender counts down to 0, the motor will stop running and the blender will return to STANDBY mode and prompt "PRESS ANY BUTTON TO BLEND," to begin another function.
NOTE: To terminate a blending program, simply press START/STOP button or any of the Program buttons. After doing this, the blender will return to STANDBY mode and LCD will prompt "PRESS ANY BUTTON TO BLEND."
REPROGRAMMING BEVERAGE STATIONS
Users can add 4 new programs to meet their needs. A program can
consist of several sections, each with a different speed and running time.
For example, 1 can be replaced with a new program that has 3 sections, as shown below:
Section 1: speed = 75%; time = 30 seconds
Section 2: speed = 100%; time = 20 seconds
Section 3: speed = 50% ; time = 20 seconds
The program has the following limitations:
Speed: 5% to 100%
Time: 5 to 90 seconds
Total running time in a program cannot exceed 90 seconds, i.e., sum of the sections cannot be longer than 90 seconds.
NOTE: The button will act as the enter key to proceed to the next step during the reprogramming process.
- To enter new program, press both Speed Up and Speed Down buttons simultaneously while unit is in STANDBY mode. The blender will enter new programming mode and the LCD will prompt "ADD NEW PROGRAM."
- Next, you will need to set values. Press the Program button you want to replace (e.g., 1-4). The LCD will prompt "USE UP/DOWN TO SET SPEED: 25% ."
NOTE: 25% is the default speed setting in the reprogramming mode.
- Press Speed Up or Speed Down button to set the speed value. The increment is 1% (150 RPM). Press and hold the button to quickly scroll through speeds. The speed can be set between 5% and 100% .
- Once required speed is reached, press button or wait 5 seconds to confirm setting. The LCD will now prompt "USE UP/DOWN TO SET TIME." NOTE: Five seconds is the default time setting in the reprogramming mode.
- Use Speed Up or Speed Down button to set the time value (up to 90 seconds). Once 90 seconds are reached, pressing Speed Up will not increase the value and the LCD will prompt "MEMORY LIMIT" for 2 seconds.
- Press button or wait 5 seconds to confirm the setting. When the blending time is confirmed, the LCD will prompt SELECT ANOTHER SPEED. Repeat steps 3-5 if additional processing is needed.
NOTE: When pressing Speed Up or Speed Down buttons to set speed for next section, the LCD will prompt "USE UP & DOWN TO SET SPEED: 25%.
- To save the new program settings, press both Speed Up and Speed Down buttons simultaneously. The LCD will prompt NEW PROGRAM (PROG #) SAVED for 5 seconds. The blender will return to STANDBY mode and the LCD will prompt "PRESS ANY BUTTON TO BLEND."
NOTE: If no button is pressed for 60 seconds when prompted to "ADD NEW PROGRAM," the blender will exit NEW PROGRAM mode and will return to STANDBY mode. The new program will not be stored.
- To run new programs, simply press the desired Program button and the blender will run the program set by the user. The LCD will display NEW PROGRAM # and will count down the set time.
RESTORING FACTORY-SET BEVERAGE STATIONS
- To restore factory-set default beverage stations, press both Speed Up and Speed Down buttons. LCD will prompt "ADD NEW PROGRAM."
- Press button. LCD will prompt "RESTORE DEFAULT PROGRAMS."
- Press button to confirm and save. The LCD will display the logo for 3 seconds.
- The unit will return to STANDBY mode and the LCD will prompt "PRESS ANY BUTTON TO BLEND."
NOTE: The STOP ① key will abort this process at any point before restoring default programs is confirmed.
DRINK COUNTER
Your reprogrammable blenders are equipped with a drink counter to keep track of daily drink totals and total drink counts for your machine. To display the counts, hold program buttons 1 & 3 simultaneously for 3 seconds. Your display will read:
DAILY COUNT XXXTTL COUNTXXXX
Daily Count will display the number of drinks mixed per day. Total Count is the accumulation of all drinks made since first use of the blender. The Daily Count can be reset by holding in Program buttons 1 & 3 simultaneously for 3 seconds, then pressing ON/OFF button for 3 seconds. Daily Count will reset to zero and Total Count will remain unchanged.
If Total Count needs to be reset, call your nearest Waring authorized service facility for information.
NOTE: Use of the PULSE features will not add to the daily or total drink counts.
RESETTING THERMAL PROTECTION
- The blender you have purchased is equipped with an Automatic Reset Switch to protect the motor from overheating.
- If your blender stops running under heavy use, turn the power switch to the STANDBY or OFF position and unplug the power cord. Empty the blender container of all its contents and allow approximately 5 minutes for the motor to cool down.
- Plug the power cord back into the outlet and continue blending.
IMPORTANT - HOT BLENDING INSTRUCTIONS
To minimize the possibility of being scalded when blending hot materials, the following precautions and procedure must be observed.
- Hot materials are those that are 100^ (38^) or hotter.
- Limit the amount of materials processed to 1 pint.
- Completely remove the center portion of the two-piece container lid before starting motor (this will allow venting of the rapidly heated and expanded air inside the container when blender is running).
- Always start blending on lowest speed setting, and then progress to desired speed.
- Never stand directly over blender when it is being started or while it is running.
INSTALLING THE SOUND ENCLOSURE
NOTE: If you are installing a sound enclosure as an optional accessory, remove the standard jar pad to access the screw holes on the upper housing. This jar pad will not fit properly with the sound enclosure. To remove it, peel it back, starting in the corner and working your way over the drive coupling until it is completely off the base unit, as seen in Figures 1, 2 and 3.
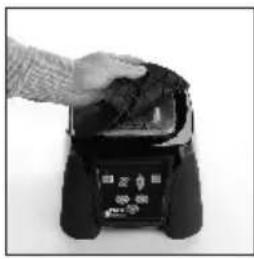
Figure 1 Figure 2 Figure 3


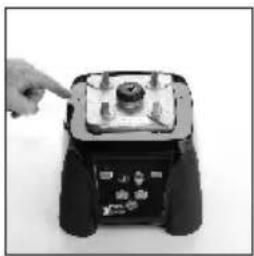
Figure 4
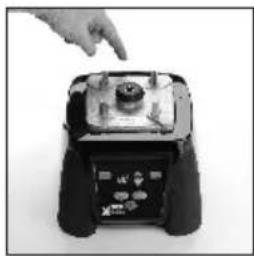
Figure 5
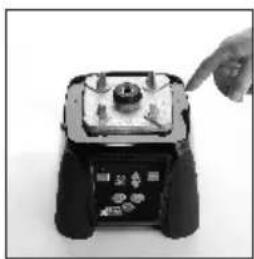
Figure 6
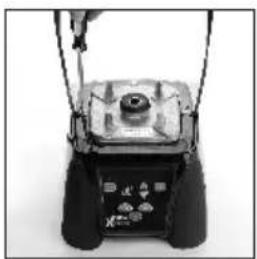
Figure 7
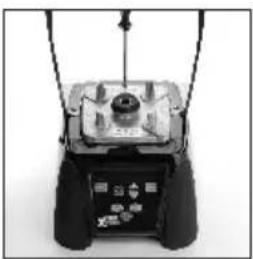
Figure 8 Figure 9
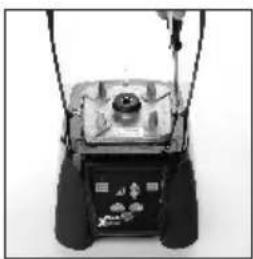
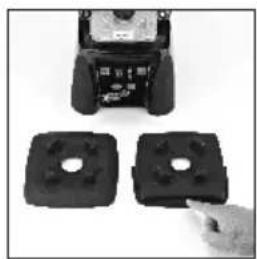
Figure 10

Figure 11 Figure 12
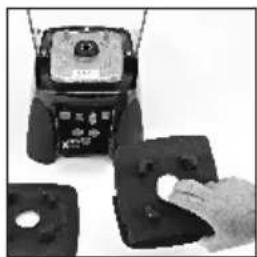
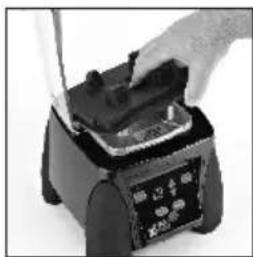
Figure 13
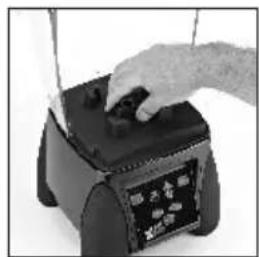
Figure 14

Figure 15
Once you have finished removing the standard jar pad OR if your blender came packed with a sound enclosure, follow these instructions:
Step 1: Find the 3 screw holes located on the left, back and right sides of the upper housing as seen in Figures 4, 5 and 6.
Step 2: Place the base of the sound enclosure on the motor housing so the screw holes on the enclosure line up with the screw holes on the base. Use a Phillips-head screwdriver and the 3 screws included with sound enclosure to secure the enclosure to the base unit in the 3 locations as seen in Figures 7, 8 and 9.
Step 3: Once the sound enclosure is secured tightly, select the custom jar pad (included with sound enclosure). Please note the standard jar pad will NOT fit properly with the sound enclosure. The correct custom jar pad has a recessed area around the outer edge. It also has a curved front with tabs on the sides, as seen in Figures 10, 11, and 12. This curved area should face the front of the blender.
Step 4: Attach custom jar pad included with sound enclosure onto upper housing with the curve facing out, as seen in Figure 13. Press tightly around coupling to secure custom jar pad onto upper housing, as seen in Figures 14 and 15.
REMOVING THE SOUND ENCLOSURE
To remove the sound enclosure, unplug your blender and follow these steps:
- Open sound enclosure and remove blender container.
- Remove front portion of sound enclosure by disengaging both sides at the pivot point.
- Remove rubber jar pad.
- Remove 3 screws from blender base and remove sound enclosure.
Whether your blender is in STANDBY mode, NEW PROGRAM mode, or the motor is running, pressing the ON/OFF button will stop the unit from running and will turn the power off. The LCD display will turn off.
NOTE: All programs and current settings will be restored next time you turn unit on.
CLEANING AND SANITIZING INSTRUCTIONS
THE CONTAINER MUST BE CLEANED AND DRIED AFTER EACH USE OF THE BLENDER ACCORDING TO THE FOLLOWING INSTRUCTIONS. FAILURE TO DO SO MAY ALLOW RESIDUE OF PROCESSED MATERIAL TO COLLECT ON THE INTERNAL SEALS OF THE BLADE ASSEMBLY, RENDERING THEM INEFFECTIVE.
- Wash, rinse, sanitize and dry container prior to initial use and whenever it will not be used again within a period of 1 hour.
- W ash and rinse container after each use.
- Clean and sanitize motor base prior to initial use and after each use.
- Washing solutions based on non-sudsing detergents and chlorine-based sanitizing solutions having a minimum chlorine concentration of 100 PPM are recommended.
The following washing, rinsing, and sanitizing solutions, or their equivalents, may be used.
| SOLUTION | PRODUCT | DILUTION IN WATER | TEMPERATURE |
| Washing | International Products Corporation LF2100 Liquid Low-Foam Cleaner | 1%-2%: 1¼ – 2¾ Ounce/Gallon (lower dilution of 1% for normal cleaning and up to 2% for more stubborn soils) | Room Temperature |
| Rinsing | Plain Water | Warm 95°F (35°C) | |
| Sanitizing | Clorox®Regular Bleach(8.25% Hypochlorite Concentration) | 2 Teaspoons/Gallon (Alternately a bleach with 5.25% Hypochlorite Concentration can be used at dilution of 3 Teaspoons/Gallon) |
- In repetitive batch-processing applications, frequent cleaning of the container will prolong the life of the blade assembly. In no case should actual running time between cleanings exceed 12 hour.
- Do not use container to store processed foods or beverages.
TO WASH AND RINSE CONTAINER:
- REMOVE CONTAINER FROM MOTOR BASE. Remove lid. Rinse container interior and lid under running water. Add washing solution to container. Scrub and flush out the container interior and lid to dislodge and remove as much food residue as possible. Empty container.
- Wipe down exterior of container with a soft cloth or sponge dampened with washing solution. Wash lid and lid insert in fresh washing solution. Fill container 14 full with fresh washing solution, cover (with lid only), place on motor base and run on the highest speed for two (2) minutes. Empty container.
- Repeat step (2) using clean rinse water in place of washing solution.
IMPORTANT
NOTE: IN ORDER TO MINIMIZE POSSIBILITY OF SCALDING, TEMPERATURE OF WASHING SOLUTION AND RINSE WATER MUST NOT EXCEED 115^ (46^) , AND QUANTITY USED MUST NOT EXCEED 1/4 CONTAINER FULL.
TO SANITIZE AND DRY CONTAINER:
- Wipe down exterior of container with a soft cloth or sponge dampened with sanitizing solution.
- Fill container with sanitizing solution, cover, place on motor base, and run on high speed for two (2) minutes. Empty container. Dislodge any residual moisture from blade assembly by placing empty container on motor base and running on the highest speed for two (2) seconds.
- Sanitize lid and lid insert by immersing in sanitizing solution for two (2) minutes.
- Do not rinse container, lid, or lid insert after sanitizing is completed. Allow parts to air-dry.
TO CLEAN AND SANITIZE MOTOR BASE:
- UNPLUG POWER CORD. Wipe down exterior surfaces of motor base with soft cloths or sponges dampened with washing solution, rinse water, and sanitizing solution. Prevent liquid from running into motor base by wringing all excess moisture from cloths or sponges before using them. DO NOT IMMERSE MOTOR BASE IN WASHING SOLUTION, RINSE WATER OR SANITIZING SOLUTION.
- Allow motor base to air-dry before using.
Any other servicing should be performed by an authorized service representative.
MX BLENDER ACCESSORIES GUIDE
| MODEL DESCRIPTION | ||
| CAC158* | Blending Assembly Kit - Includes Blade and Gasket | |
| CAC186* | Removable Drive Coupling for All Xtreme MX Series Blenders | |
| *Recommended maintenance: To ensure proper performance, replace every 3 to 6 months. | ||
| CAC95 | The Raptor® 64 oz., BPA-Free Copolyester Container Complete with Blade and Lid - Xtreme MX Series | |
| CAC93X | The Raptor® 48 oz., BPA-Free Copolyester Container Complete with Blade and Lid - Xtreme MX Series | |
| CAC116 | Blending Assembly Kit and Retainer Ring Kit for CAC93X & CAC95 | |
| CAC119 | Retainer Ring Wrench for CAC93X & CAC95 (to remove blending assembly from container) | |
| CAC159 | Retainer Ring Kit - Includes Retainer Ring and Gasket | |
| CAC161 | Drive Coupling Removal Tool for All Xtreme MX Series Blenders (to remove drive coupling from motor base) | |
| CAC162 | Drive Coupling & Coupling Removal Tool for All Xtreme MX Series Blenders (to remove drive coupling from motor base) | |
AUTHORIZED SERVICE CENTERS
For a zip code search of authorized service centers near you, visit waringcommercialproducts.com/support.
Or write to:

Waring Factory Service Center
314 Ella T. Grasso Ave.
Torrington, CT 06790
(800) 269-6640
Ship blenders for repair to the above address or to an Authorized Service Center. Do not ship to a Waring Sales Office.
NOTE: If your application involves the processing of biologically active material, we request that any items returned for service be sterilized before being shipped. Such items must be clearly identified as having been sterilized, both by a tag on the item itself and by a statement in the accompanying correspondence. Waring will not accept delivery of any return unless it is so identified.
Replacement parts for your out-of-warranty repairs are obtainable at the address below.
LIMITED THREE-YEAR MOTOR WARRANTY LIMITED TWO-YEAR WARRANTY
Waring warrants every new Waring® Commercial Blender to be free from defects in material and workmanship for a period of two years from the date of purchase when used with foodstuffs, nonabrasive liquids (other than detergents) and nonabrasive semi-liquids, providing it has not been subject to loads in excess of the indicated rating. In addition, the motor in this appliance has a full three-year warranty.
Under this warranty, Waring, during the warranty period, will repair or replace any part which, upon our examination, is defective in materials or workmanship, provided the product is delivered prepaid to the Waring Service Center at: 314 Ella T. Grasso Ave. Torrington, CT 06790, or any Factory Approved Service Center.
This warranty does not: a) apply to any product which has become worn, defective, damaged or broken due to misuse or due to repairs or servicing by other than the Waring Service Center or a Factory Approved Service Center, or due to abuse, misuse, overloading or tampering; or b) cover incidental or consequential damages of any kind.
The two-year warranty is applicable only to appliances used in the United States or Canada; this supersedes all other express product warranty or warranty statements. For Waring products sold outside of the U.S. and Canada, the warranty is the responsibility of the local importer or distributor. This warranty may vary according to local regulations.
Warning: This warranty is void if appliance is used on Direct Current (D.C.)

WARING COMMERCIAL
314 Ella T. Grasso Ave.
Torrington, CT 06790
Para性和 cost, visit the Waring commercial products.com/support.
Oswana a:

Waring Factory Service Center
314 Ella T. Grasso Ave.
Torrington, CT 06790
(800) 269-6640
Waring Factory Service Center
314 Ella T. Grasso Ave.
Torrington, CT 06790
(800) 269-6640
©2021 Waring Commercial
314 Ella T. Grasso Ave.
Torrington, CT 06790
1-800-4-WARING
www.waringcommercialproducts.com
MX Series IB
IBSERIEMX
035708
RV02-2104
21WC077627