
7015N - Blender Waring Commercial - Free user manual and instructions
Find the device manual for free 7015N Waring Commercial in PDF.


| Product Type | Commercial Blender |
| Model | 7015N |
| Brand | Waring Commercial |
| Container Capacity | 48 oz (1.4 L) |
| Container Material | Polycarbonate |
| Blade Material | Stainless Steel |
| Motor Power | 3.5 HP (2600 W) |
| Voltage | 120 V AC, 60 Hz |
| Speed Settings | Variable Speed with Pulse |
| Dimensions (H x W x D) | 20 x 7 x 8 in (51 x 18 x 20 cm) |
| Weight | 12 lb (5.4 kg) |
| Dishwasher Safe Container | Yes |
| Thermal Overload Protection | Yes |
| Replaceable Blade Assembly | Yes |
| Warranty | 1 Year Limited |
| Ideal For | Commercial kitchens, smoothies, sauces, purees |
| Certifications | NSF Listed, UL Listed |
Frequently Asked Questions - 7015N Waring Commercial
User questions about 7015N Waring Commercial
0 question about this device. Answer the ones you know or ask your own.
Ask a new question about this device
Download the instructions for your Blender in PDF format for free! Find your manual 7015N - Waring Commercial and take your electronic device back in hand. On this page are published all the documents necessary for the use of your device. 7015N by Waring Commercial.
USER MANUAL 7015N Waring Commercial
To minimize the possibility of scalding when blending hot materials, the following precautions and procedures must be observed:
1) If you are using the standard two-piece container lid that originally came with your blender, limit the amount of material processed to 1/2 pint.
NOTE: A special accessory lid assembly is available for use with stainless steel containers only, which allows safe processing of larger loads.
Order 1-Quart Hot Blending Lid, Catalog No. CAC14.
2) If you are using the standard two-piece container lid, completely remove the center portion of the lid before turning blender on. This will allow venting of the rapidly heated and expanding air present inside container when blender is running.
If you are using the special accessory lid, follow the instructions packed with the lid; venting will be accomplished automatically.
3) Always start blending on lowest speed setting, then progress to desire speed.
4) Never stand directly over blender when it is being started or while running.
SERVICE
Refer to the list of Factory Approved Service Centers enclosed with your Waring Blender for the name of the nearest Service Center or Write to:

SO AVENUE
06790
(800) 269-6640
Ship Blenders for repair to the above address or to a Factory Approved Service Center. Do not ship to a Waring Sales Office.
Replacement parts for your own “Out of Warranty” repairs are obtainable at the above address.

COMMERCIAL
www.waringproducts.com 014775 RV05 0306

COMMERCIAL
BLENDER
OPERATING MANUAL
natural_image
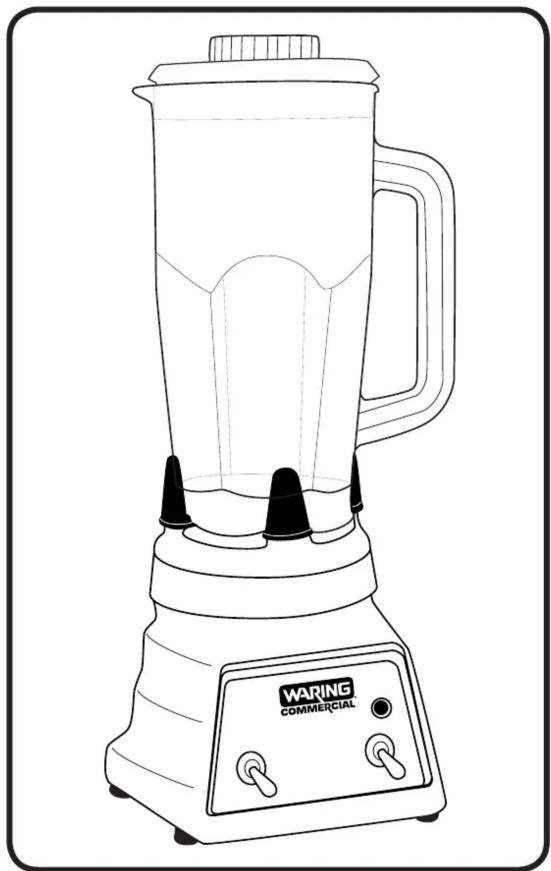
Line drawing of a Waring commercial blender with handle and control buttons (no text or symbols on the device itself)IMPORTANT SAFEGUARDS
When using electrical equipment basic safety precautions should always be followed including the following:
-
READ ALL INSTRUCTIONS.
-
To protect against electrical hazards do not immerse the Blender Base in water or other liquid.
-
Close supervision is necessary when any blender is used by or near children.
-
Unplug from outlet when not in use, before putting on or taking off parts, and before cleaning.
-
Avoid contacting moving parts.
-
Do not operate your blender with a damaged cord or plug or after the appliance malfunctions or is dropped or damaged in any manner. Return appliance to the nearest authorized service facility for examination, repair or electrical or mechanical adjustment.
-
The use of attachments including canning jars not recommended by the blender manufacturer may cause a risk of personal injury.
-
Do not use outdoors.
-
Do not let cord hang over edge of table or counter, or touch hot surfaces.
-
Keep hands and utensils out of container while blending to prevent the possibility of severe personal injury and/or damage to the blender. A rubber scraper may be used but must be used only when the blender is not running.
-
Blades are sharp. Handle carefully.
-
If your blender utilizes a removable Jar Base and Blade Assembly, to avoid injury never place cutter assembly cutting blades on base without container properly attached.
-
Always operate blender with cover in place.
-
When blending hot liquids, remove center piece of two-piece cover on those units supplied with this construction. See Hot Blending Instructions.
SAVE THESE INSTRUCTIONS
WARING COMMERCIAL
PRESET TIMER BLENDER
SPECIFICATIONS
• RATING 3.5A at 120VAC/50HZ (CATALOG NO. 7015) 1.5A at 230VAC/50HZ (CATALOG NO. 8015)
- AUTOMATIC Two preset timing intervals (15 seconds and 3 seconds) selectable via TIMER toggle switch on control panel. Timer can be bypassed for manual operation
- BASE Die cast zinc and steel, baked enamel and chrome finish top.
- CONTAINER 48 ounce capacity Lexan polycarbonate jar with stainless steel blade, two-piece plastic cover.
• CORD 6 foot, 18 gauge, three conductor grounded cord with strain relief.
• U.L. LISTED 120V models only.
CONTROL PANEL COMPONENTS
- MODE SELECTOR SWITCH Three position maintained contact toggle switch located on right hand side of control panel, labeled AUTO/OFF/MANUAL; selects desired operating mode.
- TIMING SELECTOR SWITCH Three position momentary contact toggle switch, spring loaded to center position, located on left hand side of control panel, labeled 15 SEC/3 SEC; selects desired timing interval.
- INDICATOR LAMP Neon pilot light; indicates when mode selector switch is in either AUTO or MANUAL position.
OPERATION INSTRUCTIONS
- Be sure mode selector switch is in the OFF (center) position.
- Plug power cord into properly wired and grounded outlet.
-
For AUTOMATIC operation:
-
Set mode selector switch to AUTO position. Indicator lamp will light.
- Momentarily move timing selector switch to position for time cycle desired. Motor will run for interval selected, and stop automatically.
NOTE: Override of the automatic stop can be obtained by holding the timing selector switch in position beyond the end of the preset interval. Motor will continue to run until switch is released.
- When finished blending, return mode selector switch to OFF position. Indicator lamp will extinguish.
-
For MANUAL operation:
-
Set mode selector switch to MANUAL position. Indicator lamp will light, and motor will run continuously.
-
When finished blending, return mode selector switch to OFF position. Motor will stop and indicator lamp will extinguish.
-
Unplug power cord from outlet when blender is not in use, before putting on or taking off any parts other than container, and before cleaning.


Brand : Waring Commercial
Model : 7015N
Category : Blender