NS20WLCD - Television INSIGNIA - Free user manual and instructions
Find the device manual for free NS20WLCD INSIGNIA in PDF.


| Product type | LCD TV |
| Brand | Insignia |
| Model | NS-20WLCD |
| Screen size | 20 inches (50.8 cm) |
| Dimensions (W x H x D) | 56.8 x 43.6 x 17.2 cm (22.4 x 17.2 x 6.8 in) |
| Weight | 9 kg (19.8 lb) |
| Power supply | 100-240 V AC, 50/60 Hz |
| Power consumption | 130 W (max) |
| TV standard | NTSC |
| Channels accessible | VHF 2-13, UHF 14-69, Cable 1-125 |
| Speaker | 8 W, 8 Ω x 2 |
| Inputs | RF, S-Video, Component Video (Y/Pb/Pr), AV (RCA), D-Sub (PC), Audio Line In |
| Parental control | Yes (MPAA, TV, Canada English/French ratings) |
| Closed captions | Yes (CC1-4, T1-4) |
| Sleep timer | Yes (adjustable up to 120 min) |
| Preset picture modes | Bright (Brightness), Soft (Softness), Standard, User (User) |
| Screen formats (Zoom) | Full screen, Standard (4:3) |
| Included accessories | Remote control, User guide |
| Operating temperature | 5 to 40 °C |
| Cleaning | Soft lint-free cloth, diluted mild detergent |
| Safety | Unplug before cleaning, do not obstruct ventilation |
Frequently Asked Questions - NS20WLCD INSIGNIA
User questions about NS20WLCD INSIGNIA
0 question about this device. Answer the ones you know or ask your own.
Ask a new question about this device
Download the instructions for your Television in PDF format for free! Find your manual NS20WLCD - INSIGNIA and take your electronic device back in hand. On this page are published all the documents necessary for the use of your device. NS20WLCD by INSIGNIA.
USER MANUAL NS20WLCD INSIGNIA
Insignia NS-20WLCD 20" LCD TV
Contents
| Safety information | 3 |
| Features | 5 |
| Setting up your TV | 6 |
| Using your TV | 10 |
| Maintaining | 19 |
| Troubleshooting | 20 |
| Specifications | 20 |
| Copyright | 20 |
| Français | 23 |
| Español | 45 |
Safety information
Caution
To prevent electric shock, match the wide blade on the power cord plug to the wide slot on an electric outlet. If the plug does not fit, consult a licensed electrician to replace the obsolete outlet. Do not modify the power cord plug, or you will defeat this safety feature.

This symbol indicates that dangerous voltage constituting a risk of electric shock is present within your TV. This label is located on the back of your TV.

This symbol indicates that there are important operating and maintenance instructions in the literature accompanying your TV.
Warning
Your TV contains tin-lead solder and a fluorescent lamp containing a small amount of mercury. Disposal of these materials may be regulated for environmental reasons. For disposal or recycling information, contact your local authorities or the Electronic Industries Alliance at www.eia.org.
Read instructions
Read all of the safety and operating instructions before you use your TV.
Retain instructions
Retain safety and operating instructions for future reference.
Follow warnings and instructions
Follow all warnings on your TV and in the operating instructions. Follow all operating and use instructions.
Water and moisture
Do not use your TV near water. For example, do not use it near a bath tub, wash bowl, kitchen sink, or laundry tub, in a wet basement, or near a swimming pool.
Cleaning
Unplug your TV before cleaning. Do not use liquid or aerosol cleaners. Use only a damp cloth to clean the exterior of your TV.

Ventilation
Slots and openings in the cabinet and the back or bottom are provided for ventilation, reliable operation, and protection from overheating. These openings must not be blocked or covered. Do not block the openings by placing your TV on a bed, sofa, rug, or other similar surface. Do not place your TV near or over a radiator or heat register. Do not place your TV in a built-in installation, such as a bookcase or rack, unless you provide correct ventilation or follow the manufacturer's instructions.
Heat
Make sure that your TV is located away from heat sources such as radiators, heat registers, stoves, or other products (including amplifiers) that produce heat.
Grounding or polarization
Do not defeat the safety purpose of the polarized or grounding-type plug. A polarized plug has two blades with one wider than the other. A grounding type plug has two blades and a grounding prong. The wide blade or grounding prong are provided for your safety. If the plug does not fit, contact an electrician to replace the obsolete outlet.
Power cord protection
Route power cords so that they are not likely to be walked on or pinched by items placed on or against them. Pay particular attention to cords at plugs, convenience receptacles, and the point where they exit from your TV.
Attachments
Do not use attachments not recommended by Insignia because they may cause hazards.
Stand
Do not place your TV on an unstable cart, stand, tripod, bracket, or table. Your TV may fall, causing serious personal injury and serious damage to your TV. Use only with a cart, stand, tripod, bracket, or table recommended by the manufacturer, or sold with your TV. If you mount your TV to the wall, follow the manufacturer's instructions and use a mounting accessory recommended by the manufacturer. Your TV and cart combination should be moved with care. Quick stops, excessive force, and uneven surfaces may cause your TV and cart combination to overturn.
Lightning
For added protection for your TV's receiver during a lightning storm, or when it is left unattended and unused for long periods of time, unplug it from the power outlet and disconnect the antenna or cable system. This helps prevent damage to your TV from lightning and power line surges.
Servicing
Do not attempt to service your TV yourself because opening or removing covers may expose you to dangerous voltage or other hazards. Refer all servicing to qualified service personnel.
Replacement parts
When replacement parts are required, make sure that the service technician uses replacement parts specified by the manufacturer that have the same characteristics as the original part. Unauthorized substitutions may result in fire, electric shock, personal injury, or other hazards.
Overloading
Do not overload power outlets and extension cords because this can result in a risk of fire or electric shock.
Object and liquid entry
Never push objects of any kind into your TV through openings because objects may touch dangerous voltage points or short out parts that could result in a fire or electric shock. Never spill liquid of any kind on your TV.
Damage requiring service
Unplug this TV from the power outlet and refer servicing to qualified service personnel under the following conditions:
- When the power supply cord or plug is damaged or frayed.
- If liquid has been spilled or objects have fallen into your TV.
- If your TV has been exposed to rain or water.
- If your TV does not operate normally by following the operating instructions. Adjust only those controls that are covered by the operating instructions because incorrect adjustment of other controls may result in damage and will often require extensive work by a qualified technician to restore your TV to its normal operation.
- If your TV has been dropped or damaged in any way.
- When your TV exhibits a distinct change in performance.
Replacement parts
When replacement parts are required, make sure that the service technician uses replacement parts specified by the manufacturer that have the same characteristics as the original part. Unauthorized substitutions may result in fire, electric shock, personal injury, or other hazards.
Safety check
After completing any service or repair to this TV, ask the service technician to perform routine safety checks to determine that your TV is in correct operating condition.
Power source
Operate your TV only from the type of power source indicated on the marking label. If you are not sure of the type power supplied to your home, consult your TV dealer or local power company.
Lightning
For added protection for your TV's receiver during a lightning storm, or when it is left unattended and unused for long periods of time, unplug it from the power outlet and disconnect the antenna or cable system. This helps prevent damage to your TV from lightning and power line surges.
Screen protection
Your TV's screen is made of glass. Do not drop your TV or hit the glass screen. If the screen breaks, be careful of broken glass.
Pixel defect
Your TV's screen is designed to display finely detailed pictures. Occasionally, a few non-active pixels may appear on the screen as fixed points of blue, green, or red. This is not a defect and does not affect your TV's performance.
Outdoor antenna grounding
If an outside antenna or cable system is connected to your TV, make sure that the antenna or cable system is grounded to provide some protection against voltage surges and built-up static charges. Article 810 of the National Electrical Code, ANSI/NFPA No. 70, provides information with respect to correct grounding of the mast and supporting structure, grounding of the lead-in wire to an antenna discharge unit, size of grounding conductors, location of the antenna-discharge unit, connection to grounding electrodes, and requirements for the grounding electrode.

1 Electric service equipment
2 Power service grounding electrode system
3 Ground clamps
4 Grounding conductors
5 Antenna discharge unit
6 Grounding clamp
7 Antenna lead-in wire
Note to CATV system installer
This reminder is provided to call the CATV system installer's attention to Article 820-40 of the NEC that provides guidelines for correct grounding and in particular, specifies that the cable ground must be connected to the grounding system of the building as close to the point of cable entry as practical.
Features
Front
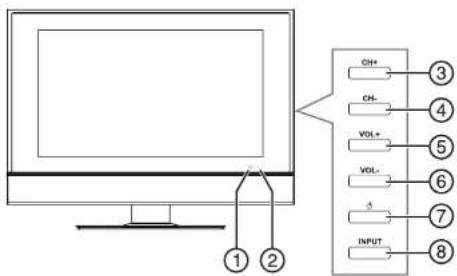
| Control Description | ||
| 1 Remote sensor Receives signals from the remote control. Do not block. | ||
| 2 Power indicator When your TV is turned on, lights blue. When your TV is in standby mode, lights red. | ||
| 3 CH+ button Press to change to the next higher TV channel. | ||
| 4 CH- button Press to change to the next lower TV channel. | ||
| 5 VOL+ button Press to increase the volume. | ||
| 6 VOL- button Press to decrease the volume. | ||
| 7 Power/Standby button Press to turn your TV on or off. When your TV is turned on, the power indicator lights. | ||
| 8 INPUT Press to select the signal source. | ||
Back
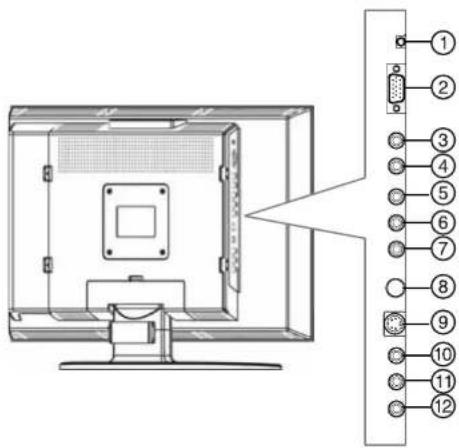
| Jack Description | ||
| 1 LINE IN Plug a computer audio cable | ||
| Jack Description | ||
| 2 D-Sub | Plug a computer video cable into this jack. | |
| 3 Component left audio if you are using a component video connection, plug the left audio cable into this jack. | ||
| 4 Component right audio | If you are using a component video connection, plug the right audio cable into this jack | |
| 5 Component video Pr/Cr | If you are using a component video connection, plug the Pr/Cr connector on a component video cable into this jack. | |
| 6 Component video Pb/Cb | If you are using a component video connection, plug the Pb/Cb connector on a component video cable into this jack. | |
| 7 Component video Y | If you are using a component video connection, plug the Y connector on a component video cable into this jack. | |
| 8 RF | Plug the antenna or cable TV into this jack. | |
| 9 S-VIDEO | Plug an S-Video device into this jack. An S-Video cable does not carry sound. You need to plug the right and left audio connectors on a standard audio/video cable into the AV IN right and left jacks to provide sound. | |
| 10 | AV IN right audio | Plug the right audio connector on a standard audio/video cable into this jack to connect an external device, such as a VCR. |
| 11 | AV IN left audio | Plug the left audio connector on a standard audio/video cable into this jack, such as a VCR. |
| 12 | AV IN video | Plug the video connector on a standard audio/video cable into this jack, such as a VCR. |
Remote control
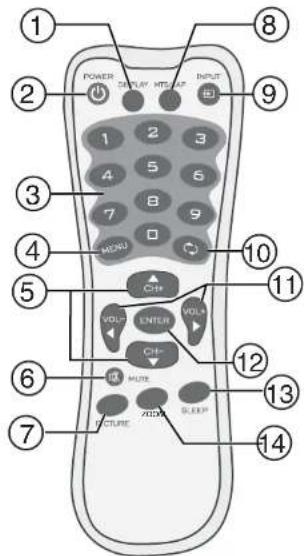
| Button Description | ||
| 1 Display | Press to display information,such as channel number, audio mode, or signal source. | |
| 2 | Power ⏻ | Press to turn your TV on or off. |
| 3 Numbers | Press to change channels. Inthe on-screen display (OSD),press to enter your password. | |
| 4 MENU | Press to open and close the OSD. | |
| 5 CH+ and CH- | Press to change channels.When the OSD is open, press to select menu options. | |
| 6 MUTE | Press to mute the sound. | Press again to restore the sound. |
| 7 PICTURE | Press to select the picture mode. | |
| 8 MTS/SAP | Press to select the stereo mode. | |
| 9 INPUT | Press to select the signal source. | |
| 10 | Return ⏻ | Press to go to the previously viewed channel. |
| 11 VOL+ | and VOL- | Press to increase or decrease the volume.When the OSD is open, press to adjust options. |
| 12 ENTER | Press to confirm selections. | |
| 13 SLEEP | Press to set the sleep timer. | |
| 14 ZOOM | Press to select the aspect ratio. | |
Using the remote control
To use the remote control:
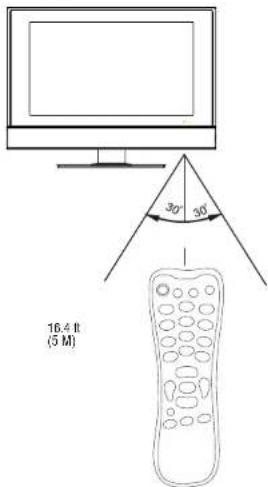
- Point the remote control towards the remote sensor on the front of your TV.
Note
The location of the remote sensor may vary.
The following illustration shows the remote control range.
Notes
- Do not expose the remote control to shock or liquids.
- Do not use the remote control in an area with high humidity.
- Do not place the remote control in direct sunlight.
- Do not place objects, such as furniture, between the remote
control and the remote sensor. - The remote control may not work if direct sunlight or bright light shines on the remote sensor. Either move your TV or change the angle at which you use the remote control.
Setting up your TV
Notes
- Check all cables and connectors before making any connections.
- Loose connectors can cause image and color problems, so make sure that all connectors are connected securely.
- Always turn off your TV and any connected devices before you connect or disconnect a device.
- The illustrations in the following tasks may vary from your model.
Installing remote control batteries
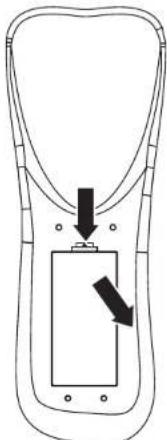
To install the remote control batteries:
1 Remove the battery cover.
natural_image
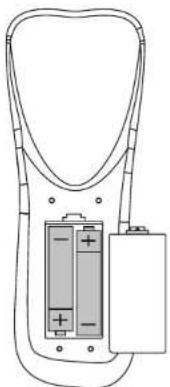
Diagram of a device with a rectangular component and two arrows indicating direction (no text or symbols)2 Insert two AAA batteries into the battery compartment. Make sure that you match the + and - symbols on the batteries with the + and - symbols in the battery compartment.
natural_image
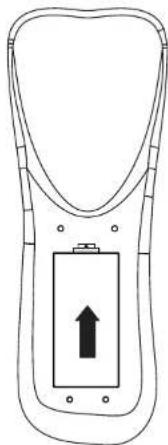
Diagram of a handheld electronic device with two batteries and a battery pack (no text or symbols)3 Replace the cover.
natural_image
Diagram of a device with an upward arrow inside a rectangular housing (no text or symbols)Notes
- Do not mix batteries of different types.
- Do not mix old and new batteries.
- Remove batteries when the charge is depleted.
- Battery chemicals can cause a rash. If the batteries leak, clean the battery compartment with a cloth. If chemicals touch your skin, wash immediately.
• The batteries that came with your TV may have a shorter life than new batteries. - If the remote control is not going to be used for an extended period of time, remove the batteries.
Connecting your TV to an electrical outlet
To connect your TV to an electrical outlet:
- Plug the power cord into an electrical outlet.
Notes
• Make sure that you use the correct type of power. See the label on your TV.
- If you do not intend to use your TV for an extended period of time, unplug the power cord from the electrical outlet.
Connecting an outside antenna
Antenna cables come in two types: 75 ohm and 300 ohm.
75 ohm cable
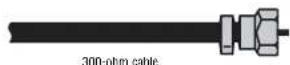

If your antenna cable has a 75 ohm connector, connect the cable to the RF jack on the back of your TV.
INSIGNIA™
Insignia NS-20WLCD 20" LCD TV
If your antenna cable has a 300 ohm connector, connect the cable to a 300-75 ohm adapter (not included), connect the adapter to a 75 ohm cable, then connect the other end of the 75 ohm connector to the RF jack on the back of your TV.
Warning
take sure that you turn off and unplug your TV before stalling devices.
Use the following illustration to connect an outside antenna.
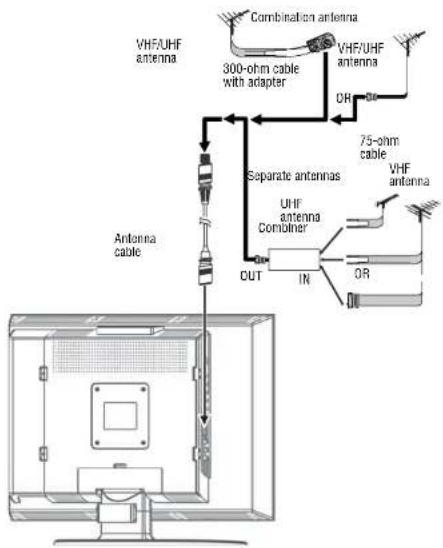
flowchart
graph TD
    A["VHF/UHF antenna"] --> B["300-ohm cable with adapter"]
    B --> C{VHF/UHF antenna}
    C --> D["Combination antenna"]
    C --> E["75-ohm cable"]
    E --> F["Separate antennas"]
    F --> G["UHF antenna Combiner"]
    G --> H["OUT"]
    G --> I["IN"]
    G --> J["OR"]
    K["Antenna cable"] --> L["Computer monitor"]
Connecting cable TV
Your TV has a 75 ohm jack for connecting cable TV.
Some cable TV providers scramble the signals for "premium" (pay) channels. To view these channels you need a converter/descrambler box.
If you do not have a converter/descrambler box, you can connect your cable TV directly to your TV. If you have a converter/descrambler box, you can connect your cable TV using an RF switch (not supplied). For more information about connecting a converter/descramble box, contact your cable TV provider.
Warning
Make sure that you turn off and unplug your TV before installing devices.
To connect cable TV without a converter/descrambler box:
1 Connect one end of a 75 ohm cable to the RF jack on the back of your TV.
2 Connect the other end of the cable to the cable TV wall outlet.
To connect cable TV with a converter/descrambler box:
- Use the following illustration to connect a converter/descrambler box. (The RF switch and the signal splitter are not provided.) Set the RF switch to the A position to watch unscrambled channels using your TV remote control. Set the RF switch to the B position to watch scrambled channels using the converter/descrambler controls.

flowchart
graph LR
    A["RF"] --> B["RF switch"]
    B --> C["A"]
    B --> D["B"]
    C --> E["Two-sat signal splitter"]
    D --> E
    E --> F["Cable TV"]
    G["Cable converter/descrambler box"] --> H["Out"]
    G --> I["In"]
Connecting a VCR
You can connect a VCR with a standard audio/video cable or with a S-Video cable. The S-Video cable does not carry sound. If you use an S-Video cable, you need to use an audio cable to connect sound.
Note
For better video, use the S-Video jack if your VCR has an S-Video connection.
Warning
Make sure that you turn off and unplug your TV before installing devices.
Use the following illustration to connect a VCR to your TV.
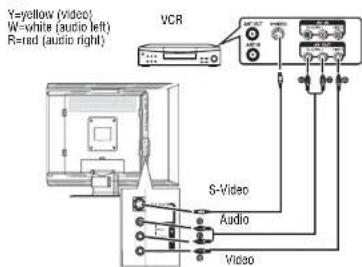
To play the VCR:
1 Turn on your TV.
2 Press the INPUT button one or more times to select Video (or S-Video if you connected the VCR to the S-Video jack).
3 Turn on your VCR.
4 Insert a videotape, then press the PLAY button.
Connecting a camcorder
Warning
Make sure that you turn off and unplug your TV before installing devices.
Use the following illustration to connect a camcorder to your TV.
To connect a camcorder:
1 Plug the audio/video cable into the AUDIO L, AUDIO R IN, and VIDEO IN jacks on the back of your TV.
2 Plug the other end of the audio/video cable into the audio and video out jacks on the camcorder.
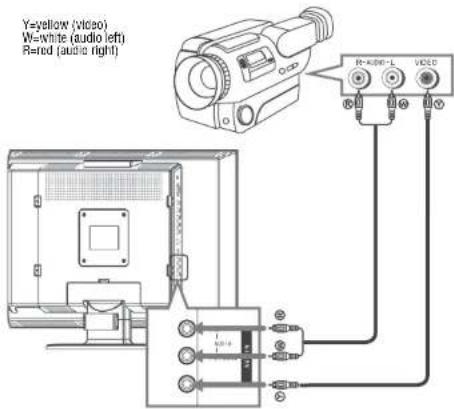
To playback from the camcorder:
1 Turn on your TV.
2 Press the INPUT button one or more times to select VIDEO.
3 Turn on the camcorder, then set it to output mode. See your camcorder documentation for more information.
4 Insert a tape into the camcorder, then press the Play button.
Connecting a DVD player using component video
Warning
Make sure that you turn off and unplug your TV before installing devices.
To connect a DVD player using component video:
1 Plug the Y, Pb, and Pr connectors on a component video cable into the Y, Pb, and Pr IN jacks on the back of your TV.
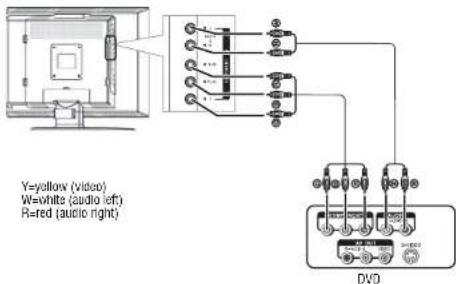
2 Plug the other ends of the cable into the Y, Pb, and Pr OUT jacks on the DVD player. The jacks on the DVD player may be labeled Y, Cb, and Cr.
3 Plug the right (red) and left (white) connectors on a standard audio/video cable into the right (red) and left (white) COMPONENT IN audio jacks on the back of your TV.
4 Plug the audio connectors on the other end of the audio/video cable into the audio OUT jacks on the DVD player.
To play a DVD:
1 Turn on your TV.
2 Press the INPUT button one or more times to select YPbPr.
3 Turn on the DVD player.
4 Insert a DVD disc, then press the Play button.
Connecting a PC
To connect a PC:
1 Plug a D-Sub cable into the D-Sub IN jack on the back of your TV.
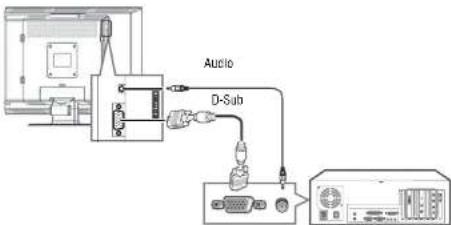
2 Plug the other end of the D-Sub cable into the D-Sub OUT jack on the computer.
3 Plug an audio cable into the D-Sub LINE IN jack on the back of your TV.
4 Plug the other end of the audio cable into the audio out jack on the computer.
To view the computer screen on your TV:
1 Tum on your TV.
2 Press the INPUT button one or more times to select D-Sub.
3 Turn on your computer, and check your computer system requirements. See your computer documentation for more information.
4 Adjust the screen resolution and other settings on your computer, if necessary.
Using your TV
Turning your TV on and off
To turn your TV on and off:
1 Make sure that the power cord is connected to your TV and an electrical outlet.
2 Press the button to turn on your TV.
3 Press the button again to turn off your TV.
Selecting the TV source
To select the TV source:
1 Press the MENU button to open the on-screen display (OSD).
2 Press the CH+ or CH− button one or more times to select Channel.
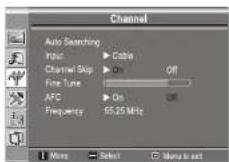
3 Press the ENTER, VOL+, or VOL- button to open the Channel menu.
4 Press the CH+ or CH- button to select Input.
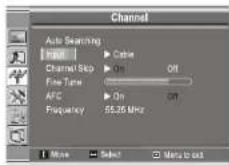
5 Press the ENTER, VOL+, or VOL- button to select Antenna or Cable.
Setting up the channel list
To set up the channel list:
1 Press the MENU button to open the on-screen display (OSD).
2 Press the CH+ or CH− button one or more times to select Channel.
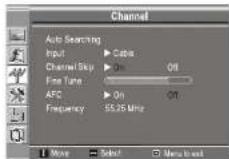
3 Press the ENTER, VOL+, or VOL- button to open the Channel menu. The Auto Searching option is highlighted.
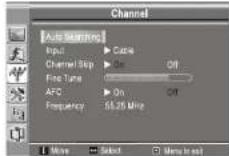
4 Press the ENTER, VOL+, or VOL- button to start searching for channels. If you want to stop the search, press the MENU button.
Adding and erasing channels
To add and erase channels:
1 Press the number buttons for the channel you want to add or erase.
2 Press the MENU button to open the on-screen display (OSD).
3 Press the CH+ or CH- button one or more times to select Channel.
4 Press the ENTER, VOL+, or VOL- button to open the Channel menu.
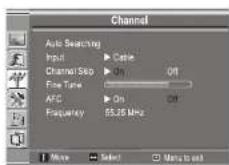
5 Press the CH+ or CH- one or more times to select Channel Skip.
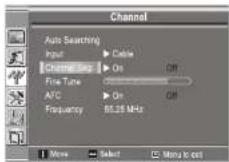
6 Press the ENTER, VOL+, or VOL- button to select On or Off.
If you select On, the channel is erased from the list.
If you select Off, the channel is added to the list.
When you erase a channel, you cannot tune to the channel with the CH+ or CH- buttons. You can tune to the channel by pressing the numbers buttons for the channel.
Fine tuning the TV signal
Automatically fine-tuning
To automatically fine-tune the TV signal:
1 Press the MENU button to open the on-screen display (OSD).
2 Press the CH+ or CH- button to select Channel.
3 Press the ENTER, VOL+, or VOL- button to open the Channel menu.
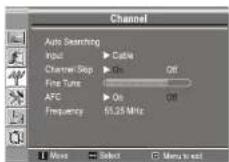
4 Press the CH+ or CH- button one or more times to select AFC.
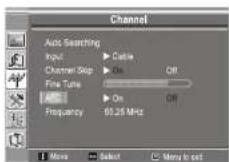
5 Press the ENTER, VOL+, or VOL- button to turn the AFC option on or off. When the AFC option is turned on, your TV automatically fine-tunes for the best picture and sound.
Manually fine-tuning
To manually fine-tune the TV signal:
1 Press the MENU button to open the on-screen display (OSD).
2 Press the CH+ or CH- button to select Channel.
3 Press the ENTER, VOL+, or VOL- button to open the Channel menu.
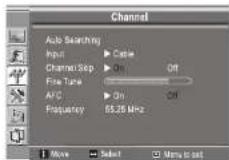
4 Press the CH+ or CH− button one or more times to select Fine Tune.
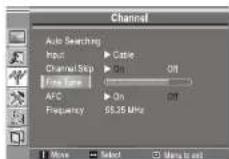
5 Press the VOL+ or VOL- button one or more times to adjust the picture and sound.
Note
If you manually fine-tune a program, the AFC option turns off.
Changing channels
To change the channels:
- Press the CH+ or CH− button one or more times to select the channel you want.
• To select a one-digit channel number, press the number button for the channel, then press the ENTER button or wait a few seconds.
• To select a two-digit channel number, press the two number buttons in sequence, then press the ENTER button or wait a few seconds.
• To select a three-digit channel number, press the three number buttons in sequence.
Note
To watch a channel that has been erased from the channel list, you must use the number buttons to tune the channel.
Adjusting the volume
To adjust the volume:
- Press the VOL+ or VOL− button to increase or decrease the volume.
- Press the MUTE button to mute sound. Press the button again to restore sound.
Selecting a menu language
To select a menu language:
1 Press the MENU button to open the OSD.
2 Press the CH+ or CH- button one or more times to select Display.
INSIGNIA™
3 Press the ENTER, VOL+, or VOL- button to open the Display menu. Language is highlighted.
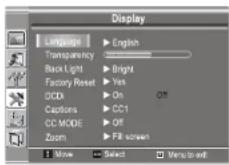
4 Press the ENTER, VOL+, or VOL- button one or more times to select English, French, or Spanish.
Using preset picture mode
To use the preset picture mode:
1 Press the MENU button to open the OSD.
2 Press the CH+ or CH- button one or more times to select Picture.
3 Press the ENTER, VOL+, or VOL- button to open the Picture menu. Picture Mode is highlighted.
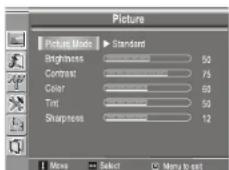
4 Press the ENTER, VOL+, or VOL- button to select the picture mode you want. You can select:
- Bright–Select for a bright picture.
- Soft–Select for a finely detailed picture.
- Standard—Select for a normal picture.
- User—Select to use picture settings you have customized. For more information about the settings you can customize, see "Customizing the picture" on page 12.
You can also press the PICTURE button to select a picture mode.
Customizing the picture
To customize the picture:
1 Press the MENU button to open the OSD. Picture is highlighted.
2 Press the ENTER, VOL+, or VOL- button to open the Picture menu.
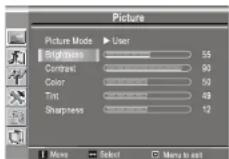
3 Press the CH+ or CH− button one or more times to select the option you want to adjust.
Insignia NS-20WLCD 20" LCD TV
4 Press the VOL+ or VOL- button one or more time to adjust the option.
If you are in TV or Video mode, you can adjust the following options:
- Brightness—Adjusts the screen brightness.
- Contrast–Adjusts the screen contrast.
• Color—Adjusts the color saturation. - Tint-Adjusts the image tint.
- Sharpness—Adjusts the sharpness.
If you are in D-Sub mode, you can adjust the following options:
- Brightness—Adjusts the screen brightness.
- Contrast—Adjusts the screen contrast.
• Color-Adjusts the color saturation.
For information about other options you can change in D-Sub mode, see "Adjusting the image in D-Sub mode" on page 12.
5 Press the MENU button.
Adjusting the image in D-Sub mode
If you are using the D-Sub mode, you can adjust the:
• Picture (automatically)
- Clock and phase
- Image position
Adjusting the picture automatically
To adjust the picture automatically:
1 Press the MENU button to open the OSD.
2 Press the CH+ or CH- button one or more times to select Image.
3 Press the ENTER, VOL+, or VOL- button to open the Image menu. The Auto Adjustment option is highlighted.
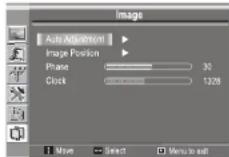
4 Press the ENTER, VOL+, or VOL- button to open the Auto Adjustment menu. The Auto Adjustment/Yes option is highlighted.
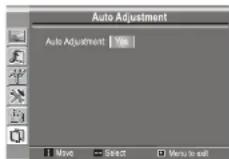
5 Press the ENTER, VOL+, or VOL- button to start the auto adjustment.
Adjusting the clock and phase
Adjust the clock frequency if the display image shimmers or has rainbow-like noise.
Adjust the phase setting if the display image is blurry.
To adjust the clock and phase:
1 Press the MENU button to open the OSD.
2 Press the CH+ or CH- button one or more times to select Image.
3 Press the ENTER, VOL+, or VOL- button to open the Image menu.
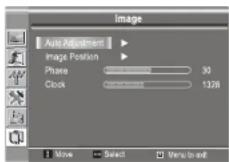
4 Press the CH+ or CH- button one or more times to select Clock or Phase.
5 Press the VOL+ or VOL- button to adjust the option.
Adjusting the image position
To adjust the image position (alignment):
1 Press the MENU button to open the OSD.
2 Press the CH+ or CH− button one or more times to select Image.
3 Press the ENTER, VOL+, or VOL- button to open the Image menu.
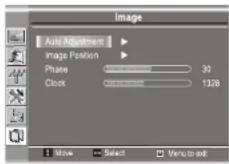
4 Press the CH+ or CH- button one or more times to select Image Position.
5 Press the ENTER, VOL+, or VOL- button to open the Image Position menu.
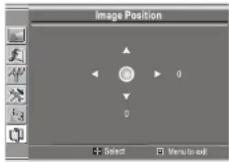
6 Press the CH+, CH-, VOL+, or VOL- button to adjust the image position.
Adjusting the sound
Setting the stereo mode
To set the stereo mode:
1 Press the MENU button to open the OSD.
2 Press the CH+ or CH- button one or more times to select Sound.
3 Press the ENTER, VOL+, or VOL- button to open the Sound menu.
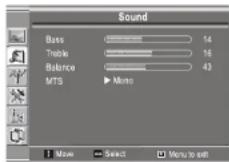
4 Press the CH+ or CH− button one or more times to select MTS.
5 Press the ENTER, VOL+, or VOL- button one or more times to select the stereo mode you want. You can select:
- Mono—Select to output the same sound to both speakers.
- Stereo—Select to output the sound in stereo. The program must be broadcast in stereo for this option to work. If you have problems listening to a stereo broadcast, select Force Mono to listen to the program in mono.
- SAP—Select to listen to a secondary audio program. The program must have an secondary audio program for this option to work.
You can also press the MTS/SAP button to select the sound mode.
Customizing sound
To customize the sound settings:
1 Press the MENU button to open the OSD.
2 Press the CH+ or CH- button one or more times to select Sound.
3 Press the ENTER, VOL+, or VOL- button to open the Sound menu.
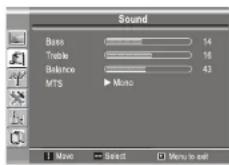
4 Press the CH+ or CH− button to select Bass, Treble, or Balance.
- Bass-Adjusts low sounds.
- Treble–Adjusts high sounds.
• Balance—Adjusts the left and right volumes.
5 Press the VOL+ or VOL- button to adjust the option.
Adjusting the menu transparency
To adjust the menu transparency:
1 Press the MENU button to open the OSD.
2 Press the CH+ or CH- button to select Display.
3 Press the ENTER, VOL+, or VOL- button to open the Display menu.
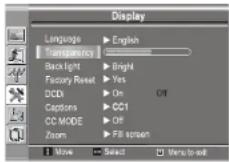
4 Press the CH+ or CH− to select the Transparency option.
5 Press the VOL+ or VOL- button to adjust the option.
Adjusting the back light
To adjust the back light:
1 Press the MENU button to open the OSD.
2 Press the CH+ or CH- button to select Display.
3 Press the ENTER, VOL+, or VOL- button to open the Display menu.
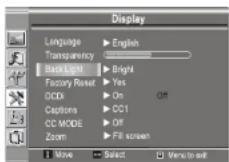
4 Press the CH+ or CH- button one or more times to select the Back Light option.
5 Press the ENTER, VOL+, or VOL- button to adjust the back light.
Setting the DCDi feature
The DCDi feature enhances picture quality by eliminating jagged edges from the display image.
To set the DCDi feature:
1 Press the MENU button to open the OSD.
2 Press the CH+ or CH− button to select Display.
3 Press the ENTER, VOL+, or VOL- button to open the Display menu.
4 Press the CH+ or CH- button one or more times to select DCDI.
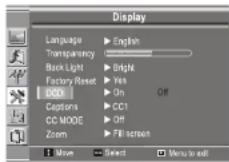
5 Press the ENTER, VOL+, or VOL- button to select On or Off.
Setting the zoom (aspect ratio) mode
The Zoom option lets you select the aspect ratio so the image is displayed full-screen or in 4:3 aspect ratio.
To set the zoom mode:
1 Press the MENU button to open the OSD.
2 Press the CH+ or CH− button to select Display.
3 Press the ENTER, VOL+, or VOL- button to open the Display menu.
4 Press the CH+ or CH- button one or more times to select Zoom.
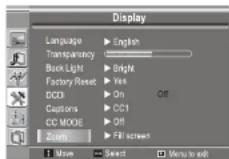
5 Press the ENTER, VOL+, or VOL- button to select Fill screen or Standard. You can also press the ZOOM button to select an aspect ration.
Restoring default TV settings
To restore the default TV settings:
1 Press the MENU button to open the OSD.
2 Press the CH+ or CH− button to select Display.
3 Press the ENTER, VOL+, or VOL- button to open the Display menu.
4 Press the CH+ or CH− button one or more times to select Factory Reset.
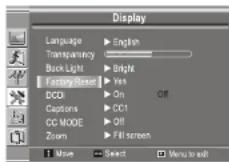
Caution
Selecting Yes will reset all your TV settings to the factory defaults.
5 Press the ENTER, VOL+, or VOL- button to select Yes and reset the settings.
Setting the sleep timer
To set the sleep timer:
- Press the SLEEP button one or more times to select the amount of time you want your TV to wait before it turns off.
- To cancel the sleep timer, press the SLEEP button one or more times until Off appears.
Viewing closed captions
Your TV can display the closed captions that are broadcast with certain TV programs. These captions are usually subtitles. All VCRs record closed captions if the recorded program has closed captions. Your TV can display the closed captions on videotapes.
Note
The closed caption feature does not work with YPbPr or D-Sub video connections.
To view closed captions:
1 Press the MENU button to open the OSD.
2 Press the CH+ or CH− button one or more times to select Display.
3 Press the ENTER, VOL+, or VOL- button to open the Display menu.
4 Press the CH+ or CH- button one or more times to select Captions.
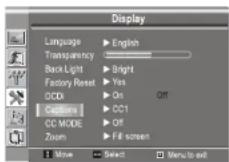
5 Press the ENTER, VOL+, or VOL- button to select the closed caption setting you want. You can select:
- CC1, CC2, CC3, or CC4—Select to view subscripts of dialogs or commentaries of TV dramas or news programs. Your TV shows the captions and a clear view of the program.
- T1, T2, T3, or T4—Select to view various types of information, such as a TV program guide or weather forecast. Your TV displays the caption over the TV image.
Setting the closed caption mode
To set the closed caption mode:
1 Press the MENU button to open the OSD.
2 Press the CH+ or CH- button to select Display.
3 Press the ENTER, VOL+, or VOL- button to open the Display menu.
4 Press the CH+ or CH- button one or more times to select CC MODE.
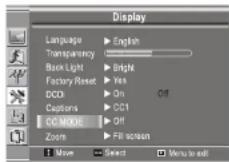
5 Press the ENTER, VOL+, or VOL- button to select On, Only Mute, or Off.
If you select Only Mute, your TV displays closed captions when you mute the sound.
Note
If you experience problems with the CCD, open the Display menu, select CC MODE, press the button, then select On and Only Mute. On changes to On+ and Only Mute changes to Only Mute+.
Setting up parental controls
You can use the parental controls feature to control the types of programs your children watch. You can set parental controls for movies (MPAA rating) and TV programs.
The movie ratings are based on age. The TV ratings are based on age and content.
MPAA ratings
| Rating Description | |
| G General audiences. | Rated for all ages. |
| PG Parental guidance suggested. | Some content may not be suitable for children. |
| PG-13 Parental guidance strongly suggested. | Some content may not be suitable for children under 13 years of age. |
| R Restricted. No suitable for children under 17 years of age without parental supervision. | |
| NC-17 Not suitable for children under 17 years of age. | |
| X Adults only. This rating is an older version of the NC-17 rating. | |
When you block a rating, that rating and all other ratings above that rating are locked. For example, if you block PG-13, the R, NC-17, and X ratings are automatically blocked.
To set up movie parental controls:
1 Press the MENU button to open the OSD.
2 Press the CH+ or CH- button one or more times to select Parental Controls.
INSIGNIA™
Insignia NS-20WLCD 20" LCD TV
3 Press the ENTER, VOL+, or VOL- button to open the Password Controls menu.
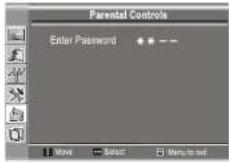
4 Use the number buttons to enter your password. The default password is 1111.
5 Press the ENTER, VOL+, or VOL- button to open the Parental Controls menu.
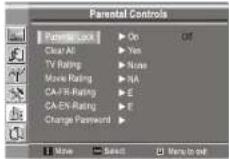
6 Press the CH+ or CH- button one or more times to select Movie Rating.
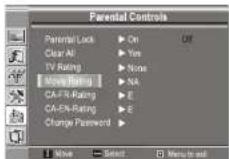
7 Press the ENTER, VOL+, or VOL- button to open the Movie Rating menu.
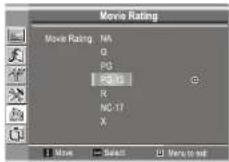
8 Press the CH+ or CH- button to select the movie rating you want to block.
9 Press the ENTER, VOL+, or VOL- button to confirm, then press the MENU button.
TV ratings (U.S.)
TV ratings are age and content based. Some of the age ratings let you also specify types of content within these ratings that you want to block.
| Age rating | Description |
| TV-Y All children. | |
| TV-Y7 Children seven years of age or older. | |
| TV-G General audience. | |
| TV-PG Parental guidance suggested. | |
| TV-14 Parental guidance strongly suggested.Not suitable for children under 14 years of age. | |
| TV-MA Mature audiences only. | |
| Age rating | D | L | S | V | F | ||
| T | V | - | Y | X | X | X | |
| T | V | - | Y | 7 | X | X | |
| T | V | - | G | X | X | X | |
| T | V | - | P | G | 0 | 0 | |
| T | V | - | 1 | 4 | 0 | 0 | |
| T | V | - | M | A | 0 | ||
| V | ||
| X | X | |
| X | X | |
| X | ||
| 0 | 0 | |
| 0 | 0 | |
| 0 | 0 | |
Note
In the content rating table
X=A content rating you can set, but which is not normally broadcast by TV stations.
O=A content rating you can set that is broadcast by TV stations.
D=Suggestive dialog
L=Strong or vulgar language
S=Sexual content
V=Violence
FV=Fantasy violence
To set up TV parental controls:
1 Press the MENU button to open the OSD.
2 Press the CH+ or CH- button one or more times to select Parental Controls.
3 Press the ENTER, VOL+, or VOL- button to open the password menu.
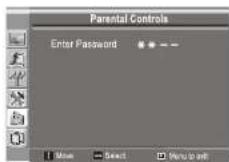
4 Use the number buttons to enter your password. The default password is 1111.
5 Press the ENTER, VOL+, or VOL- button to open the Parental Controls menu.
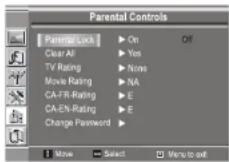
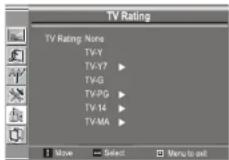
6 Press the CH+ or CH- button one or more times to select TV Rating.
7 Press the ENTER, VOL+, or VOL- button open the TV Rating menu.
8 Press the CH+ or CH- button to select the age rating you want to block.
9 Press the ENTER, VOL+, or VOL- button to confirm the setting. If the age rating has related content ratings, a content screen opens.
10 Press the CH+ or CH- button to select the content rating you want to block.
11 Press the ENTER, VOL+, or VOL- button to confirm the setting.
Canadian English ratings
| Rating Description |
| E Exempt. News, sports, documentaries, talk shows, music videos, and variety programs are exempt. |
| C Suitable for children under eight years of age. No offensive language, nudity, or sexual content. |
| C8+ Suitable for children eight years of age and older. No profanity, nudity, or sexual content. |
| G General. Suitable for all audiences. |
| PG Parental guidance suggested. Some material may not be suitable for children. |
| 14+ Parental guidance strongly suggested. Programming contains themes or content which may not be suitable for children under 14 years of age. |
| 18+ Suitable for viewers 18 years of age and older and may contain depictions of violence. |
To set parental controls for Canadian English:
1 Press the MENU button to open the OSD.
2 Press the CH+ or CH− button one or more times to select Parental Controls.
3 Press the ENTER, VOL+, or VOL- button to open the Password Controls menu.
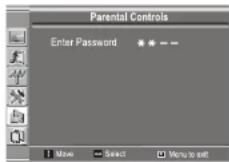
4 Use the number buttons to enter your password. The default password is 1111.
5 Press the ENTER, VOL+, or VOL- button to open the Parental Controls menu.
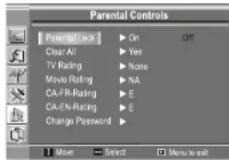
6 Press the CH+ or CH- button one or more times to select CA-EN-Rating.
7 Press the ENTER, VOL+, or VOL- button to open the CanEngRating menu.
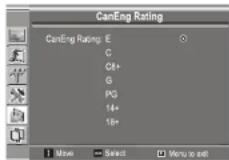
8 Press the CH+ or CH- button one or more times to select the rating you want to block.
9 Press the ENTER, VOL+, or VOL- button to confirm the rating, then press the MENU button.
Canadian French ratings
| Rating Description | |
| E Exempt. Exempt programming. | |
| G General. Suitable for all ages. Contains no violence, or the violent content is minimal or is depicted appropriately. | |
| 8 ANS+ Not suitable for young children. May contain light or occasional violence. Adult supervision is recommended. | |
| 13 ANS+ Not suitable for children under 13 years of age. May contain a few violent scenes or one or more violent scenes that may affect the viewer. Adult supervision strongly recommended. | |
| 16 ANS+ Not suitable for children under 16 years of age. May contain frequent scenes of violence or scenes with intense violence. | |
| 18 ANS+ Adults only. May contain frequent violent scenes and extreme violence. | |
To set parental controls for Canadian French:
1 Press the MENU button to open the OSD.
2 Press the CH+ or CH- button one or more times to select Parental Controls.
3 Press the ENTER, VOL+, or VOL- button to open the Password Controls menu.
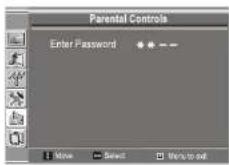
4 Use the number buttons to enter your password. The default password is 1111.
5 Press the ENTER, VOL+, or VOL- button to open the Parental Controls menu.
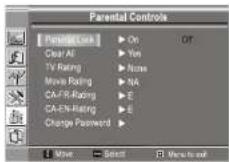
6 Press the CH+ or CH- button one or more times to select CA-FR-Rating.
7 Press the ENTER button to open the CanFR Rating menu.
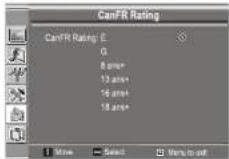
8 Press the CH+ or CH- button to select the rating you want to block.
9 Press the ENTER, VOL+, or VOL- button to confirm the rating, then press the MENU button.
Changing the parental controls password
To change the parental controls password:
1 Press the MENU button to open the OSD.
2 Press the CH+ or CH- button one or more times to select Parental Controls.
3 Press the ENTER, VOL+, or VOL- button to open the Password Controls menu.
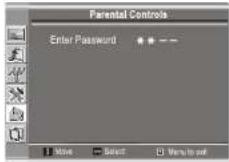
4 Use the number buttons to enter your old password. The default password is 1111.
5 Press the ENTER, VOL+, or VOL- button to open the Parental Controls menu.
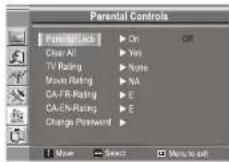
6 Press the CH+ or CH- button one or more times to select Change Password.
7 Press the ENTER, VOL+, or VOL- button to confirm.
8 Enter a new password, then press the ENTER, VOL+, or VOL- button to confirm.
9 Re-enter the new password, then press the ENTER, VOL+, or VOL- button to confirm.
Tip
You should write down your password and keep it in a safe place. If you forget your password, enter 4321.We recommend that you keep this master password away from children.
Turning the parental lock on and off
To turn the parental lock on and off:
1 Press the MENU button to open the OSD.
2 Press the CH+ or CH− button one or more times to select Parental Controls.
3 Press the ENTER, VOL+, or VOL- button to open the Password Controls menu.
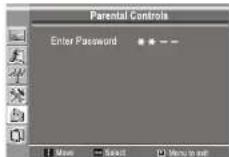
4 Use the number buttons to enter your password. The default password is 1111.
5 Press the ENTER, VOL+, or VOL- button to open the Parental Controls menu.
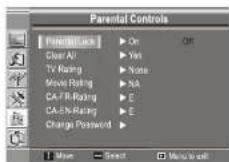
6 Press the CH+ or CH- button one or more times to select Parental Lock.
7 Press the VOL+ or VOL- button to select On or Off.
Note
If you want to use parental controls, this option must be set to On
Clearing parental control settings
To clear parental control settings:
1 From the Parental Controls menu, press the CH+ or CH- button one or more times to select Clear All.
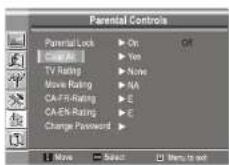
2 Press the ENTER, VOL+, or VOL- button to select Yes.
Caution
If you select Yes, all your settings are cleared.
Cleaning your TV
Clean the screen and cabinet with a soft, lint-free cloth. If the screen or cabinet is especially dirty, moisten a soft, lint-free cloth in a weak detergent solution, squeeze the excess moisture from the cloth, then wipe the screen or cabinet with the cloth. Use a clean cloth to dry the screen or cabinet.
Caution
Avoid volatile substances, such as insect sprays, solvents, and thinners. Do not leave your TV in contact with items made from rubber or PVC for long periods. They may damage your TV.
Caution
Do not let liquids drip into the cabinet.
Maintaining
Caution
Do not let a fixed image, such as a game, computer image, or captions stay on your TV's screen for an extended period of time. The image may "burn-in" and leave a "ghost" image on your screen.
Image burn-in is not covered by your warranty. To limit image burn-in, do the following:
- Reduce the brightness and contrast settings to the lowest level you can tolerate.
- Do not display a fixed image for an extended period of time.
- Turn off your TV when you are not using it.
Troubleshooting
General guidelines
- If you use your TV in a location with a low temperature, the picture may leave trails or appear slightly delayed. After your TV warms up, it will operate normally.
- Do not leave your TV in a hot or cold location.
- Do not expose your TV to direct sunlight.
- Do not place your TV near a heat source because the cabinet may be damaged and the screen may not work correctly.
Symptom Possible solution
| “Ghost” or double images | ·Your antenna may be experiencing interference from high buildings or hills. A high. directional antenna may improve the picture. |
| No power · Make sure that the power cord is connected to your TV and an electrical outlet. · Unplug the power cord, wait 60 seconds, then plug the cord back in and turn on your TV. | |
| No picture · Make sure that the antenna is connected securely and correctly to the RF jack on the back of your TV. · Possible broadcast station trouble. Try another channel. · Adjust the contrast and brightness settings. · Check the Closed Captions control. Some text modes could block the screen. · Select a correct video input. | |
| Good picture but no sound | · Increase the volume. · Make sure that the sound is not muted. |
| Good sound but poor color | · Adjust the contrast, color, and brightness settings. |
| Poor picture · Make sure that the room is not too bright. Light reflecting off the screen can make the picture difficult to see. · If an S-VHS camera or a camcorder is connected while another connected device is turned on, the picture may be poor. Turn off one or more devices. | |
| Horizontal dotted line · Your TV may be too close to another electrical device, such as a hair dryer or neon light. Turn off the device or move your TV. | |
| Remote control does not work | · Replace the batteries. Make sure that the + and - symbols on the batteries align with the + and - symbols in the battery compartment. · Clean the remote sensor on the front of your TV. · Bright or fluorescent lighting may interfere with the remote control signal. Turn off the light or move your TV. |
| Snowy picture or noise · Make sure that the A/V cables are connected correctly and securely. | |
| Symptom Possible solution | |
| D-Sub picture is not stable or synchronized | Make sure that you have selected the correct D-Sub mode on your computer. |
| No output from one of the speakers | Adjust the balance in the Sound menu. |
| Control buttons do not work | Unplug the power cord, wait few seconds, then plug the cord back in and turn on your TV. |
Note
If the preceding information does not help you solve your problem, turn off your TV, wait a few minutes, then turn it on again.
Warning
Do not try to repair your TV. See an authorized TV technician for repairs.
Specifications
- Design and specifications are subject to change without notice.
- Weight and dimensions listed are approximate.
| Power supply AC 100-240 V 50/60 Hz | |
| Power consumption | 130 W (Max.) |
| Screen 20-inch | |
| Operating temperature | 41°F to 104°F(5°C to 40°C) |
| Storage temperature | 32°F to 122°F(0°C to 50°C) |
| Channel coverage VHF: 2-13UHF: 14-69CATV: 1-125 | |
| Weight 19.8 lbs. (9 kg) | |
| DimensionsW × H × D | 22.4 × 17.2 × 6.8 Inches(56.8 × 43.6 × 17.2 cm) |
| TV system | NTSC |
| Speaker | 8 W,8Ω × 2 |
| Accessories | User guideRemote control |
Legal notices
Copyright
© 2006 Insignia. Insignia and the Insignia logo are trademarks of Best Buy Enterprise Services, Inc. Other brands and product names are trademarks or registered trademarks of their respective holders. Specifications and features are subject to change without notice or obligation.
1 Year Limited Warranty
Insignia Products ("Insignia") warrants to you, the original purchaser of this new NS-20WLCD ("Product"), that the Product shall be free of defects in the original manufacture of the material or workmanship for a period of one (1) year from the date of your purchase of the Product ("Warranty Period"). This Product must be purchased from an authorized dealer of Insignia brand products and packaged with this warranty statement. This warranty does not cover refurbished Product. If you notify Insignia during the Warranty Period of a defect covered by this warranty that requires service, terms of this warranty apply.
How long does the coverage last?
The Warranty Period lasts for 1 year (365 days) from the date you purchased the Product. The purchase date is printed on the receipt you received with the Product.
What does this warranty cover?
During the Warranty Period, if the original manufacture of the material or workmanship of the Product is determined to be defective by an authorized Insignia repair center or store personnel, Insignia will (at its sole option): (1) repair the Product with new or rebuilt parts; or (2) replace the Product at no charge with new or rebuilt comparable products or parts. Products and parts replaced under this warranty become the property of Insignia and are not returned to you. If service of Products or parts are required after the Warranty Period expires, you must pay all labor and parts charges. This warranty lasts as long as you own your Insignia Product during the Warranty Period. Warranty coverage terminates if you sell or otherwise transfer the Product.
How to obtain warranty service?
If you purchased the Product at a retail store location, take your original receipt and the Product to the store you purchased it from. Make sure that you place the Product in its original packaging or packaging that provides the same amount of protection as the original packaging. If you purchased the Product from an online web site, mail your original receipt and the Product to the address listed on the web site. Make sure that you put the Product in its original packaging or packaging that provides the same amount of protection as the original packaging.
Where is the warranty valid?
This warranty is valid only to the original purchaser of the product in the United States and Canada.
What does the warranty not cover?
This warranty does not cover:
- Customer instruction
- Installation
- Set up adjustments
•Cosmetic damage
•Damage due to acts of God, such as lightning strikes - Accident
•Misuse
•Abuse
•Negligence
•Commercial use - Modification of any part of the Product, including the antenna
This warranty also does not cover:
•Damage due to incorrect operation or maintenance
- Connection to an incorrect voltage supply
- Attempted repair by anyone other than a facility authorized by Insignia to service the Product
- Products sold as is or with all faults
- Consumables, such as fuses or batteries
- Products where the factory applied serial number has been altered or removed
REPAIR REPLACEMENT AS PROVIDED UNDER THIS WARRANTY IS YOUR EXCLUSIVE REMEDY. INSIGNIA SHALL NOT BE LIABLE FOR ANY INCIDENTAL OR CONSEQUENTIAL DAMAGES FOR THE BREACH OF ANY EXPRESS OR IMPLIED WARRANTY ON THIS PRODUCT, INCLUDING, BUT NOT LIMITED TO, LOST DATA, LOSS OF USE OF YOUR PRODUCT, LOST BUSINESS OR LOST PROFITS. INSIGNIA PRODUCTS MAKES NO OTHER EXPRESS WARRANTIES WITH RESPECT TO THE PRODUCT, ALL EXPRESS AND IMPLIED WARRANTIES FOR THE PRODUCT, INCLUDING, BUT NOT LIMITED TO, ANY IMPLIED WARRANTIES OF AND CONDITIONS OF MERCHANTABILITY AND FITNESS FOR A PARTICULAR PURPOSE, ARE LIMITED IN DURATION TO THE WARRANTY PERIOD SET FORTH ABOVE AND NO WARRANTIES, WHETHER EXPRESS OR IMPLIED, WILL APPLY AFTER THE WARRANTY PERIOD. SOME STATES, PROVINCES AND JURISDICTIONS DO NOT ALLOW LIMITATIONS ON HOW LONG AN IMPLIED WARRANTY LASTS, SO THE ABOVE LIMITATION MAY NOT APPLY TO YOU. THIS WARRANTY GIVES YOU SPECIFIC LEGAL RIGHTS, AND YOU MAY ALSO HAVE OTHER RIGHTS, WHICH VARY FROM STATE TO STATE OR PROVINCE TO PROVINCE.
Contact Insignia:
For customer service please call 1-877-467-4289
www.insignia-products.com
INSIGNIATM is a trademark of Best Buy Enterprise Services.
Inc.
Distributed by Best Buy Purchasing, LLC.
Insignia, 7601 Penn Avenue South, Richfield, Minnesota, U.S.A.
natural_image
Diagram of a battery inside a device casing with arrows indicating direction (no text or symbols)natural_image
Diagram of a handheld electronic device with two battery cells and a separate charging case (no text or symbols)INSIGNIA™
natural_image
Diagram of a device with an upward arrow inside a rectangular box, no text or symbols presentRemarques
Classifications MPAA
Classification Description
| V | ||
| X | X | |
| X | X | 0 |
| X | ||
| 0 | 0 | |
| 0 | 0 | |
| 0 | 0 | |
Remarque
natural_image
Diagram of a device with a rectangular component and two arrows indicating direction (no text or symbols)natural_image
Diagram of a handheld electronic device with two batteries and a battery pack, no text or symbols presentnatural_image
Diagram of a device with an upward arrow inside a rectangular housing (no text or symbols)Notas
| X | X | |
| X | X | 0 |
| X | ||
| 0 | 0 | |
| 0 | 0 | |
| 0 | 0 |
Nola
Insignia, 7601 Penn Avenue South, Richfield, Minnesota,
U.S.A.
INSIGNIA™
Distributed by Insignia™ Products
7601 Penn Avenue South,
Richfield, MN USA 55423-3645
www.Insignia-Products.com
© 2005 Insignia™ Products
All rights reserved. All other products and brand names are trademarks of their respective owners.
- Insignia NS-20WLCD 20" LCD TV
- Contents
- Safety information
- Caution
- Warning
- Read instructions
- Retain instructions
- Follow warnings and instructions
- Water and moisture
- Cleaning
- Ventilation
- Heat
- Grounding or polarization
- Power cord protection
- Attachments
- Stand
- Lightning
- Servicing
- Replacement parts
- Overloading
- Object and liquid entry
- Damage requiring service
- Safety check
- Power source
- Screen protection
- Pixel defect
- Outdoor antenna grounding
- Note to CATV system installer
- Features
- Using the remote control
- To use the remote control:
- Setting up your TV
- Installing remote control batteries
- Notes
- Connecting your TV to an electrical outlet
- Connecting an outside antenna
- INSIGNIA™
- Connecting cable TV
- To connect cable TV without a converter/descrambler box:
- To connect cable TV with a converter/descrambler box:
- Connecting a VCR
- Note
- To play the VCR:
- Connecting a camcorder
- To connect a camcorder:
- To playback from the camcorder:
- Connecting a DVD player using component video
- To connect a DVD player using component video:
- To play a DVD:
- Connecting a PC
- To connect a PC:
- Using your TV
- Turning your TV on and off
- To turn your TV on and off:
- Selecting the TV source
- To select the TV source:
- Setting up the channel list
- To set up the channel list:
- Adding and erasing channels
- To add and erase channels:
- Fine tuning the TV signal
- Automatically fine-tuning
- Manually fine-tuning
- Changing channels
- Adjusting the volume
- Selecting a menu language
- Using preset picture mode
- To use the preset picture mode:
- Customizing the picture
- To customize the picture:
- Adjusting the image in D-Sub mode
- Adjusting the picture automatically
- To adjust the picture automatically:
- Adjusting the clock and phase
- To adjust the clock and phase:
- Adjusting the image position
- To adjust the image position (alignment):
- Adjusting the sound
- Setting the stereo mode
- To set the stereo mode:
- Customizing sound
- To customize the sound settings:
- Adjusting the menu transparency
- Adjusting the back light
- Setting the DCDi feature
- Setting the zoom (aspect ratio) mode
- Restoring default TV settings
- Setting the sleep timer
- To set the sleep timer:
- Viewing closed captions
- To view closed captions:
- Setting the closed caption mode
- To set the closed caption mode:
- Setting up parental controls
- MPAA ratings
- To set up movie parental controls:
- TV ratings (U.S.)
- To set up TV parental controls:
- To set parental controls for Canadian English:
- To set parental controls for Canadian French:
- Changing the parental controls password
- To change the parental controls password:
- Turning the parental lock on and off
- To turn the parental lock on and off:
- Clearing parental control settings
- To clear parental control settings:
- Cleaning your TV
- Maintaining
- Troubleshooting
- General guidelines
- Specifications
- Legal notices
- Copyright
- Year Limited Warranty
- How long does the coverage last?
- What does this warranty cover?
- How to obtain warranty service?
- Where is the warranty valid?
- What does the warranty not cover?
- Remarques
- Remarque
- Notas
Brand : INSIGNIA
Model : NS20WLCD
Category : Television