
ADL 4561 A+ - Dishwasher IGNIS - Free user manual and instructions
Find the device manual for free ADL 4561 A+ IGNIS in PDF.
| Product type | Built-in dishwasher |
| Brand | Ignis |
| Model | ADL 4561 A+ |
| Capacity | 9 place settings |
| Dimensions (H x W x D) | 820 x 445 x 540 mm (adjustable height up to +60 mm) |
| Power supply | 220-240 V ~ 50 Hz, 10 A |
| Water pressure | 0.04 - 1.0 MPa |
| Hot water connection | Max 60°C |
| Energy consumption (Eco cycle) | 0.77 kWh |
| Water consumption (Eco cycle) | 10.5 L |
| Cycle duration (Eco) | 175 min |
| Wash programs | Intensive, Daily, Eco, Rapid, Delicates, Pre-wash, + 3 in 1 |
| Special functions | Delayed start 3/6/9 h, 3 in 1 function |
| Detergent type | Powder, gel or 3 in 1 tablets |
| Water softener | Yes, adjustable according to water hardness |
| Indicators | Salt, rinse aid, delayed start |
| Safety | Earth connection, child safety (door lock), overflow protection |
| Maintenance and cleaning | Removable filter, cleanable spray arms, door gasket to clean |
| Noise level | Not specified |
Frequently Asked Questions - ADL 4561 A+ IGNIS
User questions about ADL 4561 A+ IGNIS
0 question about this device. Answer the ones you know or ask your own.
Ask a new question about this device
Download the instructions for your Dishwasher in PDF format for free! Find your manual ADL 4561 A+ - IGNIS and take your electronic device back in hand. On this page are published all the documents necessary for the use of your device. ADL 4561 A+ by IGNIS.
USER MANUAL ADL 4561 A+ IGNIS
Instructions for use
Mode d'emploi
Gebruiksaanwijzing
natural_image
Close-up of wooden clothespins and clips, no text or symbols visibleBrugsanvisning
Bruksanvisning
Käyttöohje
natural_image
Black and white photo of multiple glass bottles with black lids, arranged in a row (no visible text or labels)
natural_image
Black and white close-up of multiple glasses with no visible text or symbolsΟδηγίες χρήσης
natural_image
Close-up of a white industrial fan or filter unit with perforated grille (no visible text or symbols)Návod k použití
Návod na použitie
natural_image
Simple circular diagram with a central arrow and two surrounding symbols, no text or labels present.| HÄRTEGRAD DES WASSERS | Schalterstellung | Salzverbrauch (Gramm/Zyklus) | Autonomie (Zyklen/l kg) | |||
| °dH °fH | °Clarke mmol/l | |||||
| 0~8 | 0~14 | 0~10 | 0~1,4 | / | 0 | / |
| 8~22 | 14~39 | 10~28 | 1,4~3,9 | - | 20 | 50 |
| 22~45 | 39~80 | 28~56 | 3,9~8 | Zentral | 40 | 25 |
| 45~60 | 80~107 | 56~75 | 8~11 | + | 60 | 16 |
Anmerkung I
natural_image
Line drawing of a hand pressing down on a device with buttons and a star symbol (no text or labels)natural_image
Diagram of a spray bottle with a lid and spray nozzle, no text or symbols presentnatural_image
Illustration of a hand holding a handheld device with control buttons and a star symbol (no text or symbols present)natural_image
Illustration of a hand using a remote control device to press or install a small electronic component (no text or symbols visible)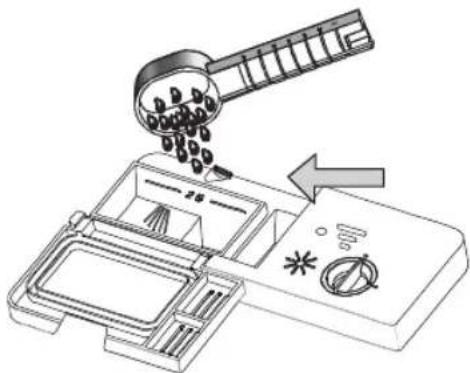
HINWEIS:
natural_image
Technical line drawing of a structural framework with beams and supports (no text or symbols)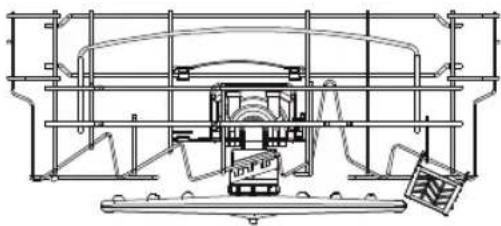
natural_image
Technical line drawing of a mechanical assembly with no visible text or symbolsHINWEIS:
natural_image
Close-up of a mechanical component with a white arrow pointing to a cylindrical feature (no visible text or symbols)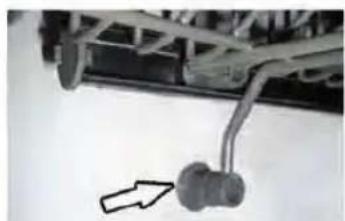
natural_image
Mechanical component with a curved arm and two spherical parts, one marked with an arrow (no visible text or symbols)natural_image
Close-up of a mechanical assembly with coiled metal components and internal cavities (no visible text or symbols)Besteckkorb
natural_image
Isometric line drawing of a multi-tiered industrial or mechanical structure with cylindrical components and structural elements (no text or symbols)


EINSORTIERSC
HEMA

WARNHINWEIS:
START EINES WASCHPROGRAMMS
natural_image
Technical diagram of a mechanical assembly with gears and a shaft (no text or labels)natural_image
Technical line drawing of a mechanical assembly with gears and shafts (no text or symbols)HINWEIS
natural_image
Illustration of a hand using a tool to adjust or install a mechanical component (no text or symbols visible)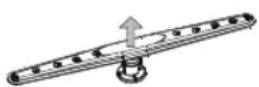
Abschrauben
natural_image
Diagram of a mechanical device with a handle and internal components, no text or symbols present
WARNHINWEIS:
natural_image
Illustration of two people in conversation, one gesturing with a question mark above the other (no text or symbols present)Besoin d'aide?
natural_image
Line drawing of a hand using a tool to press or install a component, no text or symbols presentIMPORTANT SAFETY PRECAUTIONS
READ THE INSTRUCTIONS CAREFULLY BEFORE USE

ATTENTION:
When using the dishwasher, comply with the following:

GROUNDING INSTRUCTIONS
- This appliance must be grounded. In case of malfunction or failure, grounding reduces the risk of electric shock by creating a path of least resistance for the electric current. This appliance is equipped with a power cable comprising a ground wire and a plug with ground contact.
- The power supply plug must be inserted in a suitable socket installed and grounded in conformity with all the local codes and regulations.

ATTENTION:
Incorrect connection of the appliance ground wire can involve the risk of electric shock.
- In case of doubt regarding the suitability of appliance grounding, have it checked by a qualified electrician or a maintenance technician. If the plug supplied with the appliance is not suitable for the socket, do not modify it. Have a suitable socket arranged by a qualified electrician.

ATTENTION:
PROPER USE
- Do not use improperly, do not sit or lean on the door or on the dishwasher grilles.
- Switch the dishwasher on only when all the closing panels are properly in place. Open the door very carefully if the dishwasher is working, because the water could spill out.
- Do not place heavy objects on the door or lean on it when open. The appliance could tip over.
- When loading the dishes to be washed: 1) Place sharp items so that they cannot damage the door seal; 2) Attention: knives and other sharp or pointed utensils must be placed in the rack with the tips or blades down, or be arranged flat.
- Do not let plastic objects to come into contact with the coil when the dishwasher is working. (This instruction only applies to appliances with the exposed coil.)
- Check that the detergent dispenser is empty at the end of the wash cycle.
- Do not put plastic items that are not marked dishwasher safe in the appliance. For plastic items without the special a symbol, follow the manufacturer's recommendations.
- Only use detergents and additives suitable for automatic dishwashers.
- Do not use soap, laundry detergents or hand wash detergents in the dishwasher. Keep these products out of the reach of children.
- Keep detergents and additives out of the reach of children and keep children away from the open door of the dishwasher, as there may be detergent residuals on the inside.
- This appliance is not intended for use by persons (including children) with reduced physical, sensory or mental capabilities, or lack of experience and knowledge of it, unless they have been appropriately instructed or are supervised by a person responsible for their safety during its use.
- Do not let children play with the appliance.
- Dishwasher detergents are very alkaline and, if swallowed, can be extremely dangerous. Avoid contact with skin and eyes and keep children away from the dishwasher when the door is open.
- The door should not be left open, as this increases the risk of bumping into it.
- If the power cable is damaged it must be replaced by the manufacturer, an authorized service center or a qualified technician, to avoid dangerous situations.
- When no longer used or when scrapping an old dishwasher, remove the wash compartment door.
- Dispose of the packing material in compliance with the current regulations.
- Use the dishwasher only for its intended purpose.
- During installation, do not bend or squash the power cable excessively or in a dangerous way. Do not tamper with the controls.
- The appliance must be connected to the water system using new pipes, avoiding reuse of the old pipes.
- The dishwasher has a load capacity of up to 9 place settings.
- The maximum inlet water pressure is 1 Mpa.
- The minimum inlet water pressure is 0.04 Mpa.
CAREFULLY READ AND FOLLOW THESE SAFETY INSTRUCTIONS SAVE THESE INSTRUCTIONS
PROTECTING THE ENVIRONMENT
- This product is made with recyclable or reusable materials. Its disposal must occur in compliance with the current local regulations. Before disposal, cut off the power cable so that the appliance cannot be reused.
- For more detailed information on the handling and recycling of this product, contact the local authorities responsible for differentiated waste collection or the store where the appliance was purchased.
DISPOSAL OF PACKING MATERIALS
- The packing material is 100% recyclable, as indicated by the symbol. The various parts of the packing must not be dispersed in the environment, and must be disposed of in compliance with the current local regulations.
APPLIANCE DISPOSAL
- This appliance is marked in conformity with European Directive 2002/96/EC on waste electrical and electronic equipment (WEEE).
- Correct disposal of this product will help prevent potentially negative effects on the environment and human health.
- The symbol on the product or on the enclosed documentation enclosed indicates that the appliance should not be treated as household waste, but must be taken to an appropriate collection center for the recycling of electrical and electronic equipment.
DISPOSAL
Dispose of the dishwasher packing in a proper way.
All the packing material can be recycled.
Plastic parts are marked with standard international abbreviations:
- PE for polyethylene, used for the wrapping
• PS for polystyrene, used for the filling material - POM polyoxymethylene, used for the plastic clips
- PP for polypropylene, used for the salt container
- ABS for acrylonitrile-butadiene-styrene, used for the control panel.

ATTENTION:
- The packing materials can be dangerous for children!
- To dispose of the packing and the appliance, go to a differentiated collection centre. Cut off the power cable and make the door closure unusable.
- The cardboard packing is made from recycled paper and must be disposed of at a differentiated collection centre.
- Correct disposal of this product will help prevent potential damage to the environment and human health.
- For more detailed information about the recycling of this product, contact the municipal authorities or the competent service for the collection of household waste.
DISPOSAL: Do not dispose this product as generic waste. This type of waste requires separate collection and special treatment.
OPERATING INSTRUCTIONS
IMPORTANT! To ensure best performance, read the operating instructions before using the appliance for the first time.
Control panel
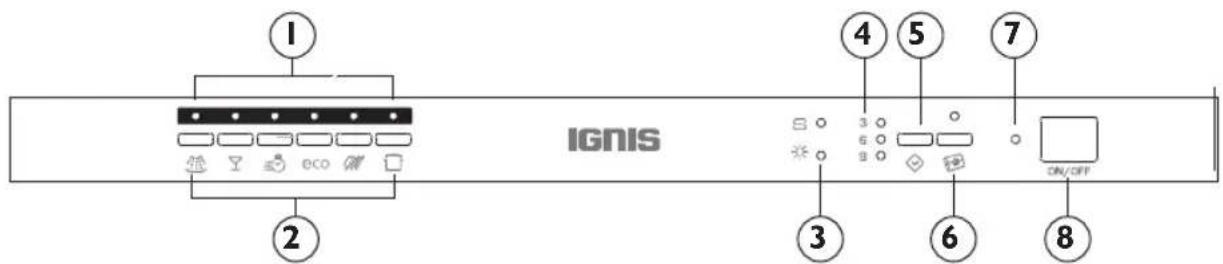
I Program indicator: when selecting a wash program, the corresponding indicator lights up.
2 Program buttons: to select the wash program by pressing the corresponding button.
3 Salt and rinse aid indicator lights: they light up when the water softener or rinse aid dispenser need filling.
4 Delayed start indicators: they indicate start delayed by 3, 6 or 9 hours.
5 Delayed start button: press this button to set the hours of delay for wash start. The start of the wash can be delayed by 3, 6 or 9 hours.
6 3 in 1 function button/3 in 1 indicator: to select and display 3 in 1.
7 Power indicator: it lights up when the ON/OFF button is pressed.
8 ON/OFF: to turn on/off the dishwasher.
Dishwasher components
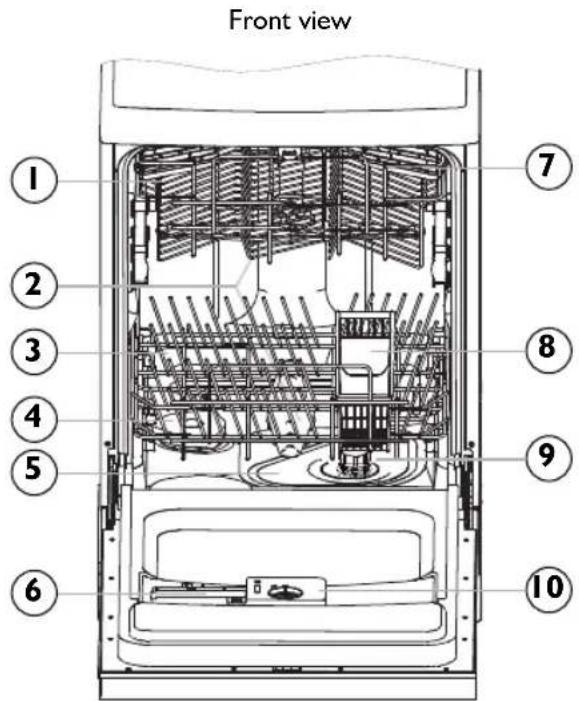
I Top rack
2 Spray arms
3 Bottom rack
4 Salt container
5 Main filter
6 Detergent dispenser
7 Cup support
8 Cutlery rack
9 Coarse filter
10 Rinse aid dispenser
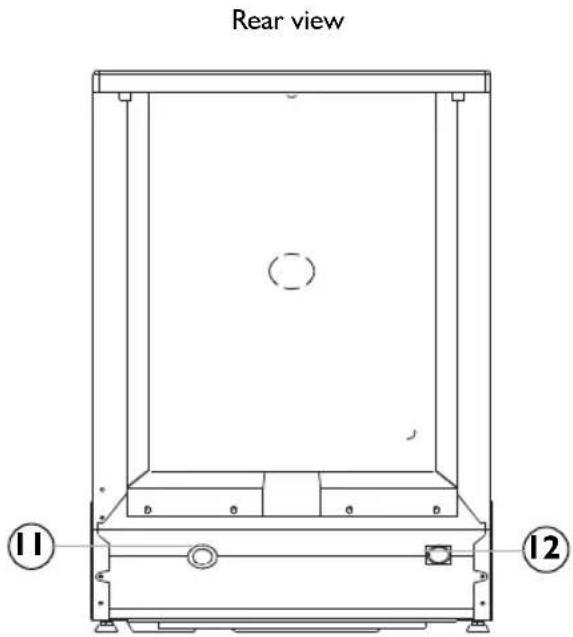
II Drain hose connector
12 Supply hose connector
BEFORE USING THE DISHWASHER FOR THE FIRST TIME
Before using the dishwasher for the first time:
A. Set the water softener
B. Pour 12 liter of water into the salt container and then fill it with dishwasher salt
C. Fill the rinse aid dispenser
D. Filling the detergent
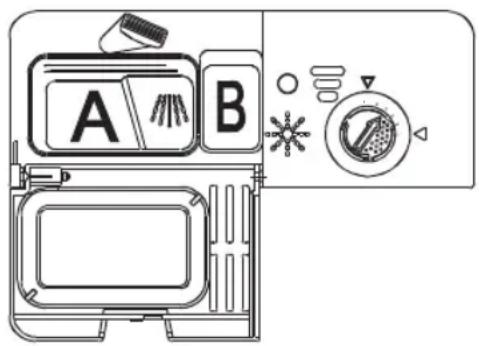
A. Water softener
The water softener must be set manually, by means of the water hardness indicator. The water softener is designed to remove minerals and salts which could compromise appliance operation. The higher the content of these minerals and salts, the harder the water. The water softener must be adjusted according to the water hardness in the place where the appliance is used. To find out the water hardness, contact the local water supply company.
Adjusting salt consumption
The dishwasher is designed to allow adjustment of the amount of salt consumed according to the water hardness. In this way salt consumption can be optimized and customized.
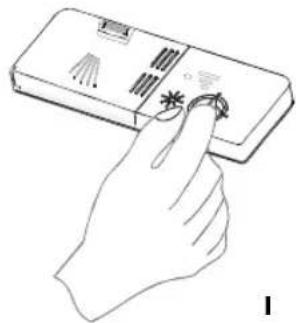
To adjust the salt consumption, proceed as follows.
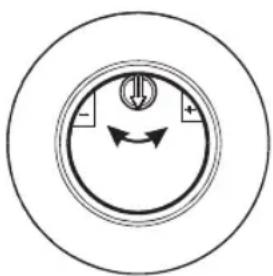
I. Unscrew the cap from salt container.
2. The container has a ring with an arrow (see figure opposite); if necessary turn the ring anticlockwise from the mark “-” to the mark “+”, depending on the water hardness. Adjustments must made according to the following diagram:
natural_image
Circular diagram with a central circular element and directional arrows, no text or symbols present.| WATER HARDNESS | Position of selector | Salt consumption (grams/cycle) | Autonomy (cycles/l kg) | |||
| °dH °fH | Clarke mmol/l | |||||
| 0~8 | 0~14 | 0~10 | 0~1.4 | / | 0 | / |
| 8~22 | 14~39 | 10~28 | 1.4~3.9 | - | 20 | 50 |
| 22~45 | 39~80 | 28~56 | 3.9~8 | Central | 40 | 25 |
| 45~60 | 80~107 | 56~75 | 8~11 | + | 60 | 16 |
Note I
$$ ^ {\circ} \mathrm{dH} = 1. 2 5 $$
$$ ^ {\circ} \text { Clarke } = 1. 7 8 $$
$$ ^ {\circ} \mathrm{fH} = 0. 1 7 8 \mathrm{mmol/l} $$
$$ ^ {\circ} \mathrm{dH} = \text { German degree } $$
$$ ^ {\circ} \mathrm{fH} = \text { French degree } $$
$$ ^ {\circ} \text { Clarke } = \text { British degree } $$
Note 2
$$ / = \text { No need to add salt } $$
$$ - = \text { Setting towards the mark }" -" $$
$$ + = \text { Setting towards the mark }" +" $$
$$ \text { Central } = \text { Set between the mark }" -" \text { and the mark }" +" $$
Contact the local water supply company to know the hardness of the mains water.
Note: If the dishwasher model does not have a water softener, this section can be skipped.

Water softener
The hardness of the water varies from place to place. If very hard water is used, deposits accumulate on the dishes and utensils.
The appliance is equipped with a special water softener that uses special salt to eliminate the lime and minerals in the water.
B. Loading salt in the water softener
Always use dishwasher salt.
The salt container is located under the bottom rack and must be filled as explained below.
Attention!
- Only use dishwasher salt! All other types of salt not specific for dishwashers, and especially table salt, will damage the water softener. The manufacturer provides no guarantee for any damage caused by the use of unsuitable salt.
- Fill with salt only before starting one of the complete wash programs. This will prevent any grains of salt or spilled salt water from remaining on the bottom of the machine and eventually causing corrosion.
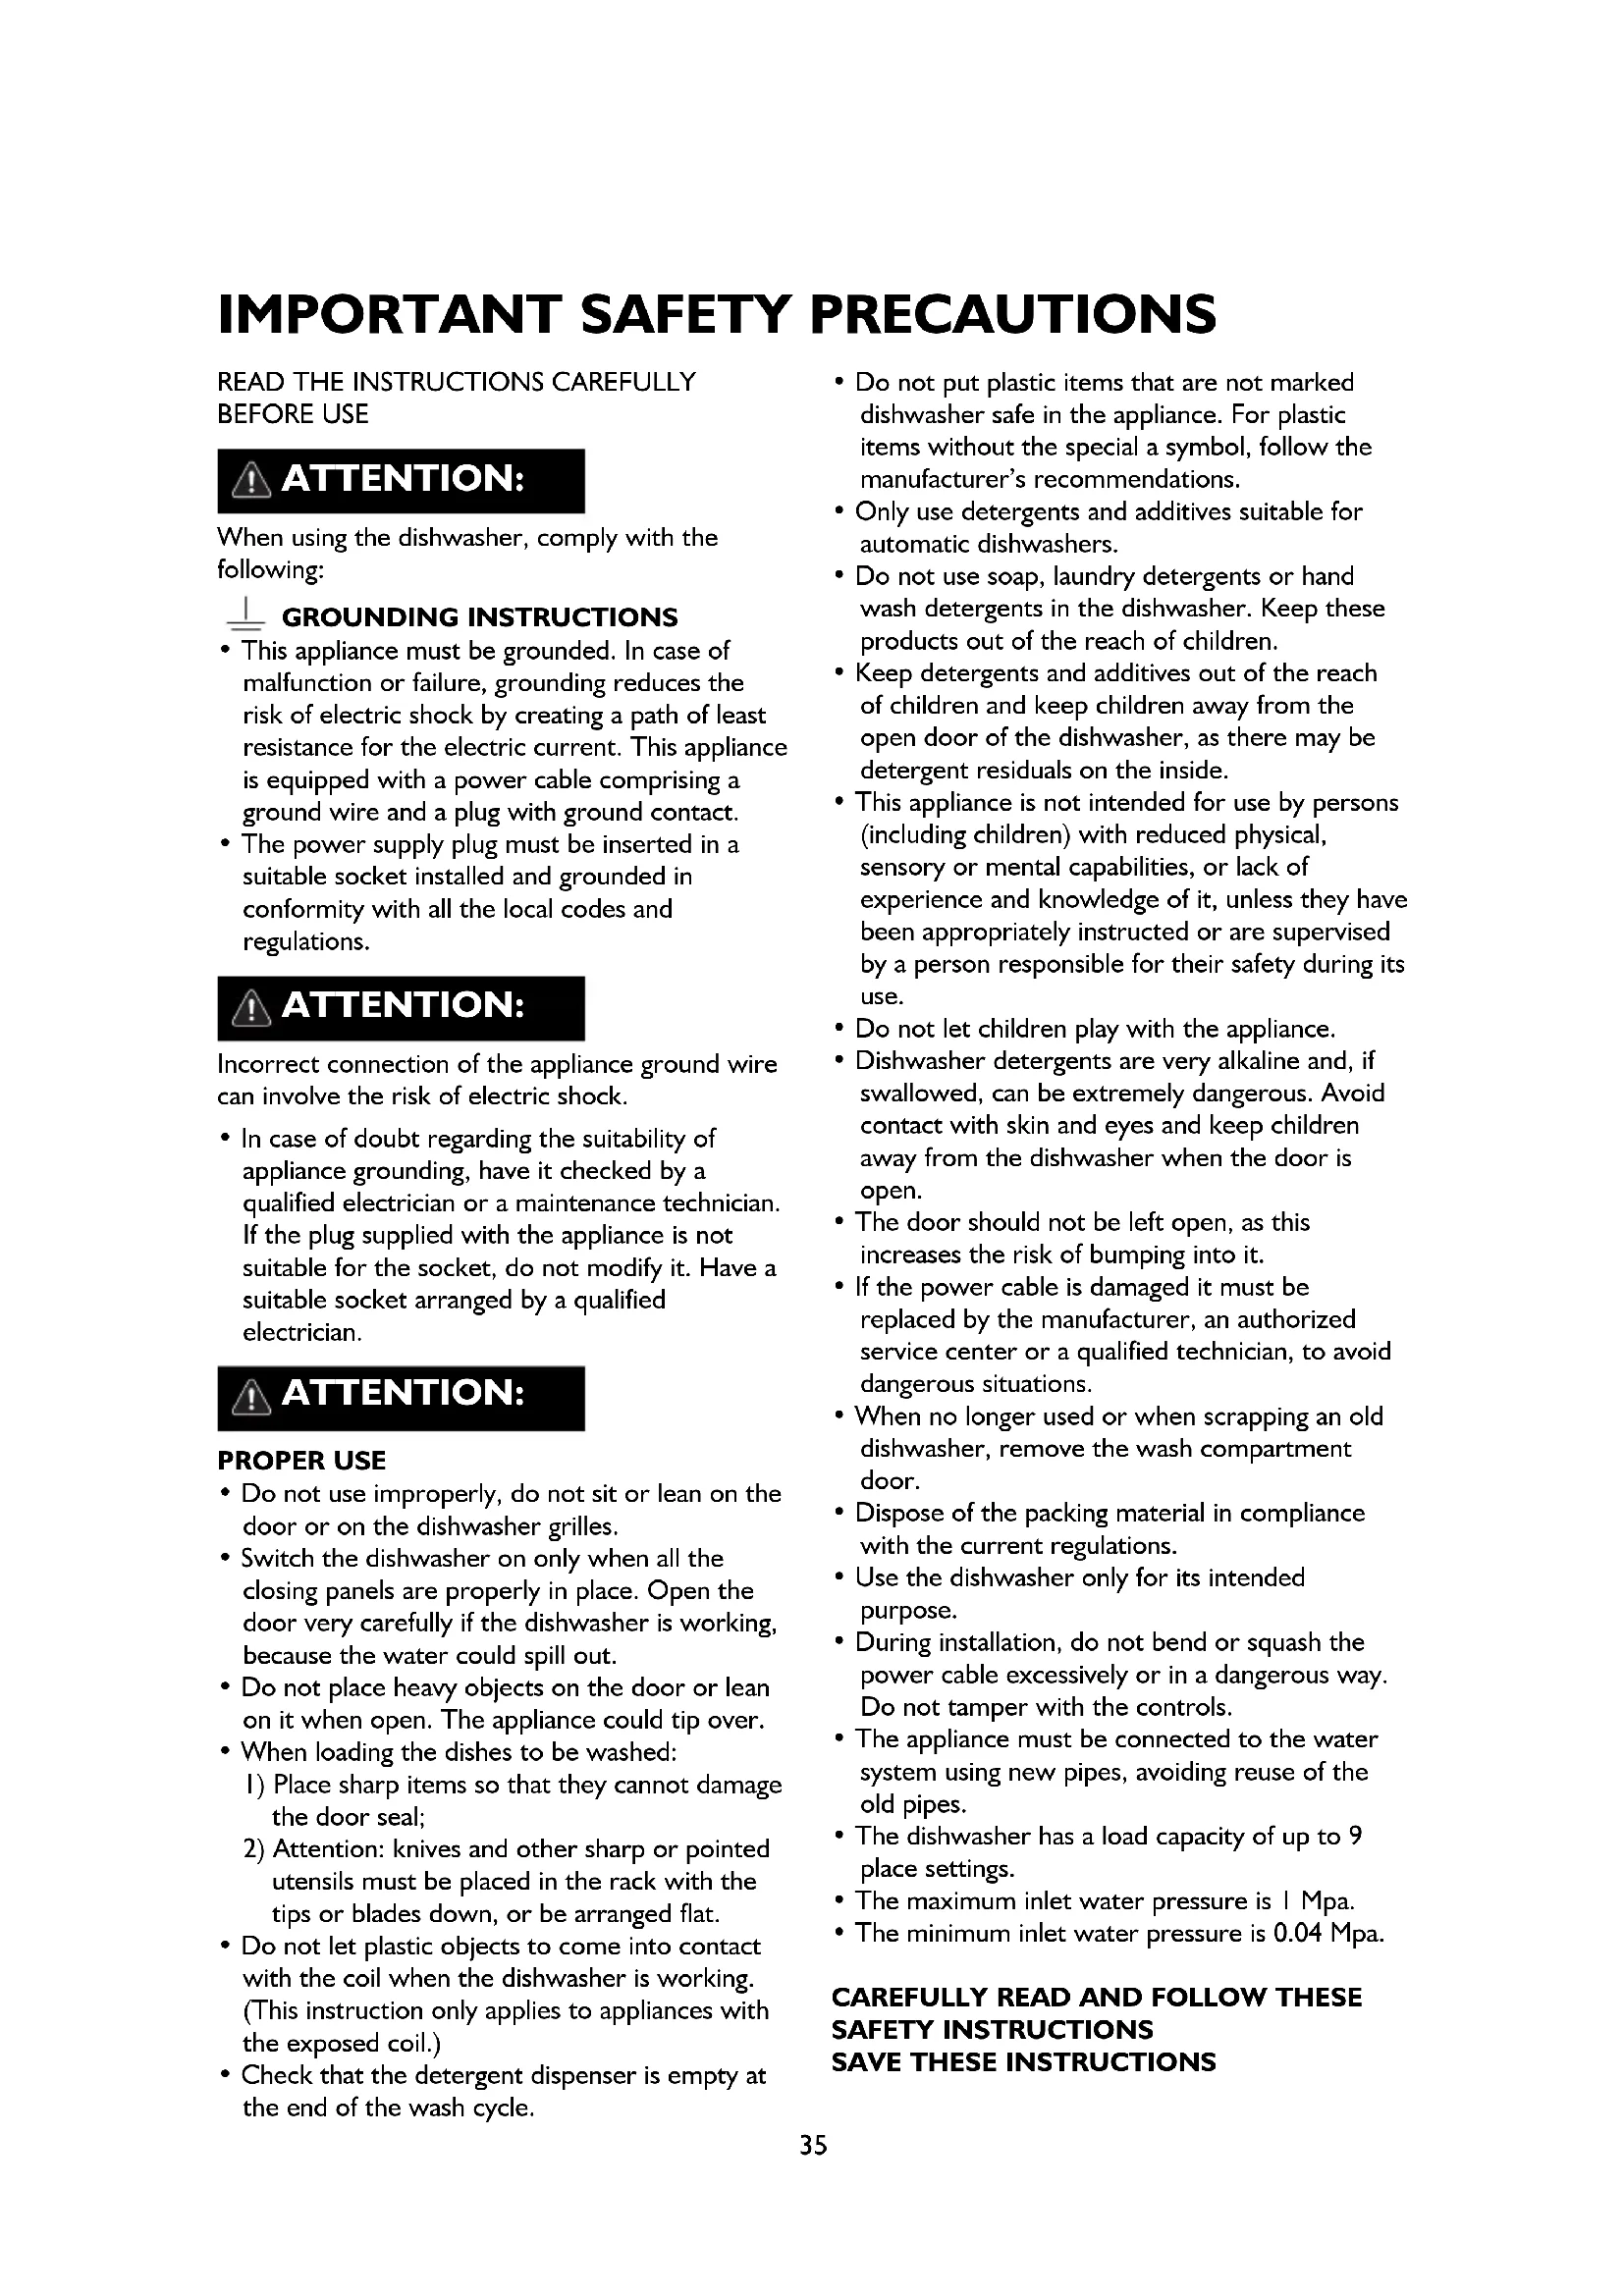
natural_image
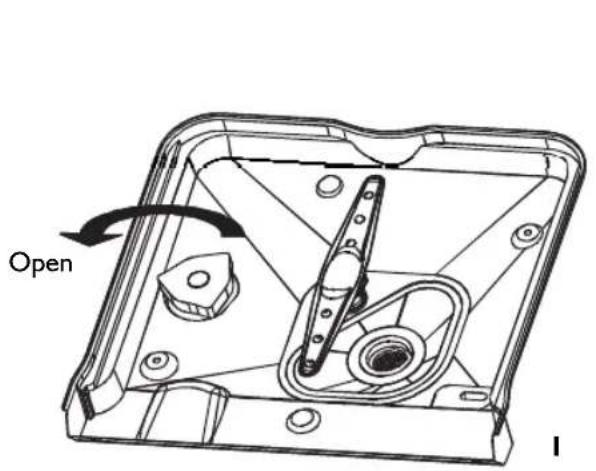
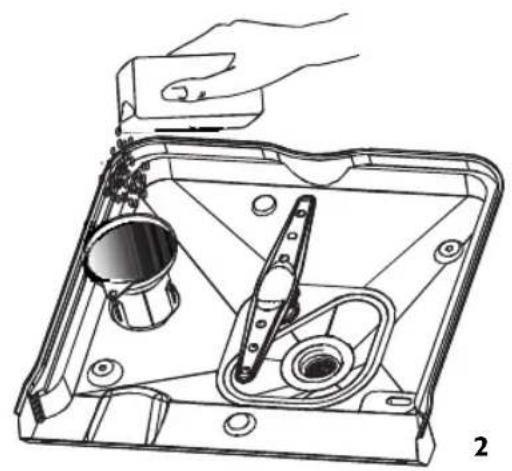
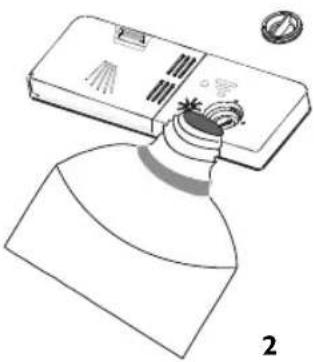
Technical line drawing of a mechanical assembly with a hand holding a component (no text or symbols)A. Remove the bottom rack, then unscrew and remove the cap from salt container. (I)
B. Before the first wash, pour one liter of water into the salt container.
C. Put the end of the funnel (supplied) in the hole and add about 1 kg of salt. A small amount of water may come out of the container; this is quite normal. (2).
D. After filling the container, tighten the cap counterclockwise.
E. The salt indicator usually goes off 2-6 days after filling the container.
F. Immediately after filling the salt container it is necessary to start a wash program (we recommend using a soak program or a quick program). Otherwise the filtering system, pump or other important components of the machine can be damaged by the salt water. This type of damage is not covered by warranty.
Note:
-
The salt container must be refilled only when the indicator on the control panel lights up. If the salt does not dissolve properly, the salt indicator may remain lit even after filling the container. If the control panel does not have an indicator light (on some models), it is possible to estimate when to load salt in the water softener according to the cycles done by the dishwasher.
-
If salt comes out, start a soak program or a quick program to remove the excess salt.
C. Fill the rinse aid dispenser
Rinse aid dispenser
The rinse aid is dispensed during the final rinse to prevent drops of water on the dishes that would leave stains and streaks. It also improves drying by allowing the water to run off dishes. The dishwasher is designed for the use of liquid rinse aids. The rinse aid dispenser is on the inside of the door, next to the detergent dispenser. To fill the dispenser, open the cap and add the rinse aid until the level indicator is completely black. The rinse aid dispenser has a capacity of about 140 ml.
Rinse aid function
Rinse aid is automatically added during the last rinse to ensure thorough rinsing and drying free of stains and streaks.
Attention!
Only use rinse aid specific for dishwashers. Never fill the rinse aid dispenser with other substances (e.g. dishwasher detergent, liquid detergent), as this would damage the appliance.
When to refill the rinse aid dispenser
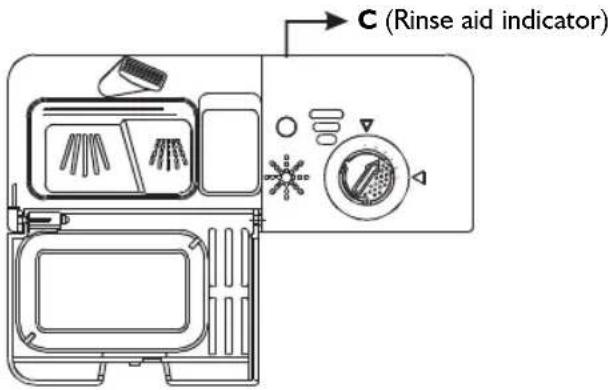
If the control panel does not have a rinse aid indicator, the rinse aid level can be judged by the color of the optical indicator C next to the cap. When the rinse aid dispenser is full, all the indicator is dark. The dark spot gets smaller as the rinse aid level decreases. Never allow the rinse aid level to fall below 14 the capacity of the dispenser.
As the rinse aid level decreases, the size of the dark spot on the rinse aid level indicator decreases, as shown below.
Full
3/4 full
1/2 full
- 1/4 full - It must be refilled to remove stains
○ Empty
Rinse aid dispenser
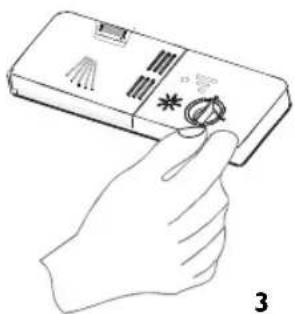
I. To open the dispenser, turn the cap towards the arrow "open" (left) and remove it.
natural_image
Illustration of a hand pressing down on a device with a star symbol (no text or labels)- Add rinse aid in the dispenser, being careful not to overfill.
natural_image
Diagram of a spray bottle with a lid and spray nozzle, no text or symbols present- Refit the cap, inserting it aligned with the arrow "open" and turning it towards the arrow "closed" (right).
natural_image
Hand holding a handheld device with icons and a knob, no text or symbols presentThe rinse aid is dispensed during the final rinse to prevent drops of water on the dishes that would leave stains and streaks. It also improves drying by allowing the water to run off dishes. The dishwasher is designed for the use of liquid rinse aids. The rinse aid dispenser is on the inside of the door, next to the detergent dispenser. To fill the dispenser, open the cap and add the rinse aid until the level indicator is completely black. The rinse aid dispenser has a capacity of about 140 ml. Be careful not to overfill the dispenser because it could overflow. Remove any spilled rinse aid with a damp cloth. Remember to refit the cap before closing the dishwasher door.
Attention!
Remove any rinse aid spilled during filling with an absorbent cloth, to avoid excess foaming during the next wash.
Rinse aid dispenser adjustment
The rinse aid dispenser has six or four settings. Always start with the dispenser set to "4". If the dishes do not dry properly and have stains, increase rinse aid dispensing amount by removing the cap and turning the selector to "5". If the dishes are still not perfectly dry or have stains, set the selector to the next highest number until the dishes are completely clean. It is advisable to set it to "4". (The factory setting is "4")
NOTE
Increase the dosage if there are drops of water or lime spots on the dishes after washing. Reduce it if there are sticky whitish spots on the dishes or a bluish film on glassware or on knife blades.

D. Detergent function
Detergents with their chemical components are necessary to remove dirt, break it up and take it outside the dishwasher. Most commercial detergents are suitable for this purpose.
Concentrated detergent
According to their chemical composition, dishwasher detergents can be divided into two basic types:
• conventional alkaline detergents with caustic substances
• concentrated low alkaline detergents with natural enzymes
The use of “normal” wash programs in conjunction with concentrated detergents reduces pollution and is ideal for dishes; these wash programs are specially designed for the dirt dissolving properties of the enzymes in the concentrated detergent. For this reason “normal” wash programs, in which concentrated detergents are used, can give the same results otherwise obtainable only with “intensive” programs.
Detergent tablets
Detergent tablets by the different brands dissolve at different speeds. For this reason some detergent tablets are unable to dissolve and develop their full cleaning power during short programs. Therefore, use long programs when using detergent tablets, to ensure the complete removal of detergent residuals.
Detergent dispenser
The dispenser must be filled before the start of each wash cycle, according to the instructions in the table of wash cycles. This appliance uses less detergent and rinse aid than conventional washing machines.
Generally, only one tablespoon of detergent is sufficient for a normal wash load. If the dishes are very dirty, a larger amount of detergent will be necessary. Always add the detergent just before starting the dishwasher, otherwise it could become damp and not dissolve properly.
Amount of detergent to use

NOTE:
- If the lid is closed: press the release button.
- The lid opens. Always add the detergent just before the start of each wash cycle.
- Only use rinse aid for specific dishwashers.

ATTENTION:
The dishwasher detergent is corrosive! Keep it out of the reach of children.
Correct use of the detergent
Use only dishwasher detergent. Store the detergent in a cool and dry place. Pour the detergent powder in the dispenser only when ready to wash dishes.
Filling the detergent
Fill the detergent dispenser. The mark indicates the dosage levels, as shown on the right:
A. In the main wash cycle compartment, "MIN" means approx. 20 g of detergent.
B. In the pre-wash cycle compartment, approx. 5 g of detergent.
Comply with manufacturer's recommendations for dosage and storage, as indicated on detergent pack.
Close the lid and press until it locks in place.
If the dishes are very dirty, add more detergent in the compartment for pre-wash. This detergent develops its effectiveness during the pre-wash phase.
NOTE:
- For information on the amount of detergent to be used for individual programs, see the last page.
- Bear in mind that there may be differences depending on how dirty the dishes are and the specific hardness of the water.
- Comply with manufacturer's recommendations on the detergent package.
Detergents
There are 3 types of detergents
I. With phosphates and with chlorine
2. With phosphates and without chlorine
3. Without phosphates and without chlorine
The new powder detergents are usually phosphate-free. Therefore they do not perform the function of water softening determined by phosphates. In this case, we recommend filling the salt container even when the water hardness is only 6 dH. If phosphate-free detergents are used with hard water, white spots often form on dishes and glasses. In this case, add more detergent for better results. Detergents without chlorine have only a mild bleaching action. Stubborn and colored stains are not removed completely. In this case choose a wash program with a higher temperature.
Keep all detergents in a safe place, out of the reach of children. Always add the detergent before starting the dishwasher.
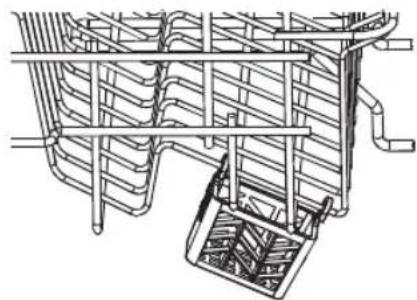
Using the 3 in I function
The dishwasher has a 3 in 1 function with which a 3 in 1 tablet, and not salt and rinse aid, must be used. This dishwasher has a container for 3 in 1 tablets, as an accessory.
NOTE:
The 3 in 1 tablet must only be used with the 3 in 1 function (when selecting the Intensive/Normal/Eco program). If the 3 in 1 tablet is used with other programs, the appliance will not provide optimum performance.
-
The figure below shows how to hang the 3 in 1 tablet container in the top rack.
-
Turn the upper spray arm and, if necessary, change the position of the container to make sure the upper spray arm is not hindered by the 3 in 1 tablet container. See figure below.
-
Insert the 3 in 1 tablet in the container and start the 3 in 1 program.
natural_image
Technical line drawing of a mechanical assembly with no visible text or symbols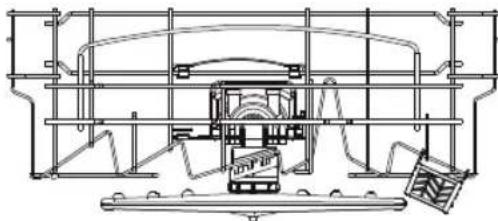
natural_image
Technical line drawing of a mechanical assembly with no visible text or symbolsNOTE:
When using 3 in I tablet detergents, make sure they are of suitable size for the container, so that they can be inserted easily and do not break the container.
LOADING THE RACKS
For best dishwasher performance, comply with the following instructions. The racks and cutlery racks may be different depending on the model.
Before or after loading the dishwasher
Scrape off the largest food residuals. Soften the residuals of burnt food in pans.
The dishes do not have to be rinsed under running water.
Place items in the dishwasher as follows:
I. Items such as cups, glasses, pots/pans, etc. must be placed upside down.
2. Curved or concave items must be tilted so that the water can run off.
3. All utensils must be firmly in place, so that they cannot tip over.
4. All utensils must be placed so that the spray arms can rotate freely during washing.
Very small items should not be put in the dishwasher, as they could easily fall out of the racks.
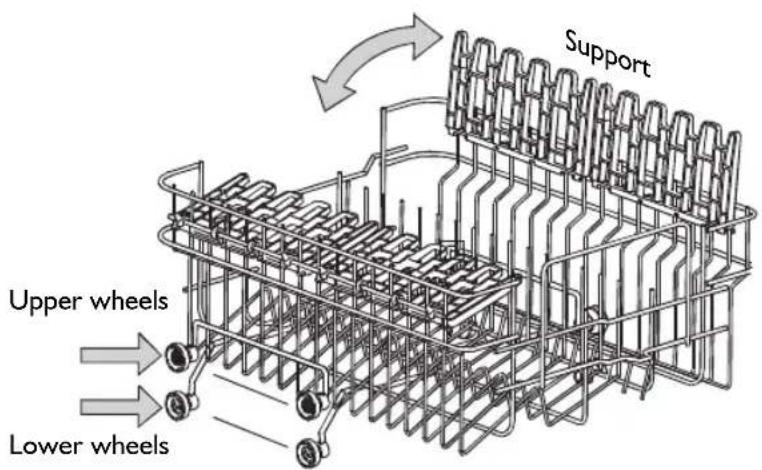
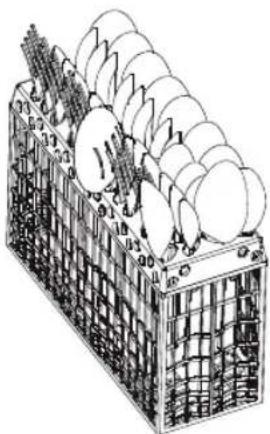
Loading the top rack
The top rack is designed for more delicate and lighter items, such as glasses, tea and coffee cups and saucers, plates, small bowls and shallow pans (if not too dirty). Position the dishes and pots so that they cannot be moved by the spray of water.
Top rack adjustment
The height of the top rack can be adjusted to create more space in the top/lower rack for large utensils. The height of the top rack can be adjusted by placing the wheels on the runners of different heights. Long items, serving cutlery, salad cutlery and knives should be placed on the supports so as not to hinder the rotation of the spray arms. The support can be folded back or removed when not needed.
natural_image
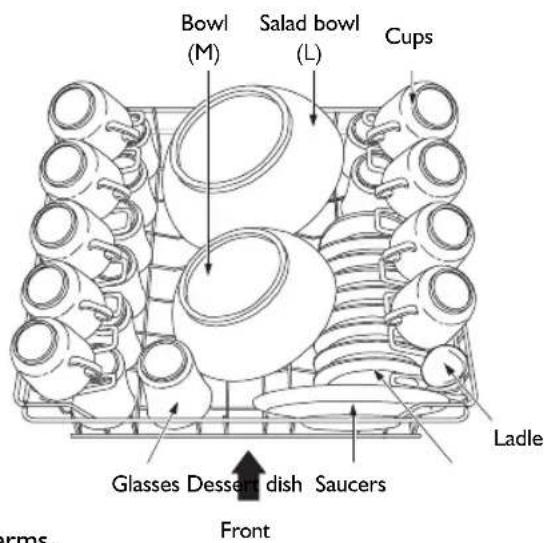
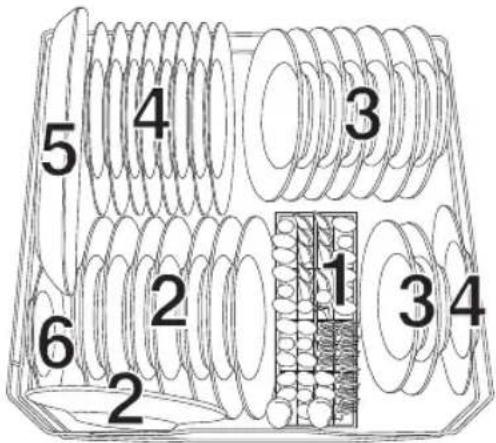
Mechanical assembly diagram showing two views of a mechanical component with no visible text or symbolsLoading the bottom rack
It is advisable to place harder to clean large items in the bottom rack: pots, pans, lids, serving dishes and bowls, as shown in the figure on the right. It is best to place the serving dishes and lids at the sides of the racks to avoid blocking the rotation of the upper spray arm.
Pots, serving bowls, etc. must always be placed upside down. Deep pots should be tilted to allow the
water to run off. The bottom rack has folding partitions for loading larger or more pots and pans.
I Cutlery rack
2. Dessert dishes
3. Deep plates
4. Flat plates
5. Oval serving plate
6. Saucer
natural_image
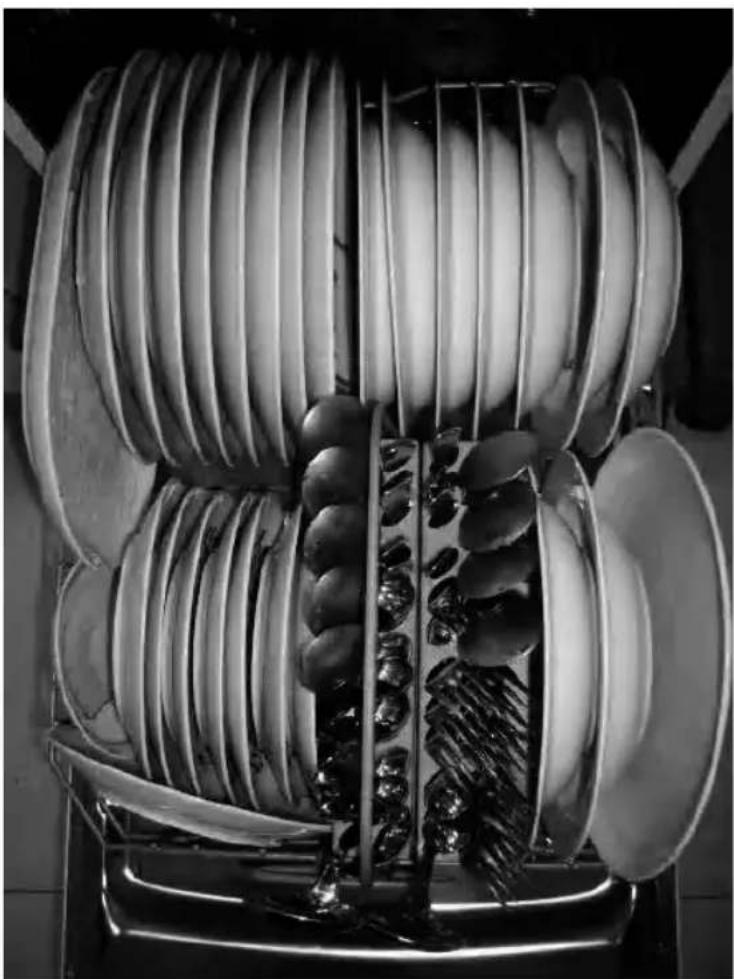
Black-and-white overhead view of a kitchen appliance with multiple plates and a central dish (no visible text or symbols)Cutlery rack
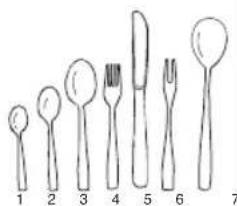
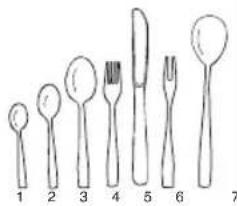
Cutlery should be placed in the special rack with the handles facing down. If the cutlery rack has side racks, spoons should be placed individually in the special slots, and particularly long utensils should be placed flat in front of the top rack, as shown in the illustration
I Teaspoons
-
Dessert spoons
-
Soup spoons
-
Forks
-
Knives
-
Serving forks
-
Serving spoons
natural_image
Illustration of a multi-tiered basket filled with corn and rice, no text or symbols present

natural_image
Line drawing of a set of seven kitchen utensils arranged in a row (no text or symbols)
PLACING DIAGRAM

ATTENTION:
- Do not let any item protrude from the bottom of the rack. Knives and other sharp or pointed utensils must be placed in the rack with the tips or blades down, or be arranged flat.
• Always load sharp utensils with the sharp part down!

The following dishes/cutlery are:
Not suitable for putting in the dishwasher
- Cutlery with wooden, horn, porcelain or mother of pearl handles
• Plastic items that are not heat resistant
- Old cutlery with glued parts that are not resistant to high temperatures
• Cutlery or dishes with coupled parts
- Pewter or copper items
- Crystalware
- Oxidizable steel items Wooden serving dishes Synthetic fiber items
Only limitedly suitable for putting in the dishwasher
- Certain types of glasses that can become dull after many washes
• The parts in silver and aluminum tend to become discolored during washing
- Enameled decorations can fade if washed frequently in the dishwasher
NOTE: Do not put items dirty with cigarette ash, candle wax, polish or paint in the dishwasher.
When purchasing new dishes, make sure they are dishwasher safe.
NOTE: Do not overload the dishwasher. It can only contain 9 standard dishes. Do not use plates that are not dishwasher safe. This is important for obtaining good results and reasonable energy consumption.
Loading cutlery and dishes
Before loading dishes:
Remove the largest food residuals
Soften residuals of burnt food in pans
When loading dishes and cutlery:
Dishes and cutlery must not hinder the rotation of the spray arms
Load concave items such as cups, glasses, pans, etc. with the opening facing down so that water cannot accumulate in the container or on a deep base
Dishes and cutlery must not be placed inside each other or cover each other
• To avoid damage, glasses must not touch
- Load large and hardest to clean items in the bottom rack
- The top rack is designed for more delicate and lighter items, such as glasses and tea and coffee cups.
Attention!
Knives with long blades placed upright are a potential danger!
Long and/or sharp cutlery, such as steak knives, must be placed flat in the top rack.
Damage to glasses and dishes
Possible causes:
- Type of glass or production process. Chemical composition of the detergent.
• Water temperature and duration of the program.
Recommended cure:
- Use glassware or porcelain dishes marked by the manufacturer as dishwasher safe
- Use a mild detergent suitable for those types of dishes. If necessary, request further information from the detergent producer.
- Select a program with the lowest possible temperature.
- To avoid damage, remove glasses and cutlery from the dishwasher as soon as possible at the end of the program.
STARTING A WASH PROGRAM
Table of wash cycles
NOTE
• ★ Meaning: rinse aid needs to added.
- * En50242: this program is the test cycle; it is advisable to set the rinse aid dispenser to position 6.
| Program Information for cycle selection | Description of the cycle | Pre-wash/main wash detergent | Duration (min) | Energy (kWh) | Water (l) | Rinse | |
 Intensive Intensive | For the dirtiest loads, such as pots, pans and dishes on which dried food has remained for some time. | Pre-wash (50°C)Pre-washWash (65°C)RinseRinse (55°C)Drying | 5/22g 120 1.13 | 6.0 | ★ | ||
 Daily*EN 50242 Daily*EN 50242 | For normally soiled loads, such as lightly soiled pans, dishes and glasses. Standard daily cycle. | Pre-washWash (55°C)Rinse (65°C)Drying | 5/22 g 155 13.0 | 1.09 | ★ | ||
 Eco Eco | For lightly soiled loads, such as lightly soiled pans, dishes, glasses and bowls. | Pre-washWash (50°C)Rinse (60°C)Drying | 5/22 g | 175 0.77 10.5 | ★ | ||
 Quick Quick | A shorter wash for lightly soiled loads that do not require drying. | Wash (40°C)Rinse (40°C) | 15 g | 30 9.0 | 0.5 | ||
 Delicates Delicates | For lightly soiled loads, such as glasses, crystalware and china. | Pre-washWash (40°C)Rinse (60°C) | 15 g 0.71 13.0 | 95 | ★ | ||
 Pre-wash Pre-wash | To rinse dishes for washing later that day | Pre-wash | 8 | 0.01 | 3.0 | ||
 Intensive+ 3 in l Intensive+ 3 in l | For dirtier loads, such as pots, pans and dishes on which dried food has remained for some time. | Pre-wash (50°C)Wash (65°C)RinseRinse (55°C)Drying | 3 in l 120 1.13 | 16.0 | |||
 Daily+ 3 in l Daily+ 3 in l | For normally soiled loads, such as lightly soiled pans, dishes and glasses. Standard daily cycle. | Pre-washWash (55°C)Rinse (65°C)Drying | 3 in l 150 1.08 | 13.5 | |||
 Eco+ 3 in l Eco+ 3 in l | For lightly soiled pans, dishes, glasses and salad bowls. | Wash (50°C)Rinse (6°C)Drying | 3 in l 160 0.84 | 10.5 | |||
Switching the appliance on
Starting a wash cycle
I. Pull out the top and bottom racks, load the dishes and reinsert the racks.
It is advisable to load the bottom rack first, then the top one (see the section "Loading the dishwasher").
2. Add the detergent (see the section "Salt, detergent and rinse aid").
3. Insert the plug in the power socket. The power supply is 220-240 VAC /50 HZ, the socket is 10A 250 VAC. Make sure the water supply is at full pressure.
4. Close the door, press the ON/OFF button, the ON/OFF indicator lights up. Press the program button to select the desired wash cycle. Close the door. After 3 seconds, the machine starts.
Modification of program...
Premise:
I. A current cycle can be modified only if it has been running for just a short time. Otherwise, the detergent may have already been dispensed and the appliance may have already drained the wash water. In this case, the detergent dispenser must be refilled (see the section "Loading the detergent").
2. Press the program button for more than 3 seconds to cancel the program and the program can then be modified, setting the desired one (see the section "Starting a wash cycle...").
3. Press one of the other program buttons for more than 3 seconds to cancel the current program and select the program corresponding to the pressed button.
4. Press the display button for more than 3 seconds to modify the time shown.
NOTE: If all the indicators light up, it means that the machine has a fault; switch off the power supply and turn off the water tap before calling the After-Sales Service.
A dish has not been loaded?
A forgotten dish can be added at any time before the detergent dispenser is opened.
I. Open the door slightly to stop the wash.
2. When the spray arms stop, the door can be opened completely.
3. Load the forgotten dishes.
4. Close the door and the dishwasher resumes operation after 10 seconds.

ATTENTION:
It is dangerous to open the door during washing: risk of scalding by boiling water.
At the end of the wash cycle
When the wash cycle has finished, the dishwasher buzzer sounds for 8 seconds and then goes off. Switch the appliance off by pressing the ON/OFF button, turn off the water supply and open the dishwasher door. Wait a few minutes before unloading the dishwasher, to avoid touching the dishes and utensils when they are still hot and more susceptible to breakage. They will dry even better.
Switching off the dishwasher
The program ends only when the dishwasher buzzer has sounded for 8 seconds.
I. Switch off the dishwasher by pressing the ON/OFF button.
2. Turn off the water tap!
Open the door carefully.
The hot dishes are sensitive to impact. The dishes must be left to cool for about 15 minutes before removing them.
Open the dishwasher door, leave it ajar and wait a few minutes before removing the dishes. In this way, they cool and drying is better.
Unloading the dishwasher
It is normal for the dishwasher to be wet inside.
Empty the bottom rack first and then the top one. In this way water will not drip from the top rack onto the dishes in the bottom rack.
MAINTENANCE AND CLEANING
Filtering system
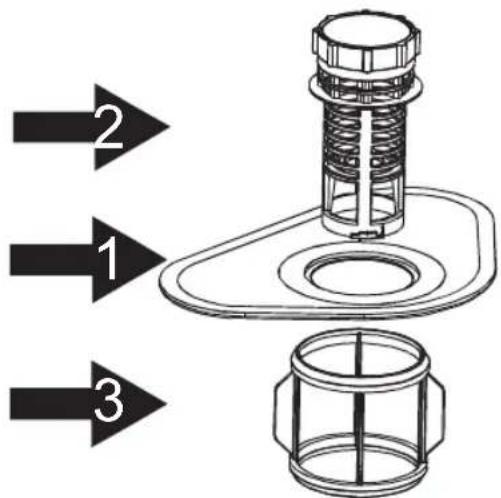
The filter prevents the entry of food residuals or other objects. The residuals can block the filter, in which case they must be removed.
The filtering system is consists of a coarse filter, a flat filter (main filter) and a microfilter (fine filter).
I. Main filter
Food residuals and dirt retained by this filter are pulverized by a special jet of the lower spray arm and then run to the drain channel.
2. Coarse filter
The largest residuals, such as pieces of bone or glass, that could clog the drain are caught in the coarse filter. To remove the residuals retained in this filter, gently press the lid on the top of the filter and remove it.
3. Fine filter
This filter retains the dirt and food residuals in the tray and prevents them from being deposited on the dishes during a cycle.
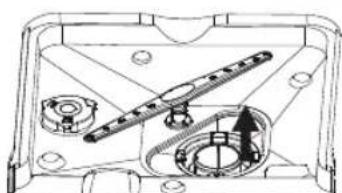
- After every wash, inspect the filters to make sure they are not clogged.
- The filtering system can be removed by unscrewing the coarse filter. Remove the food residuals and clean the filters under running water
Step I: turn the filter counterclockwise and pull it out.
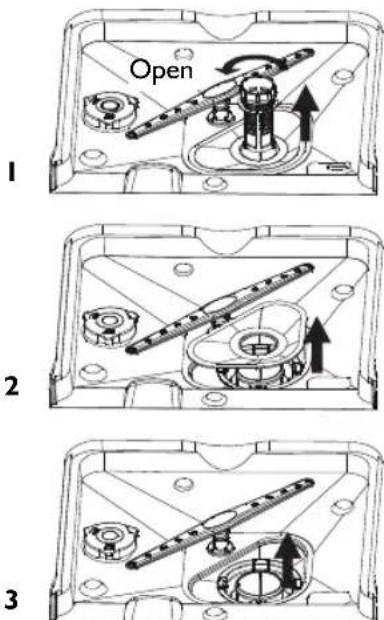
Step 2: lift the main filter
Step 3: lift the fine filter
3
natural_image
Technical diagram of a mechanical assembly with gears and shafts (no text or labels)NOTE
To remove the filter, carry out steps 1 to 3; carry out the steps in reverse order, from 3 to 1, to install it.
Filter assembly
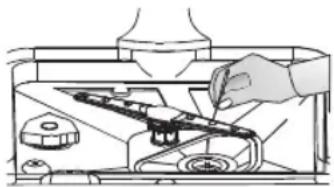
To obtain the best performance and results, the filter assembly must be cleaned.
The filter effectively removes food residuals from the washing water, allowing its recycling during the cycle. To obtain best performance and results, the filter must be cleaned. Therefore, it is advisable to remove the largest food residuals caught in the filter after every wash cycle, rinsing the semicircular filter and cup under running water.
To remove the filter assembly, pull the cup grip upward. The entire filter assembly should be cleaned once a week.
Use a brush to clean the coarse filter. Then reassemble the filter parts as shown in the figures and refit the entire assembly in the dishwasher, positioning it in its place and pressing it down.
The dishwasher must never be used without the filters. Incorrect reassembly of the filter can reduce appliance performance and damage dishes and utensils.

ATTENTION:
- The dishwasher must never be used without the filters.
- Incorrect reassembly of the filter can reduce appliance performance and damage dishes and utensils.
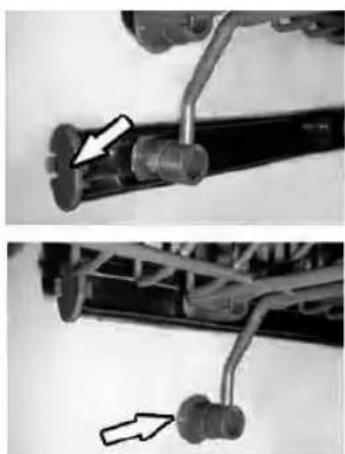
Cleaning the spray arms
The spray arms must be cleaned regularly to remove scale caused by hard water and to prevent blocking of the nozzles and the spray arm supports.
It is advisable to insert a needle in the clogged nozzles of the spray arms to ensure a good wash.
natural_image
Illustration of a hand using a tool to adjust or install a mechanical component inside a container (no text or symbols visible)
Unscrew
Dishwasher care
The control panel can be cleaned with a damp cloth. Dry thoroughly after cleaning. To clean the exterior, use a good wax polish.
Never use sharp objects, scouring pads or harsh detergents on any component of the dishwasher.
Frost protection
In winter take precautions to protect the dishwasher against frost. After every wash cycle, proceed as follows:
I. Cut the dishwasher power cable.
2. Turn off the water supply and disconnect the water inlet pipe from the water valve.
3. Drain the water from the supply hose and the water valve. (Use a basin to collect the water)
4. Reconnect the water supply hose to the water valve.
5. Remove the filter on the bottom of the tub and use a sponge to absorb the water in the tray.
Cleaning the door
To clean the edge around the door, only use a warm and damp soft cloth. To prevent the ingress of water in the door closure and in the electrical components, do not use any type of spray detergent.
natural_image
Diagram of a mechanical device with a handle and base plate, showing no text or symbols
ATTENTION:
- Never use spray detergents to clean the door panel, because they could damage the door closing device and the electrical components.
- Do not use abrasive substances or paper towels, as they can scratch the stainless steel surface or leave marks.
Keeping the dishwasher in good condition
• After every wash
After every wash, turn off the water supply and leave the door slightly ajar so that moisture and odors do not remain inside the dishwasher.
- Remove the plug
Always remove the power plug from the socket before cleaning the appliance or servicing. Do not run risks.
- Do not use solvents or abrasive detergents
Do not use solvents or abrasive detergents to clean the exterior and rubber parts of the dishwasher. Only use a cloth with lukewarm soapy water. To remove stains from the internal surface, use a cloth moistened with water and a little vinegar, or a cleaning product specific for dishwashers.
- When the appliance is not used for a long time
It is advisable to run a wash cycle with the dishwasher empty, then remove the plug from the socket, turn off the water supply and leave the door slightly ajar.
In this way the door seals last longer and odors will not be created inside the appliance.
- Moving the appliance
If the appliance has to be moved, try and keep it upright. If absolutely necessary, it can be placed on the back.
- Seals
One of the factors causing odors in the dishwasher is food residuals trapped in the seals. To avoid this, clean periodically with a damp sponge.
INSTALLATION INSTRUCTIONS
ATTENTION: Installation of the hoses and electrical components must be carried out by professional technicians.

ATTENTION:
Danger of electric shock. Disconnect the power supply before installing the dishwasher. Failure to take this precaution can result in risk of death or electric shock
Preparation for Installation
The dishwasher must be installed near the supply and drain hoses and the power cable. Choose a side of the sink cabinet to facilitate connection of the dishwasher drain hoses.
NOTE: Check the installation accessories supplied (hook for external wooden panel, screw)
Read the installation instructions carefully.
Illustrations of the cabinet dimensions and dishwasher installation position Carry out all the necessary preparations before positioning the dishwasher in the place installation.
I. Choose a position near the sink to facilitate the installation of the supply and drain hoses (see figure I).
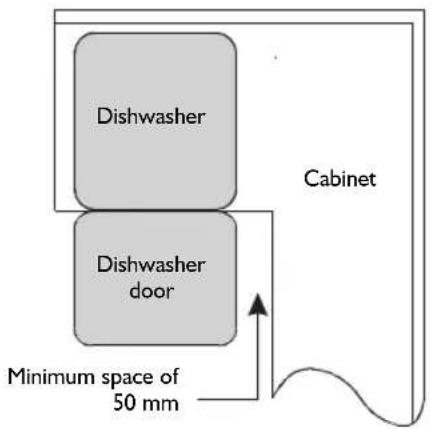
2. If the dishwasher is installed in the corner of the cabinet, a little space must remain (as shown in figure 2) when the door is open.
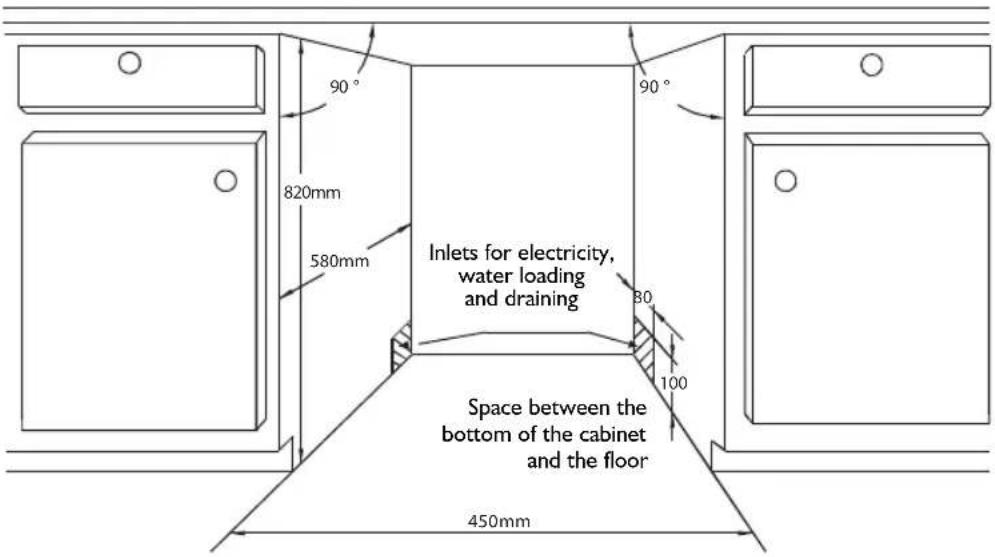
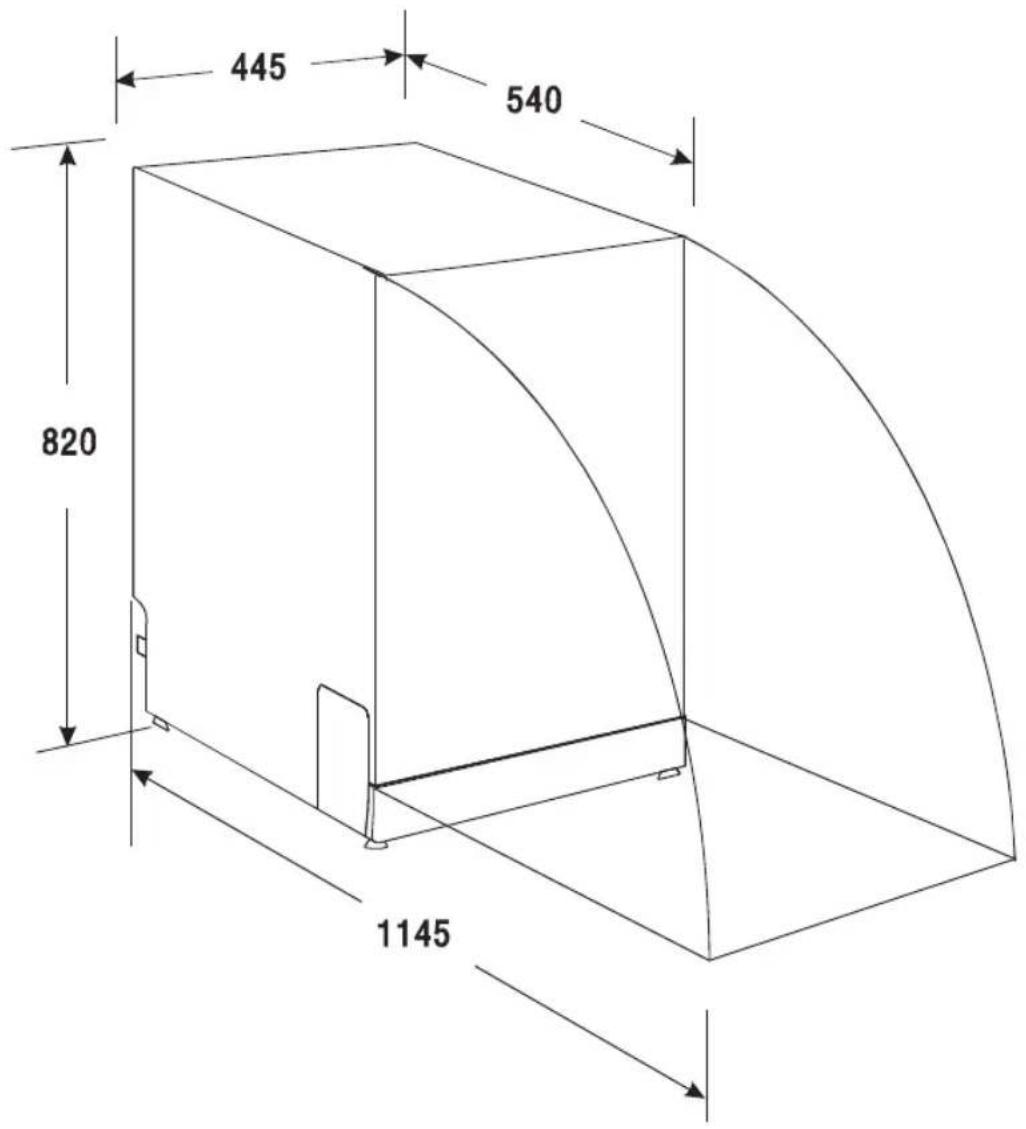
Figure I Cabinet dimensions
Less than 5 mm between the top of the dishwasher and the cabinet and the outside of the door aligned with the cabinet.
Figure 2 Minimum space when the door is open.
External wooden panel dimensions and installation
I. The dimensions of the external wooden panel must be as in figure 3.
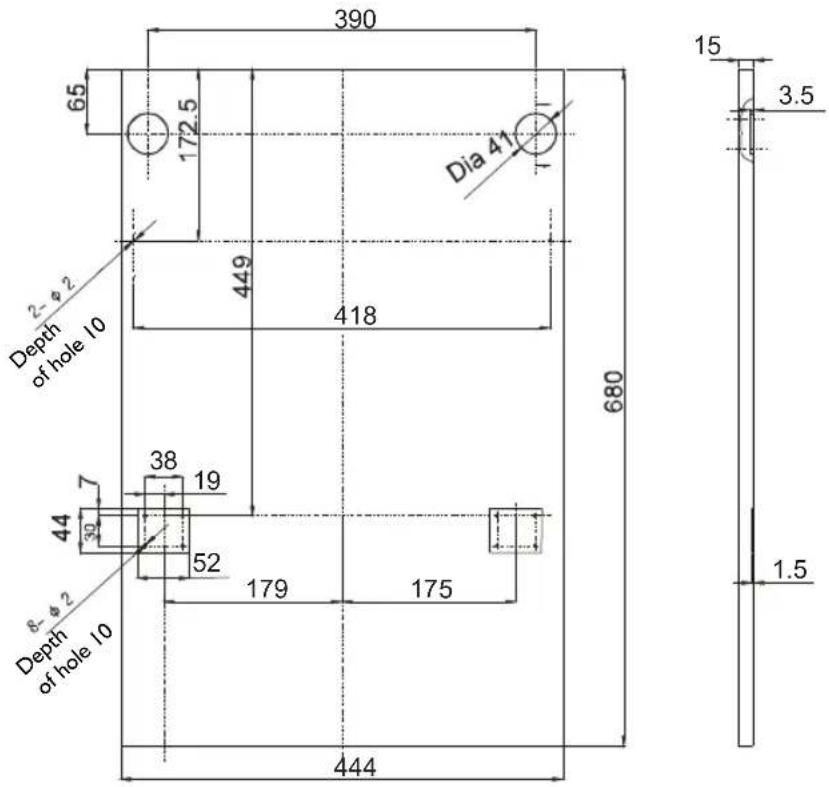
Unit: mm
Figure 3 The dimensions of the external wooden panel must be as shown.
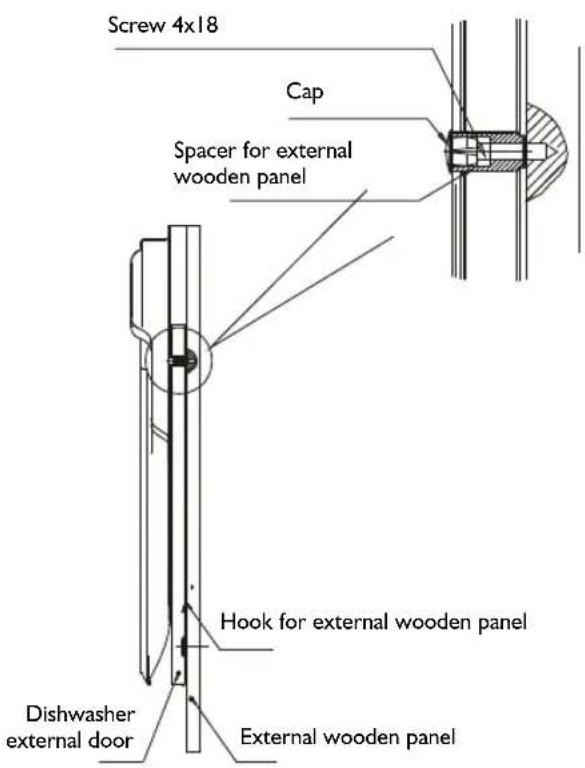
- Fit the hook on the external wooden panel, then place it in the groove on the outer side of the dishwasher door (see figure 4a). After positioning the panel, secure it on the outside of the door with screws and bolts (see figure 4b).
Figure 4a
External wooden panel
installation.
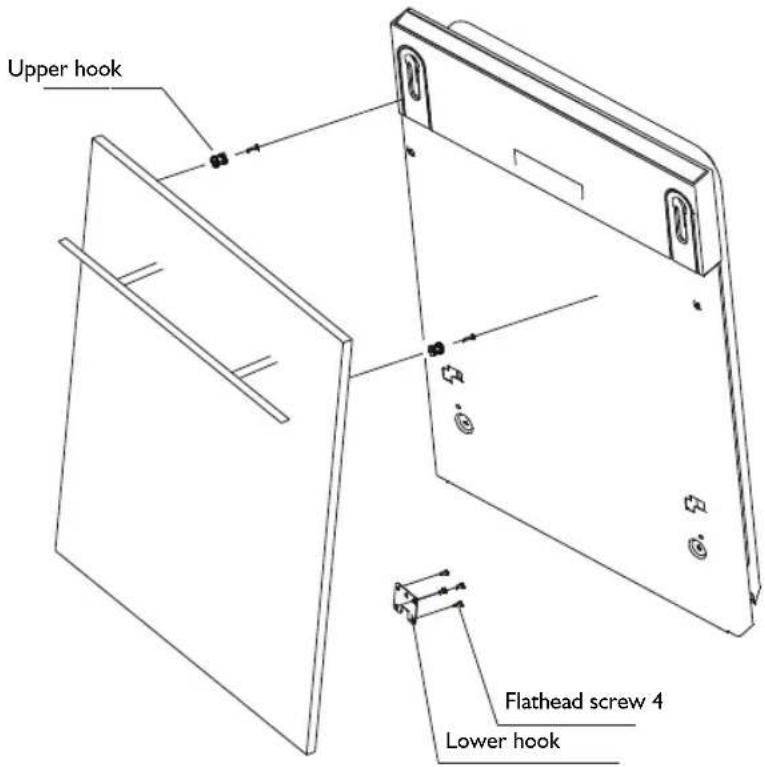
Figure 4b External wooden panel installation.
I. Remove the covering
2. Secure the screw
3. Refit the cap
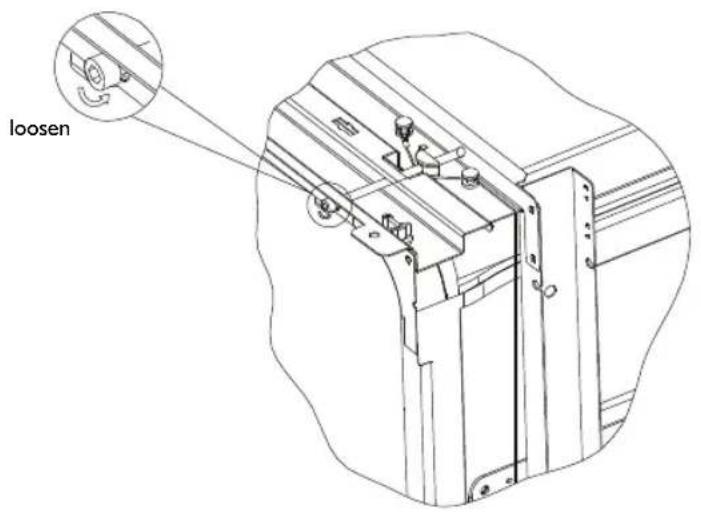
Door spring tension adjustment
The door springs are factory adjusted with the correct tension for the door. If an external wooden panel is installed, the tension of the door spring must be adjusted. Turn the adjustment screw so that the adjusting device tightens or loosens the steel cable (see figure 5).
The door spring tension is correct when the door remains horizontal in the fully open position, but closes at the touch of a finger.
Figure 5 Door spring tension adjustment.
Drain hose connection
Insert the drain hose in a drain pipe at least 4 cm wide, or make it drain in the sink, without bending or kinking it. Use the special plastic support included with the appliance (figure 6). The free end of the hose must be at a height of between 400 and 1,000 mm and must not be immersed in water, to prevent backflow.
ATTENTION: The special plastic support must be securely fixed to the wall to prevent the drain hose from moving and spilling the water.
Figure 6
Drain hose connection.
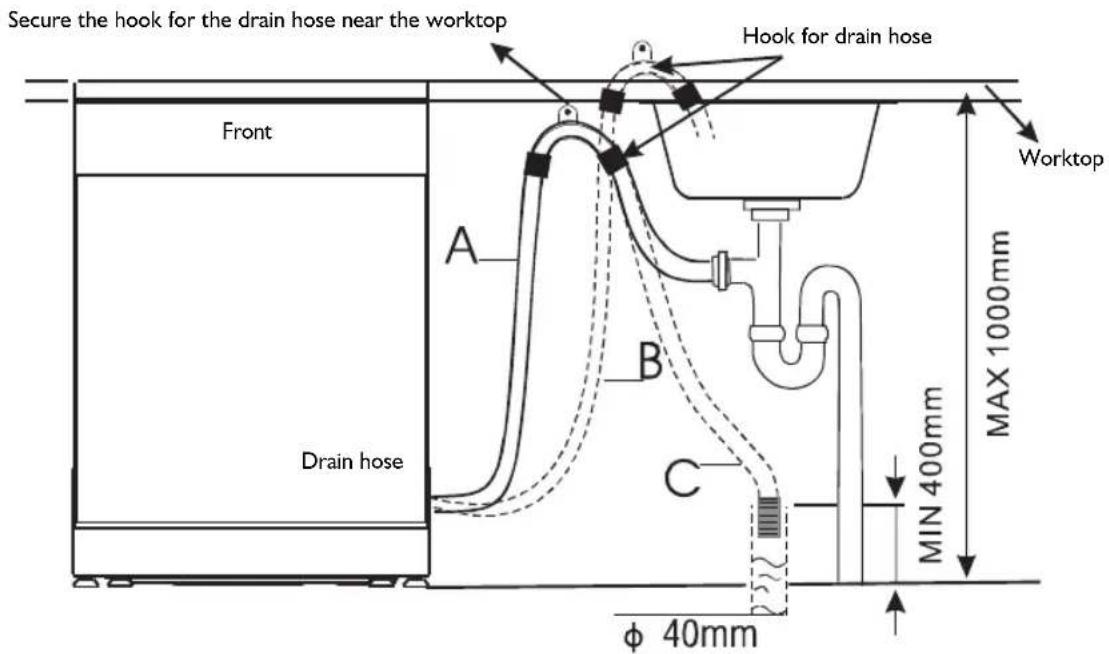
ATTENTION. Hang the drain hose as in A, B or C
Dishwasher installation
I. Fit the cabinet door on the outer side of the dishwasher door using the brackets supplied. Use the template for positioning of the brackets.
2. Adjust the tension of the door springs with an Allen key, turning it clockwise to tighten the springs on the right and left. If the tension is not adjusted the dishwasher could become damaged (figure 2).
3. Connect the supply hose to the cold water pipe.
-
Connect the drain hose. See the diagram (figure 6)
-
Connect the power cabled.
-
Fix the anti-condensation strip under the cabinet worktop. Make sure the anti-condensation strip is flush with the edge of the worktop.
-
Position the dishwasher.
-
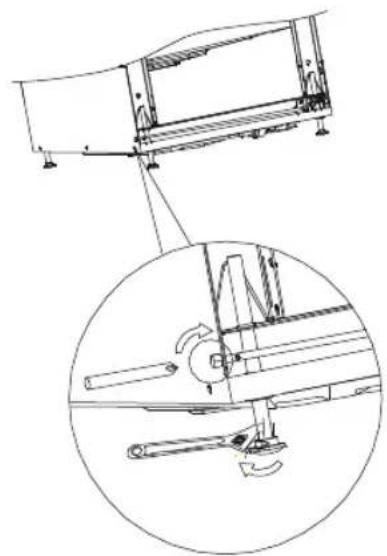
Level the dishwasher. The rear feet can be adjusted from the front of the dishwasher by turning the screws on the left and right sides of the cabinet (figure 5A). To adjust the front feet, use a wrench and turn the front feet until the dishwasher is level (figure 5B).
-
The dishwasher must be securely positioned. This can be done in two ways:
A. Normal worktop - Fix to the worktop with two wood screws, making sure the dishwasher does not strike the surface (figure 6).
B. Marble or granite worktop - Fix the bracket on the side panel of the dishwasher and fix the dishwasher to the cabinet. Fit the rubber cap on the screw (figure 7).

Figure 7
The dishwasher must be level for proper operation of the racks and to ensure best washing performance.
I. Place the level on the door and on the runner of the rack inside the tub, as illustrated, to check if the dishwasher is level.
2. Level the dishwasher by adjusting the four feet individually.
3. When leveling the dishwasher, be careful not tip it over.
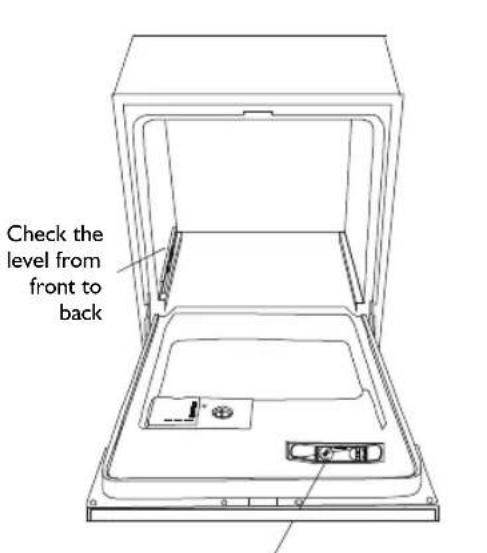
Check the level from side to side
natural_image
Technical line drawing of a mechanical assembly with an inset circular view showing internal components (no text or symbols)Figure 8 Illustration of feet adjustment.
NOTE: The maximum height adjustment of the feet is 60 mm.
Electrical connection

ATTENTION:
For personal safety:
• DO NOT USE EXTENSION LEADS OR ADAPTERS WITH THIS APPLIANCE.
• DO NOT CUT OR REMOVE THE POWER CABLE PLUG GROUND CONNECTION.
Electrical requirements
Check the rated voltage on the data plate and connect the dishwasher to an adequate power supply. Use a 10 amp fuse; a fuse or delay switch is recommended, and use a separate circuit just for this appliance.

ATTENTION:
Before using the appliance, make sure there is a proper ground connection
Electrical connection
Make sure the voltage and frequency match the values given on the data plate. Insert the plug only in a grounded electrical socket. If the electrical socket the appliance is to be connected to is not suitable for the plug, replace the socket rather than use adapters or similar devices that could cause overheating and burns

Instructions for the ground connection
This appliance must be grounded. In case of malfunction or failure, the ground connection reduces the risk of electric shock by providing a path of least resistance for the electric current. This appliance is equipped with a cable with ground wire and grounding plug. The plug must be inserted a suitable socket installed and grounded in compliance with the local regulations.

ATTENTION:
Incorrect connection of the ground wire can result in electric shock. In case of doubt regarding correct grounding of the appliance, contact a qualified electrician or an After-Sales Service technician. Do not modify the plug supplied with the appliance; if it is unsuitable for the socket, have a suitable one installed by a qualified electrician.

ATTENTION:
To avoid stagnation of water in the supply hose, turn off the water tap after use. (For models without safety supply hose).
Cold water connection
The appliance must be connected to the water supply with new hoses, and the old ones must not be reused.
The water pressure must be between 0.04 MPa and 1 MPa. If the pressure drops below the minimum, contact our After-Sales Service Department.
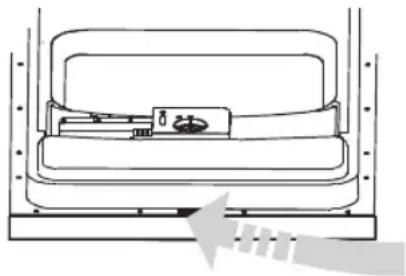
- Pull out the safety filling hoses from the compartment located in the back of the dishwasher.
- Tighten the screws of the safety filling hose on the tap with 34 " thread.
- Before starting the dishwasher, turn the water supply on fully.
natural_image
Line drawing of a hand using a tool to adjust or install a mechanical component (no text or symbols present)Safety filling hose
The safety filling hose has double walls. The safety system stops the flow of water in case of breakage of the inlet pipe or water filling the cavity between the inlet pipe and the external corrugated pipe.

ATTENTION:
If a hose connected to a spray device in the sink is installed on the same water line of the dishwasher, there is risk of bursting. If the sink is equipped with a device of this type, it is advisable to disconnect the hose and insert the plug in the hole.
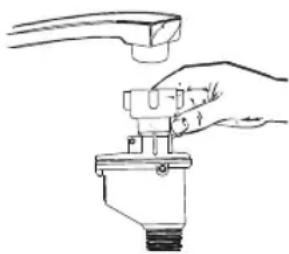
Disconnecting the safety filling hose
I. Turn off the water tap.
2. Reduce the water pressure by pressing the pressure relief button. A lower pressure will protect you and the entire room from any strong sprays.
3. Unscrew the safety inlet pipe from the tap.
Cold water connection
Connect the cold water supply hose to a 3/4" threaded connector, making sure it is tight.
If the water pipes are new or have not been used for a long time, let the water run and make sure it becomes clear and free of impurities. Without this precaution, the water entry point could become clogged, damaging the appliance.
Hot water connection
The water system supplying the appliance can also be connected to the domestic hot water piping (centralized system, heating system), provided a temperature of 60^ C is not exceeded. In this case, the wash cycle time will be shorter by about 15 minutes and washing efficiency slightly less.
Connection to the hot water piping must be carried out following the same procedures described for the connection to the cold water.
Positioning the appliance
Place the appliance in the desired position. The back must be against the rear wall and the sides along the adjacent cabinet or walls. The water supply and drain hoses can be positioned on the right or the left to facilitate proper installation.
Draining excess water from the hoses
If the sink is more than 1,000 mm from the floor, the excess water in the hoses cannot be drained directly in the sink. In this case it will be necessary to drain the excess water from the hoses into a bowl or a suitable container outside the sink and in a lower position with respect to the sink.
Water drain
Connect the water drain hose. The drain hose must be correctly fitted to avoid water leaks.
Make sure the water supply hose is not bent or squashed.
Extension
If a drain hose extension is needed, use a similar hose.
It must not be longer than 4 meters, otherwise the cleaning effect of the dishwasher may be reduced.
Trap connection
The drain connection must be between 50 cm (minimum) and 100 cm (maximum) from the bottom of the dishwasher. The water drain hose must be secured with a hose clamp.
Starting the dishwasher
Before starting the dishwasher, make sure.
I. The dishwasher is level and properly secured
2 The water inlet valve is open
3 There are no leaks in the pipe connections
4 The electrical cables are connected and taut
5 The power is on
6 The water supply and drain hoses are not twisted
7 All packaging materials and adhesives are removed from the dishwasher
ATTENTION: Keep this manual after installation. This manual is very useful for users.
TROUBLESHOOTING TIPS
Before calling the After-Sales Service
By checking the following troubleshooting guide, you may not need to call the After-Sales Service
Technical problems
| Problem Possible | causes What to do | |
| The dishwasher does not start | Blown fuse or tripped switch | Replace the fuse or reset the switch. Remove any other appliance connected to the same circuit as the dishwashe. |
| The power is not turned on Make sure | the dishwasher is switched on and that the door is properly closed.Make sure the power cable is plugged into the wall socket. | |
| Error code: El; the water pressure is low | Check that the water supply hose is properly connected and that the water tap is turned on. | |
| The dishwasher door is not closed properly | Make sure the door closes properly and secure it. | |
| The dishwasher does not drain the water | Bend in the drain hose Check the drain hose. | |
| Clogged filter Check the filter (see the section “Cleaning the filter”). | ||
| Kitchen sink clogged Check the sink to make sure it drains properly. If the problem is the kitchen sink that does not drain, you may need a plumber instead of a technician for the dishwasher. | ||
General problems
| Problem Possible | causes What to do | |
| Foam in the tub Unsuitable | detergent. Only use detergents specific for dishwashers. In case of excess of foam, open the dishwasher and let it evaporate. Pour 4 liters of cold water into the tub. Close and secure the dishwasher, then start the “soak” cycle to drain the water. Repeat if necessary. | |
| Spilling of rinse aid. Any spilled rinse aid must be immediately removed with a cloth. | ||
| Inside of tub stained Detergent with dyes used. Make sure the detergent is without dyes. | ||
| White film on the inner surface | Minerals in hard water. To clean the inside, use a damp sponge with dishwasher detergent and wear rubber gloves. Never use detergents that are not specific for dishwashers: risk of foaming. | |
| Rust stains on cutlery | The stained items are not corrosion resistant. | - |
| A program was not started after the addition of salt. Traces of salt in the wash cycle. | Always start a quick wash program without dishes in the machine and without selecting the “Turbo” function (if available), after adding the salt. | |
| The water softener lid is not closed properly. | Check the lid. Make sure it is well sealed. | |
Noise
| Problem Possible | causes What to do | |
| Beating in the wash tub A | spray arm is hitting against an item in the rack. | Stop the program, rearrange the items blocking the spray arm. |
| Shaking in the wash tub The | dishes are not placed firmly in the wash tub. | Stop the program and rearrange the dishes. |
| Beating in the water pipes | This can be caused by the installation in the place or by the pipe section. | This does not affect dishwasher operation; in case of doubt, contact a qualified plumber. |
Unsatisfactory wash results
| Problem Possible | causes What to do | |
| The dishes are not clean T | the dishes were not loaded properly. | See the notes in the section “Loading dishwasher racks”. |
| The program is not intensive enough. | Select a more intensive program.See “Table of wash cycles”. | |
| Not enough detergent was dispensed. | Use more detergent, or change the type of detergent. | |
| Dishes block the spray arms. Rearrange | the items so that the arms can rotate freely. | |
| The filter assembly on the bottom of the wash tub is not clean or not fitted properly. This can cause clogging of the spray arm nozzles. | Clean and/or properly fit the filter assembly. Clean the spray arm nozzles.See the section “Cleaning the spray arms”. | |
| Streaks on glasses Combination of soft water and too much detergent. | Use less detergent if the water is soft and select a shorter cycle for the glasses to make them clean. | |
| Black or gray marks on dishes | Aluminum utensils have rubbed against dishes. | Use a mildly abrasive detergent to remove the marks. |
| Detergent residuals in the dispenser | The dishes block the detergent dispenser. | Reload the dishes properly. |
The dishes are not dry
| Problem Possible | causes What to do | |
| Unsatisfactory drying results | Load incorrect Load the dishwasher according to the instructions. | |
| Insufficient amount of rinse aid | Increase the amount of rinse aid/refill the rinse aid dispenser. | |
| The dishes were removed too soon | Do not empty the dishwasher immediately after washing. Open the door a little to let steam out. Start unloading the dishwasher only when the dishes have become just warm to the touch. Empty the bottom rack first. This will prevent water dripping from the dishes in the top rack. | |
| Wrong program selected The washing temperature is lower in the quick program. This reduces washing results. Choose a program with a longer wash time. | ||
| Use of cutlery with low quality coating | Drying is more difficult with such cutlery. This type cutlery is not suitable for putting in a dishwasher. | |

ATTENTION:
- If an overflow condition occurs, turn off the main water supply before contacting the After-Sales Service.
- If there is water in the tub due to overfilling or a small leak, the water must be removed before restarting the dishwasher.
TECHNICAL DATA
| Height 820 mm (adjustable + 60 mm) | |
| width 445 mm | |
| Depth 540 mm | |
| Voltage load See data plate | |
| Water pressure 0.04-1.0 MPa | |
| Hot water connection Max. 60°C | |
| Power supply See data plate | |
| Load capacity 9 place settings |
INFORMATIONS DE SÉCURITÉ IMPORTANTES
LIRE ATTENTIVEMENT LES INSTRUCTIONS DE SÉCURITÉ AVANT D'UTILISER L'APPAREIL

AVERTISSEMENT :
natural_image
Circular diagram with concentric rings and directional arrows, no text or symbols presentnatural_image
Technical line drawing of a mechanical assembly with a hand holding a tool, showing internal components like gears and a housing (no text or symbols)natural_image
Hand pressing a button on a device panel (no text or symbols visible)natural_image
Diagram of a spray bottle with a lid and spray nozzle, no text or symbols presentnatural_image
Illustration of a hand holding a handheld device with control buttons and icons (no text or symbols)natural_image
Technical line drawing of a mechanical assembly with no visible text or symbols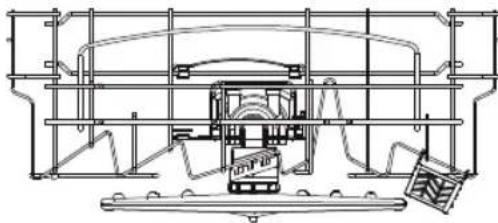
natural_image
Technical line drawing of a mechanical assembly with no visible text or symbolsREMARQUE :
natural_image
Mechanical assembly diagram showing two views of a pipe connection with arrows indicating components (no text or symbols present)natural_image
Black-and-white overhead view of a kitchen appliance with multiple plates and a central dish (no visible text or symbols)Panier à couverts
natural_image
Illustration of a multi-tiered container with corn and egg-like structures (no text or symbols)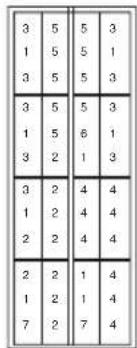

SCHÉMA
D'INTRODUCTION

AVERTISSEMENT :
natural_image
Technical line drawing of a mechanical assembly with gears and shafts (no text or symbols)natural_image
Technical line drawing of a mechanical assembly with gears and shafts (no text or symbols)REMARQUE
natural_image
Illustration of a hand using a tool to adjust or install a mechanical component (no text or symbols visible)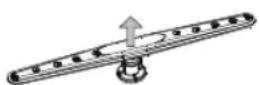
Dévisser
natural_image
Diagram of a medical device with internal components and a hand pointing to a button (no text or symbols)
AVERTISSEMENT :
natural_image
Line drawing of a hand using a tool to press or install a mechanical component (no text or symbols present)HET APPARAAT AFDANKEN
natural_image
Simple circular diagram with a central arrow and two directional arrows, no text or symbols present.natural_image
Illustration of a hand pressing down on a device with a star symbol (no text or labels)natural_image
Diagram of a spray bottle with a lid and spray nozzle, no text or symbols presentnatural_image
Illustration of a hand holding a device with control buttons and a star symbol (no text or symbols present)Let op!
natural_image
Technical line drawing of a structural framework with beams and supports (no text or symbols)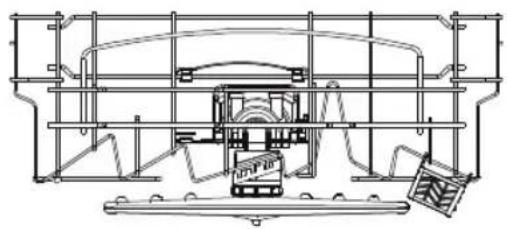
natural_image
Technical line drawing of a mechanical assembly with no visible text or symbolsOPMERKING:
natural_image
Black-and-white overhead view of a kitchen appliance with multiple plates and a central dish (no visible text or symbols)Bestekkorf
natural_image
Illustration of a multi-tiered basket filled with corn and rice, no text or symbols present| 3 | 5 | 5 | 3 |
| 1 | 5 | 5 | 1 |
| 3 | 5 | 5 | 3 |
| 3 | 5 | 5 | 3 |
| 1 | 5 | 6 | 1 |
| 3 | 2 | 1 | 3 |
| 3 | 2 | 4 | 4 |
| 1 | 2 | 4 | 4 |
| 2 | 2 | 4 | 4 |
| 2 | 2 | 1 | 4 |
| 1 | 2 | 1 | 4 |
| 7 | 2 | 7 | 4 |

PLAATSINGSSCHEMA

WAARSCHUWING:
natural_image
Technical diagram of a mechanical assembly with gears and a lever (no text or labels)natural_image
Technical line drawing of a mechanical assembly with gears and a shaft (no text or symbols)OPMERKING
natural_image
Illustration of a hand using a tool to adjust or install a mechanical component (no text or symbols visible)
Schroef de
natural_image
Diagram of a mechanical device with a handle and internal components, no visible text or symbols
WAARSCHUWING:
natural_image
Line drawing of a hand using a tool to press or install a mechanical component (no text or symbols present)natural_image
Technical line drawing of a mechanical device with labeled components (no text or symbols beyond labels 11 and 12)natural_image
Circular diagram with concentric rings and directional arrows, no text or symbols presentnatural_image
Illustration of a hand pressing down on a control panel with buttons and a star symbol (no text or labels)natural_image
Diagram of a spray bottle with a lid and spray nozzle, no text or symbols presentnatural_image
Hand holding a device with a knob and control buttons (no text or symbols visible)NOTA
natural_image
Technical line drawing of a structural framework with beams and supports (no text or symbols)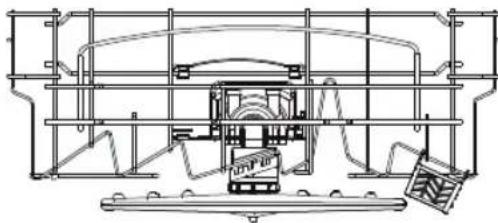
natural_image
Technical line drawing of a mechanical assembly with no visible text or symbolsNOTA:
natural_image
Mechanical assembly diagram showing two views of a mechanical component with no visible text or symbolsnatural_image
Black-and-white overhead view of a kitchen appliance with multiple plates and a central dish, no visible text or symbols.natural_image
Illustration of a multi-tiered basket filled with corn and rice, no text or symbols present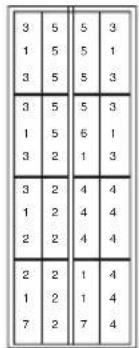


natural_image
Technical line drawing of a mechanical assembly with gears and a tool (no text or symbols)natural_image
Technical line drawing of a mechanical assembly with gears and shafts (no text or symbols)NOTA
natural_image
Illustration of a hand using a tool to adjust or install a mechanical component (no text or symbols visible)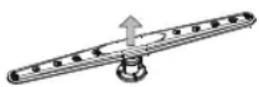
Svitare
natural_image
Diagram of a mechanical device with a handle and internal components, no visible text or symbols