Swing - Bike Monty - Free user manual and instructions
Find the device manual for free Swing Monty in PDF.

| Brand | Monty |
| Model | Swing |
| Product type | Bike |
| Category | Folding bike |
| Maximum authorized weight (rider) | 85 kg |
| Bike weight (estimated) | Approximately 13-15 kg |
| Brakes | Depending on model: rim brakes, disc brakes, drum brakes, or coaster brake |
| Transmission | Chain, chainrings, sprockets with derailleurs |
| Suspension | Depending on model, adjustable preload (SAG 15-35%) |
| Wheels | Size varies by version |
| Folding | Yes, quick folding system |
| Folding system | Folding frame, folding handlebars, adjustable saddle |
| Lighting | Optional (front/rear lights) |
| Warranty | 24 months for the bike, 12 months for electrical components |
| Maintenance | Regular cleaning, chain lubrication every month, brake check before each use |
| Safety | Helmet mandatory, brakes, reflectors, obey traffic rules |
| Tire pressure | Indicated on the tire sidewall |
| Tightening torque (example) | Power screws: 8-10 Nm; crank bolts: 25-50 Nm (depending on type) |
Frequently Asked Questions - Swing Monty
User questions about Swing Monty
0 question about this device. Answer the ones you know or ask your own.
Ask a new question about this device
Download the instructions for your Bike in PDF format for free! Find your manual Swing - Monty and take your electronic device back in hand. On this page are published all the documents necessary for the use of your device. Swing by Monty.
USER MANUAL Swing Monty
FAILURE TO FOLLOW THE INDICATIONS IN THIS MANUAL MAY LEAD TO MECHANICAL FAILURE CAUSING A LACK OF CONTROL AND A POSIBLE FALL FROM THE BICYCLE, WHICH MAY RESULT IN SERIOUS PHYSICAL INJURY AND EVEN DEATH TO THE RIDER OR THIRD PARTIES.
INAPPROPRIATE RIDING MAY ALSO PUT YOUR PHYSICAL INTEGRITY AND THAT OF THIRD PARTIES IN DANGER.
SAFETYWARNINGS
-
WE RECOMMEND ALWAYS WEARING A SAFETY HELMET.
-
WEAR SUITABLE CLOTHING FOR CYCLING.
-
IN CONDITIONS WITH LOW VISIBILITY, ALWAYS ENSURE THE BICYCLE IS EQUIPPED WITH REFLECTIVE MATERIALS OR LIGHTS.
-
NEVER EXCEED THE BICYCLE'S MAXIMUM WEIGHT LIMIT.
WARRANTY WARNING
ANY MODIFICATION OF THE FRAME, FORK OR ANY OTHER COMPONENT INDICATES THAT THE PRODUCT IS NO LONGER IN LINE WITH OUR SPECIFICATIONS, THUS VOIDING THE WARRANTY.
TAMPERING BY THE USER WITH ANY OF THE VEHICLE'S PARTS SHALL RELIEVE MONTY OF ANY LIABILITY.
IF YOU HAVE ANY QUESTIONS, PLEASE CONTACT YOUR DISTRIBUTOR OR VISIT OUR WEBSITE: http://www.montybikes.com
BICYCLE ADJUSTMENT, INSPECTION AND LUBRICATION 31
CUSTOMER FORM back cover

WWW.MONTYBIKES.COM
Welcome and thank you for choosing the Monty brand.
This User Manual contains important and necessary information for proper bicycle use and maintenance. It was prepared so that you use the vehicle confidently and safely and get the most out of the experience.
Please read this Manual carefully before taking the first ride on your new bicycle and keep it in a safe place for future reference. Please contact your Monty distributor if you have any questions.
Parents and guardians responsible for minors riding the bicycle should pay special attention to the contents of this Manual.
The drawings and photos in this Manual are used only to increase comprehension and may not correspond exactly to the models in question. We apologize for any inconvenience if some sections of this manual do not correspond to the exact features of your bicycle.
This General Manual provides information on the following types of bicycles:
- Trial bikes
- Mountain, trekking, city, BMX and kids' bicycles and tricycles
- Folding bicycles
- Electric bicycles
Due to our ongoing efforts to improve our Monty products, we are constantly innovating to offer our customers the finest-quality products made with the best materials. As a result, we may implement technical improvements in our models or alter our parts without notifying customers in advance.
Thank you for taking a few minutes and paying special attention to the contents of this Manual. We hope you enjoy the product.
For more information on our products, visit our website:
http://www.montybikes.com
or send us an email:
monty@monty.es
NOTE: For queries regarding repairs and/or the warranty, always attach the Manual and invoice.
MAXIMUM WEIGHT LIMITS
ENG
26
| TYPE OF BICYCLE MAXIMUM WEIGHT LIMIT (cyclist) | |
| TRIAL 90 kg | |
| MOUNTAIN 100 kg | |
| CITY 90 kg | |
| BMX 90 kg | |
| KIDS 14” / 16” / 18” wheels 20” / 24” wheels | 30kg 45kg |
| FOLDING 85 kg | |
| TRICYCLE 90 kg | |
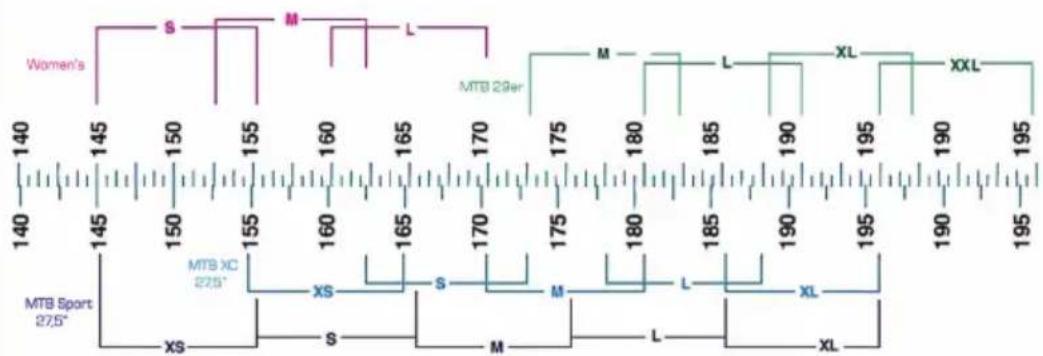
WHEEL SIZE COMPARISON

CHOOSING THE RIGHT SIZE
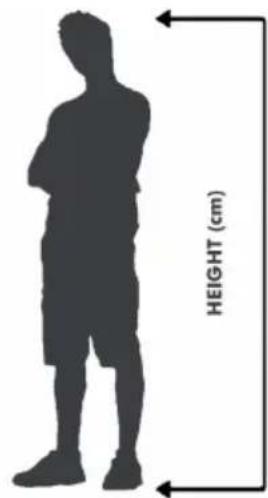
ADULTS

KIDS
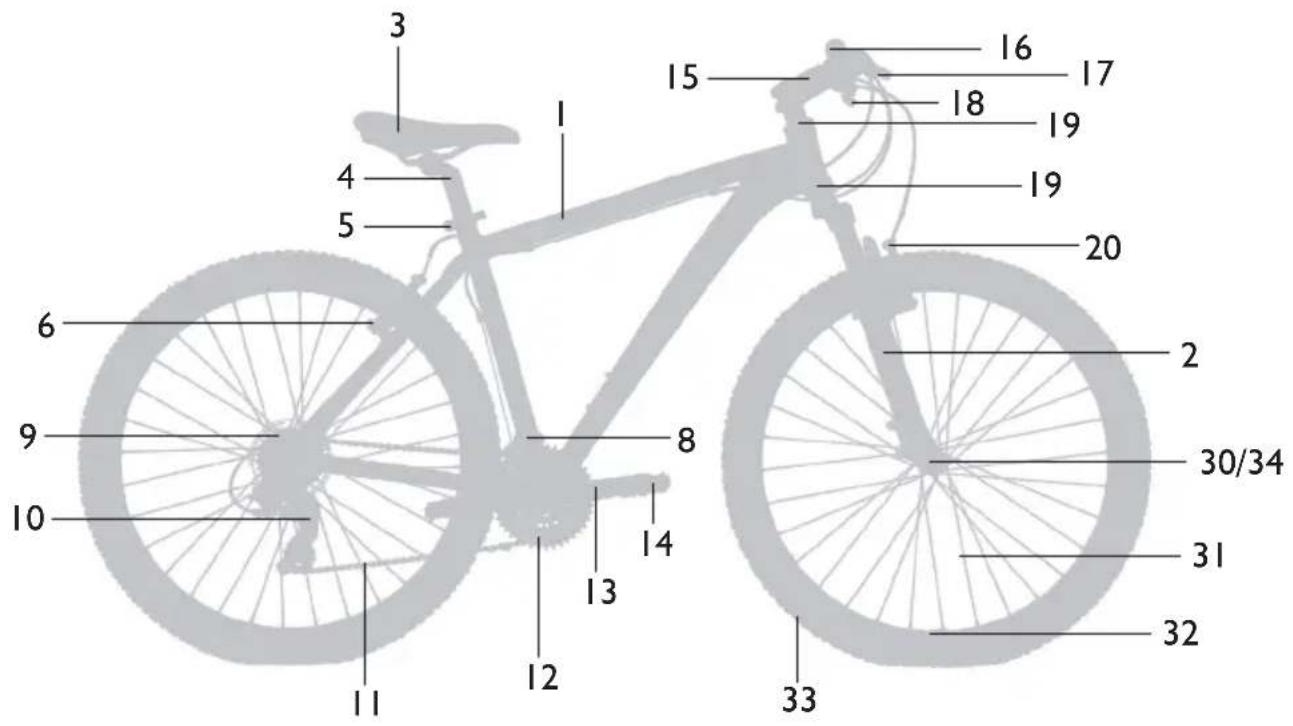
PARTS OF THE BICYCLE
I - Frame
2-Fork
3 - Saddle
4 - Seat post
5 - Seat binder
6 - Rear brake
7 - Rear brake disc
8 - Front derailleur
9 - Cassette
10 - Rear derailleur
I I -Chain
12 - Chainset
13 - Crank
14-Pedal
15 - Stem
16-Handlebar
17 - Brake lever
18 - Gear shifting mechanism
19-Headset
20 - Front brake
21 - Front brake disc
22 - Carrier
23 - Rear light
24 - Front light
25 - Kickstand
26 - Motor
27 - Battery
28 - Mudguard
29 - Folding system
WHEEL
30 - Axle
31 - Spoke
32 - Rim
33 - Tyre
34-Hub
TRIAL
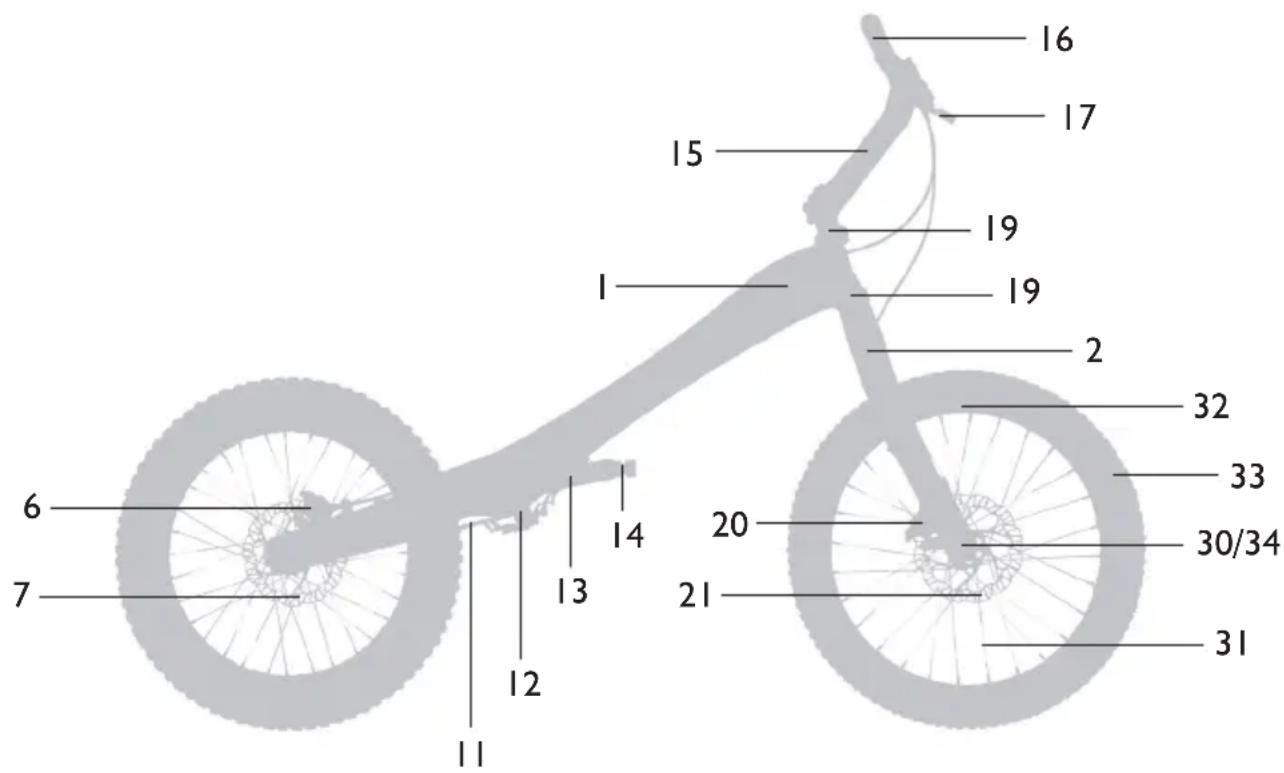
FOLDING
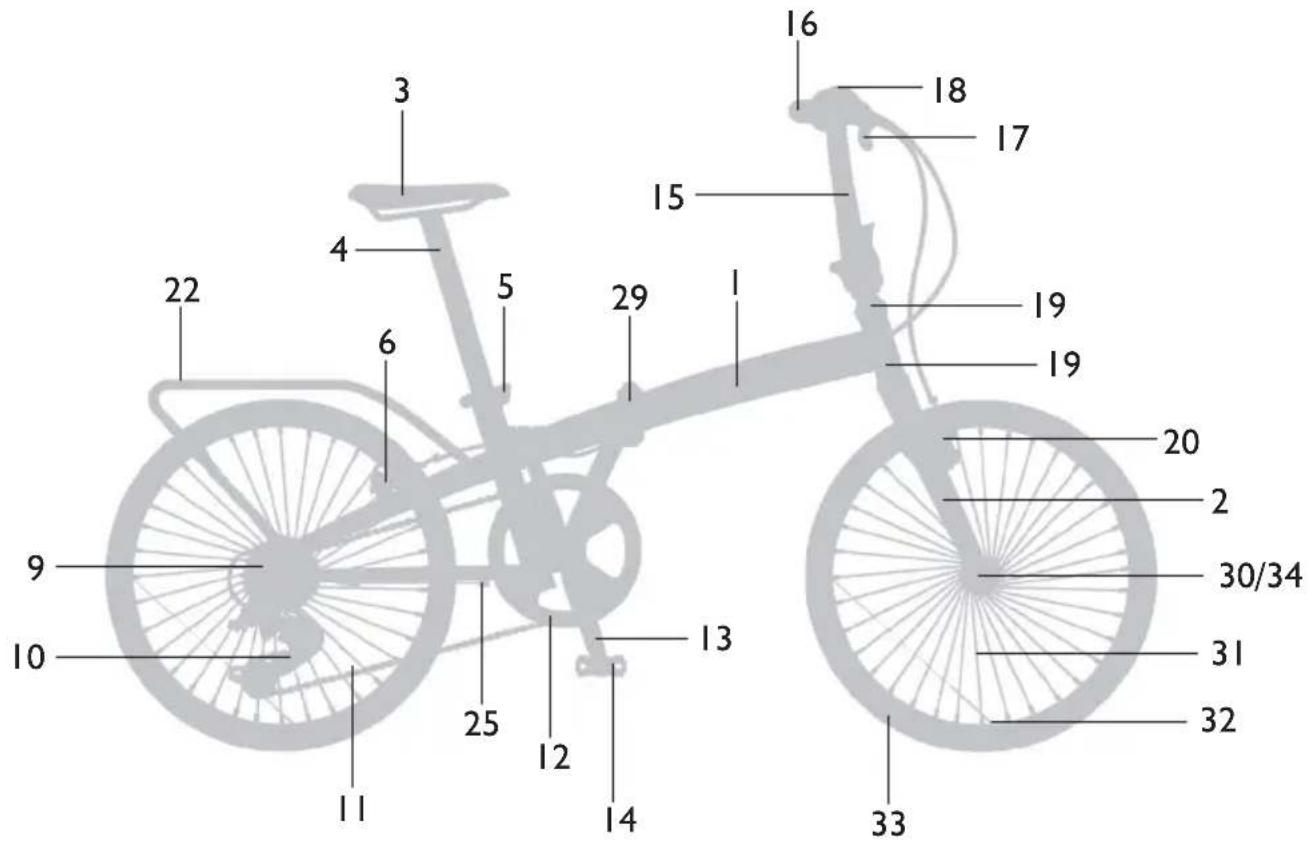
*This section shows general models of some bicycle types. They may not correspond exactly to actual bicycles.
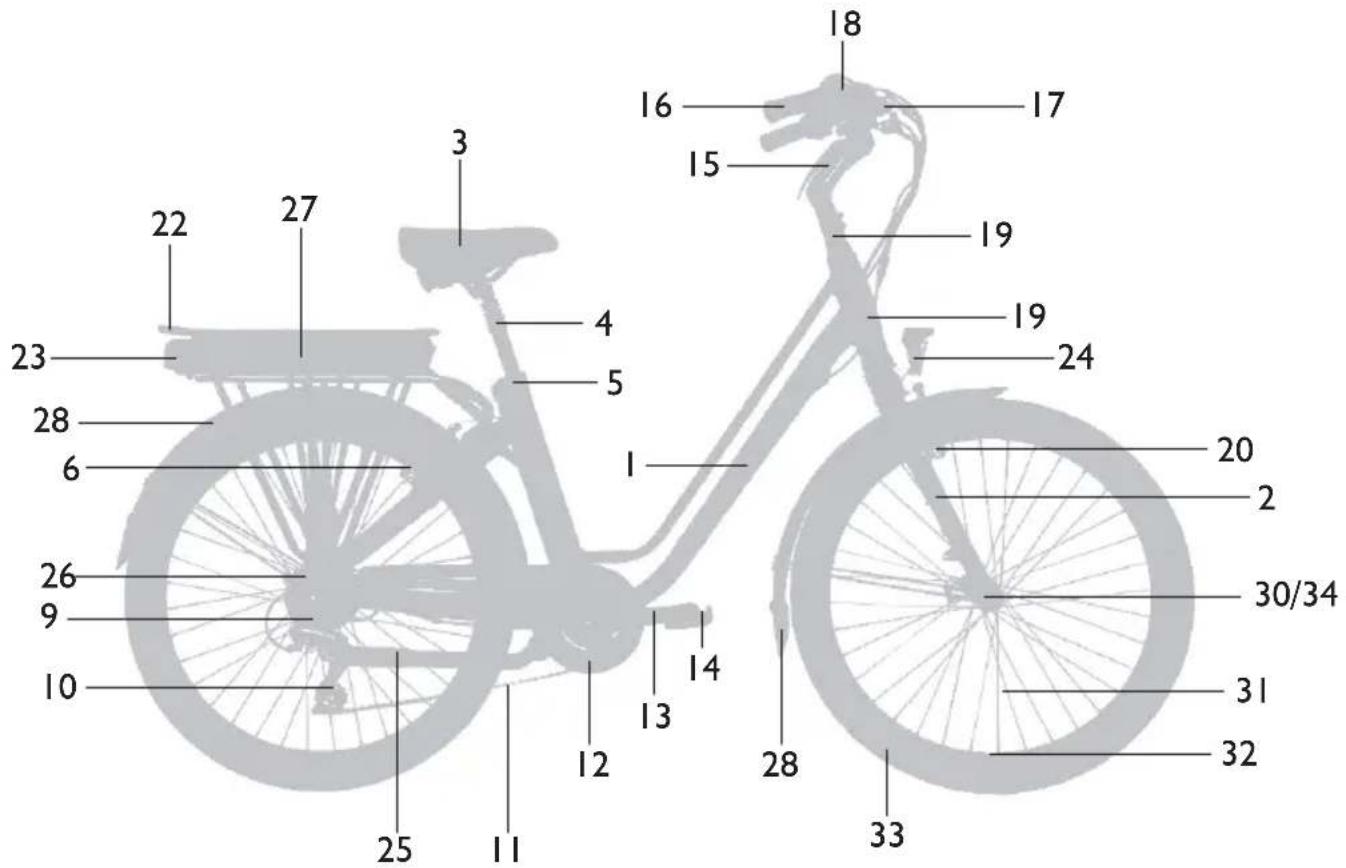
ELECTRIC BIKE
TYPES OF BICYCLES
TRIAL BIKES
Our range of trial bikes is designed and developed based on our market experience to meet everyone's needs, including cyclists just getting started and elite riders in the sport.
They are always equipped with state-of-the-art technological innovations and top-quality materials to go higher and farther while overcoming all obstacles.
BMX BIKES
Enjoy strong emotions with our BMX / Freestyle range. Speed, power and imagination are all you need to enjoy a unique experience while you wow them with your tricks.
MOUNTAIN BIKES
For riders who enjoy tracks, climbing mountains and descending them at full speed, we've designed a range of bicycles that are perfect for beginners eager to push their limits, as well as experts keen on discovering new adventures.
CITY BIKES
In terms of geometry and components, the city bike is the perfect commuter bicycle for riding in city traffic, so you can leave the tracks and paths behind.
The range is designed to meet the needs of the many kinds of urban cyclists in terms of fun, practicality, unlimited mobility and adapting to your lifestyle.
FOLDING BIKES
A folding bike is perfect for daily use and also has certain advantages: it's lightweight, easy to transport and takes up little space. You can use it to go wherever you want, carry it if you need to and even take it on public transport.
KIDS' BIKES
Your first experience riding a bicycle is something you never forget. That's why we make the models in our kids' range so they're strong, lightweight and safe. And so that kids never stop pedalling, having fun and discovering new places!
TRICYCLES
These three-wheel vehicles are the best option for saving energy on short rides on paved surfaces. They're perfect for companies and short package delivery trips.
ELECTRIC BICYCLES
This is the best option for making longer trips faster, thanks to electric pedal assistance. It provides a different form of environmentally friendly travel. Travel farther, discover new places and get there faster with less energy.
BICYCLE ADJUSTMENT, INSPECTION AND LUBRICATION
*ADJUSTING THE SADDLE HEIGHT
This distance is calculated by measuring your inseam while wearing the shoes you will wear for cycling. Multiply the measurement by the coefficient 0.885. Now measure that distance from centre of the chainset screw to the centre of the saddle padding. To change the saddle height, loosen the screw on the clamp holding the seat post to the frame.
For your safety, the saddle should not be raised beyond the reference point marked on the seat post (horizontal mark for minimum setting).
*ADJUSTING THE SADDLE CLAMP
Make sure that the saddle is secured to the frame assembly and has no horizontal, vertical or rotational movement with respect the axis of the seat tube.
ADJUSTING THE HANDLEBAR
For a comfortable position that does not cause neck and back pain, we recommend following the indications in the table:
| SADDLE HEIGHT HANDLEBAR HEIGHT DIFFERENCE | |
| 65-68 cm 5 - 6 cm | |
| 69-72 cm 6 - 7 cm | |
| 73-76 cm 7 - 8 cm | |
| 77-79 cm 8 - 9 cm | |
| 80-82 cm 9 - 10 cm | |
WHEEL ALIGNMENT
Check the connection between the stem and the handlebar by moving it against the front wheel. Verify that all the screws are Verifique que todos los tornillos are tightened correctly.
*ADJUSTING THE SUSPENSION
SAG is a factor that should be assessed so that the preload on the bicycle suspension is set properly. In general, SAG values should be between 15% and 35% .
To determine the right SAG, consult the specific instructions for the suspension fork that comes with your bicycle.
DRIVETRAIN
The bicycle's drivetrain transmits power to the back wheel through:
- Pedals
- Crankset
-Chain
Cassette
*Not all Monty bicycles have all the components described in this section.
INSPECTION
When the drivetrain is functioning properly, shifting will work smoothly and quietly.
Once a month, check that the cassette and chain are clean and well oiled. All links in the chains should pivot well without squeaking. Likewise, check that no links are deformed. Rise the rear wheel and spin the cassette. If you hear a strange noise or if the cassette stops as soon as you let go, it may need to be repaired or replaced.
Once a month, if your bike has a chainguard, check that it is securely attached and aligned. Try to move the chainguard from one side to the other and tap it. Lift the rear wheel and turn the crank arms to hear if the chain or the chainring is rubbing against the chainguard. Realign the chainguard and adjust the screws so it is secure.
Inspect your pedals every three months. Check that the pedal reflectors are clean and correctly positioned. Make sure the pedals are properly secured to the crank arms. The right pedal is marked with the letter R on its axis. Screw the right pedal clockwise and the left pedal in the opposite direction. To check that the pedal bearings are well-adjusted, move the pedals up and down and left to right. If you feel that anything is loose or too stiff, take the bicycle to your dealer so they can be adjusted, lubricated or replaced.
Every three months, inspect the crankset and check that the bolts are secured.
CHAINRING ADJUSTMENT CHECK
- Shift the chain to the largest chainring.
- Spin the chainrings until the crank arms are parallel to the seatpost.
- Put one hand on the crank arm and one on the seatpost; try to move the crank arm towards and against the seatpost. If it is loose, it needs to be checked by your dealer.
- If, when turning the chainrings, you notice that they are loose or you hear a strange noise in the bearings, they need to be checked by your dealer.
- Clean the chainrings and inspect them for any damage. If any tooth is bent or damaged, the chainring must be replaced by your authorized dealer.
Check the chain for wear every three months. Every complete link of a chain measures one inch (25.4mm). If twelve links measure more than 30.8cm, the chain must be replaced. With a properly maintained road bicycle, the chain generally lasts between 1600 and 2400 km. The service life for mountain bikes is slightly less. Special tools and know-how are required to change the chain. Therefore, you should take your bike to your authorized dealer.
ADJUSTMENT
Adjusting the drivetrain (cassette, chain, chainring and pedals) must be performed by an authorized dealer, since it requires specific tools and special skills.
Adjusting the chain on a single speed bicycle:
Gradually loosen the nuts of the wheel hub. In single-speed bikes, or bicycles with internal hub shifters, chain tension has to be adjusted so that, halfway between the wheel hub and bottom bracket, there is 1cm of slack in the chain. Tighten the nuts until the wheel is uniformly secured.
LUBRICATION AND CLEANING
Once a month, clean and lubricate the cassette and the chain. You should always keep a cloth behind the chain so that oil does not drip on the rest of the bicycle. Once the chain is lubricated, clean any excess off the chain.
Do not use gasoline to clean the cassette. It is highly flammable and leaves a thin film of grease after it evaporates. Clean the cassette with a degreasing fluid and brush.
Once a year, lubricate the pedal bearings, the clipless pedal mechanism and the part of the pedal that screws into the crank arms. Some bearings are sealed and do not require lubrication.
Lubricating the bearings requires specific tools and special know-how, and should only be performed by an authorized dealer.
Note: The left and right pedals have a mark stamped on the corner indicating the side to which they pertain.
LUBRICATION
To ensure your bicycle works properly and to extend its life, the following parts should be oiled at regular intervals:
-
Chain: Degrease and then oil with Monty Teflon lubricant.
-
Headset: Disassemble, degrease and oil.
-
Sprockets: Degrease and oil slightly.
*GEAR SHIFTING SYSTEM
ADJUSTING THE FRONT DERRAILLEUR
Ensure that the lower part of the outer cage plate is between 1 and 3mm from the top part of the teeth on the large sprocket.
-
Adjusting the lower limit: With the chain on the small chainring and the large sprocket, tighten the screw that adjusts the lower limit until there is a gap of 1 to 3mm between the chain and the inner cage plate.
-
Adjusting the upper limit: With the chain on the large chainring and the small sprocket, tighten the screw that adjusts the upper limit until there is a gap of 1 to 3mm between the chain and the outer cage plate.
-
Adjusting cable tension: If the chain makes contact with the inner cage plate when it is on the middle chainring, turn the screw that adjusts the cable tension clockwise. If the chain makes contact with the outer cage plate, turn the screw anti-clockwise.
ADJUSTING THE REAR DERRAILLEUR
-
Adjusting derailleur range of motion: There are two screws for adjusting the inner and outer limits of the derailleur's range of motion. Turn the screws so the chain does not make contact when in motion. The spacer should be aligned with the smallest and largest sprockets.
-
Adjusting the derailleur: Place the gear shifting mechanism in the second position. Turn the screw that adjusts the cable tension until alignment is perfect with the second sprocket.
*Not all Monty bicycles have all the components described in this section.
CHANGING GEAR
If your bike is equipped with a double or triple chainring kit, you will be able to ride anywhere easily, saving your strength and maintaining a uniform pedal stroke regardless of the terrain or your speed.
However, to avoid any mechanical issues, (chain skipping, noise when pedaling, etc.) follow these recommendations:
- Select the correct gear by shifting just before the start of an ascent or the obstacle you are maneuvering.
- When you are about to shift gears, keep pedaling normally without excessive force and use the shifting levers until the chain is correctly positioned on the desired cog and chainring.
- Avoid shifting when straining, even if the synchronized systems allow for it in a tough situation.
- Strictly avoid extreme combinations, such as the inner chainring with the two outermost cogs, or outer chainring with the two innermost cogs. These situations, as shown in the figure below, lead to a diagonal chain line that jeopardizes the performance of the drivetrain and durability of your components (premature wear).
TORQUE
Below are the torque settings (Nm) for the most important components:
TRIAL:
| DESCRIPTION TORQUE (Nm) | |
| Hub screws 8 - 10 | |
| Brake lever screws 2 - 4 | |
| Stem screws 8 - 10 | |
| Crank screws 25 - 50 | |
| Brake pad screws 8 - 10 | |
| Disc brake screws 10 - 12 | |
| Skid plate screws 3 - 5 | |
MOUNTAIN, TREKKING, CITY, BMX, KIDS', FOLDING AND ELECTRIC BIKES AND TRICYCLES:
| DESCRIPCION PAR (Nm) | |
| Hub screws 8 - 10 | |
| Brake lever screws 2,5 - 3 | |
| Stem screws 8 - 10 | |
| Crank screws 235 - 450 | |
| Brake pad screws 6 - 8 | |
| Disc brake screws 2 - 4 | |
* ELECTRIC MODELS
CHARGING THE BATTERY
- Make sure the local power supply is suitable for the charger.
- Disconnect the battery from the bicycle.
- Plug the charger into the battery outlet and then plug the charger into the mains outlet.
SAFETY WHEN CHARGING THE BATTERY
Caring for the battery is vital not only for your own safety, but to extend the battery life as much as possible. Critical situations such as a fire or explosion may occur if these instructions are not followed.
- Ensure the charger plug is dry and well connected to the battery.
- Do not cover the battery or charger while charging the battery. Do not charge the battery near flammable components or in unventilated places. The ambient temperature should not exceed 40^ .
- Keep the battery away from water to avoid short circuits.
- Use only the charger supplied with the battery.
- Do not tamper with or modify the battery in any way.
- Do not expose the battery to fire or extreme temperatures.
- Avoid strong blows and impacts.
- When the battery is charged, first remove the plug from the mains socket and then remove the plug from the charger. It is not recommended to leave the plugs connected to the battery and the mains after the charging process has finished.
- Stop the battery charging operation if there is a burning smell and contact your distributor.
- The battery and charger should be kept out of reach of children.
- For regular, long-distance use of the electric bicycle, we recommend charging the battery before each ride.
- Occasional Use: The battery should be charged at least once a week. If the bicycle is not used, it should be charged every three months.
The manufacturer shall not be liable for any damages caused due to user misuse when charging the battery.
RIDING
- Check the functions of each part and understand how it works before getting on the electric bicycle.
Learn to control the bicycle using the brake and handlebar. - Gently turn the twist throttle and enjoy your ride.
- All cyclists must obey traffic signs and signals.
Before each ride check your bicycle and its components. Remember that if you detect any problem on your bike, and you can't repair it, you should go to your authorized dealer.
WHEELS
ALIGNMENT
Spin each wheel and check for brake pad and frame clearance. If the wheel spin is not uniform, take your bike to an authorized dealer.
SECURE ATTACHMENT
For safe riding, the wheels on your bicycle should be firmly attached to the fork and the frame. The wheels are attached with screws or quick-release mechanisms, which allow the wheel to be attached and removed without the need for tools.
TIRE PRESSURE
Inflate your tires to the pressure indicated on the side of the tire. You should also take your own weight into consideration. High pressure yields better performance on hard surfaces like asphalt, while lower pressures are best for off-road rides.
BRAKES
The brake lever on right side of the handlebar activates the rear brake and the lever on the left activates the front brake, unless local legislation indicates otherwise.
There are different types of brakes:
- Rim brakes: the brake levers are connected to brake shoes that squeeze the wheel rim.
- Disc brakes: the brake levers are connected to brake pads that squeeze the brake disc.
- Drum brakes: the brake levers are connected to the hub of the wheel by a cable, and a minimum of 15mm is needed to stop the bike.
Coaster brakes: the braking action is carried out by pedaling backwards.
Follow the inspection instructions for the type of brakes on your bike.
HANDLEBAR AND STEM
Make sure the stem and the handlebar are correctly positioned and tightened. Carefully inspect the handlebar and stem for signs of fatigue: scratches, cracks, dents, deformities and discoloring. If any part shows signs of fatigue or damage, change it before riding your bike. Likewise, check that the handlebar ends and extensions are plugged.
*Not all Monty bicycles have all the components described in this section.
*SADDLE
The saddle must be positioned at the proper height for your use and height. Moreover, you must also check that the seatpost and seat are correctly positioned and tightened.
The seatpost can only be placed below the horizontal limit mark.
*ADJUSTMENT OF THE SUSPENSION
Make sure that the suspension components are adjusted to your preference, and that no suspension element is at its limit. The suspension system affects your bike's performance; therefore, proper adjustment is very important. If the suspension system is compromised to a point where the fork is blocked, you could lose control. For more information about how to adjust the suspension system, see the chapter on "Inspection adjustment and lubrication of your bike" or the manual for the suspension system that may have come with your bike.
*LIGHTS
Inspect the angles and function of the front and rear lighting and signaling systems. These should be kept clean to work properly.
*BICYCLE FOLDING SYSTEM
I. Unfold the frame and secure it with the clasp. For safety, turn the small adjusting wheel until it locks in place.
2. Unfold the handlebar and secure it with the lever. For safety, the lever locks into place. Use the upper clasp to set the handlebar to the desired height.
3. Move the seat post at the desired height and lock the clasp lever into place.
4. Unfold the pedals.
5. To fold up the bicycle, follow the above steps in reverse order.
*VEHICLES OF MORE THAN 2 WHEELS
Please, take into account this information before using a vehicle with more than two wheels:
| Number of occupants allowed I | |
| Weight of the vehicle 35 kg | |
| Maximum permissible load (with rider) 115 kg | |
| Maximum recommended velocity 25 km/h | |
| Turning radius at maximum recommended velocity | 10 m |
*Not all Monty bicycles have all the components described in this section.
BEFORE EVERY RIDE WEEKLY MONTHLY EVERY 3 MONTHS ANNUALLY
| Check that the wheels are trued | Check that the screws in the various suspension systems are tight | Check the handlebar and the stem | Inspect and lubricate brake levers | Lubricate suspension forks |
| Check tire pressure | Lubricate the suspension fork | Check the adjustment of the bearings | Inspect the cassette and chainrings | Lubricate quick-re-leases |
| Check the brakes Check the spokes | Inspect the adjustment of accessories | Inspect the crank arms and pedals | Lubricate the seatpost | |
| Check that both wheels are secure | Clean the bicycle Check the chain tension | Lubricate the valve stem | ||
| Check the handlebar and stem | Check the lighting system and reflectors | Check the braking system | Lubricate the pedal threads and bearings | |
| Check the suspension setting | Check the tire for cuts and rips | Check the internal shifter | Lubricate the wheel bearings | |
| Check the lighting system | Inspect and lubricate the cassette and derailleur | Lubricate the fork rown bearings | ||
| Check the saddle Check derailleur function | ||||
| Check gear and brake cables | ||||
| Check the chainguard and fender | ||||
| Check the saddle and the seatpost | ||||
| Check the rims |
USER SAFETY
WEAR A HELMET
You must always wear a helmet.
An unprotected head is very fragile, even in the event of a minor bump, but wearing a helmet that complies with EC safety regulations or other recognized legislation could reduce that risk. Eye protection and proper clothing are also recommended.
BE AWARE OF LOCAL TRAFFIC LAWS FOR BICYCLE
Most states have specific laws for cyclists. Cycling clubs or the Department of Transportation (or its equivalent) in your area should be able to provide you information in that regard. Some of the most important regulations are:
- Use the appropriate hand signals
- When riding with other cyclists, form a single-file line
- Ride on the correct side of the road; never against traffic
- Expect the unexpected and ride defensively. Cyclists are difficult to see, and many drivers are unaccustomed to recognizing the rights of cyclists.
DO NOT PERFORM STUNTS OR OTHER UNSAFE ACTIVITIES WITH YOUR BIKE
Many cycling accidents can be avoided by using common sense:
- Do not ride "no hands": the slightest imperfection in the road could cause a vibration or sudden turn of the front wheel.
- Do not ride with objects hanging from the handlebars or any other part of the frame: they could get stuck in the spokes and cause the handlebars to jerk suddenly, making you lose control of your bicycle.
- Do not ride under the effects of alcohol or medicines that cause drowsiness. Bicycles require good coordination of movements, and your must always be alert to your surroundings.
- Do not carry anyone on your bicycle. Standard bikes are not designed to hold the additional weight of a second rider. Moreover, the extra weight makes the bicycle much harder to turn and stop.
RUEDE A LA DEFENSIVA
To pedestrians, drivers and other cyclists, you are not as visible as a car. You must always beware of dangerous situations and be prepared to stop.
Pay attention to what surrounds you.
WATCH THE ROAD
Be prepared to avoid potholes, sewer grates or shoulders, since they could cause your wheels to skid. When maneuvering around an obstacle, try to do so at a 90^ angle, and if you are unsure of the conditions, get off your bike.
WATHC THE CARS YOU ARE GOING TO PASS
If a car suddenly crosses your path or someone suddenly opens the door of a parked car you are going to pass, you could have a serious accident. Install a bell on your bike to alert others of your presence.
BE CAREFUL WHEN RIDING IN LOW-LIGHT CONDITIONS
Your bike is equipped with a complete range of reflectors. Keep them clean and properly positioned. Though reflectors help you to be seen, they do not provide emit light. Use a front and rear light when riding in low light. Also, you should wear light-colored, shiny and reflective clothing, especially at night, to make you more visible.
AVOID LETTING WATER ENTER ANY BEARINGS
Your bike's bearings allow the various parts of the bike to move smoothly. Corrosion occurs when water comes into contact with metal; therefore, it should be avoided.
Avoid cleaning your bike with power washing systems like those used for cars.
USE CAUTION WHEN BRAKING
Always maintain a safe distance from vehicles and other objects. Adjust the distance to your braking capacity. If your bike has two brake levers, squeeze them at the same time. Excessive use of the front lever, and braking with the front brake lever alone, could cause the rear wheel to lose contact with the ground and make you lose control.
Many new brake models are very powerful and are able to stop the bike on wet or muddy terrain.
If you notice that your brakes are too strong for your needs, take your bike to your authorized dealer for adjustment or to change the braking system
BE CAREFUL WHEN RIDING IN WET CONDITIONS
There is no brake, regardless of design, that is as efficient in wet conditions as in dry. Though the brakes are trued, lubricated and in good operating conditions, in wet conditions, the braking system requires greater force in the levers and braking distance.
Rain reduces both visibility and traction. Ride at lower speeds around curves, manhole covers and crosswalks in rainy or wet conditions.
If your bike is suitable for it, be especially careful when riding off the asphalt:
- Ride in marked areas.
- Avoid rocks, branches and dips.
- Never ride on an unpaved road or path with a road or urban bike.
- Wear proper clothing and protection, such as a helmet, glasses and gloves.
- When nearing a descent, slow down, and keep your weight back and low. Use the rear brake more than the front.
KEEP YOUR BICYCLE IN PERFECT CONDITIONS
Bicycles are not indestructible: like any machine, each part of the bike has a service life limited to tension and fatigue. Fatigue refers to minor tensions that, when repeated a finite number of cycles, can compromise the integrity of the material. The service life varies according to its design, material, use and maintenance. Lighter frames generally have a longer service life than heavier frames, and premium bikes need greater care and more frequent inspections.
BE CAREFUL
It is preferable that you always ride accompanied. Your companion will be able to help you immediately in the event you have any trouble or an accident. Also, you should never forget to take a puncture repair kit or a spare inner tube and tire levers with you on all of your rides.
You should also consider taking a multi-tool specific to your bike and a first aid kit if you are planning to ride long distances.
GENERAL RECOMMENDATIONS
CLEAN YOUR BIKE
In order for your bike to work properly, it must be kept clean.
STORE YOUR BIKE IN AN APPROPRIATE PLACE
When you are not using your bike, keep it in an area where it is protected from the rain, snow and sun. Rain and snow can cause the metal to corrode. Ultraviolet rays from the sun can discolor the paint or dry rot the bike's rubber or plastic components.
When storing the bike, lift it off the ground and leave the tires at half their pressure. Do not leave the bicycle near electric motors, since the ozone emitted by the motors destroys rubber and paint. Before using the bicycle again, make sure it is in optimum condition
PROTECT YOUR BICYCLE FROM THIEVES
Your new bicycle is very attractive to thieves. You can insure your bike in several ways:
- Register your bicycle in a local police file.
- Purchase and use a lock. A good lock is effective against knives and saws. Follow the recommendations for use. Never leave your bike unlocked.
- If you have quick-release mechanisms on the wheels, lock the wheels to the frame. If there is a quick-release mechanism on the saddle, you should take the saddle with you when the bicycle is locked. However, you should avoid allowing water to enter the frame through the seatpost.
PROTECT YOUR BICYCLE FROM BUMPS
Always park your bike in areas where it is out of the way of moving vehicles and ensure that it is in a stable position so that it does not fall. Do not lean the bike against the cassette, since it can be damaged or become dirty. Keep the bike from falling, since this could damage the handlebars or the saddle, etc. Also, the improper use of a luggage carrier could damage the bike.
SHIFTING GEARST
Some Monty bikes are equipped with two gear shifting systems:
- One is a "derailleur" drivetrain in which the chain moves from one toothed cog to another.
- In the others, the shifting system is situated in the rear internal hub.
TRADITIONAL SHIFTER
The left shifter controls the front derailleur, and the right shifter controls the rear derailleur. Choose the gear ratio that offers you the most comfort when pedaling. You can only shift when the chain is moving forwards. Never try to shift gears when stopped or moving the chain backwards. Whenever you are going to shift, reduce the force transmitted to the chain, since this could hinder the shift and wear out the chain and cassette. You should never shift on uneven surfaces.
INTERNAL SHIFTER
This system can shift when the chain is moving forward, but it can also shift when stopped or moving backward. Whenever you shift, reduce the force transmitted to the chain to facilitate the shift. Choose the gear ratio that offers you the most comfort when pedaling.
PREVENT THE HANDLEBAR FROM STRIKING THE FRAME
In some bikes, the front wheel can rotate to extreme angles, and the handlebar can strike the frame. Avoid this impact by adding pads to the end of the handlebar or to the frame itself.
DON'T CHANGE THE COMPONENTS
A modification to any part of the bicycle, including the frame, fork or any other component could make your bicycle unsafe. For example, poor paintwork could reduce the rigidity of the frame.
Changing the fork of your bicycle could affect the bicycle's headset or create undesired tension:
-
If you want to change the fork of your bicycle, talk to your authorized dealer about the different compatible options.
-
Any modification to the frame, fork or components means that the bicycle no longer complies with our specifications and, therefore, would render the bicycle's warranty void.
Never modify the frameset. Never sand, drill, fill or disassemble any excess retaining devices or the like. An improper modification could cause you to lose control and fall.
* ELECTRIC BICYCLES
USE AND MAINTENANCE GUIDE
- Battery loss of range is due to battery ageing and under no circumstances shall it be considered a manufacturing defect.
- Batteries ARE NOT considered wear and tear items.
- The maintenance of an unused battery includes charging it every three months, which is also a way to ensure it works. The battery should be charged on a regular basis to maintain the proper charging cycle, which depends on the type of battery and the brand of bicycle.
- Remove the battery from the bicycle only in cases of very infrequent use.
- The optimum ambient storage temperature for a battery should be between 15^ and 30^ . Summer temperatures may slightly affect the battery, so a cool, dry place is recommended.
- Perform all battery charging operations in a well-ventilated place.
- The components that may be processed under the warranty include the battery itself and the battery maintenance system (BMS) protection circuit module.
- The battery has a lifetime of 300 to 500 charging/discharging cycles.
- How long a battery works depends on frequency of use, number of charging cycles and temperature. But most of all it depends on the depth of discharge.
For example, if a user does three charge cycles per week = 156 cycles per year. Therefore, if the battery's minimum life is 300 cycles, the user should not have any battery problems for at least two years.
- The battery can be charged whenever you want. Charging is more effective if the battery is not completely discharged. In other words, it's better and even preferable to charge the battery before it goes completely dead.
- If the battery is always charged before it is completely discharged, its useful life will be extended considerably (charging the battery at a depth of discharge of 10% to 20% is recommended).
- The bicycle's range is highly proportional to the geography of the land: riding on a flat surface is not the same as going uphill. The battery has to work harder and the range is shortened on uphill rides.
- Riding at a moderate, steady speed is recommended, as this will improve battery performance.
Range is also affected by the conditions of use, such as whether you ride at 20km/h or 9km/h , or whether you drive up a mountain road or down a flat highway.
- Use only the charger supplied with your model.
- In the rain, pay special attention to parts with electrical connections.
- Do not use a high-pressure cleaning system.
ACTIONS THAT AFFECT BATTERY PERFORMANCE
- Constantly starting up and turning off the bicycle (power spikes).
- Constantly braking, and powering the battery on and off.
- Riding in windy conditions, uphill and while carrying a load.
- Low tyre pressure and braked wheels.
Any tampering with the battery, charger or electric circuit may cause a short circuit, injury and/or burns.
WARRANTY
A legal warranty is established through the Retailer/Distributor and pursuant to the General Law for the Defence of Consumers and Users in accordance with Directive on Guarantees in the Sale of Consumer Goods RDL 1/2007:
WARRANTY TERMS AND CONDITIONS
Bicycletas Monty S.A. hereby provides a warranty for its bicycles against any manufacturing or assembly defects that also covers the replacement of defective parts or repairing them under the following terms and conditions:
- Application period for bicycles: 24 months against manufacturing and assembly defects, as from the date on the invoice, proof of purchase or delivery note.
- Application period for electric components: 12 months against manufacturing and assembly defects, as from the date on the invoice, proof of purchase or delivery note.
- In the case of replacements, a new warranty period shall not begin for the new product. The warranty period shall correspond to any time left on the original warranty of the replaced part.
- Application period for repaired components: 6 months against manufacturing and assembly defects, as from the date on the invoice, proof of purchase or delivery note.
- Consumers shall immediately inform the retailer of their lack of agreement with the alleged defect and/or, as an exception, within two months of learning about it.
- Unless there is evidence to the contrary, it is assumed that products are delivered in good condition to the point of sale or official distributor, which means that claims may be filed on new products from the warehouse only within a maximum of six months after the delivery date.
The warranty is limited to the original purchaser and may not be transferred to subsequent or future buyers. - The ultimate decision as to whether a bicycle or part is included under the terms and conditions of the warranty shall be made by the Monty Technical Service.
- The warranty period shall be suspended during the repair period and, in the event of replacement, it shall be automatically renewed for the affected item.
- Any claims against the warranty for Monty parts shall be filed through the authorized distributor who made the original sale.
NOTE: Any components that do not bear the Monty brand shall be covered by the original manufacturer's warranty.
- Under no circumstances shall the warranty cover the replacement of parts whose wear and tear derives from normal use of the bicycle. These parts, referred to as consumables, are as follows: tyres, rims, chain, chainrings, sprockets, brake pads, brake calipers, fuses, light bulbs, etc.
- The warranty does not cover damages resulting from improper use of the product as well as fatigue cracks, folds, dents, damaged threads, etc. Especially if the product has been used in competition, tricks, ramps, jumps or any other kind of extreme riding.
ADDITIONAL TERMS AND CONDITIONS
- Under no circumstances shall the warranty cover:
- Damages attributed to a failure to interpret the advice provided in this manual.
- Failures and damages attributable to accidents, blows/impacts, inappropriate use, erroneous repairs, and the lack of maintenance and care.
- Modifications made to the bicycle by anyone outside Monty's official service.
- Not having passed the obligatory inspections at the point of sale of the vehicle or at an official Monty distributor.
- The involvement of external agents or elements (natural catastrophes, floods, fire, burglary, etc.).
- Bicicletas Monty S.A. shall not be liable for any incidents or collateral damage to third parties.
Failure to accept these terms and conditions shall result in Monty S.A. not being held liable and assuming no liability regarding conformity of the warranty. If you have any questions, please contact your regular official distributor or go online: www.montybikes.com
WARRANTY REQUEST PROCEDURE
I. Fill in the official warranty request before contacting your distributor.
NOTE: Any failure to provide information may mean the request is not processed.
2. Claims against the warranty shall always be accompanied by the proof of purchase, a photograph of the problem in question and the official request date.
3. In the event of an electronic/electric failure, an expert's opinion shall be required to apply the warranty process.
4. For any product returns under the warranty, the purchaser shall pay any transport expenses until the validity of said warranty is confirmed. These expenses shall be reimbursed if the warranty is determined to be valid.
5. The product shall be completely replaced only when it has not been put to any use or is completely unserviceable.
6. The warranty on new and repaired products shall expire six months after delivery.
OFFICIAL WARRANTY REQUEST FORM
| MONTY WARRANTY REQUEST | |
| REQUEST DATE: | |
| CUSTOMER NO. AND NAME: | |
| PART: | |
| SERIES NO.: | |
| DEFECT (brief description): | |
| PURCHASE DATE (attach invoice): | |
| PHOTO (attach): | |

ATTENTION: TRES IMPORTANT
LE NON-RESPECT DES INDICATIONS DE CE MANUEL PEUT PROVOQUER DES DÉFAITS MÉCANIQUES OCCASIONNANT UNE PERTE DE CONTROôle ET UNE POSSIBLE CHUTE AVEC DE SÉRIEUX DOMMAGES PHYSIQUES PERSONNELS OU À DES TIERS, VOIRE LA MORT.
UNE CONDUITE INDUE PEUT ÉGALEMENT METTRE EN DANGER VOTRE INTEGRITE, AINSI QUE CELLE DE TIERS.
MISE EN GARDE DE SECURITE
- NOUS CONSEILLONS DE TOUJOURS UTILISER LE CASQUE PROTECTEUR. -PORTEZ DES VETEMENTS APPROPRIÉS POUR CIRCULER EN VELO.
- SUR LES TRONÇONS AVEC PEU DE VISIBILITÉ, PORTEZ TOUTJOURS DES BANDES RÉFLÉCHISSANTES OU DES FEUX.
-NE DEPASSEZ PAS LE POIDS TOTAL ADMISSIBLE DU VÉLO.
MISE EN GARDE DE GARANTIE
LA MODIFICATION DU CADRE, DE LA FOURCHE OU DE TOUT AUTRE COMPOSANT SUPPOSE QUE LE PRODUIT NE CONSERVE PAS NOS SPECIFICATIONS ET ANNULE LA GARANTIE.
LA MANIPULATION DES ÉLÉMENTS DU VÉHICULE PAR L'UTILISATEUR EXONÈRERA MONTY DE TOUTE RESPONSABILITÉ.
SI VOUS AVEZ UN DOUTE QUELCONQUE, CONTACTEZ VOTRE DISTRIBUTEUR OU VISITEZ NOTRE SITE WEB : http://www.montybikes.com
Bicycle riding can be hazardous.
Always wear a helmet.
Do not ride at night.
SELLO/STAMP/CACHE/TIEGEL/SIGILLIO
NOMBRE/NAME/NOM/NOME:
DNI/ID/CNI/P/CI:
This bicycle is certified in Spain and complies with the essential safety requirements specified by legal decree on the prevention of hazards arising from its use.