EVC02AC11 - Phone charger VESTEL - Free user manual and instructions
Find the device manual for free EVC02AC11 VESTEL in PDF.
| Product Type | Electric Vehicle (EV) Charger |
| Model | EVC02AC11 (EVC02-AC11 series) |
| Brand | Vestel |
| Maximum AC Charging Power | 11 kW (3-phase 400 V, 16 A) |
| Vehicle Connector | Type 2 (IEC 62196) |
| Input Power | 400 V AC 3-phase, 50/60 Hz, 16 A |
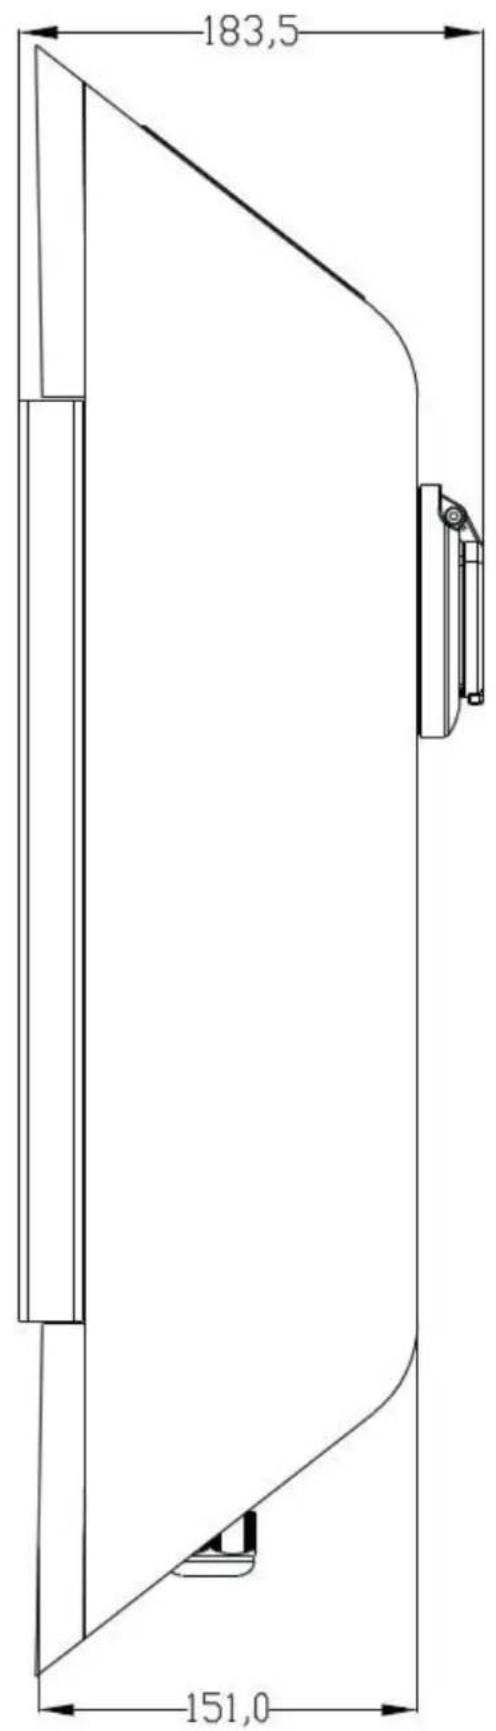
| Dimensions (W × H × D) | 180.0 × 646.7 × 183.5 mm |
| Net Weight | 10.7 kg |
| Weight with Packaging | 12 kg |
| Housing Material | Aluminum |
| Protection Rating | IP54 (outdoor) / IK10 (impact) |
| Operating Temperature | -25 °C to 50 °C |
| Operating Humidity | 20 % to 80 % RH |
| Connectivity | WiFi (IEEE 802.11n), GSM/GPRS (2G), RFID/NFC |
| Charging Protocol | OCPP 1.6 (via GSM) |
| Remote Control | Android application (tablet, PC, smartphone) |
| EcoTime Function | Deferred charging during off-peak hours |
| LED Indicator | Fixed blue (ready), flashing blue (charging), fixed red (fault), flashing red (ventilation required) |
| Mounting | Wall-mounted (WM) or on pole (SS) |
| Required Circuit Breaker | 4P-20A MCB Type C |
| Required Residual Current Device | 20 A - 30 mA RCCB Type B |
| Power Cable Cross Section | 5 × 4 mm² (< 50 m) |
| Standby Consumption | 3.5 W |
Frequently Asked Questions - EVC02AC11 VESTEL
User questions about EVC02AC11 VESTEL
0 question about this device. Answer the ones you know or ask your own.
Ask a new question about this device
Download the instructions for your Phone charger in PDF format for free! Find your manual EVC02AC11 - VESTEL and take your electronic device back in hand. On this page are published all the documents necessary for the use of your device. EVC02AC11 by VESTEL.
USER MANUAL EVC02AC11 VESTEL
Safety Information 2
SafetyWarnings 2
Ground ConnectionWarnings 2
Power Cords, Plugs and charging cable warnings .2
Wall MountingWarnings 2
Basic Operation 3
Remote Control via Tablet PC or smartphone application 3
Specifications 7
Electrical Specifications 7
Connectivity 7
Mechanical Specification 7
Environmental Specification 7
Dimensional Drawings 8
Troubleshooting 11
SAFETY INFORMATION

CAUTION
RISK OF ELECTRIC SHOCK
CAUTION: VESTEL EV CHARGER MUST BE INSTALLED ONLY BY A LICENSED AND EXPERIENCED ELECTRICIAN IN ACCORDANCE WITH ALL APPLICABLE LOCAL AND NATIONAL ELECTRICAL CODES AND STANDARDS.
IMPORTANT - Please read these instructions fully before installing or operating
SAFETYWARNINGS
- Keep this manual in a safe place. These safety and operating instructions must be kept in a safe place for future reference.
- Check that the voltage marked on the rating label and do not use charging station without appropriate mains voltage.
- Do not continue to operate the unit if you are in any doubt about it working normally, or if it is damaged in any way - switch off, withdraw the mains plug and remove the energy. Consult your local dealer.
The ambient temperature range during charging should be between -30^ and +50^ and at a relative humidity of between 5% and 95% . Use the charging station only within these specified operating parameters. - The charging station is intended for outdoor and indoor use but which may also be used in public places.
- To reduce the risk of fire, electric shock or product damage, do not expose this unit to severe rain, snow, electrical storm or other severe weathers. Moreover, the charging station shall not be exposed to spilled or splashed liquids.
- Do not touch end terminals, electric vehicle connector and other hazardous live parts of the charging station with sharp metallic objects.
- Avoid exposure to heat sources and place the unit well away from near flammable, explosive, harsh, or combustible materials, chemicals, or vapors.
-
Risk of Explosion. This equipment has internal arcing or sparking parts which should not be exposed to flammable vapors. It should not be located in a recessed area or below floor level.
-
This device is intended only for charging vehicles not requiring ventilation during charging.
- To prevent risk of explosion and electric shock, ensure that the specified Circuit Breaker and RCD are connected to building grid.
- The lowest part of the socket-outlet shall be located at a height between 0,4 m and 1,5 m above ground level.
WARNING: Never let people (including children) with reduced physical, sensory or mental capabilities or lack of experience and or knowledge use electrical devices unsupervised.
GROUND CONNECTION WARNING
- The Electric Vehicle Charger (EVC) must be connected to a centrally grounded system. The ground conductor entering the EVC must be connected to the equipment grounding lug inside the charger. This should be run with circuit conductors and connected to the equipment grounding bar or lead on the EVC. Connections to the EVC are the responsibility of the installer and purchaser.
- To reduce the risk of electrical shock, connect only to properly grounded outlets.
POWER CORDS, PLUGS and CHARGING CABLE WARNINGS
- Be sure that vehicle charge cable is Type 2 socket compatible on charging station side.
- A damaged power cord/plug or EV cable can cause fire or give you an electric shock. Do not use this product if the flexible power cord or EV cable is frayed, has broken insulation, or shows any other signs of damage.
- Ensure that the charge cable is well positioned thus; it will not be stepped on, tripped over, or subjected to damage or stress.
- Do not forcefully pull the charge cable or damage it with sharp objects.
- Never touch the power cord/plug or EV cable with wet hands as this could cause a short circuit or electric shock.
- To avoid a risk of fire or electric shock, do not use this device with an extension cord. If the mains cable or EV cable is damaged it must be replaced by the manufacturer, its service agent, or similarly qualified persons in order to avoid a hazard.
WALL MOUNTING WARNINGS
- Read the instructions before mounting your charging station on the wall.
- Do not install the charging station on a ceiling or inclined wall.
Use the specified wall mounting screws and other accessories.
This unit is rated for indoor or outdoor installation. If this unit is mounted outdoors, the hardware for connecting the conduits to the unit must be rated for outdoor installation and be installed properly to maintain the proper IP rating on the unit.
BASIC OPERATION
VESTEL Electric Vehicle Charger (EVC) is designed to charge plug-in electric vehicles (PHEV) and battery electric vehicles (BEV) with Type 2 socket compatible cable on charging station side. Please read important safety warnings and instructions carefully before operating the EVC.
Button Functions Start/StopCharging : Short Press
Button Light Color
Indications
Ready: Steady Blue
Charging: Blinking Blue
Fault: Steady Red
Ventilation Required Mode: Blinking Red
Waiting for EcoTime: Blinking Blue and Red (WiFi equipped models)
The VESTEL EVC has a button serving START / STOP functions and contains LED type illuminated status indicator. (Button functions needs an authorization with a defined ID card for models with RFID card reader.) Button functions and corresponding button light color indications are given above.
At the start-up, please be sure of that Blue LED is on. If the LED is steady Red, please check troubleshooting section and do not connect any charging plug to the VESTEL EVC.
Connect the charging plug to the EV and then to the EVC. VESTEL EVC waits until the user pushes the Start button. The charging session starts
immediately.
Before removing the charging plug, STOP charging (press button during charging). The charging plug is always locked to socket outlet before starting to charge to prevent arcing and theft.
During charging mode, if the button LED is blinking red, your car is in ventilation mode because of increased ambient temperature. In this state, Vestel EVC disconnects power supply to the car.
Remote Control via Tablet PC or Smart Phone Application (WiFi Equipped Models)
Vestel EVC remote control application controls EVC and displays charging parameters.
Following steps explain how to install the application and how to configure Wi-Fi module of product.
1- Download Vestel EVC application from Google Play Store to a smart phone or tablet and create new user profile by following steps as shown in Figure 1,2 and 3.
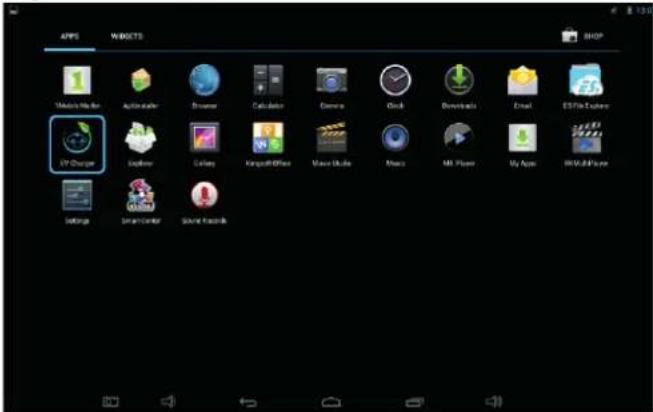
Figure.1
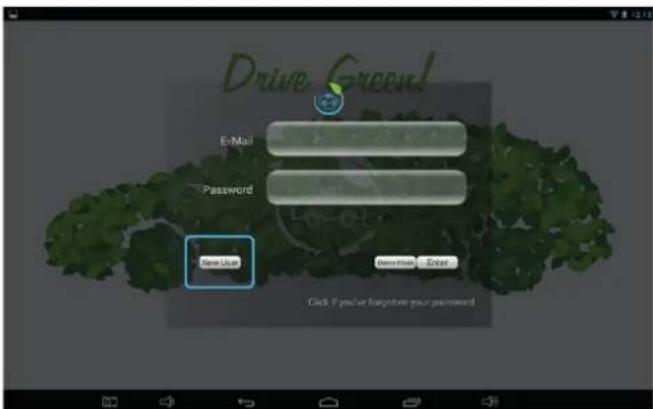
Figure.2
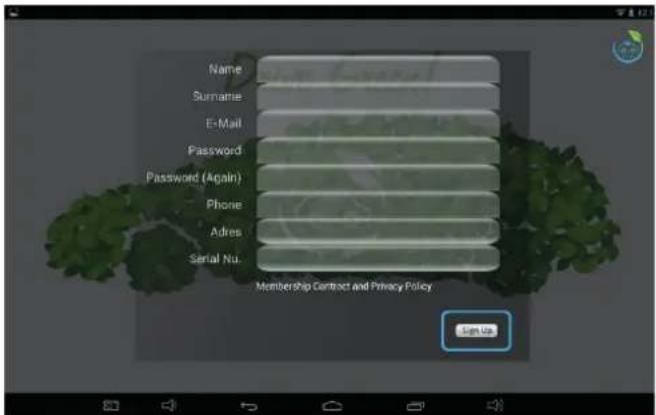
Figure.3
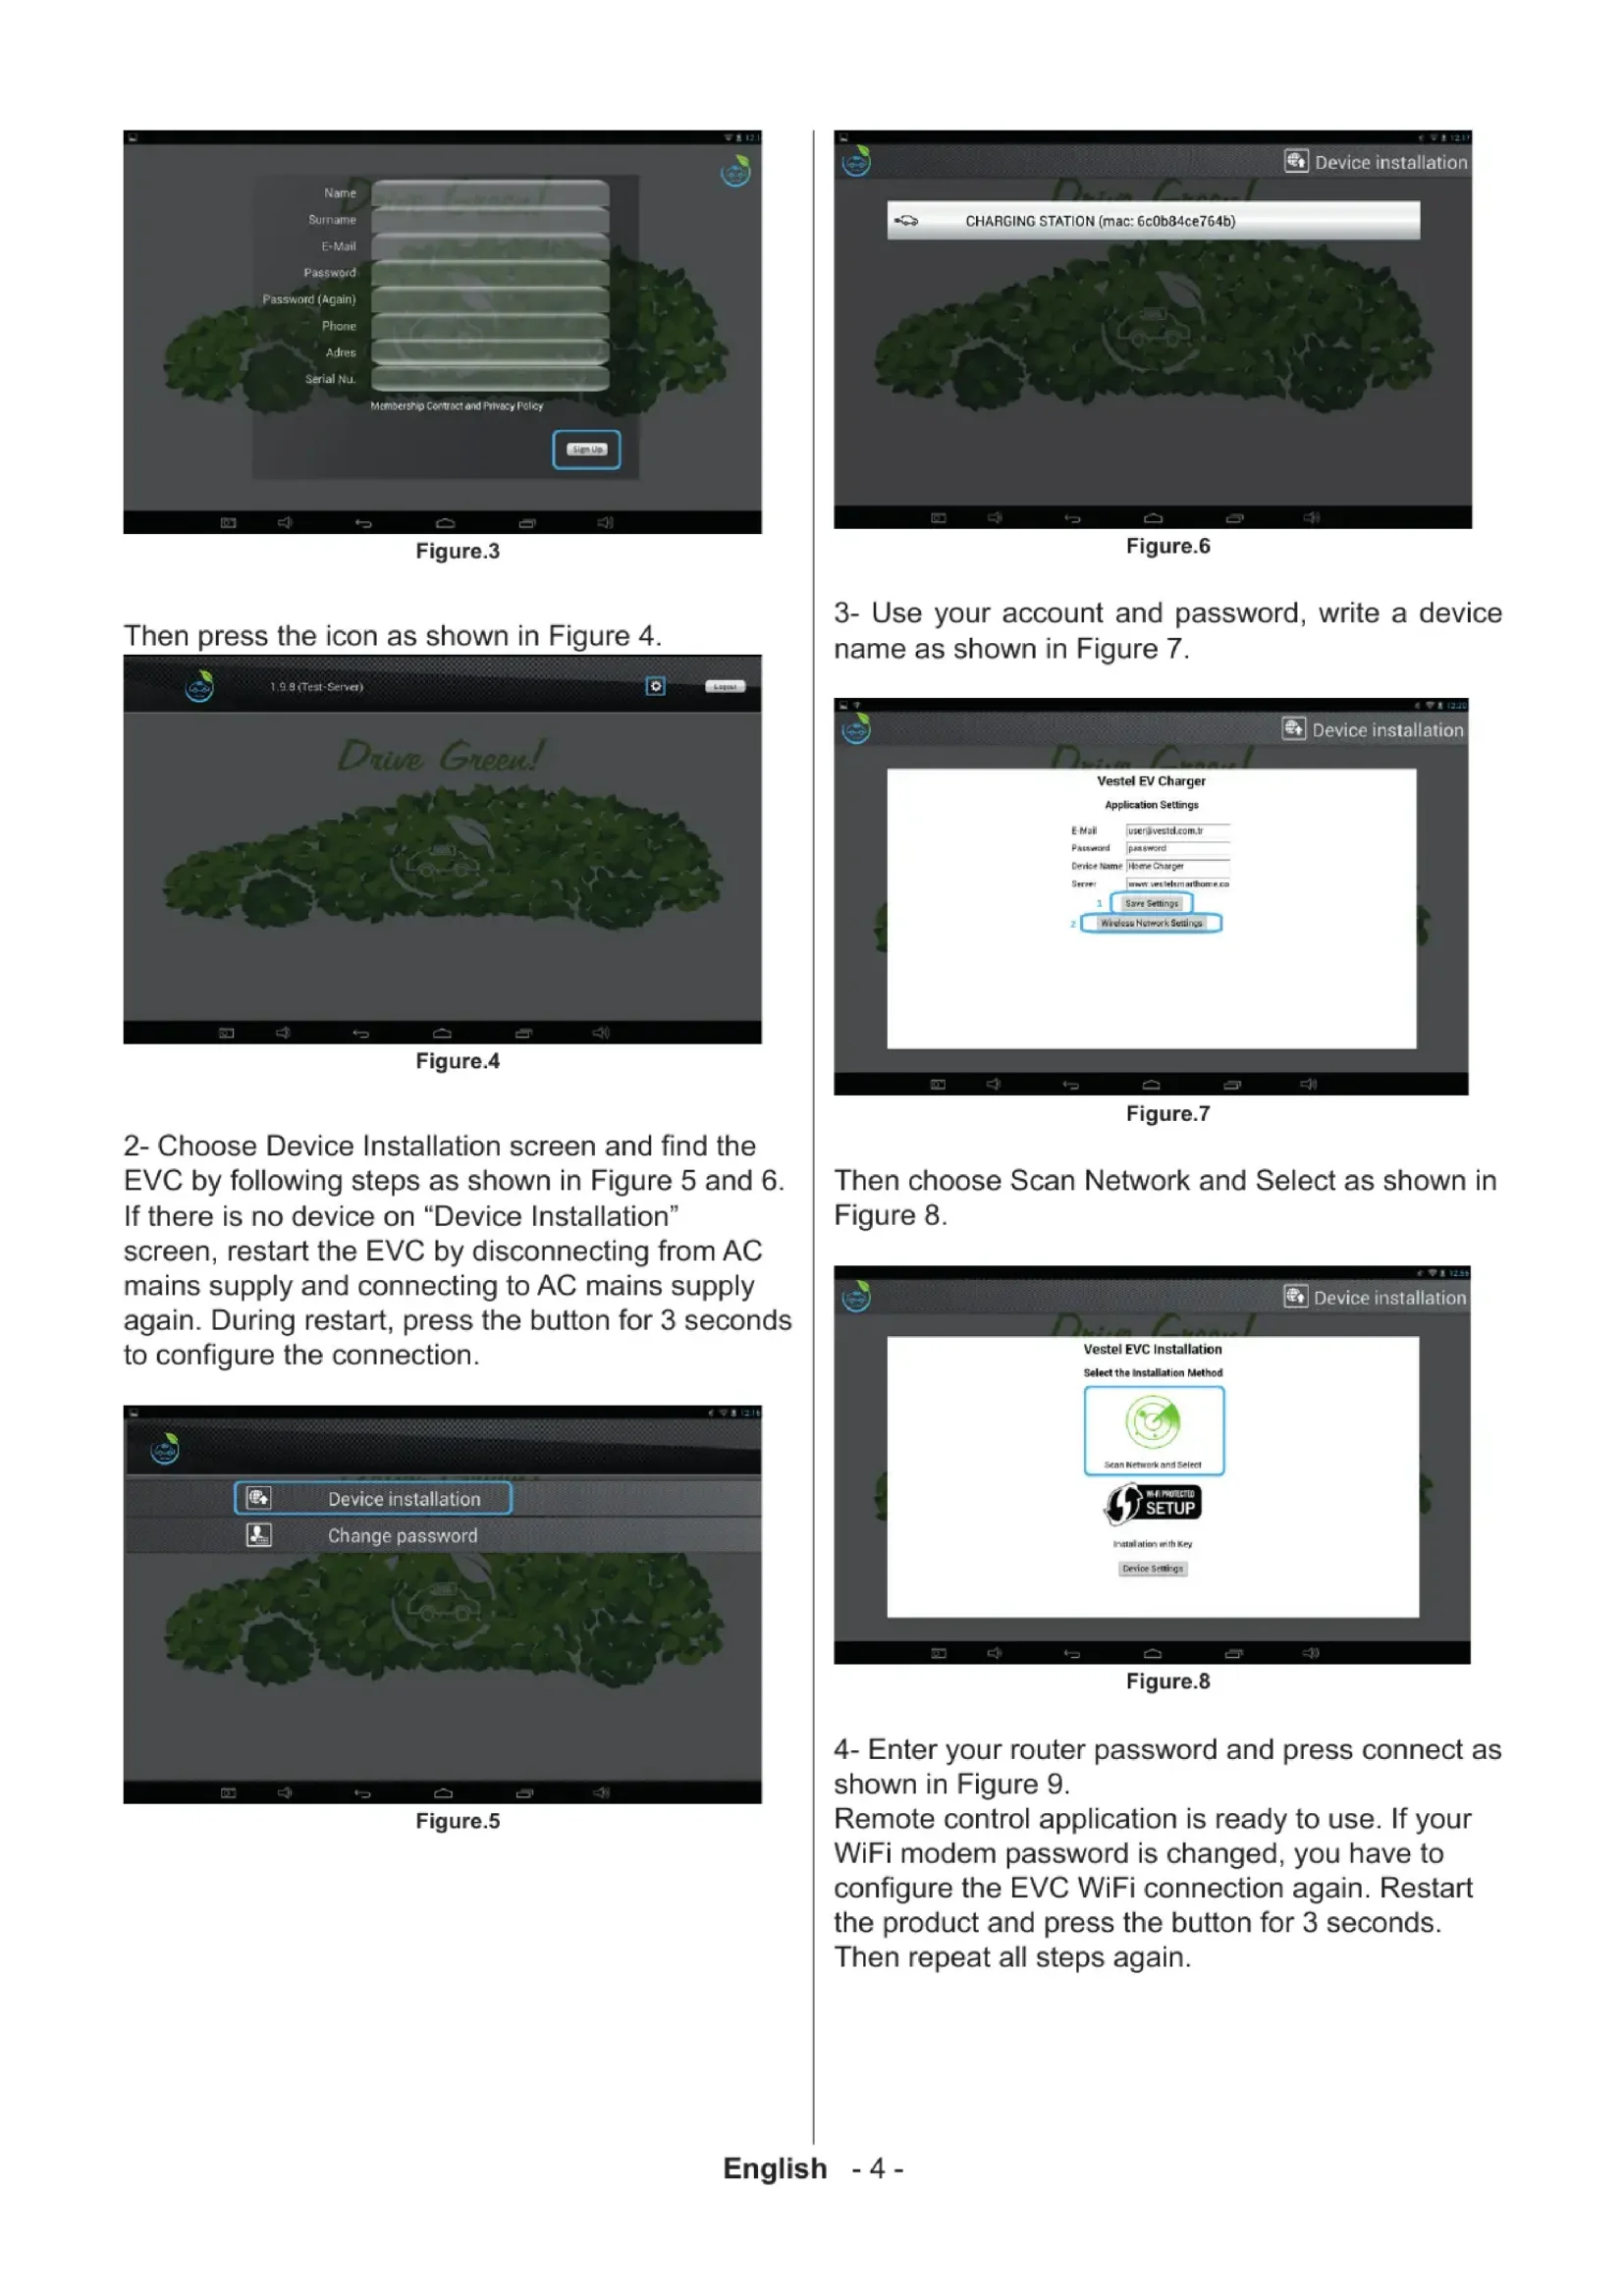
Then press the icon as shown in Figure 4.

Figure.4
2- Choose Device Installation screen and find the EVC by following steps as shown in Figure 5 and 6. If there is no device on "Device Installation" screen, restart the EVC by disconnecting from AC mains supply and connecting to AC mains supply again. During restart, press the button for 3 seconds to configure the connection.
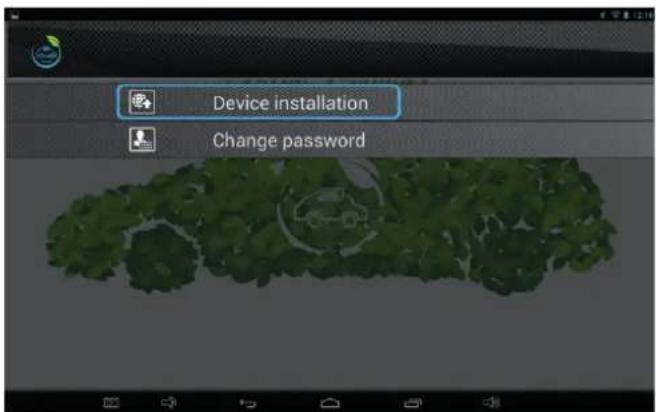
Figure.5
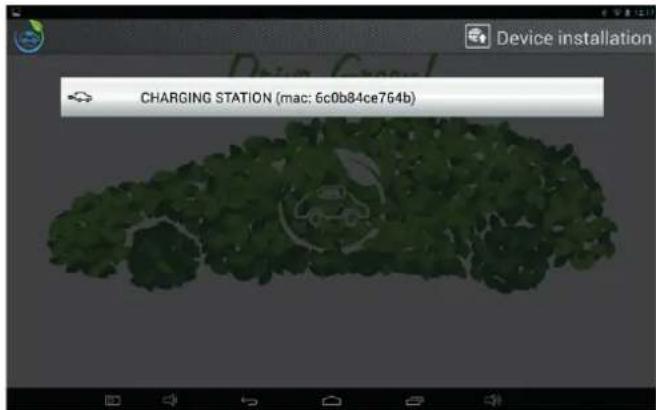
Figure.6
3- Use your account and password, write a device name as shown in Figure 7.
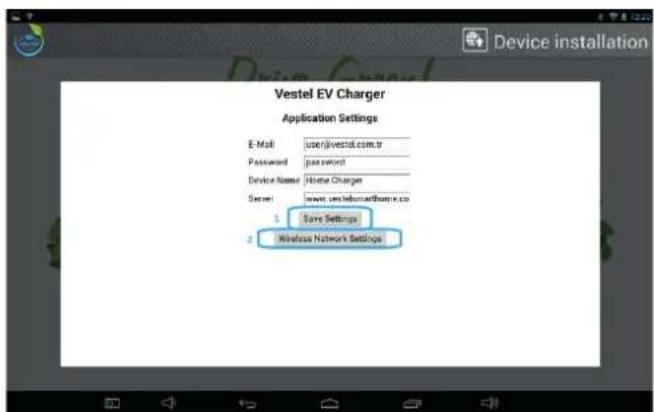
Figure.7
Then choose Scan Network and Select as shown in Figure 8.
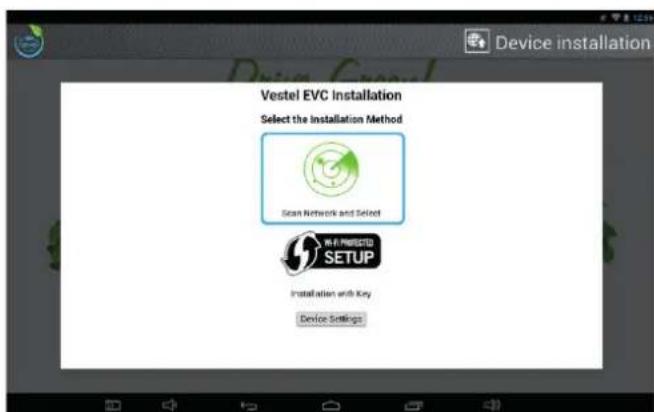
Figure.8
4- Enter your router password and press connect as shown in Figure 9.
Remote control application is ready to use. If your WiFi modem password is changed, you have to configure the EVC WiFi connection again. Restart the product and press the button for 3 seconds.
Then repeat all steps again.
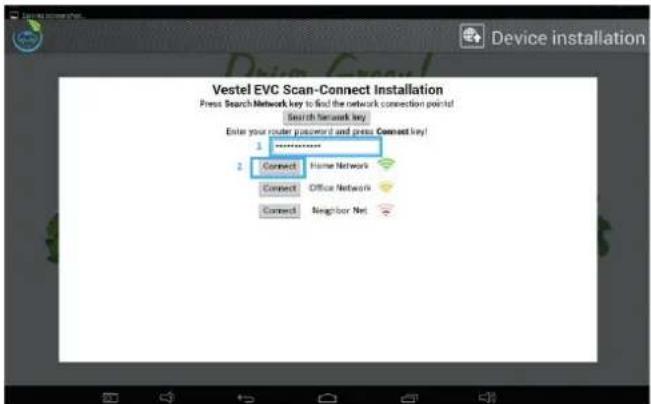
Figure.9
Then, press your device name as shown in Figure 10.
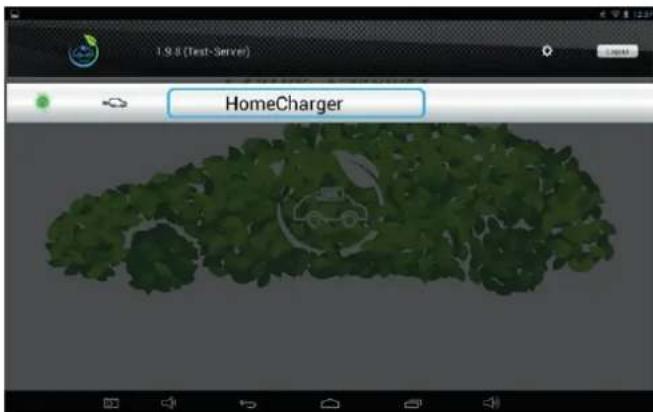
Figure.10
5- Remote control application is ready to use now. If there is no electric vehicle cable connected to EVC, EVC state will be "not connected" as shown in Figure 11. After a cable is plugged in EVC socket and Electric Vehicle socket, EVC state will return "ready" as shown in Figure 12.
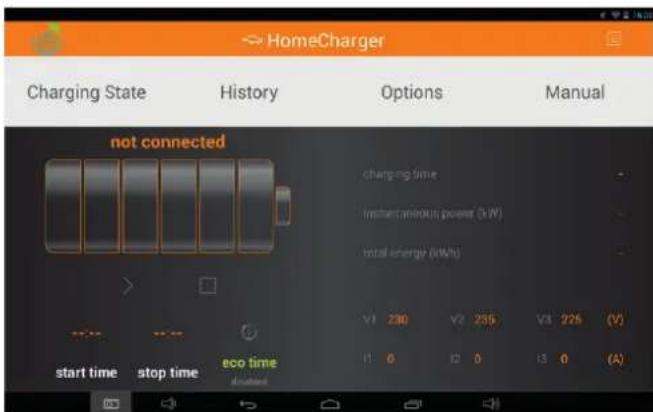
Figure.11
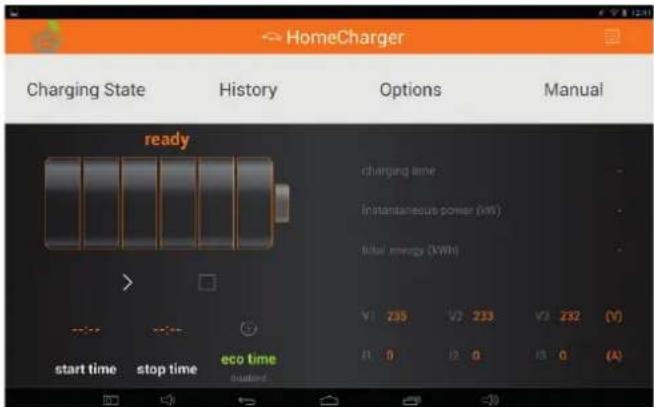
Figure.12
6- When start button is activated, EVC delivers energy to your EV and EVC state will return "charging" as shown in Figure 13.
When stop button is activated, EVC stops delivering energy to EV. EVC situation will return "stopped".
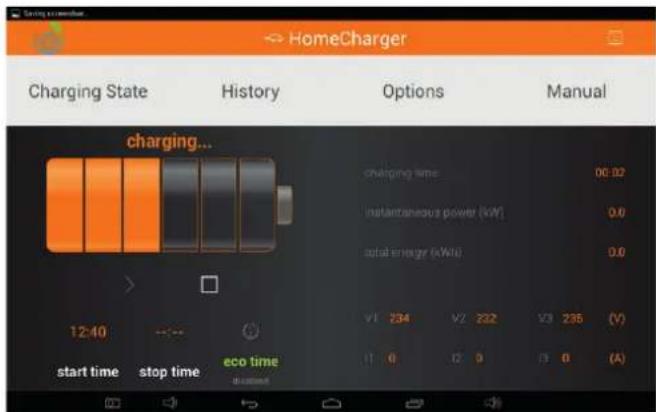
Figure.13
7- History page gives information about last 10 charging session as shown in Figure 14.
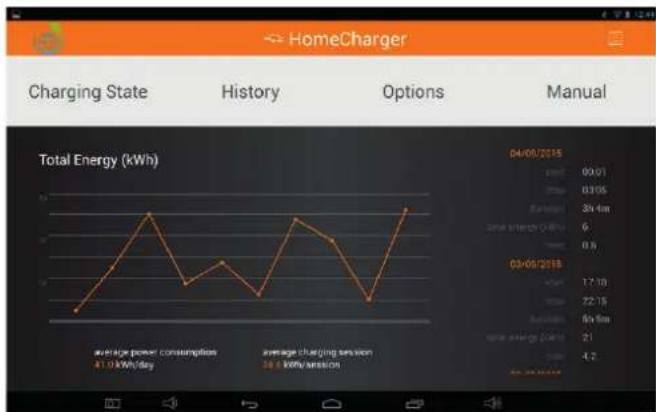
Figure.14
8- Price of energy consumption vary in a day. When ecotime function is activated color of the application becomes green as shown in Figures15 and 16 and the charging starts in economic tariff time.Therefore ecotime function provides saving your money. In order to activate eco time from smartphone/tablet application, Start Time & Stop Time is set in the
OPTIONS page. Then it is enabled by pressing the Eco Time icon. If ecotime is enabled, the EVC will wait until predefined Start Time. The charging will stop when End Time was reached. At this point WAITING FOR ECO TIME page will be shown. To start the charging session immediately without waiting until Start Time, the ECO TIME must be disabled or by pushing START button mounted on VESTEL EVC for at least 3 seconds. During CHARGING, ECO TIME and price settings can not be changed.
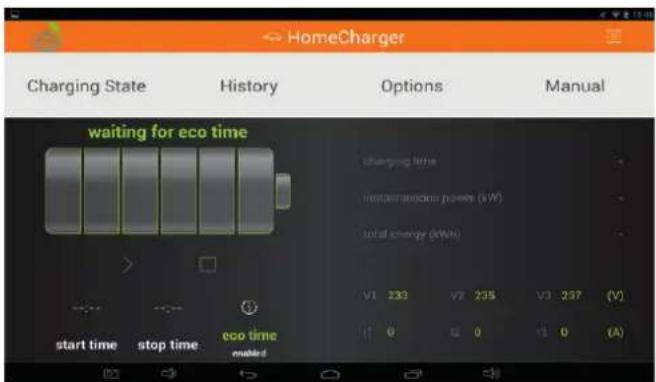
Figure.15
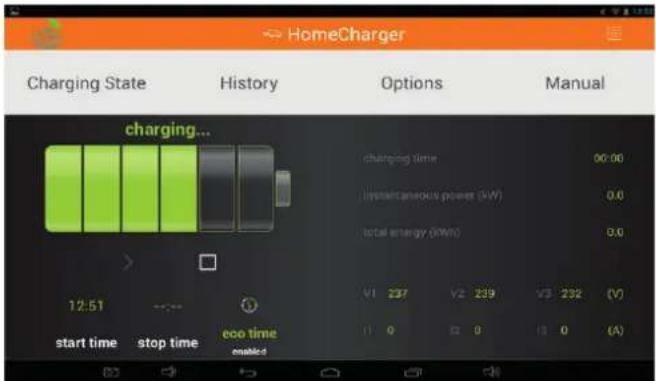
Figure.16
Note : The VESTEL EVC date and time is synchronised with VESTEL EV Charger Application automatically.
SPECIFICATIONS
| Model Name EVC02 | 2-AC22 Series (Name Coding: EVC02-AC22GRW-WM)EVC02-AC11 Series (Name Coding: EVC02-AC11GRW-WM)G => GSM Module EquippedW=> WiFi Module EquippedR => RFID Module EquippedWM or SS => Wall Mounted or Self Standing |
| Cabinet EVC02 |
| ELECTRICAL SPECIFICATION | ||
| Model EVC02-AC22 Series | EVC02-AC11 Series | |
| IEC Protection Class Class I Class I | ||
| Socket Outlet (Vehicle Interface) | Socket Outlet TYPE 2 (IEC 62196) Socket Outlet TYPE 2 (IEC 62196) | |
| Voltage & Current Rating | 400VAC 50/60 Hz - 3-phase 32A 400VAC 50/60 Hz - 3-phase 16A | |
| AC Maximum Charging Output | 22kW 11kW | |
| Idle Mode Power Consumption | 3.5W 3.5W | |
| Required Circuit Breaker on AC Mains | 4P-40A MCB Type-C 4P-20A MCB Type-C | |
| Required Ground Fault Protector on AC Mains | 40A - 30mA RCCB Type-B 20A - 30mA RCCB Type-B | |
| Required AC Mains Cable | 5x 6mm2 (< 50m) Outer Dimension: Ø 15-21 mm | 5x 4 mm2 (< 50m) Outer Dimension: Ø 15-21 mm |
| CONNECTIVITY | |
| WLAN Connectivity (Supported models only) | WI-FI (IEEE 802.11n) |
| GSM Connectivity (Supported models only) | GPRS (2G) GSM |
| RFID / NFC Module (Supported models only) | ISO-14443A/B and ISO-15693 NFC (ISO/IEC 18092 - ISO / IEC 21481) |
| OCPP Specification (Supported models only) | OCPP 1.6 with GSM Interface |
| Remote Monitoring & Control (Supported models only) | Android App for Remote Monitoring & Control |
| MECHANICAL SPECIFICATION | |
| Material Aluminum | |
| Wall-Mounted | |
| Dimension | 180.0 mm (Width) x 646.7 mm (Height) x 183.5 mm (Depth) |
| Dimension (Packing) | 245.0 mm (Width) x 710.0 mm (Height) x 270.0 mm (Depth) |
| Weight | 10.7 kg, 12 kg with packing |
| AC Mains Cable Dimension | Ø 15-21 mm |
| ENVIRONMENTAL SPECIFICATION | ||
| Protection Degree Ingress | Protection Impact Protection | IP54 IK10 |
| Operating Condition Temperature | Humidity Altitude | -25 °C - 50 °C 20 % - 80 % (Relative humidity, without dewdrops) 0 - 2.000m |
| Storage Condition Temperature | Humidity Altitude | -30 °C - 50 °C 20 % - 80 % (Relative humidity, without dewdrops) 0 - 5.000m |
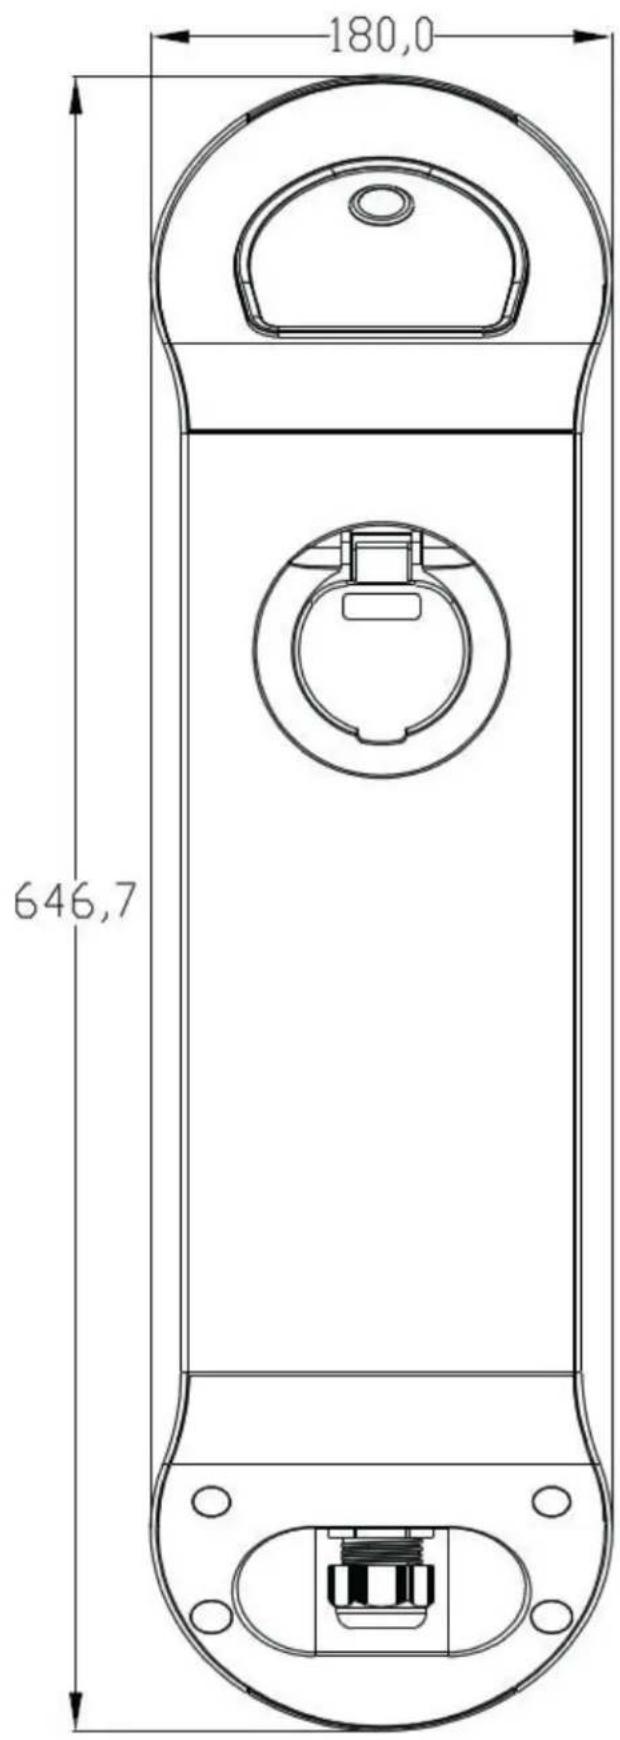
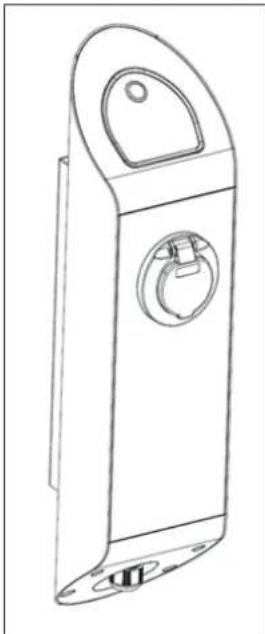
Front and Side view
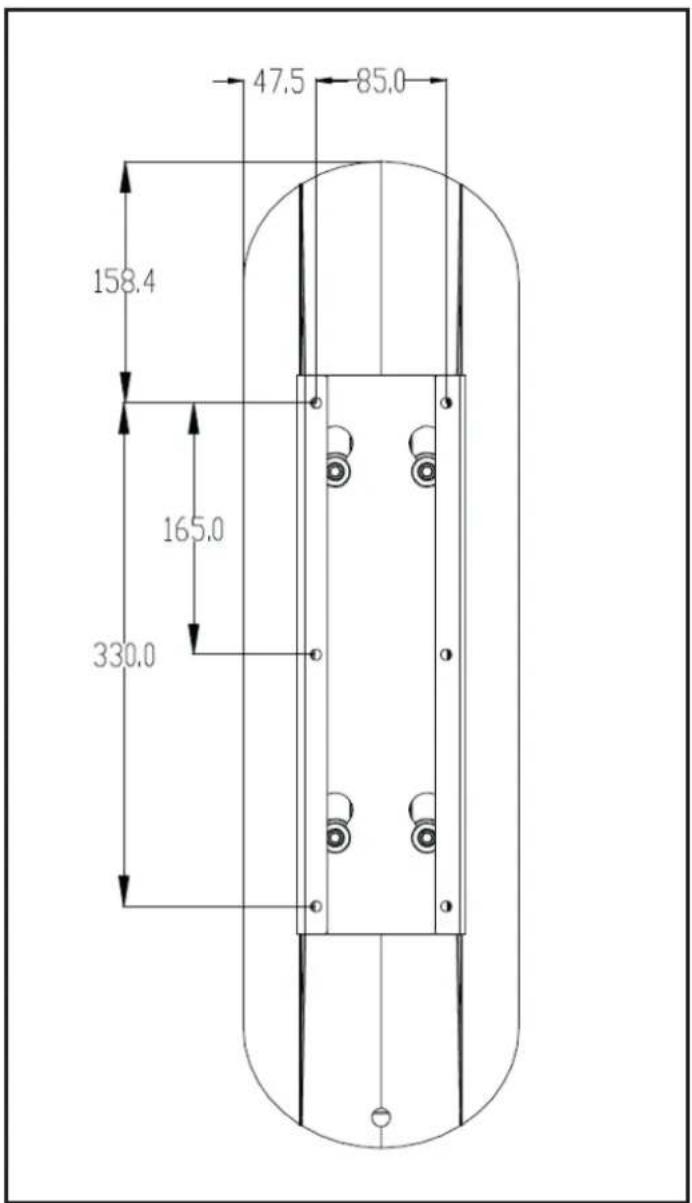
Back View
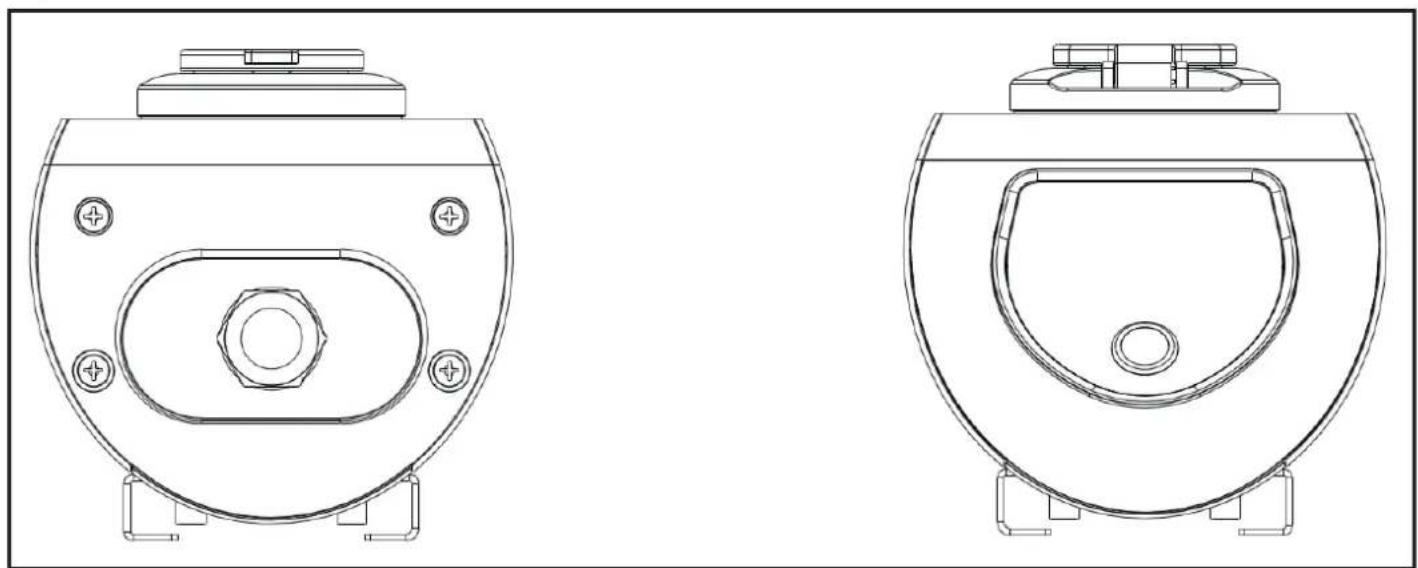
Top and Bottom View
TROUBLESHOOTING
| PROBLEM POSSIBLE REASONS | SUGGESTED SOLUTIONS |
| The product button LED is not lit when it is energized. | There might be power outage or the circuit breaker can be tripped. Check circuit breaker whether it is tripped or not and be sure that the charger is energized properly. |
| The product does not lock the cable in charging state. | Be sure that cable is connected properly. If the problem still continues, please consult the service. |
| The button LED blue and red blinking together. (Wifi equipped model only) | The charger waits eco time. If you do not want to wait please cancel eco time from smartphone / tablet to start charging immediately. |
| The button LED blinking red. Your car is in ventilation mode. There isn't any problem. Button LED indication only gives information. | You may decrease the ambient temperature of your car if it is in an indoor environment. |
| The button LED is steady red. The AC supply voltage might not be in the range that is specified in the user manual or the EVC device might have a internal fault. | Please be sure that the voltage is in the desired range. If it is still steady red, please consult the service. |
Inhaltsverzeichnis
(Modles equipments de WiFi) 4
SPECIFICATIONS 7
SCHEMAS COTES 9
DEPANNAGE 11
INFORMATIONS SUR LA SÉCURITÉ

MISE EN GARDE!
RISQUE DE CHOC ÉLECTRIQUE

MISE EN GARDE: LE CHARGEUR EV DE VESTEL NE DOIT ETRE INSTALLÉ QUE PAR UN ÉLECTRIEN QUALIFIÉ ET AGREE DANS LE RESPECT DE TOUS LES CODES ET NORMES ÉLECTRIQUES LOCAUX ET NATIONALAUX.