AKL - Basket Steel Cucine - Free user manual and instructions
Find the device manual for free AKL Steel Cucine in PDF.
Frequently Asked Questions - AKL Steel Cucine
Download the instructions for your Basket in PDF format for free! Find your manual AKL - Steel Cucine and take your electronic device back in hand. On this page are published all the documents necessary for the use of your device. AKL by Steel Cucine.
USER MANUAL AKL Steel Cucine
- 2002/95/CE (ROHS - REDUCTION OF HAZARDOUS
Models with round filter (type GK and AK hoods).............................................16 TROUBLESHOOTING................................................................................................172 General informations Thank you for choosing this product... ... dedicated to real lovers of cooking. Our goal has always been to promote a culture of good taste, attention to detail, and a refined, stylish design for the kitchen. This appliance's power, reliability, ease of use and easy cleaning, teamed with its elegant appearance, make it one of a kind. Its exceptional performance is comparable only with professional equipment because it is designed with solid criteria aimed at productivity, safety and ergonomics and is built with superior quality materials. It is our sole desire to share with you our passion for cooking with art, style and elegance. Manual sections General information. Product presentation, structure of the use manual, explanation of the symbols used and important notices on operator safety, product integrity and the validity of the warranty. Warnings. General regulations regarding the safety of operators and correct appliance use. Installation. Instructions for the qualified technician in charge of installing, connections, commissioning and testing the appliance. Use. Description of controls, switching on the appliance and tips. Cleaning and Maintenance. Recommended cleaning procedures and useful advice for ensuring the appliance continues to work efficiently and look good over time. Special maintenance. Maintenance, repairs and checks to be carried out only when required and with the assistance of a qualified technician. Accessories. Description, installation and use of the accessories supplied with the equipment or on request. Symbols used Important note. Failure to comply may cause danger that may jeopardise the user's health and the integrity of the equipment. Correct procedure. Compliance is strongly recommended. Original spare parts. The use of original spare parts ensures the equipment performs reliably over time. Disclaimer
- This equipment is designed for domestic use only, not for professional use.
- The use in a professional setting or any other use considered improper cause the immediate decline of the guarantee.
- The appliance meets the conformity requirements of current EC standards.
- This manual is an integral part of the purchased product, It should be preserved for the product’s entire lifespan.
- Before using the product, we recommend carefully reading this manual and all the instructions it contains.
- These instructions are valid solely for the countries the symbols of which are shown on the cover page.
- The appliance must be installed by qualified personnel in accordance with current regulations.
- The manufacturer is not liable for any inaccuracies in this booklet resulting from printing or transcription errors. The manufacturer reserves the right to modify its products as it considers necessary or in the interests of the user, without compromising their essential safety and operating characteristics.Warnings 3 General safety guidelines
MAY CAUSE DAMAGE. FOR ALL REPAIR AND OTHER WORK ON THE APPLIANCE, CONTACT AN AUTHORISED SERVICE/SPARE PARTS CENTRE.
- THIS PRODUCT CONFORMS TO THE REQUIREMENTS OF THE FOLLOWING EUROPEAN DIRECTIVES:
- 2002/96/CE, WASTE ELECTRICAL AND ELECTRONIC EQUIPMENT (WEEE). BY ENSURING THIS PRODUCT IS DISPOSED OF CORRECTLY, YOU WILL HELP PREVENT
HANDLING OF THIS PRODUCT.Installation 5 Components The packing contains the following components:
- an extraction/filtration hood;
- a chimney complete with extension;
- one or two wall mounting bars, depending on hood type;
- two or four 8 mm toggle bolts with screws, depending on hood type;
- four 6 mm toggle bolts with screws;
- ten self-tapping screws;
- plastic reducer with 12 cm diameter;
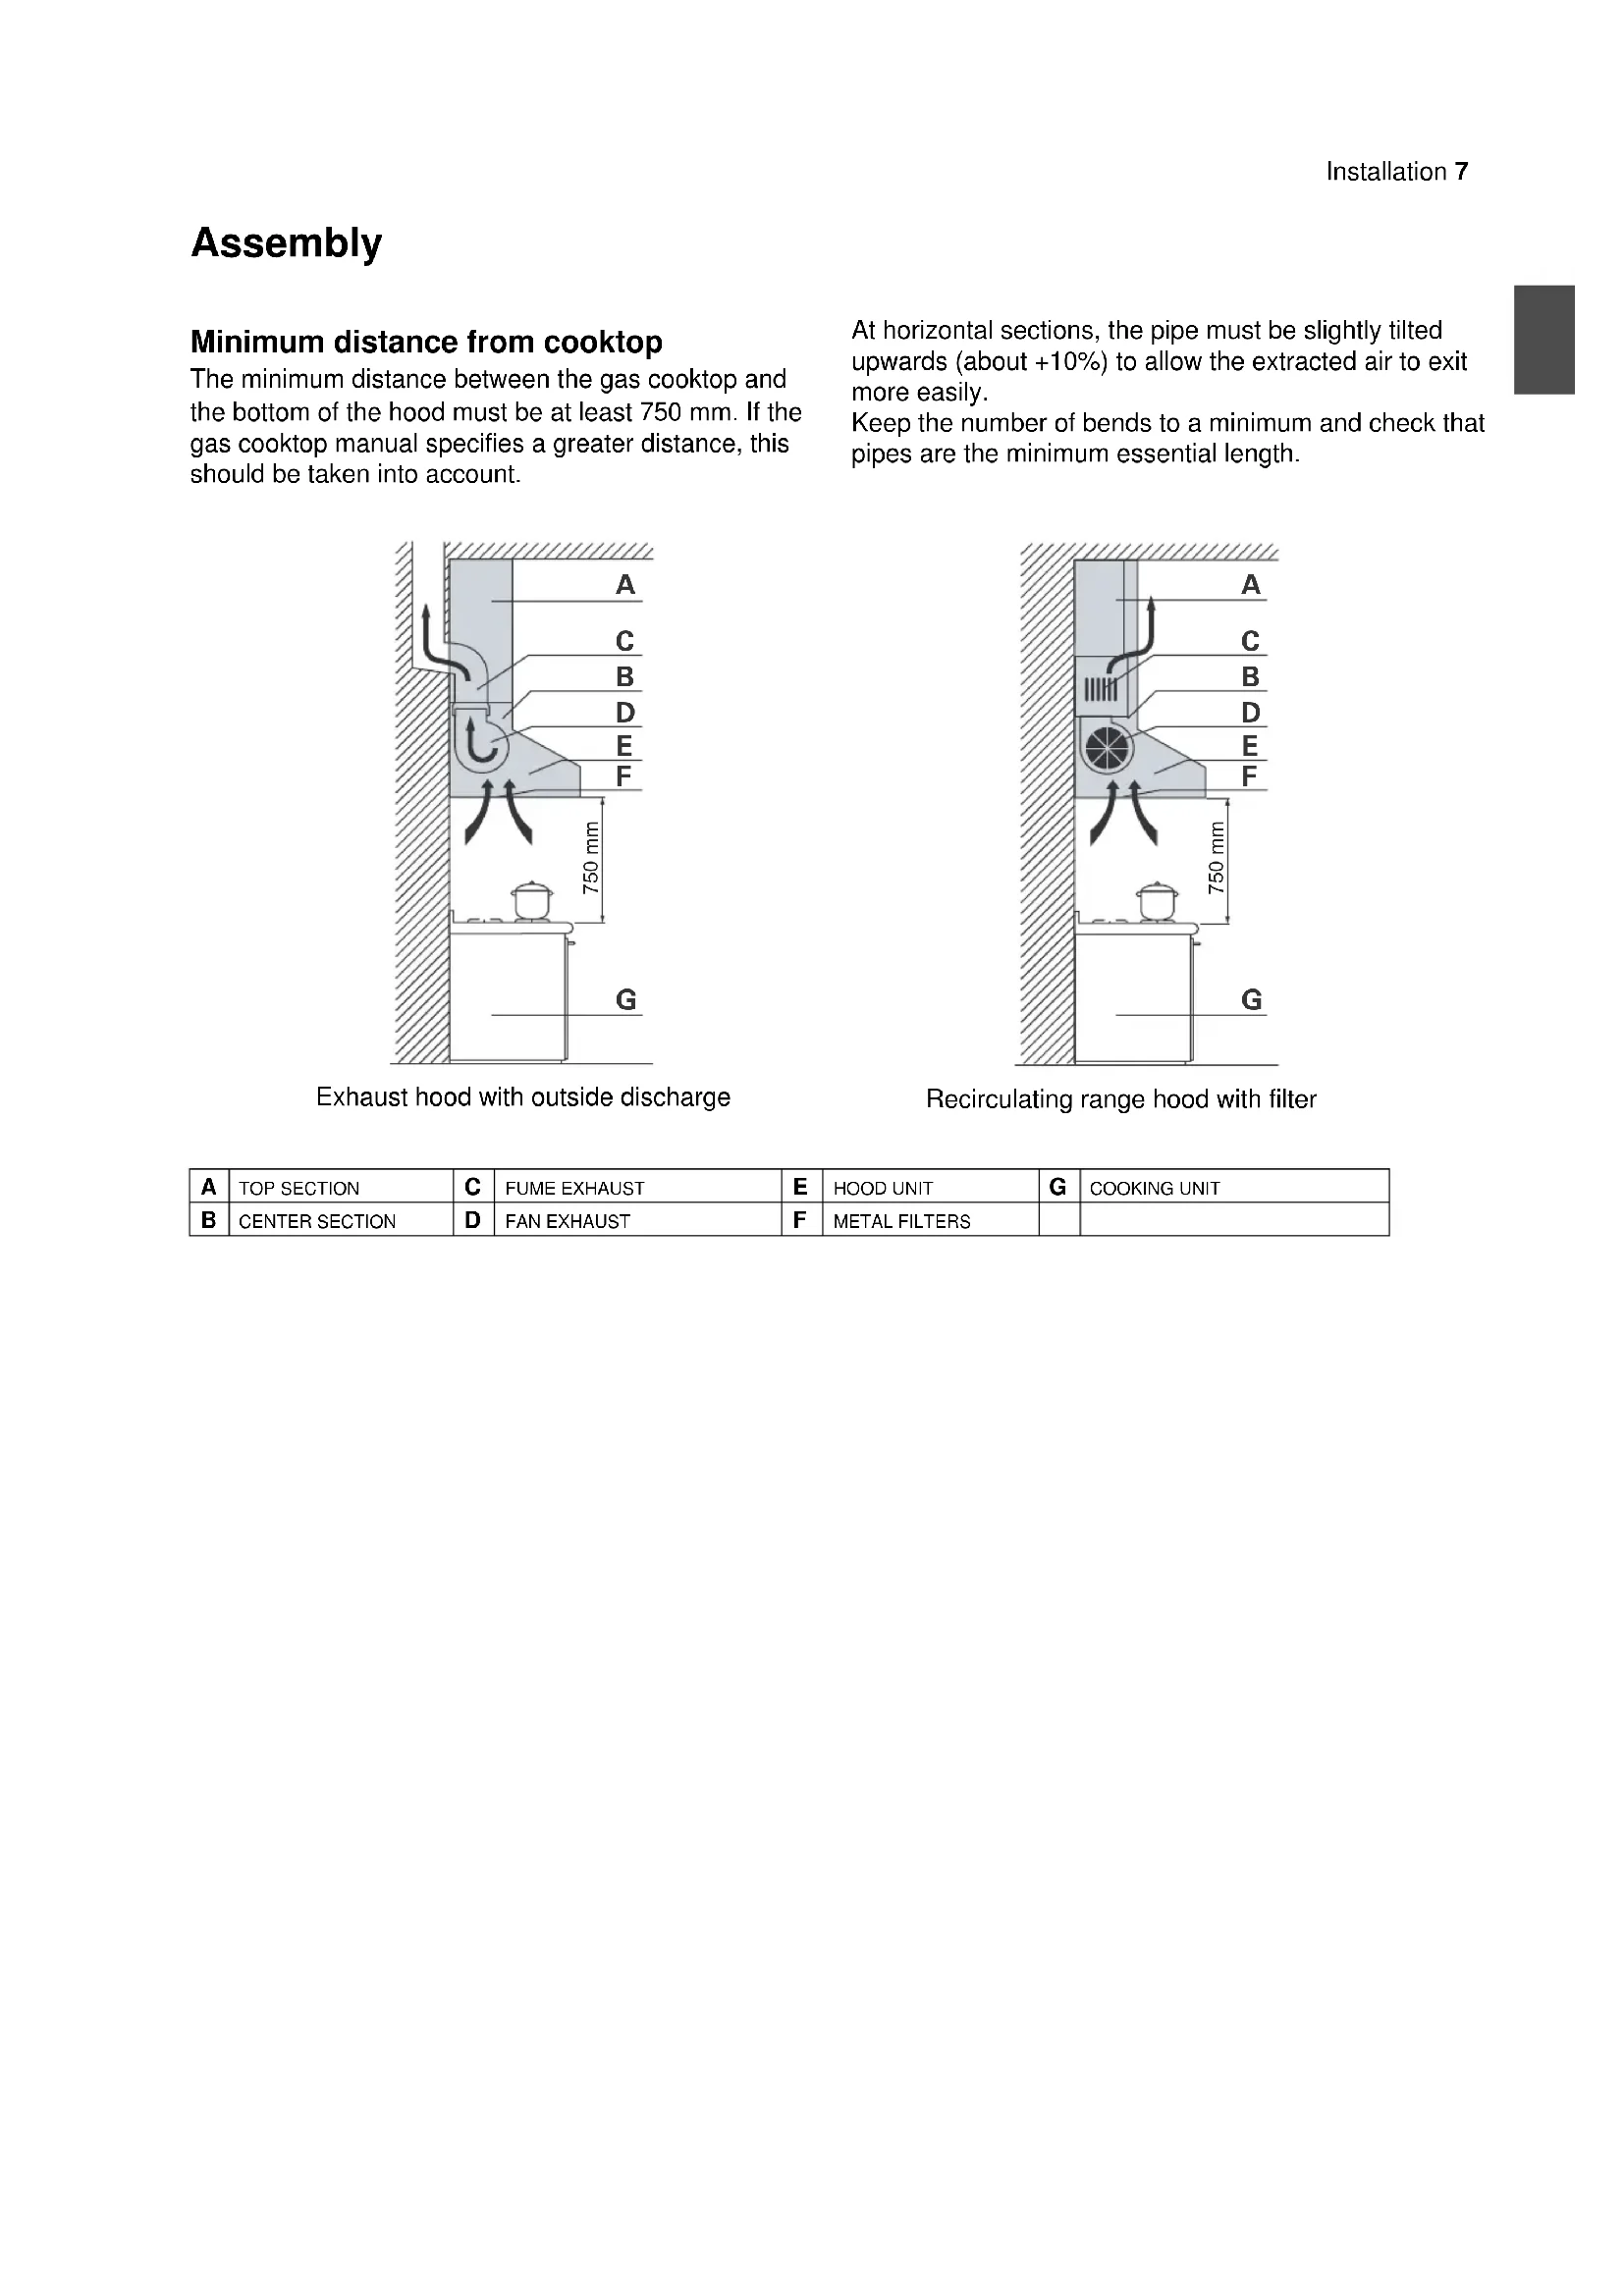
700 / 900 / 1000 / 1200 Type K Type GK Type AK Type AKLInstallation 7 Assembly Minimum distance from cooktop The minimum distance between the gas cooktop and the bottom of the hood must be at least 750 mm. If the gas cooktop manual specifies a greater distance, this should be taken into account. At horizontal sections, the pipe must be slightly tilted upwards (about +10%) to allow the extracted air to exit more easily. Keep the number of bends to a minimum and check that pipes are the minimum essential length.
750 mm750 mm Exhaust hood with outside discharge Recirculating range hood with filter
TOP SECTION FUME EXHAUST HOOD UNIT COOKING UNIT CENTER SECTION FAN EXHAUST METAL FILTERS8 Installation Removing the chimney from the hood (GK and AK hoods only) In type “K" and “AKL” hoods, the chimney is packed next to the hood; in type “GK” hoods, the chimney is secured in the interior compartment and turned 90° (fig. 1); in type “AK” hoods, the chimney is secured in the interior compartment, in a central position in front of the suction motor (fig. 2). Removing the metallic filters
- Lower the splines "A1" and pull the filters "A" downwards.
- Keeping the filters tilted down, remove them by pulling out. The connector "B" is now accessible. In type “GK” and “AK” hoods (figure 2), the connector "B" should be released from the suction motor to allow the removal of the plastic reducer "E". Removing the chimney
- Unscrew the screws "C" to free the chimney "D".
- Take out the chimney "D", complete with extension, from the hood compartment.
- Rest the mounting bar "A" against the wall, at a height determined by the sum of the 750 mm distance from the cooktop + the "h" value relating to the relevant model of hood.
- "Type GK" hood h = 357 mm
- "Type AK" hood: h = 413 mm
- Check the horizontal alignment with a spirit level and mark the 2 holes to be drilled at the ends of the bar.
- Drill the holes, insert 2 x 8 mm dia. screw anchors, and fasten the bar using the corresponding screws.
- Hook the range hood to the support bar.
- Adjust the alignment of the range hood using the screws on the brackets. The top screw “B” adjust the distance from the wall, the bottom screw “C” adjust the height.
- Fasten the bottom of the hood to the wall with the screws and two 6 mm bolts using the holes "F".
- For extractor hoods: connect pipe "E" (not supplied) coming from the duct hole to union "D". 520 mm750 mm750 mm750 mm357 mm413 mm
- Move part "G" towards the hood until fully inserted.
- Screw part "G" to the hood using the self-tapping screws "N".
- Slide the telescopic component "H" to reach the required height.
- Mark the wall at the position of the two holes "Q" in the mounting bar "L".
- Lower the telescopic component "H" and remove the mounting bar "L" by unscrewing the two screws "M".
- Move the mounting bar "L" to the wall in line with the previously marked holes.
- Use a spirit level to check the horizontal alignment and drill the holes.
- Insert two 6 mm toggle bolts and fasten the mounting bar "L" to the wall.
- Screw the telescopic component "H" to the mounting bar "L" with the screws "M". If previously disconnected, reconnect the connector "B" to the suction motor. Refitting the metallic filters Reposition the filters by introducing first the guides "P" into the rear slots, then push the filters up and lock them in position by closing the splines "A". Plastic reducer The motor exhaust union has a diameter of 15 cm. The hoods are fitted with a 12 cm plastic reducer.
12 cmInstallation 11 Electrical connections The connections must be performed in compliance with the legal standards in force. Check that the relief valve and the electrical system are able to support the load of the appliance. The equipment is not fitted with plugs. The yellow/green earth wire must not be disconnected by the switch. The technical specifications of the appliance are shown on the rating plate located inside the range hood. Make sure the mains voltage corresponds to the values on the rating plate. Use plugs conforming to current electrical standards, taking into account that:
- the yellow-green wire must be used for the earth;
- the blue wire must be used for the neutral;
- the brown wire must be used for the phase; the cable must not come into contact with hot parts (over 75°C);
- fit a plug that is suitable for the load to the power cable, and connect it to a suitable power outlet. Before plugging in the appliance, check that:
- the power voltage corresponds to that indicated on the specification plate;
- the earth connection is correct and operational;
- the power supply system has an effective earth connection according to current legislation;
- the socket or the omnipolar switch used are within easy reach when the appliance is installed. Test Check:
- that the duct and external outlet are not blocked;
- the metallic and active charcoal filters (if fitted) are positioned correctly. Refer to section “Active charcoal filters” on p. 16. Connect the hood to the electric supply, switch on the motor as described in section “Operation” on p. 12 and check:
- the correct operation and suction capacity at all selectable speeds;
- the correct operation of the lights.12 Use Operation Electronic control panel The hood has three different suction speeds plus one for intensive operation. On/off button Press this button to start or stop suction. The hood will operate at the speed selected before last switching off. Increase button Press this button to go to the next suction speed. Decrease button Press this button to return to the previous suction speed. Speeds 1, 2 and 3 can be seen by the number of lit buttons, not including the light and timed switch- off buttons. Intensive operation On pressing the increase button three times, the hood enters intensive operation mode (the button flashes). Intensive operation is timed and the motor returns automatically to the 3
speed after about 15 minutes. Timed switch-off and filter saturation alarm Press this button to automatically switch off the hood after 15 minutes of operation. The button will flash red until the suction motor switches off. After about 30 hours of operation a warning light automatically appears to indicate the metallic filters should be cleaned (the button is lit with a steady red light even when the motor is off). Clean the metallic filters as described in section “Metal grease-trapping filters” on page 14. To deactivate the warning light, hold the button down for a few seconds. Light button Press this button to switch the lights on and off. 1 2 3Use 13 Tips The range hood should be switched on when starting to cook, and left on until the odours disappear. Exhaust hood with outside discharge In this version, the fumes and steam from the kitchen are conveyed outside through an exhaust duct. The exhaust conveyor that protrudes from the upper part of the range hood must be connected to a duct that carries the fumes and steam outside. Active charcoal filters are not used for this type of operation, as exhaust air is not reintroduced into the kitchen. Always ensure the room is sufficiently ventilated when the extractor hood and gas-fired appliances are used at the same time. Recirculating range hood with filter In this version, the air passes through charcoal filters (available on demand) for purification, and is then recirculated back into the kitchen. Check that the charcoal filters are fitted to the motor, and if not, install them as described in the instructions “Active charcoal filters” at page 16. FIRST SPEED (decrease button lit): to maintain clean air in the kitchen with low electric consumption. SECOND SPEED (decrease and on/off buttons lit): for normal cooking. THIRD SPEED (decrease, on/off and increase buttons lit): to eliminate strong odours and steam from the kitchen. INTENSIVE OPERATION (decrease and on/off buttons lit, increase button flashing): for use to eliminate very strong odours or excessive amounts of steam or to quickly eliminate particularly persistent cooking fumes. Intensive operation deactivates automatically after 15 minutes.14 Cleaning and Maintenance Cleaning of the hood Regular maintenance ensures the hood will run efficiently over time. Particular attention should be paid to the metallic and active charcoal filters. Cleaning the filters and relative supports frequently will prevent the build-up of grease and grime. These substances, in addition to reducing the hood's performance, can be a fire hazard. Before performing any cleaning or maintenance operations, disconnect the appliance by unplugging it or using the main switch. Do not clean the surfaces of the appliance when they are still hot. Use only suitable detergents to clean the surfaces of the appliance. The manufacturer declines all responsibility and is not liable for damage arising from the use of unsuitable and/or other detergents than those indicated. Do not use pressure or steam spray guns to clean the appliance. Do not use liquids or solvents on electrical parts or close to the suction motor. Charcoal filters These trap the odours present in the stream of air that passes through them. The air is purified by passing a number of times through the filters and being recirculated into the kitchen. The charcoal filters cannot be cleaned, and should be replaced on average every 3- 4 months (according to use). To replace the charcoal filters, see the instructions “Active charcoal filters” on page 16. Metal grease-trapping filters These trap the fat and grease particles suspended in the
ir, and therefore should be washed every month in hot water and detergent, without bending them. To remove the metallic filters, see the instructions in section “Removing the metallic filters” on page 8. Wait until they are completely dry before repositioning them. Cleaning the stainless steel surfaces To clean and preserve the stainless steel surfaces, use
solution of warm water and vinegar or neutral soap. Pour the solution onto a damp cloth and wipe the steel surface, in the direction of the satin finish, rinse thoroughly and dry with a soft cloth or chamois leather. Do not under any circumstances use metallic sponges or sharp scrapers that may damage the surfaces. Only use non-scratch, non-abrasive sponges and, if necessary, wooden or plastic utensils. Cleaning the polished surfaces Clean with a non-abrasive, scratchproof sponge
ampened with warm water and neutral soap or with a standard detergent for polished surfaces. Rinse and dry carefully with a soft cloth. Abrasive pastes, coarse wire pads, steel wool or acid will damage the surfaces. Do not use alcohol. Cleaning the inside of the appliance The interior parts of the hood do not require any routine cleaning. Cleaning the control panel Clean the control panel with a damp clothSpecial maintenance 15 Lamp replacement Make sure the appliance is disconnected from the mains power supply. Light bulbs with different shapes and power ratings from the original may seriously damage the light compartment.
- Remove, by levering with a screwdriver, the support ring “A” for the cover glass.
- Remove the cover glass “B” to access the light compartment.
- Replace the lamp with the same type (halogen max 20 W - 12 Volt, G4 fitting).
- Replace the glass cover “B” and fasten it using the special ring “A”. Model with "Square halogen light":
- Completely open the panel to a 90° angle (see figure) by pressing PUSH.
- Replace the lamp with the same type (halogen max 20 W - 12 Volt, G4 fitting).
- Close the panel correctly. Model with LED spotlight In this case the hood is equipped with high efficiency, low power LED spotlights with extremely high durability under normal use conditions.
B16 Accessories Accessories on request Make sure the appliance is disconnected from the mains power supply. Coloured edge (type GK hoods only) Front moulding in painted steel available in a variety of colours.
- Remove the metallic filters "A".
- Unscrew the ten screws "B" from inside the hood.
- Remove the standard edge.
- Replace with the new edge "C", making sure the control panel "D" is correctly fitted in the edge frame.
- Tighten the ten screws "B".
- Reposition the metallic filters "A". Active charcoal filters Two types of active charcoal filters are available, depending on the hood model. Models with square filter (type K and AKL hoods)
- Remove the metallic filters.
- Place the nut "F" above the filter housing slot.
- Position the filter “B” in the housing and fasten it by screwing knob "C" in nut "F".
- Reposition the metallic filters. Models with round filter (type GK and AK hoods)
- Remove the metallic filters.
- Rest the filters on the motor (one on each side), taking care to place the pins close to hooks "E" on the motor.
- Turn the filters clockwise until properly hooked on.
- Reposition the metallic filters. Contact your distributor to order new active charcoal filters.
ETroubleshooting 17 Troubleshooting If the equipment is not working properly, consult the following table of possible causes and recommended remedies before contacting Customer Service. If the cause of the problem cannot be found, switch off the equipment, remove the plug and contact Customer Service.
PROBLEM POSSIBLE CAUSES AND RECOMMENDED REMEDY
The suction motor does not start when the on button is pressed. The plug is not connected to the socket or there is a mains failure. The electrical connector on the suction motor is disconnected. The suction motor starts, but the lights do not switch on when the lights button is pressed. Bulbs blown. Replace them. Bulbs not fully inserted. Transformer faulty. Contact Customer Service. The motor starts but cooking fumes are not extracted. Metallic or active charcoal filters clogged. Clean metallic filters or replace the active charcoal filters. Disconnect the hood from the mains before accessing internal parts. Duct clogged. The suction motor stops suddenly after running for a few minutes. This is normal if the timed switch-off has been activated. When the motor is off the timed switch-off button is lit with a red light. This is normal after 30 hours of operation. The warning light (steady red light) signals the need to clean the metallic filters. To eliminate the filter saturation warning light, simply hold the button down for a few seconds.Sommaire 1
- 2002/95/CE (ROHS - REDUCTION OF HAZARDOUS