
HTD6759W - Home Theater System SAMSUNG - Free user manual and instructions
Find the device manual for free HTD6759W SAMSUNG in PDF.
| Product Type | 7.1-channel home theater system |
| Brand | Samsung |
| Model | HTD6759W |
| Dimensions (W x H x D) of main unit | 429.3 x 58.4 x 325.1 mm |
| Weight of main unit | 3.5 kg |
| Power supply | 220-240 V AC, 50/60 Hz |
| Total output power | 7 x 165 W + 2 x 170 W (7.1 channels) |
| Playable disc formats | Blu-ray, DVD, CD, CD-R/RW, DVD-R/RW, BD-RE/R |
| Network functions | Smart Hub, BD-LIVE, AllShare, vTuner |
| Video connectivity | HDMI (input x2, output x1), Component, Composite |
| Audio connectivity | HDMI, Optical (input), Analog (AUX input) |
| Network connectivity | Ethernet (LAN), Wi-Fi (via wireless transmitter card) |
| USB port | 1 (front) for playback and updates |
| FM tuner | Yes, with supplied antenna |
| 3D playback | Yes (via HDMI) |
| Auto calibration for music | Yes (with supplied ASC microphone) |
| Security | Class 1 laser, compliance with safety standards, copy protection |
| Maintenance and cleaning | Clean discs with a soft cloth, avoid humidity and condensation |
| Spare parts and repairability | Not provided by the manufacturer; contact a qualified technician |
| Included accessories | Remote control, batteries, FM antenna, ASC microphone, video cable, soft cloth, wireless transmitter card, receiver module, iPod dock cradle |
Frequently Asked Questions - HTD6759W SAMSUNG
User questions about HTD6759W SAMSUNG
0 question about this device. Answer the ones you know or ask your own.
Ask a new question about this device
Download the instructions for your Home Theater System in PDF format for free! Find your manual HTD6759W - SAMSUNG and take your electronic device back in hand. On this page are published all the documents necessary for the use of your device. HTD6759W by SAMSUNG.
USER MANUAL HTD6759W SAMSUNG
Home Entertainment System user manual
imagine the possibilities
Thank you for purchasing this Samsung product.
To receive more complete service,
please register your product at
www.samsung.com/register
SAMSUNG
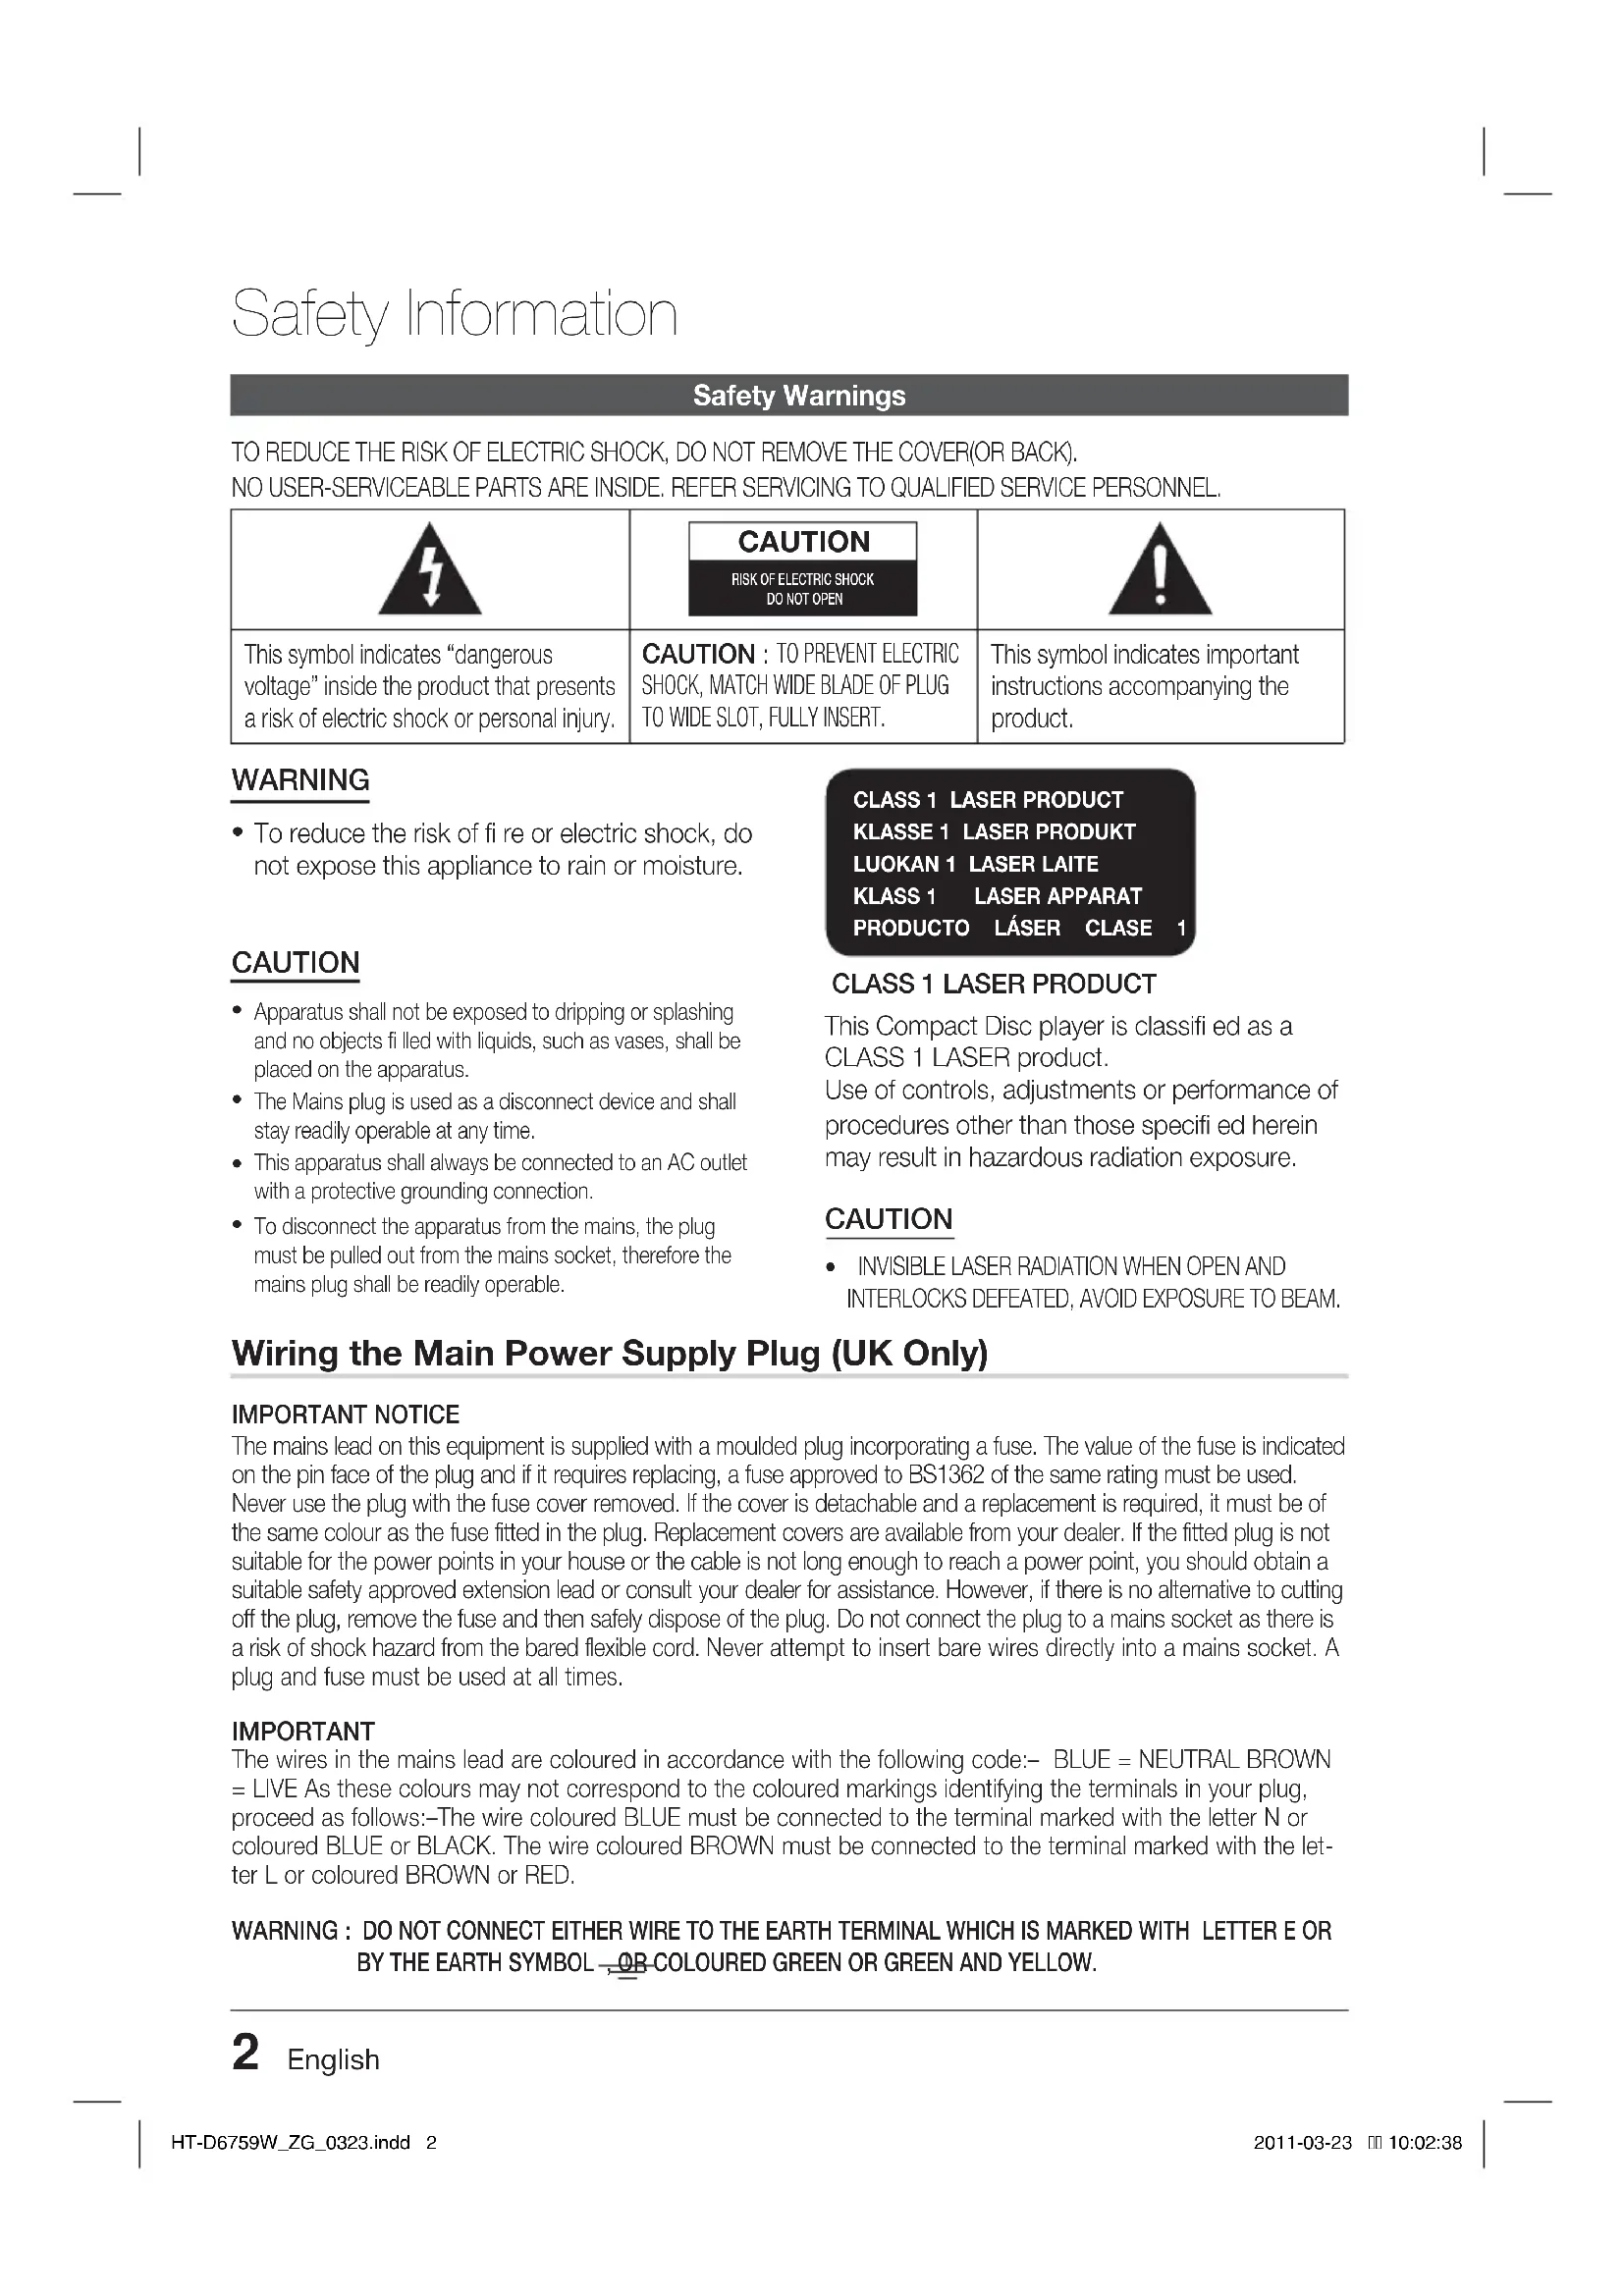
Safety Information
Safety Warnings
TO REDUCE THE RISK OF ELECTRIC SHOCK, DO NOT REMOVE THE COVER(OR BACK).
NO USER-SERVICEABLE PARTS ARE INSIDE. REFER SERVICING TO QUALIFIED SERVICE PERSONNEL.
 |  |  |
| This symbol indicates “dangerous voltage” inside the product that presents a risk of electric shock or personal injury. | CAUTION: TO PREVENT ELECTRIC SHOCK, MATCH WIDE BLADE OF PLUG TO WIDE SLOT, FULLY INSERT. | This symbol indicates important instructions accompanying the product. |
WARNING
- To reduce the risk of fi re or electric shock, do not expose this appliance to rain or moisture.
CAUTION
- Apparatus shall not be exposed to dripping or splashing and no objects filled with liquids, such as vases, shall be placed on the apparatus.
- The Mains plug is used as a disconnect device and shall stay readily operable at any time.
- This apparatus shall always be connected to an AC outlet with a protective grounding connection.
- To disconnect the apparatus from the mains, the plug must be pulled out from the mains socket, therefore the mains plug shall be readily operable.
CLASS 1 LASER PRODUCT
KLASSE 1 LASER PRODUKT
LUOKAN 1 LASER LAITE
KLASS 1 LASER APPARAT
PRODUCTO LÁSER CLASE 1
CLASS 1 LASER PRODUCT
This Compact Disc player is classified as a CLASS 1 LASER product.
Use of controls, adjustments or performance of procedures other than those specified herein may result in hazardous radiation exposure.
CAUTION
• INVISIBLE LASER RADIATION WHEN OPEN AND INTERLOCKS DEFEATED, AVOID EXPOSURE TO BEAM.
Wiring the Main Power Supply Plug (UK Only)
IMPORTANT NOTICE
The mains lead on this equipment is supplied with a moulded plug incorporating a fuse. The value of the fuse is indicated on the pin face of the plug and if it requires replacing, a fuse approved to BS1362 of the same rating must be used. Never use the plug with the fuse cover removed. If the cover is detachable and a replacement is required, it must be of the same colour as the fuse fitted in the plug. Replacement covers are available from your dealer. If the fitted plug is not suitable for the power points in your house or the cable is not long enough to reach a power point, you should obtain a suitable safety approved extension lead or consult your dealer for assistance. However, if there is no alternative to cutting off the plug, remove the fuse and then safely dispose of the plug. Do not connect the plug to a mains socket as there is a risk of shock hazard from the bared flexible cord. Never attempt to insert bare wires directly into a mains socket. A plug and fuse must be used at all times.
IMPORTANT
The wires in the mains lead are coloured in accordance with the following code:– BLUE = NEUTRAL BROWN = LIVE As these colours may not correspond to the coloured markings identifying the terminals in your plug, proceed as follows:–The wire coloured BLUE must be connected to the terminal marked with the letter N or coloured BLUE or BLACK. The wire coloured BROWN must be connected to the terminal marked with the letter L or coloured BROWN or RED.
WARNING : DO NOT CONNECT EITHER WIRE TO THE EARTH TERMINAL WHICH IS MARKED WITH LETTER E OR BY THE EARTH SYMBOL, OR COLOURED GREEN OR GREEN AND YELLOW.
2 English
Precautions
- Ensure that the AC power supply in your house complies with the identification sticker located on the back of your product.
- Install your product horizontally, on a suitable base (furniture), with enough space around it for ventilation (7.5\~10cm).
- Do not place the product on amplifiers or other equipment which may become hot. Make sure the ventilation slots are not covered.
- Do not stack anything on top of the product.
- Before moving the product, ensure the Disc Insert Hole is empty.
- To disconnect the product completely from the power supply, remove the mains plug from the wall outlet.
- If you leave the product unused for a long period of time, disconnect the plug from the wall outlet.
- During thunderstorms, disconnect the AC plug from the wall outlet. Voltage peaks due to lightning could damage the product.
- Do not expose the product to direct sunlight or other heat sources. This could lead to overheating and malfunction of the product.
- Protect the product from moisture, excess heat, and equipment creating strong magnetic or electric fi elds (i.e. speakers.).
- Disconnect the power cable from the AC supply if the product malfunctions.
- Your product is not intended for industrial use. Use of this product is for personal use only.
- Condensation may occur if you store your product or a disc in cold temperatures. If transporting the product during the winter, wait approximately 2 hours until the product has reached room temperature before using.
- The batteries used with this product contain chemicals that are harmful to the environment. Do not dispose of batteries in the general household trash.
Viewing TV using the 3D function
IMPORTANT HEALTH AND SAFETY INFORMATION FOR 3D PICTURES. Read and understand the following safety information before using the TV's 3D function.
WARNING
- Some viewers may experience discomfort while viewing 3D TV such as dizziness, nausea and headaches. If you experience any such symptom, stop viewing 3D TV, remove the 3D Active Glasses, and rest.
- Watching 3D images for an extended period of time may cause eye strain. If you feel eye strain, stop viewing 3D TV, remove your 3D Active Glasses, and rest.
- A responsible adult should frequently check on children who are using the 3D function. If there are any reports of tired eyes, headaches, dizziness, or nausea, have the child stop viewing 3D TV and rest.
- Do not use the 3D Active Glasses for other purposes (such as general eyeglasses, sunglasses, protective goggles, etc.)
- Do not use the 3D function or 3D Active Glasses while walking or moving around. Using the 3D function or 3D Active Glasses while moving around may result in injuries caused by running into objects, tripping, and/or falling.
English
Safety Information
Cautions on Handling and Storing Discs
Small scratches on the disc may reduce sound and picture quality or cause skipping.
Be especially careful not to scratch discs when handling them.
Holding discs
- Do not touch the playback side of the disc.
- Hold the disc by the edges so that fingerprints will not get on the surface.
- Do not stick paper or tape on the disc.

Disc Storage
- Do not keep in direct sunlight
- Keep in a cool ventilated area
- Keep in a clean Protection jacket. Store vertically.

NOTE
- Do not allow the discs to become contaminated with dirt.
■ Do not load cracked or scratched discs.
Handling and Storing Discs
If you get fingerprints or dirt on the disc, clean it with a mild detergent diluted in water and wipe with a soft cloth.
- When cleaning, wipe gently from the inside to the outside of the disc

NOTE
- Condensation may form if warm air comes into contact with cold parts inside the product. When condensation forms inside the product, it may not operate correctly. If this occurs, remove the disc and let the product stand for 1 or 2 hours with the power on.
Licence
- Dolby and the double-D symbol are registered trademarks of Dolby Laboratories.
- "ABOUT DIVX VIDEO: DivX® is a digital video format created by DivX, Inc. This is an official DivX Certifi ed® device that plays DivX video. Visit www.divx.com for more information and software tools to convert your files into DivX video.
ABOUT DIVX VIDEO-ON-DEMAND: This DivX Certifi ed® device must be registered in order to play purchased DivX Video-on-Demand (VOD) movies. To obtain your registration code, locate the DivX VOD section in your device setup menu. Go to vod.divx.com for more information on how to complete your registration.
DivX Certifi ed® to play DivX® video up to HD 1080p, including premium content. DivX®, DivX Certifi ed® and associated logos are trademarks of DivX, Inc. and are used under licence."
Covered by one or more of the following U.S. patents : 7,295,673; 7,460,668; 7,515,710; 7,519,274
- HDMI, the HDMI Logo, and High-Defi nition Multimedia Interface are trademarks or registered trademarks of HDMI Licensing LLC in the United States and other countries

- Oracle and Java are registered trademarks of Oracle and/or its affiliates. Other names may be trademarks of their respective owners.
- This item incorporates copy protection technology that is protected by U.S. patents and other intellectual property rights of Rovi Corporation. Reverse engineering and disassembly are prohibited.
- Blu-ray Disc™, Blu-ray™, and the logos are trademarks of Blu-ray Disc Association.
- iPod is a trademark of Apple Inc., registered in the U.S. and other countries. iPhone is a trademark of Apple Inc.

- < Open Source Licence Notice > In the case of using open source software, Open Source Licenses are available on the product menu.
Copyright
© 2011 Samsung Electronics Co., Ltd. All rights reserved.
4
English
Contents
SAFETY INFORMATION
2
GETTING STARTED
7
CONNECTIONS
17
SETUP
27
2 Safety Warnings
3 Precautions
4 Cautions on Handling and Storing Discs
4 Licence
4 Copyright
7 Icons that will be used in manual
8 Disc Types and Characteristics
12 Accessories
13 Description
13 Front Panel
14 Rear Panel
15 Remote Control
17 Connecting the Speakers
20 Attaching the Toroidal Ferrite Core to the Power Cord of the Main Unit
21 Connecting External Devices/your TV via HDMI
22 Connecting the FM Antenna
24 Connecting Audio from External Components
25 Connecting to the Network
41 BD Data Management
27 Initial Settings
28 Accessing the Settings Menu
29 Display
29 3D Settings
30 TV Aspect
30 Smart Hub Screen Size
30 BD Wise (Samsung Products only)
30 Resolution
32 HDMI Color Format
32 Movie Frame (24 Fs)
32 HDMI Deep Color
32 Still Mode
32 Progressive Mode
33 Audio
33 Speaker Settings
34 Musical Auto Calibration
34 User EQ
35 HDMI Audio
35 Audio Return Channel
35 Digital Output
36 Dynamic Range Control
37 Audio Sync
37 Network
37 Network Settings
40 Network Status
40 BD-LIVE Internet Connection
41 System
41 Initial Settings
41 Anynet+ (HDMI-CEC)
41 Time Zone
41 DivX® Video On Demand
41 Reset
42 Language
English
Contents
SETUP
42
42 Security
42 BD Parental Rating
42 DVD Parental Rating
42 Change Password
42 General
42 Front Display
42 Light Effect
43 Network Remote Control
43 Support
43 Software Upgrade
45 Contact Samsung
BASIC FUNCTIONS
46
46 Playing a Disc
46 Using the Disc menu / Title menu / Popup menu
47 Using the Search and Skip Functions
48 Slow Motion Play/Step Motion Play
48 Repeat Playback
49 Using the TOOLS button
51 Listening to Music
53 Sound Mode
54 Playing back a Picture
55 Playing back a USB Storage Device
56 Listening to Radio
58 Connecting iPod/iPhone Using the USB Cable
58 Connecting iPod/iPhone Using the Dock
59 Use iPod/iPhone with a Wireless Dock Cradle for iPod/iPhone
60 iPod/iPhone Models You Can Use with This Product
61 How to Link the Wireless Transmitter with the Main Unit
NETWORK SERVICES
62
62 Using Smart Hub
69 Samsung Apps
71 Using vTuner Function
71 BD-LIVE ^TM
71 Using the AllShare Function
OTHER INFORMATION
72
72 Troubleshooting
75 Specifications
- Figures and illustrations in this User Manual are provided for reference only and may differ from actual product appearance.
• An administration fee may be charged if either
a. an engineer is called out at your request and there is no defect in the product (i.e. where you have failed to read this user manual)
b. you bring the unit to a repair centre and there is no defect in the product (i.e. where you have failed to read this user manual). - The amount of such administration charge will be advised to you before any work or home visit is carried out.
6
English
Getting Started
Icons that will be used in manual
Make sure to check the following terms before reading the user manual.
| Term Logo | Icon Definition | ||
| BD-ROM |  |  | This involves a function available on a BD-ROM. |
| BD-RE/-R |  | This involves a function available on a BD-RE/-R disc recorded in the BD-RE format. | |
| DVD-VIDEO |  VIDEO VIDEO |  | This involves a function available on a DVD-VIDEO. |
| DVD-RW(V) |  | DVD+RW/+R | This involves a function available on recorded DVD+RW or DVD-RW(V)/ DVD-R/+R discs that have been recorded and finalized. |
| DVD-R |  | ||
| DVD+RW |  | ||
| DVD+R |   | ||
| Audio CD |  |  | This involves a function available on an audio CD-RW/-R (CD-DA format). |
| MP3WMA | - |  | This involves a function available in a CD-RW/-R, DVD-RW/-R disc or a USB storage media containing MP3 or WMA contents. |
| JPEG | - |  | This involves a function available in a CD-RW/-R, DVD-RW/-R disc or a USB storage media containing JPEG contents. |
| DivXMKVMP4 | DIVXHDDivX |  | This involves a function available in a CD-RW/-R, DVD-RW/-R disc or a USB storage media containing DivX contents. |
| USB storage device | - |  | This involves a function available on a USB storage device. |
| CAUTION | - | [3206] | This involves a situation where a function does not operate or settings may be cancelled. |
| NOTE | - | [XX3C] | This involves tips or instructions on the page that help each function operate. |
| Shortcut Key | - |  | This function provides direct and easy access pressing the button on the remote control. |
• This product is compatible with the PAL colour system only.
• NTSC discs will not play.
Getting Started
Disc Types and Characteristics
Blu-ray Disc Compatibility
Blu-ray is a new and evolving format. Accordingly, disc compatibility issues are possible. Not all discs are compatible and not every disc will play back. For additional information, refer to the Disc Types and Characteristics section of this Manual.

NOTE
■ Playback may not work for some types of discs, or when specific operations, such as angle change and aspect ratio adjustment, are being performed. Information about the discs is written in detail on the box. Please refer to this if necessary.
- Do not allow the disc to become dirty or scratched. Fingerprints, dirt, dust, scratches or deposits of cigarette smoke on the recording surface may make it impossible to use the disc for playback.
- When a BD-Java title is played, loading may take longer than a normal title, or some functions may perform slowly.
Discs that cannot be played
- HD DVD Disc
- DVD-RAM
• 3.9 GB DVD-R Disc for Authoring. - DVD-RW(VR mode)
• Super Audio CD(except CD layer) - DVD-ROM/PD/MV-Disc, etc CVD/CD-ROM/CDV/CD-G/CD-I/LD
• CDGs play audio only, not graphics.

NOTE
■ Some commercial discs and DVD discs purchased outside your region may not be playable with this product.
If a DVD-R/-RW disc has not been recorded properly in DVD video format, it will not be playable.
Logos of Discs that can be played


Blu-ray Disc 3D Blu-ray Disc


Dolby Digital Plus
PAL broadcast system in U.K, France, Germany, etc.


Dolby TrueHD
DTS-HD High Resolution Audio


Java
DTS-HD Master Audio I Essential

BD-LIVE
8
English
Region Code
Both the product and the discs are coded by region. These regional codes must match in order to play the disc. If the codes do not match, the disc will not play.
| Disc Type | Region Code | Area |
| Blu-ray |  | North America, Central America, South America, Korea, Japan, Taiwan, Hong Kong and South East Asia. |
 | Europe, Greenland, French territories, Middle East, Africa, Australia and New Zealand. | |
 | India, China, Russia, Central and South Asia. | |
| DVD-VIDEO |  | The U.S., U.S. territories and Canada |
 | Europe, Japan, the Middle East, Egypt, South Africa, Greenland | |
 | Taiwan, Korea, the Philippines, Indonesia, Hong Kong | |
 | Mexico, South America, Central America, Australia, New Zealand, Pacific Islands, Caribbean | |
 | Russia, Eastern Europe, India, most of Africa, North Korea, Mongolia | |
 | China |
Disc Types
BD-ROM
This Blu-ray disc can only be played back. This product can play back pre-recorded commercial BD-ROM discs.
BD-RE/-R
This Blu-ray disc can be recorded and played back. This product can play back a BD-RE/-R disc recorded by other compatible Blu-ray disc recorders.
DVD-VIDEO
- This product can play back pre-recorded commercial DVD discs (DVD-VIDEO discs) with movies.
- When switching from the first layer to the second layer of a dual-layered DVD-VIDEO disc, there may be momentary distortion in the image and sound. This is not a malfunction of the product.
DVD-RW/-R/+R
This product can play back a DVD-RW/-R/+R disc recorded and fi nalized with a DVD video recorder. Ability to play back may depend on recording conditions.
DVD+RW
- This product can play back a DVD+RW disc recorded with a DVD Video recorder. Ability to play back may depend on recording conditions.
Audio CD (CD-DA)
- This product can play back CD-DA format audio CD-RW/-R discs.
- The product may not be able to play some CD-RW/-R discs due to the condition of the recording.
CD-RW/-R
- Use a 700MB(80 minutes) CD-RW/-R disc. If possible, do not use a 800MB(90 minutes) or above disc, as the disc may not play back.
- If the CD-RW/-R disc was not recorded as a closed session, you may experience delays when playing back the beginning of the disc or all recorded fi les may not play.
- Some CD-RW/-R discs may not be playable with this product, depending on the device which was used to burn them. For contents recorded on CD-RW/-R media from CDs for your personal use, playability may vary depending on contents and discs.
English
9
Getting Started
Disc Format
Using JPEG disc
- CD-R/-RW, DVD-RW/-R recorded with UDF or JOLIET format can be played back.
- Only JPEG files with the ".jpg", ".JPG", ".jpeg" or "JPEG" extension can be displayed.
• Progressive JPEG is supported.
DVD-RW/-R (V)
- This is a format that is used for recording data on a DVD-RW or DVD-R disc. The disc can be played by this product once it has been finalized.
- If a disc that has been recorded in Video Mode by a different maker's recorder but has not been finalized, it cannot be played by this product.
Supported File Formats
Video File Support
| File Extension Container Video Codec Audio Codec Resolution | ||||
| *.avi | AVI | DivX 3.11/4.x/5.1/6.0 | MP3AC3LPCMADPCMDTS Core | 1920x1080 |
| XviD | 1920x1080 | |||
| H.264 BP/MP/HP | 1920x1080 | |||
| MPEG4 SP/ASP | 1920x1080 | |||
| Motion JPEG | 1920x1080 | |||
| *.mkv | MKV | DivX 3.11/4.x/5.1/6.0 | MP3AC3LPCMADPCMDTS Core | 1920x1080 |
| XviD | 1920x1080 | |||
| H.264 BP/MP/HP | 1920x1080 | |||
| MPEG4 SP/ASP | 1920 × 1080 | |||
| Motion JPEG | 1920x1080 | |||
| *.asf | ASF | DivX 3.11/4.x/5.1/6.0 | MP3AC3LPCMADPCMWMA | 1920x1080 |
| XviD | 1920x1080 | |||
| H.264 BP/MP/HP | 1920x1080 | |||
| MPEG4 SP/ASP | 1920x1080 | |||
| Motion JPEG | 1920x1080 | |||
| *.wmv | ASF Window Media Video v9 | WMA 1920x1080 | ||
| *.mp4 | MP4 | H.264 BP/MP/HP | MP3ADPCM AAC | 1920x1080 |
| MPEG4 SP/ASP | 1920x1080 | |||
| XVID | 1920x1080 | |||
| *.3gp | 3GPP | H.264 BP/MP/HP | ADPCM AAC HE-AAC | 1920x1080 |
| MPEG4 SP/ASP | 1920x1080 | |||
10 English
| File Extension Container Video Codec Audio Codec Resolution | ||||
| *.vro | VROVOB | MPEG2 | AC3MPEGLPCM | 1920x1080 |
| MPEG1 | 352x288 | |||
| *.mpg*.mpeg | PS | MPEG1 | AC3MPEGLPCM | 352x288 |
| MPEG2 | 1920x1080 | |||
| H.264 | AAC | 1920x1080 | ||
| *.ts*.tp*.trp | TS | MPEG2 | AC3AACMP3DD+HE-AAC | 1920x1080 |
| H.264 | 1920x1080 | |||
| VC1 | 1920x1080 | |||
Restrictions
- Some of the Codecs above listed are not supported if having a problem with the contents.
• Video source with incorrect container information or if corrupt will not be played properly. - AV source with more than the standard bit rate or frame rate may not be played properly.
- If the index table is corrupt, the Seek (Jump) function will not be supported.
- If you play a video via the network, it may not be played properly depending on the network status.
Video decoder
- Up to H.264 Level 4.1 supported.
• H.264 FMO/ASO/RS, VC1 SP/MP/AP L4, AVCHD not supported.
• XVID, MPEG4 SP, ASP :
- Below 1280 x 720: 60 frame max
- Above 1280 x 720: 30 frame max
• GMC 2 or higher not supported.
Audio decoder
- Up to WMA 7,8,9 supported.
- WMA 9 PRO with more than two channels (multi-channel) not supported.
• WMA 9 Lossless, Voice not supported.
• WMA sampling rate at 22050Hz mono not supported.
Music File Support
| File Extension Container Audio Codec Support Range | |||
| *.mp3 | MP3 | MP3 - | |
| *.wma | WMA | WMA | Compliant with WMA version 10* Sampling rates (in kHz) - 8, 11, 16, 22, 32, 44.1, 48* Bit rates - All bit-rates in the range 5kbps to 384kbps |
Getting Started
Notes on USB connection
Supported devices:
USB storage media, MP3 player, digital camera, USB card reader
1) Does not support if a folder or file name is longer than 125 characters.
2) A subtitle file bigger than 300 KB may not be properly displayed.
3) A certain USB/digital camera device may not be compatible with the product.
4) FAT16 and FAT32 file systems are supported.
5) Photo (JPEG), music (MP3) and video file should have their names in Korean or English. Otherwise, the file may not played.
6) Connect directly to the product's USB port. Connecting through another cable may raise problems with USB compatibility.
7) Inserting more than one memory device to a multi-card reader may not operate properly.
8) PTP protocol for digital camera is not supported.
9) Do not disconnect USB device during a "loading" process.
10) Bigger the image resolution, the longer the delay to displaying.
11) DRM applied MP3 files downloaded from a commercial site are not played back.
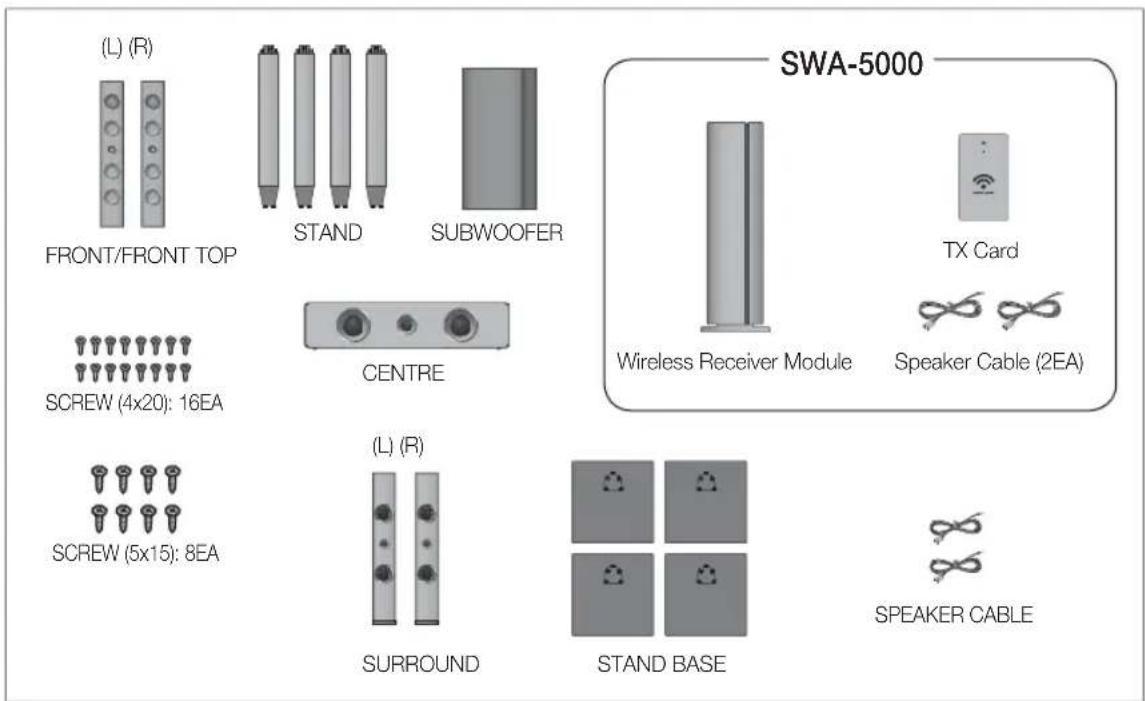
Accessories
Check for the supplied accessories below.

Video Cable FM Antenna Soft Cloth User's Manual


Remote Control/ Batteries (AAA size)

ASC Microphone iPod Dock Toroidal Ferrite Core

(For Power cord)
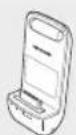
Wireless Dock Cradle for iPod/iPhone : HT-WDC10
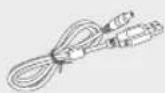
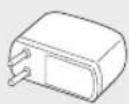
Wireless Transmitter Charging Cradle DC Power Cord DC Power Adapter

12 English
Description
Front Panel

| 1 | POWER BUTTON (💡) | Turns the product on and off. |
| 2 | FUNCTION BUTTON | The mode switches as follows :BD/DVD → D. IN → AUX → R. IPOD → W. IPOD → H. IN1 → H. IN2 → FM |
| 3 | DISPLAY | Displays the playing status, time, etc. |
| 4 | STOP BUTTON | Stops disc playback. |
| 5 | PLAY/PAUSE BUTTON | Plays a disc or pauses playback. |
| 6 | ENTER BUTTON | Selects menu items or starts a Blu-ray disc. (It will not start a DVD disc.) |
| 7 | EJECT BUTTON | Ejects a Disc. |
| 8 | DISC SLOT | Insert disc here. |
| 9 | REMOTE CONTROL SENSOR | Detects signals from the remote control. |
| 10 | ASC IN JACK | Used to connect the ASC Microphone for setting up MAC (Musical Auto Calibration). |
| 11 | VOLUME CONTROL | Volume adjustment. |
| 12 | USB PORT | You can connect a USB memory fl ash stick here and use it as storage when the product is connected to BD-LIVE. You can also use the USB Host for software upgrades and MP3/JPEG/DivX/MKV/MP4 playback. And also it is possible to use R. IPOD when iPod is connected. |

NOTE
- You can perform software upgrades using the USB Host jack with a USB memory flash stick only.
- When the product displays the Blu-ray disc menu, you cannot start the movie by pressing the PLAY button on the product or the remote. To play the movie, you must select Play Movie or Start in the disc menu, and then press the ENTER button.
Getting Started
Rear Panel
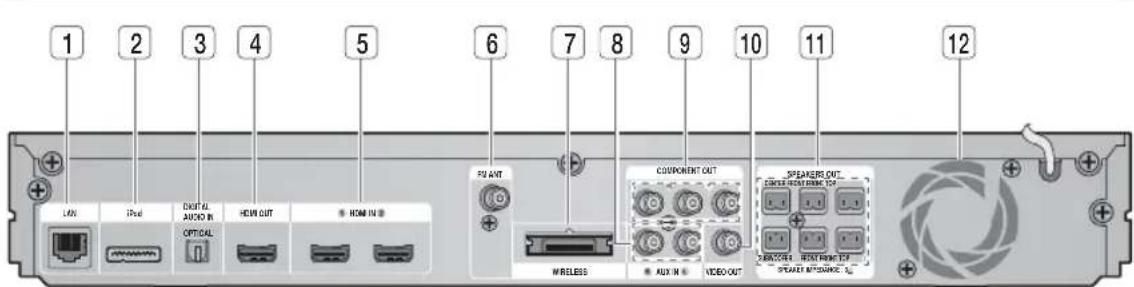
| 1 | LAN TERMINAL | Can be used for network based services (see pages 62~71), BD-LIVE and software upgrade under the network connection. |
| 2 | iPod JACK | Connect the iPod dock connector here. |
| 3 | EXTERNAL DIGITAL AUDIO IN JACK (OPTICAL) | Use this to connect external equipment capable of digital output. |
| 4 | HDMI OUT JACK | Use an HDMI cable, connect this HDMI output terminal to the HDMI input terminal on your TV for the best quality picture. |
| 5 | HDMI IN JACKS | Receives digital video and audio signals simultaneously using an HDMI cable. |
| 6 | FM ANTENNA JACK | Connect the FM antenna. |
| 7 | TX CARD CONNECTION (WIRELESS) | The TX card enables communication between the product and the wireless receiver module. |
| 8 | AUX IN JACKS | Connect to the 2CH analogue output of an external device (such as a VCR) |
| 9 | COMPONENT VIDEO OUT JACKS | Connect a TV with Component video inputs to these jacks. |
| 10 | VIDEO OUT JACK | Connect your TV's Video Input jack (VIDEO IN) to the VIDEO OUT Jack on this product. |
| 11 | SPEAKER OUTPUT CONNECTORS | Connect the front, front top, center, subwoofer speakers. |
| 12 | COOLING FAN | The cooling fan supplies cool air to the product to prevent overheating and always revolves when the power is on. |
! CAUTION
- Ensure a minimum of 10 cm of clear space on all sides of the cooling fan when installing the product.
■ Do not obstruct the cooling fan or ventilation holes.
14 English
Remote Control
Tour of the Remote Control
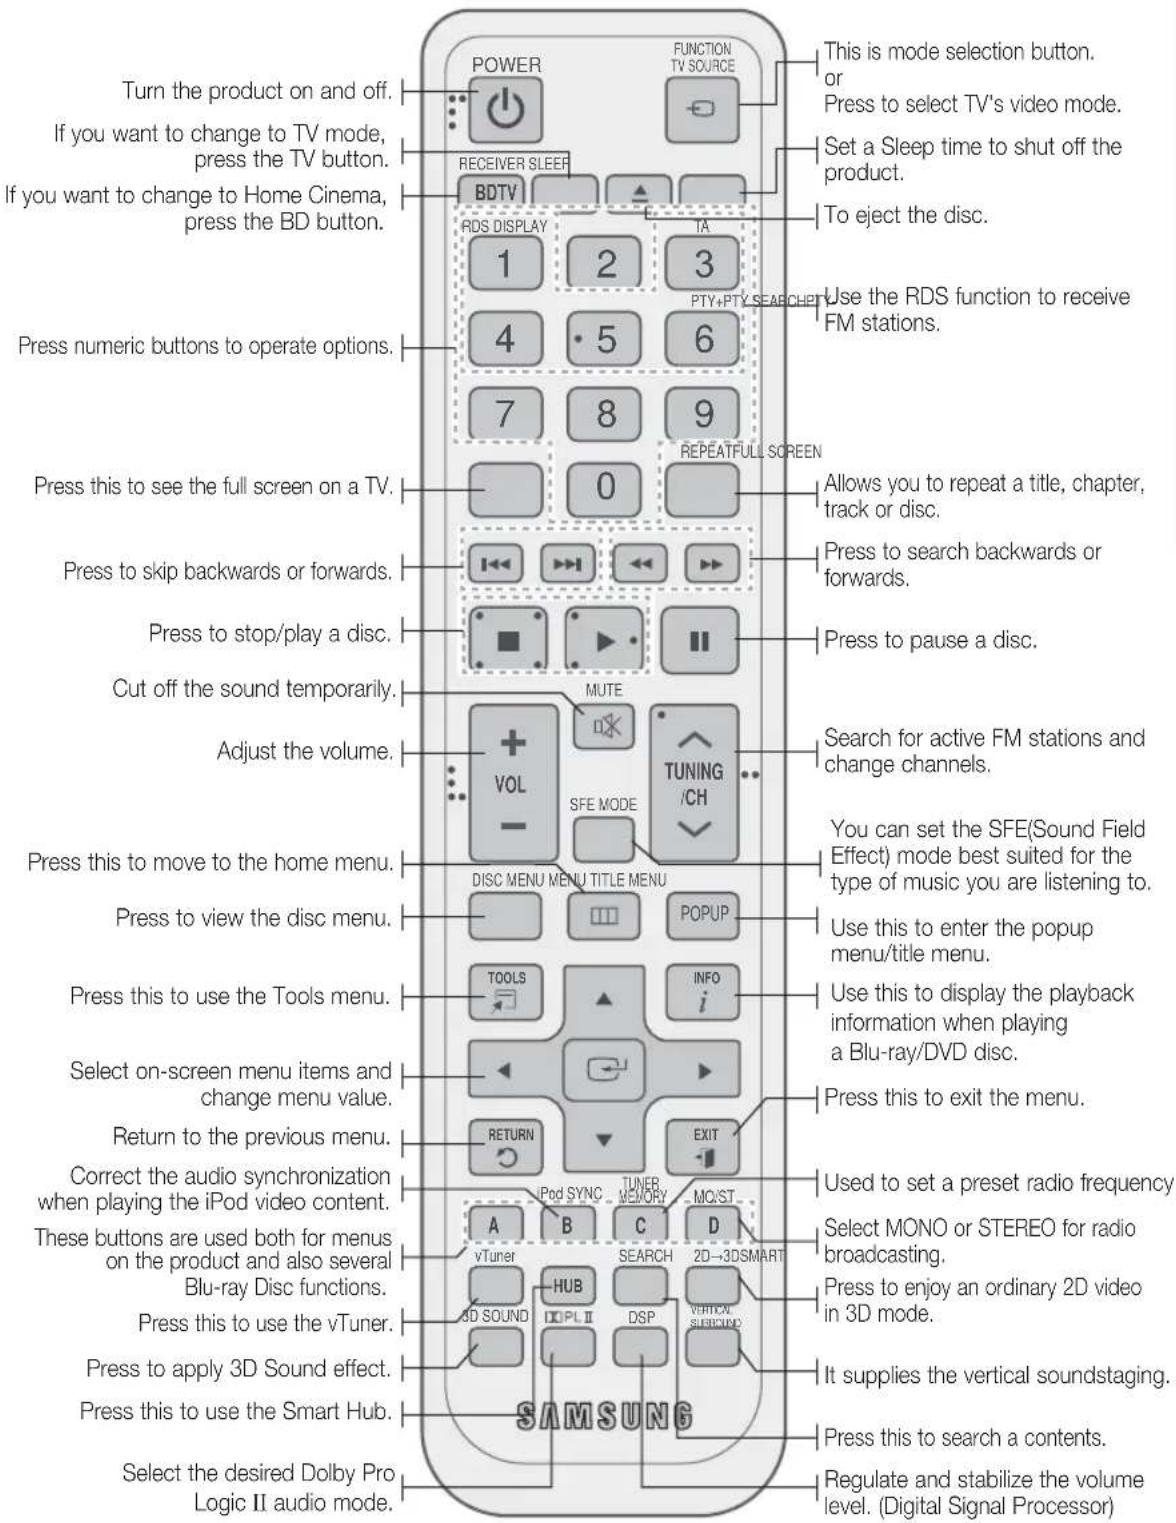
English
Getting Started
Installing batteries in the Remote Control
* Battery size: AAA
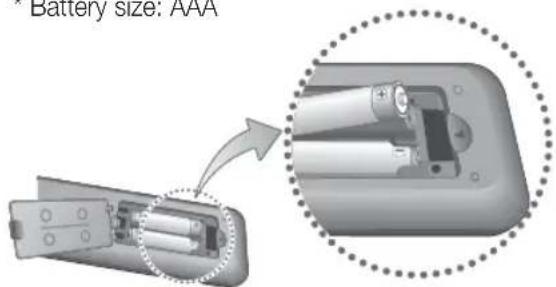

NOTE
■ Make sure to match the “+” and “-” ends of the batteries with the diagram inside the compartment.
■ Assuming typical TV usage, the batteries last for about one year.
■ The remote control can be used up to approximately 7 meters in a straight line.
Setting the Remote Control
You can control certain functions of your TV with this remote control.
When operating a TV with the remote control
- Press the TV button to set the remote control to TV mode.
- Press the POWER button to turn on the TV.
-
While holding down the POWER button, enter the code corresponding to your brand of TV.
-
If there is more than one code listed for your TV in the table, enter one at a time to determine which code works.
• Example : For a Samsung TV
While holding down the POWER button, use the number buttons to enter 00, 15, 16, 17 and 40.
- If the TV turns off, the setting is complete.
- You can use the TV POWER, VOLUME, CHANNEL, and Numeric buttons (0\~9).

NOTE
The remote control may not work on some brands of TV's. Also, some operations may not be possible, depending on your brand of TV.
■ The remote control will work with Samsung TVs by default.
16
English
TV Brand Code List
| Brand Code | Brand Code | ||
| Admiral(M.Wards) | 56, 57, 58 | Mitsubishi/MGA | 18, 40, 59, 60, 75 |
| A Mark | 01, 15 | MTC | 18 |
| Anam | 01, 02, 03, 04, 05,06, 07, 08, 09, 10,11, 12, 13, 14 | NEC | 18, 19, 20, 40, 59, 60 |
| Nikei | 03 | ||
| Onking | 03 | ||
| AOC | 01, 18, 40, 48 | Onwa | 03 |
| Bell &Howell(M.Wards) | 57, 58, 81 | Panasonic | 06, 07, 08, 09, 54,86, 67, 73, 74 |
| Brocsonic | 59, 60 | Penney | 18 |
| Candle | 18 | Philco | 03, 15, 17, 18, 48,54, 59, 62, 69, 90 |
| Cetronic | 03 | Philips | 15, 17, 18, 40,48, 54, 62, 72 |
| Citizen | 03, 18, 25 | ||
| Cinema | 97 | Pioneer | 63, 66, 80, 91 |
| Classic | 03 | Portland | 15, 18, 59 |
| Concerto | 18 | Proton | 40 |
| Contec | 46 | Quasar | 06, 66, 67 |
| Coronado | 15 | RadioShack | 17, 48, 56, 60,61, 75 |
| Craig | 03, 05, 61, 82, 83, 84 | RCA/Proscan | 18, 59, 67, 76, 77,78, 92, 93, 94 |
| Croslex | 62 | ||
| Crown | 03 | Realistic | 03, 19 |
| CurtisMates | 59, 61, 63 | Sampo | 40 |
| CXC | 03 | Samsung | 00, 15, 16, 17, 40,43, 46, 47, 48, 49,59, 60, 98 |
| Daewoo | 02, 03, 04, 15, 16,17, 18, 19, 20, 21,22, 23, 24, 25, 26,27, 28, 29, 30, 32,34, 35, 36, 43, 59, 90 | Sanyo | 19, 61, 65 |
| Scott | 03, 40, 60, 61 | ||
| Daytron | 40 | Sears | 15, 18, 19 |
| Dynasty | 03 | Sharp | 15, 57, 64 |
| Emerson | 03, 15, 40, 46, 58, 61,64, 82, 83, 84, 85 | Signature2000(M.Wards) | 57, 58 |
| Fisher | 19, 65 | Sony | 50, 51, 52, 53, 55 |
| Funai | 03 | Sounddesign | 03, 40 |
| Futuretech | 03 | Spectricon | 01 |
| GeneralElectric (GE) | 06, 40, 56, 59,66, 67, 68 | SSS | 18 |
| Hall Mark | 40 | Sylvania | 18, 40, 48, 54,59, 60, 62 |
| Hitachi | 15, 18, 50, 59, 69 | Symphonic | 61, 95, 96 |
| Inkel | 45 | Tatung | 06 |
| JC Penny | 56, 59, 67, 86 | Techwood | 18 |
| JVC | 70 | Teknika | 03, 15, 18, 25 |
| KTV | 59, 61, 87, 88 | TMK | 18, 40 |
| KEC | 03, 15, 40 | Toshiba | 19, 57, 63, 71 |
| KMC | 15 | Vidtech | 18 |
| LG(Goldstar) | 01, 15, 16, 17, 37, 38,39, 40, 41, 42, 43, 44 | Videch | 59, 60, 69 |
| Luxman | 18 | Wards | 15, 17, 18, 40,48, 54, 60, 64 |
| LXI(Sears) | 19, 54, 56, 59,60, 62, 63, 65, 71 | Yamaha | 18 |
| Magnavox | 15, 17, 18, 48, 54,59, 60, 62, 72, 89 | York | 40 |
| Yupiteru | 03 | ||
| Marantz | 40, 54 | Zenith | 58, 79 |
| Matsui | 54 | Zonda | 01 |
| MGA | 18, 40 | Dongyang | 03, 54 |
Connections
This section involves various methods of connecting the product to other external components. Before moving or installing the product, be sure to turn off the power and disconnect the power cord.
Connecting the Speakers
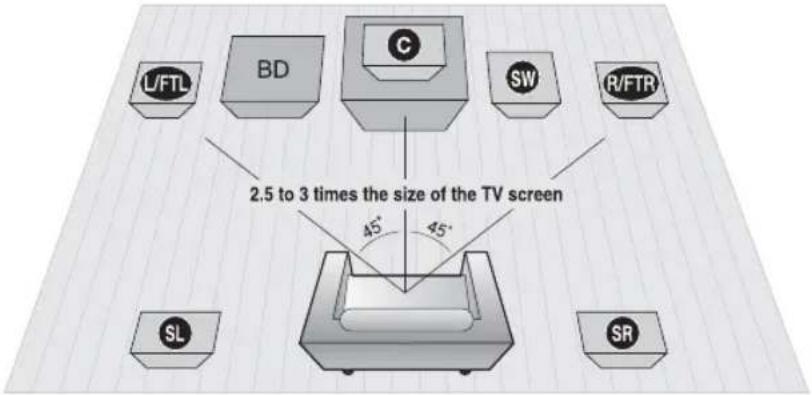
Position of the product
Place it on a stand or cabinet shelf, or under the TV stand.
Selecting the Listening Position
The listening position should be located about 2.5 to 3 times the distance of the TV's screen size away from the TV.
Example: For 32" TV's 2\~2.4m
For 55" TV's 3.5\~4m
| Front/Front Top SpeakersL/FTLR/FTR | Place these speakers in front of your listening position, facing inwards (about 45°) toward you. Place the front speakers so that their tweeters will be at the same height as your ear. Align the front face of the front/front top speakers with the front face of the centre speaker or place them slightly in front of the centre speakers. |
| Centre SpeakerC | It is best to install it at the same height as the front/front top speakers. You can also install it directly over or under the TV. |
| Surround SpeakersSLSR | Place these speakers to the side of your listening position. If there isn't enough room, place these speakers so they face each other. Place them about 60 to 90cm above your ear, facing slightly downward.* Unlike the front/front top and centre speakers, the surround speakers are used to handle mainly sound effects and sound will not come from them all the time. |
| SubwooferSW | The position of the subwoofer is not so critical. Place it anywhere you like. |
Connections
Speaker Components
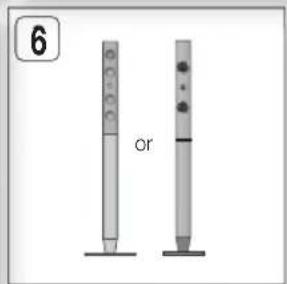
Installing the Speakers on the Tallboy Stand
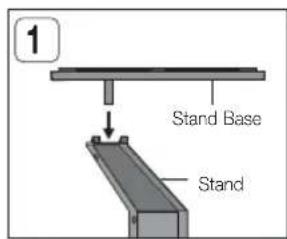
- Turn the Stand Base upside-down and connect it to the Stand.
- Insert small screws (4x20, For connecting Stand & Stand Base) clockwise into the four holes marked using a screwdriver as shown in the illustration.
! CAUTION
- When you use a torque screwdriver, be careful not to put excessive force. Otherwise, it runs idle or can be damaged. (torque screwdriver-below 15 kg.f.cm)
- Insert the large screw (5x15, For connecting Stand & Stand Base) clockwise into the hole on the rear of the stand using a screwdriver.
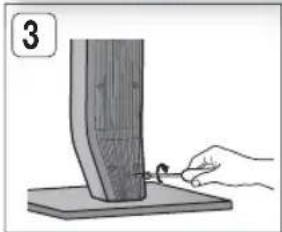
- Connect the upper Speaker to the assembled Stand.
- Insert another large screw (5x15, For connecting Speaker & Stand) clockwise into the hole on the rear of the speaker using a screwdriver.
- This is the appearance after the speaker is installed.
Follow this steps to install other speaker.
natural_image
Illustration of a hand using a tool to press or install a wooden block on a flat surface (no text or symbols visible)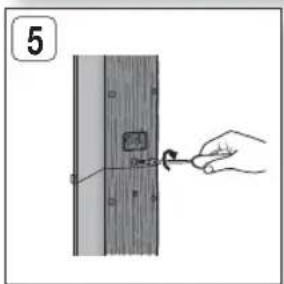
natural_image
Hand holding a tool interacting with a wooden panel or panel (no text or symbols visible)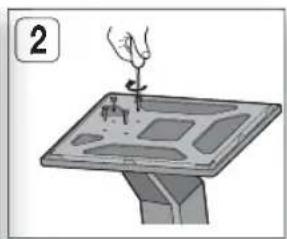
natural_image
Illustration of a hand holding a tool above a tray with internal compartments (no text or symbols)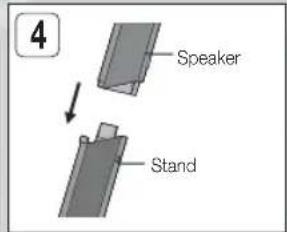
18 English
Connecting The Speakers
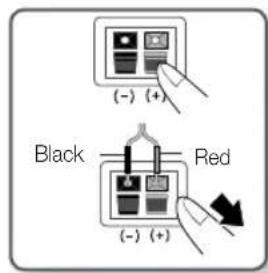
- Press down the terminal tab on the back of the speaker.
- Insert the black wire into the black terminal (−) and the red wire into the red (+) terminal, and then release the tab.
-
Connect the connecting plugs to the back of the product by matching the colors of the speaker plugs to the speaker jacks.
-
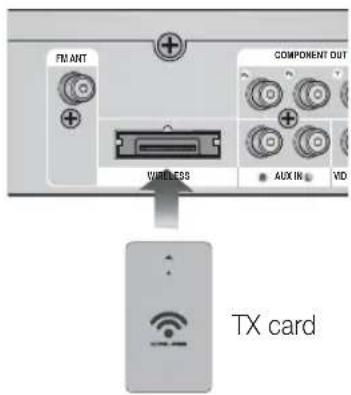
With the product turned off, insert the TX card into the TX Card Connection (WIRELESS) on the back of the product.
-
Hold the TX card so that the label "WIRELESS" faces upward and insert the card into the port.
-
The TX card enables communication between the product and the wireless receiver module.
-
Connect the left and right surround speakers to the wireless receiver module.
-
Plug the power cord of the wireless receiver module into the wall outlet.
-
Turn on the product. The product and wireless receiver module will now communicate with each other and you will hear sound from the Surround speakers.
flowchart
graph TD
    A["Surround Speaker (L)"] --> B["Wireless Receiver Module"]
    C["Surround Speaker (R)"] --> B
    D["Subwoofer"] --> E["Centre Speaker"]
    E --> F["Speaker OUT"]
    F --> G["Speaker Impedance 1"]
    G --> H["Front/Front Top Speaker (L)"]
    G --> I["Front/Front Top Speaker (R)"]
This product should be connected with the SWA-5000 only.
Connections
! CAUTION
- Do not let children play with or near the speakers. They could get hurt if a speaker falls.
- When connecting the speaker wires to the speakers, make sure that the polarity (+/−) is correct.
- Keep the subwoofer speaker out of reach of children so as to prevent children from inserting their hands or alien substances into the duct (hole) of the subwoofer speaker.
- Do not hang the subwoofer on the wall through the duct (hole).
- Do not insert any other card except the TX card dedicated to the product. If a different TX card is used, the product may be damaged or the card may not be removed easily.
- Do not insert the TX card upside down or in the reverse direction.
- Insert the TX card when the product is turned off. Inserting the card when it is turned on may cause a problem.
- The wireless receiving antenna is built into the wireless receiver module. Keep it away from water and moisture.
- For optimal listening performance, make sure that the area around the wireless receiver module location is clear of any obstructions.
If no sound is heard from the wireless surround speakers, switch the mode to Dolby Pro Logic II.
In 2-CH mode, no sound will be heard from the wireless surround speakers.
NOTE
If you place a speaker near your TV set, screen colour may be distorted because of the magnetic field.
- Place the wireless receiver module at the rear of the listening position. If the wireless receiver module is too close to the product, some sound interruption may be heard due to interference.
If you use a device such as a microwave oven, wireless LAN Card or any other device that uses the same frequency (2.4/5.8GHz) near the product, some sound interruption may be heard due to interference.
The transmission distance from the product to the wireless receiver module is about 10m, but may vary depending on your operating environment. If a steel-concrete wall or metallic wall is between the product and the wireless receiver module, the system may not operate at all, because the radio wave cannot penetrate metal.
If the product doesn't make wireless connection, the system needs ID Setting between the product and wireless receiver module. With the main unit turned off, press the remote control's "0"→"1"→"3"→"5" number buttons and then turn on the unit. With the wireless receiver module turned on, press "ID SET" button on the back of the wireless receiver module for 5 seconds. And then power on the product (HT-D6750W).
Attaching the Toroidal Ferrite Core to the Power Cord of the Main Unit
If you attach a Toroidal ferrite core to the power cord of the man unit, it will help to prevent RF interference from radio signals.
- Pull the fixing tab of the Toroidal ferrite core to open it.
- Make a loop twice in the main unit power cord.
- Attach the Toroidal ferrite core to the main unit power cord as the figure shows and press it until it clicks.

20 English
Connecting External Devices/your TV via HDMI
HDMI is the standard digital interface for connecting to devices such as a TV, projector, DVD player, Blu-ray player, set top box, and more.
Because HDMI is all digital, you'll enjoy digital quality video and sound as it was originally created, without the distortions that can be caused when digital content is converted to analogue.
DVD or Blu-ray Player SAT(Satellite/Set top box)
flowchart
graph TD
    A["PC"] --> B["HDMI OUT"]
    C["PC"] --> D["HDMI OUT"]
    B --> E["HDMI IN"]
    D --> E
    E --> F["HDMI OUT"]
    F --> G["TV"]
    style A fill:#f9f,stroke:#333
    style C fill:#f9f,stroke:#333
    style E fill:#ccf,stroke:#333
    style F fill:#cfc,stroke:#333
    style G fill:#fcc,stroke:#333
HDMI OUT : Connecting to a TV with an HDMI Cable (BEST QUALITY)
Connect an HDMI cable (not supplied) from the HDMI OUT jack on the back of the product to the HDMI IN jack on your TV.

NOTE
■ Certain HDMI output resolutions may not work, depending on your TV.
■ After making the video connection, set the Video input source on your TV to match the corresponding Video output (HDMI, Component or Composite) on your product.
See your TV owner's manual for more information on how to select the TV's Video Input source.
If you have set the product's remote control to operate your TV, press the TV SOURCE button on the remote control and select HDMI as the external source of the TV.
- You must have an HDMI connection to enjoy videos with 3D technology.
A long HDMI cable may cause a screen noise. If this is the case, set Deep Colour to Off in the menu.
English
21
Connections
HDMI IN : Connecting to an External Component with an HDMI Cable
- Connect an HDMI cable (not supplied) from the HDMI IN jack on the back of the product to the HDMI OUT jack on your digital device.
- Press the FUNCTION button to select H. IN1 or H. IN2 input.
The mode switches as follows : BD/DVD → D. IN → AUX → R. IPOD → W. IPOD → H. IN1 → H. IN2 → FM
HDMI Auto Detection Function
If you have connected your home cinema by HDMI cable, the home cinema's video output automatically switches to the HDMI mode when you turn it on. For available HDMI video resolutions, see page 31.
- This function is not available if the HDMI cable does not support CEC.
• HDMI connection description - HDMI outputs only a pure digital signal to the TV.
- If your TV does not support HDCP, random noise appears on the screen.
• What is the HDCP?
HDCP (High-band width Digital Content Protection) is a system for preventing BD/DVD content outputted via HDMI from being copied. It provides a secure digital link between a video source (PC, DVD, etc) and a display device (TV, projector, etc). Content is encrypted at the source device to prevent unauthorized copies from being made.
! CAUTION
The Anynet+ function is supported only when an HDMI Cable is connected to the HDMI OUT of the product.
Connecting the FM Antenna
FM Antenna (supplied)
- Connect the FM antenna supplied to the FM ANTENNA Jack.
- Slowly move the antenna wire around until you find a location where reception is good, then fasten it to a wall or other rigid surface.
NOTE
This product does not receive AM broadcasts.
22 English
METHOD 1 : Component Video (BETTER QUALITY)
If your television is equipped with Component Video inputs, connect a Component video cable (not supplied) from the Component Video Output (Pr, Pb and Y) Jacks on the back of the product to the Component Video Input Jacks on your TV.

NOTE
- You can select from a variety of resolution settings such as 1080i, 720p, 576p/480p and 576i/480i, depending on the disc type. (See page 31)
The actual resolution may differ from the setting in the Setup menu if both Component and HDMI cables are connected. The resolution may also be different depending on the disc. (See page 31)
■ After making the video connection, set the Video input source on your TV to match the corresponding Video output (HDMI, Component or Composite) on your product.
See your TV owner's manual for more information on how to select the TV's Video Input source.
If you have set the product's remote control to operate your TV, press the TV SOURCE button on the remote control and select COMPONENT as the external source of the TV.
In DVD playback, if both HDMI and Component jacks are connected and you select the Component 1080p, 1080i, 720p or 576p/480p mode, the Display Setup menu will show the output resolution as 1080p, 1080i, 720p or 576p/480p in the menu. The resolution is actually 576i/480i.
METHOD 2 : Composite Video (GOOD QUALITY)
Connect the supplied Video cable from the VIDEO OUT jack on the back of the product to the VIDEO IN jack on your TV.

NOTE
The VIDEO source is always output in 576i/480i resolution regardless of the resolution set in the Setup menu. (See page 31)
■ After making the video connection, set the Video input source on your TV to match the corresponding Video output (HDMI, Component or Composite) on your product.
See your TV owner's manual for more information on how to select the TV's Video Input source.
If you have set the product's remote control to operate your TV, press the TV SOURCE button on the remote control and select VIDEO as the external source of the TV.
! CAUTION
- Do not connect the unit through a VCR. Video signals fed through VCRs may be affected by copyright protection systems and the picture will be distorted on the television.
English
23
Connections
Connecting Audio from External Components
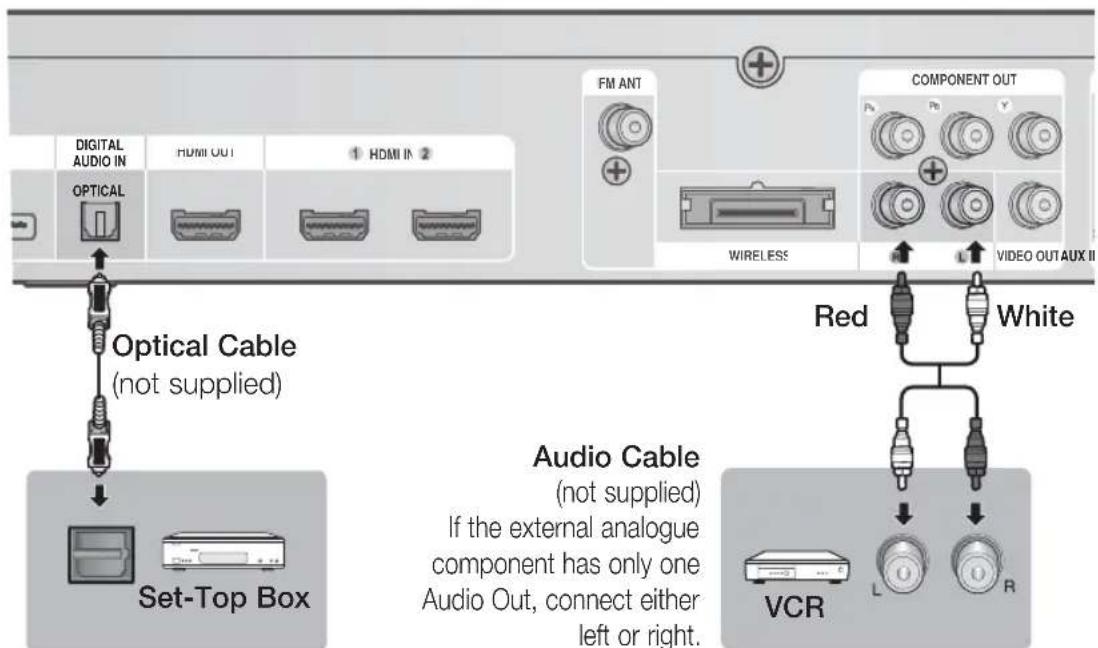
OPTICAL AUX
OPTICAL : Connecting an External Digital Component
Digital signal components such as a Cable Box/Satellite receiver (Set-Top Box).
- Connect the Digital Input (OPTICAL) on the product to the Digital Output of the external digital component.
- Press the FUNCTION button to select D.IN input.
- The mode switches as follows: BD/DVD → D. IN → AUX → R. IPOD → W. IPOD → H. IN1 → H. IN2 → FM

NOTE
To see video from your Cable Box/Satellite receiver, you must connect it's video output to a TV.
This system supports Digital sampling frequencies of 32 kHz of higher from external digital components.
This system supports only DTS and Dolby Digital audio, MPEG audio which is bitstream cannot be supported.
AUX : Connecting an External Analogue Component
Analogue signal components such as a VCR.
- Connect AUX IN (Audio) on the product to the Audio Out of the external analogue component.
- Be sure to match connector colors.
- Press the FUNCTION button to select AUX input.
- The mode switches as follows: BD/DVD → D. IN → AUX → R. IPOD → W. IPOD → H. IN1 → H. IN2 → FM

NOTE
- You can connect the Video Output jack of your VCR to the TV, and connect the Audio Output jacks of the VCR to this product.
24
English
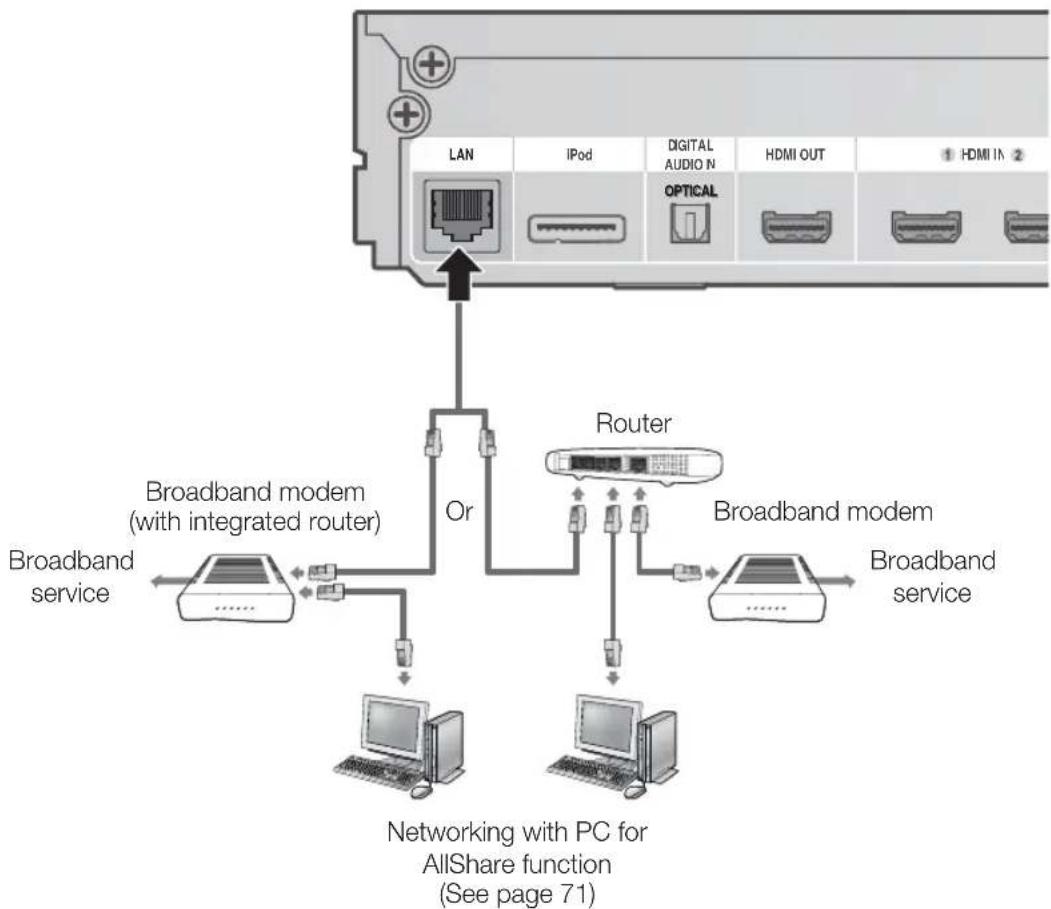
Connecting to the Network
This product enables you to view network based services (See pages 62\~71) such as Smart Hub and BD-LIVE, as well as receive software upgrades when a network connection is made. We recommend using an Wireless router or IP router for the connection.
For more information on router connection, refer to the user manual of the router or contact the router manufacturer for technical assistance.
Cable Network
- Using the Direct LAN Cable (UTP cable), connect the LAN terminal of the product to the LAN terminal of your modem.
- Set the network options. (See page 37)
flowchart
graph TD
    A["LAN"] --> B["Or"]
    C["IPD"] --> B
    D["DIGITAL AUDIO N"] --> B
    E["HDMI OUT"] --> B
    F["1 HDMI IN 2"] --> B
    G["OPTICAL"] --> B
    H["Broadband modem (with integrated router)"] --> I["Broadband service"]
    J["Router"] --> K["Broadband modem"]
    L["Broadband service"] --> M["Broadband modem"]
    N["Networking with PC for AllShare function (See page 71)"] --> O["Computer"]
    P["Computer"] --> Q["Computer"]

NOTE
- Internet access to Samsung's software update server may not be allowed, depending on the router you use or the ISP's policy. For more information, contact your ISP (Internet Service Provider).
For DSL users, please use a router to make a network connection.
For the AllShare function, a PC must be connected in the network as shown in the figure.
English
25
Connections
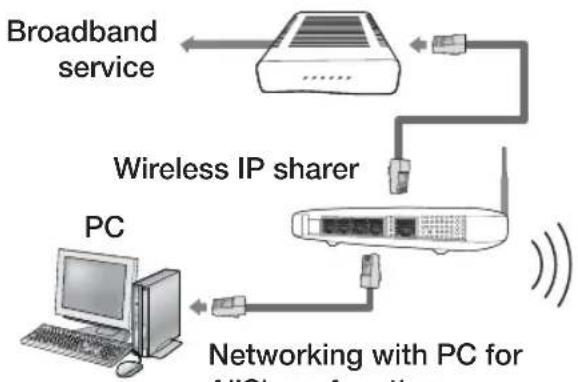
Wireless Network
You can connect to your network with a Wireless IP sharer. A wireless AP/IP router is required to make a wireless network connection. To set the network configuration options, see page 37.
flowchart
graph TD
    A["Broadband service"] --> B["Server"]
    B --> C["Wireless IP sharer"]
    C --> D["PC"]
    D --> E["Networking with PC for Wi-Fi services"]
    style A fill:#f9f,stroke:#333
    style B fill:#ccf,stroke:#333
    style C fill:#cfc,stroke:#333
    style D fill:#fcc,stroke:#333
    style E fill:#cff,stroke:#333

Networking with PC for AllShare function
(See page 71)

NOTE
To use a wireless network, your product must be connected to a wireless IP sharer. If the wireless IP sharer supports DHCP, your product can use a DHCP (dynamic) or static IP address to connect to the wireless network.
This product supports IEEE 802.11b,g and n. We recommend using IEEE 802.11n. When you play video over a IEEE 802.11b or g connection, the video may not play smoothly.
- Select a channel for the wireless IP sharer that is not currently being used. If the channel set for the wireless IP sharer is currently being used by another device nearby, this will result in interference and communication failure.
If you select the Pure High-throughput (Greenfi eld) 802.11n mode and set your AP's Security Encryption type to WEP, TKIP or TKIPAES (WPS2Mixed), your Samsung home cinema will not support the connection in compliance with new Wi-Fi certification specifications.
If your AP supports WPS (Wi-Fi Protected Setup), you can connect to the network via PBC (Push Button Confi guration) or PIN (Personal Identifi cation Number). WPS will automatically confi gure the SSID and WPA key in either mode.
■ Connection Methods : You can setup the wireless network connection 3 ways:
- WPS(PBC)
- Auto Setup (Using the Auto Network Search function)
- Manual Setup
■ Wireless LAN, by its nature, may cause interference, depending on the operating conditions. (AP performance, distance, obstacles, interference by other radio devices, etc).
- Set the wireless IP sharer to Infrastructure mode. Ad-hoc mode is not supported.
- When applying the security key for the AP (wireless IP sharer), only the following security protocols are supported:
1) Authentication Mode: WEP, WPAPSK, WPA2PSK
2) Encryption Type : WEP, AES
To use the AllShare function, you must connect your PC to your network as shown in the figure. The connection can be wired or wireless.
Setup
Initial Settings
- Turn on your TV after connecting the product. When you connect and turn on the product to a TV for the first time, the Initial Settings screen appears.
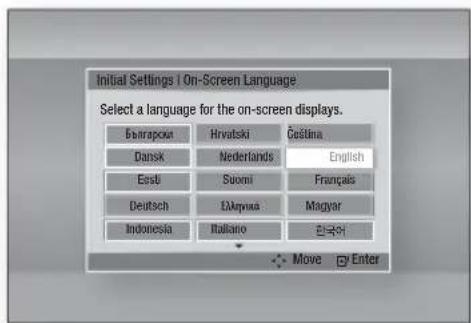
-
Press the ▲▼◀▶ buttons to select the desired language, and then press the ENTER button.
-
Press the ENTER button to select Start.
-
Press the ▲▼ buttons to select the desired TV Aspect Ratio, and then press the ENTER button. (See page 30) Musical Auto Calibration screen will be displayed.
-
Plug the ASC microphone into the ASC IN jack on the product. (See page 34)
-
Press the ENTER button to select Start button. Setting the Musical Auto Calibration function takes about 3 minutes.
-
Press the ▲▼ buttons to select the desired Network Settings: Wired, Wireless (General), WPS(PBC) or One Foot Connection, and then press the ENTER button. If you do not know the details of your Network Settings, press the BLUE (D) button on your remote instead to skip Network Settings here, fi nish the Initial Settings, and go to the Home menu.
If you selected a Network Settings, go to pages 37\~40 for more information about the Network settings. When done, go to Step 8.
- The Home menu appears. (For more information about the Home menu, please see page 28.)
- Home Menu

NOTE
The Home menu will not appear if you do not configure the initial settings except as noted below.
If you press the BLUE (D) button during the Musical Auto Calibration/network setup, you can access the Home menu even if the network setup is not completed yet.
If you want to display the Initial Setting screen again to make changes, select the Reset option. (See page 41)
If you use an HDMI cable to connect the product to an Anynet+(HDMI-CEC)-compliant Samsung TV and 1.) You have set the Anynet+(HDMI-CEC) feature to On in both the TV and the product and 2.) You have set the TV to a language supported by the product, the product will select that language as the preferred language automatically.
If you leave the product in the stop mode for more than 5 minutes without using it, a screen saver will appear on your TV. If the product is left in the screen saver mode for more than 20 minutes, the power will automatically turn off.
Setup
Accessing the Settings Menu

| 1 | MENU Button : Press to move to the Home menu. |
| 2 | RETURN Button : Return to the previous menu. |
| 3 | ENTER / DIRECTION Button :Move the cursor or select an item.Activate the currently selected item.Confi rm a setting. |
| 4 | EXIT Button : Press to exit the current menu. |
To access the Settings menu and sub-menus, follow these steps:
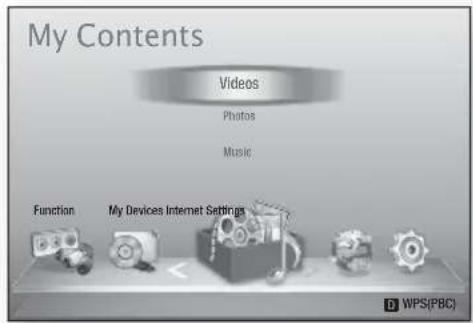
- Press the POWER button. The Home Menu appears.
- Home Menu
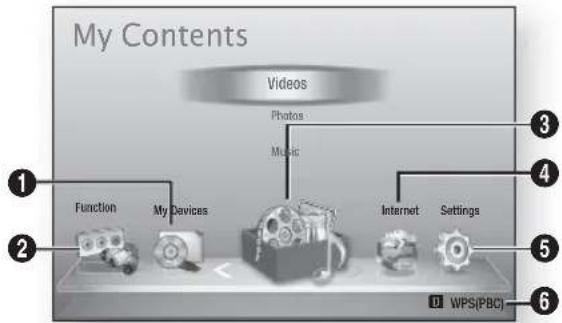
| 1 | Selects My Devices. |
| 2 | Selects Function. |
| 3 | Selects My Contents. |
| 4 | Selects Internet. |
| 5 | Selects Settings. |
| 6 | Displays the buttons available. |
28 English
- Press the ◀▶ buttons to select Settings, and then press the ENTER button.
- Press the ▲▼ buttons to select the desired submenu, and then press the ENTER button.
- Press the ▲▼ buttons to select the desired item, and then press the ENTER button.
- Press the EXIT button to exit the menu.
NOTE
- When the product is connected to a network, select Internet from the Home menu. Download the desired content from Samsung Apps. (See pages 69\~71)
The access steps may differ depending on the menu you selected.
The OSD (On Screen Display) may change in this product after you upgrade the software version.
Display
You can configure various display options such as the TV Aspect Ratio, Resolution, etc.
3D Settings
Select whether to play a Blu-ray Disc with 3D contents in 3D Mode.
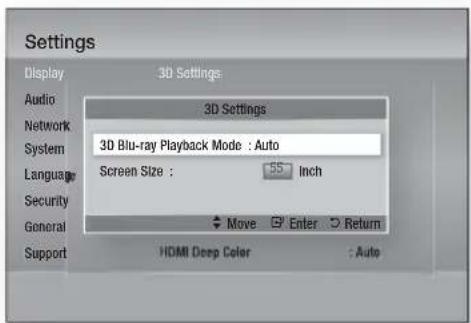
3D Blu-ray Playback Mode
3D Blu-ray Discs are available in two formats: Blu-ray 3D and 3D only. You can choose to watch a Blu-ray 3D disc in 3D or 2D mode before playing the disc.
- Auto : Automatically detect if a connected TV has 3D capability and play a Blu-ray 3D disc in 3D or 2D accordingly or a 3D only disc in 3D if the TV supports 3D.3D only discs will not be played if your TV does not support 3D.
- 3D → 3D : Play 3D only and Blu-ray 3D discs in 3D mode at all times.
- 3D → 2D : Play Blu-ray 3D discs in 2D mode at all times. 3D only discs will not be played.

NOTE
- To stop a movie during 3D playback, press the STOP(■) button once. The movie stops and the 3D mode option is de-activated. To change a 3D option selection when you are playing a 3D movie, press the STOP(■) button once. The Blu-ray menu appears. Press the STOP(■) button again, then select 3D Settings in the Blu-ray menu.
■ Depending on the content and the position of the picture on your TV screen, you may see vertical black bars on the left side, right side, or both sides.
Screen Size
Lets you enter the actual screen size of your TV so that the product can adjust the image according to the screen size and display an optimal 3D image. (The maximum allowed screen size is 116 inches for this product.)
! CAUTION
If you want to enjoy 3D content, connect a 3D device (3D compliant AV receiver or TV) to the product's HDMI OUT port using a high-speed HDMI cable. Put on 3D glasses before playing the 3D content.
The product outputs 3D signals only through HDMI cable connected to the HDMI OUT port.
As the video resolution in 3D play mode is fixed according to the resolution of the original 3D video, you can not change the resolution to your preference.
■ Some functions such as BD Wise, screen size adjustment, and resolution adjustment may not operate properly in 3D play mode.
- Stay at least three times the width of the screen from the TV when watching 3D images. For example, if you have a 46 inch screen, stay 138 inches (3.5 meters) from the screen.
- Place the 3D video screen at eye level for the best 3D picture.
- When the product is connected to some 3D devices, the 3D effect may not function properly.
Setup
TV Aspect
Depending on the type of television you have, you may want to adjust the screen size setting.
- 16:9 Original : Select when you connect the product to a 16:9 TV screen. The product will display all content in its original aspect ratio. Content formatted in 4:3 will be displayed with black bars on the left and right.
- 16:9 Full : Select when you connect the product to a 16:9 TV screen. All content will fill the full screen. Content formatted in 4:3 will be stretched.
- 4:3 Letter Box : Select when you connect the product to a 4:3 TV screen. The product will display all content in its original aspect ratio. Content formatted in 16:9 will be displayed with black bars on the top and bottom.
- 4:3 Pan-Scan : Select when you connect the product to a 4:3 TV screen. 16:9 content will have the extreme left and right portions cut off.

NOTE
■ Depending on the disc type, some aspect ratios may not be available.
If you select an aspect ratio and option which is different than the aspect ratio of your TV screen, then the picture might appear to be distorted.
If you select the 16:9 Original, your TV may display 4:3 Pillarbox (black bars on sides of picture).
Smart Hub Screen Size
Set the Smart Hub Screen to the optimal size.
- Size 1 : Smart Hub screen size will be smaller than default. You may see some black on sides of screen.
- Size 2: This is the default setting for Smart Hub. The product displays the normal Smart Hub screen size.
- Size 3: This will display a larger Smart Hub screen size. The image may be too large for your TV screen.
BD Wise (Samsung Products only)
BD Wise is Samsung's latest inter-connectivity feature.
When you connect a Samsung product and a Samsung TV with BD Wise to each other via HDMI, and BD Wise is on in both the product and TV, the product outputs video at the video resolution and frame rate of the BD/DVD disc.
- Off : The output resolution stays fixed at the resolution you set previously in the Resolution menu, regardless of the resolution of the disc. See Resolution below.
- On: The product outputs video at the original resolution and frame rate of the BD/DVD disc.

NOTE
- When BD Wise is on, the Resolution setting automatically defaults to BD Wise and BD Wise appears in the Resolution menu.
If the product is connected to a device that does not support BD Wise, you can not use the BD Wise function. - For proper operation of BD Wise, set the BD Wise menu of both the product and the TV to On.
Resolution
Lets you set the output resolution of the Component and HDMI video signal to Auto, 1080p, 1080i, 720p, 576p/480p, or 576i/480i. The number indicates the number of lines of video per frame. The i and p indicate interlaced and progressive scan, respectively. The more lines, the higher the quality.
- Auto : Automatically sets the output resolution to the connected TV's maximum resolution.
- BD Wise : Automatically sets the resolution to the resolution of the BD/DVD disc if you have connected the product via HDMI to a TV with the BD Wise feature. (The BD Wise menu item appears only if BD Wise is set to On. See BD Wise above.)
- 1080p : Outputs 1080 lines of progressive video. (HDMI only)
• 1080i : Outputs 1080 lines of interlaced video. - 720p : Outputs 720 lines of progressive video.
- 576p/480p : Outputs 576/480 lines of progressive video.
- 576i/480i : Outputs 576/480 lines of interlaced video. (VIDEO only)
Resolution according to the output mode
- Blu-ray Disc/E-contents/Digital Contents playback
| Output Setup | HDMI / connected HDMI / not connected | |||||
| HDMI Mode | Component/VIDEO Mode | Component Mode | VIDEO Mode | |||
| Blu-ray Disc | E-contents/Digital contents | Blu-ray Disc | E-contents/Digital contents | |||
| BD Wise | Resolution of Blu-ray Disc | 1080p@60F 576i/480i --- | ||||
| Auto | Max.Resolution of TV input | Max.Resolution of TV input | 576i/480i --- | |||
| 1080p@60F 1080p@60F 1080p@60F 576i/480i --- | ||||||
| Movie Frame : Auto (24Fs) | 1080p@24F 1080p@24F 576i/480i --- | |||||
| 1080i 1080i | 1080i 576i/480i 576i/480i 1080i 576i/480i | |||||
| 720p 720p | 720p 576i/480i 576i/480i 720p 576i/480i | |||||
| 576p/480p 576p/480p 576p/480p 576i/480i | ||||||
| 576i/480i | --- 576i/480i 576i/480i 576i/480i | |||||
- DVD playback
| Setup\Output | HDMI / connected | HDMI / not connected | ||
| HDMI Mode | Component/VIDEO Mode | Component Mode | VIDEO Mode | |
| BD Wise | 576i/480i | 576i/480i | - | - |
| Auto | Max. Resolution of TV input | 576i/480i | - | - |
| 1080p@60F | 1080p@60F 576i/480i | |||
| 1080i | 1080i | 576i/480i | 576p/480p | 576i/480i |
| 720p | 720p | 576i/480i | 576p/480p 576i/480i | |
| 576p/480p | 576p/480p | 576i/480i | 576p/480p | 576i/480i |
| 576i/480i | - | - | 576i/480i | 576i/480i |
Setup

NOTE
If the TV you connected to the product does not support Movie Frame or the resolution you selected, the message "If no pictures are shown after the selection, please wait for 15 seconds. And then, the resolution will be reverted to the previous value automatically. Would you like to make a selection?" appears. If you select Yes, the TV's screen will go blank for 15 seconds, and then the resolution will revert to the previous resolution automatically.
If the screen stays blank after you have changed the resolution, remove all discs, and then press and hold the STOP (■) button on the front of the product for more than 5 seconds. All settings are restored to the factory default. Follow the steps on the previous page to access each mode and select the Display Setup that your TV will support.
- When the factory default settings are restored, all stored user BD data is deleted.
■ The Blu-ray Disc must have the 24 frame feature for the product to use the Movie Frame (24Fs) mode.
If both HDMI and Component jacks are connected and you are currently viewing Component output, the resolution is fixed to 576i/480i.
HDMI Color Format
Lets you set the colour space format for HDMI output to match the capabilities of the connected device (TV, monitor, etc).
- Auto : Automatically sets the product to the optimum format supported by your device.
- YCbCr (4:4:4) : If your TV supports the YCbCr colour space via HDMI, select this to output the normal YCbCr colour gamut.
- RGB (Standard) : Select this to output the normal RGB colour gamut.
- RGB (Enhanced) : If you have connected the product to a DVI display device such as a monitor, select this to output the enhanced RGB colour gamut.
Movie Frame (24 Fs)
Setting the Movie Frame (24Fs) feature to Auto allows you to adjust the product's HDMI output to 24 frames per second for improved picture quality. You can enjoy the Movie Frame (24Fs) feature only on a TV supporting this frame rate. You can select Movie Frame only when the product is in the HDMI 1080i or 1080p output resolution modes.
• Auto : Movie Frame (24Fs) functions work.
- Off : Movie Frame (24Fs) functions are off.
HDMI Deep Color
Lets you output video from the HDMI OUT jack with Deep Colour. Deep Colour provides more accurate colour reproduction with greater colour depth.
- Auto: The product outputs video with Deep Colour to a connected TV which supports HDMI Deep Colour.
- Off: The picture is output without Deep Colour.
Still Mode
Lets you set the type of picture the product displays when you pause DVD playback.
- Auto: Automatically shows the best still picture depending on the content.
- Frame : Select when pausing a scene with a little action.
- Field : Select when pausing a scene with a lot of action.
Progressive Mode
Lets you improve picture quality when viewing DVDs.
- Auto : Select to have the product automatically select the best picture quality for the DVD you're watching.
• Video : Select for the best picture quality from concert or TV show DVDs.
32
English
Audio
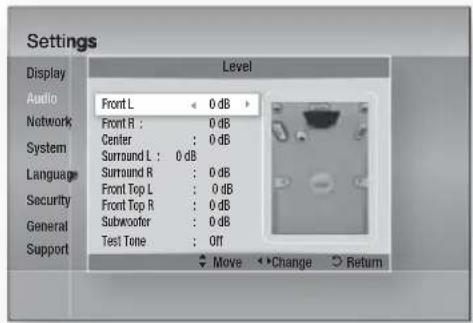
Speaker Settings
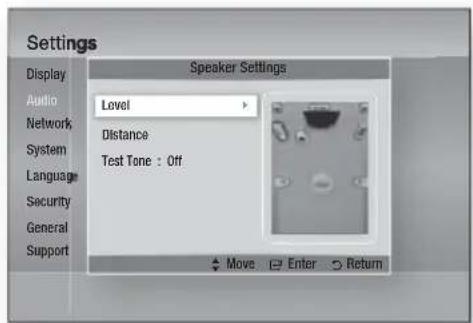
Level
You can adjust the balance and level for each speaker.
Adjusting Front/Centre/Surround/Front Top/Subwoofer Speaker Level
- The volume level can be adjusted in steps from +6dB to -6dB.
- The sound gets louder as you move closer to +6dB and quieter as you get closer to -6dB.
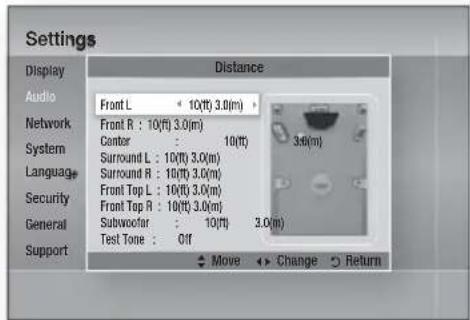
Distance
If the speakers cannot be placed at equal distances from the listening position, you can adjust the delay time of the audio signals from the front, front top, centre, surround and subwoofer speakers.
- You can set the Speaker Distance between 1ft(0.3m) and 30ft(9.2m).
Test Tone
Use the Test Tone feature to check the speaker connections.
Press the ◀, ▶ buttons to select ON.
- A test tone will be sent to Front L → Center → Front R → Surround R → Front Top R → Front Top L → Surround L → Subwoofer in order so you can make sure the speakers are set up correctly.
To stop the test tone, press the ◀, ▶ buttons to select Off.
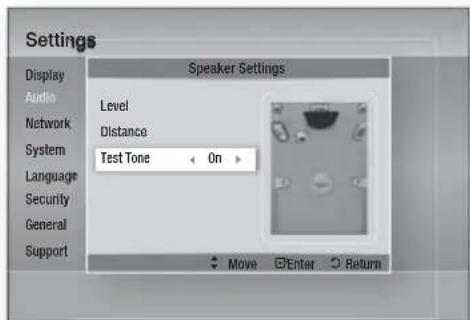
NOTE
- When HDMI Audio is ON (audio is produced through TV speakers), the Test Tone function is not available.
English
33
Setup
Musical Auto Calibration
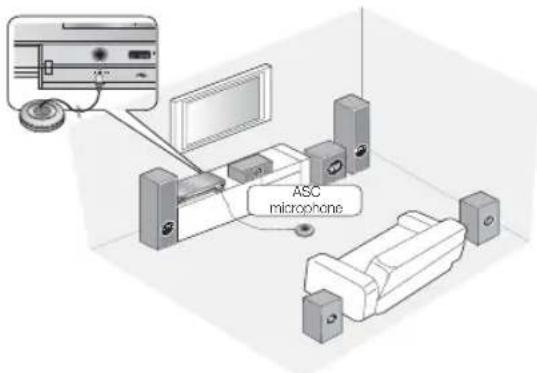
By setting the Musical Auto Calibration (MAC) function just once when you relocate or install the product, you can have the product automatically recognize the distance between speakers, levels between channels, and frequency characteristics to create a 7.1-channel sound fi eld optimized for your environment.
Musical Auto Calibration Mode
You will hear either the Musical Auto Calibration mode or the User Speaker Settings.
- Off: You will hear sound in the the Speaker Setting value.
- On: You will hear sound in the Musical Auto Calibration mode.
Measurement
- Plug the ASC microphone into the ASC IN jack.
- Place the ASC microphone at the listening position.
- Musical Auto Calibration will be automatically set up in the following sequence:
Front L → Center → Front R → Surround R → Front Top R → Front Top L → Surround L → Subwoofer
- Press the RETURN button to cancel the Musical Auto Calibration Setting.

NOTE
- Setting the Musical Auto Calibration function takes about 3 minutes.
- The Musical Auto Calibration setup can be made when there is no disc in the product.
If the ASC microphone is disconnected during the Musical Auto Calibration setup, the setup will be cancelled.
■ When the Musical Auto Calibration function is activated, the DSP, Dolby Pro Logic II and SFE Mode will not work.
If the product is connected to external devices or other components (such as an iPod, AUX, D.IN), the Musical Auto Calibration Setup may not work properly.
■ Noise may result in wrong measurement. So please proceed with the measurement in a quiet room to obtain proper calibration. - Place the microphone on the main listening position.
■ Nothing should get in the way between speakers and microphone.
Note that the test tone of the speaker may be loud when conducting the test. - Do not place the microphone behind the furniture or too close to the wall. Otherwise, it can produce an incorrect test result.
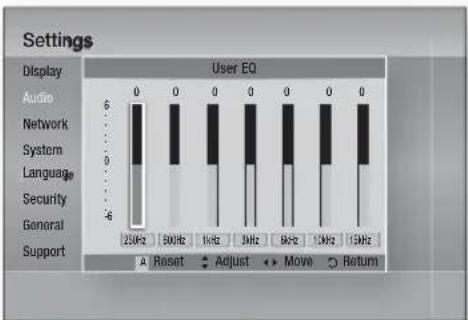
User EQ
You can configure the equalizer settings manually to your preference.
bar
Settings | Display | Audio | Network | System | Language | Security | General | Support | | :--- | :--- | :--- | :--- | :--- | :--- | :--- | :--- | | 20Hz | 0 | 0 | 0 | 0 | 0 | 0 | 0 | | 30Hz | 0 | 0 | 0 | 0 | 0 | 0 | 0 | | 4Hz | 0 | 0 | 0 | 0 | 0 | 0 | 0 | | 8Hz | 0 | 0 | 0 | 0 | 0 | 0 | 0 | | 1MHz | 0 | 0 | 0 | 0 | 0 | 0 | 0 | | 15Hz | 0 | 0 | 0 | 0 | 0 | 0 | 0 | The chart displays a stacked bar chart representing User EQ values for each category. The legend indicates four states: Reset (A), Adjust (◆), Move (◀), and Return (○). All bars are labeled with the corresponding frequency band in Hz.HDMI Audio
The audio signals transmitted over the HDMI Cable can be toggled On/Off.
- Off: Video is transmitted over the HDMI connection cable only, and audio is output through your product speakers only.
- On: Both video and audio signals are transmitted over the HDMI connection cable, and audio is output through your TV speakers only.

NOTE
■ HDMI Audio is automatically down-mixed to 2ch for TV speakers.
Audio Return Channel
You can enjoy TV sound from the Home Cinema speakers by using just one HDMI cable.
- Auto : Listen to TV sound from the Home Cinema speakers if your TV is compatible with the Audio Return Channel function.
- Off : Turn the Audio Return Channel function off.

NOTE
- When Anynet+(HDMI-CEC) is Off, the Audio Return Channel function is not available.
■ Using an ARC (Audio Return Channel)-uncertifi ed HDMI cable may cause a problem in compatibility. - ARC function is only available if an ARC-compliant TV is connected.
Digital Output
You set the Digital Output to match the capabilities of the AV receiver you've connected to the product :
- PCM : Choose if you have connected an HDMI supported AV receiver.
- Bitstream (Unprocessed) : Select if you have connected an HDMI supported AV receiver with Dolby TrueHD and DTS-HD Master Audio decoding capabilities.
- Bitstream (Re-encoded DTS): Choose if you have connected an AV receiver using a Digital Optical input that can decode DTS.
- Bitstream (Re-encoded Dolby D) : Select if you don't have an HDMI supported AV receiver, but have an AV receiver with Dolby Digital decoding capabilities.
For more details, please refer to the digital output selection table. (See page 36)
Blu-ray Discs may include three audio streams :
- Main Feature Audio : The audio soundtrack of the main feature.
- BONUSVIEW audio : An additional soundtrack such as the director or actor's commentary.
- Navigation Sound Effects : When you choose some menu navigation, Navigation Sound Effects may sound. Navigation Sound Effects are different on each Blu-ray Disc.

NOTE
It can be activated when HDMI Audio is ON.
- Be sure to select the correct Digital Output or you will hear no sound or just loud noise.
If the HDMI device (AV receiver, TV) is not compatible with compressed formats (Dolby digital, DTS), the audio signal outputs as PCM.
■ Regular DVDs do not have BONUSVIEW audio and Navigation Sound Effects.
■ Some Blu-ray Discs do not have BONUSVIEW audio and Navigation Sound Effects.
This Digital Output setup does not effect the analogue (L/R) audio or HDMI audio output to your TV.
It effects the optical and HDMI audio output when your product is connected to an AV receiver.
If you play MPEG audio soundtracks, the audio signal outputs as PCM regardless of your Digital Output selections (PCM or Bitstream).
Setup
Digital Output Selection
| Setup PCM | Bitstream (Unprocessed) | Bitstream (Re-encoded DTS) | Bitstream (Re-encoded Dolby D) | ||
| Connection | HDMI supported AV receiver | HDMI supported AV receiver | HDMI supported AV receiver | HDMI supported AV receiver | |
| Audio Stream on Blu-ray Disc | PCM Up to 7.1ch PCM DTS re-encoded | Re-encoded Dolby Digital * | |||
| Dolby Digital Up to 7.1ch Dolby Digital | DTS re-encoded | Re-encoded Dolby Digital * | |||
| Dolby Digital Plus Up to 7.1ch Dolby Digital Plus DTS re-encoded | Re-encoded Dolby Digital * | ||||
| Dolby TrueHD Up to 7.1ch Dolby True HD DTS re-encoded | Re-encoded Dolby Digital * | ||||
| DTS Up to 6.1ch DTS DTS re-encoded | Re-encoded Dolby Digital * | ||||
| DTS-HD HRA Up to 7.1ch DTS-HD HRA DTS re-encoded | Re-encoded Dolby Digital * | ||||
| DTS-HD MA | Up to 7.1ch | DTS-HD MA DTS re-encoded | Re-encoded Dolby Digital * | ||
| Audio Stream on DVD | PCM | PCM 2ch | PCM 2ch | PCM 2ch PCM | 2ch |
| Dolby Digital | Up to 5.1ch | Dolby Digital | Dolby Digital | Dolby Digital | |
| DTS Up to 6.1ch DTS | DTS | DTS | DTS | ||
| Definition for Blu-ray Disc | Any | Decodes the main feature audio and BONUSVIEW audio stream together into PCM audio and adds Navigation Sound Effects. | Outputs only the main feature audio stream so that your AV receiver can decode the audio bitstream. You will not hear BONUSVIEW audio or Navigation Sound Effects. | Decodes the main feature audio and BONUSVIEW audio stream together into PCM audio and adds Navigation Sound Effects, then re-encodes the PCM audio into DTS bitstream. | Decodes the main feature audio and BONUSVIEW audio stream together into PCM audio and adds Navigation Sound Effects, then re-encodes the PCM audio into Dolby digital bitstream or PCM. |
* If the Source Stream is 2ch, "Re-encoded Dolby D" Setting are not applied. Output will be LPCM 2ch.
Dynamic Range Control
You can listen at low volumes, but still hear dialog clearly. This is only active if your product detects a Dolby Digital signal.
- Auto : The Dynamic Range Control will be set automatically based on the information provided by the Dolby TrueHD Soundtrack.
- Off: You can enjoy the movie with the standard Dynamic Range.
- On: When Movie soundtracks are played at low volume or through smaller speakers, the system can apply appropriate compression to make low-level content more intelligible and prevent dramatic passages from getting too loud.
Audio Sync
Video may look slower than the audio when the product is connected to a digital TV. If this occurs, adjust the audio delay time to match the video.
- You can set the audio delay time between 0 msec and 300 msec. Set it to the optimal status.
Network
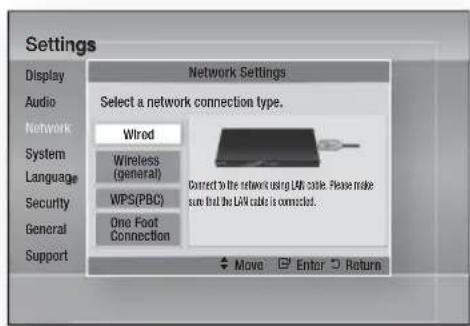
Before you begin, contact your ISP to find out if your IP address is static or dynamic. If it is dynamic, and you are using a wired or wireless connection, we recommend using the Auto procedures. If you are using a wireless connection and your router has the capability, you can use WPS(PBC) or One Foot Connection. If your IP address is static, you must use the manual set up procedure for both wired and wireless connections.
Network Settings
To begin setting up the network connection for your product, follow these steps:
- In the Home menu, press the ◀▶ buttons to select Settings, and then press the ENTER button.
- Press the ▲▼ buttons to select Network, and then press the ENTER button.
- Press the ▲▼ buttons to select Network Settings, and then press the ENTER button.
- Press the ▲▼ buttons to select Wired, Wireless (General), WPS(PBC) or One Foot Connection, and then press the ENTER button.
- If you have a wired network, go to Wired Network below. If you have a wireless network, go to Wireless Network on pages 38\~40.
Wired Network
Setting Up a Wired Connection - Auto
- Press the ▲▼ buttons to select Wired.
- Press the ENTER button. The Network Status screen appears. The product connects to the network after the network connection is verified.
Setting Up a Wired Connection - Manual
If you have a static IP address or the Auto Setting does not work, you'll need to set the Network Settings values manually.
To view your Network Settings values on most Windows computers, follow these steps:
- Right click the Network icon on the bottom right of the Windows desktop.
- In the pop-up menu, click Status.
- On the dialog that appears, click the Support tab.
- On the Support tab, click the Details button. The Network settings are displayed.
Setup
To enter the Network settings into your product, follow these steps:
-
Press the ▲▼ buttons to select Wired, and then press the ENTER button.
-
Press the ◀▶ buttons to select IP Settings, and then press the ENTER button.
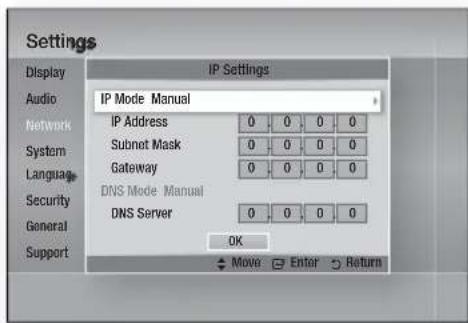
-
Press the ENTER button to select IP Mode.
-
Press the ▲▼ buttons to select Manual, and then press the ENTER button.
-
Press the ▼ button to go to the first entry field (IP Address).
-
Use the number buttons on your remote to enter numbers.
-
When done with each fi eld, press the ▶ button to move successively to the next fi eld. You can also use the other arrow buttons to move up, down, and back.
-
Enter the IP Address, Subnet Mask, and Gateway values.
-
Press the ▼ button to go to DNS Mode.
-
Press the ▼ button to go to the first DNS entry field. Enter the numbers as above.
-
Press the ENTER button to select OK. The Network Status screen appears. The product connects to the network after the network connection is verified.
Wireless Network
You can setup a wireless network three ways:
- Wireless (General)
• Using WPS(PBC).
• One Foot Connection
Wireless (General) includes both Automatic and Manual setup procedures.
Setting Up the Wireless Network Connection - Auto
Most wireless networks have an optional security system that requires devices that access the network to transmit an encrypted security code called an Access or Security Key. The Security Key is based on a Pass Phrase, typically a word or a series of letters and numbers of a specified length you were asked to enter when you set up security for your wireless network. If you use this method of setting up the network connection, and have a Security Key for your wireless network, you will have to enter the Pass Phrase during the Auto setup process.
- Press the ▲▼ buttons to select Wireless (General).
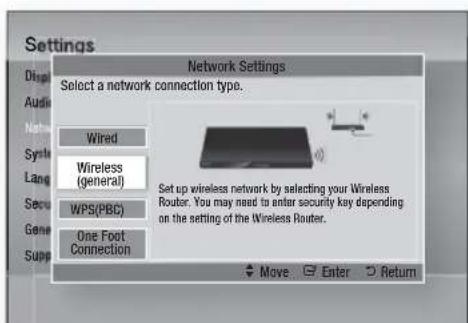
-
Press the ENTER button. When done, it displays a list of the available networks.
-
Press the ▲▼ buttons to select the desired network, and then press the ENTER button. The Security screen appears.
-
On the Security screen, enter your network's Pass Phrase. Enter numbers directly using your remote control.
To select a letter, press the ▲▼◀▶ buttons to move the cursor, then press the ENTER button.
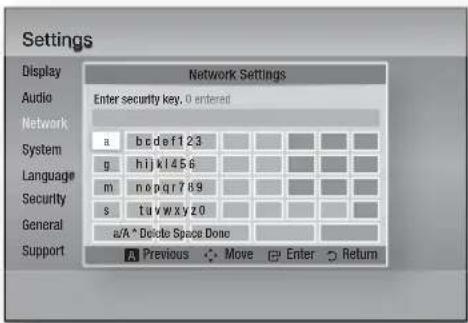

NOTE
- You should be able to find the Pass Phrase on one of the set up screens you used to set up your router or modem.
- When done, press the ▲▼◀▶ buttons to move the cursor to Done, and then press the ENTER button.
The Network Status screen appears. The product connects to the network after the network connection is verified.
Setting Up the Wireless Network Connection - Manual
If the Auto Setting does not work, you need to enter the Network settings values manually.
To view the Network Settings values on most Windows computers, follow these steps:
-
Right click the Network icon on the bottom right of the screen.
-
In the pop-up menu, click Status.
-
On the dialog that appears, click the Support tab.
-
On the Support tab, click the Details button. The Network settings are displayed.
To enter the Network settings into your product, follow these steps:
-
Follow Steps 1 through 5 in the 'Setting Up the Wireless Network Connection - Auto' procedure.
-
When done, press the ▲▼◀▶ buttons to move the cursor to Done, and then press the ENTER button. The Network Status screen appears.
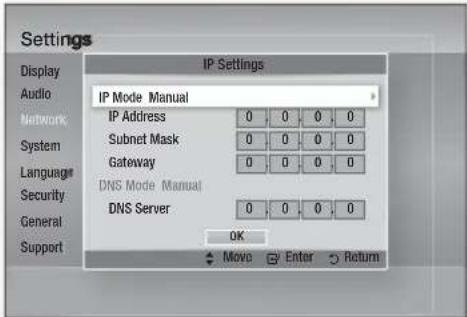
-
On the Network Status screen, select Cancel, and then press Enter.
-
Press the ◀▶ buttons to select IP Settings, and then press the ENTER button.
-
Press the ENTER button to select IP Mode.
-
Press the ▲▼ buttons to select Manual, and then press the ENTER button.
-
Press the ▼ button to go to the first entry field (IP Address).
-
Use the number buttons to enter numbers.
-
When done with each fi eld, press the ▶ button to move successively to the next fi eld. You can also use the other arrow buttons to move up, down, and back.
-
Enter the IP Address, Subnet Mask, and Gateway values.
-
Press the ▼ to go to DNS Mode.
-
Press the ▼ button to go to the fi rst DNS entry fi eld. Enter the numbers as above.
-
The Network Status screen appears. The product connects to the network after the network connection is verified.
Setup
WPS(PBC)
The easiest way to set up the wireless network connection is using the WPS(PBC) function or the One Foot Connection function.
If your wireless router has a WPS(PBC) button, follow these steps:
- Press the ▲▼ buttons to select WPS(PBC).
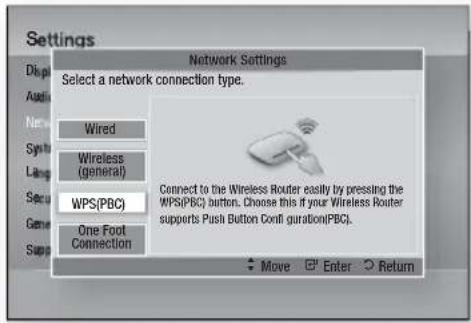
- Press the ENTER button.
- Press the WPS(PBC) button on your router within two minutes. Your product displays the Network Selection Screen, and automatically acquires all the network settings values it needs and connects to your network. When it is done, it displays an OK button. Press the ENTER button on your remote.
One Foot Connection
You can set up the wireless connection automatically if you have a Samsung Wireless Router which supports One Foot Connection. To connect using the One Foot Connection function, follow these steps:
- Press the ▲▼ buttons to select One Foot Connection.
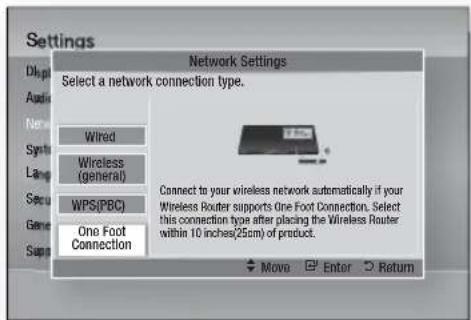
40 English
- Press the ENTER button.
- Place the Samsung Wireless Router within 25 cm (10 inches) of your product to connect.
- Wait until the connection is automatically established.
Network Status
Check whether a connection to the network and the Internet have been established.
BD-LIVE Internet Connection
Set to allow or prohibit an Internet connection when you use the BD-LIVE service.
- Allow (All) : The Internet connection is allowed for all BD-LIVE contents.
- Allow (Valid Only) : The Internet connection is allowed only for BD-LIVE contents containing a valid certifi cate.
- Prohibit: No Internet connection is allowed for any BD-LIVE content.
NOTE
■ What is a valid certifi cate?
When the product uses BD-LIVE to send the disc data and a request to the server to certify the disc, the server uses the transmitted data to check if the disc is valid and sends the certifi cate back to the product.
The Internet connection may be restricted while you are using BD-LIVE contents.
System
Initial Settings
By using the Initial Settings function, you can set the language, Musical Auto Calibration, Network Settings, etc.
For more information about the Initial Settings function, refer to the Initial Settings section of this user manual. (See pages 27\~45)
Anynet+(HDMI-CEC)
Anynet+ is a convenient function that offers linked operations with other Samsung products that have the Anynet+ feature.
To operate this function, connect this product to a Samsung TV with an HDMI cable.
With Anynet+ on, you can operate this product using a Samsung TV remote control and start disc playback simply by pressing the PLAY (▶) button on the TV's remote control.
For more information, please see the TV user manual.
- Off: Anynet+ functions will not work.
- On: Anynet+ functions will work.

NOTE
This function is not available if the HDMI cable does not support CEC.
If your Samsung TV has an Anynet+ logo, then it supports the Anynet+ function.
■ Depending on your TV, certain HDMI output resolutions may not work.
Please refer to the user manual of your TV.
BD Data Management
Lets you manage the downloaded contents you accessed through a Blu-ray Disc that supports the BD-LIVE service and stored on an attached Flash memory device.
You can check the device's information including the storage size, delete the BD data, or change the Flash memory device.
BD Data Management Screen Information :
• Total Size : Total memory size of the device.
• Available Size : Available memory in the device.
- Delete BD Data : Delete all BD data in the storage.
- Select Device : Change location of desired memory to store BD data.

NOTE
In the external memory mode, disc playback may be stopped if you disconnect the USB device in the middle of playback.
- Only those USB devices formatted in FAT fi le system (DOS 8.3 volume label) are supported. We recommend you use USB devices that support USB 2.0 protocol with 4 MB/sec or faster read/write speed.
■ The Resume Play function may not work after you format the storage device.
■ The total memory available to BD Data Management may differ, depending on the conditions.
Time Zone
You can specify the time zone that is applicable to your area.
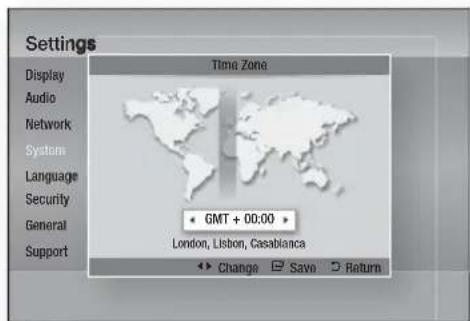
DivX® Video On Demand
View DivX® VOD Registration Codes to purchase and play DivX® VOD contents or view the deregistration code to deregister this product.
Reset
All settings will revert to the default except for the network and Smart Hub settings.
English
Setup
Language
You can select the language you prefer for the Home menu, disc menu, etc.
- On-Screen Menu : Select the language for the on-screen displays.
- Disc Menu : Select the language for the disc menu displays.
• Audio : Select the language for disc audio. - Subtitle : Select the language for disc subtitles.

NOTE
- The selected language will only appear if it is supported on the disc.
Security
This function works in conjunction with Blu-ray and DVD discs that have been assigned an age rating or numeric rating that indicates the maturity level of the content. These numbers help you control the types of Blu-ray and/DVD discs that your family can watch.
When you access this function for the first time, the password setup screen appears. Enter a desired 4-digit password using the number buttons. (The default password is 0000.)
After you have set your password, select an age rating you want to set for the BD Parental Rating and a rating level you want to set for the DVD Parental Rating. The product will only play Blu-ray discs rated at or below the age rating and DVD discs rated below the numeric rating unless the password is entered.
Larger numbers indicate more mature content.
BD Parental Rating
This will prohibit playback of Blu-ray disc rated above Parental Rating.
DVD Parental Rating
Prevent playback of DVD discs with specific numerical ratings unless a password is entered.
Change Password
Change the 4-digit password used to access security functions.
If you forgot your password
- Remove the disc.
- Press and hold the STOP (■) button on the front panel for 5 seconds or more. All settings will revert to the factory settings.

NOTE
- When the factory default settings are restored, all the user stored BD data will be deleted.
General
Front Display
Change the brightness of the front panel.
• Auto : Dim during playback.
- Dim : Dim the display window.
- Bright : Brighten the display window.

NOTE
■ The Power button and the Function button are not possible to change the Brightness.
Light Effect
You can activate or deactivate the light effect on the top of the product.
- Always On : Activate Light Effect at all times. Select this for retail display.
- Auto : Activate Light Effect when turning the product on and off or when slot-in/out the disc. Select when installing the product in your home.
- Off : Turn Light Effect off at all times.
42
English
Network Remote Control
The Network Remote Control function lets you control your Blu-ray Home Cinema from a remote device such as a smart phone through a wireless connection to your local area network.
To use the Network Remote Control function, follow these steps:
- Select On in the Network Remote Control menu.
- Install the Samsung network remote control application to control your product on your compatible portable device.
- Make sure your portable device and your product are connected to the same wireless router.
- Start the application on your portable device. The application should find your product and display it on a list.
- Select the product.
- If this is the first time you are using the function, it will ask you to allow or deny remote control of the product. Select Allow.
- Follow the instructions that came with the application to control the product.
Support
Software Upgrade
The Software Upgrade menu allows you to upgrade the product's software for performance improvements or additional services. You can upgrade in four ways:
- By Internet
- By USB
- By Disc
- Via download (File)
The four methods are explained below.
By Internet
To upgrade by Internet, follow these steps:
- Select By Internet, and then press the ENTER button. The Connecting to Server message appears.
- If there is a download available, the Download pop-up appears with a progress bar and the download starts.
- When the download is complete, the Upgrade Query window appears with three choices: Upgrade Now, Upgrade Later, or Don't Upgrade.
- If you select Upgrade Now, the product upgrades the software, turns off, and then turns on automatically.
- If you do not make a selection in one minute or select Upgrade Later, the product stores the new upgrade software. You can upgrade the software later using the Via download function.
- If you select Don't Upgrade, the product cancels the upgrade.

NOTE
- Your product must be connected to the Internet to use the By Internet function.
- The upgrade is complete when the product turns off, and then turns on again by itself.
■ Never turn the product off or back on manually during the update process.
Samsung Electronics shall take no legal responsibility for product malfunction caused by an unstable Internet connection or consumer negligence during a software upgrade.
If you want to cancel the upgrade while the upgrade software is downloading, press the ENTER button.
English
Setup
By USB
To upgrade by USB, follow these steps:
- Visit www.samsung.com/bluraysupport
- Download the latest USB software upgrade zip archive to your computer.
-
Unzip the zip archive to your computer. You should have a single folder with the same name as the zip file.
-
Copy the folder to a USB flash drive.
-
Make sure the disc tray is empty, and then insert the USB flash drive into the USB port of the product.
-
In the product's menu, go to Settings > Support > Software Upgrade.
-
Select By USB.

NOTE
- The disc tray must be empty when you upgrade the software using the USB Host jack.
- When the software upgrade is done, check the software details in the software Upgrade menu.
- Do not turn off the product during the software upgrade. It may cause the product to malfunction.
■ Software upgrades using the USB Host jack must be performed with a USB memory flash stick only.
By Disc
To upgrade by Disc, follow these steps:
- Visit www.samsung.com/bluraysupport.
- Download the latest disc software upgrade zip archive to your computer.
- Unzip the zip archive to your computer. You should have a single folder with the same name as the zip file.
- Write the folder onto a disc. We recommend a CD-R or DVD-R.
- Finalise the disc before you remove it from your computer.
- Insert the disc into product.
44
English
- In the product's menu, go to Settings > Support > Software upgrade.
- Select By Disc.

NOTE
- When the system upgrade is done, check the software details in the software Upgrade menu.
- Do not turn off the product during the Software Upgrade. It may cause the product malfunction.
Via download
The Via download option lets you upgrade using a fi le the product downloaded earlier but you decided not to install immediately or a fi le downloaded by the product in Standby Mode (See Download in Standby Mode below).
To upgrade Via download, follow these steps:
- If upgrade software has been downloaded, you will see the software version number to the right of Via download.
- Select Via download, and then press the ENTER button.
- The product displays a message asking if you want to upgrade. Select Yes. The product begins the upgrade.
- When the update is complete, the product turns off automatically, and then turns on.

NOTE
- When the system upgrade is done, check the software details in the software Upgrade menu.
- Do not turn off the product during the software Upgrade. It may cause the product to malfunction.
■ To use the Via download function, your product must be connected to the Internet.
Download in Standby Mode
You can set the Download in Standby Mode function so that the product downloads new upgrade software when it is in Standby mode. In Standby mode, the product is off, but its Internet connection is active. This allows the product to download upgrade software automatically, when you are not using it.
To set Download in Standby Mode, follow these steps:
-
Press the ▲▼ buttons to select Download in Standby Mode, and then press the ENTER button.
-
Select On or Off.
-
Off : If you select Off, the product will notify you with a pop up message when new upgrade software is available.
- On : If you select On, the product will automatically download new upgrade software when it is in Standby mode with the power off. If it downloads new upgrade software, the product will ask you if you want to install it when you turn the product on.

NOTE
- To use the Download in Standby Mode function, your product must be connected to the Internet.
Contact Samsung
Provides contact information for assistance with your product.
Basic Functions
Playing a Disc
Playback
-
Insert a disc into the disc slot with the disc's label facing up.
-
Press the PLAY (▶) button.
Playback related buttons
| PLAY ( ▶ ) | Starts playback. |
| STOP ( ■ ) | Stops playback.If you press the button once : The stop position is memorized.If you press the button twice : The stop position is not memorized. |
| PAUSE ( II ) | Pauses playback. |

NOTE
- For some discs, pressing the STOP ( ■ ) button once may not memorize the stop position.
■ Video fi les with high bit rates of 20Mbps or more strain the product's capabilities and may stop playing during play back.
Disc Structure
The content of discs are usually divided as shown below.
- Blu-ray Disc, DVD-VIDEO

- Audio CD (CD-DA)
- track 1 track 2 track 3 track 4 track 5


• MP3, WMA, DivX, MKV and MP4
← folder (group) 1 folder (group) 2

file 1 file 2 file 1 file 2 file 3


Playing a 2D video in 3D mode


You can enjoy an ordinary 2D video in 3D mode.

NOTE
If you move to the Home or Smart Hub Home menu in 3D mode, it will switch to 2D automatically.
Using the Disc menu/Title menu/ Popup menu
Using the Disc Menu


- During playback, press the DISC MENU button on the remote control.

- Press the ▲▼◀▶ buttons to make a selection, and then press the ENTER button.

NOTE
■ Depending on the disc, the menu items may differ and this menu may not be available.
Using the Title Menu
- During playback, press the TITLE MENU button on the remote control.
- Press the ▲▼◀▶ buttons to make the desired selection, then press the ENTER button.

NOTE
■ Depending on the disc, the menu items may differ and this menu may not be available.
■ The Title Menu will only be displayed if there are at least two titles on the disc.
Playing the Title List
- During playback, press the DISC MENU or TITLE MENU button.
- Press the ▲▼ buttons to select an entry you want to play from Title List, then press the ENTER button.
Using the Popup Menu
- During playback, press the POPUP button on the remote control.
- Press the ▲▼◀▶ buttons or ENTER button to select the desired menu.

NOTE
■ Depending on the disc, the menu items may differ and this menu may not be available.


DISC MENU

TITLE MENU


TITLE MENU

Using the Search and Skip Functions
During playback, you can search quickly through a chapter or track, and use the skip function to jump to the next selection.
Searching for a Desired Scene

- During playback, press the SEARCH (◀◀▶▶) button. Each time you press the SEARCH (◀◀▶▶) button, the playback speed will change as follows.
| BD-ROM,BD-RE/-R,DVD-RW/-R,DVD+RW/+R,DVD-VIDEO | ▶ 1 → ▶ 2 → ▶ 3 →▶ 4 → ▶ 5 → ▶ 6 → ▶ 7◀◀ 1 → ◀◀ 2 → ◀◀ 3 →◀◀ 4 → ◀◀ 5 → ◀◀ 6 → ◀◀ 7 |
| DivX, MKV, MP4 | ▶ 1 → ▶ 2 → ▶ 3◀◀ 1 → ◀◀ 2 → ◀◀ 3 |
- To return to normal speed playback, press the PLAY (▶) button.

NOTE
■ No sound is heard during search mode.
If you press the ◀◀ or ▶▶ button too quickly this product might think you are just holding the button down. This will lead to improper operation, be sure to not press these buttons too rapidly.
Skipping Chapters

- During playback, press the SKIP (I◄►►►) button. If you press the SKIP (►►) button, it moves to the next chapter. If you press the SKIP (I◄◄) button, it moves to the beginning of the chapter. One more press makes it move to the beginning of the previous chapter.
English
47
Basic Functions
Slow Motion Play/Step Motion Play
Slow Motion Play

- In pause (II) mode, press the SEARCH (▶▶) button.
If you press the SEARCH (▶▶) button, the playback speed is reduced to
1/8 1/4 1/2
- To return to normal speed playback, press the PLAY (▶) button.
NOTE
■ No sound is heard during slow mode.
■ Slow motion operates only in the forward direction.
Step Motion Play

- In pause mode, press the PAUSE (II) button. Each time the PAUSE (II) button is pressed, a new frame will be appear.
- To return to normal speed playback, press the PLAY (▶) button.
NOTE
■ No sound is heard during step mode.
- Step motion operates only in the forward direction.
Repeat Playback
Repeat the Title or Chapter

Repeat the disc title or chapter.
- During playback, press the REPEAT button on the remote control.
- Press the ▲▼ buttons to select Chapter or Title, then press the ENTER button.

48 English
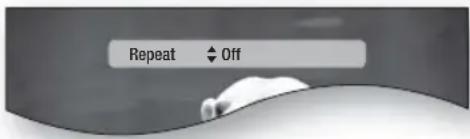
- To return to normal play, press the REPEAT button again.
- Press the ▲▼ buttons to select Off, the press the ENTER button.
NOTE
■ Depending on the disc, the Repeat function may not be available.
Repeat the Section

- During playback, press the REPEAT button on the remote control.
- Press the ▲▼ buttons to select REPEAT A-B.


- Press the ENTER button at the point where you want repeat play to start (A).
- Press the ENTER button at the point where you want repeat play to stop (B).
- To return to normal play, press the REPEAT button again.
- Press the ENTER button.
NOTE
If you set point (B) before 5 seconds has lapsed, the prohibition message will appear.
Using the TOOLS button
During playback, you can operate disc menu by pressing the TOOLS button.
• TOOLS Menu Screen
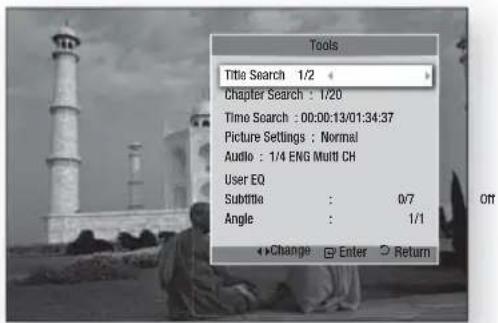

NOTE
■ Depending on the disc, the TOOLS menu may differ.
Moving to a Desired Scene Directly

- During playback, press the TOOLS button.
- Press the ▲▼ buttons to select Title, Chapter or Playing Time.
- Enter the desired Title, Chapter or Playing Time using the number buttons, then press the ENTER button.
Selecting the Audio Language

- During playback, press the TOOLS button.
- Press the ▲▼ buttons to select Audio.
- Press the ENTER button.
- Press the ▲▼ buttons to select the audio language you want.

NOTE
- The ◀▶ indicator will not be displayed on the screen if the BONUSVIEW section does not contain any BONUSVIEW audio settings.
Information about the primary / secondary mode will be also displayed if the Blu-ray Disc has a BONUSVIEW section.
Use the ◀▶ button to switch between primary and secondary audio modes.
This function depends on what audio languages are encoded on the disc and may not be available.
■ Some Blu-ray Discs may allow you to select either the multi-channel LPCM or Dolby digital audio soundtrack in English.
Selecting the Subtitle Language

- During playback, press the TOOLS button.
- Press the ▲▼ buttons to select Subtitle.
- Press the ◀▶ buttons to select the desired subtitle language.

NOTE
■ Depending on the Blu-ray Disc / DVD, you may be able to change the desired subtitle in the Disc Menu.
Press the DISC MENU button.
This function depends on what subtitles are encoded on the disc and may not be available on all Blu-ray Discs/DVDs.
Information about the primary / secondary mode will also be displayed if the Blu-ray Disc has a BONUSVIEW section.
■ This function changes both the primary and secondary subtitles at the same time.
The total number of subtitles is the sum of the primary and secondary ones.
English
Basic Functions
Caption Function

- You must have some experience with video extraction and editing in order to use this feature properly.
- To use the caption function, save the caption fi le (*.smi) in the same fi le name as that of the DivX media fi le (*.avi) within the same folder. Example. Root Samsung_007CD1.avi Samsung_007CD1.smi
- Up to 60 alphanumeric characters or 30 East Asian characters (2 byte characters such as Korean and Chinese) for the file name.
Changing the Camera Angle

When a Blu-ray Disc/DVD contains multiple angles of a particular scene, you can use the ANGLE function.
- During playback, press the TOOLS button.
- Press the ▲▼ buttons to select Angle.
- Press the ◀▶ buttons to select the desired Angle.
Selecting the Picture Settings

This function enables you to adjust video quality.
- During playback, press the TOOLS button.
- Press the ▲▼ buttons to select Picture Settings, then press the ENTER button.
-
Press the ◀▶ buttons to select the desired Mode.
-
Dynamic : Choose this setting to increase Sharpness.
- Normal : Choose this setting for most viewing applications.
- Movie : This is the best setting for watching movies.
- User : The user can adjust the sharpness, noise reduction, Contrast, Brightness, Colour, Tint(G/R) function.
NOTE
If the system is connected to a BD Wise-compliant TV that has set BD Wise to On, the picture setting menu will not appear.
Setting the BONUSVIEW

The BONUSVIEW feature allows you to view additional content (such as commentaries) in a small screen window while the movie is playing. This function is only available if the disc has the bonusview feature.
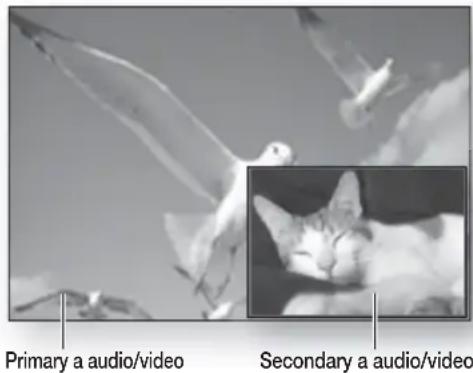
- During playback, press the TOOLS button.
- Press the ▲▼ buttons to select BONUSVIEW Video or BONUSVIEW Audio.
- Press the ◀▶ buttons to select the desired bonusview.
NOTE
■ If you switch from BONUSVIEW Video, BONUSVIEW Audio will change automatically in accordance with BONUSVIEW Video.
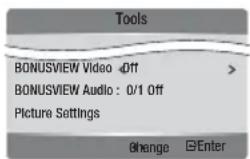
50 English
Listening to Music


Buttons on the Remote Control used for Music Playback
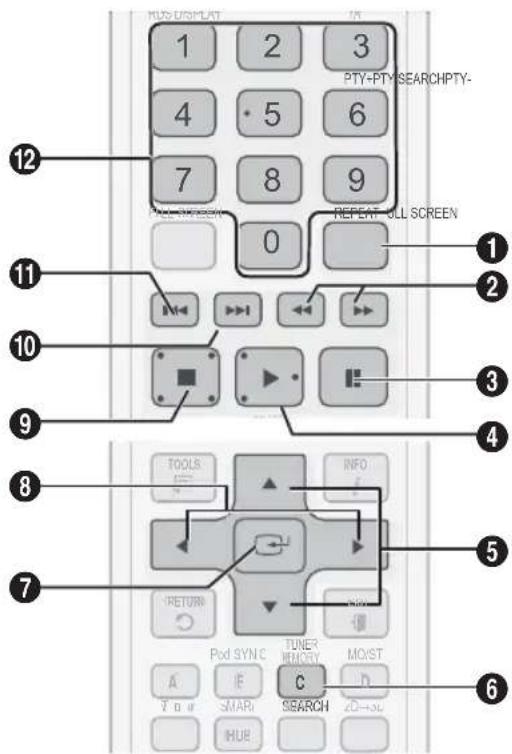
| 1 | REPEAT button : Selects the play mode in the Playlist. |
| 2 | SEARCH buttons :Audio CD (CD-DA) - Fast Play.MP3 - Jump Play. (10 seconds) |
| 3 | PAUSE button : Pauses playback. |
| 4 | PLAY button : Plays the currently selected track. |
| 5 | ▲▼ buttons : Selects a track in the Music List or Playlist. |
| 6 | YELLOW(C) button : Select Edit Mode or Play Mode. |
| 7 | ENTER button : Plays the selected track. |
| 8 | ▶ button : During playback, moves to the next page in the Music List or moves to the next track in the Playlist.◀ button : During playback, moves to the previous page in the Music List or moves to the previous track in the Playlist. |
| 9 | STOP button : Stops a track. |
| 10 | ▶▶I button : Plays the next track. |
| 11 | ◀◀ button : Plays the previous track.If you press this button after three seconds of playback in the Playlist, the current track will be replayed from the beginning. But, if you press this button within three seconds after playback starts in the Playlist, the previous track will be played. |
| 12 | NUMBER button : During the Playlist playback, press the desired track number. The selected track will be played. (only Audio CD(CD-DA)) |
Basic Functions
Playing an Audio CD (CD-DA)/MP3
- Insert an Audio CD (CD-DA) or an MP3 Disc into the disc slot.
- For an Audio CD (CD-DA), the first track will be played automatically.
- For an MP3 disc, press the ◀▶ buttons to select Music, then press the ENTER button.
Audio CD (CD-DA)/MP3 Screen Elements
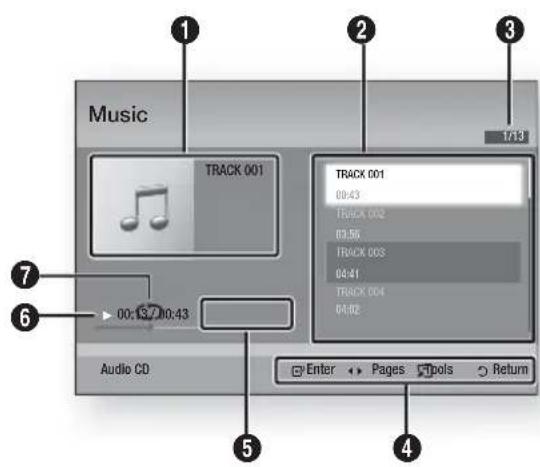
| 1 | Displays the music information. |
| 2 | Displays the playlist. |
| 3 | Shows the current track/total tracks. |
| 4 | Displays buttons available. |
| 5 | Shows the current play time/total play time. |
| 6 | Displays the current playback status. |
| 7 | Displays the repeated playback status. |
- Press the ▲▼ buttons to select the track you want to play, and then press the ENTER button.
Repeat an Audio CD (CD-DA)/MP3
-
During the Playlist playback, press the REPEAT button.
-
Select the desired play mode by pressing the REPEAT button repeatedly.

| Off | Audio CD (CD-DA)/MP3 | Tracks on a disc are played in the order in which they were recorded on the disc. |
| (CD) One Song | Audio CD (CD-DA)/MP3 | Current track is repeated. |
| (CD) All | Audio CD (CD-DA)/MP3 | All tracks are repeated. |
NOTE
During playback, press the TOOLS button and set Shuffle Mode to On. You can play the tracks in the random order.
Playlist
- Insert an Audio CD (CD-DA) or an MP3 Disc into the disc slot.
- For an Audio CD (CD-DA), the first track will be played automatically.
- For an MP3 disc, press the ◀▶ buttons to select Music, then press the ENTER button.
- To move to the Music List, press the STOP (■) or RETURN button.
The Music List screen is displayed.
-
Press the YELLOW(C) button to switch to Edit Mode.
-
Press ▲▼◀▶ to select a desired track. Then, press ENTER. Repeat this procedure to select additional tracks.
• The selected file will be checked.
- To cancel your selection, press ENTER again to uncheck the track.
52 English
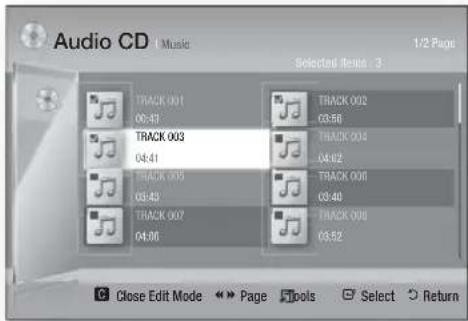
- Select a desired track and press the TOOLS button.
- To play the selected track(s), select Play Selected in the Tools menu and press ENTER.
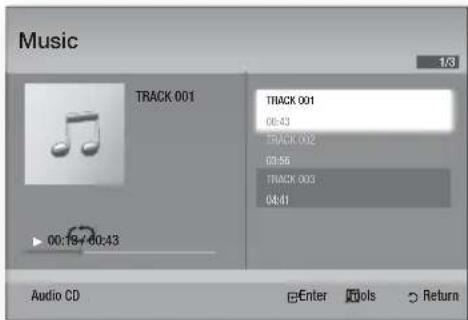
- To return to the Edit Mode, press STOP or RETURN.
- To exit Edit Mode, press the YELLOW(C) button.

NOTE
■ You can create a playlist with up to 99 tracks on Audio CD (CD-DA).
Sound Mode
DSP(Digital Signal Processor) Function
You can select mode to optimize the sound for sound based on your tastes.
Press the DSP button.
SMART SOUND → MP3 ENHANCER → POWER BASS → USER EQ → DSPOFF
- SMART SOUND: This will regulate and stabilize the volume level against a drastic volume change when changing channels or during a scene transition.
- MP3 ENHANCER: This also helps enhance your sound experience (ex. mp3 music). You can upscale your MP3 level sound(24 kHz, 8bit) to CD level sound(44.1 kHz, 16bit).
- POWER BASS : This function stresses low tones providing thudding sound effects.
- USER EQ : You can configure the equalizer settings manually to your preference.
SFE(Sound Field Effect) MODE
You can set the SFE mode best suited for the type of music you are listening to.

Press the SFE MODE button.
| Symphony Hall in Boston (Hall 1) | Provides a clear vocal as if listening in a concert hall. |
| Phillharmonic Hall in Bratislava (Hall 2) | Provides also a clear vocal as if listening in a concert hall but, less powerful than HALL1. |
| Jazz Club in Seoul B | Recommended setting for Jazz. |
| Church in Seoul | Gives the feel of being in a grand church. |
| Amphitheater (Rock) | Recommended setting for Rock. |
| Off | Select this for normal listening. |
English
53
Basic Functions
Dolby Pro Logic II Mode
You can select the desired Dolby Pro Logic II audio mode.
Press the ☐ PL II button.
| Music | When listening to music, you can experience sound effects as if you are listening to the actual performance. |
| Movie | Adds realism to the movie soundtrack. |
| Prologic | You can listen to a 2CH sound source in 5.1CH surround sound with all speakers active.- A specific speaker(s) may not be output depending on the input signal. |
| Matrix | You will hear multi channel surround sound. |
| Stereo | Select this to listen to sound from the front left and right speakers and the subwoofer only. |

NOTE
- When selecting Dolby Pro Logic II mode, connect your external device to the AUDIO INPUT jacks (L and R) on the product. If you connect to only one of the inputs (L or R), you cannot listen to surround sound.
iPod SYNC
If you insert your iPod player in the iPod Dock that has already been connected to the system, the video fi les in your iPod player can be played through the connected TV.

If the video signal does not synchronize properly with the audio signal, press iPod SYNC on the remote control to correct the synchronization.

NOTE
Before you can play the video files in iPod player, the Audio/Video terminals of the TV should be connected using the Composite cable.
■ Models below support lip sync settings. Press iPod SYNC on the remote control to change audio delay.
■ Supported Models : classic/3G nano/4G nano/120GB classic/160GB Classic/5G nano
3D Sound
You can enjoy much natural and vivid surround sound with enriched tones of sound. You can adjust the depth of sound using the level options.

Off → High → Medium → Low.

NOTE
It is not available in FM or W.iPod mode.
Vertical Surround
Implementing the vertical sound fi eld effect, it reinforces the sense of space for music and movie in addition to vivid sound tones.

Off → High → Low → Off.
Playing back a Picture

Viewing Photo Files
- Connect a USB memory that contains JPEG fi les or insert a disc that contains JPEG fi les.
- Press the ◀▶ buttons to select the My Contents, and then press the ENTER button after press the ▲▼ buttons to select the Photos.
- Press the ▲▼◀▶ buttons to select the folder you want to play, and then press the ENTER button.
- Press the ▲▼◀▶ buttons to select the photo you want to play, and then press the ENTER button.

NOTE
- You can't enlarge the subtitle and PG graphic in the full screen mode.
54
English
Using the TOOLS button
During the slide show playback, you can use various function by pressing the TOOLS button.
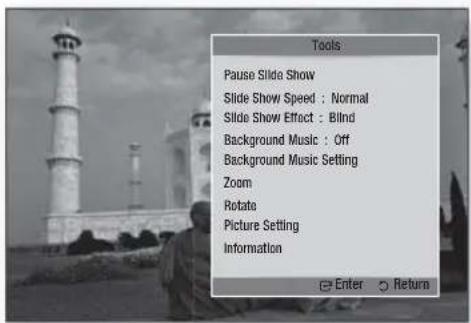
- Pause Slide Show : Select this if you want to pause the slide show.
- Slide Show Speed : Select to adjust the slide show speed.
- Slide Show Effect : Select set the slide show effect.
- Background Music : Select this if you want to listen to music while viewing a picture.
- Background Music Setting : Select this if you want to set the background music setting.
- Zoom : Select this if you want to enlarge the current picture. (Enlarged up to 4 times)
- Rotate : Select this if you to rotate the picture. (This will rotate the picture either clockwise or counter clockwise.)
• Picture Setting : Select this if you want to adjust the picture quality.
• Information : Shows the picture information including the name and size, etc.

NOTE
Before you can enable the background music function, the photo fi le should exist in the same storage media with the music fi le. However, the sound quality can be affected by the bit rate of the MP3 fi le, the size of the photo and the encoding method.
- High bit rate of 20Mbps or more video fi les can be stopped during the playback.
Playing back a USB Storage Device

You can use the USB connection to play multimedia files (MP3, JPEG, DivX, etc) downloaded from the USB storage device.
- Move to the home menu.
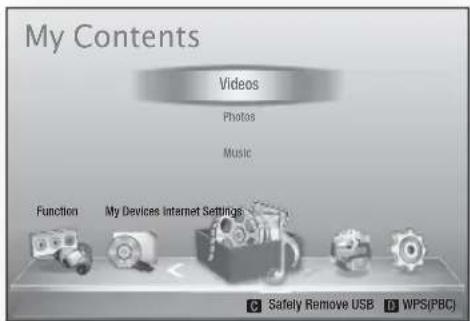
- In Stop mode, connect the USB storage device to the USB port on the front panel of the product.
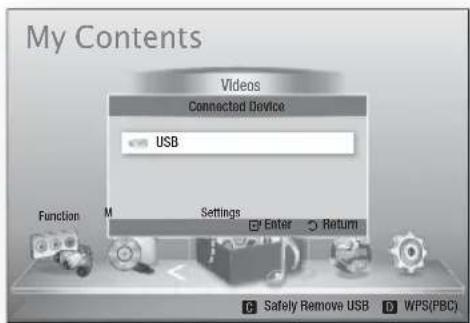
- Press the ENTER button.
- Press the ▲▼◀▶ buttons to select the desired Videos, Music or Photos, then press the ENTER button.
- For playing back Video, Music or Photo files, refer to pages 46\~55.

NOTE
- You must remove the USB storage device safely (by performing the "Safely Remove USB" function) in order to prevent a possible damage to the USB memory. Press the MENU button to move to the home menu, and select the YELLOW(C) button and press the ENTER button.
If you insert the disc when playing USB storage device, the device mode is changed to "BD/DVD" automatically.
English
Basic Functions
Listening to Radio
Using buttons on the Remote Control
- Press the FUNCTION button to select FM.
-
Tune in to the desired station.
-
Preset Tuning 1 : You must first add a desired frequency as a preset. Press the STOP (■) button to select PRESET and then press the TUNING/CH (^▼) button to select the preset station.
- Manual Tuning : Press the STOP (■) button to select MANUAL and then press the TUNING/CH (^▼) button to tune in to a lower or higher frequency.
- Automatic Tuning : Press the STOP (■) button to select MANUAL and then press and hold the TUNING/CH (^▼) button to automatically search the band.
Setting Mono/Stereo
Press the MO/ST button.
• Each time the button is pressed, the sound switches between STEREO and MONO.
- In a poor reception area, select MONO for a clear, interference-free broadcast.
Presetting Stations

Example : Presetting FM 89.10 into memory
- Press the FUNCTION button to select FM.
- Press the TUNING/CH (^^) button to select <89.10>.
- Press the TUNER MEMORY button.
• NUMBER fl ashes on the display.
-
Press the TUNER MEMORY button again.
-
Press the TUNER MEMORY button before NUMBER disappears from the display.
• NUMBER disappears from the display and the station is stored in memory. -
To preset another station, repeat steps 2 to 4.
- To tune in to a preset station, press the TUNING/CH (↑) button to select a channel.
56 English

About RDS broadcasting
Using the RDS (Radio Data System) to receive FM stations
RDS allows FM stations to send an additional signal along with their regular program signals. For example, the stations send their station names, as well as information about what type of program they broadcast, such as sports or music, etc.
When tuned to an FM station which provides the RDS service, the RDS indicator lights up on the display.
Description on RDS function
- PTY (Program Type) : Displays the type of program currently being broadcast.
- PS NAME (Program Service Name) : Indicates the name of broadcasting station and is composed of 8 characters.
- RT (Radio Text) : Decodes the text broadcast by a station (if any) and is composed of maximum 64 characters.
- CT (Clock Time) : Decodes the real time clock from the FM frequency. Some stations may not transmit PTY, RT or CT information therefore this may not be displayed in all cases.
- TA (Traffi c Announcement) : TA ON/OFF it shows that the traffic c announcement is in progress.
NOTE
■ RDS may not operate correctly if the station tuned is not transmitting RDS signal properly or if the signal strength is weak.
To show the RDS signals
You can see the RDS signals the station sends on the display.
Press the RDS DISPLAY button while listening to an FM station.

• Each time you press the button, the display change to show you the following information : PS NAME → RT → CT → Frequency
| PS(Program Service) | While searching,appears and then the station names will be displayed.appears if no signal is sent. |
| RT(RadioText) | While searching,appears and then text messages the station sends will be displayed.appears if no signal is sent. |
| Frequency | Station frequency (non-RDS service) |
About characters shown in the display
When the display shows PS, or RT signals, the following characters are used.
- The display window cannot differentiate upper case and lower case letters and always uses upper case letters.
- The display window cannot show accented letters,
PTY (Program Type) indication and
PTY-SEARCH function
One of the advantages of the RDS service is that you can locate a particular kind of program from the preset channels by specifying the PTY codes.
To search for a program using the PTY
codes
Before you start!
- The PTY Search is only applicable to preset stations.
- To stop searching any time during the process, press STOP (■) button while searching.
- There is a time limit in doing the following steps.
If the setting is cancelled before you finish, start from step 1 again. - When pressing the buttons on the primary remote control, make sure that you have selected the FM station using the primary remote control.
-
Press the PTY SEARCH button while listening to an FM station.
-
Press the PTY- or PTY+ button until the PTY code you want appears on the display.
• The display gives you the PTY codes described to the right.
- Press the PTY SEARCH button again, while the PTY code selected in the previous step is still on the display.
- The centre unit searches 15 preset FM stations, stops when it finds the one you have selected, and tunes in that station.
Basic Functions
Connecting iPod/iPhone Using the USB Cable
If the system is connected to iPod/iPhone using the provided USB cable, you can play music in iPod/iPhone using the system.
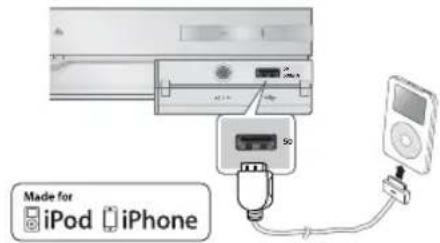
-
Connect iPod/iPhone using the USB cable to the front USB port.
-
Your iPod is automatically turned on.
-
"iPod" message appears on the TV screen.
-
Press the ENTER button.
-
Select the music file to play.
- You can use the remote control or the product to control simple playback functions such as the PLAY, PAUSE, STOP, ◄◀/▶◀ and ◄◀/▶◀ buttons. (See page 15.)

NOTE
- Playing a video is possible only when the iPod Dock is used.
If you want to return to the iPod menus with iPod player connected using the USB cable, press FUNCTION on the remote control or press on the front panel of the system and select R. IPOD. The FUNCTION mode switches as follows: BD/DVD → D. IN → AUX → R. IPOD → W. IPOD → H. IN1 → H. IN2 → FM
Connecting iPod/iPhone Using the Dock
If the system is connected to the iPod/iPhone specifi c dock, you can play videos or music in iPod/iPhone using the system.
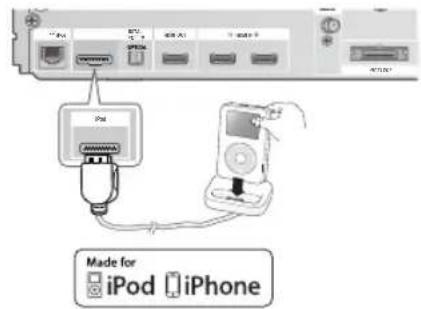
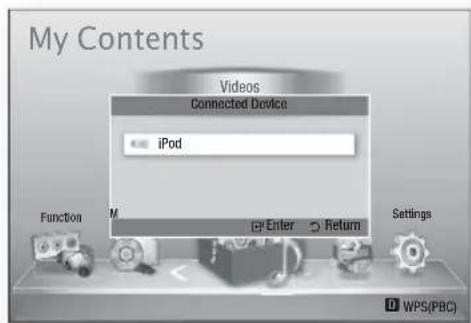
- Connect the iPod dock connector to the iPod Jack on the rear panel of the product.
- Place the iPod in the supplied iPod Dock.
- Your iPod is automatically turned on.
- "iPod" message appears on the TV screen.
- Press the ENTER button.
- Press the ◀▲▼ buttons to select Music, then press the ENTER button.
- Select the music file to play.
- You can use the remote control or product to control simple playback functions such as the PLAY, PAUSE, STOP, I<</▶▶I, ◀◀/▶▶ and REPEAT buttons. See page 15.

NOTE
■ Adjust the volume to a moderate level before you connect your iPod and product.
- When the product is powered on and you connect an iPod, the product will charge your iPod's battery.
■ Make sure to connect the dock connector so that the label “▲” faces upward.
Watching a Movie
You can play video files stored in the iPod player by connecting it to the product.
- Connect the iPod dock connector to the iPod Jack on the rear panel of the product.
- In the iPod screen, move to Videos > Settings, then set the TV Out option and the TV signal.
- Place the iPod in the supplied iPod Dock.
- "iPod" message appears on the TV screen.
- Press the ENTER button.
- Press the ◀▲▼ buttons to select Video, then press the ENTER button.
- Select the video file to play.
- You can use the remote control or the product to control simple playback functions such as the PLAY, PAUSE, STOP, I◀◀/▶◀I and ◀◀/▶▶ buttons. (See page 15.)

NOTE
- You must have the VIDEO output (Composite) connected to your TV to view iPod video (See page 23).
If you want to iPod video via VIDEO output, set Anynet+(HDMI-CEC) to off.
No other screen than the playback one will appear on the TV screen. Check other screens on the iPod player.
If the connected iPod does not support video playback, the "Playing video files is not supported on this iPod model." message appears when you select the Video menu.
If you want to return to the iPod menus with iPod player connected using the dock, press FUNCTION on the remote control or press
on the front panel of the system and select R. IPOD. The FUNCTION mode switches as follows: BD/DVD → D. IN → AUX → R. IPOD → W. IPOD → H. IN1 → H. IN2 → FM
Use iPod/iPhone with a Wireless Dock Cradle for iPod/iPhone
You can enjoy fi ner quality music through the speakers by transmitting an iPod/iPhone's audio signal using a Wireless Transmitter.
To connect the main unit when the product is used for the first time, you have to set the Linking ID manually. (see page 61)
After first setting of the main unit, it will be connected to Wireless Transmitter automatically when turn on.
Turn on the main unit and connect the iPod/iPhone to the Wireless transmitter.
Then, press the 📄 button on the product to select "W. IPOD" mode.
The FUNCTION mode of the main unit switches as follows : BD/DVD → D. IN → AUX → R. IPOD → W. IPOD → H. IN1 → H. IN2 → FM ( See page 13)
How to charge the Wireless Transmitter

- Connect the Wireless Transmitter to the Charging Cradle.
- Connect the DC power adapter to a wall socket.
- The charging indicator lights and charging starts. After the battery is fully charged, the charging indicator turns Green.
Basic Functions
Operation status of the charging
cradle's LED
| Display Function | |
| GREEN LED ON | Power on /Charging completed |
| RED LED ON | Charging. |

NOTE
The LED indicates the charging state of the built-in battery in the wireless iPod transmitter. Check the charging state of iPod/iPhone by checking the charging indication of its battery.

CAUTION
It links to Wireless Dock Cradle when SWA-5000 is used.
■ Only Samsung wireless transmitter that is compliant with the system can be recharged.
iPod/iPhone Models You Can Use with This Product
■ iPod touch (3rd generation)
■ iPod touch (2nd generation)
■ iPod touch (1st generation)
- iPod classic
- iPod with video
■ iPod with dock connector
■ iPod with Click Wheel
■ iPod nano (5th generation)
■ iPod nano (4th generation)
■ iPod nano (3rd generation)
■ iPod nano (2nd generation)
■ iPod nano (1st generation)
iPhone 4
iPhone 3GS
iPhone 3G
iPhone

NOTE
■ “Made for iPod” means that an electronic accessory has been

designed to connect specifi cally to iPod and has been certifi ed by the developer to meet Apple performance standards.
- "Made for iPhone" means that an electronic accessory has been designed to connect specifically to iPhone and has been certified by the developer to meet Apple performance standards.
■ Apple is not responsible for the operation of this device or its compliance with safety and regulatory standards.
The volume control may not operate normally with iPod and iPhone models not listed above. If you have a problem with any of the models listed above, please update the software of the iPod/iPhone to the lastest version.
■ Depending on the software version of the iPod, control problems may occur. This is not a malfunction of the Home Cinema.
■ Depending on the software version or the type of the iPod, some operations may differ. Install the latest iPod software. (recommended)
■ Some actions like iPod SYNC may depend on video sources or the iPod model you have. - You can enjoy music or videos through the BD/DVD function and enjoy music, videos or photos through the Remote iPod function. You need to use iPod Dock to enjoy videos or photos.
■ Playback of applications' contents through the product may not be guaranteed. We recommend playing contents downloaded on the iPod.
If you have a problem using iPod, please visit www.apple.com/support/ipod
How to Link the Wireless Transmitter with the Main Unit
- Turn off your Home Cinema.
- Press the 4, 7, 6, 3 buttons on the remote control in order.
• The Power LED blinks once. - Connect the iPod/iPhone to the Wireless transmitter.
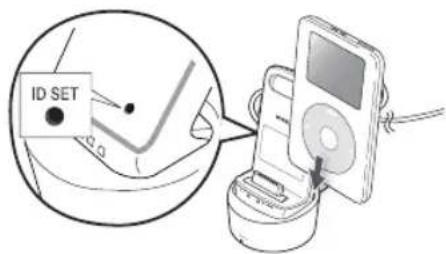
- Turn on the iPod/iPhone. Press the "ID SET" button on the back of the Wireless transmitter for 5 seconds. The link light on the wireless transmitter blinks rapidly.
- Turn on your product.
- To listen to music from iPod/iPhone over the product, press the E button to select "W. IPOD" mode.
- After you select "W. IPOD" mode, turn the volume of the product down to avoid hearing damage.
- You can control the speaker volume of iPod/iPhone with a volume wheel or a volume bar.
- When iPod/iPhone is stopped or in a power saving mode, the Wireless transmitter enters Sleep Mode.
When iPod/iPhone is set to Deep Sleep Mode, the Wireless transmitter turns off.
Operation status of the wireless transmitter's LED
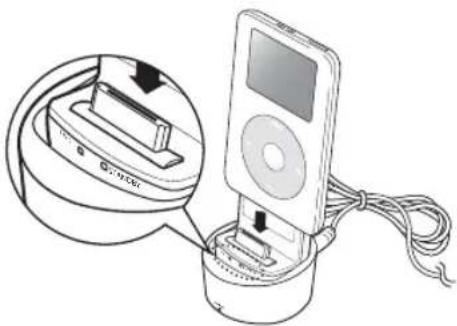
natural_image
Illustration of an iPod device connected to a charging case, showing internal components and cable (no text or symbols)| Display | Function | |
| LINK(Blue LED) | STANDBY(Red LED) | |
| LED ON | Pairing successfully completed | STANDBY |
| LED BLINK(Long blink) | Processing iPod/iPhone | LOW BATTERY |
| LED BLINK(Short blink) | Processing pairing | Pairing failed |
! CAUTION
If you use the main unit near a wireless device such as a laptop computer, an AP, or Wifi, an unstable operation error can occur.
- Do not pair the SWA-5000 and iPod/iPhone at the same time. If you pair them at the same time, the iPod/iPhone and SWA-5000 may not connect to the product.
■ The transmission distance from the product to the wireless transmitter is about 5 meters, but may vary depending on your operation environment.
The audio signal may be weakened or even lost where there is an obstacle such as a wall or partition between the product and wireless transmitter. You can also weaken or lose signal if you move the wireless transmitter around.
English
Network Services
You can enjoy various network services such as Smart Hub or BD-LIVE by connecting the product to your network.
Read the following instructions before using any network service.
- Connect the product to the network. (see pages 25\~26)
- Confi gure the network settings. (see pages 37\~40)
Using Smart Hub
Using Smart Hub, you can stream movies, videos, and music from the Internet, access various for pay or free-of-charge applications and view them on your TV. Application content includes news, sports, weather forecasts, stock market quotes, maps, photos, and games.
You can also start this function by pressing the SMART HUB button on the remote control.

Starting Smart Hub the First Time
To start Smart Hub for the first time, follow these steps :
- Go to the Home menu.
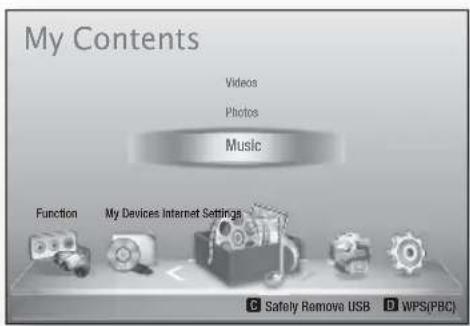
-
Press the ◀▶ buttons to select Internet, and press the ENTER button.
-
The Smart Hub screen appears.
NOTE
■ Certain applications are available only in certain countries.
- The Terms of Service Agreement screen appears. If you want to agree, press the ◀▶ buttons to select Agree, then press the ENTER button.
NOTE
■ Screens can take a few seconds to appear.
- The Service Update screen appears and installs a number of services and applications. When done, it closes. The applications and services downloaded are displayed on the Smart Hub screen. This may take some time.
NOTE
■ Smart Hub may close momentarily during the installation process.
A number of screens may appear after installation. You can press the ENTER button to close them or let them close on their own.
- To start an application, press the ▲▼◀▶ buttons to highlight a widget, then press the ENTER button.
62 English
Smart Hub at a Glance
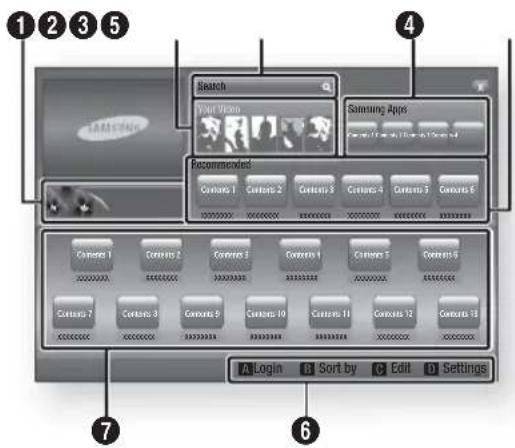
| 1 | Commercial: Displays the Smart Hub Guide, an introduction to the product, and new application introductions. |
| 2 | Your Video: Provides recommendations for videos based on your tastes.Lets you see movie recommendations based on your previous preferences.Lets you select a movie, displays a list of VOD (Video on Demand) providers that have the movie, and then lets you choose a provider for streaming. (Streaming is unavailable in some areas.)For instructions to use Your Video, please visit www.samsung.com.This feature is limited to certain regions. |
| 3 | Search: Provides an integrated search of your video providers and connected AllShare devices.Usable while using Smart Hub (except when you are watching a Blu-ray Disc).For easy access, use the SEARCH button on the remote control.For instructions to use search function, please visit www.samsung.com. |
| 4 | Samsung Apps: You can download various for pay or free-of-charge application services. |
| 5 | Recommended: Displays recommended contents managed by Samsung. |
| 6 | Navigation Help: Displays the remote control buttons you can use to navigate in Smart Hub.RED (A): To log in to Smart Hub.GREEN (B): To sort the applications.YELLOW (C): To edit the applications.BLUE (D): To change the settings of Smart Hub. |
| 7 | My Applications: Displays your personal gallery of applications which you can add to, modify, and delete. |
NOTE
Samsung Electronics takes no legal responsibility for any interruption of the Smart Hub service caused by the service provider for any reason.
The Smart Hub service downloads and processes data via the Internet so that you can enjoy the Internet contents on your TV screen. If the Internet connection is unstable, the service may be delayed or interrupted. Furthermore, the product may turn off automatically in response to conditions on the Internet. If this occurs, check the Internet connection and try again.
■ Application services may be provided in English only and the contents available may vary, depending on your area.
■ For more information about a Smart Hub service, visit the web site of the applicable service provider.
■ The services provided are subject to change by the Smart Hub service provider without notice.
The Smart Hub service contents may differ depending on the product's firmware version.
For pay DivX contents with copy protection can only be played through a composite, a component or an HDMI cable.
Network Services
Using the Keypad
Through your remote, you can use the On-Screen Keypad to enter letters, numbers, and symbols.

| 1 | The current keypad.Use to enter letters, numbers, and symbols. |
| 2 | Press the FULL SCREEN button on the remote control to shift the input mode.: ab, Ab, AB, numbers or icons. |
| 3 | Displays the current input mode. |
| 4 | Press the GREEN (B) button on the remote control to change the input method. (T9 or ABC) |
| 5 | Press the TOOLS button on the remote control to change the language. |
| 6 | Press the REPEAT button on the remote control to delete a character. |
Entering Text, Numbers and Symbols
To enter text, press the number button on the remote that corresponds to the letter you want to enter. Press the button rapidly to enter a letter that is not the first letter listed on the On-Screen keypad button. For example, if you want to enter the letter b, press the 2 button on your remote rapidly twice. To enter the first letter listed on a button, press, release, and then wait.
To move within the text, use the Arrow buttons. To delete text, move the cursor to the right of the character you want to delete, and then press the REPEAT button. To change case or enter numbers or punctuation, press the FULL SCREEN button.
64 English
Creating an Account
To establish your own, exclusive, configuration of Smart Hub, create your own Smart TV Account. To create an account, follow these steps:
- Press the RED (A) button on your remote control. The Login screen appears.
![Search Your Video Login Recommended Smart TV ID Press [ENTER] Password Press [ENTER] Remember Smart TV Account Password Login Cancel Create Account Find Password](/content/2026/03/431649/images/1ae2c24d4afcf2b8833d5577d0b6a88e14649824c643a72be036bcaebe8d4528.jpg)
- Press the ▲▼◀▶ buttons to select Create Account, and then press the ENTER button.
- On the next screen, select Smart TV ID, and then press the ENTER button. An entry screen and keypad appear.
- Use the keypad to enter your e-mail address. This will serve as your ID.
NOTE
The keypad works like the keypad on a cell phone.
- When done, press the ENTER button to select OK, and then press the ENTER button again. The Create Account screen reappears.
- Select Password, and then press the ENTER button. The Password screen and a keypad appear.
- Use the keypad to enter a password. The password can be any combination of letters, numbers, and symbols.
NOTE
- Press the RED (A) button on your remote to show or hide the password as you enter it.
- When done, press the ENTER button to select OK, and then press the ENTER button again. The Create Account screen reappears.
- Select Confirm password, and then press the ENTER button.
- Repeat Steps 7 and 8.
- When the Create Account screen reappears, select Create Account, and then press the ENTER button. The Confirmation window appears.
- Select OK, and then press the ENTER button. The Continue to Register Service window appears.
- Select Connect Service, and then press the ENTER button.
- The Register Service Account Window appears.
- If you have existing accounts with any of the listed providers, you can associate the provider account and the provider account password with your Smart TV Account. Registration makes it easier to access the providers web site. For registration instructions, go to Step 2 in Account Management under the Settings Menu.
- If you don't have existing provider accounts or do not want to register existing accounts at this time, select OK, and then press the ENTER button. You can also let the window close on its own in about a minute.
NOTE
■ You must use an e-mail address as an ID.
■ You can register up to 10 User Accounts.
- You do not need an account to use Smart Hub.
Account Log In
To log in to your Smart TV Account, follow these steps:
-
With the Smart Hub main screen displayed on your TV, press the RED (A) button on your remote. The Login screen appears.
-
Select the Down Arrow next to the Smart TV ID field, and then press the ENTER button.
- Select your ID from the list that appears, and then press the ENTER button. The Login screen re-appears.
- Select Password, and then press the ENTER button. The Password window and a keypad appears.
- Using the keypad and your remote, enter your password. When done, press the ENTER button, select OK, and then press the ENTER button again.
NOTE
If you want Smart Hub to enter your password automatically, select Remember my Smart TV ID and password after you have entered your password, and then press the ENTER button. A check appears. Smart Hub will now enter your password automatically when you select or enter your ID.
The Settings Menu - BLUE (D)
The Settings Menu Screen gives you access to account management, account reset, and account properties functions.
To access the Settings Menu, and then select a menu item, follow these steps:
- Press the BLUE (D) button on your remote.
- Press the ▲▼ to select a menu item, and then press the ENTER button.
The functions on the Settings Menu screen are described below.
NOTE
■ The Service Manager item listed in the Settings Menu is not available for Blu-ray Home Theaters.
Account Management
The Account Management Menu contains functions that let you register your service provider accounts, change your Smart Hub password, and delete or deactivate your Smart TV Account.
English
Network Services
Register Service Account
If you have existing accounts with any of the providers listed by the Register Service Account function, you can associate the provider account and the provider account password with your Smart TV Account. If you associate the account, you will be able to log onto the account through Smart Hub easily, without entering your account name or password.
To use the Account Management function, follow these steps:
-
In the Account Management menu, select Register Service Account, and then press the ENTER button. The Register Service Account Window appears.
-
Press the ▲▼ arrow buttons to select a Service Provider you want to associate with your Smart TV Account, and then press the ENTER button.

NOTE
If you have a Samsung account and you want to use the Samsung Apps function in Smart Hub, you must register your Samsung Apps account here. See page 69 for more information.
- Using your remote and the on-screen Keypad, enter your site ID and password. When done, press the ENTER button.

NOTE
This is the ID and password you normally use to access your account on this site.
-
If you have entered the ID and password correctly, the Registered Successfully message appears.
-
If you pressed OK, repeat Steps 2 through 4 to associate another Service Provider.
-
When you are done, press the RETURN button.
Change Password
The Change Password function lets you change your Smart Hub password. To change the password, follow these steps:
- Select Change Password, and then press the ENTER button.
- Enter your current password. The next screen appears.
- On the next screen, enter a new password on the first line. Enter it again on the second line to confirm.
- The Changing Password Complete message screen appears. Press the ENTER button or wait for the screen to close - about 5 seconds.
Remove Service Accounts
The Remove Service Accounts function cancels all your current registered Service Accounts that you registered on the Register Service Account screen.
Deactivate Account
The Deactivate Account function deactivates your Smart TV Account and deletes it and all your account settings entirely from Smart Hub.
Reset
The Reset function initializes all downloaded widgets, erases all user accounts and settings from the product, and resets all Smart Hub settings to the factory default settings. It then restarts Smart Hub as if it were starting for the first time. Your account, however, remains on the Smart Hub server. To log into your account, enter your ID and password on the Create Account screen.
To use the Reset function, follow these steps:
-
In the Account Management menu, select Reset, and then press the ENTER button. The Reset screen appears.
-
Enter the your Security password. This is the password you entered if you set up a BD or DVD Parental rating (See page 42). If you did not, enter 0000.
-
After a few moments, Smart Hub automatically resets. The screen may go black, then Smart Hub re-appears. In a few moments, it starts the re-initialization procedure.
- To complete the re-initialization, go to Step 4 in Starting Smart Hub for the First Time. (See page 62)

NOTE
If you forgot your password, press the STOP (■) button on the front panel of the product for more than 5 seconds with no disc inserted.
Properties
The Properties menu item lists three functions that display information about Smart Hub :
More
Lists information about Smart Hub including version number, the number of services installed, memory usage, and the unique product ID.
Check the speed of your internet connection
Runs a test which shows how fast your connection to the Samsung's server is in Mbps (Megabits per second). Speeds lower than 1.5 Mbps can limit your enjoyment of Smart Hub.
Terms of Service Agreement
Displays the Terms of Service Agreement.
The Edit Mode Menu - YELLOW (C)
The functions in the Edit Mode menu let you manipulate the widgets in the My Applications section of the Smart Hub screen. Using these functions, you can lock and unlock access to some widgets, New Folder and move widgets to them, rename folders, delete widgets, and change the position of widgets on the screen. To access the Edit Mode Menu, and then select a menu item, follow these steps:
-
Press the YELLOW (C) button on your remote. The Edit Mode menu bar appears on the bottom of the screen.
-
Press the ▲▼◀▶ to select a menu item, and then press the ENTER button.
The functions in the Edit Mode Menu bar are described below.

NOTE
Some menu items may not appear on the screen. To see these items, press the ◀▶ to move to the screen edge, and then press one more time to reveal the items.
- You can close the bar by highlighting the X on the bottom right side, and then pressing the ENTER button.
Move
The Move function lets you change the screen position of a widget. To use the Move function, follow these steps:
- Press the YELLOW (C) button on your remote.
- Select a widget, and then press the ENTER button. A check appears above the widget.
- Press the ▲▼◀▶ to select Move, and then press the ENTER button. The Move window opens.
- Press the ▲▼◀▶ to move the icon. Press the ENTER button when the icon is in the position of your choice. The widget moves to its new location.
New Folder
The New Folder function lets you create and name new folders. Once you have created a folder, you can move widgets into it. To use the New Folder function, follow these steps:
- Press the YELLOW (C) button on your remote.
- Press the ▲▼◀▶ to move the cursor to New Folder, and then press the ENTER button. The New Folder window and a keypad appear.
- Use the keypad to enter the name of the folder, and then press the ENTER button. The New Folder screen closes and the New Folder appears on the Smart Hub screen.
English
Network Services
Move to Folder
The Move to Folder function lets you move a widget to a folder. To use the Move to Folder function, follow these steps:
- Press the YELLOW (C) button on your remote.
- Select a widget, and then press the ENTER button.
- Press the ▲▼◀▶ to select Move to Folder, and then press the ENTER button. The Move to Folder window opens.
- Press the ▲▼◀▶ to select a folder, and then press the ENTER button. The Moved to Folder message appears, and then closes. The widget has been moved to the folder.
To Access Widgets in a Folder
- Close the Edit Mode menu.
- In My Applications, press the ▲▼◀▶ to select a folder, and then press the ENTER button. The folder opens.
- Select a widget, and then press the ENTER button. The widget's application or service starts.
To Edit Items in a Folder
Select a folder, and then press the ENTER button. The folder opens.
Press the YELLOW (C) button on your remote. The Edit buttons appear at the bottom of the screen.
These buttons work the same as the Edit Mode menu buttons on the main screen. For example, to move a widget back to the My Applications main screen:
- Select the widget.
- Select Move to Folder, and then press the ENTER button. The Move to Folder window appears.
- Select My Applications, and then press the ENTER button. The Move to Folder window closes and the widget returns to the main My Applications screen.
Rename Folder
The Rename Folder function lets you rename folders. To use the Rename Folder function, follow these steps:
- Press the YELLOW (C) button on your remote.
- Press the ▲▼◀▶ to select a folder, and then press the ENTER button.
- Press the ▲▼◀▶ to select Rename a Folder, and then press the ENTER button. The Folder Rename window and a keyboard appears.
- Use the key board to enter a new name, and then press the ENTER button. The Rename window closes and the new name appears below the folder.
Lock
The Lock function lets you lock some widgets in My Applications so they can not be opened without entering the Parental Security Code.
To use the Lock function, follow these steps:
- Press the YELLOW (C) button on your remote.
- Press the ▲▼◀▶ to select a widget, and then press the ENTER button. If the widget can be locked, the Lock menu item is enabled.
- Press the ▲▼◀▶ to select Lock, and then press the ENTER button. The Security window appears.
- Enter your Parental Security Code (See page 42). If you have not created a Parental Security Code, enter 0000.
- Press the ENTER button. The Lock Service window appears confi rming the lock, and then closes. A lock symbol appears next to the widget.
Unlock
- Press the YELLOW (C) button on your remote.
- Press the ▲▼◀▶ to select a locked widget, and then press the ENTER button.
- Press the ▲▼◀▶ to select Unlock, and then press the ENTER button. The Security window appears.
- Enter the Parental Security Code (See page 42). If you have not created a Parental Security Code, enter 0000.
- Press the ENTER button. The Lock Service Released window appears confirming the lock has been release, and then closes.
Delete
The Delete function lets you delete widgets from My Applications. To use the Delete function, follow these steps:
- Press the YELLOW (C) button on your remote.
- Press the ▲▼◀▶ to select a widget, and then press the ENTER button.
- Press the ▲▼◀▶ to select Delete, and then press the ENTER button. The message, "Do you want to delete the selected item(s)?" appears.
- Select Yes, and then press the ENTER button. The widget is deleted.
The Sort Menu - GREEN (B)
The functions in the Sort Menu let you sort the widgets in My Applications by Name, Date, Frequency (of use), and Category. If you manually change the position of a widget, the Sort Menu automatically highlights User Defined when you start it.
To sort the widgets in My Applications, follow these steps:
- Press the GREEN (B) button on your remote.
- Press the ◀▶ to select a sorting method, and then press the ENTER button. Smart Hub sorts the widgets by the method you have chosen.
Samsung Apps
Samsung Apps lets you download for pay or free-of-charge applications and services to your Blu-ray Home Cinema and view or use them on your TV.
These applications and services include videos, music, photos, games, news, sports, etc. Widgets for the new apps appear in My Applications.
Additional applications and services are added regularly.
For Pay Apps
To download for pay apps, you need to create a Samsung Account and add a credit card to the account.
To create a Samsung account, please visit www.samsung.com

NOTE
■ This service may not provide in some countries.
Accessing the Samsung Apps Screen
To access Samsung Apps, press the ▲▼◀▶ buttons to navigate to the Samsung Apps area on the Smart Hub main screen, and then press the ENTER button. The Samsung Apps screen appears.

NOTE
If this is the first time you are accessing this screen, the terms of service window appears. Select Agree, and then press the ENTER button.
Network Services
Using the Samsung Apps Screen
To use the Samsung Apps screen, follow these steps:
- Press the ◀▶ buttons to move to the category list on the left.
- Press the ▲▼ to highlight a category. In a few seconds, the Samsung Apps screen displays the applications in that category. The Sort tabs appear across the top.
- Press the ▶ button to move to the displayed applications or services.
- Press the ▲▼◀▶ buttons to select an application or service, and then press the ENTER button. The Application Details screen appears describing the service or application.
- Select Download Now, and then press the ENTER button. If the application or service is free, it downloads and runs. If not, and there is a fee, follow the directions on the screen to complete the download.

NOTE
■ Some apps are free to download, but require registration with the provider or a paid account with the provider to use.
- Widgets for applications and services you have downloaded from Samsung Apps appear in My Applications.
Sort By Tabs
You can access the Sort By tabs on the top of the screen using the ▲▼◀▶ buttons. Each tab displays the services or applications in the category you chose, sorted by the criteria on the tab (Recommended, Most Downloaded, Most Recent, Name).
You can also use the BLUE (D) button on your remote to access the Sort By tabs. Each time you press the BLUE (D) button, you change the display from one sort tab to the next.
Samsung Apps by category
The following categories are available:
- What's New? : Displays newly registered applications.
• Video : Displays various video media such as movies, TV shows, and short length videos. - Game : Displays various games such as sudoku and chess.
- Sports : Displays various sports media services such as match information, images, and short length videos.
- Lifestyle : Includes various lifestyle media services such as music, personal photo management tools, and social networking such as Facebook and Twitter.
• Information : Includes various information services such as news, stocks, and weather. - Other : Includes other miscellaneous services.
My Account
My Account gives you access to your Samsung Apps order and download history, and to the My Apps Cash screen. You must have a Samsung account to access this information.
Help
If you have questions about Samsung Apps, check Help fi rst. If none of the tips apply, please visit www.samsung.com.
To use the Help function, follow these steps:
- Press the ▲▼◀▶ buttons to select Help, and then press the ENTER button.
- Press the ◀▶ to enter Help after it appears.
- Press the ▲▼ to scroll the Help text.
- Press the ◀ to exit Help.
Using the colored buttons on your remote with Samsung Apps
- RED (A) (Login) : To log into your Smart TV Account.
- GREEN (B) (Thumbnail/List View): To toggle applications between Thumbnail and List view.
- BLUE (D) (Sort By): To sort the applications in a category by Recommended, Most Downloaded, Most Recent, or Name.
- Return: To return to the previous menu.

NOTE
- The Internet contents services may be added or deleted by providers without notice.
For instructions to use Your Video or Search Function, please visit www.samsung.com
Using vTuner Function
vTuner is the fuction of the listening a radio. If you press the vTuner button, you can move to vTuner widget.
Press the vTuner button.

BD-LIVE™
Once the product is connected to the network, you can enjoy various movie-related service contents using a BD-LIVE compliant disc.
- Attach a USB memory stick to the USB jack on the front of the product, and then check its remaining memory. The memory device must have at least 1GB of free space to accommodate the BD-LIVE services.
- Insert a Blu-ray disc that supports BD-LIVE.
- Select an item from various BD-LIVE service contents provided by the disc manufacturer.

NOTE
The way you use BD-LIVE and the provided contents may differ, depending on the disc manufacturer.
Using the AllShare Function
AllShare lets you play music, video, and photo fi les located in your PC or your DLNA compatible mobile phone or NAS on the product.
To use AllShare with your product, you must connect the product to your network (See pages 25\~26).
To use AllShare with your PC, you must install AllShare software on your PC.
If you have a DLNA compatible mobile phone or NAS, you can use AllShare without any additional software.
You can download the PC software and get detailed instructions for using AllShare from the Samsung.com web site.
Other information
Troubleshooting
Refer to the chart below when this product does not function properly. If the problem you are experiencing is not listed below or if the instruction below does not help, turn off the product, disconnect the power cord and contact the nearest authorized dealer or Samsung Electronics Service Centre.
| Symptom Check/Remedy | |
| I cannot eject the disc. | Is the power cord plugged securely into the outlet?Turn off the power and then turn it back on. |
| The iPod fails to connect. | Check the condition of the iPod connector and Dock.Keep the iPod S/W version up to date. |
| Playback does not start. | Check the region number of the BD/DVD.BD/DVD discs purchased from abroad may not be playable.CD-ROMs and DVD-ROMs cannot be played on this Product.Make sure that the rating level is correct. |
| Playback does not start immediately when the Play/Pause button is pressed. | Are you using a deformed disc or a disc with scratches on the surface?Wipe the disc clean. |
| Sound is not produced. | No sound is heard during fast playback, slow playback, and step motion playback.Are the speakers connected properly? Is the speaker setup correctly customized?Is the disc severely damaged? |
| Sound can be heard only from a few speakers and not all 8. | On certain BD/DVD discs, sound is output from the front speakers only.Check if the speakers are connected properly.Adjust the volume.When listening to a CD, radio or TV, sound is output to the front speakers only.Select "PRO LOGIC II" by pressing ☐II (Dolby Pro Logic II) on the remote control to use all six speakers. |
| Dolby Digital 7.1 CH Surround Sound is not produced. | Is there "Dolby Digital 7.1 CH" mark on the disc? Dolby Digital 7.1 CH Surround Sound is produced only if the disc is recorded with 7.1 channel sound.Is the audio language correctly set to Dolby Digital 7.1-CH in the information display? |
| The remote control does not work. | Is the remote control being operated within its operation range of angle and distance?Are the batteries drained?Have you selected the mode(TV/BD) functions of the remote control (TV or BD) correctly? |
| Disc is rotating but no picture is produced.Picture quality is poor and picture is shaking. | Is the TV power on?Are the video cables connected properly?Is the disc dirty or damaged?A poorly manufactured disc may not be playable. |
| Audio language and subtitles do not work. | Audio language and subtitles will not work if the disc does not contain them. |
| Menu screen does not appear even when the menu function is selected. | Are you using a disc that does not contain menus? |
72 English
| Symptom Check/Remedy | |
| Aspect ratio cannot be changed. | You can play 16:9 BD/DVDs in 16:9 Wide mode, 4:3 Letter Box mode, or 4:3 Pan - Scan mode, but 4:3 BD/DVDs can be seen in 4:3 ratio only. Refer to the Blu-ray Disc jacket and then select the appropriate function. |
| The product is not working.(Example: The power goes out or a strange noise is heard.)The Product is not working normally. | Press and hold the remote control's STOP (■) button for 5 seconds in STANDBY mode.- Using the RESET function will erase all stored settings.Do not use this unless necessary. |
| The rating level password has been forgotten. | With no disc in the product, press and hold the product's STOP (■) button for longer than 5 seconds.INITappears on the display and all settings will return to the default values.And then press the POWER button.- Using the RESET function will erase all stored settings.Do not use this unless necessary. |
| Can't receive radio broadcasts. | Is the antenna connected properly?If the antenna's input signal is weak, install an external FM antenna in an area with good reception. |
| While listening to TV audio through the Product, no sound is heard. | If the EJECT (▲) button is pressed while listening to TV audio using the D.IN or AUX functions, the BD/DVD functions are turned on and the TV audio is muted. |
| "Not Available" appears on screen. | The features or action cannot be completed at this time because:The BD/DVD's software restricts it.The BD/DVD's software doesn't support the feature (e.g., angles)The feature is not available at the moment.You've requested a title or chapter number or search time that is out of range. |
| If the HDMI output is set to a resolution your TV cannot support (for example, 1080p), you may not see a picture on your TV. | Press and hold the STOP (■) button on front panel for more than 5 seconds with no disc inserted. All settings will revert to the factory settings. |
| No HDMI output. | Check the connection between the TV and the HDMI jack of the Product.Check if your TV supports 576p/480p/720p/1080i/1080p HDMI input resolution. |
| Abnormal HDMI output screen. | If random noise appears on the screen, it means that TV does not support HDCP (High-bandwidth Digital Content Protection). |
Other information
| Symptom Check/Remedy | |
| PC Share Manager function | |
| I can see folders shared through the PC Share Manager, but I cannot see the fi les. | Since it shows only fi les corresponding to the Image, Music, and Movie categories, fi les that do not correspond to these categories may not be displayed. |
| AllShare function | |
| Video is played intermittently. | Check if the network is stable.Check if the network cable is properly connected and if the network is not overloaded.Wireless connection between the server and the product is unstable.Check the connection. |
| AllShare connection between TV and PC is unstable. | IP address under the same subnetwork should be unique, otherwise IP collision can results in such a phenomenon.Check if you have a fi rewall enabled.If so, disable the fi rewall function. |
| BD-LIVE | |
| I cannot connect to the BD-LIVE server. | Check whether the network connection is successful or not by using Network Test menu.Check whether the USB memory device is connected with product or not.The memory device must have at least 1GB of free space to accommodate the BD-LIVE service.You can check the available size in BD Data Management. (See page 41)Please check whether the BD-LIVE Internet Connection menu is set to Allow(All).If all above fails, contact the contents provider or update the latest fi rmware. |
| When using the BD-LIVE service, an error occurs. | The memory device must have at least 1GB of free space to accommodate the BD-LIVE service.You can check the available size in BD Data Management. (See page 41) |

NOTE
- When the factory default settings are restored, all the user data stored in the BD data will be deleted.
[ Recommendation ]- EU Only
CE!
Hereby, Samsung Electronics, declares that this Home Cinema System is in compliance with the essential requirements and other relevant provisions of Directive 1999/5/EC.
The official Declaration of Conformity may be found at http://www.samsung.com, go to Support > Search Product Support and enter the model name.
This equipment may only be used indoors.
This equipment may be operated in all EU countries.
74
English
Specifications
| General | Weight 3.5 kg | |
| Dimensions 429.3 (W) x 58.4 (H) x 325.1 (D) mm | ||
| Operating Temperature Range +5°C to +35°C | ||
| Operating Humidity Range 10 % to 75 % | ||
| FM Tuner | Signal/noise ratio | 55 dB |
| Usable sensitivity 12 dB | ||
| Total harmonic distortion | 0.5 % | |
| Disc | BD (Blu-ray Disc) Reading Speed: 9.834 m/sec | |
| DVD (Digital Versatile Disc) | Reading Speed: 6.98 ~ 7.68 m/sec. | |
| Approx. Play Time (Single Sided, Single Layer Disc): 135 min. | ||
| CD: 12cm (COMPACT DISC) | Reading Speed: 4.8 ~ 5.6 m/sec. | |
| Maximum Play Time: 74 min. | ||
| CD: 8cm (COMPACT DISC) | Reading Speed: 4.8 ~ 5.6 m/sec. | |
| Maximum Play Time: 20 min. | ||
| Video Output | Composite Video | 1 channel: 1.0 Vp-p (75 Ω load) |
| Blu-ray Disc: 576i/480i DVD: 576i/480i | ||
| Component Video | Y: 1.0 Vp-p (75 Ω load) | |
| Pr: 0.70 Vp-p (75 Ω load) | ||
| Pb: 0.70 Vp-p (75 Ω load) | ||
| BD: 576i/480i | ||
| DVD: 576p/480p, 576i/480i | ||
| Video/Audio | HDMI | 1080p, 1080i, 720p, 576p/480p |
| PCM multichannel audio, Bitstream audio, PCM audio | ||
| Amplifier | Front speaker output 165W x 2(3) | Ω) |
| Front Top speaker output 165W x 2(3) | Ω) | |
| Centre speaker output 170W(3) | Ω) | |
| Surround speaker output 165W x 2(3) | Ω) | |
| Subwoofer speaker output 170W(3) | Ω) | |
| Frequency response | Analogue input 20Hz~20kHz (±3dB) | |
| Digital input 20Hz~40kHz (±-4dB) | ||
| S/N Ratio 70dB | ||
| Channel separation | 60dB | |
| Input sensitivity | (AUX)500mV | |
Other information
| Speaker | Speaker system | 7.1ch speaker system | ||||
| Front Front Top | Surround Centre | Subwoofer | ||||
| Impedance | 3 | Ω | 3 | Ω | 3 | |
| Frequency range | 140Hz~20kHz | 140Hz~20kHz | 140Hz~20kHz | 140Hz~20kHz | 40Hz ~ 160Hz | |
| Output sound pressure level | 86dB/W/M | 86dB/W/M | 86dB/W/M | 88dB/W/M | ||
| Rated input | 165W | 165W | 170W | 170W | ||
| Maximum input | 330W | 330W | 340W | 340W | ||
| Dimensions(W x H x D) | Front/Front Top : 90 x 1320 x 119 mm (Stand base : 250 x 250 mm)Surround : 90 x 1300 x 119 mm (Stand base : 250 x 250 mm)Centre : 360 x 74.5 x 68.5 mmSubwoofer : 200 x 390 x 350 mm | |||||
| Weights | Front/Front Top : 4.96 kg, Surround : 3.80 kgCentre : 0.98 kg, Subwoofer : 5.70 kg | |||||
*: Nominal specification
- Samsung Electronics Co., Ltd reserves the right to change the specifications without notice.
- Weight and dimensions are approximate.
- Design and specifications are subject to change without prior notice.
- For the power supply and Power Consumption, refer to the label attached to the product.
SWA-5000
| Weight | 1.1 kg |
| Dimensions (W x H x D) | 76.2 x 228 x 152 mm |
| Operating Temperature Range | +5°C to +35°C |
| Operating Humidity Range | 10% ~ 75% |
| Output | 165W x 2 CH |
| Frequency range | 20Hz~20KHz |
| S/N Ratio | 65dB |
Contact SAMSUNG WORLD WIDE
If you have any questions or comments relating to Samsung products, please contact the SAMSUNG customer care centre.
| Area Contact Centre | Web Site | |
| ▪ North America | ||
| Canada 1-800-SAMSUNG (726-7864) www.samsung.com | ||
| Mexico 01-800-SAMSUNG (726-7864) www.samsung.com | ||
| U.S.A 1-800-SAMSUNG (726-7864) www.samsung.com | ||
| ▪ Latin America | ||
| Argentine 0800-333-3733 www.samsung.com | ||
| Brazil 0800-124-421 / 4004-0000 www.samsung.com | ||
| Chile 800-SAMSUNG (726-7864) www.samsung.com | ||
| Colombia 01-800-0112112 www.samsung.com | ||
| Costa Rica 0-800-507-7267 www.samsung.com | ||
| Dominica 1-800-751-2676 www.samsung.com | ||
| Ecuador 1-800-10-7267 www.samsung.com | ||
| El Salvador | 800-6225 | www.samsung.com |
| Guatemala 1-800-299-0013 www.samsung.com | ||
| Honduras | 800-7919267 | www.samsung.com |
| Jamaica | 1-800-234-7267 www.samsung.com | |
| Nicaragua | 00-1800-5077267 | www.samsung.com |
| Panama 800-7267 www.samsung.com | ||
| Peru | 0-800-777-08 | www.samsung.com |
| Puerto Rico | 1-800-682-3180 www.samsung.com | |
| Trinidad & Tobago | 1-800-SAMSUNG (726-7864) www.samsung.com | |
| Venezuela | 0-800-100-5303 www.samsung.com | |
| ▪ Europe | ||
| Albania | 42 27 5755 | - |
| Austria | 0810 - SAMSUNG (7267864, € 0.07/mln) | www.samsung.com |
| Belgium 02-201-24-18 | www.samsung.com/be (Dutch)www.samsung.com/be_fr (French) | |
| Bosnia | 05 133 1999 | - |
| Bulgaria 07001 33 11 www.samsung.com | ||
| Croatia 062 SAMSUNG (062 726 7864) www.samsung.com | ||
| Czech | 800-SAMSUNG (800-726786) | www.samsung.com |
| Samsung Zrt., česká organizační složka, Oasis Florenc, Soko-lovská394/17, 180 00, Praha 8 | ||
| Denmark | 70 70 19 70 | www.samsung.com |
| Finland | 030 - 6227 515 | www.samsung.com |
| France | 01 48 63 00 00 | www.samsung.com |
| Germany | 01805 - SAMSUNG (726-7864 € 0,14/Min) | www.samsung.com |
| Hungary | 06-80-SAMSUNG (726-7864) www.samsung.com | |
| Italia | 800-SAMSUNG (726-7864) www.samsung.com | |
| Kosovo | +381 0113216899 | - |
| Luxemburg | 261 03 710 | www.samsung.com |
| Macedonia | 023 207 777 | - |
| Montenegro | 020 405 888 | - |
| Netherlands | 0900-SAMSUNG (0900-7267864) (€ 0,10/Min) | www.samsung.com |
| Norway | 815-56 480 | www.samsung.com |
| Poland | 0 801 1SAMSUNG (172678) / 022-607-93-33 | www.samsung.com |
| Portugal | 80820-SAMSUNG (726-7864) | www.samsung.com |
| Rumania | 1. 08010 SAMSUNG (72678) - doar din rejeaua Romtelecom, tarif local2. 021,206.01.10 - din orice rejea, tarif normal | www.samsung.com |
| Area Contact Centre | Web Site | |
| Serbia | 0700 Samsung (0700 726 7864) | www.samsung.com |
| Slovakia 0800-SAMSUNG (726-7864) www.samsung.com | ||
| Spain 902-1-SAMSUNG (902 172 678) www.samsung.com | ||
| Sweden | 0771 726 7864 (SAMSUNG) | www.samsung.com |
| Switzerland | 0848-SAMSUNG (7267864, CHF 0.08/min) | www.samsung.com/chwww.samsung.com/ch_fr/(French) |
| U.K | 0330 SAMSUNG (7267864) | www.samsung.com |
| Eire | 0818 717100 | www.samsung.com |
| Lithuania | 8-800-77777 | www.samsung.com |
| Latvia | 8000-7267 | www.samsung.com |
| Estonia | 800-7267 | www.samsung.com |
| CIS | ||
| Russia | 8-800-555-55-55 | www.samsung.com |
| Georgia 8-800-555-555 | ||
| Armenia | 0-800-05-555 | - |
| Azerbaijan | 088-55-55-555 | - |
| Kazakhstan | 8-10-800-500-55-500 (GSM: 7799) | www.samsung.com |
| Uzbekistan | 8-10-800-500-55-500 www.samsung.com | |
| Kyrgyzstan | 00-800-500-55-500 | www.samsung.com |
| Tadjikistan | 8-10-800-500-55-500 www.samsung.com | |
| Ukraine 0-800-502-000 | www.samsung.uawww.samsung.com/ua_ru | |
| Belarus 810-800-500-55-500 | ||
| Moldova | 00-800-500-55-500 - | |
| Asia Pacific | ||
| Australia | 1300 362 603 | www.samsung.com |
| New Zealand | 0800 SAMSUNG (0800 726 786) | www.samsung.com |
| China | 400-810-5858 / 010-6475 1880 | www.samsung.com |
| Hong Kong | (852) 3698 4698 | www.samsung.com/hkwww.samsung.com/hk_en/ |
| India | 3030 8282 / 1800 110011 / 1800 3000 8282 / 1800 266 8282 | www.samsung.com |
| Indonesia | 0800-112-8888 / 021-5699-7777 | www.samsung.com |
| Japan | 0120-327-527 | www.samsung.com |
| Malaysia | 1800-88-9999 | www.samsung.com |
| Philippines | 1-800-10-SAMSUNG(726-7864) / 1-800-3-SAMSUNG(726-7864) / 1-800-8-SAMSUNG(726-7864) / 02-5805777 | www.samsung.com |
| Singapore | 1800-SAMSUNG (726-7864) www.samsung.com | |
| Thailand | 1800-29-3232 / 02-689-3232 | www.samsung.com |
| Taiwan | 0800-329-999 | www.samsung.com |
| Vietnam 1 800 588 889 www.samsung.com | ||
| Middle East | ||
| Bahrain 8000-4726 www.samsung.com | ||
| Egypt 08000-726786 www.samsung.com | ||
| Jordan | 800-22273 | www.samsung.com |
| Morocco | 080 100 2255 | www.samsung.com |
| Oman | 800-SAMSUNG (726-7864) www.samsung.com | |
| Saudi Arabia 9200-21230 www.samsung.com | ||
| Turkey | 444 77 11 | www.samsung.com |
| U.A.E 800-SAMSUNG (726-7864) www.samsung.com | ||
| Africa | ||
| Nigeria 0800-SAMSUNG (726-7864) www.samsung.com | ||
| South Africa | 0860-SAMSUNG (726-7864 ) | www.samsung.com |
SAMSUNG

Correct disposal of batteries in this product
(Applicable in the European Union and other European countries with separate battery return systems.)
This marking on the battery, manual or packaging indicates that the batteries in this product should not be disposed of with other household waste at the end of their working life. Where marked, the chemical symbols Hg, Cd or Pb indicate that the battery contains mercury, cadmium or lead above the reference levels in EC Directive 2006/66. If batteries are not properly disposed of, these substances can cause harm to human health or the environment.
To protect natural resources and to promote material reuse, please separate batteries from other types of waste and recycle them through your local, free battery return system.

Correct Disposal of This Product (Waste Electrical & Electronic Equipment)
(Applicable in the European Union and other European countries with separate collection systems)
This marking on the product, accessories or literature indicates that the product and its electronic accessories (e.g. charger, headset, USB cable) should not be disposed of with other household waste at the end of their working life. To prevent possible harm to the environment or human health from uncontrolled waste disposal, please separate these items from other types of waste and recycle them responsibly to promote the sustainable reuse of material resources.
Household users should contact either the retailer where they purchased this product, or their local government office, for details of where and how they can take these items for environmentally safe recycling.
Business users should contact their supplier and check the terms and conditions of the purchase contract. This product and its electronic accessories should not be mixed with other commercial wastes for disposal.
HT-D6759W
7.1CH Blu-ray™
LASERPRODUKT DER KLASSE 1
| Marke Code | Marke Code | ||
| Admiral(M.Wards) | 56, 57, 58 | Mitsubishi/MGA | 18, 40, 59, 60, 75 |
| A Mark | 01, 15 | MTC | 18 |
| Anam | 01, 02, 03, 04, 05,06, 07, 08, 09, 10,11, 12, 13, 14 | NEC | 18, 19, 20, 40, 59, 60 |
| Nikei | 03 | ||
| Onking | 03 | ||
| AOC | 01, 18, 40, 48 | Onwa | 03 |
| Bell &Howell(M.Wards) | 57, 58, 81 | Panasonic | 06, 07, 08, 09, 54,86, 67, 73, 74 |
| Brocsonic | 59, 60 | Penney | 18 |
| Candle | 18 | Philco | 03, 15, 17, 18, 48,54, 59, 62, 69, 90 |
| Cetronic | 03 | Philips | 15, 17, 18, 40,48, 54, 62, 72 |
| Citizen | 03, 18, 25 | ||
| Cinema | 97 | Pioneer | 63, 66, 80, 91 |
| Classic | 03 | Portland | 15, 18, 59 |
| Concerto | 18 | Proton | 40 |
| Contec | 46 | Quasar | 06, 66, 67 |
| Coronado | 15 | RadioShack | 17, 48, 56, 60,61, 75 |
| Craig | 03, 05, 61, 82, 83, 84 | RCA/Proscan | 18, 59, 67, 76, 77,78, 92, 93, 94 |
| Croslex | 62 | ||
| Crown | 03 | Realistic | 03, 19 |
| CurtisMates | 59, 61, 63 | Sampo | 40 |
| CXC | 03 | Samsung | 00, 15, 16, 17, 40,43, 46, 47, 48, 49,59, 60, 98 |
| Daewoo | 02, 03, 04, 15, 16,17, 18, 19, 20, 21,22, 23, 24, 25, 26,27, 28, 29, 30, 32,34, 35, 36, 48, 59, 90 | Sanyo | 19, 61, 65 |
| Scott | 03, 40, 60, 61 | ||
| Daytron | 40 | Sears | 15, 18, 19 |
| Dynasty | 03 | Sharp | 15, 57, 64 |
| Emerson | 03, 15, 40, 48, 59, 61,64, 82, 83, 94, 85 | Signature2000(M.Wards) | 57, 58 |
| Fisher | 19, 65 | Sony | 50, 51, 52, 53, 55 |
| Funai | 03 | Soundesign | 03, 40 |
| Futuretech | 03 | Spectricon | 01 |
| GeneralElectric (GE) | 06, 40, 56, 59,66, 67, 68 | SSS | 18 |
| Hall Mark | 40 | Sylvania | 18, 40, 48, 54,59, 60, 62 |
| Hitachi | 15, 18, 50, 59, 69 | Symphonic | 61, 95, 96 |
| Inkel | 45 | Tatung | 06 |
| JC Penny | 56, 59, 67, 86 | Techwood | 18 |
| JVC | 70 | Teknika | 03, 15, 18, 25 |
| KTV | 59, 61, 87, 88 | TMK | 18, 40 |
| KEC | 03, 15, 40 | Toshiba | 19, 57, 63, 71 |
| KMC | 15 | Vidtech | 18 |
| LG(Goldstar) | 01, 15, 16, 17, 37, 38,39, 40, 41, 42, 43, 44 | Videch | 59, 60, 69 |
| Luxman | 18 | Wards | 15, 17, 18, 40,48, 54, 60, 64 |
| LXI(Sears) | 19, 54, 56, 59,60, 62, 63, 65, 71 | Yamaha | 18 |
| Magnavox | 15, 17, 18, 48, 54,59, 60, 62, 72, 89 | York | 40 |
| Marantz | 40, 54 | Yupiteru | 03 |
| Matsui | 54 | Zenith | 58, 79 |
| MGA | 18, 40 | Zonda | 01 |
| Dongyang | 03, 54 | ||
Anschlüsse
(L) (R)
FRONT/OBERER-FRONT
STANDFUSS
SUBWOOFER
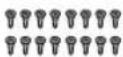
SCHRAUBE (4 x 20): 16 Stk.
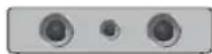
CENTER

SCHRAUBE (5 x 15): 8 Stk.
(L) (R)
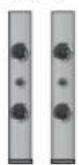
SURROUND
natural_image
Illustration of a hand using a tool to press or install a wooden block on a flat base (no text or symbols visible)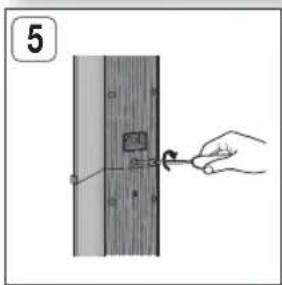

natural_image
Illustration of a hand using a tool to press or install a device on a stand (no text or symbols visible)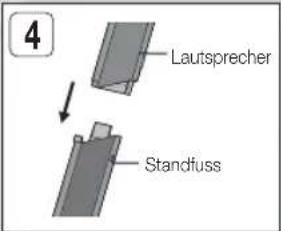
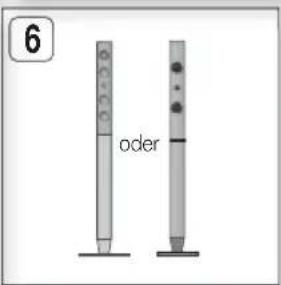
18 Deutsch
20 Deutsch
Track 1 Track 2 Track 3 Track 4 Track 5
Aus → Hoch → Mittel → Gering.

HINWEIS
Aus → Hoch → Gering → Aus.
natural_image
Illustration of a CD or DVD player with an open rear panel and cable, showing internal components (no text or symbols)PRODUIT LASER DE CLASSE 1
| Marque Code | Marque Code | ||
| Admiral(M.Wards) | 56, 57, 58 | Mitsubishi/MGA | 18, 40, 59, 60, 75 |
| A Mark | 01, 15 | MTC | 18 |
| Anam | 01, 02, 03, 04, 05,06, 07, 08, 09, 10,11, 12, 13, 14 | NEC | 18, 19, 20, 40, 59, 60 |
| Nikei | 03 | ||
| Onking | 03 | ||
| AOC | 01, 18, 40, 48 | Onwa | 03 |
| Bell &Howell(M.Wards) | 57, 58, 81 | Panasonic | 06, 07, 08, 09, 54,86, 67, 73, 74 |
| Brocsonic | 59, 60 | Penney | 18 |
| Candle | 18 | Philco | 03, 15, 17, 18, 48,54, 59, 62, 69, 90 |
| Cetronic | 03 | Philips | 15, 17, 18, 40,48, 54, 62, 72 |
| Citizen | 03, 18, 25 | ||
| Cinema | 97 | Pioneer | 63, 66, 80, 91 |
| Classic | 03 | Portland | 15, 18, 59 |
| Concerto | 18 | Proton | 40 |
| Contec | 46 | Quasar | 06, 66, 67 |
| Coronado | 15 | RadioShack | 17, 48, 56, 60,61, 75 |
| Craig | 03, 05, 61, 82, 83, 84 | RCA/Proscan | 18, 59, 67, 76, 77,78, 92, 93, 94 |
| Croslex | 62 | ||
| Crown | 03 | Realistic | 03, 19 |
| CurtisMates | 59, 61, 63 | Sampo | 40 |
| CXC | 03 | Samsung | 00, 15, 16, 17, 40,43, 46, 47, 48, 49,59, 60, 98 |
| Daewoo | 02, 03, 04, 15, 16,17, 18, 19, 20, 21,22, 23, 24, 25, 26,27, 28, 29, 30, 32,34, 35, 36, 48, 59, 90 | Sanyo | 19, 61, 65 |
| Scott | 03, 40, 60, 61 | ||
| Daytron | 40 | Sears | 15, 18, 19 |
| Dynasty | 03 | Sharp | 15, 57, 64 |
| Emerson | 03, 15, 40, 48, 59, 61,64, 82, 83, 94, 85 | Signature2000(M.Wards) | 57, 58 |
| Fisher | 19, 65 | Sony | 50, 51, 52, 53, 55 |
| Funai | 03 | Soundesign | 03, 40 |
| Futuretech | 03 | Spectricon | 01 |
| GeneralElectric (GE) | 06, 40, 56, 59,66, 67, 68 | SSS | 18 |
| Hall Mark | 40 | Sylvania | 18, 40, 48, 54,59, 60, 62 |
| Hitachi | 15, 18, 50, 59, 69 | Symphonic | 61, 95, 96 |
| Inkel | 45 | Tatung | 06 |
| JC Penny | 56, 59, 67, 86 | Techwood | 18 |
| JVC | 70 | Teknika | 03, 15, 18, 25 |
| KTV | 59, 61, 87, 88 | TMK | 18, 40 |
| KEC | 03, 15, 40 | Toshiba | 19, 57, 63, 71 |
| KMC | 15 | Vidtech | 18 |
| LG(Goldstar) | 01, 15, 16, 17, 37, 38,39, 40, 41, 42, 43, 44 | Videch | 59, 60, 69 |
| Luxman | 18 | Wards | 15, 17, 18, 40,48, 54, 60, 64 |
| LXI(Sears) | 19, 54, 56, 59,60, 62, 63, 65, 71 | Yamaha | 18 |
| York | 40 | ||
| Magnavox | 15, 17, 18, 48, 54,59, 60, 62, 72, 89 | Yupiteru | 03 |
| Marantz | 40, 54 | Zenith | 58, 79 |
| Matsui | 54 | Zonda | 01 |
| MGA | 18, 40 | Dongyang | 03, 54 |
16
Français
Branchements
natural_image
Illustration of a hand using a tool to press or install a wooden block on a flat surface (no text or symbols)5
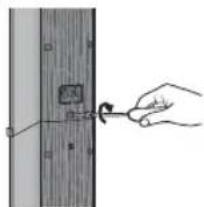
natural_image
Hand holding a tool interacting with a wooden panel (no text or symbols visible)2

natural_image
Illustration of a hand using a tool to press or install a device on a stand (no text or symbols visible)4
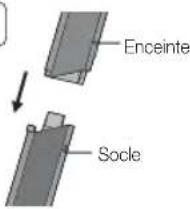
6
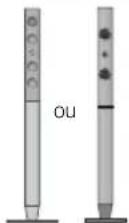
18 Français
20 Français
Avant G → Centre → Avant D → Surround D → Avant D. → Avant G. → Surround G → Caisson basses
natural_image
Illustration of an iPod device connected to a cable, showing internal components and a magnified view (no text or symbols)CLASS 1 LASER PRODUCT
KLASSE 1 LASER PRÓDUKT
LUOKAN 1 LASER LAITE
KLASS 1 LASER APPARAT
PRODUCTO LÁSER CLASE 1
PRODOTTO LASER CLASSE 1
| Marca Codice | Marca Codice | ||
| Admiral(M.Wards) | 56, 57, 58 | Mitsubishi/MGA | 18, 40, 59, 60, 75 |
| A Mark | 01, 15 | MTC | 18 |
| Anam | 01, 02, 03, 04, 05,06, 07, 08, 09, 10,11, 12, 13, 14 | NEC | 18, 19, 20, 40, 59, 60 |
| Nikei | 03 | ||
| Onking | 03 | ||
| AOC | 01, 18, 40, 48 | Onwa | 03 |
| Bell &Howell(M.Wards) | 57, 58, 81 | Panasonic | 06, 07, 08, 09, 54,86, 67, 73, 74 |
| Brocsonic | 59, 60 | Penney | 18 |
| Candle | 18 | Philco | 03, 15, 17, 18, 48,54, 59, 62, 69, 90 |
| Cetronic | 03 | Philips | 15, 17, 18, 40,48, 54, 62, 72 |
| Citizen | 03, 18, 25 | ||
| Cinema | 97 | Pioneer | 63, 66, 80, 91 |
| Classic | 03 | Portland | 15, 18, 59 |
| Concerto | 18 | Proton | 40 |
| Contec | 46 | Quasar | 06, 66, 67 |
| Coronado | 15 | RadioShack | 17, 48, 56, 60,61, 75 |
| Craig | 03, 05, 61, 82, 83, 84 | RCA/Proscan | 18, 59, 67, 76, 77,78, 92, 93, 94 |
| Croslex | 62 | ||
| Crown | 03 | Realistic | 03, 19 |
| CurtisMates | 59, 61, 63 | Sampo | 40 |
| CXC | 03 | Samsung | 00, 15, 16, 17, 40,43, 46, 47, 48, 49,59, 60, 98 |
| Daewoo | 02, 03, 04, 15, 16,17, 18, 19, 20, 21,22, 23, 24, 25, 26,27, 28, 29, 30, 32,34, 35, 36, 48, 59, 90 | Sanyo | 19, 61, 65 |
| Scott | 03, 40, 60, 61 | ||
| Daytron | 40 | Sears | 15, 18, 19 |
| Dynasty | 03 | Sharp | 15, 57, 64 |
| Emerson | 03, 15, 40, 46, 58, 61,64, 82, 83, 84, 85 | Signature2000(M.Wards) | 57, 58 |
| Fisher | 19, 65 | Sony | 50, 51, 52, 53, 55 |
| Funai | 03 | Soundesign | 03, 40 |
| Futuretech | 03 | Spectricon | 01 |
| GeneralElectric (GE) | 06, 40, 56, 59,66, 67, 68 | SSS | 18 |
| Hall Mark | 40 | Sylvania | 18, 40, 48, 54,59, 60, 62 |
| Hitachi | 15, 18, 50, 59, 69 | Symphonic | 61, 95, 96 |
| Inkel | 45 | Tatung | 06 |
| JC Penny | 56, 59, 67, 86 | Techwood | 18 |
| JVC | 70 | Teknika | 03, 15, 18, 25 |
| KTV | 59, 61, 87, 88 | TMK | 18, 40 |
| KEC | 03, 15, 40 | Toshiba | 19, 57, 63, 71 |
| KMC | 15 | Vidtech | 18 |
| LG(Goldstar) | 01, 15, 16, 17, 37, 38,39, 40, 41, 42, 43, 44 | Videch | 59, 60, 69 |
| Luxman | 18 | Wards | 15, 17, 18, 40,48, 54, 60, 64 |
| LXI(Sears) | 19, 54, 56, 59,60, 62, 63, 65, 71 | Yamaha | 18 |
| York | 40 | ||
| Magnavox | 15, 17, 18, 48, 54,59, 60, 62, 72, 89 | Yupiteru | 03 |
| Marantz | 40, 54 | Zenith | 58, 79 |
| Matsui | 54 | Zonda | 01 |
| MGA | 18, 40 | Dongyang | 03, 54 |
Connessioni
natural_image
Illustration of a hand using a tool to press or install a wooden block on a base (no text or symbols visible)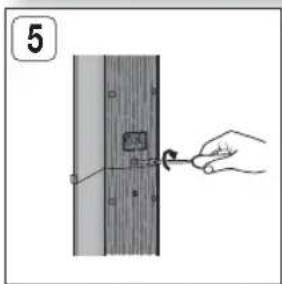

natural_image
Illustration of a hand using a screwdriver to press or install a component on a stand (no text or symbols visible)
natural_image
Two vertical cylindrical objects with circular patterns, one with a small circle and the other with a plus sign (no text or symbols)18 Italiano
20 Italiano
Antenna FM (fornita)
BD/DVD → D. IN → AUX → R. IPOD → W. IPOD → H. IN1 → H. IN2 → FM

NOTA
NOTA
SFE (Sound Field Effect) MODE (Mod. SFE Effetto campo audio)
Off → Alto → Basso → Off.
natural_image
Illustration of a portable electronic device with a CD and cable connector, showing internal components (no text or symbols)Code no. AH68-02359V (01)

- Home Entertainment System user manual
- Safety Information
- Safety Warnings
- WARNING
- CAUTION
- CLASS 1 LASER PRODUCT
- Wiring the Main Power Supply Plug (UK Only)
- IMPORTANT NOTICE
- IMPORTANT
- English
- Precautions
- Viewing TV using the 3D function
- Cautions on Handling and Storing Discs
- Holding discs
- Disc Storage
- NOTE
- Handling and Storing Discs
- Licence
- Copyright
- Contents
- GETTING STARTED
- CONNECTIONS
- SETUP
- BASIC FUNCTIONS
- NETWORK SERVICES
- OTHER INFORMATION
- 6
- Icons that will be used in manual
- Disc Types and Characteristics
- Blu-ray Disc Compatibility
- Discs that cannot be played
- Logos of Discs that can be played
- Region Code
- Disc Types
- BD-ROM
- BD-RE/-R
- DVD-VIDEO
- DVD-RW/-R/+R
- DVD+RW
- Audio CD (CD-DA)
- CD-RW/-R
- Disc Format
- Using JPEG disc
- DVD-RW/-R (V)
- Supported File Formats
- English
- Restrictions
- Video decoder
- Audio decoder
- Notes on USB connection
- Supported devices:
- Accessories
- English
- Description
- ! CAUTION
- English
- Remote Control
- Installing batteries in the Remote Control
- Setting the Remote Control
- When operating a TV with the remote control
- Position of the product
- Selecting the Listening Position
- Speaker Components
- Installing the Speakers on the Tallboy Stand
- English
- Connecting The Speakers
- Attaching the Toroidal Ferrite Core to the Power Cord of the Main Unit
- English
- Connecting External Devices/your TV via HDMI
- HDMI OUT : Connecting to a TV with an HDMI Cable (BEST QUALITY)
- HDMI IN : Connecting to an External Component with an HDMI Cable
- HDMI Auto Detection Function
- Connecting the FM Antenna
- English
- METHOD 1 : Component Video (BETTER QUALITY)
- METHOD 2 : Composite Video (GOOD QUALITY)
- OPTICAL : Connecting an External Digital Component
- AUX : Connecting an External Analogue Component
- 24
- English
- Connecting to the Network
- Cable Network
- Wireless Network
- Initial Settings
- English
- Display
- 3D Settings
- 3D Blu-ray Playback Mode
- Screen Size
- TV Aspect
- Smart Hub Screen Size
- BD Wise (Samsung Products only)
- Resolution
- Resolution according to the output mode
- HDMI Color Format
- Movie Frame (24 Fs)
- HDMI Deep Color
- Still Mode
- Progressive Mode
- 32
- Audio
- Speaker Settings
- Level
- Adjusting Front/Centre/Surround/Front Top/Subwoofer Speaker Level
- Distance
- Test Tone
- Musical Auto Calibration
- Musical Auto Calibration Mode
- Measurement
- User EQ
- HDMI Audio
- Audio Return Channel
- Digital Output
- Digital Output Selection
- Dynamic Range Control
- Audio Sync
- Network
- Network Settings
- Wired Network
- Setting Up a Wired Connection - Auto
- Setting Up a Wired Connection - Manual
- Setting Up the Wireless Network Connection - Auto
- Setting Up the Wireless Network Connection - Manual
- WPS(PBC)
- One Foot Connection
- English
- Network Status
- BD-LIVE Internet Connection
- System
- Anynet+(HDMI-CEC)
- BD Data Management
- BD Data Management Screen Information :
- Time Zone
- DivX® Video On Demand
- Reset
- Language
- Security
- BD Parental Rating
- DVD Parental Rating
- Change Password
- If you forgot your password
- General
- Front Display
- Light Effect
- 42
- Network Remote Control
- Support
- Software Upgrade
- By Internet
- By USB
- By Disc
- 44
- Via download
- Download in Standby Mode
- Contact Samsung
- Playing a Disc
- Playback
- Playback related buttons
- Disc Structure
- Playing a 2D video in 3D mode
- Using the Disc menu/Title menu/ Popup menu
- Using the Disc Menu
- Using the Title Menu
- Playing the Title List
- Using the Popup Menu
- Using the Search and Skip Functions
- Searching for a Desired Scene
- Skipping Chapters
- Slow Motion Play/Step Motion Play
- Slow Motion Play
- Step Motion Play
- Repeat Playback
- Repeat the Title or Chapter
- English
- Repeat the Section
- Using the TOOLS button
- Moving to a Desired Scene Directly
- Selecting the Audio Language
- Selecting the Subtitle Language
- Caption Function
- Changing the Camera Angle
- Selecting the Picture Settings
- Setting the BONUSVIEW
- English
- Listening to Music
- Buttons on the Remote Control used for Music Playback
- Playing an Audio CD (CD-DA)/MP3
- Repeat an Audio CD (CD-DA)/MP3
- Playlist
- English
- Sound Mode
- DSP(Digital Signal Processor) Function
- SFE(Sound Field Effect) MODE
- Dolby Pro Logic II Mode
- iPod SYNC
- 3D Sound
- Vertical Surround
- Playing back a Picture
- Viewing Photo Files
- 54
- Playing back a USB Storage Device
- Listening to Radio
- Using buttons on the Remote Control
- Setting Mono/Stereo
- Presetting Stations
- English
- About RDS broadcasting
- Using the RDS (Radio Data System) to receive FM stations
- Description on RDS function
- To show the RDS signals
- About characters shown in the display
- PTY (Program Type) indication and
- PTY-SEARCH function
- To search for a program using the PTY
- codes
- Before you start!
- Connecting iPod/iPhone Using the USB Cable
- Connecting iPod/iPhone Using the Dock
- Watching a Movie
- Use iPod/iPhone with a Wireless Dock Cradle for iPod/iPhone
- How to charge the Wireless Transmitter
- Operation status of the charging
- cradle's LED
- iPod/iPhone Models You Can Use with This Product
- How to Link the Wireless Transmitter with the Main Unit
- Operation status of the wireless transmitter's LED
- Using Smart Hub
- Starting Smart Hub the First Time
- English
- Using the Keypad
- Entering Text, Numbers and Symbols
- English
- Creating an Account
- Account Log In
- The Settings Menu - BLUE (D)
- Account Management
- Register Service Account
- Remove Service Accounts
- Deactivate Account
- Properties
- More
- Check the speed of your internet connection
- Terms of Service Agreement
- The Edit Mode Menu - YELLOW (C)
- Move
- New Folder
- Move to Folder
- To Access Widgets in a Folder
- To Edit Items in a Folder
- Rename Folder
- Lock
- Unlock
- Delete
- The Sort Menu - GREEN (B)
- Samsung Apps
- For Pay Apps
- Accessing the Samsung Apps Screen
- Using the Samsung Apps Screen
- Sort By Tabs
- Samsung Apps by category
- My Account
- Help
- Using the colored buttons on your remote with Samsung Apps
- Using vTuner Function
- BD-LIVE™
- Using the AllShare Function
- Troubleshooting
- English
- [ Recommendation ]- EU Only
- CE!
- 74
- Contact SAMSUNG WORLD WIDE
- SAMSUNG
- Correct disposal of batteries in this product
- Correct Disposal of This Product (Waste Electrical & Electronic Equipment)
- 7.1CH Blu-ray™
- LASERPRODUKT DER KLASSE 1
- Anschlüsse
- Deutsch
- Deutsch
- HINWEIS
- PRODUIT LASER DE CLASSE 1
- Branchements
- Français
- Français
- PRODOTTO LASER CLASSE 1
- Connessioni
- Italiano
- Italiano
- NOTA
- SFE (Sound Field Effect) MODE (Mod. SFE Effetto campo audio)
Brand : SAMSUNG
Model : HTD6759W
Category : Home Theater System