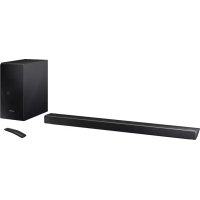
HWN550 - Soundbar SAMSUNG - Free user manual and instructions
Find the device manual for free HWN550 SAMSUNG in PDF.



Frequently Asked Questions - HWN550 SAMSUNG
User questions about HWN550 SAMSUNG
0 question about this device. Answer the ones you know or ask your own.
Ask a new question about this device
Download the instructions for your Soundbar in PDF format for free! Find your manual HWN550 - SAMSUNG and take your electronic device back in hand. On this page are published all the documents necessary for the use of your device. HWN550 by SAMSUNG.
USER MANUAL HWN550 SAMSUNG
Thank you for purchasing this Samsung product.
To receive more complete service, please register
your product at www.samsung.com/register
SAFETY INFORMATION
SAFETYWARNINGS
TO REDUCE THE RISK OF ELECTRIC SHOCK, DO NOT REMOVE THE COVER (OR BACK). NO USER- SERVICEABLE PARTS ARE INSIDE. REFER SERVICING TO QUALIFIED SERVICE PERSONNEL.
| CAUTION RISK OF ELECTRIC SHOCK. DO NOT OPEN. | |
| This symbol indicates that high voltage is present inside. It is dangerous to make any kind of contact with any internal part of this product. | |
| This symbol indicates that this product has included important literature concerning operation and maintenance. | |
| Class II product: This symbol indicates that it does not require a safety connection to electrical earth (ground). | |
| AC voltage: This symbol indicates that the rated voltage marked with the symbol is AC voltage. | |
| DC voltage: This symbol indicates that the rated voltage marked with the symbol is DC voltage. | |
| Caution, Consult instructions for use: This symbol instructs the user to consult the user manual for further safety related information. | |
WARNING
- To reduce the risk of fire or electric shock, do not expose this appliance to rain or moisture.
CAUTION
- TO PREVENT ELECTRIC SHOCK, MATCH WIDE BLADE OF PLUG TO WIDE SLOT, FULLY INSERT.
- This apparatus shall always be connected to a AC outlet with a protective grounding connection.
- To disconnect the apparatus from the mains, the plug must be pulled out from the mains socket, therefore the mains plug shall be readily operable.
- Do not expose this apparatus to dripping or splashing. Do not put objects filled with liquids, such as vases on the apparatus.
- To turn this apparatus off completely, you must pull the power plug out of the wall socket. Consequently, the power plug must be easily and readily accessible at all times.
PRECAUTIONS
- Ensure that the AC power supply in your house complies with the power requirements listed on the identification sticker located on the bottom of your product. Install your product horizontally, on a suitable base (furniture), with enough space around it for ventilation (7 10~cm) . Make sure the ventilation slots are not covered. Do not place the unit on amplifiers or other equipment which may become hot. This unit is designed for continuous use. To fully turn off the unit, disconnect the AC plug from the wall outlet. Unplug the unit if you intend to leave it unused for a long period of time.
- During thunderstorms, disconnect the AC plug from the wall outlet. Voltage peaks due to lightning could damage the unit.
- Do not expose the unit to direct sunlight or other heat sources. This could lead to overheating and cause the unit to malfunction.
-
Protect the product from moisture (i.e. vases), and excess heat (e.g. a fireplace) or equipment creating strong magnetic or electric fields. Unplug the power cable from the AC wall socket if the unit malfunctions. Your product is not intended for industrial use. It is for personal use only. Condensation may occur if your product has been stored in cold temperatures. If transporting the unit during the winter, wait approximately 2 hours until the unit has reached room temperature before using.
-
The battery used with this product contains chemicals that are harmful to the environment. Do not dispose of the battery in the general household trash. Do not expose the battery to excess heat, direct sunlight, or fire. Do not short circuit, disassemble, or overheat the battery. Danger of explosion if the battery is replaced incorrectly. Replace only with the same or equivalent type.
ABOUT THIS MANUAL
The user manual has two parts: this simple paper, USER MANUAL and a detailed FULL MANUAL you can download.

USER MANUAL
See this manual for safety instructions, product installation, components, connections, and product specifications.
FULL MANUAL
You can access the FULL MANUAL on Samsung's on-line customer support centre by scanning the QR code. To see the manual on your PC or mobile device, download the manual in document format from Samsung's website. (http://www.samsung.com/support)
Design and specifications are subject to change without prior notice.
CONTENTS
01 Checking the Components 2
Inserting Batteries before using the Remote Control (AA batteries X 2) 2
02 Product Overview 3
Front Panel / Right Side Panel of the Soundbar 3
Bottom Panel of the Soundbar 4
03 Connecting the Soundbar 5
Connecting Electrical Power 5
Connecting the Soundbar to the Subwoofer 6
- Automatic connection between the Subwoofer and the Soundbar 6
- Manually connecting the Subwoofer if automatic connection fails
Connecting the SWA-8500S to a Soundbar (Sold Separately) 8
04 Connecting to your TV 10
Method 1. Connecting with a Cable 10
- Connecting using an Optical Cable 10
- Connecting a TV using an HDMI Cable 11
Method 2. Connecting Wirelessly 12
- Connecting a TV via Bluetooth 12
05 Connecting an External Device 14
Connecting using an Optical or Analogue Audio (AUX) Cable 14
Connecting using an HDMI Cable 15
06 Connecting a USB Storage Device 16
07 Connecting a Mobile Device 18
Connecting via Bluetooth 18
Using the Samsung Audio Remote App 21
- Installing the Samsung Audio Remote App 21
- Launching the Samsung Audio Remote App 21
08 Using the Remote Control 22
How to Use the Remote Control 22
Adjusting the Soundbar volume with a TV remote control 25
Using the Hidden Buttons (Buttons with more than one function) 26
Output specifications for the different sound effect modes 26
09 Installing the Wall Mount 27
Installation Precautions 27
Wallmount Components 27
10 Software Update 29
Updating Procedure 30
If UPDATE is not displayed 30
11 Troubleshooting 31
Licence 32
Open Source Licence Notice 32
14 Important Notes About Service 32
Specifications and Guide 33
Specifications 33
01 CHECKING THE COMPONENTS


Soundbar Main Unit Subwoofer Remote Control / Batteries
Power Cord (Subwoofer)
AC/DC Adapter (Main Unit)
Power Cord (AC/DC Adapter)
Optical Cable
- For more information about the power supply and power consumption, refer to the label attached to the product. (Label : Bottom of the Soundbar Main Unit)
- The power components are labelled (1,2,3) . For more information about power connections, see page 5.
- For Soundbar wall mounting components, see page 27.
- To purchase additional components or optional cables, contact a Samsung Service Centre on Samsung Customer Care.
The appearance of the accessories may differ slightly from the illustrations above.
Inserting Batteries before using the Remote Control (AA batteries X 2)
Slide the battery cover in the direction of the arrow until it is completely removed. Insert 2 AA batteries (1.5V) oriented so that their polarity is correct. Slide the battery cover back into position.
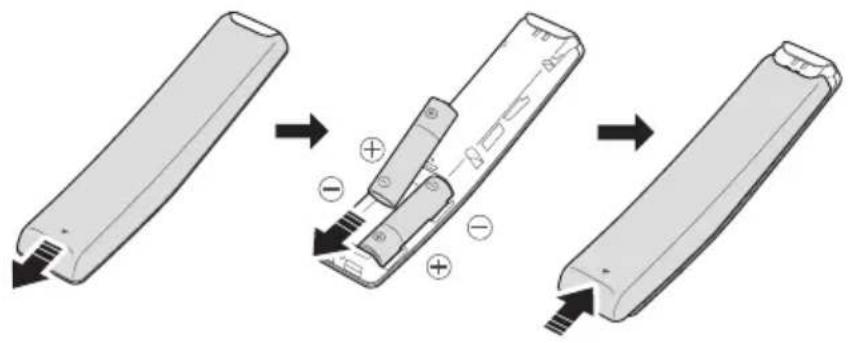
ENG-2
02 PRODUCT OVERVIEW
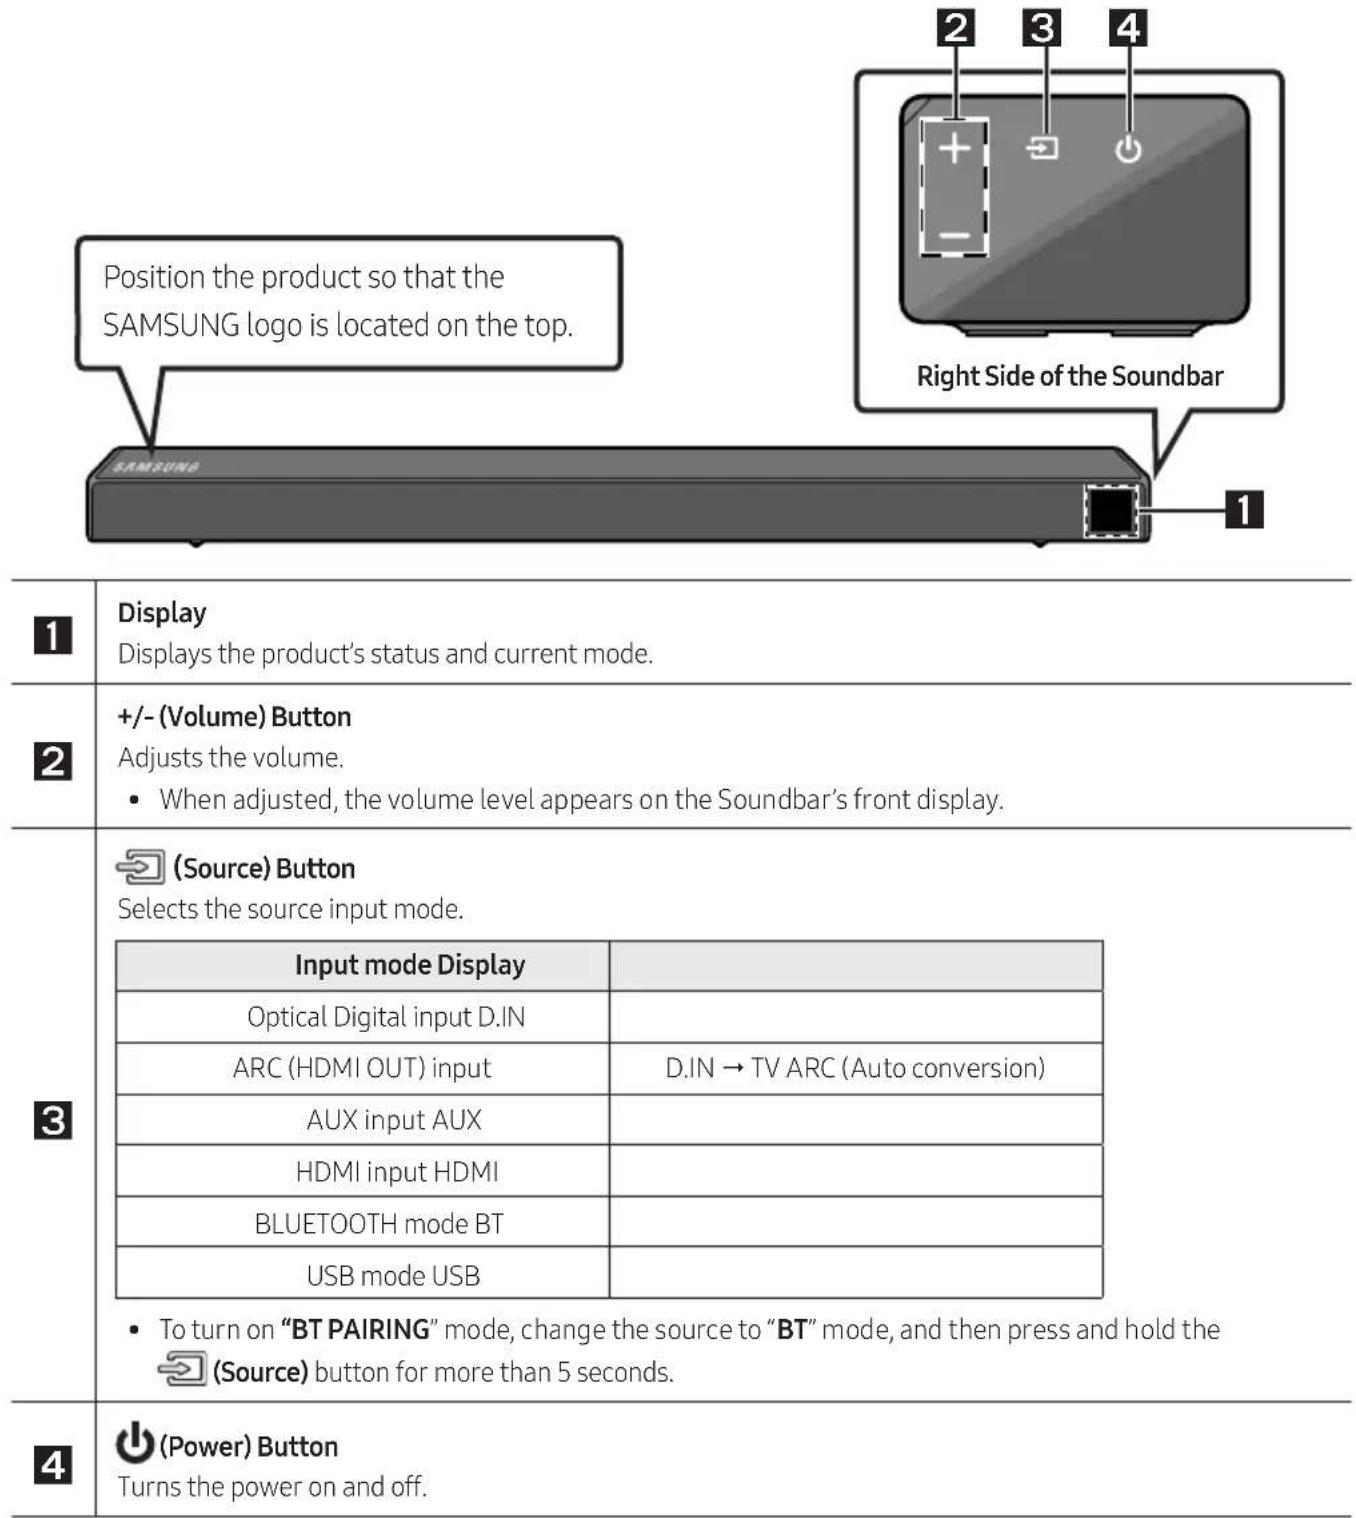
Front Panel / Right Side Panel of the Soundbar
- When you plug in the AC cord, the power button will begin working in 4 to 6 seconds.
- When you turn on this unit, there will be a 4 to 5 second delay before it produces sound.
If you want to enjoy sound only from the Soundbar, you must turn off the TV's speakers in the Audio Setup menu of your TV. Refer to the owner's manual supplied with your TV.
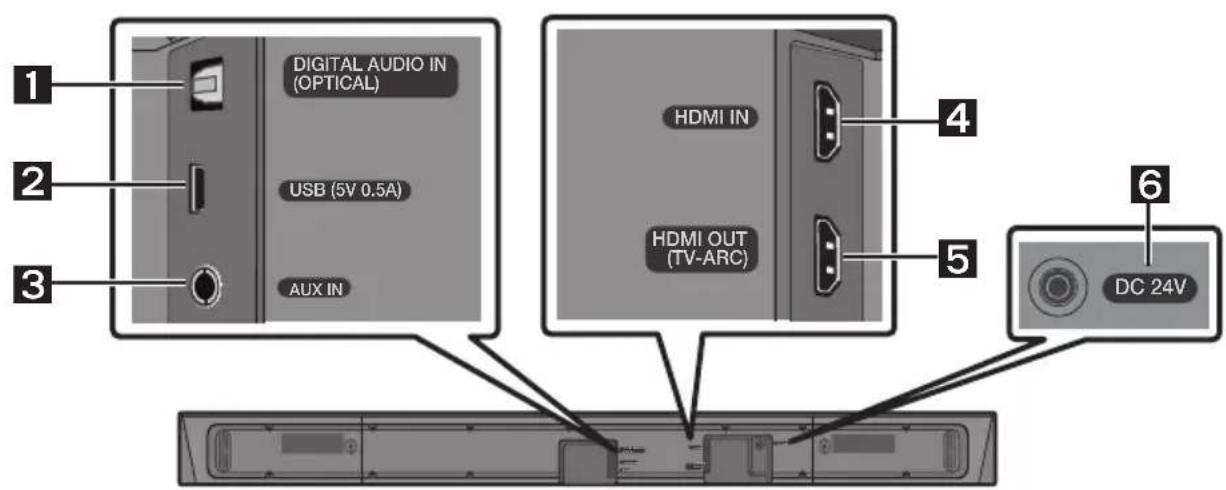
Bottom Panel of the Soundbar
| 1 | DIGITAL AUDIO IN (OPTICAL) Connect to the digital (optical) output of an external device. |
| 2 | USB (5V 0.5A) Connect a USB device here to play music files on the USB device through the Soundbar. |
| 3 | AUXIN Connect to the Analogue output of an external device. |
| 4 | HDMI IN Inputs digital video and audio signals simultaneously using an HDMI cable. Connect to the HDMI output of an external device. |
| 5 | HDMI OUT (TV-ARC) Connect to the HDMI (ARC) jack on a TV. |
| 6 | DC24V (Power Supply In) Connect the AC/DC power adapter. |
- When disconnecting the power cable of the AC/DC power adaptor from a wall outlet, pull the plug. Do not pull the cable.
- Do not connect this unit or other components to an AC outlet until all connections between components are complete.
03 CONNECTING THE SOUNDBAR
Connecting Electrical Power
Use the power components (1, 2, 3) to connect the Subwoofer and Soundbar to an electrical outlet in the following order:
1 Connect the power cord to the Subwoofer.
Connect the power output cable to the power adapter, and then to the Soundbar.
3 Connect the power cord to a wall socket.
See the illustrations below.
- For more information about the required electrical power and power consumption, refer to the label attached to the product. (Label : Bottom of the Soundbar Main Unit)
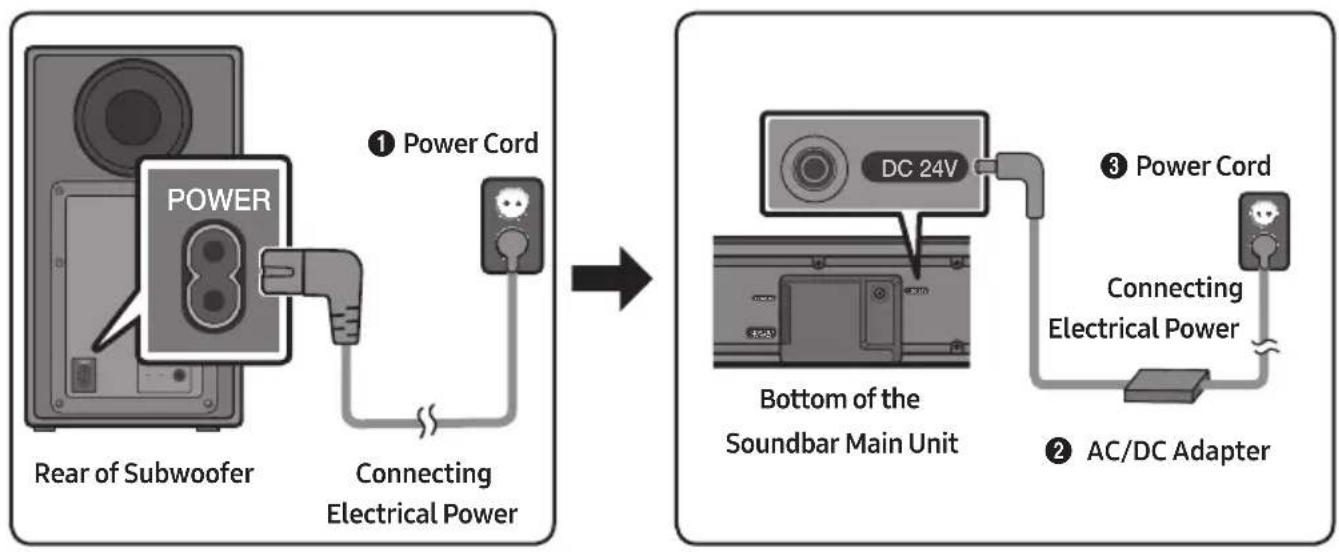
- Make sure to rest the AC/DC Adapter flat on a table or the floor. If you place the AC/DC Adapter so that it is hanging with the AC cord input facing upwards, water or other foreign substances could enter the Adapter and cause the Adapter to malfunction.
Connecting the Soundbar to the Subwoofer
When the subwoofer is connected, you can enjoy rich bass sound.
Automatic connection between the Subwoofer and the Soundbar
When you turn the power on after connecting the power cables to the Soundbar and subwoofer, the subwoofer is automatically connected to the Soundbar.
- When auto pairing is complete, the blue indicators at the rear of the subwoofer turn on.
LED Indicator Lights on the Rear of Subwoofer
| LED Status Description Resolution | |||
| Blue | On | Successfully connected (normal operation) | - |
| Blinking Recovering the connection | Check if the power cable attached to the main Soundbar unit is connected properly or wait about 5 minutes. If blinking persists, try manually connecting the subwoofer. See page 7. | ||
| Red On | Standby (with the Soundbar main unit turned off) | Check if the power cable attached to the main Soundbar unit is connected properly. | |
| Connection failed | Connect again. See the instructions for manual connection on page 7. | ||
| Red and blue | Blinking Malfunction | See the contact information for the Samsung Service Centre in this manual. | |
Manually connecting the Subwoofer if automatic connection fails
Before performing the manual connection procedure below:
-
Check whether the power cables for the Soundbar and subwoofer are connected properly.
Make sure that the Soundbar is turned on. -
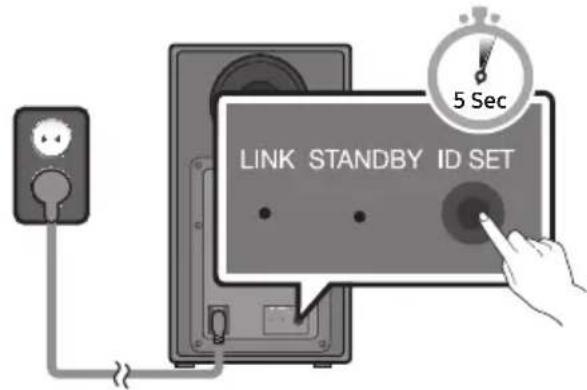
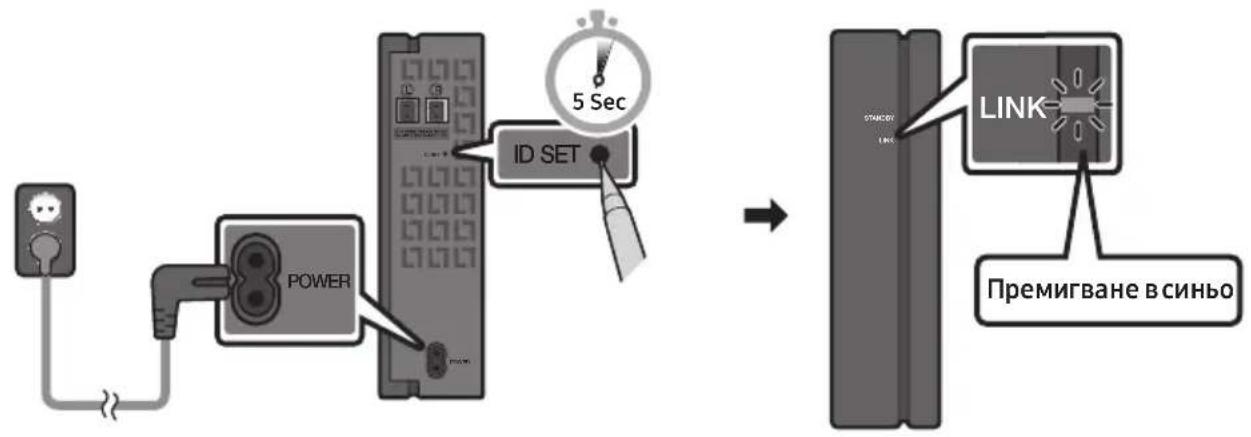
Press and hold ID SET on the rear of the subwoofer for at least 5 seconds.
-
The red indicator on the rear of the subwoofer turns off and the blue indicator blinks.
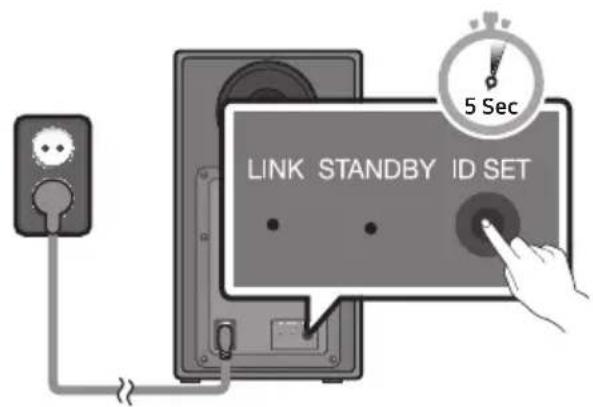
Rear of Subwoofer
-
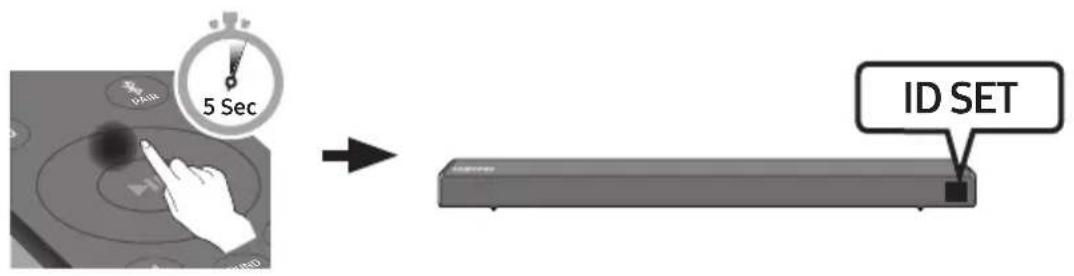
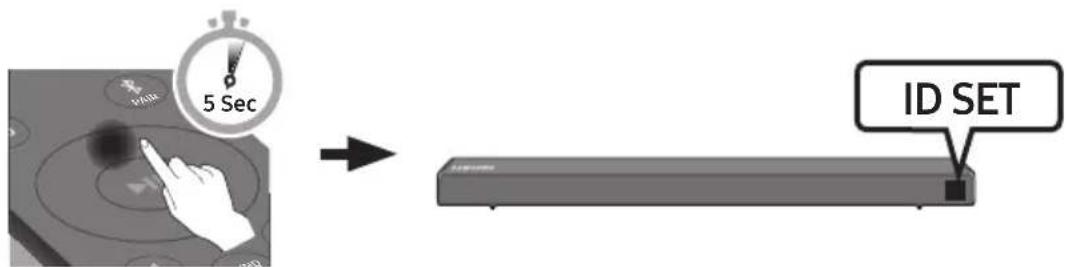
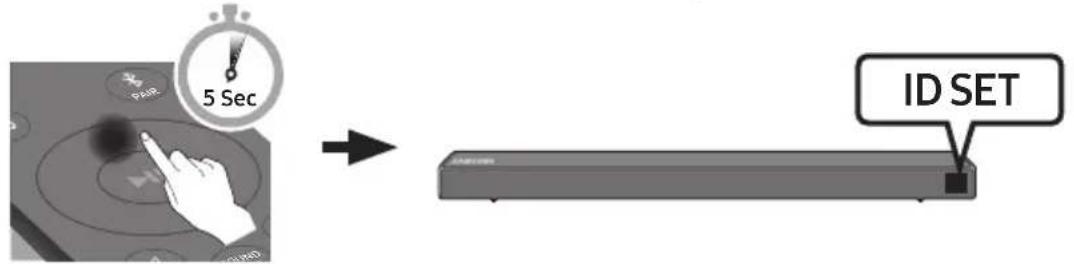
Press and hold the Up button on the remote control for at least 5 seconds.
-
The ID SET message appears on the display of the Soundbar for a moment, and then it disappears.
- The Soundbar will automatically power on when ID SET is complete.
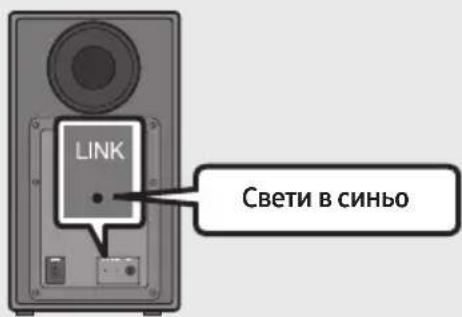
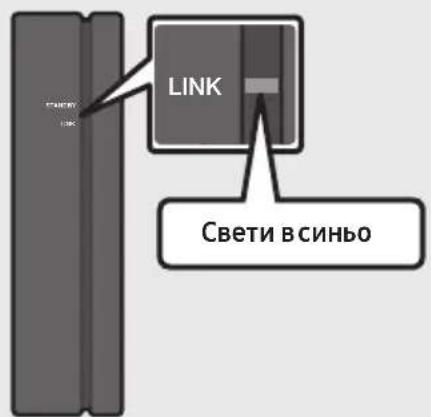
- Check if the LINK LED is solid blue (connection complete).
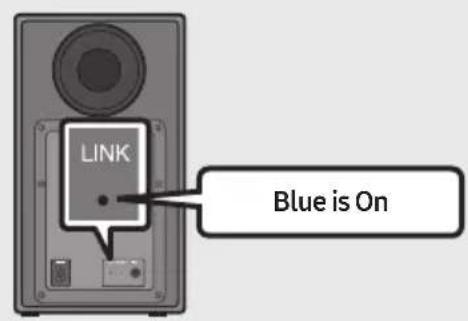
The LINK LED indicator stops blinking and glows a solid blue when a connection is established between the Soundbar and the Wireless Subwoofer.
NOTES
- Do not connect the power cord of this product or your TV to a wall outlet until all connections between components are complete.
- Before moving or installing this product, be sure to turn off the power and disconnect the power cord.
- If the main unit is powered off, the wireless subwoofer will go into stand-by mode and the STANDBY LED on the rear will be Red after blinking Blue several times.
- If you use a device that uses the same frequency (5.8GHz) as the Soundbar near the Soundbar, interference may cause some sound interruption.
- The maximum transmission distance of the wireless signal of the main unit is about 10 meters, but may vary depending on your operating environment. If a steel-concrete or metallic wall is between the main unit and the wireless subwoofer the system may not operate at all, because the wireless signal cannot penetrate metal.
PRECAUTIONS
- Wireless receiving antennas are built into the wireless subwoofer. Keep the units away from water and moisture.
- For optimal listening performance, make sure that the area around the wireless subwoofer and Wireless Receiver Module (Sold separately) location is clear of any obstructions.
Connecting the SWA-8500S to a Soundbar (Sold Separately)
Expand to true wireless surround sound by connecting the Samsung Wireless Rear Speaker Kit (SWA-8500S) to your Soundbar (Sold separately).
-
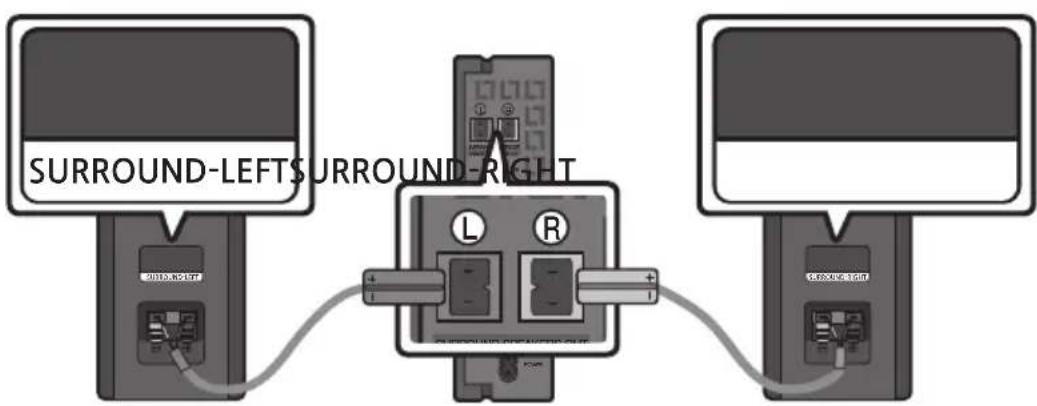
Connect the Wireless Receiver Module to 2 Surround Speakers.
-
The speaker cables are colour coded.
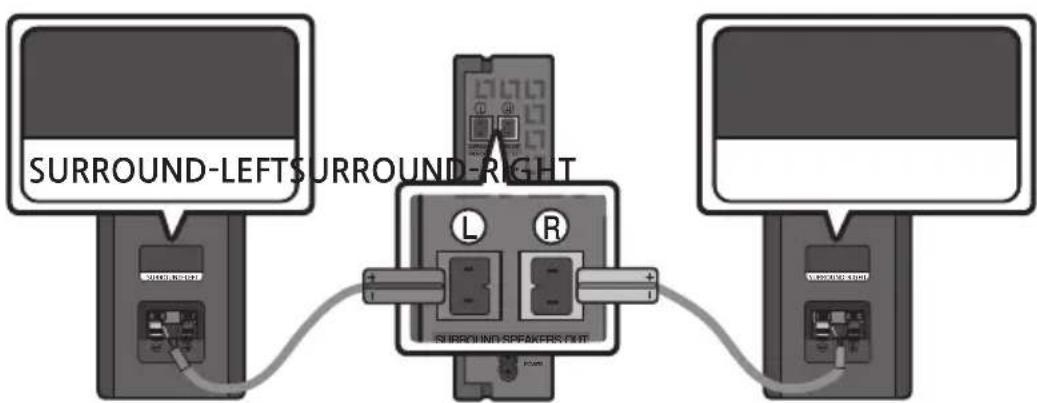
-
Check the standby status of the Wireless Receiver Module after plugging it into an electrical outlet.
-
The LINK LED indicator (blue LED) on the Wireless Receiver Module blinks. If the LED does not blink, press the ID SET button on the back of the Wireless Receiver Module with a pen tip for 5~6 seconds until the LINK LED indicator blinks (in Blue). For more about the LED, please refer to the SWA-8500S user manual.
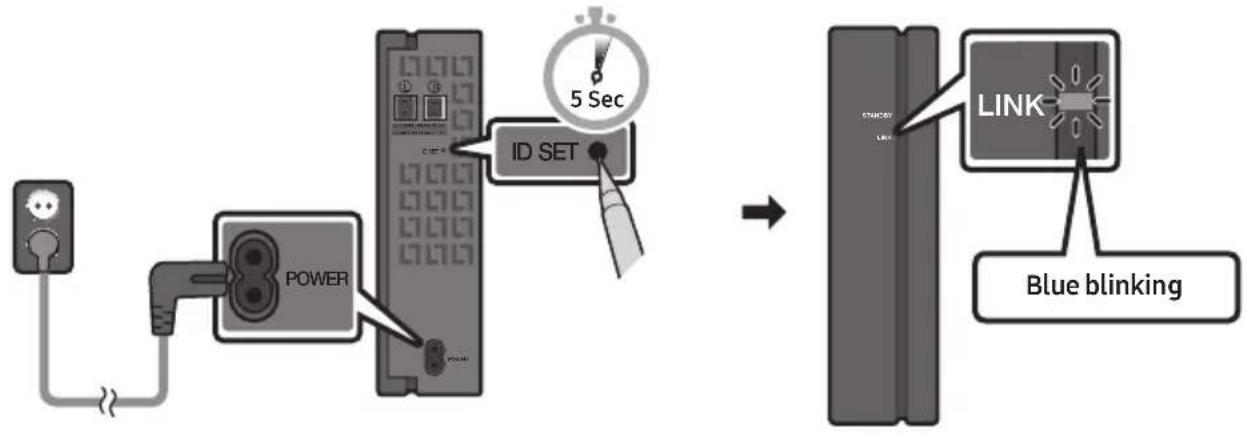
-
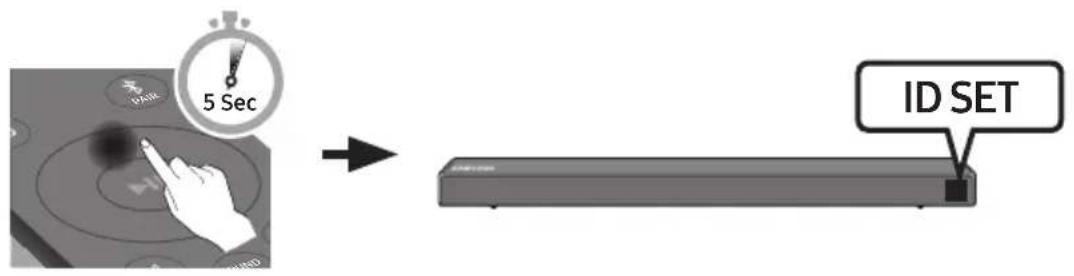
Press and hold the Up button on the remote control for at least 5 seconds.
-
The IDSET message appears on the display of the Soundbar for a moment, and then it disappears.
- The Soundbar will automatically power on when ID SET is complete.

CAUTION
-
If your Soundbar was playing music when it connects to the SWA-8500S, you may hear some stuttering from the woofer as the connection finalises.
-
Check if the LINK LED is solid blue (connection complete)
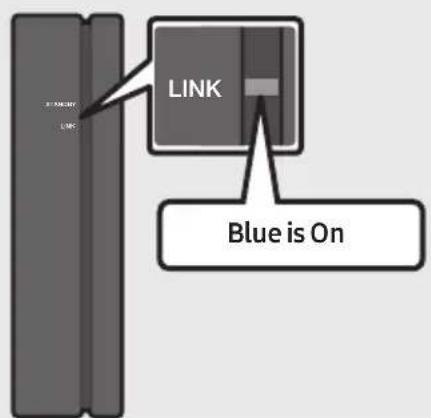
The LINK LED indicator stops blinking and glows a solid blue when a connection is established between the Soundbar and the Wireless Receiver Module.
- If SWA-8500S is not connected, repeat the procedure from Step 2.
04 CONNECTING TO YOUR TV
Hear TV sound from your Soundbar through wired or wireless connections.
-
When the Soundbar is connected to selected Samsung TVs, the Soundbar can be controlled using the TV's remote control.
-
This feature is supported by 2017 and later Samsung Smart TVs that support Bluetooth when you connect the Soundbar to the TV using an optical cable.
-
This function also allows you to use the TV menu to adjust the sound field and various settings as well as the volume and mute.
Method 1. Connecting with a Cable
When the audio in a broadcast is encoded in Dolby Digital and the "Digital Output Audio Format" on your TV is set to PCM, we recommend that you change the setting to Dolby Digital. When the setting on the TV is changed, you will experience better sound quality. (The TV menu may differ depending on the TV manufacturer.)
Connecting using an Optical Cable
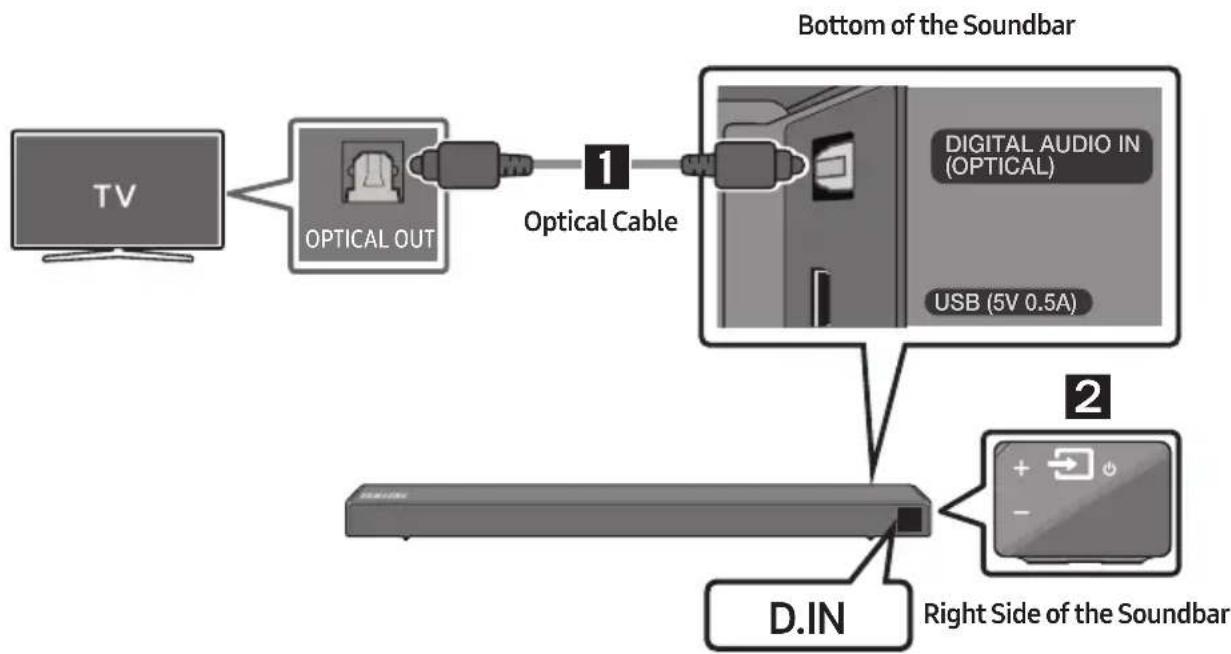
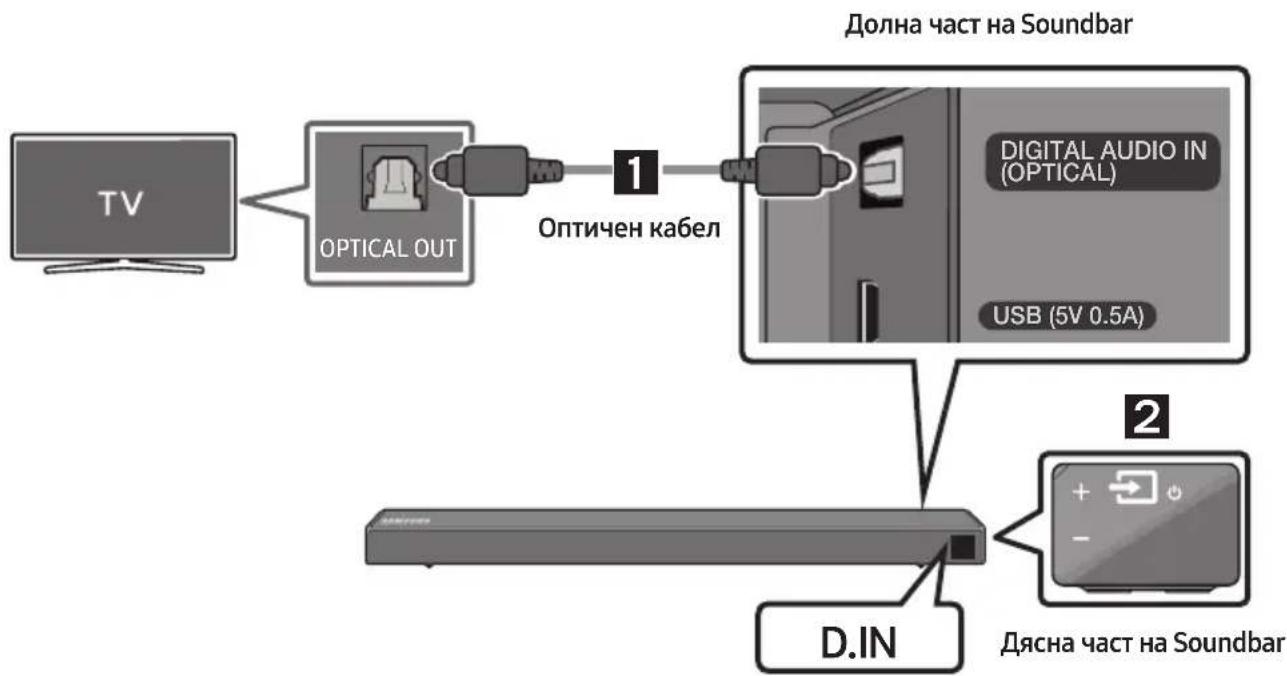
- Connect the DIGITAL AUDIO IN (OPTICAL) jack on the Soundbar to the OPTICAL OUT jack of the TV with a digital optical cable.
- Press the (Source) button on the right side panel or remote control, and then select the "D.IN" mode.
Auto Power Link
Auto Power Link automatically turns on the Soundbar when the TV is turned on.
-
Connect the Soundbar and a TV with a digital optical cable.
-
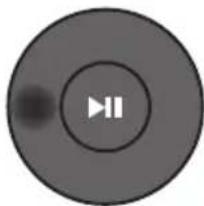
Press the Left button on the remote control (the blue spot in the illustration to the right) for 5 seconds to turn Auto Power Link on or off.
-
Auto Power Link is set to ON by default.
(To turn off this function, hold the Left button on the remote for 5 seconds.)
- Depending on the connected device, Auto Power Link may not function.
- This function is only available in the "D.IN" mode.
Connecting a TV using an HDMI Cable
-
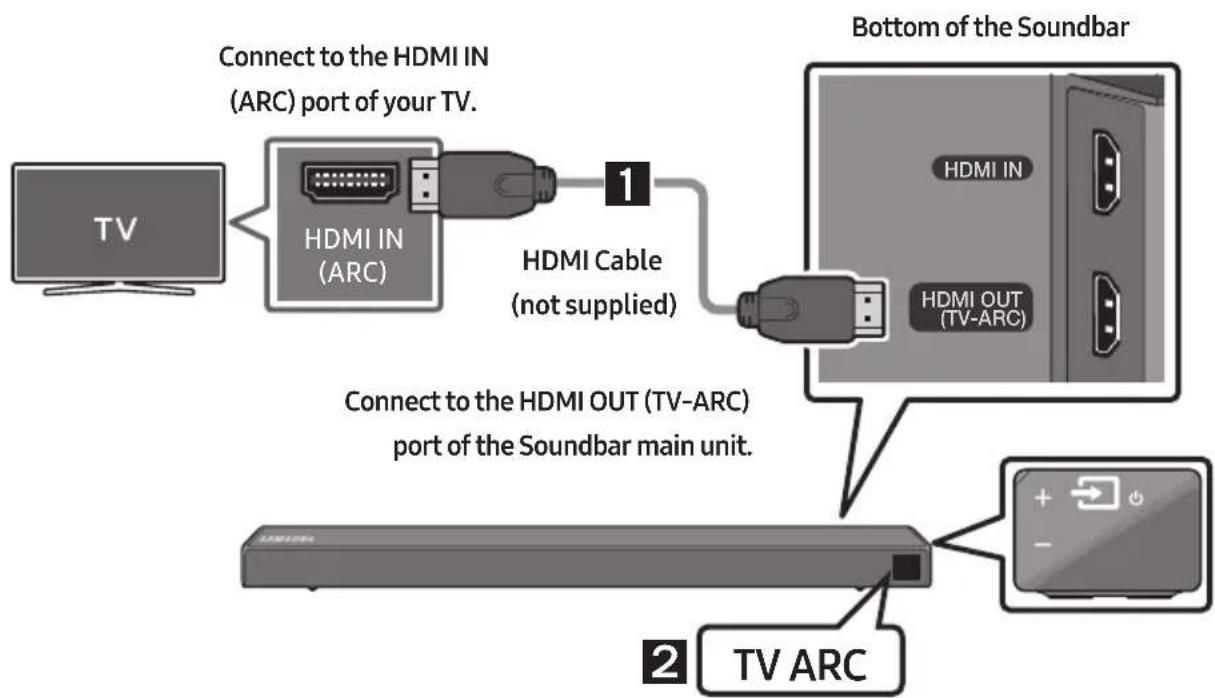
With the Soundbar and TV turned on, connect the HDMI cable (not supplied) as shown in the figure.
-
"TVARC" appears in the display window of the Soundbar main unit and the Soundbar plays TV sound.
-
If TV sound is inaudible, press the (Source) button on the remote control or on the right side of the Soundbar to switch to "D.IN" mode. The screen displays "D.IN" and "TV ARC" in sequence, and TV sound is played.
-
If "TV ARC" does not appear in the display window of the Soundbar main unit, confirm that the HDMI cable (not supplied) is connected to the correct port.
- Use the volume buttons on the TV's remote control to change the volume on the Soundbar.
NOTES
- HDMI is an interface that enables the digital transmission of video and audio data with just a single connector.
- If the TV provides an ARC port, connect the HDMI cable to the HDMI IN (ARC) port.
- We recommend you use a coreless HDMI cable if possible. If you use a cored HDMI cable, use one whose diameter is less than 14mm .
- Anynet+ must be turned on.
- This function is not available if the HDMI cable does not support ARC.
Method 2. Connecting Wirelessly
Connecting a TV via Bluetooth
When a TV is connected using Bluetooth, you can hear stereo sound without the hassle of cabling.
- Only one TV can be connected at a time.
The initial connection
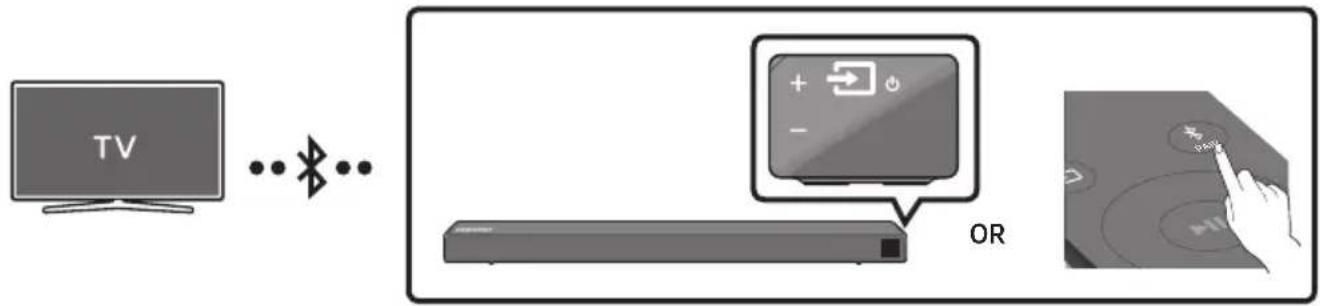
- Press the PAIR button on the remote control to enter the "BT PAIRING" mode.
(OR) a. Press the (Source) button on the right side panel and then select "BT". Change "BT" to "BT READY".
b. When "BT READY" appears, press and hold the (Source) button on the right side panel of the Soundbar for more than 5 seconds to display "BT PAIRING".
-
Select Bluetooth mode on the TV. (For more information, see the TV's manual.)
-
Select "[AV] Samsung Soundbar Nxxx N-Series" from the list on TV's screen. An available Soundbar is indicated with "Need Pairing" or "Paired" on the TV's Bluetooth device list. To connect the TV to the Soundbar, select the message, and then establish a connection.
-
When the TV is connected, [TV Name] "BT" appears on the Soundbar's front display.
-
You can now hear TV sound from the Soundbar.
If the device fails to connect
- If a previously connected Soundbar listing (e.g. "[AV] Samsung Soundbar Nxxx N-Series") appears in the list, delete it.
- Then repeat steps 1 through 3.
NOTE
- After you have connected the Soundbar to your TV the first time, use the "BT READY" mode to reconnect.
Disconnecting the Soundbar from the TV
Press the (Source) button on the right side panel or on the remote control and switch to any mode but "BT".
- Disconnecting takes time because the TV must receive a response from the Soundbar. (The time required may differ, depending on the TV model.)
- To cancel the automatic Bluetooth connection between the Soundbar and TV, press the II (Play/Pause) button on the remote control for 5 seconds with the Soundbar in "BT READY" status. (Toggle On Off)
What is the difference between BT READY and BT PAIRING?
- BT READY: In this mode, you can search for previously connected TVs or connect a previously connected mobile device to the Soundbar.
- BT PAIRING: In this mode, you can connect a new device to the Soundbar. (Press the PAIR button on the remote control or press and hold the Source) button on the right side of the Soundbar for more than 5 seconds while the Soundbar is in "BT" mode.)
NOTES
- If asked for a PIN code when connecting a Bluetooth device, enter <0000>.
- In Bluetooth connection mode, the Bluetooth connection will be lost if the distance between the Soundbar and the Bluetooth device exceeds 10 meters.
- The Soundbar automatically turns off after 5 minutes in the Ready state.
-
The Soundbar may not perform Bluetooth search or connection correctly under the following circumstances:
-
If there is a strong electrical field around the Soundbar.
- If several Bluetooth devices are simultaneously paired with the Soundbar.
-
If the Bluetooth device is turned off, not in place, or malfunctions.
-
Electronic devices may cause radio interference. Devices that generate electromagnetic waves must be kept away from the Soundbar main unit - e.g., microwaves, wireless LAN devices, etc.
05 CONNECTING AN EXTERNAL DEVICE
Connect to an external device via a wired or wireless network to play the external device's sound through the Soundbar.
Connecting using an Optical or Analogue Audio (AUX) Cable
1 Optical Cable
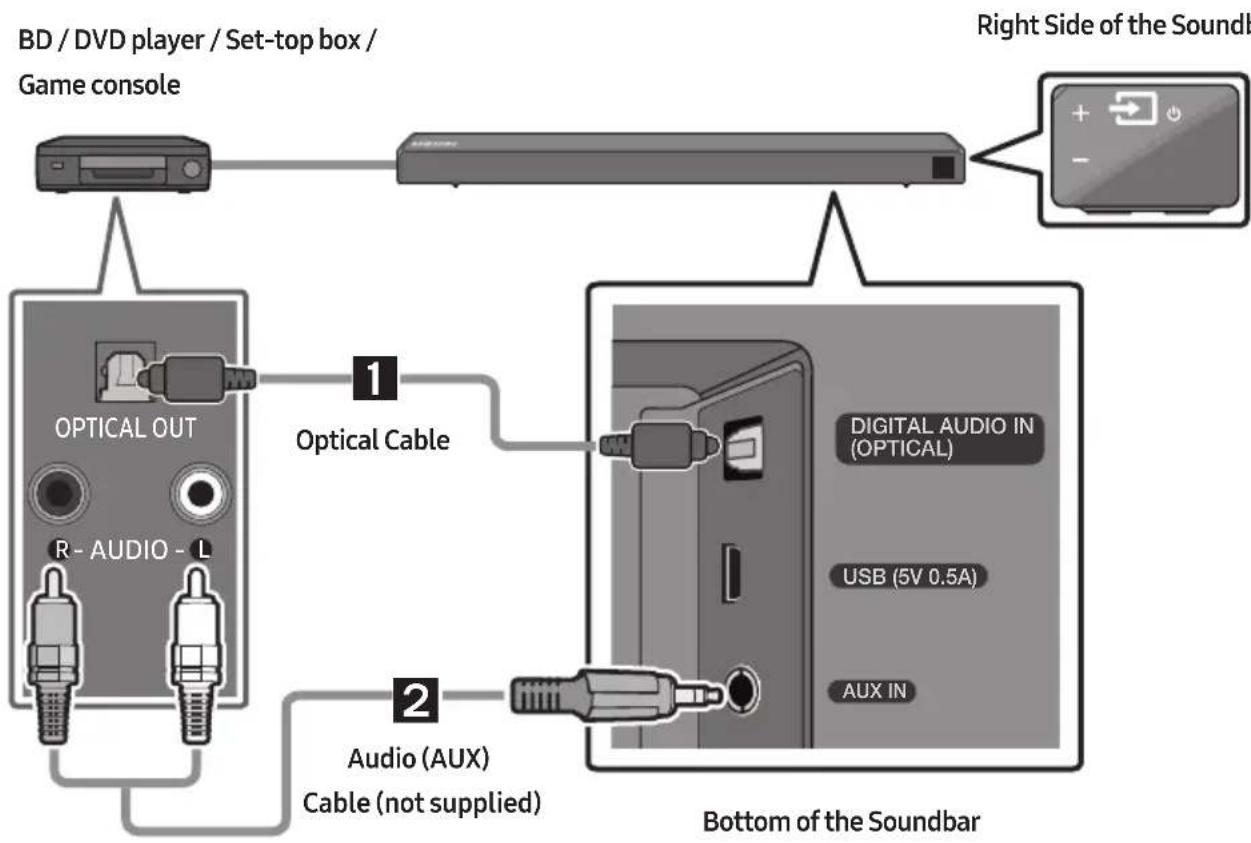
Connect DIGITAL AUDIO IN (OPTICAL) on the main unit to the OPTICAL OUT jack of the Source Device using a digital optical cable.
2 Select "D.IN" mode by pressing the (Source) button on the right side panel or on the remote control.
2 Audio (AUX) Cable
Connect AUXIN (Audio) on the main unit to the AUDIO OUT jack of the Source Device using an audio cable.
2 Select "AUX" mode by pressing the (Source) button on the right side panel or on the remote control.
Connecting using an HDMI Cable

- Connect an HDMI cable (not supplied) from the HDMI IN jack on the back of the product to the HDMI OUT jack on your digital device.
- Connect an HDMI cable (not supplied) from the HDMI OUT (TV-ARC) jack on the back of the product to the HDMI IN jack on your TV.
- Press the (Source) button on the right side panel or on the remote control, and then select "HDMI".
- "HDMI" mode is displayed on the Soundbar display panel and sound plays.
06 CONNECTING A USB STORAGE DEVICE
You can play music files located on USB storage devices through the Soundbar.
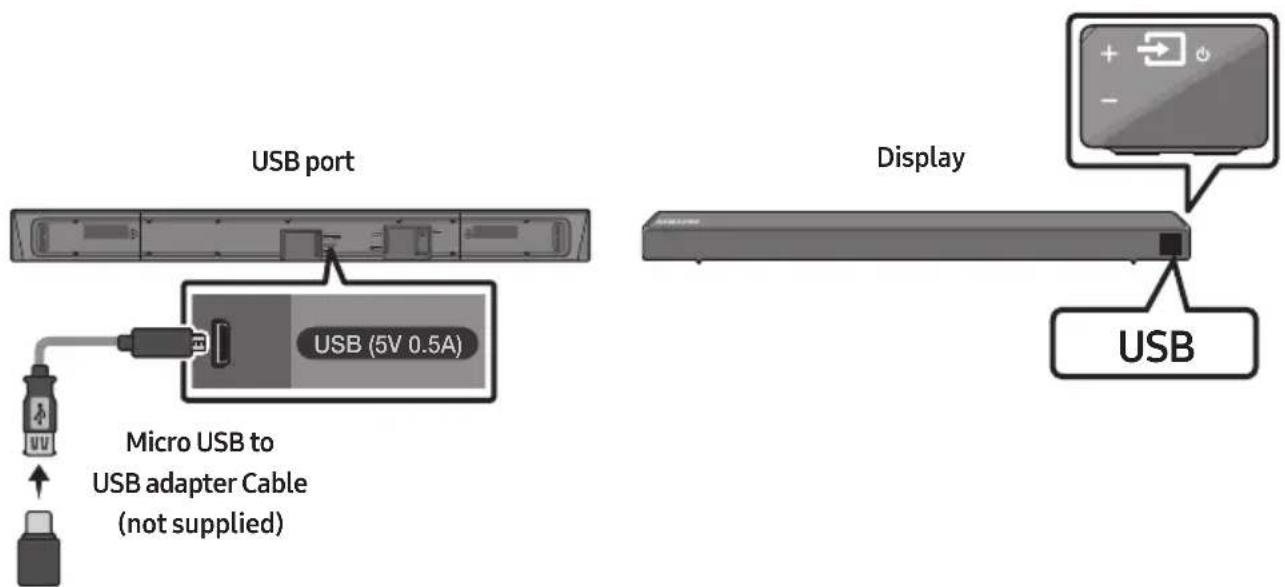
- Connect a Micro USB to USB adapter cable with a male USB 2.0 Micro USB plug (Type B) on one end and a standard female 2.0 USB jack (Type A) on the other end to the micro USB jack on your Soundbar.
- The Micro USB to USB adapter cable is sold separately. To purchase, contact a Samsung Service Centre or Samsung Customer Care.
- Connect your USB device to the female end of the adapter cable.
- Press the (Source) button on the right side panel or on the remote control, and then select "USB".
- "USB" appears in the display screen.
-
Play music files from the USB storage device through the Soundbar.
-
The Soundbar automatically turns off (Auto Power Off) if no USB device has been connected for more than 5 minutes.
File Format Type Compatibility list
| Extension Codec Sampling Rate Bitrate | |||
| *.mp3 MPEG 1 Layer2 16KHz ~ 48KHz 80kbps~320kbps | |||
| MPEG 1 Layer3 16KHz ~ 48KHz | 80kbps~320kbps | ||
| MPEG 2 Layer3 16KHz ~ 48KHz | 80kbps~320kbps | ||
| MPEG 2.5 Layer3 16KHz ~ 48KHz | 80kbps~320kbps | ||
| *.wma | Wave_Style_MSAudio1 | 16KHz ~ 48KHz | 56kbps~128kbps |
| Wave_Style_MSAudio2 16KHz ~ 48KHz | 16KHz ~ 48KHz 56kbps~128kbps | ||
| *.aac | AAC | 16KHz ~ 96KHz | 48kbps~320kbps |
| AAC-LC | 16KHz ~ 96KHz | 128kbps~192kbps5.1ch 320kbps | |
| HE-AAC | 24KHz ~ 96KHz | 48kbps~64kbps5.1ch 160kbps | |
| *.wav | - | 16KHz ~ 48KHz | up to 3000kbps |
| *.ogg | OGG 1.1.0 | 16KHz ~ 48KHz | 50kbps~500kbps |
| *.flac | FLAC 1.1.0, FLAC 1.2.1 | 16KHz ~ 96KHz | up to 3000kbps |
- If there are too many folders and files stored on the USB device, it may take the Soundbar some time to access and play files.
07 CONNECTING A MOBILE DEVICE
Connecting via Bluetooth
When a mobile device is connected using Bluetooth, you can hear stereo sound without the hassle of cabling.
- You cannot connect more than one Bluetooth device at a time.
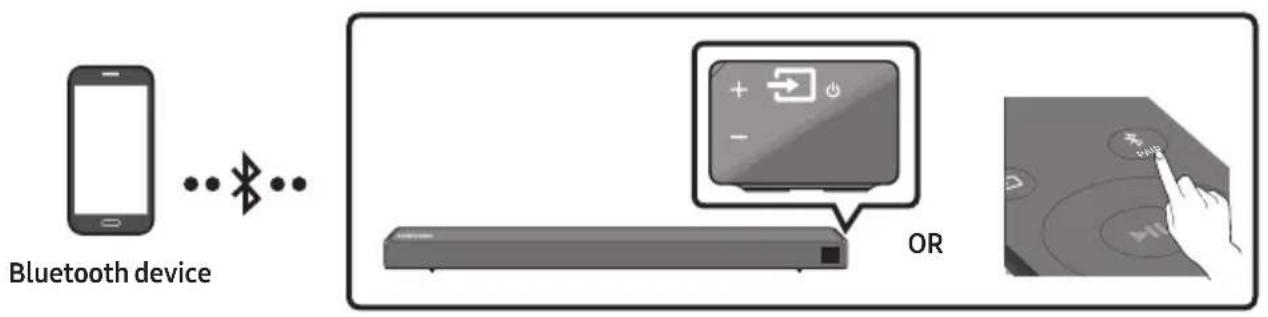
The initial connection
- Press the PAIR button on the remote control to enter the "BT PAIRING" mode.
(OR) a. Press the (Source) button on the right side panel and then select "BT". Change "BT" to "BT READY".
b. When "BT READY" appears, press and hold the l (Source) button on the right side panel of the Soundbar for more than 5 seconds to display "BT PAIRING".
-
On your device, select "[AV] Samsung Soundbar Nxxx N-Series" from the list that appears.
-
When the Soundbar is connected to the Bluetooth device, [Bluetooth Device Name] "BT" appears in the front display.
-
Play music files from the device connected via Bluetooth through the Soundbar.
If the device fails to connect
-
If a previously connected Soundbar listing (e.g. "[AV] Samsung Soundbar Nxxx N-Series") appears in the list, delete it.
-
Then repeat steps 1 through 2.
NOTE
- After you have connected the Soundbar to your mobile device the first time, use the "BT READY" mode to reconnect.
What is the difference between BT READY and BT PAIRING?
- BT READY: In this mode, you can search for previously connected TVs or connect a previously connected mobile device to the Soundbar.
- BT PAIRING: In this mode, you can connect a new device to the Soundbar. (Press the PAIR button on the remote control or press and hold the Source) button on the right side of the Soundbar for more than 5 seconds while the Soundbar is in "BT" mode.)
NOTES
- If asked for a PIN code when connecting a Bluetooth device, enter <0000>.
- In Bluetooth connection mode, the Bluetooth connection will be lost if the distance between the Soundbar and the Bluetooth device exceeds 10 meters.
- The Soundbar automatically turns off after 5 minutes in the Ready state.
-
The Soundbar may not perform Bluetooth search or connection correctly under the following circumstances:
-
If there is a strong electrical field around the Soundbar.
- If several Bluetooth devices are simultaneously paired with the Soundbar.
-
If the Bluetooth device is turned off, not in place, or malfunctions.
-
Electronic devices may cause radio interference. Devices that generate electromagnetic waves must be kept away from the Soundbar main unit - e.g., microwaves, wireless LAN devices, etc.
The Soundbar supports SBC data (44.1kHz, 48kHz). - Connect only to a Bluetooth device that supports the A2DP (AV) function.
- You cannot connect the Soundbar to a Bluetooth device that supports only the HF (Hands Free) function.
-
Once you have paired the Soundbar to a Bluetooth device, selecting "[AV] Samsung Soundbar Nxxx N-Series" from the device's scanned devices list will automatically change the Soundbar to "BT" mode.
-
Available only if the Soundbar is listed among the Bluetooth device's paired devices.
(The Bluetooth device and the Soundbar must have been previously paired at least once.)
- The Soundbar will appear in the Bluetooth device's searched devices list only when the Soundbar is displaying "BT READY".
- The Soundbar cannot be paired to another Bluetooth device if already in Bluetooth mode and paired to a Bluetooth device.
Bluetooth Power On (SOUND MODE)
If a previously paired Bluetooth device tries to pair with the Soundbar when the Bluetooth Power On function is on and the Soundbar is turned off, the Soundbar turns on automatically.
- Press and hold the SOUND MODE button for more than 5 seconds on the remote while the Soundbar is turned on.
- "ON-BLUETOOTH POWER" appears on the Soundbar's display.
Disconnecting the Bluetooth device from a Soundbar
You can disconnect a Bluetooth device from the Soundbar. For instructions, see the Bluetooth device's user manual.
- The Soundbar will be disconnected.
- When the Soundbar is disconnected from the Bluetooth device, the Soundbar will display "BT DISCONNECTED" on the front display.
Disconnecting the Soundbar from the Bluetooth device
Press the (Source) button on the right side panel or on the remote control, and then change to any mode except "BT".
- Disconnecting takes time because the Bluetooth device must receive a response from the Soundbar. (Disconnection time may differ, depending on the Bluetooth device)
- When the Soundbar is disconnected from the Bluetooth device, the Soundbar will display "BT DISCONNECTED" on the front display.
NOTES
- In Bluetooth connection mode, the Bluetooth connection will be lost if the distance between the Soundbar and the Bluetooth device exceeds 10 meters.
- The Soundbar automatically turns off after 5 minutes in the Ready state.
More About Bluetooth
Bluetooth is a technology that enables Bluetooth-compliant devices to interconnect easily with each other using a short wireless connection.
- A Bluetooth device may cause noise or malfunction, depending on usage, if:
- A part of your body is in contact with the receiving/transmitting system of the Bluetooth device or the Soundbar.
- It is subject to electrical variation from obstructions caused by a wall, corner, or office partition.
- It is exposed to electrical interference from same frequency-band devices including medical equipment, microwave ovens, and wireless LANs.
- Pair the Soundbar with the Bluetooth device while they are close together.
- The further the distance between the Soundbar and Bluetooth device, the worse the quality is. If the distance exceeds the Bluetooth operational range, the connection is lost.
- In poor reception areas, the Bluetooth connection may not work properly.
- The Bluetooth connection only works when it is close to the unit. The connection will be automatically cut off if the Bluetooth device is out of range. Even within range, the sound quality may be degraded by obstacles such as walls or doors.
- This wireless device may cause electric interference during its operation.
Using the Samsung Audio Remote App
Installing the Samsung Audio Remote App
To control the Soundbar with your smart device and the Samsung Audio Remote app, download the Samsung Audio Remote app from the Google Play store.
Market search : Samsung Audio Remote

Launching the Samsung Audio Remote App
To launch and use the Samsung Audio Remote app, touch the Audio Remote icon on your smart device, and then follow the directions on the screen.
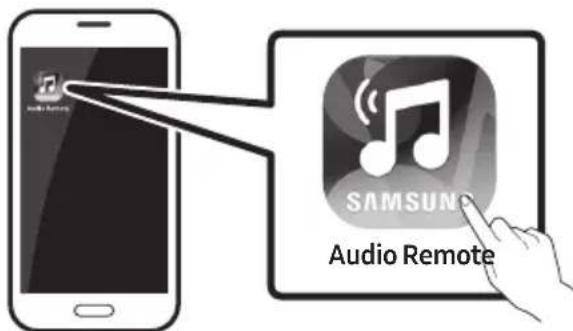
- The Samsung Audio Remote app is only compatible with Android mobile phones and mobile devices running Android OS 3.0 or later.
08 USING THE REMOTE CONTROL
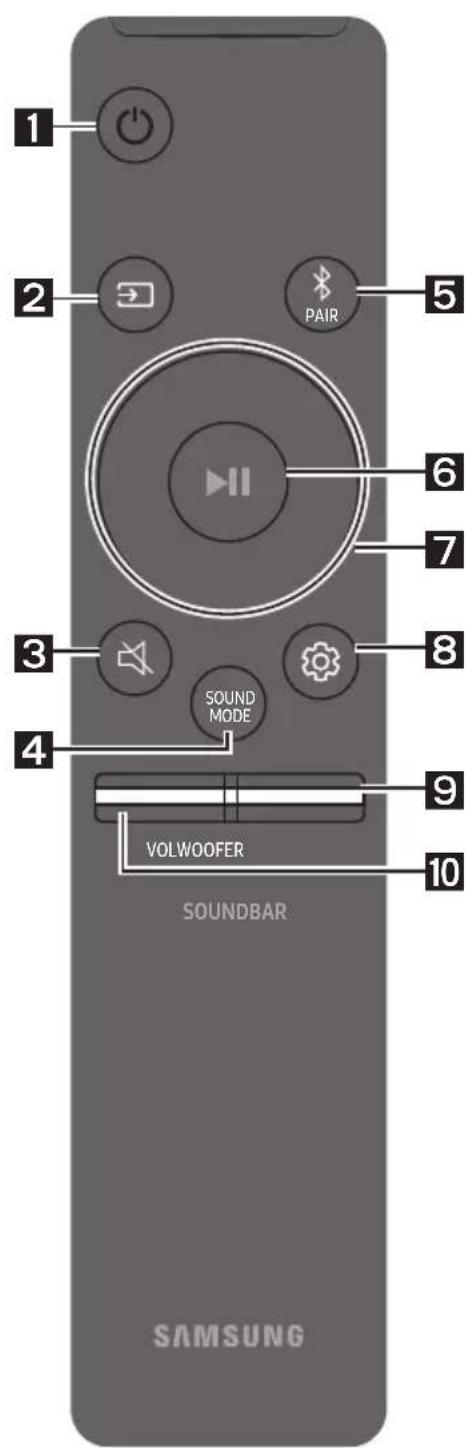
How to Use the Remote Control
| 1 | Power | Turns the Soundbar on and off. |
| 2 | Source | Press to select a source connected to the Soundbar. • BT PAIRING mode To turn on “BT PAIRING” mode, press and hold the <Source> button for more than 5 seconds. |
| 3 | Mute | Press the (Mute) button to mute the sound. Press it again to unmute the sound. |
| 4 | SOUND MODE | You can select the desired sound effect by choosing STANDARD or SURROUND. Select the “STANDARD” mode if you want to enjoy the original sound. • DRC (Dynamic Range Control) Lets you apply dynamic range control to Dolby Digital tracks. Press and hold the SOUND MODE button while the Soundbar is powered off to turn DRC (Dynamic Range Control) on or off. With the DRC turned on, loud sound is reduced. (The sound may be distorted.) • Bluetooth Power This feature automatically turns the Soundbar on when it receives a connection request from a previously connected TV or Bluetooth device. The setting is On by default. • Press and hold the SOUND MODE button for more than 5 seconds to turn off the Bluetooth Power function. |
| 5 | Bluetooth PAIR | Press the PAIR button. "BT PAIRING" appears in the Soundbar's display. You can connect the Soundbar to a new Bluetooth device in this mode by selecting the Soundbar from the Bluetooth device's search list. |
| 6 | Play / Pause | Press the button to pause a music file temporarily. When you press the button again, the music file plays. • Auto Power Down Function The unit turns off automatically in the following situations. - D.IN / HDMI / BT / USB Mode: If there is no audio signal for 5 minutes. - AUX Mode: - If the Audio (AUX) Cable is disconnected for 5 minutes. - If there is no KEY input for 8 hours when the Audio (AUX) Cable is connected. (Auto Power Down function can be turned off only in that case.) - To turn off Auto Power Down function, while in "AUX" mode, press and hold the button for 5 seconds. "ON-AUTO POWER DOWN" / "OFF-AUTO POWER DOWN" appears on the display. |
| 7 | Up/Down/ Left/Right | Press the indicated areas to select Up/Down/Left/Right. Press Up/Down/Left/Right on the button to select or set functions. • Repeat To use the Repeat function in "USB" mode, press the Up button. • Music Skip Press the Right button to select the next music file. Press the Left button to select the previous music file. • Anynet+ / Auto Power Link You can turn Anynet+ and Auto Power Link on or off. Anynet+ and Auto Power Link are turned on and turned off by the Right and Left buttons respectively. - Anynet+: If the Soundbar is connected to a Samsung TV through an HDMI cable, you can control your Soundbar with a Samsung TV remote control. Press and hold the Right button for 5 seconds to toggle Anynet+ ON and OFF. - Auto Power Link: If the Soundbar is connected to your TV through a digital optical cable, the Soundbar can automatically turn on when you turn on your TV. Press and hold the Left button for 5 seconds to toggle Auto Power Link ON and OFF. - Anynet+ / Auto Power Link are set to ON by default. • ID SET Press and hold the Up button for 5 seconds to complete ID SET (when connecting to an accessory item). |
| ·Volume restriction function Because it may damage hearing when the power is turned on at high volumes, it adjusts the volume to 20 when the set volume is higher than 20. - The default value for Volume restriction is off. The set volume is maintained even when the power is turned off. - To change the setting, press and hold the Down button on the remote control for 5 seconds. With the volume restriction off, "V FREE" appears on the front display and with the function on, "V LOCK" appears. | ||
| 8 | Sound Control | You can select from TREBLE, BASS, or AUDIO SYNC. ·To control the volume of the treble or bass sound, select TREBLE or BASS in Sound Settings, and then adjust the volume between -6~+6 by using the Up/Down buttons. ·Press and hold the (Sound Control) button for about 5 seconds to adjust the sound for each frequency band. 150Hz, 300Hz, 600Hz, 1.2KHz, 2.5KHz, 5KHz, and 10KHz are selectable using the Left/Right buttons and each can be adjusted to a setting between -6 to +6 using the Up/Down buttons. ·If the video on the TV and audio from the Soundbar are not synchronised, select AUDIO SYNC in Sound Settings, and then set the audio delay between 0~300 milliseconds by using the Up/Down buttons. (Not available in "USB" mode.) ·AUDIO SYNC is only supported for some functions. |
| 9 | WOOFER | Push the button up or down to adjust the volume of the subwoofer to -12 or between -6 to +6. To set the subwoofer volume level to 0, press the button. |
| 10 | VOL | Push the button up or down to adjust the volume. ·Mute Press the VOL button to mute the sound. Press it again to unmute the sound. |
Adjusting the Soundbar volume with a TV remote control
If you have a Samsung TV, you can adjust the Soundbar's volume using the IR remote control that came with your Samsung TV.
First use the TV menu to set the TV audio on your Samsung TV to external speakers, then use your Samsung remote to control the Soundbar's volume. For more information, see the TV's user manual. The default mode for this function is control by a Samsung TV remote. If your TV is not a Samsung TV, follow the directions below to change the settings of this function.
- Turn Off the Soundbar.
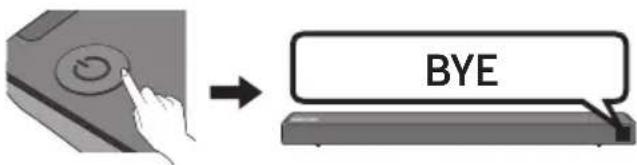
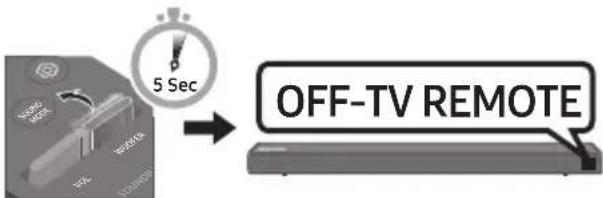
- If you do not want to use this function, push up and hold the WOOFER button repeatedly for 5 seconds until "OFF-TV REMOTE" appears in the display.
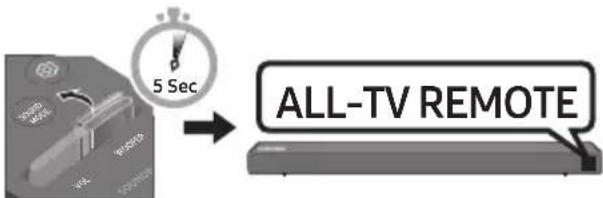
- If you want to control the Soundbar with your TV's remote, push up and hold the WOOFER button for 5 seconds repeatedly until "ALL-TV REMOTE" appears in the display. Then, use your TV's menu to select external speakers.
- If you want to return the Soundbar to the default mode (control by a Samsung TV remote), push up and hold the WOOFER button for 5 seconds repeatedly until "SAMSUNG-TV REMOTE" appears in the display.
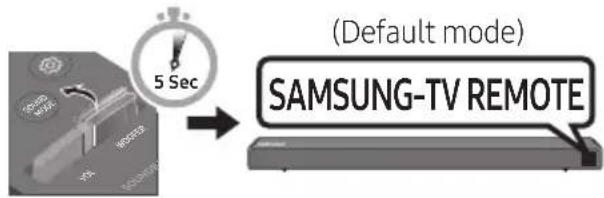
Each time you push the WOOFER button up and hold it for 5 seconds, the mode switches in the following order:
"SAMSUNG-TV REMOTE" (Default mode) "OFF-TVREMOTE" "ALL-TV REMOTE".
-
This function may not be available, depending on the remote control.
-
Manufacturers supporting this function: VIZIO, LG, Sony, Sharp, PHILIPS, PANASONIC, TOSHIBA, GRUNDIG, Hisense, RCA
Using the Hidden Buttons (Buttons with more than one function)
| Hidden Button | Reference page | |
| Remote Control Button Function | ||
| WOOFER | TV remote control On/Off (Standby) | page 25 |
| (Source) | BT Pairing page 22 | |
| II (Play / Pause) | Auto Power Down On/Off (AUX mode) | page 23 |
| Initialise (Standby) page 30 | ||
| BT Ready page 13 | ||
| Left | Auto Power Link ON/OFF | page 23 |
| Right Anynet+ ON/OFF page 23 | ||
| Up ID SET page 23 | ||
| Down | Volume restriction On/Off | page 24 |
| (Sound Control) | 7 Band EQ page 24 | |
| SOUND MODE | DRC ON/OFF (Standby) | page 22 |
| Bluetooth Power | page 22 | |
Output specifications for the different sound effect modes
| Effect | Input | Output | ||
| Without Wireless Rear Speaker Kit | With Wireless Rear Speaker Kit | |||
| SOUND MODE | STANDARD | 2.0 ch | 2.1 ch | 4.1 ch |
| 5.1 ch | 3.1 ch | 5.1 ch | ||
| SOUND MODE | SURROUND | 2.0 ch | 3.1 ch | 5.1 ch |
| 5.1 ch | 3.1 ch | 5.1 ch | ||
- Samsung Wireless Rear Speaker Kit can be purchased separately. To purchase a Kit, contact the vendor you purchased the Soundbar from.
09 INSTALLING THE WALL MOUNT
Installation Precautions
Install on a vertical wall only.
- Do not install in a place with high temperature or humidity.
- Verify whether the wall is strong enough to support the product's weight. If not, reinforce the wall or choose another installation point.
- Purchase and use the fixing screws or anchors appropriate for the kind of wall you have (plaster board, iron board, wood, etc.). If possible, fix the support screws into wall studs.
Purchase wall mounting screws according to the type and thickness of the wall you want to mount the Soundbar on.
Diameter: M5
Length: 35mm or longer recommended.
- Connect cables from the unit to external devices before you install the Soundbar on the wall.
Make sure the unit is turned off and unplugged before you install it. Otherwise, it may cause an electric shock.
Wallmount Components

Wall Mount Guide
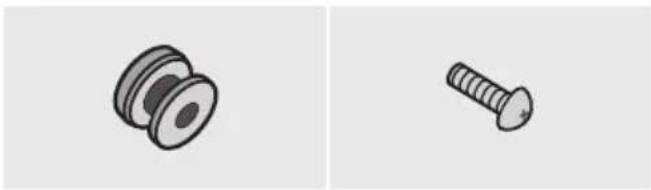

Holder-Screw (2 EA) Screw (2 EA)
Bracket-Wall Mount (2 EA)
-
Place the Wall Mount Guide against the wall surface.
-
The Wall Mount Guide must be level.
- If your TV is mounted on the wall, install the Soundbar at least 5 cm below the TV.
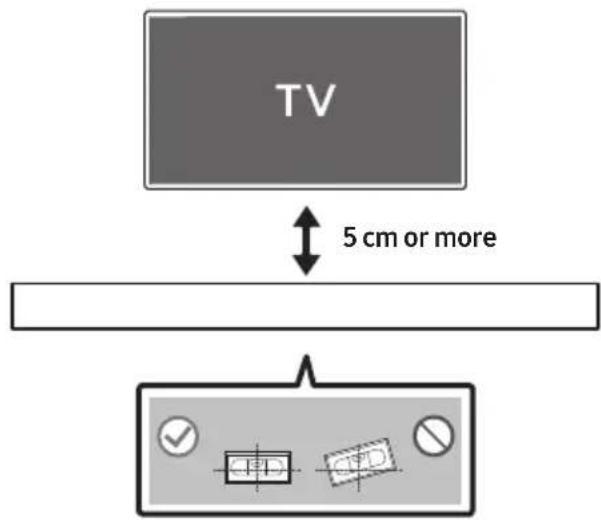
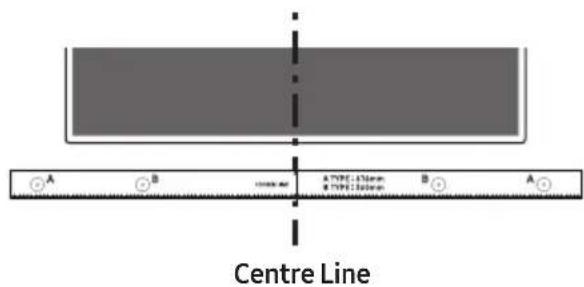
- Align the Wall Mount Guide's Centre Line with the centre of your TV (if you are mounting the Soundbar below your TV), and then fix the Wall Mount Guide to the wall using tape.
If you are not mounting below a TV, place the Centre Line in the centre of the installation area.
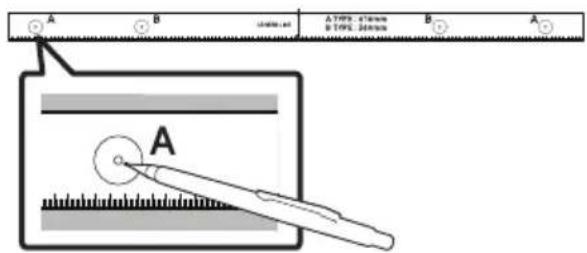
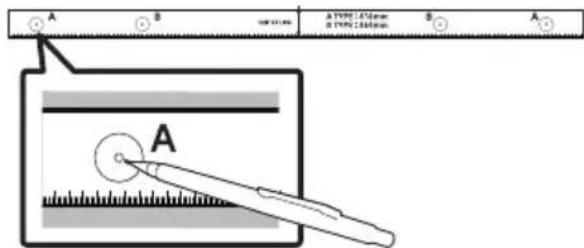
- Push a pen tip or sharpened pencil tip through the centre of the A-TYPE images on each end of the Guide to mark the holes for the supporting screws, and then remove the Wall Mount Guide.
-
Using an appropriately sized drill bit, drill a hole in the wall at each marking.
-
If the markings do not correspond to the positions of studs, make sure you insert appropriate anchors or mollies into the holes before you insert the support screws. If you use anchors or mollies, make sure the holes you drill are large enough for the anchors or mollies you use.
-
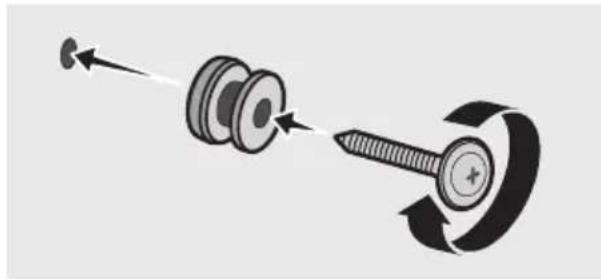
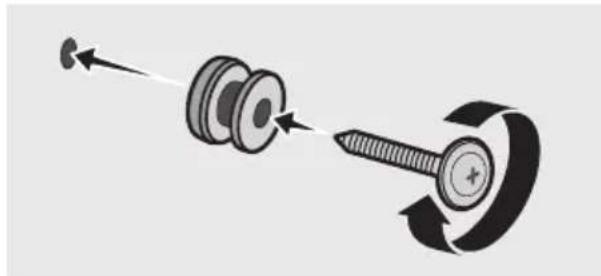
Push a screw (not supplied) through each Holder-Screw, and then screw each screw firmly into a support screw hole.
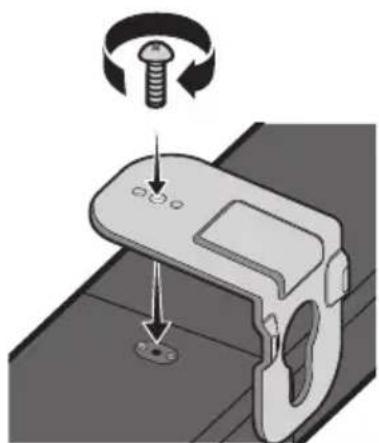
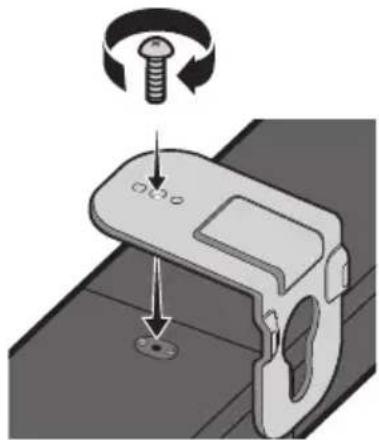
- Install the 2 Bracket-Wall Mounts in the correct orientation on the bottom of the Soundbar using 2 Screws.
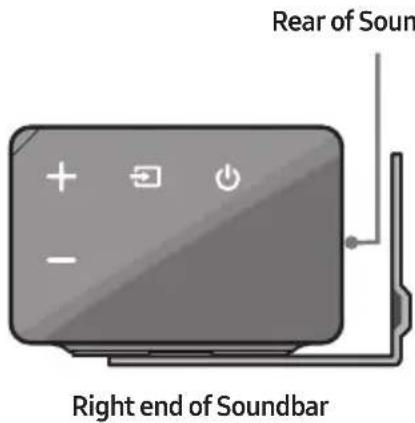
- When assembling, make sure the hanger part of the Bracket-Wall Mounts are located behind the rear of the Soundbar.
- Install the Soundbar with the attached Bracket-Wall Mounts by hanging the Bracket-Wall Mounts on the Holder-Screws on the wall.
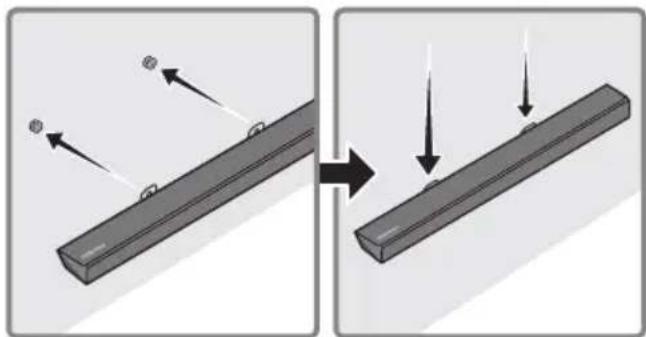
-
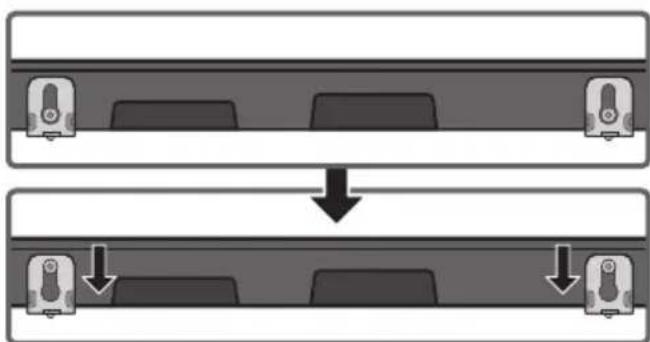
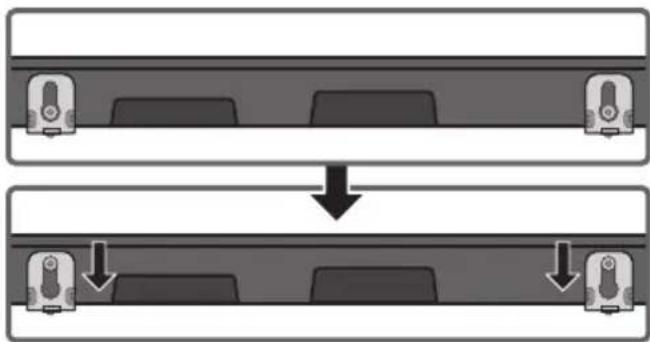
Slide the Soundbar down as shown below so that the Bracket-Wall Mounts rest securely on the Holder-Screws.
-
Insert the Holder-Screws into the wide (bottom) part of the Bracket-Wall Mounts, and then slide the Bracket-Wall Mounts down so that Bracket-Wall Mounts rest securely on the Holder-Screws.
10 SOFTWARE UPDATE
Samsung may offer updates for the Soundbar's system firmware in the future.
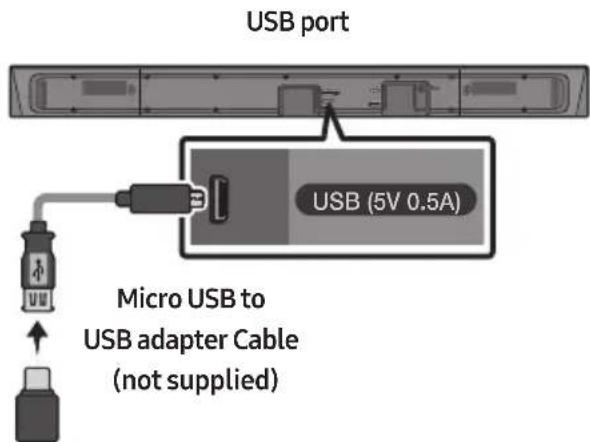
If an update is offered, you can update the firmware by connecting a USB device with the firmware update stored on it to the USB port on your Soundbar. For more information about how to download update files, go to the Samsung Electronics website at www.samsung.com Support.
Then, enter or select the model number of your Soundbar, select the Software & Apps option, and then Downloads. Note that the option names can vary.
Updating Procedure
-
Connect a Micro USB to USB adapter cable with a male USB 2.0 Micro USB plug (Type B) on one end and a standard female 2.0 USB jack (Type A) on the other end to the micro USB jack on your Soundbar.
-
The Micro USB to USB adapter cable is sold separately. To purchase, contact a Samsung Service Centre or Samsung Customer Care.
-
Follow the steps below to download the product software:
Go to the Samsung website at (samsung.com) search for the model name - select the customer support option (the option name is subject to change) - Save the downloaded software to a USB stick and select "Extract Here" to unzip the folder.
- Turn off the Soundbar and connect the USB stick containing the software update to the female port on a Micro USB adapter cable. Connect the cable to the USB port on the Soundbar.
- Turn on the Soundbar. Within 3 minutes, "UPDATE" is displayed and updating begins.
-
When the update finishes, the Soundbar turns off. Press the button on the remote control for 5 seconds. "INIT" appears on the display and then the Soundbar turns off. The update is complete.
-
This product has a DUAL BOOT function. If the firmware fails to update, you can update the firmware again.
If UPDATE is not displayed
- Turn off the Soundbar, disconnect and then reconnect the USB storage device that contains the update files to the Soundbar's USB port.
-
Disconnect the Soundbar's power cord, reconnect it, and then turn on the Soundbar.
-
Updating firmware may not work properly if audio files supported by the Soundbar are stored in the USB storage device.
- Do not disconnect the power or remove the USB device while updates are being applied. The main unit will turn off automatically after completing the firmware update.
-
After update is completed, the user setup in Soundbar is initialised. We recommend you write down your settings so that you can easily reset them after the update. Note that updating firmware resets the subwoofer connection too. If the connection to the subwoofer is not re-established automatically after the update, refer to page 6. If the software update fails, check if the USB stick is defective.
-
Mac OS users should use MS-DOS (FAT) as the USB format.
- Updating via USB may not be available, depending on the USB storage device manufacturer.
11 TROUBLESHOOTING
Before seeking assistance, check the following.
| The unit will not turn on. |
| Is the power cord plugged into the outlet?→Connect the power plug to the outlet. |
| A function does not work when the button is pressed. |
| Is there static electricity in the air?→Disconnect the power plug and connect it again. |
| Sound dropouts occur in BT mode. |
| →See the Bluetooth connection sections on pages 12 and 18. |
| Sound is not produced. |
| Is the Mute function on?→Press the VOL button to cancel the function. |
| Is the volume set to minimum?→Adjust the Volume. |
| The remote control does not work. |
| Are the batteries drained?→Replace with new batteries. |
| Is the distance between the remote control and Soundbar main unit too far?→Move the remote control closer to the Soundbar main unit. |
| The red LED on the subwoofer blinks and the subwoofer is not producing sound. |
| This issue can occur if the subwoofer is not connected to the Soundbar main unit.→Try to connect your subwoofer again. (See page 6.) |
| The subwoofer drones and vibrates noticeably. |
| Try to adjust the vibration of your subwoofer.→Push the WOOFER button on your remote control up or down to adjust the subwoofer volume. (to -12, or between -6 ~ +6). |
12 LICENCE

DOLBY
AUDIO
Manufactured under license from Dolby Laboratories. Dolby, Dolby Audio, Pro Logic, and the double-D symbol are trademarks of Dolby Laboratories.

dt
Digital Surround
For DTS patents, see http://patents.dts.com. Manufactured under license from DTS Licensing Limited. DTS, the Symbol, DTS in combination with the Symbol, and DTS Digital Surround are registered trademarks or trademarks of DTS, Inc. in the United States and/or other countries. © DTS, Inc. All Rights Reserved.

HIGH.DEPTION MULTIMEDIA INTERFERENCE
The terms HDMI and HDMI High-Definition Multimedia Interface, and the HDMI Logo are trademarks or registered trademarks of HDMI Licensing LLC in the United States and other countries.
13 OPEN SOURCE LICENCE NOTICE
To send inquiries and requests regarding open sources, contact Samsung via Email (oss.request@samsung.com).
14 IMPORTANT NOTES ABOUT SERVICE
- Figures and illustrations in this User Manual are provided for reference only and may differ from actual product appearance.
- An administration fee may be charged if either
(a) an engineer is called out at your request and there is no defect with the product (i.e. where the user manual has not been read).
(b) you bring the unit to a repair centre and there is no defect with the product (i.e. where the user manual has not been read).
- You will be informed of the administration fee amount before a technician visits.
15 SPECIFICATIONS AND GUIDE
Specifications
| Model Name HW-N550 | |
| USB 5V/0.5A | |
| Weight 2.9 kg | |
| Dimensions(W x H x D) 1060.0 x 59.0 x 87.5 mm | |
| Operating Temperature Range +5°C to +35°C | |
| Operating Humidity Range 10 % ~ 75 % | |
| AMPLIFIER Rated Output power 30W x 6 | |
| Supported play formats | LPCM 2ch, Dolby AudioTM (supporting Dolby® Digital), DTS |
| WIRELESS DEVICE OUTPUT POWER BT max transmitter power | 100mW at 2.4GHz – 2.4835GHz |
| SRD max transmitter power | 25mW at 5.725GHz – 5.825GHz |
| Subwoofer Name PS-WN30 | |
| Weight 7.0 kg | |
| Dimensions(W x H x D) 215.0 x 384.5 x 304.0 mm | |
| AMPLIFIER | |
| Rated Output power 160W |
| Overall Standby Power Consumption (W) 2.9W | |
| Bluetooth Port deactivation method | Press and hold the SOUND MODE button for more than 5 seconds to turn off Bluetooth Power function. |
NOTES
Samsung Electronics Co., Ltd reserves the right to change the specifications without notice.
Weight and dimensions are approximate.
- Hereby, Samsung Electronics, declares that this equipment is in compliance with Directive 2014/53/EU.
The full text of the EU declaration of conformity is available at the following internet address: http://www.samsung.com go to Support > Search Product Support and enter the model name.
This equipment may be operated in all EU countries.
[Correct disposal of batteries in this product]
(Applicable in countries with separate collection systems)
This marking on the battery, manual or packaging indicates that the batteries in this product should not be disposed of with other household waste at the end of their working life. Where marked, the chemical symbols Hg, Cd or Pb indicate that the battery contains mercury, cadmium or lead above the reference levels in EC Directive 2006/66.
If batteries are not properly disposed of, these substances can cause harm to human health or the environment.
To protect natural resources and to promote material reuse, please separate batteries from other types of waste and recycle them through your local, free battery return system.
Correct Disposal of This Product
(Waste Electrical & Electronic Equipment)
(Applicable in countries with separate collection systems)
This marking on the product, accessories or literature indicates that the product and its electronic accessories (e.g. charger, headset, USB cable) should not be disposed of with other household waste at the end of their working life. To prevent possible harm to the environment or human health from uncontrolled waste disposal, please separate these items from other types of waste and recycle them responsibly to promote the sustainable reuse of material resources.
Household users should contact either the retailer where they purchased this product, or their local government office, for details of where and how they can take these items for environmentally safe recycling.
Business users should contact their supplier and check the terms and conditions of the purchase contract. This product and its electronic accessories should not be mixed with other commercial wastes for disposal.
For information on Samsung's environmental commitments and product specific regulatory obligations e.g. REACH, WEEE, Batteries, visit:
http://www.samsung.com/uk/aboutsamsung/samsungelectronics/corporatecitizenship/data-corner.html
MeToI 2. Be3KnUHO CBbP3BaHe 12
- Cbbp3BaHe Ha TeIeBn3Op Upe3 Bluetooth 12
05 Cbbp3BaHe Ha BbHsHo yctpoiCTBO 14
Cbbp3BaHe ype3 onTnueH nIaHaIorOB ayDIO (AUX) ka6eI 14
Cbbp3BaHe ype3HDMI ka6eJ 15
06 Cbbp3BaHe Ha USB namet 16
07 Cbbp3BaHe Ha Mo6nIHO yCTpoiCTBO 18
Cbbp3BaHe uee3 Bluetooth 18
I3noJ3BaHe Ha npInoJxHnETo Audio Remote Ha Samsung 21
-Инстадирае на пиюжениTo Audio Remote Ha Samsung 21
- CtapTupahe Ha npiloxeHneTo Audio Remote Ha Samsung 21
08 I3noI3BaHe Ha dInCTaHcNoHHoto ynpabJeHne 22
Kak da n3noJ3BaTe nCTaHcNHOHTo ynpabJeHne 22
HactpoBbAne Ha cnIata Ha 3Byka Ha Soundbar ype3 dNCTaHcNoHNO ynpabLeHne Ha TeleBn3Op 25
I3noJ3BaHe Ha cKpntTe 6yToHn (6yToHn C noBuee OTeHa yHKuJa) 26
I3xoJHn CneuΦnKaun 3a pa3JIuHHTe peKIMn 3a 3ByKOb n eKeTn 26
09 MoHTnpaHe Ha KOH3OJaTa 3a CTeHa 27
IpeiNa3HmepKn np MoHTaJ 27
KOMnoHeHTn 3a CteHeH MOHTaX 27
10 AktyалиразноHa coФуер 29
IpoueDypa 3a akTuaynInpaHe 30
Ako He ce nokajke UPDATE 30
11 OTeTpaHЯBaHe Ha Hen3PpABHOCtN 31
Cpeunfokaun npbKOBOdCTBO 33
Пицен3 32
Белека 3a Лиценза 3a OTbOpen Кд 32
Baxnn 6eJekn 3a 06cnyKbaHeTo 32
CneuΦkaua 33
01 ПЮВЕРKA HA KOMПОHEHTNTE

OCHOBHO yCTPOIcTBo Ha Soundbar Cy6yΦep DnCTaHNoHNO

ynpablenne/BaTePN
3axpaHbaaKa6en (Cy6yΦep)
AC/DC aanTep (OchOBHO yctpoiCTBO)
3axpaHbau,ka6en (AC/DCaandTep)
Ottueyen ka6eJ
3adoIbHnTeHa HOpMaun OTHoCHo 3axpaHbaHeTo I NOTpe6JeHneTo Ha eKeTpoEnerHa npabete cnpaBka c etnketa, noCTaBeH Ha npOdykta. (EtKET:doHa qact Ha ochOBHoto yctpoiCTBO Ha Soundbar)
- Ctbnknte 3a Cbbp3BaHe Ha 3axpaHbaHeto ca 0603haueHN (1,2,3). 3a dobnHnTeHa HOpMaunr OTHOCHO Cbbp3BaHeto Ha 3axpaHbaHeto BxKTe CTpaHua 5.
- 3a komnoheHtn 3a moHTnpaHe Ha Soundbar KbM CteHaTa BnJTe CtpaHnca 27.
- 3a 3aknyBaHe Ha DoIbHnTeHn KOMHOHeHTn NIn DoIbHnTeHn Ka6eN, O6bpHeTe ce KbM cepBn3eH ueTbp Nm KbM OTdeLa 3a KIneHTcko 06cnyXBaHe Ha Samsung.
BbHnHnT BnHa akcecoapTe MoKe Jneko da ce pa3nUaBa OT nIIOCTpaunTe no-rope.
CBeTInHHn LED nHdNkAToPn B 3aHaTa YacT Ha cy6yΦepa
| LED индикатори | Състаяне | Описане Раделенha сюбноct | |
| Син bó | Вкл. | Усpenho CBvp3bahe (hopmaлиа pa6ota) | - |
| Мira | Вьздановаяне на Врьзкata | ПробпpoПрobерete дали зхраисят Кабел, поденин Кьм основно усточьо на Soundbar e CBvp3ан павлино пли Ичakайte 5 минут. Ако пемигванeto пproдьожи, опitaиные рчны за CBvpжete субфера. Вижte сTRAница 7. | |
| Черveно Вкл. | Мira | Готовноct (ocnoboto усточьо на Soundbar се иЗкючillo) | Прobерete дали зхраисят кабел на OCnoboto усточьо на Soundbar e CBvp3ан павлино. |
| Сьvp3baHETo e Heucneшо | Свьржete OTHOB. Вижte Иструкцип te 3a рьчно CBvp3baHe Na STPANUca 7. | ||
| Черveно И Син bó | Мira He | Изпразвноct | Вижte Информацята за Врьзka сbc сервизен цentьр на Samsung в рьковостВOTO. |
PbHcBb3BaHe Ha cy6yepa, aKO aBTOMaTnHOTo CBbp3BaHe e HeycneHHO
Ipei n3PbJIHeHne Ha npOeDypaTa 3a pbUHO CBbp3BaHe no-dOny:
-
Пювереталл зхарнвацпткабели на Soundbarи на субуфepа ссьрзанnpabINHO.
-
YBepete ce, ye Soundbar e BKJIoueH.
-
HATINCHETI 3aDpBkTe ID SET B 3aHATA cact Ha cy6yepa HAI-MaIKo 3a 5cekyHn.
-
YepBENHrT INnKAtOp OT3aJHa cy6yfepa Ce n3KJIuOyBa H CINHrT INnKAtOp PpeMnRbA.
3aHa qacT Ha cy6yΦepa
- HATINCHETe 3aIpBXTe 6yToHa Harope Ha INCTaHcNHOHOTo ynpabJeHne Hn-MaIKO 3a 5 cekyni.
Ha nscnne Ha Soundbar 3a MOMENT ce n3Bexka cbo6ueneTo ID SET n cJeT TOBa n3ue3Ba.
Soundbar ce BkIIOyBa aBtOMaTnUHO, KOraTO ID SET 3aBbPSh.
- ПовереталLED ИндikatopbT 3a CBbp3BaHe CBETN NOCTOHHO B CINHbO (3abbpseHo CBbp3BaHe).
LED INIINKATOpbT 3a Cbbp3BaHe cnnpa da npemrBa n CBETBa NOCTOARHNO B CnHbO, KOrato e yctaHOBeHa Bpb3Ka MeJdY Soundbar n 6e3xuHnry cy6yfep.
BENEXKNI
He cBbp3BaIte 3axpaHbAunna Ka6eHa To3n IpOdyKT nIN BaUnrT TeJeBn3Op KbM eJekTpueckn KOHTaKT, DOkATO BCNUKn Bpb3Kn Mejdy KOMNoHEHTnte He 6bDat 3aBbpSeHN.
- Праздддддддддддддддддддддддддддддддддддддддддддддддддддддддддддддддддддддддддддддддддддддддддддддддддддд徴убва da ce yberite, ye 3axpaHbaHeto e n3KJIIOUeHO n 3axpaHbAuzIaT ka6e He e CBp3aH KbM eJeKTpUeCKn KOHTaKT.
- Ako ochobnayr moyn e n3knuehen, 6e3kunnyr cy6yep ue npemHe B peKm Ha rotOBHOCT n CBetoIOBbT STANDBY B 3aHata qact ue CBetHe B cepBeHo, cIeI KaTo e npemrHaJ HraKoI Ko IbTu B CInHbO.
- Ako n3no3BaTe yctpoiCTBO, Koeto n3no3Ba cBuaTa yeCTota (5,8 GHz), KaKTo Soundbar, B 6n3ocT do Soundbar, cmUeHraTa Morat da npuHnT pKeKbCbaHe Ha 3Byka.
- Makcimamno To pa3ctoHne Ha npedabane Ha 6e3KnHnCnHa n Ha ochOBnma oky e okono 10 MeTpa, Ho MoKe Da Bapnpa B 3abncmocT OT BaWata pa6OTHa cpea. Ako MeJy ochOBnma moyn 6e3KnHnca cy6yep mMa CTOMaHO6eTOHnHa nn MetaHa CTeHa, cnCTemata MoKe n3o6uO da He pa6OTn, 3aIOTO 6e3KnHnT CnHaI He MoKe Da npOHnKHe ppe3 MetaI.
PNEIa3HIMEPKIN
B6e3KnHnCy6yepnMa BrpaJeHN aHTeHN 3a npneMaHe Ha 6e3KuHc nHaI. CbXpaHraBaIte Moynite daJeU OT BOna N Blara.
3a da cn ocunpynte onnmaHNO kauectBO npn cnyuane, ybepete ce, ye B 30HaTa OKoI0 6e3KnuHnBvcoKOrOBOpNTeJ 3a HnCKN YeCTOTn MOnyla Ha 6e3KnuHn npneMHNK (npoJaBa ce OTdeJIHO) Hama npenTCTBna.
Cbbp3BaHe Ha SWA-8500S KbM Soundbar (npo#aBa ce otdeJHo)
3a da noCTnHHeTe nCTnHcN 6e3KnueH cbpayNd 3Byk, CBpbXeTe KOMnJIeKTa OT 6e3KnUHn 3aHn BvcoKorOBopuTeHn Ha Samsung (SWA-8500S) KbM Soundbar (npoJaBa ce otJeHNo).
-
CbpxkTe 6e3xuHn npneMaU MOyU KbM 2 cbpayHd BcOKoROBOpntJI.
-
Ka6eInte Ha BvCOKoROBOpNTeIte ca ZBeTHO KoInpaHn.
- CnEi BkIIOUBaHe Ha 6e3KuHnI npMaI MoyI B eIeKTpueckn KOHTaKT npOBepTe daIe B CbCTOHN He Ha N3aKBaHe.
LED nHnKATOpbT 3a CbP3BaHe (CIN LED) Ha 6e3xNCHn npneMaTeIen MoyI npemrBa. Ako LED He npemrBa, HATNCHEte 6byToHa IDSET Ha Tbp6a Ha 6e3xNCHn npneMaTeIen MoyI c Bbpxa Ha Xmikai 3a 5~6 cekyni, DOKato LED nHnKATOpbT LINK npemrHe (B cnHbo). 3a Ooie nHΦopMaun OTHOcHo LED BnKTe pkbOoCTBOTo Ha Notpe6nteHa SWA-8500S.
-
HatncheTe 3aapbXte 6yToHa Harope Ha nctaHnOHHO ynpabJeHne Hn-MaIKo 3a 5 cekyni.
-
Ha dinçnPnê Ha Soundbar 3a MOMENT ce n3BexJa cbo6üeHneTo ID SET i cJIeT TOBa n3Ye3Ba.
Soundbar ce BkIIOUba aBTOMaTNUHO, KOraTO ID SET 3aBbPnN.
BHUMAHNE
-
Ako Baunr Soundbar n3nBnHbMa My3nKa,doKATO ce CBbp3Ba KbM SWA-8500S, moKe da CyBaTe N3BeCTHn CmUeHn O T BACOBN BnCOKOROBOpTeI,doKATO ce yCTaHOBn Bp3kata.
-
PpOBepe TaI INHINKaTOpBt 3a CbP3BaHe CBETn NOCToHHO B CInHbO (3aBbPseHo CbbP3BaHe).
LED nHnKaTopbT 3a Cbbp3BaHe cnnpa da npemrBa n CBETBa NOCTOAnHO B CnHbO, KOrato ce yctaHOBn Bpb3Ka MeJdy Soundbar n 6e3xuHnI npneMaU MoDyI.
5.AKO SWA-8500S He ce cBbpxke, NOBTOpe TPOueDypata O TcTbnka 2.
04 CBbP3BAHE KbM BALUNA TEJIEBN3OP
Mokte na cnyuatae 3Byka Ha TeleBn3opa oT cBoa Soundbar ue3 ka6eJHa nn6e3KuHa Bpb3ka.
Korato cayndabptcBbp3an KbM n36paHn TeleBn3Opn Samsung,ToJ MoKe da ce ynpabnaBnocpeDCTBOM INCTaHcN0HHOynpaBHeHne Ha TeleBn3Opa.
- Ta3n φункця ce noДьрka ot 2017 r n ot no-HOBITE TeleBn3opn Samsung Smart, kOnto noДьрkaT Bluetooth, korato CBpKete Soundbar KBM TeLEBn3opa nocpeDCTBOM onTNUeH ka6eI.
- OcbeH ToBa Ta3n FyHKuIe Bn N03BOLra Ba Da N3N0J3BaTe MeHIO To Ha TeJeBu3Opa, 3a Da 3aDaBaTe POnEtO Ha 3Byka I pa3JIuHn HAcTpoiKn, KaKTo I Cnilata Ha 3Byka I 3aRnyUbaHaTeo Ha 3Byka.
MeToI 1. Cbbp3BaHe ue3 ka6eI
Korato n3JIbUbaHnTe cIgHaII ca Dolby Digital, a hAcTpoiKaTa Ha TeJeBn3Opa 3a „LlΦpOB n3XoJeh aydno φopMaT" e PCM, npenopbYBa ce da npomeHte hAcTpoiKaTa, taKa ye da 6bDe Dolby Digital. Korato hAcTpoiKaTa ce npomeHn, moKeTe da Cnyuatae 3Byk C no-IO6po KaueCTBO. (MeHHTO moKe da ce pa3LIuHabv B 3aBVCIMoCT OT npOn3BOIDntela Ha TeJeBn3Opa.)
Cbbp3BaHe ype3 onTnueH ka6eI
- CbpxkTe kaka DIGITAL AUDIO IN (OPTICAL) Ha Soundbar KbM kaka OPTICAL OUT ha TeIeBn3opa ype3 uΦpOB onTnueH Ka6en.
- Hatachete 6ytoHa (M3ToUHnK) Ha nane OToACHO nn Ha nCTaHIOHOTO npabHeHne n CteToba n36epe peXIM ,D.IN".
Auto Power Link
Bpb3kata 3a aBTOMATNUHO 3axpaHbAHe BKJIIOUBA aBTOMATNUHO Soundbar, kORATo TeIeBN3OpbT Ce BKJIIOUH.
-
Cbpxkete Soundbar n TeIeBn3opa Upe3 uΦpOB oTnueh Ka6eJ.
-
Hatnche 6ytoHa HnABo Ha nCTaHnOHHoYnpabIeHne (CnHra ToKa HnIOCTpaunrTa BnCHO) B npObLnKeHne Ha 5 cekyn, 3a da BkIoUHTe nnN3KIOUHTe Auto Power Link.
-
По подаразапане Auto Power Link e Вклоча (ON). (3a за изкючite таи Функця, за рьхтс 6утона Наляво на дістанционно управленье в пордьжение на 5 cekyн.)
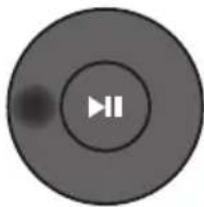
B3aBnCmOCTOTCBp3aHToyctpoNcTBoeBb3MoXHoAutoPowerLinkdaHeyHKUOnHnpa.
Ta3nΦyHKUeHaJIInuHa cMoBpeKIM,D.IN".
Cbbp3BaHe Ha TeIeBn3Op 4pe3 HDMI ka6eJ
-
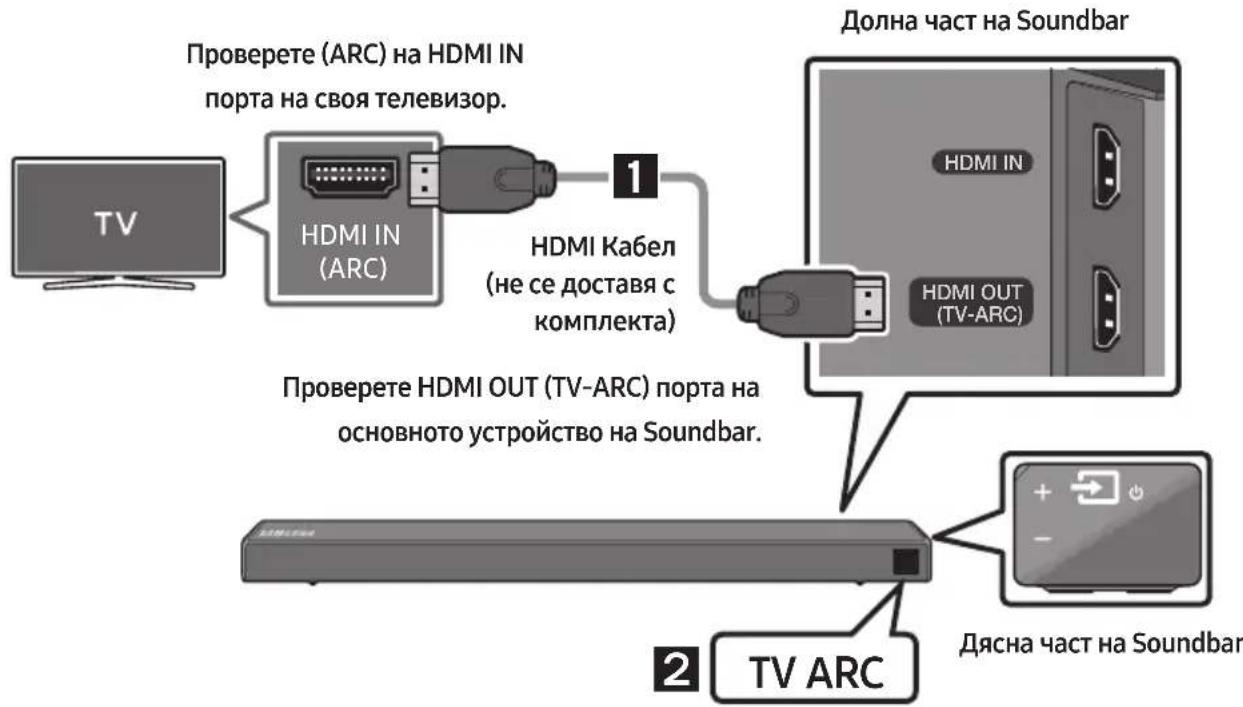
Пи влочен Soundbar и телевизор сбъркete HDMI ka6ena (he e doctabeh), кakto e noka3aHo Ha Фигурata.
-
"TVARC" ce noявая на ekрана на дисплег на ochobhoto устpoистwo Ha Soundbar n Soundbar Bb3npoIN3Bexka 3Byka Na TeleBn3opa.
-
Ako 3ByKbT Ha TelenBn30pa He ce cyBa, HATNCHeTe 6yToHa (N3ToCHNK) Ha INCTaHcNoHHOTU npabHeHne nIN B DaChata CtpaHa Ha Soundbar, 3a da npeBknOuHTe B pexHM ,D.IN". Ha ekpaHa Ce n3BExkDaT NocJeIOBaTeHNO ,D.IN" N ,TV ARC" IN Ce Bb3npOn3BExkDa 3ByKbT Ha TelenBn30pa.
-
Ako B npo3opeca Ha dincnej Ha ochoBHOTo yctpoiCTBO Ha Soundbar He ce nokaKe, TV ARC", npoBepe TaHDMI Ka6eIbT (He ce doCTaB B KOMnEKA) e Cbbp3aH KbM npabuHnA nopT.
- IV3noI3BaIte 6byOHTe 3a Cnla Ha 3Byka Ha IInCTaHcIOHHOTo ynpabJIeHne Ha TeJeBn3Opa, 3a Da npomHeTe CnIata Ha 3Byka Ha Soundbar.
BENEKNI
HDMI npedctablaBa nHTeppeic, KOTo no3BOJBA uΦpOBo npedabaHe Ha Bndeo aydno daHHI camo ype3 edNH KOHEKTOP.
- Ako TeIeBn3OpbT mMa ARC nOPT. CbPKeTe HDMI ka6eJa KbM nOPTa HDMl IN (ARC).
- IpnopbVbme n3noJ3BaHeTo Ha HDMI ka6eJ 6e3 cbpuebnHa, aKo e Bb3MOxH0. Ako n3noJ3BaTe HDMI ka6eJ cbccbpueBnHa, n3noJ3BaIte TaKbB, uHTo DnAmetbp e NO-MaJIbK OT 14 MM.
- Anynet+ Tp86Ba Da 6bIe BkJIIOUyeHO.
- Ta3nФυнкиЯ He e haJInuHa aKO HDMI ka6eIbT He noIbPjka ARC.
Metod 2. Be3xuHcBbP3BaHe
Cbbp3BaHe Ha TeIeBn3Op Upe3 Bluetooth
Korato TeleBn3OpbTe cBbP3aH ue3 Bluetooth, moKeTe da cnUwate cTepeo 3Byk, 6e3 da nMa xaoc ca Ka6eInte.
KoMNoHeTn 3a CTeHeH MoHTaJ

Bodau 3a MOHTIPAHe Ha cTeHa
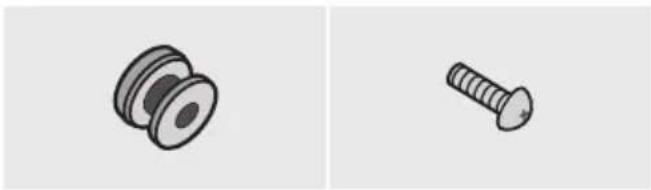
- Ako He MOHTnpaTe NOI TeJIeBN3Op, NOCTaBete LcHtpaHa IHHN B UcHTbpa Ha 30HaTa 3a MOHTnpaHe.
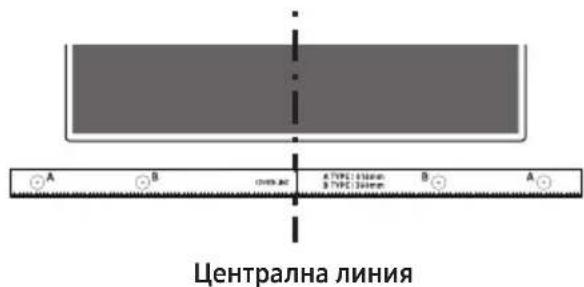
3.Пьхhte Вьрха Ha XIMIKaI ИИ ПОДОCTpeH MOLINBпрзцentbpaHa n3O6paXeHЯTA A-TYPE BvB BCEKn KpaI Ha BOJaUa,3aДa МарКирATE OTBOPHTe 3a NOДьрЖaUNTe BINTOBe,CleI TOBa MAXHeTe Boa43a MOHTIPAHe Ha CTeHa.
-
KaTo n3POn3BaTe CBpeIIO C NOxOJaU pa3Mep, npo6nIte OTBOp B CTeHaTa Bbpxy BCa MapKnupOBka.
-
Ako MapknpoBknte He cBbnaat Ha no3nnte Ha rpeinte, noCTaBeTe noXoJusn anKeepn nn DIO6eN B OTBOPnte, npei Da noCTaBNTe ONOpHNTe BHTObe. Ako n3NoI3BaTe aHKeepn nn IIO6eN, yBepTe ce, ye OTBopnte, KOnTO npo6nBaTe, ca DoCTaTbUHO roJeMn 3a anKeepnte nn IIO6eNte, KOnTO NOI3BaTe.
5.BkapaTe BnHT (He e doctabeH) npe3 BCEKN DbpKau-BnHT I CneI TOBa 3aBnHTe TcEKN BnHT 3dpaBO B OTbopa 3a ONopeH BnHT.
6.МонтураиTe 2 MoHTaЖн eLemeHTa cko6a-CTeHa B npaBnHaTa opneHTaцЯ OT ДолнATA CTpaHa Ha Soundbar, kato n3noJ3BaTe 2 BnHTa.
-Писглобявано ce yvepeTe, Ye 3akayalkaTHa KOH30n 3a OkayBaHe Ha CteHa e paNIOJKeHa 3aД 3aJaHaTa Yact Ha Soundbar.
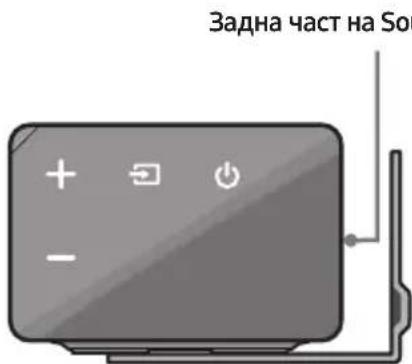
Дecen Кай Ha Soundbar
- MohtnpaTe Soundbar c npikpeneHte KOH30JI 3a OKaYBaHe Ha CTeHa, KaTO 3aKaHTe KOH30JI 3a OKaYBaHe Ha CTeHa Ha DbpxKaY-BnHTOBete Ha CTeHaT.

8.Пьзhte Soundbar haOу,kaKTo e noka3aHNo no-dOу,Taka Ye MoHTaXHH eIeMeHtacko6a-CTeHa da 3aCTaHaT cTa6nHbBvBnHTObe 3a Dpbxkaay.
BkapaTe BnHTOBe 3a DbpxkaaB Wnpokata (Dolna) aact Ha MoNTaxHnTe eIeMeHTN cko6a-CTeHa, CJIeKoETo nIb3HeTe MoTAXHnTe eIeMeHTN cko6a-CTeHa HADony, TaKa Ye da 3aCTaHaT CTA6NIHO BB BnHTOBete 3a Dbpxkaa.
10 AKTYAJIIN3NPAHE HA COΦTYEP
Samsung Moxe da npedloxn aKtyaun3aun Ha cnCTeMHnA _b pMyep Ha Soundbar B 6bndeJe.
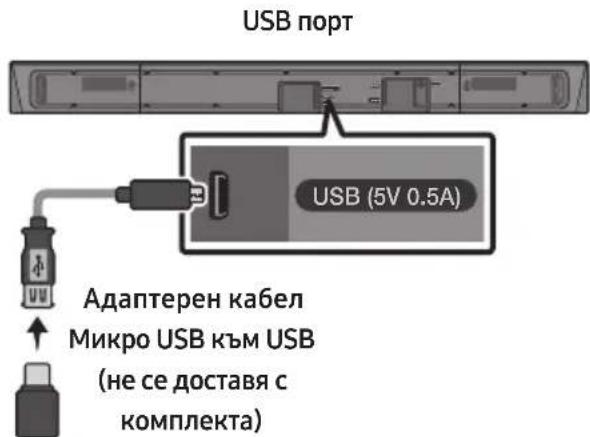
Ako ce npedla raga aktyaun3aun, mokeTe da aktyaun3nape Te bprmyepa, kaTo cBbpxeTe USB yctpoiCTBO C aktyaun3aunrTa Ha bprmyepa, cbxpaneha B Hero, KbM USB nopTa Ha Baunr Soundbar.
3aДоьнелп ha nHΦopMaця OTHOCHO 3TeTЯнeto Ha faHIOBE c aKtuaIzauN, nocetete ye6caYHa Samsung Electronics Ha aDpec www.samsung.com Support. CTeTobA BbBeTe IIN N36epTe MoJena Ha CB0r Soundbar, n36epTe CoФТуер i npinIoXeHnI n CTeI TOBa IV3TeTЯнha.ObbPHeTe BHNMaHne,ye Ha3BaHЯTa Ha onUInTe MOnke da ca pa3JIuHn.
Ako He ce nokajke UPDATE
1.ИЗкlioуete Soundbar,ИЗвадеTeи CBьржete OTHOBO USB CTnka,КоJOTo CBДьржа Файловerte сaktyaJIиЗaци,КьM USB npopta HaSoundbar.
2.ИЗклочete 3axpaHbauЯ Ka6eI Ha Soundbar, cIeI TOBa ITo CBbPjKeTe OTHOBO IN BkIIOChTe Soundbar.
- Aktyализиранeto Na Фърмуера можende не павелно, акоayднофайLOBete подьржан OTSoundbar, ca сьхсан c USB стika.
He n3KlIOUBAIte 3axpaHbAHeTo n He otCTpaHbAite USB yCTPOiCTBOTO, JOKaTO ce akTuJIIN3aCInTe ce npINarat. OChOBnIrT MoJyI Ie ce n3KJIOnu IABTomATnHO CLeI, 3aBbPbBaHe Ha akTuJIIN3aCInTa Ha _乙 pMyepa. - Cnéд кATO akTyaln3aunra 3abbpwn, ce HnHnuaJIIN3upat notpe6nteJcNte HactpoiKn Ha Soundbar. IpenopbUBaMe Da cn 3aPiWTe BaWnte HactpoiKn, TaKa Ye leCHO da MoKeTe da rN Bb3CTaHOBInTe CnéД akTyaln3aun.
ImaTe npedBnD,Ye aKtuaHn3npaHeTo HaΦbPmEpa Hynipa CbUO N Bp3KaTa KbM cy6yΦepa.AKO Bp3KaTa KbM cy6yΦepa He ce Bb3CTaHO BVOMaTHuHO Cnei aKtuaHn3aunraT, BNKe CTpaHnUa 6.
AkoakTuayn3aunraHa cooTyepa e HeycneuHa, npOBepTe daHn USB cTKbT He e dekeTeH.
→3aMeHeTe C HOBN 6aTeepuN.
Pa3ctoHHeTo MeKdy DnCTaHcNoHHTo ynpabNeHne N OCHOBHO To yCtpoiCTBO Ha Soundbar TBbpde roJMy o n e?
YepeHnT LED nHnKaTop Ha cy6yepa npemrBa, HO ToH He npOn3BexJa 3ByK.
To3n npo6JIem MoKeJa Bb3HnKHe, aKO cy6yΦepbT He e Cbbp3aH KbM OCHOBHOTO yCTpoIcTB0 Ha Soundbar.
OonTaITe da cBbPjKeTe cy6yphiepa oTHOBo. (BnKTe cTpaHnua 6.)
Cy6yΦepbT 6pbMn n Bn6pnpa 3a6eJxmo.
OnntaTe ce da perylnpate Bn6paunra Ha cy6yepa.
→HaTnCHeTe 6yToHa WOOFER Ha nuctaHcnoHHTO cn ynpaBneHne Harope nn HaOny, 3a da perynipate cnilata Ha 3Byka Ha cy6yepa. (do -12 nn MeJy -6\~ +6).
12JIINCEH3

DOLBY
AUDIO
Manufactured under license from Dolby Laboratories. Dolby, Dolby Audio, Pro Logic, and the double-D symbol are trademarks of Dolby Laboratories.

dt
Digital Surround
For DTS patents, see http://patents.dts.com. Manufactured under license from DTS Licensing Limited. DTS, the Symbol, DTS in combination with the Symbol, and DTS Digital Surround are registered trademarks or trademarks of DTS, Inc. in the United States and/or other countries. © DTS, Inc. All Rights Reserved.

HIGHOGENITION MULTIMEDIA INTERFACE
The terms HDMI and HDMI High-Definition Multimedia Interface, and the HDMI Logo are trademarks or registered trademarks of HDMI Licensing LLC in the United States and other countries.
13 BENEKKA 3A
ЛицEH3A 3A
OTBOPEH KOD
3a n3npaashe Ha 3aNTBaHnI N 3aBKN BbB Bpb3Ka C n3TOUHnIte C OTBOpEN KOD Ce CBpJKeTe cbc Samsung ype3 ImeJ (oss.request@samsung.com).
14 BAXKHN
БЕЛEXКИ 3A
OBCJIyXBAHETO
- ΚифриTe N ИЮстрациTe B TOBa pbkoBOДСТВ 3a NOTpe6nteЯ ca празoctавен CamO 3a Справka N MoRaT Да ce pa3лчabAT OT DeICTBNTeHnN I3rIeД Ha ИЗдELIneTO.
- Ke da ce NaHcNn TaKca 3a aDMNHnCTpnpaHe, aKO:
(a) e n3BnKaH TexnK NO BaIe HaCToRBaHe n HЯMa IeΦeKT B npOdykTa (T.e. He cTe npOyei npkoBOdCTBOTO 3a Notpe6ntela)
(b) 3aHeceTe ypeDa B cepBn3eH ueHTbp NHaMa DeΦeKT B npOdyKTA (T.e. He cTe npOyei pBkoBOdCTBOTO 3a notpe6ntela).
Cymata 3a Ta3n TaKc3a aDMNHnCTpnpaHe
Ie Bn 6bJe Cbo6uHa, Ipei Da ce
IN3BbPm KkBATo n Da e 6nlo pa6oTa nn
NoceueHne Bkbu.
Ako 6aTeepnTe He ce n3XbPJIrT npaBnIHO, Te3N BeIeCTBa MoRa T da IpeDn3BnKaT yBpeKdaHe Ha OOBeShKOTo 3dpaBe NII Na OKoJHaTa CpeJa.
3a da ppeiHaNTe npipOHNTE pecypcn i 3a da cBdeIcTBaTe 3a MHOROKpaTHaTa ynoTpe6a Ha MaTePnAInHtPe pecypcn, moJr OTdEJIaIe 6aTePnIte OT dpyrIte BnIOBe OTnaIbUHn IpoDyKtn n r peuKlnpaIte nocpeIcTBom BaWata lokaHa cnCTema 3a 6e3PiATHO BpbuaHe ha 6aTePnn.
IpaBnHTo TpeTnpaHe Ha n3dJIneTo CneI KpA Ha eKcNlOaTaUHOHHMy JxHBOT (OtnaDbu, npedCTablaBaun eJekTpuecko n eJekTpoHNo 06OpyDahe)
(HaIInuHO B CtpaHn CbC CnCTeMn 3a pa3JeHNo CMeTOcb6npaHe)
To3n 3NaK, noctaben Bbpyx n3denneto, herobn npnaJaleknoCTn nn neaTHMaTePnala, 03NaUba, ye npodukTbT n npinaJaleknoCTte (HaNPimep 3apndo yctpoiCTBO, cnyuallkn, USB ka6e) He 6nbda ce n3xBbprIaT 3aeDnO C dpynte 6ntOBn OTpaDbuN, kOrato n3teue ekCnloataunOHnRT My jKNBOT. Otdela Te3n yctpoiCTBa ot dpynte BnuDBuN OTpaDbuN n rnpedabaTe 3a peuiknipane. Cna3BaKnTOBa npabnilo He n3laRaTe Ha onacnoct 3dpabeto Ha dpuyn Xopa n npedna3BaTe Okolnata CpeDaOT 3ambpcaBaHe, npedn3BvkaHO OT 6e3koHTpOlnHO n3XBbprJaHe Ha OTpaDbuN. Ocben TOBa, noD06Ho OTROBOPHO NOBeHne Cb3daBA Bb3MOXHOCT 3a NOBtOpHO (ekOLOrHuHO Cbo6pa3Ho) n3No13BaHe Ha MaTePnAhnite pecypcn.
ДомашнITEnotpe6nteItrp6BaJaCECBpbKJATCTbproBeuaHaIpe6Ho,OTKOROTOca3akyniIn
n3deJIneTo,INNCbCbOTBeTHaTMeCTHaDbPkaBHaareHcNIA,3aDaNOLyauTPODp6HnIHCTpyKcNKNbDe
nKORA MoRat Da 3aHecat Te3u yctpoiCTBa 3a peunKlnpaHe,6eOonacHO 3a OKoJHata CpeJa.
KopnpaTHNBHTeNotpe6nteINcIeBaJaCeCBpbKAtCDOCTabUckaCNJaPNOBeprTycNoBnTaHa
doROBopa 3a NOKyPkA.ToBa n3dEInne HnEROBtE eJeKTPOHn PpuHaIeJXHocTn He 6Nbda Ce CmecTBaT c
dpyrHteOTNaDbuHa TbproBCKOTOppeIprTne.
3a nHΦopMaζη oTHOcHo aHraJxMentHte Ha Samsung no oTHoUeHne Ha OKoJIHaTa cpea i cnEunΦnUHNTe 3a npOduKta peryIaTOpHn 3aIbIxKeHn, hAnpUmEp REACH, WEEE, 6aTePn, nocetete: http://www.samsung.com/uk/aboutsamsung/samsungelectronics/corporatecitizenship/data-corner.html
SIGURNOSNE INFORMACije
SIGURNOSNA UPOZORENJA
DA BISTE SMANJILI OPASNOST OD
ELEKTRICNOG UDARA, NE ODSTRANJUJE
POKLOPAC (ILI POLEDINU).
U UNUTRAŠNJOSTI NEMA DIJELOVA KOJE MOZE
SERVISIRATI KORISNIK. PREPUSTITE
SERVISIRANJE KVALIFICIRANOM SERVISNOM
OSOBLJU.
| 4 | OPREZ OPASNOST OD ELEKTRICNOG UDARA NE OTVARAJTE |
| 5 | Ovaj simbol znači da je struja u unutrašnjosti visokog napona. Opasno je dolaziti u bilo kakav doticaj s unutarnjim sklopovima proizvoda. |
| 7 | Ovaj simbol naznačuje da je uz urežaj priložena važna dokumentacija o njejgovom radu i odžavanju. |
| 10 | Proizvod II. razreda: Ovaj simbol označava da.nije potrebna sigurnosna veza s uzemljem. |
| ~ | AC napon: Ovaj simbol označava da nazivni napon označen navenimen simbolom predstavlja AC napon. |
| --- | DC napon: Ovaj simbol označava da nazivni napon označen navenimen simbolom predstavlja DC napon. |
| ai | Oprez, pogledajte upute za upotrebu: Ovaj simbol upićuje korisnika da potraži dodatne informacije u pogledu sigurnosti u korisničkom prisćniku. |
UPOZORENJE
- Da biste smanjili opasnost od požara ili elektricnog udara, ne izlažite uredaj kisi ili vlazi.
OPREZ
DA BISTE SPRIJEČILI ELEKTRICNI UDAR, NAMJESTITE ŠIROKE KONTAKTE UTIKAÇA U SIOK UTOR, UMETNUT DO KRAJA.
- Ovaj uredaj treba uvijek biti spojen na uticnicu izmjenične struje sa zašitnim uzemljenjem.
- Da biste isključili urežaj iz struje, morate izvuci utikač iz strujne utičnice. Stoga strujni utikač treba biti spreman za rad.
- Ne izlažite ovaj urešaj kapanju ili prskanjutekućina. Ne stavljajte predmete punetekućine, poput vaza, na urešaj.
- Da biste potpuno isključili ovaj uredaj, morate izvuci utikač za napajanje iz zidne uticnice.
Stoga utikač mora uvijek biti lako dostupan.
MJERE OPREZA
SamsungUNCTS Samsung iPhone 5, 6, 7, 8, 9, 10, 11, 12, 13, 14, 15, 16, 17, 18, 19, 20, 21, 22, 23, 24, 25, 26, 27, 28, 29, 30, 31, 32, 33, 34, 35, 36, 37, 38, 39, 40, 41, 42, 43, 44, 45, 46, 47, 48, 49, 50, 51, 52, 53, 54, 55, 56, 57, 58, 59, 60, 61, 62, 63, 64, 65, 66, 67, 68, 69, 70, 71, 72, 73, 74, 75, 76, 77, 78, 79, 80, 81, 82, 83, 84, 85, 86, 87, 88, 89, 90, 91, 92, 93, 94, 95, 96, 97, 98, 99
USB priključak

Ako je ponudeno ažuriranje, možete ažurirati opremu povezivanjem uredaja USB na kojem je pohranjeno ažuriranje s prikljuckom za USB na vašem uredaju Soundbar.
Za više informacija o preuzimanju dokumenata za ažuriranje pogledajte mrežnu stranicu Samsung Electronics na (www.samsung.com Support). Poté zadejte nebo vyberte model vašeho zařizení Soundbar, vyberte možnost Software a aplikace a potom Ke staženi. Imajte na umu da se nazivi opcija mogu razlikovati.
Postupak ažuriranja
- Spojite kabel Micro USB za USB prilagodnik s muskim prikljuckom Micro USB 2.0 (tip B) s jederne strane i standardnim zenskim prikljuckom 2.0 USB (tip A) s druge strane s Micro USB prikljuckom na uredaju Soundbar.
- Kabel Micro USB za USB prilagodnik prodaje se zasebno. Za kupnju kontaktirajte Samsungov servisni centar ili korisničku podršku.
- Slijedite korake u nastavku kako bistepreuzeli softver proizvoda: ldite na mreznomjesto Samsung na adresi (samsung.com) pretražite naziv modela - odaberitemogucnosti podrške za korisnika (nazivmogucnosti moze se promijeniti)
- Spremite preuzeti softver na USB uredaj za pohranu podataka i odaberite „lzdvojiti ovdje" kako biste raspakirali mapu.
- Iskligite Soundbar i umetnite USB uredaj za pohranu podataka s ažuriranjem softvera uŽenski prikljucak na Micro USB kabelu s adapterom. Spojite USB kabel u USB prikljucak na sustavu Soundbar.
- Ukljucite Soundbar. Unutar 3 minute prikazuje se poruka „UPDATE" i ažuriranje započinja.
-
Kada je ažuriranje dovrseno, Soundbar se isključuje. Na daljinskom upravljacu pritisnite i zadržite gumb 5 sekundi. Na załonu ce se prikazati "INIT" i zatim ce se Soundbar isključiti. Ažuriranje je završeno.
-
Ovaj proizvod ima funkcjju DUAL BOOT. Ako se firmver ne ažurira, možete ga ažurirati ponovno.
Manufactured under license from Dolby Laboratories. Dolby, Dolby Audio, Pro Logic, and the double-D symbol are trademarks of Dolby Laboratories.

dt
Digital Surround
For DTS patents, see http://patents.dts.com. Manufactured under license from DTS Licensing Limited. DTS, the Symbol, DTS in combination with the Symbol, and DTS Digital Surround are registered trademarks or trademarks of DTS, Inc. in the United States and/or other countries. © DTS, Inc. All Rights Reserved.

HIGH-DEFINITION MULTIMEDIA INTERFACE
The terms HDMI and HDMI High-Definition Multimedia Interface, and the HDMI Logo are trademarks or registered trademarks of HDMI Licensing LLC in the United States and other countries.
13 OBAVIJESTO LICENCIZA UPORABU SOFTWARE KODA
Za slanje upita i zahtjeva u vezi otvorenih izvora obratite se tvrtki Samsung putem e-poste (oss.request@samsung.com).
14 VAŽNA NAPOMENA VEZANA UZ SERVIS
- Slike u ovom korisničkom prisuručniku služe kao samo kao referencec i mogu se razlikovati od stvarnog izgleda proizvoda.
- Moguca je naplata administrativne pristoje u slučaju
(a) poziva inženjera na vaš zahtjev, a nema oštećenja na proizvodu (tj. ako niste pročitali korisnički prirucnik)
(b) da做一些te Jedinicu na popravak u servis, a nema ostecenja na proizvodu (tj. akoniste prociitali korisniicki prisncnik)
- S visinom administrativne pristojbe bit cete upoznati prije poduzimanja bilo kakvih radnji ili kućnog posjeta.
15 TEHNICKI PODACI I VODIC
Tehnicki podaci
| Naziv modela HW-N550 | |
| USB 5V/0,5A | |
| Težina 2,9 kg | |
| Dimenzije (Š x V x D) 1060,0 x 59,0 x 87,5 mm | |
| Raspon radne temperature +5°C do +35°C | |
| Raspon vlažnosti 10 % ~ 75 % | |
| POJACALO Nazivna izlazna snaga | 30W x 6 |
| Podržani formati za reprodukciju | LPCM 2ch, Dolby Audio™ (podržava Dolby® Digital), DTS |
| IZLAZNA SNAGA BEŽICNOG UREDAJA Maks. snaga BT odašiljača | 100mW pri 2,4GHz - 2,4835GHz |
| Maks. snaga SRD odašiljača | 25mW pri 5,725GHz - 5,825GHz |
| Naziv subwoofera PS-WN30 | |
| Težina 7,0 kg | |
| Dimenzije (Š x V x D) 215,0 x 384,5 x 304,0 mm | |
| POJACALO Nazivna izlazna snaga | 160W |
| Ukupna potrošnja energije u stanju mirovanja (W) | 2,9W |
| Bluetooth Način isključivanja ulaza | Pritisnite i držite gumb SOUND MODE dulje od 5 sekundi da biste isključili funkcju Bluetooth Power. |
NAPOMENE
Samsung Electronics Co., Ltd prirzava pravo promjene specifikacija bez prethodne obavijesti.
- Težina i dimenzije su približni.
Manufactured under license from Dolby Laboratories. Dolby, Dolby Audio, Pro Logic, and the double-D symbol are trademarks of Dolby Laboratories.

dt
Digital Surround
For DTS patents, see http://patents.dts.com. Manufactured under license from DTS Licensing Limited. DTS, the Symbol, DTS in combination with the Symbol, and DTS Digital Surround are registered trademarks or trademarks of DTS, Inc. in the United States and/or other countries. © DTS, Inc. All Rights Reserved.

HIGHSOPINIONMULTIMPOA
The terms HDMI and HDMI High-Definition Multimedia Interface, and the HDMI Logo are trademarks or registered trademarks of HDMI Licensing LLC in the United States and other countries.
13 POZNÁMKA K LICENCI OTEVRENEHO SOFTWARE
Das Benutzerhandbuch hat zwei Teile:这其中, there are two more versions of this book. The first is a 1985 edition of the German translation of the German translation of the German translation of the German translation of the German translation of the German translation of the German translation of the German translation of the German translation of the German translation of the German translation of the German translation of the German translation of the German translation of the German translation of the German translation of the German translation of the German translation of the German translation of the German translation of the German translation of the German translation of the German translation of the German translation of the German translation of the German

BENUTZERHANDBUCH
Manufactured under license from Dolby Laboratories. Dolby, Dolby Audio, Pro Logic, and the double-D symbol are trademarks of Dolby Laboratories.

dt
Digital Surround
For DTS patents, see http://patents.dts.com. Manufactured under license from DTS Licensing Limited. DTS, the Symbol, DTS in combination with the Symbol, and DTS Digital Surround are registered trademarks or trademarks of DTS, Inc. in the United States and/or other countries. © DTS, Inc. All Rights Reserved.

HIGHOFTINETIONMULTIMEDIAINTERFAGE
The terms HDMI and HDMI High-Definition Multimedia Interface, and the HDMI Logo are trademarks or registered trademarks of HDMI Licensing LLC in the United States and other countries.
13 BEKANNTMACHUNG ZU OPEN SOURCE LIZENZEN
Manufactured under license from Dolby Laboratories. Dolby, Dolby Audio, Pro Logic, and the double-D symbol are trademarks of Dolby Laboratories.

dt
Digital Surround
For DTS patents, see http://patents.dts.com. Manufactured under license from DTS Licensing Limited. DTS, the Symbol, DTS in combination with the Symbol, and DTS Digital Surround are registered trademarks or trademarks of DTS, Inc. in the United States and/or other countries. © DTS, Inc. All Rights Reserved.

HIGHOPHNNTIONMULTIMPDAA
The terms HDMI and HDMI High-Definition Multimedia Interface, and the HDMI Logo are trademarks or registered trademarks of HDMI Licensing LLC in the United States and other countries.
13 AVATUD LÄHTEKOODI LITSENTSI TEATIS
Manufactured under license from Dolby Laboratories. Dolby, Dolby Audio, Pro Logic, and the double-D symbol are trademarks of Dolby Laboratories.

dt
Digital Surround
For DTS patents, see http://patents.dts.com. Manufactured under license from DTS Licensing Limited. DTS, the Symbol, DTS in combination with the Symbol, and DTS Digital Surround are registered trademarks or trademarks of DTS, Inc. in the United States and/or other countries. © DTS, Inc. All Rights Reserved.

HIGHOPHNNTIONMULTIMPDAA
The terms HDMI and HDMI High-Definition Multimedia Interface, and the HDMI Logo are trademarks or registered trademarks of HDMI Licensing LLC in the United States and other countries.
13 AVIS DE LICENCE LIBRE
Manufactured under license from Dolby Laboratories. Dolby, Dolby Audio, Pro Logic, and the double-D symbol are trademarks of Dolby Laboratories.

dt
Digital Surround
For DTS patents, see http://patents.dts.com. Manufactured under license from DTS Licensing Limited. DTS, the Symbol, DTS in combination with the Symbol, and DTS Digital Surround are registered trademarks or trademarks of DTS, Inc. in the United States and/or other countries. © DTS, Inc. All Rights Reserved.

HIGHNDEFINITION MULTIMEDIA
The terms HDMI and HDMI High-Definition Multimedia Interface, and the HDMI Logo are trademarks or registered trademarks of HDMI Licensing LLC in the United States and other countries.
13 EIDONOHIATIAGEIEXPHESIOMIKOY ANOXTOY KQIA
Manufactured under license from Dolby Laboratories. Dolby, Dolby Audio, Pro Logic, and the double-D symbol are trademarks of Dolby Laboratories.

dt
Digital Surround
For DTS patents, see http://patents.dts.com. Manufactured under license from DTS Licensing Limited. DTS, the Symbol, DTS in combination with the Symbol, and DTS Digital Surround are registered trademarks or trademarks of DTS, Inc. in the United States and/or other countries. © DTS, Inc. All Rights Reserved.

HIGHOFTNNTION MULTIMEDIA INTERFACE
The terms HDMI and HDMI High-Definition Multimedia Interface, and the HDMI Logo are trademarks or registered trademarks of HDMI Licensing LLC in the United States and other countries.
13 NYICT FORRASKODU LICENC MEGJEGYZES
Manufactured under license from Dolby Laboratories. Dolby, Dolby Audio, Pro Logic, and the double-D symbol are trademarks of Dolby Laboratories.

dt
Digital Surround
For DTS patents, see http://patents.dts.com. Manufactured under license from DTS Licensing Limited. DTS, the Symbol, DTS in combination with the Symbol, and DTS Digital Surround are registered trademarks or trademarks of DTS, Inc. in the United States and/or other countries. © DTS, Inc. All Rights Reserved.

HIGHPINNTIONMULTIMPOA
The terms HDMI and HDMI High-Definition Multimedia Interface, and the HDMI Logo are trademarks or registered trademarks of HDMI Licensing LLC in the United States and other countries.
13 AVVISO DI LICENZA OPEN SOURCE
http://www.samsung.com/it/aboutsamsung/sustainability/environment/our-commitment/data/
DROŠIBAS INFORMÁCIJA
DROŠIBAS BRIDINAJUMI
LAI SAMAZINATU ELEKTRISKAS STRAVAS TRIECIENA RISKU, NENONEMIET PARSEGU (VAI KORPUSA AIZMUGURI). IERICES IEKSPUSE NEATRODAS NEVIENA DETALA, KURAS APKOPE BUTU JAVEIC LIETOTAJAM. UZTICIET APKOPI KVALIFICETIEM APKOPES SPECIALISTEM.
11 PROBLEMU NOVER'SANA
Manufactured under license from Dolby Laboratories. Dolby, Dolby Audio, Pro Logic, and the double-D symbol are trademarks of Dolby Laboratories.

dt
Digital Surround
For DTS patents, see http://patents.dts.com. Manufactured under license from DTS Licensing Limited. DTS, the Symbol, DTS in combination with the Symbol, and DTS Digital Surround are registered trademarks or trademarks of DTS, Inc. in the United States and/or other countries. © DTS, Inc. All Rights Reserved.

HIGHPDEFINITIONMULTIMEDAAINTERFAC
The terms HDMI and HDMI High-Definition Multimedia Interface, and the HDMI Logo are trademarks or registered trademarks of HDMI Licensing LLC in the United States and other countries.
13 PAZINOJUMS PAR ATVERTA PIRMKODA LICENCI
Manufactured under license from Dolby Laboratories. Dolby, Dolby Audio, Pro Logic, and the double-D symbol are trademarks of Dolby Laboratories.

dt
Digital Surround
For DTS patents, see http://patents.dts.com. Manufactured under license from DTS Licensing Limited. DTS, the Symbol, DTS in combination with the Symbol, and DTS Digital Surround are registered trademarks or trademarks of DTS, Inc. in the United States and/or other countries. © DTS, Inc. All Rights Reserved.

HIGHPONNTIONMULTIMDAATTERPA
The terms HDMI and HDMI High-Definition Multimedia Interface, and the HDMI Logo are trademarks or registered trademarks of HDMI Licensing LLC in the United States and other countries.
13 ATVIROSIOS PROGRAMINES IRANGOS LICENCIJOS PRANEŠIMAS
Manufactured under license from Dolby Laboratories. Dolby, Dolby Audio, Pro Logic, and the double-D symbol are trademarks of Dolby Laboratories.

dt
Digital Surround
For DTS patents, see http://patents.dts.com. Manufactured under license from DTS Licensing Limited. DTS, the Symbol, DTS in combination with the Symbol, and DTS Digital Surround are registered trademarks or trademarks of DTS, Inc. in the United States and/or other countries. © DTS, Inc. All Rights Reserved.

HIGHPDEFINITIONMULTIMEDAAINTERFAC
The terms HDMI and HDMI High-Definition Multimedia Interface, and the HDMI Logo are trademarks or registered trademarks of HDMI Licensing LLC in the United States and other countries.
13 INFORMACJA O LICENCJI OPEN SOURCE
Manufactured under license from Dolby Laboratories. Dolby, Dolby Audio, Pro Logic, and the double-D symbol are trademarks of Dolby Laboratories.

dt
Digital Surround
For DTS patents, see http://patents.dts.com. Manufactured under license from DTS Licensing Limited. DTS, the Symbol, DTS in combination with the Symbol, and DTS Digital Surround are registered trademarks or trademarks of DTS, Inc. in the United States and/or other countries. © DTS, Inc. All Rights Reserved.

HIGHNDEFINITIONMULTEMDAATTERPAE
The terms HDMI and HDMI High-Definition Multimedia Interface, and the HDMI Logo are trademarks or registered trademarks of HDMI Licensing LLC in the United States and other countries.
13 NOTIFICARE DE LICENTÀ OPEN SOURCE
Pentru a trimite intrebari si solicitari referitoare la software-ul open source, contactaSamsung prin e-mail (oss.request@samsung.com).
14 NOTÄ IMPORTANT DESPRE SERVICE
SIGURNOSNE INFORMACije
SIGURNOSNA UPOZORENJA
DA BISTE SMANJILI OPASNOST OD
ELEKTRICNOG UDARA, NE SKIDAJTE POKLOPAC (ILI ZADNJU PLOCU).
UNUTRA SE NE NALAZE DELOVI KOJI SE MOGU
SERVISIRATI. SERVISIRANJE POVERITE
KVALIFIKOVANOM OSOBLJU SERVISA.
| 4 | OPREZ OPASNOST OD ELEKTRICNOG UDARA. NE OTVARATI. | |
| 5 | Ovaj simbol ukazuje na to da je unutar urežaja prisutan visoki napon. Svaka vrsta kontakta sa unutrašnjim komponentama ovog uredaja predstavlja opasnost. | |
| 1 | Ovaj simbol ukazuje na to da se uz proizvod isporučuje važna dokumentacija koja se odnosi na rukovanje i održavanje. | |
| Proizvod klase II: Ovaj simbol označava da povezivanje na zašitno elektricno uzemljenje nilje neophodno. | ||
| ~ | Naizmenična struja: Ovaj simbol označava da naizmeničnu struju. | |
| = | Jednosmerna struja: Ovaj simbol označava da Jednosmernu struju. | |
| i | Oprez, videti uputstva za upotrebu: Ovaj simbol upićuje korisnika da u korisnčkom prisćniku pročita dodatne informacije u vezi sa bezbednosću. | |
UPOZORENJE
- Da biste smanjili opasnost od požara ili elektricnog udara, ne izlazite ovaj proizvod kiši ili vlazi.
OPREZ
Manufactured under license from Dolby Laboratories. Dolby, Dolby Audio, Pro Logic, and the double-D symbol are trademarks of Dolby Laboratories.

dt
Digital Surround
For DTS patents, see http://patents.dts.com. Manufactured under license from DTS Licensing Limited. DTS, the Symbol, DTS in combination with the Symbol, and DTS Digital Surround are registered trademarks or trademarks of DTS, Inc. in the United States and/or other countries. © DTS, Inc. All Rights Reserved.

HIGHOFFINETIONMULTIMPOIAINTERPAC
The terms HDMI and HDMI High-Definition Multimedia Interface, and the HDMI Logo are trademarks or registered trademarks of HDMI Licensing LLC in the United States and other countries.
13 OBAVEŠTENJE O LICENCI OTVORENOG IZVORNOG KODA
Svoje upite i zahteve u vezi sa otvorenim izvornim kodovima možete uputiti kompaniji Samsung putem e-poste (oss.request@samsung.com).
14 VAŽNA NAPOMENA O SERVISIRANJU
- Slike i ilustracije koje su upotrebljene u ovom korisničkom uputstvu date su samo kao reference i mogu se razlikovati od vašeg proizvoda.
- Administrativni troškovi mogu biti naplaceni u sledećim slučajevima:
11 RIESENIE PROBLEMOV
Manufactured under license from Dolby Laboratories. Dolby, Dolby Audio, Pro Logic, and the double-D symbol are trademarks of Dolby Laboratories.

dt
Digital Surround
For DTS patents, see http://patents.dts.com. Manufactured under license from DTS Licensing Limited. DTS, the Symbol, DTS in combination with the Symbol, and DTS Digital Surround are registered trademarks or trademarks of DTS, Inc. in the United States and/or other countries. © DTS, Inc. All Rights Reserved.

HIGHPONNNTIONMULTIMPOIAINTERPAC
The terms HDMI and HDMI High-Definition Multimedia Interface, and the HDMI Logo are trademarks or registered trademarks of HDMI Licensing LLC in the United States and other countries.
13 POZNÁMKA K LICENCIIS OTVORENÍM ZDROJOVÍM KÓDOM
Manufactured under license from Dolby Laboratories. Dolby, Dolby Audio, Pro Logic, and the double-D symbol are trademarks of Dolby Laboratories.

dt
Digital Surround
For DTS patents, see http://patents.dts.com. Manufactured under license from DTS Licensing Limited. DTS, the Symbol, DTS in combination with the Symbol, and DTS Digital Surround are registered trademarks or trademarks of DTS, Inc. in the United States and/or other countries. © DTS, Inc. All Rights Reserved.

HIGHNDEFINITIONMULTEMDAATTERPAE
The terms HDMI and HDMI High-Definition Multimedia Interface, and the HDMI Logo are trademarks or registered trademarks of HDMI Licensing LLC in the United States and other countries.
13 OBVESTILO O ODPRTOKODNIH LICENCAH
© 2018 Samsung Electronics Co., Ltd. All rights reserved.
Contact SAMSUNG WORLD WIDE
If you have any questions or comments relating to Samsung products, please contact the SAMSUNG customer care Centre.
| Country | Contact Centre | Web Site |
| ■Europe | ||
| UK 0330 SAMSUNG (7267864) | www.samsung.com/uk/support | |
| IRELAND (EIRE) | 0818 717100 | www.samsung.com/ie/support |
| GERMANY 06196 | 77 555 77 | www.samsung.com/de/support |
| FRANCE 01 48 63 | 00 00 | www.samsung.com/fr/support |
| ITALIA 800-SAMSUNG (800.7267864) | www.samsung.com/it/support | |
| SPAIN 0034902172678 | www.samsung.com/es/support | |
| PORTUGAL 808 207 267 | www.samsung.com.pt/support | |
| LUXEMBURG 261 03 710 | www.samsung.com/be_fr/support | |
| NETHERLANDS 088 90 90 100 | www.samsung.com/nl/support | |
| BELGIUM 02-201 24-18 | www.samsung.com/be/support (Dutch)www.samsung.com/be_fr/support (French) | |
| NORWAY 815 56480 | www.samsung.com/no/support | |
| DENMARK 707 0970 | www.samsung.com.dk/support | |
| FINLAND 030-6227 515 | www.samsung.com/fe/support | |
| SWEDEN | 0771 726 786 | www.samsung.com/se/support |
| POLAND | 801-172-678* lub +48 22 607-93-33* (* koszt polączenia wedtug taryfy operadora) | http://www.samsung.com/pl/support/ |
| HUNGARY | 0680SAMSUNG (0680-726-7864) | www.samsung.com/hu/support |
| AUSTRIA | 0800-SAMSUNG (0800-7267864) [Only for Dealers] 0810-112233 | www.samsung.com/at/support |
| Country | Contact Centre | Web Site |
| SWITZERLAND | 0800 726 78 64 (0800-SAMSUNG) | www.samsung.com/ch/support (German)www.samsung.com/ch_fr/support (French) |
| CZECH | 800 - SAMSUNG (800-726786) | www.samsung.com/cz/support |
| SLOVAKIA | 0800 - SAMSUNG (0800-726 786) | www.samsung.com/sk/support |
| CROATIA | 072 726 786 | www.samsung.com/hr/support |
| BOSNIA | 055 233 999 | www.samsung.com/support |
| MONTENEGRO | 020 405 888 | |
| SLOVENIA | 080 697 267 (brezplačna številka) | www.samsung.com/si/support |
| SERBIA | 011 321 6899 | www.samsung.com/rs/support |
| ALBANIA 045 620 | 202 | www.samsung.com/al/support |
| BULGARIA | *3000 Lěna в міржата0800 111 31, Беллaitа телегонналика | www.samsung.com/bg/support |
| ROMANIA | *8000 (apel in retea)08008-726-78-64 (08008-SAMSUNG)Apel Gratisuit | www.samsung.com/ro/support |
| CYPRUS | 8009 4000 only from landline, toll free | www.samsung.com/gr/support |
| GREECE | 80111-SAMSUNG (80111 726 7864) onlyfrom land line(+30) 210 6897691 from mobile andland line | |
| LITHUANIA 8-80 | 0-7777 | www.samsung.com/lt/support |
| LATvia | 8000-7267 | www.samsung.com/lv/support |
| ESTONIA | 800-7267 | www.samsung.com/ee/support |