32PW8718 - TV PHILIPS - Free user manual and instructions
Find the device manual for free 32PW8718 PHILIPS in PDF.


| Brand | PHILIPS |
| Model | 32PW8718 |
| Category | Television |
| Screen size | 32 inches (81 cm) |
| Screen formats | 4:3, 14:9, 16:9, Full screen, Super 4:3, Auto |
| Power supply | 220-240 V / 50 Hz |
| Standby consumption | Less than 1 W |
| Display technologies | 100 Hz, Digital Scan, Natural Motion, Dynamic Contrast |
| Noise reduction | DNR (Digital Noise Reduction) |
| Sound | Virtual Dolby Surround, AVL (Automatic Volume Leveler), Graphic equalizer |
| SCART sockets | 2 or 3 depending on version: EXT1 (RGB), EXT2 (S-VHS), EXT3 (audio/video) |
| Side connections | Audio/video inputs (AUDIO L/R, video), headphone jack |
| Teletext functions | 1200-page memory, T.O.P., subtitling |
| Program guide | NexTView or teletext guide depending on availability |
| EasyLink function | Yes (compatible VCR control) |
| Sleep timer | 0 to 180 minutes |
| Key lock | Yes (child safety) |
| Factory settings | Restorable via Configuration menu |
| Remote control mode selector | VCR, DVD, AMP, SAT |
| Cleaning | Soft, lint-free cloth, without alcohol or solvent |
| Recycling | Recyclable materials, follow local guidelines |
Frequently Asked Questions - 32PW8718 PHILIPS
User questions about 32PW8718 PHILIPS
0 question about this device. Answer the ones you know or ask your own.
Ask a new question about this device
Download the instructions for your TV in PDF format for free! Find your manual 32PW8718 - PHILIPS and take your electronic device back in hand. On this page are published all the documents necessary for the use of your device. 32PW8718 by PHILIPS.
USER MANUAL 32PW8718 PHILIPS
Selection prises EXT (p.12)
NexView/Teletext-gids 8
System: selecteer West-Europa (BG-norm),
Oost-Europa (DK-norm), Gr. Br. (I-norm) of Frankrijk (LL'-norm).
NextView/Teletext-gids
NexView/Teletext Guide 8
NextView/Teletext Guide
Guida NexView/Teletext 8
Guida NexView/Teletext
Smart picture e sound controls
Thank you for purchasing this television set.
This handbook has been designed to help you install and operate your TV set.
We would strongly recommend that you read it thoroughly.
Table of Contents
Installation
Installing your television set 2
The keys on the TV set 2
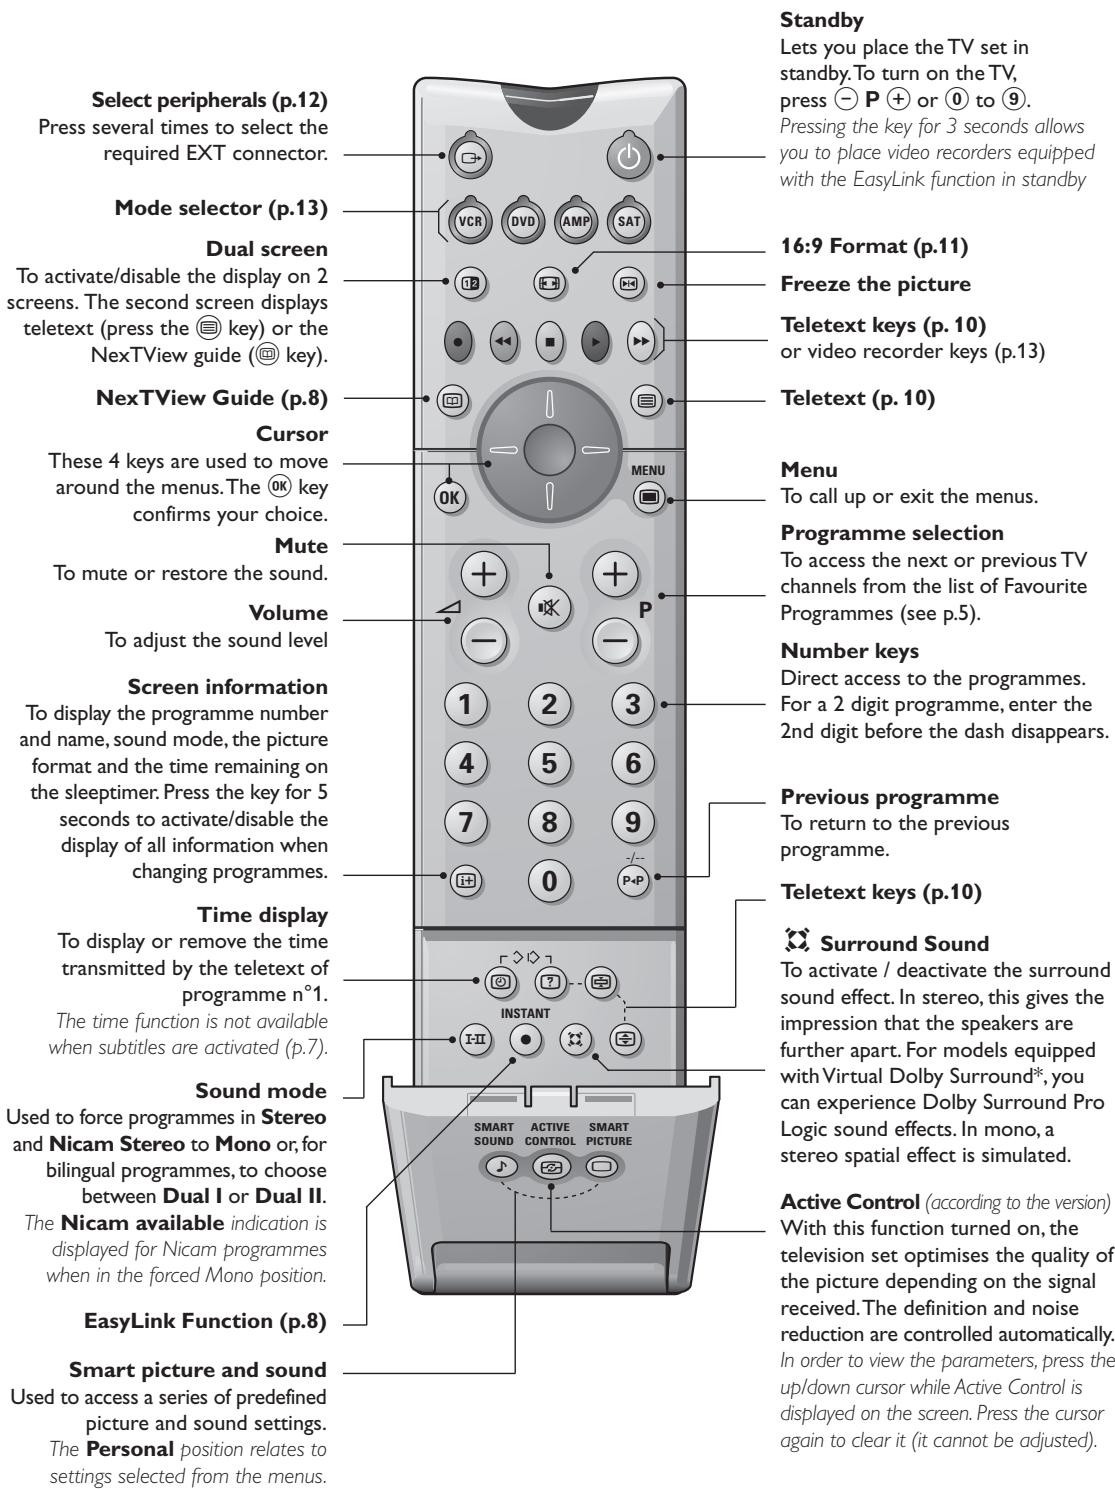
Remote control keys 3
Choice of language and country 4
Automatic installation 4
Reshuffle programmes 4
Manual installation 5
Give name 5
Favourite Programmes 5
Operation
Picture settings 6
Sound settings 6
Feature settings 7
List of programmes 7
EasyLink Function 8
NexView / Teletext Guide 8
Using NexView 9
Teletext 10
16:9 Formats 11
Peripherals
Video recorder 12
Other equipment 12
Side connections 12
Amplifier 12
Setup menu 13
VCR,DVD,AMP or SAT 13
Practical information
Tips 14
Glossary 14

Recycling
The materials used in your set are either reusable or can be recycled.
To minimise environmental waste, specialist companies collect used appliances and dismantle them after retrieving any materials that can be used again (ask your dealer for further details).
Installing your television set
Positioning your television set
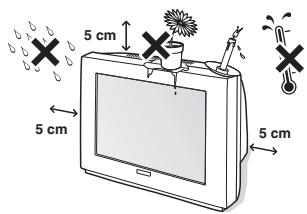
Place your TV on a solid, stable surface. To avoid accidents, do not expose the set to water and do not place anything on the set such as a cloth (mat), a container full of liquid (vase) or a heat source (lamp).
Connections
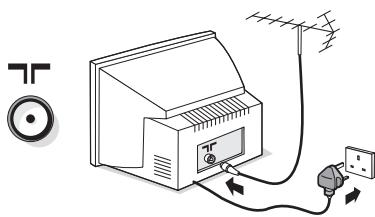
- Insert the aerial plug into the connector at the rear of the set.
- Insert the mains plug into the wall socket (220-240V / 50 Hz).
To prevent damaging the mains (AC) cord which could cause of fire or electric shock, do not place the TV on the cord.
Remote control
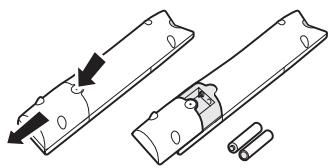
Insert the 2 R6-type batteries (supplied) making sure that they are the right way round. For environmental reasons the batteries supplied with this appliance do not contain mercury or nickel cadmium. Please do not discard your used batteries, use available recycling facilities (consult your dealer on this).
Switching on
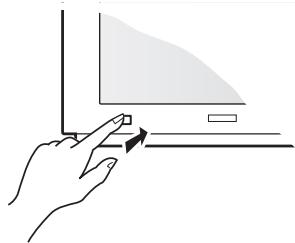
To switch on the set, press the on/off key. The indicator comes on and the screen lights up.
If the television remains in standby, press P ① on the remote control. Go straight to page 4.
The indicator will flash when you use the remote control.
The keys on the TV set
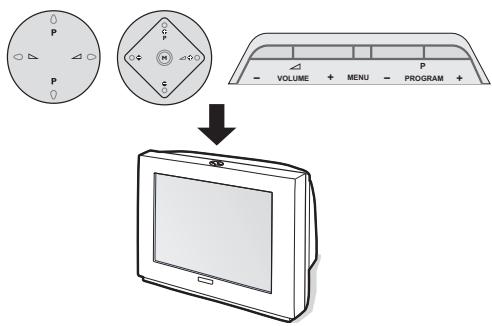
Depending on the model, the television set has 4 or 5 keys located on the front or the top of the set. The VOLUME (- +) keys are used to adjust the sound levels. The PROGRAM (-P+) keys are used to select the required programmes. The M / MENU key (for 5 key versions), allows you to select Volume, Brightness, Colour and Contrast. Then use the P - + to make the adjustment.
Note: when the Childlock function is activated, these keys are unavailable (see page 6).
Remote control keys
Choice of language and country
The first time you switch on the television, the language menu will appear and the languages will change in succession. Go straight to step ③. Alternatively :
To select the INSTALLATION menu, press the and ? keys on the remote control at the same time.
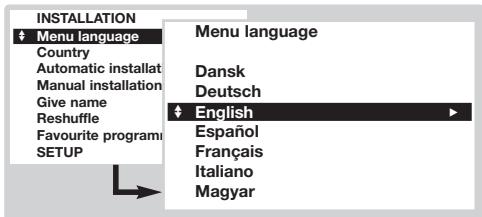
With the cursor, select LANGUAGE and press OK. The list of languages is displayed.
3 Select your language with the up/down cursor and press OK. The menus will appear in the selected language.
4 With the cursor, select COUNTRY and press OK.
Select your country with the up/down cursor and press OK.
This setting is used for the tuning, the automatic installation of programmes and teletext. If your country does not appear on the list, select Other. Also see : EasyLink Function page 8.
If you wish to exit the menus, press MENU several times.
Automatic installation
This menu allows automatic tuning of all programmes.
1 First select the language and country, then :
With the cursor, select Automatic installation and press OK.
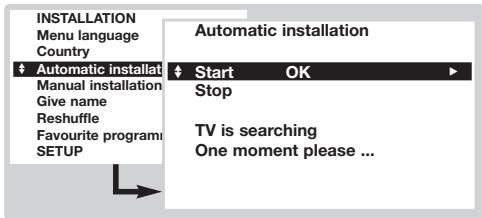
3 Select Start and press OK. The tuning starts. After a few minutes, the list of programmes that have been found is displayed.
If the transmitter or cable network transmits an automatic signal (ACI), the programmes will be numbered correctly. The installation is complete.
Without ACI broadcast, the programmes are numbered according your language and country selection. You can use Reshuffle to renumber them.
Some transmitters or cable networks broadcast their own sort parameters (region, language,...). In this case, indicate your choice by using the cursor and validate with OK. To exit or pause a search press MENU. If no picture is found, see Tips (p.14). Also see: EasyLink Function page 8.
To exit, press MENU repeatedly.
Reshuffle programmes
This menu allows you to change the programme numbers.
From the Installation menu (to select press and at the same time):
1 Select Reshuffle and press OK.
2 Select the programme you wish to change with the up/down cursor and validate with OK.
Use the up/down cursor to select the new number and press OK. The two programmes are exchanged.
Repeat steps 2 and 3 for all the programmes that require renumbering.
To exit, press MENU several times. See also : EasyLink Function page 8.
Manual installation
This menu is used to store the programmes one at a time or to add a programme to the existing list.
From the Installation menu (to select press and at the same time):
1 Select Manual installation and press OK.
Use the up/down cursor to select and the left/right one to adjust :
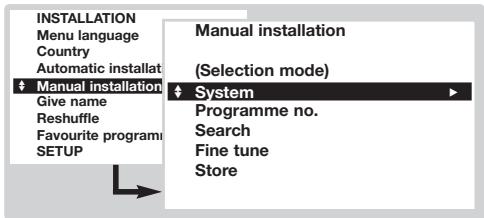
Selection mode (only available in certain countries): permits selection of search mode by Frequency or by Channel.
System: select Western Europe (BG
standard), Eastern Europe (DK standard), Great Britain (I standard) or France (LL' standard).
4 Programme number : enter the required number using only the left/right keys.
Search: press OK. The search starts. Once a programme is found, the scanning stops and the name of the programme is displayed (when available). Go to the next step. If you know the frequency of the required programme, this can be entered directly using the 0 to 9 keys.
If no picture is found, see Tips (p. 14). See also: EasyLink Function page 8.
6 Fine Tune : if reception is poor, adjust using the left/right cursor.
7 Store: press OK. The programme is stored.
Repeat steps 4 to 7 for each programme to store.
9 To exit, press MENU several times.
Give name
This menu allows you to change or give a name to the programmes and external connectors. From the Installation menu (to select press ⑦ and 7 at the same time):
1 Select Give name and press OK.
2 Select the programme with the up/down cursor and validate with OK.
3 Use the left/right cursor to move around the
name display area (5 characters).
Use the up/down cursor to select the characters.
Press OK when the name has been entered. The programme name is stored.
6 Repeat steps 2 to 5 for all programmes or connectors to be named.
To exit, press MENU several times.
Favourite Programmes
This menu allows you to select the programmes to be accessed with the -P + key.From the Installation menu (to select press and at the same time) :
1 Select Favourite Programmes and press OK. The list of favourite programmes is displayed. The programmes that were stored at installation will automatically appear on this list.
Use the up/downcursor to select the required programme.
Use the left/right cursor to add or remove a programme from the list.
4 Run through steps 2 and 3 for each programme to be added or removed from the list.
To exit, press MENU several times.
Picture settings
Press the MENU key.With the cursor, select PICTURE and press OK.The PICTURE menu is displayed :
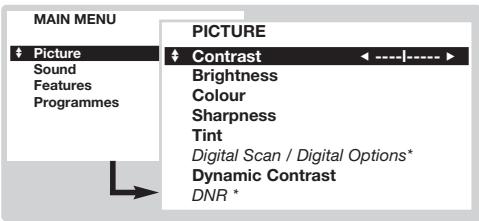
Use the cursor to adjust (the settings are stored automatically):
- Contrast : this changes the difference between light and dark tones.
- Brightness : this changes picture brilliance.
Colour : this changes the intensity of the colour. - Sharpness : this changes the picture definition.
-
Tint : this changes the colour rendering : Cold (more blue), Normal or Warm (more red).
-
Digital Scan*: reduces line flicker which is visible on some pictures.
-
Digital Options*:
-
100Hz = 100Hz processing.
- Digital Scan = 100 Hz + Digital Scan.
- Natural Motion: 100Hz + Digital Scan ^+ Natural Motion (Field and line flicker reduction and smooth movement reproduction).
- Double lines: Natural Motion plus a doubling of vertical resolution which removes visible picture lines. Advised for NTSC (60Hz) pictures.
- Dynamic Contrast : Min, Med (optimum position), Max or Off. Enhances the contrast of details in lighter, average and darker areas.
-
DNR Dynamic Noise Reduction*:automatically reduces noise (snowy picture) when receiving weak video signals.
-
(only available on certain versions)
The Hue setting will appear if you connect an NTSC peripheral to one of the EXT connectors.
3 Press MENU several times to exit.
Sound settings
Press the MENU key.With the cursor, select SOUND and press OK. The SOUND menu is displayed :
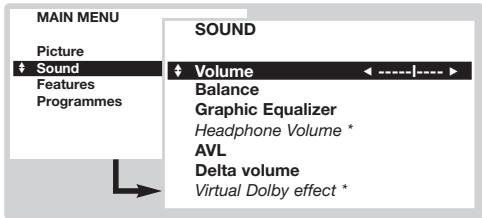
Use the cursor to select a setting (the settings are stored automatically):
Volume : to adjust the preferred volume.
Balance: to balance the sound on the left and right speakers.
- Treble / Bass or Graphic Equaliser (according to the version) : allows you to adjust the tone
of the sound.
- Headphone volume (according to the version): allows you to adjust the headphones volume independently from the loud-speakers on the TV set.
AVL (Automatic Volume Leveller): automatically controls the volume and is used to limit increases in sound, especially during programme changes or advertising. - DeltaVolume : this is used to compensate any volume discrepancies between the different programmes or EXT connectors. Use the P ① keys to compare the level of different programmes.
- Virtual Dolby effect (according to the version): select the level of Virtual Dolby effect with the cursor left/right.
3 Press MENU several times to exit.
Feature settings
Press MENU, select FEATURES and press OK. The FEATURES menu is displayed:
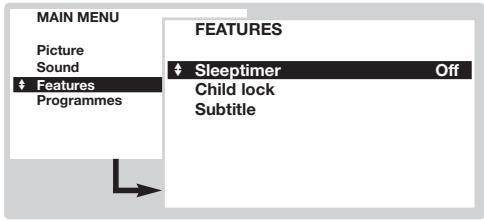
Use the cursor to adjust :
-
Sleeptimer : to set the time after which the TV will switch to standby (from 0 to 180 minutes).
-
Child lock: If the child lock is on, the TV can only be switched on with the remote control. Select On, then turn off the television and hide the remote control. To cancel, change Child Lock to Off.
-
Subtitles: TV channels with teletext often transmit programmes with subtitles. This function activates or disables the automatic display of teletext subtitling, when it is being transmitted. For each TV channel, first activate the teletext, select the subtitle page, then exit teletext. The subtitle page is then stored, the symbol appears at the bottom of the screen.
3 Press MENU several times to exit.
List of programmes
This menu displays the list of available programmes.
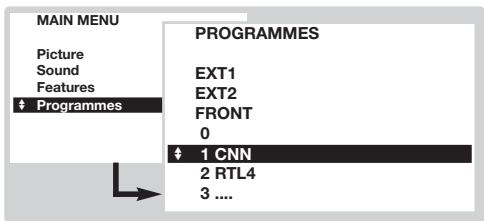
Press MENU, select PROGRAMMES and press OK. The list of programmes is displayed.
Use the up/down cursor to search the list of available programmes.
3 Press the OK key to view the selected programme.
4 Press MENU several times to exit.
EasyLink Function

If your video recorder has an EasyLink function, during installation, the language, country and available channels are automatically transmitted to the video recorder. Recordings may also be programmed through the NexTV view guide. Equally, when the video recorder is in standby, pressing the INSTANT key on the remote control will start the recording of the same programme displayed on the TV set.
The video recorder must be connected to the EXT2 connector (see p. 12).
NextView/Teletext guide
(only available on certain versions)

NexTView is an electronic guide that allows you to look up programmes as you would in a newspaper or a TV magazine. You can sort the programmes by subject (films, sport,...), obtain detailed information and programme your video recorder if it comes with the NexTViewLink function.
Important note :The NexTView service is only available on certain programmes and in certain countries.When no NexTView information is broadcast, the teletext programme guide appears in its place.This is based on teletext program information (if available) and offers most functions of NexTView.
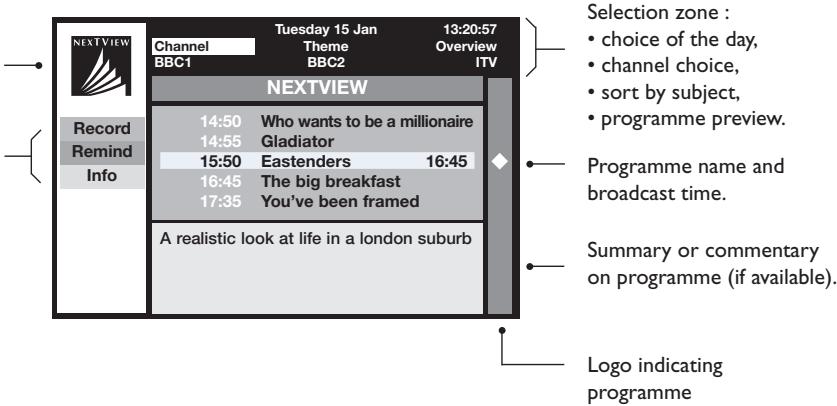
Display of a NexTView page
The information is set by the channel that transmits the NexView service.
For example :
This logo is only displayed during a NexView transmission. No logo indicates it is a teletext programme guide
NextView Functions: Use the coloured keys on the remote control to activate them. The text appears in grey when the function is not available.
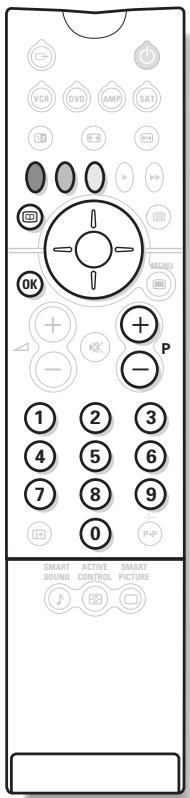
Call NexView guide
Press the key to call or exit the NexView guide. A menu appears with the message "One moment please" at the bottom of the screen.
After a while you obtain :
- a NexView page, if the selected channel broadcasts this service (the NexView logo is displayed in the top left of the screen),
- a teletext page, if the selected channel does not broadcast NexView,
- "Information unavailable" is displayed if neither NexTView nor teletext are transmitted. In this case, select another channel.
Selection zone
A selection zone is displayed at the top of the screen. Use the up/down left/right cursor to select :
- the required channel (each channel may offer a different service),
- the day of the broadcast (NextView page only),
- the subject, in order to sort the broadcasts (film, sport, news ...),
- programme previews already carried out (see NexTView functions).
The text will appear in grey when the function is no longer available.
NexView Page (logo visible top left)
Use the up/down cursor to run through the various suggested broadcasts for the selected day. When a summary or commentary is available, it appears at the bottom of the screen.
Press one of the red, green or yellow keys to activate a NexView function.
3 Press OK to return to the selection zone.
Teletext Page
The first time, the teletext contents will appear. Select the programme guide page (if available).
With certain channels, the programme guide is detected automatically. In this case, go straight to step 3.
Use the bottom cursor to activate the selection zone on the page.
2 With the ① to ⑨ or P + keys, enter the teletext programme page number. If necessary, use the left/right keys to select the sub-pages.
Use the up/down cursor to scroll through the different broadcasts suggested and the coloured keys to activate a NexView function.
4 Press OK to return to the selection zone.
NextView Functions
Press one of the red, green or yellow keys to activate a NexTView function: The text appears in grey if the function is not available.
Record.: to programme the recording of the video recorder (if it has a NexViewLink function and is connected to EXT2).
Remind: automatically turns on the TV set, if it is in standby, or stops a programme from being broadcast by displaying a message if the TV set is on. For these 2 functions, a window appears and the frequency of the recording should be stored by using the cursor and the OK key (and in certain cases confirm the channel).
For certain broadcasts, the series option is suggested. With this option, the system will independently search for when the next episode in the series is being broadcast.
3 Info : to obtain more information on the selected broadcast.
Teletext
Teletext is an information system, broadcast by certain channels. This television has a 1200 pages memory that will store most broadcasted pages and subpages to reduce waiting time.
After each programme change, the memory is refreshed. It may take some time for all pages to load.
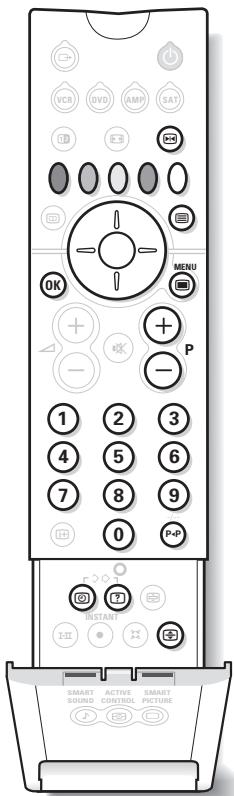
Press :

Call teletext
You will obtain:
This is used to call or exit teletext. The Contents appear with a list of items that can be accessed. Each item has a corresponding 3 digit page number.
If the channel selected does not broadcast teletext, the screen will remain blank (in this case, exit teletext and select another channel). If the characters on the teletext pages are not in your language, press the 1n key to change them.


Selecting a page
Enter the number of the page required using the 0 to 9, or ± keys. For example: for page 120, enter ① ② ① .The number is displayed top left and then the page is displayed. Repeat this operation to view another page.

Direct access to the items
Coloured areas are displayed at the bottom of the screen. The 4 coloured keys are used to access the items or corresponding pages.

Contents
To return to the main index page (usually page 100).

Previous page
To display last page viewed.

Selecting sub-pages
Some pages have sub-pages. In this case, the first line indicates the sub-pages available (for example, page 120 contains sub-pages 01, 02, 03). Use the left/right keys to select the required sub-page.
You may also press the key and enter the number of the required sub-page.

Stop sub-page acquisition
Certain sub-pages are automatically displayed successively. This key is used to stop or resume the alternation. The indication 三 appears top left.

Hidden information
To display or hide the concealed information (games solutions).

Enlarge a page
This allows you to display the top or bottom part of the page and then return to normal size.

Teletext preview
Press the MENU key to display or clear a preview of the available items and pages. Then, with the up/down, left/right cursor select the required item and press OK to display it.

The teletext preview is only available on channels using the T.O.P. system (Table Of Pages). If this system is not available, a message appears at the top of the screen.


Subtitles
Some channels transmit teletext subtitles. Refer to the teletext contents to find the subtitle pages. Simply enter the page number and the subtitle is displayed (if it is available). For automatic display of subtitles, see the features menu (p. 7).
16:9 Formats
The pictures you receive may be transmitted in 16:9 format (wide screen) or 4:3 format (conventional screen). 4:3 pictures sometimes have a black band at the top and bottom of the screen (letterbox format). This function allows you to optimise the picture display on screen.
This TV set is also equipped with automatic switching which will select the correct-screen format, provided the specific signals are transmitted with the programmes.
Using the different screen formats
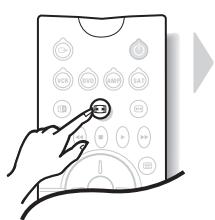
Press the key to select the different modes :
4:3, Movie Expand 14:9, Movie Expand 16:9, 16:9 Subtitle, Widescreen, Automatic and Super zoom.
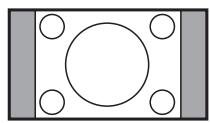
4:3
The picture is reproduced in 4:3 format and a black band is displayed on either side of the picture.
Movie Expand 14:9
The picture is enlarged to 14:9 format, a thin black band remains on both sides of the picture. The keys allow you to move the image vertically to view the top or bottom of the picture (subtitles).
Movie Expand 16:9
The picture is enlarged to 16:9 format. This mode is recommended when displaying pictures which have black bands at the top and bottom (letterbox format).
Use the 00 keys if you wish to move the image vertically to view the top or bottom of the picture.
16:9 Subtitle
This mode is used to display 4:3 pictures using the full surface of the screen leaving the sub-titles visible.
Use the keys to increase or decrease the compression at the bottom of the screen.
Widescreen
This mode restores the correct proportions only of pictures transmitted in 16:9 using full screen display.
Note: If you display a 4:3 picture in this mode, it will be enlarged horizontally.
Super zoom
This mode is used to display 4:3 pictures using the full surface of the screen by enlarging the sides of the picture.
The keys allow you to scroll the image up or down the screen.
Automatic
The format of the picture is automatically adjusted to fill as much of the screen as possible. This mode is only available if Auto format has been activated in the SET UP menu (see p.13).
Connections
Depending on the versions, the TV set is equipped with 2 or 3 SCART connectors EXT1,EXT2 and EXT3 located on the rear.
The EXT1 connector has audio video inputs/outputs and RGB inputs.
The EXT2 connector has audio video inputs/outputs and S-VHS inputs.
The EXT3 connector has audio video inputs.
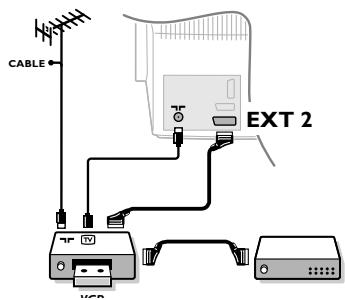
Video recorder
Carry out the connections shown opposite, using the EXT2 connector. Use a good quality SCART connector cable.
If your video recorder does not have a SCART connector, the only possible connection is via the aerial cable. You will therefore need to tune in your video recorder's test signal and assign it programme number 0 (refer to manual installation p.5).To reproduce the video recorder picture, press 0.
Video recorder with Decoder
Connect the decoder to the second SCART connector of the video recorder. You will then be able to record scrambled transmissions. See also the SETUP menu (following page).
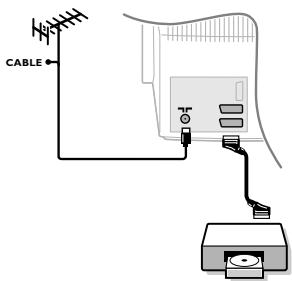
Other equipment
Satellite receiver, decoder, DVD, games, etc.
Carry out the connections shown opposite. To optimise picture quality, connect the equipment which produces the RGB signals (digital decoder, DVD players, games, etc...) to EXT1, and the equipment which produces the S-VHS signals (S-VHS and Hi-8 video recorders) to EXT2, ...). For digital equipment or a decoder, go to the SETUP menu settings (see next page).
To select connected equipment
Press to select EXT1 or EXT2 (or EXT3). Most equipment (decoder, video recorder) carries out this switching automatically.
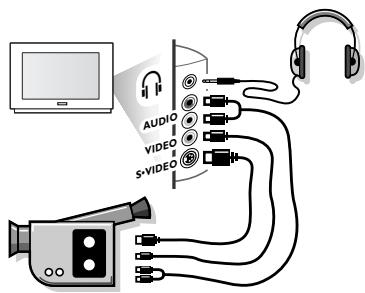
Side connections
Make the connections as shown opposite.With the key 心 select FRONT.
For a monophonic device, connect the audio signal to the AUDIO L input. Use the key to reproduce the sound on the left and right speakers of the TV set.
Headphones
The + keys are used to adjust the volume. Press the key to mute the sound on the TV set (see also sound settings, page 6).
The headphone impedance must be between 8 and 4000 ohms.
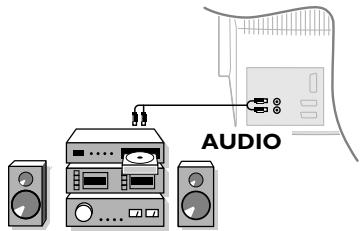
Amplifier
To connect to a Hi-fi equipment, use an audio connection cable and connect the "L" and "R" outputs of the TV set to the "AUDIO IN" "L" and "R" input of the Hi-fi equipment.
Setup Menu
Press and on the remote control at the same time.
2 With the cursor, select SETUP and press OK.
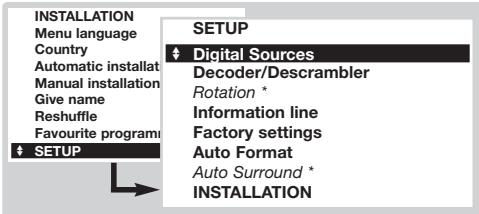
3 Use the cursor to adjust :
- Digital sources: if you have connected a digital peripheral (DVD, satellite receiver, ...), select the corresponding connector: FRONT, EXT1, EXT2, (EXT3) or None.
- Decoder : select the programme(s) that use the external decoder then select the connector where the decoder is connected :EXT1 or EXT2 (or EXT3). Press MENU to return to the previous menu.
If the decoder is connected to the video recorder, select the video recorder's connector (EXT2).
- Rotation (if available): adjusts the angle of the picture.
- Information line : to activate or disable the display of information on the programme (if available).This information (name of channel or broadcast) is displayed when the channels are changed or by pressing ⑥ .The content is defined by the programme.
Factory settings: press OK to reset the factory picture and sound settings. - Auto Format : when set to on, the format of the picture received is automatically adjusted to the format of the screen. Temporally choose another format by using the key.
- Auto Surround (only available on certain versions): when this function is switched on, the television set will automatically select Virtual Dolby Surround sound when the identification signal is being transmitted.
To exit, press MENU several times.
VCR, DVD, AMP and SAT keys
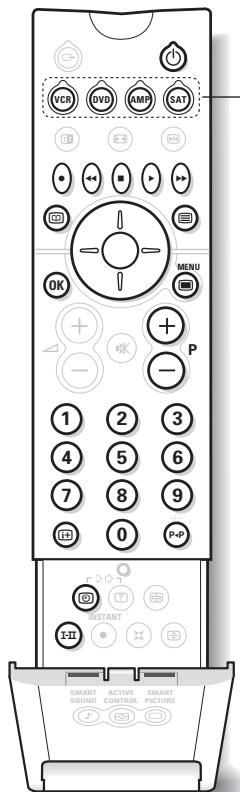
Most of the audio and video equipment from our range of products can be operated with the remote control of your TV.
Press one of the keys to select the required mode : VCR (video recorder), DVD, AMP (amplifier) or SAT (satellite receiver).The remote control indicator lights up to display the selected mode.
After 30 seconds of no buttons having been pressed the remote will automatically return to tv mode.
The following keys are operational, depending on the equipment:
| standby, | MENU | menu, |
| recording, | cursor | navigation and adjustments, |
| fast rewind, | OK | validation, |
| stop, | 09 | digit keys, |
| play, | -P+ | programme selection, |
| fast forward, | I-II | audio selection. |
| VCR timer, | IDD | OSD menu, |
| DVD : title selection, | (P-P) | DVD :T-C function |
| DVD : subtitle selection | VCR :index function. | |
| VCR : tape list function, |
Tips
Poor picture
The proximity of mountains or high buildings may be responsible for ghost pictures, echoing or shadows. In this case, try manually adjusting your picture: see Fine Tuning (p. 5) or change the direction of the outside aerial.
Does your aerial enable you to receive broadcasts in this frequency range (UHF or VHF band)?
There may be interference if the TV set is too close to equipment that is not earthed (sound system, cordless phone,...) or if a piece of equipment connected to the side connectors is operating at the same time as a piece of equipment connected to EXT1 or EXT2 (or EXT3). Switch off one of the 2 pieces of equipment.
No picture
Have you connected the aerial properly?
Have you chosen the right system? (p. 5)
Are the contrast and brightness correctly tuned? Reset the factory settings with the
SETUP menu (p.13).
A wrong SCART or aerial socket connection is often the cause of poor picture or sound problems. Check all the connections.
No sound
If on certain programmes you receive a picture but no sound, this means that you do not have the correct TV system. Modify the System setting (p. 5).
Is the sound interrupted with the mute key?
Teletext
Certain characters are not displayed correctly?
Press the 1II key to change the set of characters.
Smart picture and sound controls
The eco mode is intended to lower power consumption of the TV and to improve picture quality of low quality digital sources.
The personal mode is redefined with the settings of the picture and sound menus after you have changed any of the settings.
The remote control is no longer working?
The indicator on the TV set no longer flashes when you use the remote control? Replace the batteries.
Standby
When you switch the TV set on it remains in standby mode and Locked is displayed when you use the keys on the TV set ? The Child Lock function is switched on (p. 7).
If the set receives no signal for 15 minutes, it automatically goes into standby mode.
To save power, your television is fitted with components that give it a very low power consumption when in standby mode (less than 1 W). We advise to switch off the TV overnight instead of leaving it on standby. You save energy.
Still no results?
Switch yout TV off and on again once.
If your TV set breaks down, never attempt to repair it yourself, contact the after-sales service.
Cleaning the set
Only use a clean, soft and lint-free cloth to clean the screen and the casing of your set.
Do not use alcohol-based or solvent-based products.
Glossary
RGB signals: These are 3 Red, Green and Blue video signals which directly drive the red, green and blue emitters in the cathode ray tube. Using these signals provides better picture quality.
NICAM sound: Process by which digital sound can be transmitted.
System: Television pictures are not broadcast in the same way in all countries. There are different standards: BG, DK, I, and L L'. This is not to be confused with PAL or SECAM colour coding. Pal is used in most countries in Europe, Secam in France, Russia and most African countries. The United States and Japan use a different system called NTSC.
100Hz: Conventional televisions (50 Hz) produce a visible image flicker. Thanks to 100 Hz technology, the scanning frequency is doubled. It is visually more comfortable and the flickering effect is reduced.
16:9: Refers to the length / height of the screen. Wide screen televisions have a ratio of 16/9 and conventional TV sets have a ratio of 4/3.