
TeraStation TS7120r - Server BUFFALO - Free user manual and instructions
Find the device manual for free TeraStation TS7120r BUFFALO in PDF.

| Product type | Professional 12-bay network storage server (NAS) |
| Brand and model | Buffalo TeraStation TS7120r |
| Dimensions (W x H x D) | 480 x 88 x 736 mm |
| Weight | 25 kg |
| Power supply | 100-240 V AC, 50/60 Hz, dual redundant, max consumption 220 W |
| Processor and memory | Not specified in manual, professional-grade |
| Storage capacity | 12 bays for SATA hard drives (3.5 inches), capacity varies depending on installed drives |
| Supported RAID modes | RAID 0, 1, 5, 6, 10, 51, 61, JBOD, with hot spare |
| Network interfaces | 4 Gigabit LAN ports (RJ-45) + optional 10 GbE expansion |
| USB ports | 6 USB 2.0 ports (Type A) |
| Additional ports | 1 VGA port, 1 UPS port (D-sub 9-pin) |
| Sharing protocols | SMB/CIFS, AFP, FTP/SFTP, NFS, HTTP/HTTPS, iSCSI |
| Software features | Backup, replication, disaster recovery, media server (DLNA, iTunes), video surveillance, BitTorrent, web server, MySQL |
| Encryption | AES 128-bit encryption of disks and transfers (FTP) |
| Management and administration | Web interface (Settings), NAS Navigator2 (Windows/Mac), email notifications, SNMP |
| Supported operating systems | Windows 10/8.1/8/7/Vista/XP, Windows Server 2012 R2/2012/2008 R2/2008/2003 R2/2003, macOS 10.4 to 10.11 |
| Operating environment | Temperature: 5-35°C, humidity: 20-80% (non-condensing) |
| Maintenance | Hot-swappable hard drives, CR2032 battery replacement after approximately 5 years, fan cleaning |
| Security | Administrator password, access restrictions, CHAP for iSCSI, automatic shutdown on power failure |
| Spare parts and repairability | Buffalo hard drives series OP-HDZS/OP-HDZH, power supply OP-PU-2RZ, CR2032 battery, optional NIC or USB 3.0 card |
Frequently Asked Questions - TeraStation TS7120r BUFFALO
User questions about TeraStation TS7120r BUFFALO
0 question about this device. Answer the ones you know or ask your own.
Ask a new question about this device
Download the instructions for your Server in PDF format for free! Find your manual TeraStation TS7120r - BUFFALO and take your electronic device back in hand. On this page are published all the documents necessary for the use of your device. TeraStation TS7120r by BUFFALO.
USER MANUAL TeraStation TS7120r BUFFALO
natural_image
Illustration of a rack-mounted server with multiple drive bays and ventilation slots (no text or labels)Chapter 3 Sharing Files ...... 19
Adding a Shared Folder 19
Adding Users 22
Importing User Information....24
Adding Groups 24
Configuring Access Restrictions 26
Local Users and Groups 26
Active Directory 27
NT Domain....30
User Authentication with an External SMB Server....32
RMM (RAID Mode Manager)......41
l'analyse RAID....44
Data Service Policies....134
Vault Admin....135
Surveillance Video Manager 136
Network Activity 137
Mini Vault Stats 138
Remarques:
Remarques:
Chapter 3 Sharing Files
Adding a Shared Folder
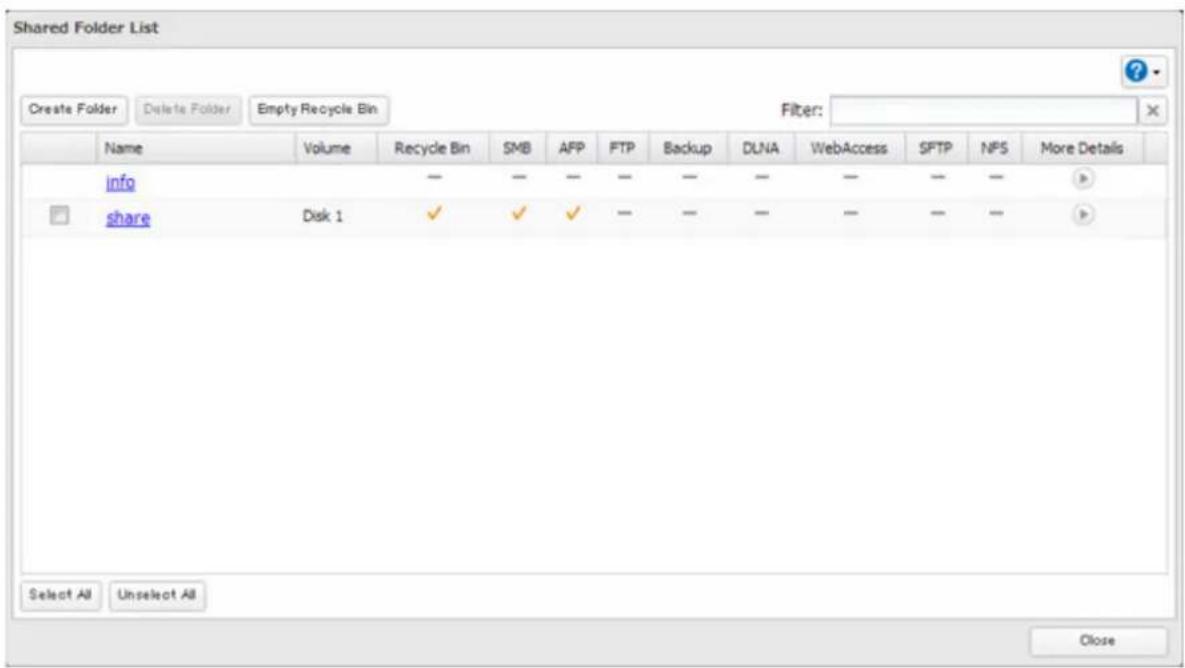
2 Click Button of "Folder Setup (Configuration des dossiers)".

3 Click [Create Folder (Créer un dossier)].
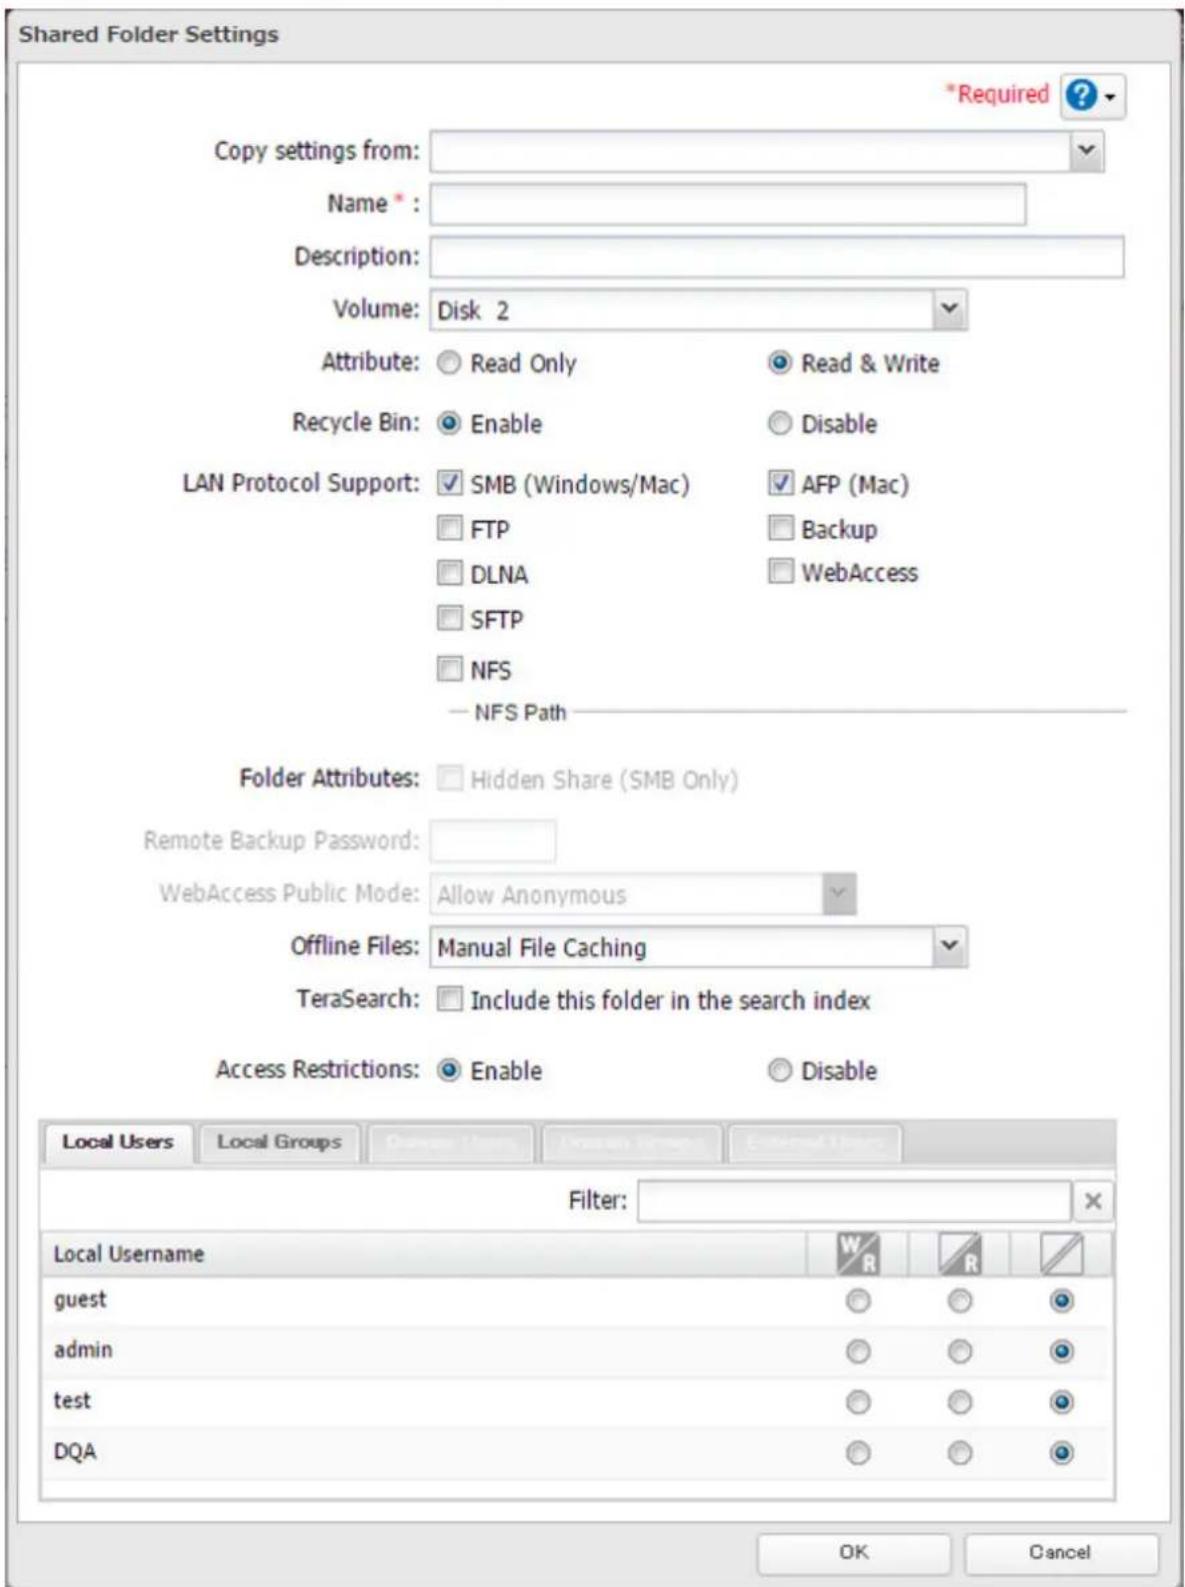
4 Configure the desired settings, then click [OK].
Remarques:
- Names may contain up to 27 alphanumeric characters, hyphens (-), and underscores (_). Do not use a symbol as the first character in a name.
- The description may contain up to 75 alphanumeric characters, hyphens (-), underscores ( ), and spaces. Do not use a space as the first character.
• You may create up to 400 shared folders.
- If the names of shared folders accessed via AFP and FTP connections contain multibyte characters, configure the client language in [Management (Gestion)] - [Name/Time/Language (Nom/Heure/Langue)] to match the characters. If the setting does not match, the shared folder name will not be displayed correctly.
- The following characters are handled differently by Mac OS and Windows. Avoid using these characters when sharing data between Mac OS and Windows: —\~ || - ¢ £ →
- Windows does not support some characters that Mac OS and the TeraStation allow. If you create a filename on a Mac with any of the following characters, it will not display correctly on a Windows computer. With OS X 10.2 or later, you may have to connect to the TeraStation via AFP in order to display or copy any of the following characters:
$$ ? [ ] / \backslash = + < >; ^ {\prime \prime}, | * $$
- Do not use any of the following words as the name of a shared folder. These words are reserved for internal use by the TeraStation: info, spool, lost+found, global, printers, homes, lp, authtest, ram, msdfs_root, mt-daapd, usbdisk# (where # is a number, for example: usbdisk1)
- Don't use the following unsupported characters in shared folder names, workgroup names, or filenames: ①②③④⑤⑥⑦⑧⑨⑩⑪⑫⑬⑭⑮⑯⑰⑱⑲⑳ⅠⅡⅢⅣVⅤⅥⅦⅧⅨX i ii iii iv v vi viii i x x mmcmkmmgkgccm²No.K.K.Tel上中下左右(株)(有)(代)明治大正昭和平成 ミキセンメーグラト アーヘクリッワッカロド センパーミリベー 1 " " " " ∅ΣL△ 纏襲錠鉉配倍炻昱精銀昇彎丨仡任仏仏仏俛俛俛俛俛俛俛俛俛俛俛俛俛俛俛俛俛俛俛俛俛俛俛俛俛俛俛俛俛俛俛俛俛俛俛俛俛俛俛俛俛俛俛俛俛俛俛俛俛俛俾 個儆兌纏宜冷風弱扎荔勅勅匀匆匡邵厓厲敩雙咤呪咩哿喆堀垣拱垅埇峪塚 増塙灸參萌裔弱好妹孖案甯寛寮峯岑崆崧宮崎津嶼嶼駝弭彧德恋恕 悅悲愬惕愠惲愷愷愷愷愷愷愷愷愷愷愷愷愷愷愷愷愷愷愷愷愷愷愷愷愷愷愷愷愷愷愷愷愷愷愷愷愷愷愷愷愷愷愷愷愷愷愷愷愷愷愶 嘻曹聆朗杕枡棗栃枡枡枡枡枡枡枡枡枡枡枡枡枡枡枡枡枡枡枡枡枡枡枡枡枡枡枡枡枡枡枡枡枡枡枡枡枡枡枡枡枡枡枡枡枡枡枡枡枡枡枨 涖渋渋渋渋渋渋渋渋渋渋渋渋渋渋渋渋渋渋渋渋渋渋渋渋渋渋渋渋渋渋渋渋渋渋渋渋渋渋渋渋渋渋渋渋渋渋渋渋渋渋渉 玖珉珮珣瑇琦瑇琦瑇瑇瑇瑇瑇瑇瑇瑇瑇瑇瑇瑇瑇瑇瑇瑇瑇瑇瑇瑇瑇瑇瑇瑇瑇瑇瑇瑇瑇瑇瑇瑇瑇瑇瑇瑇瑇瑇瑇瑇瑇瑇瑇瑇瑇瑇瑇瑇瑇瑇瑁 禍福禍竑鳴靖綸箸精紹絜綸緒繪縈羨羽茁芽茞菇蓁菓蕪蔥薔藂蘿蝦蝦蝦蝦蝦蝦蝦蝦蝦蝦蝦蝦蝦蝦蝦蝦蝦蝦蝦蝦蝦蝦蝦蝦蝦蝦蝦蝦蝦蝦蝦蝦蝦蝦蝦蝦蝦蝦蝦蝦蝦蝦蝦蝦蝦蝦蝦蝦蝦蝦蝟 蟎裹訳誄詹舗聞謹諸誣謹謹賭賭賭賭賭賭賭賭賭賭賭賭賭賭賭賭賭賭賭賭賭賭賭賭賭賭賭賭賭賭賭賭賭賭賭賭賭賭賭賭賭賭賭賭賭賭賭賭賭賭賣 鈺鈺鈺鈺鈺鈺鈺鈺鈺鈺鈺鈺鈺鈺鈺鈺鈺鈺鈺鈺鈺鈺鈺鈺鈺鈺鈺鈺鈺鈺鈺鈺鈺鈺銘 銘鑽鏞鏞鏞鏞鏞鏞鏞鏞鏞鏞鏞鏞鏞鏞鏞鏞鏞鏞鏞鏞鏞鏞鏞鏞鏞鏞鏞鏞鏞鏞鏞鏞鏞鏞鏞鏞鏞鏞鏞鏞鏞鏞鏞鏞鏞鏞鏞鏞鏞鏞鏉 鮑鮑鮑鶏鶏鶏黑畞科緇臂蘊計躲鍊餵鶏
• File and folder names may contain up to 255 single-byte characters.
- Folder and workgroup names whose names contain non-Roman characters may not be displayed correctly.
- If shared folders are accessed from a Mac, information files for the Mac may be generated automatically. Do not delete these files. If they are deleted using Windows, this may prevent further access from a Mac.
- If an SMB connection is used with OS X 10.3.9, the names of mounted volumes may appear as unreadable characters in Finder and other applications. This is not a problem with the filename or data.
- With OS X 10.5 to 10.5.6, Spotlight searches are not supported over AFP connections. Use SMB connections or upgrade to OS X 10.5.7 or later.
• The TeraStation belongs to the default zone in AppleShare: the zone cannot be specified.
- When files are copied to the TeraStation or to a USB drive connected to the TeraStation, file information such as date created, date modified, and other date information may be updated or changed.
• During a file transfer, if settings are changed, the file transfer operation may be aborted.
- File copying to the TeraStation is protected by a journaling file system. If the Ethernet cable is disconnected or a power outage occurs while copying data, the following may occur:
- Preset data such as the TeraStation name, users, and groups may be erased.
- An incomplete file may be copied and the file can no longer be deleted. If this happens, restart the TeraStation, delete the file, and perform the copy operation again.
Recycle Bin
To protect your data from accidental deletion, you may configure your TeraStation to use a recycle bin instead of deleting files immediately. The recycle bin will only work with SMB connections. To empty the recycle bin, click [File Sharing (Partage de fichiers)] - [Folder Setup (Configuration des dossiers)] - [Empty Recycle Bin (Vider la corbeille)] in Réglages.
Read-Only Shares
By default, new shares are set with read and write access, but you may change the attribute to [Read Only (Lecture seule)] in [Attribute (Attribut)]. Read-only shares and HFS Plus-formatted USB hard drives will have "Read-only (Lecture seule)" added to the shared folder description.
Remarque: Configure read-only file attribute in Réglages. Configuring them from within Windows is not supported and may cause unexpected behavior.
Hidden Shares
If hidden shares are enabled, shared SMB folders will not be displayed in Réseau, and only certain users are allowed to access them. To hide a shared SMB folder, follow the instructions below.
1 In Réglages, navigate to [File Sharing (Partage de fichiers)] - [Folder Setup (Configuration des dossiers)] and choose a shared folder or a USB drive to configure hidden shares.
2 Check "Hidden Share (SMB Only) (Partage masqué (SMB uniquement))" and click [OK].
Remarques:
- If protocols other than "SMB" or "Backup (Sauvegarde)" under "LAN Protocol Support (LAN Support du protocole)" are enabled, the hidden shares option will be grayed out and cannot be selected.
- Configure hidden share attribute in Réglages. Configuring them from within Windows is not supported and may cause unexpected behavior.
To access a hidden folder, open Explorateur de fichiers in your computer and enter "\TeraStation name\Shared folder name\" for the name. For example, if the TeraStation name is "TSXXX001" and the shared folder name is "share", enter "001\" to open it.
Adding Users
Remarque: The TeraStation can register a maximum 300 of users, which includes the default users "admin" and "guest".
2 Click Light of "Users (Utilisateurs)".
Local Users 3 User(s)

Remarques:
- Usernames may contain up to 224 characters, including hyphens (-), underscores (_), periods (.), !, #, &, @, \$, *, ^, and %. Do not use a symbol as the first character.
- The user ID should be a number from 1000 to 1999. Each user ID should be unique. If this field is left blank, a user ID is assigned automatically.
- Do not duplicate user IDs, group IDs, usernames, or group names. Each should be distinct and unique.
- The description may contain up to 75 alphanumeric characters, hyphens (-), underscores (_), and spaces. Do not use a space as the first character.
- Passwords may contain up to 20 alphanumeric characters and the following characters: - _ @! # \$ % & ' () * + , ./; < > = ? " [ ] ^ { } | \~. Do not use a symbol other than an underscore (_ ) as the first character.
- Use the same username and password for both Windows and the TeraStation or you may not be able to access shared folders.
- Do not use any of the following words as a username: root, bin, daemon, sys, adm, tty, disk, lp, sync, shutdown, halt, operator, nobody, mail, news, uucp, ftp, kmem, utmp, shadow, users, nogroup, all, none, hdusers, admin, guest, man, www, sshd, administrator, ftpuser, apache, mysql, splx
Importing User Information
Format for user data: Username (required), password (required), and user description (optional).
Examples:
username1, password1, comment1
username2, password2, comment2
username3, password3, comment3
Guidelines:
- Use commas (,) as separators. Do not put spaces before or after commas.
• If a line has an incorrect format, the user on that line will not be registered.
• If a username already exists, the new user information will overwrite the old information. - Do not use commas (,) in the username, password, or user description.
Remarque: Importing users may take some time. During import, other operations in Réglages may be much slower than usual.
Adding Groups
2 Click the right of "Groups (Groupes)".

Remarques:
- Group names may contain up to 224 alphanumeric characters, hyphens (-), underscores ( ), and periods (.). Do not use a symbol other than an underscore ( ) as the first character.
- Group descriptions may contain up to 75 alphanumeric characters, hyphens (-), underscores (_), and spaces. Do not use a symbol or space as the first character.
- If the group ID field is left blank, a group ID is automatically assigned. Use numbers between 1000 and 1999 to set a group ID manually. Don't use duplicate group IDs.
• You may register up to 300 groups with the TeraStation. - If you are logged in as a member of the general users group, you can only change your own password. If you're logged in as an administrator, you can change any settings, including other users' passwords. If you are logged in as a member of the power users group, you can create and edit shared folders, users, and groups.
- Do not use any of the following words as a group name: root, bin, daemon, sys, adm, tty, disk, lp, sync, shutdown, halt, operator, nobody, mail, news, uucp, ftp, kmem, utmp, shadow, users, nogroup, all, none, hdusers, admin, guest, man, www, sshd, administrator, ftpuser, apache, mysql, splx
Configuring Access Restrictions
You may restrict access to specific shared folders, including external USB drives.
Remarques:
- Access restrictions can be set separately for each shared folder, but not for folders within the shared folders.
- Configure access restrictions through Réglages. Configuring access restrictions through Windows is not supported and may cause unexpected behavior.
• Shared folders with limited access can still be used as backup destinations.
Local Users and Groups
2 Click Light of "Folder Setup (Configuration des dossiers)".

3 Click the shared folder that you want to set access restrictions for.
Access Restrictions: ☐ Enable
Disable
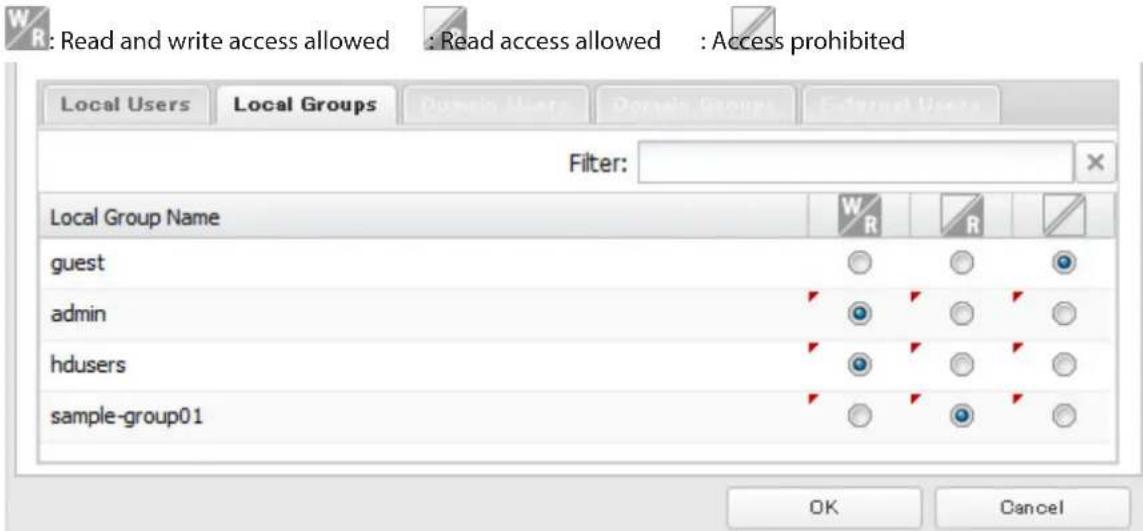
6 Select the level of access for the user or group you added.
7 Click [OK].
Remarques:
- The example above shows access restriction by group. To restrict access by user, click the [Local Users (Utilisateurs locaux)] tab and select user permissions.
- If both read-only and read & write permissions are given to a user, the user will have read-only access. The most restrictive access always applies.
Active Directory
If an Active Directory environment, the TeraStation uses account information from the Active Directory domain controller to set access restrictions for TeraStation's shared folders. There is no need to perform individual account management for the TeraStation. If multiple TeraStations are installed on the network, the account information is centrally managed in Active Directory, greatly reducing the operations required for installation and management.
Remarques:
- If usernames or group names from Active Directory include multi-byte characters, you will not be able to configure access restrictions for them.
- The TeraStation supports a domain environment with a maximum of 1000 users and 1000 groups. 10,000 users and 10,000 groups can be downloaded from the domain controller but are not supported.
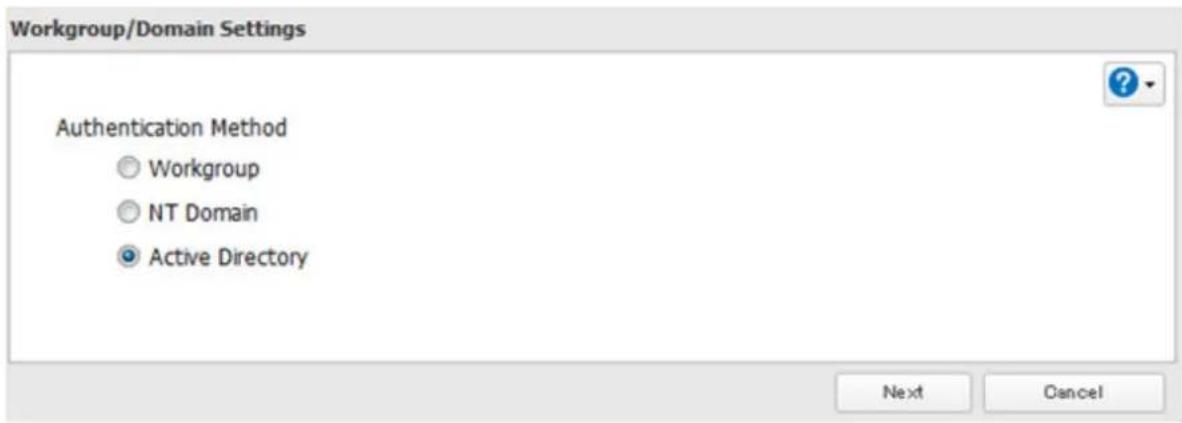
4 Select "Active Directory (Active Directory)", then click [Next (Suivant)].
5 Click [Yes (Oui)].
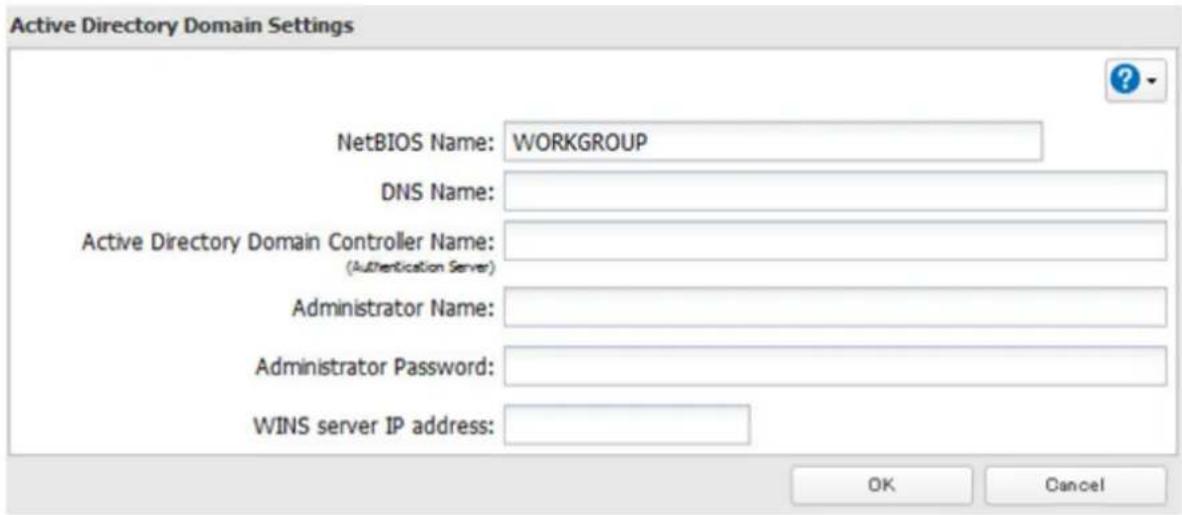
6 Enter the desired settings, then click [OK].
7 Click Light of "Folder Setup (Configuration des dossiers)".

8 Click a shared folder that you want to set access restrictions for.
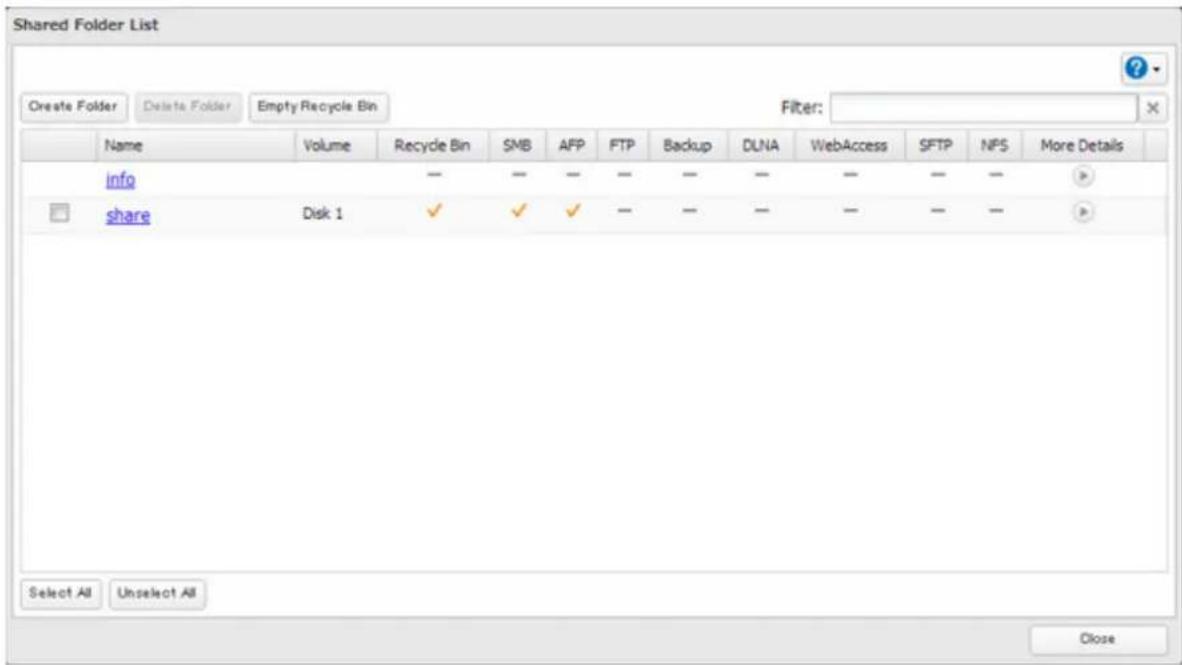
9 Click [Edit (Modifier)].
Access Restrictions: ☐ Enable
Disable
11 Select the level of access for the user or group.

: Read and write access allowed

ad access allowed

: Access prohibited
12 Click [OK].
Remarques:
- To have the TeraStation join an Active Directory domain, configure it to use a DNS server that can resolve names for the Active Directory domain.
- After building an Active Directory domain, the administrator password for joining the domain must be changed at least once, or joining the Active Directory domain will fail.
• The DNS name and NetBIOS name of Active Directory domains should be identical. - If both read-only and read and write permissions are given, the user will have read-only access. The most restrictive access setting will apply.
- If there are more than 5 minutes difference between the TeraStation's clock and the domain controller's clock, joining the domain or authenticating domain users and groups may fail. For best results, use an NTP server to set the time for all network devices.
- To use the TeraStation as a member server in an Active Directory domain, the TeraStation should be logged in to the domain and accessed from a computer that is not a member of the domain with a valid domain account.
- If the TeraStation is a member server of an Active Directory domain, you cannot connect as a guest user via AFP.
- If your TeraStation is a member server in an Active Directory domain and you change the authentication method to "Workgroup (Groupe de travail)", the account on the domain controller will not be deleted automatically.
• If the TeraStation has joined a domain network, you cannot connect to it via FTP.
NT Domain
In an NT domain environment, the TeraStation uses account information from the NT domain server to set access restrictions for files and folders on the TeraStation. There's no need to perform individual account management for the TeraStation. If multiple TeraStations are installed on the network, the account information is centrally managed in the NT domain, greatly reducing the operations required for installation and management.
Remarque: The TeraStation supports a NT domain environment with a maximum of 1000 users and 1000 groups. 10,000 users and 10,000 groups can be downloaded from the domain controller but are not supported.
1 Create an account on the domain controller for the TeraStation.
2 In Réglages, click [Network (Réseau)].

3 Click to the right of "Workgroup/Domain (Groupe de travail/domaine)".

4 Click [Edit (Modifier)].
5 Select "NT Domain (Domaine NT)", then click [Next (Suivant)].
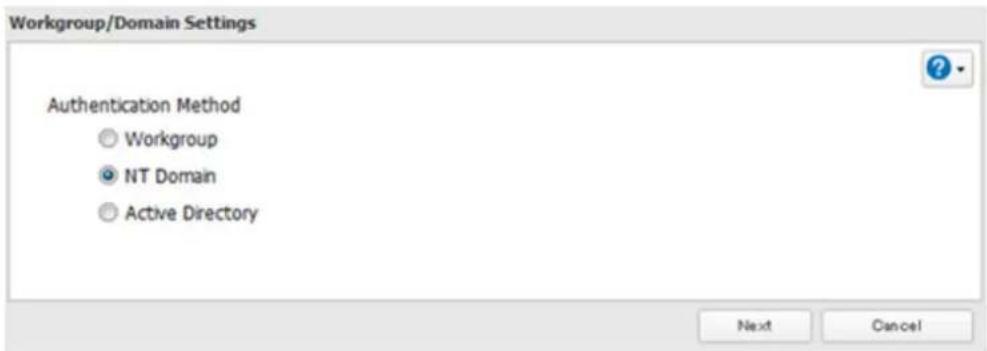
Remarque: To use Active Directory from Windows 2000 or Windows Server 2003, select "Active Directory (Active Directory)" instead of "NT Domain (Domaine NT)".
6 Click [Yes (Oui)].
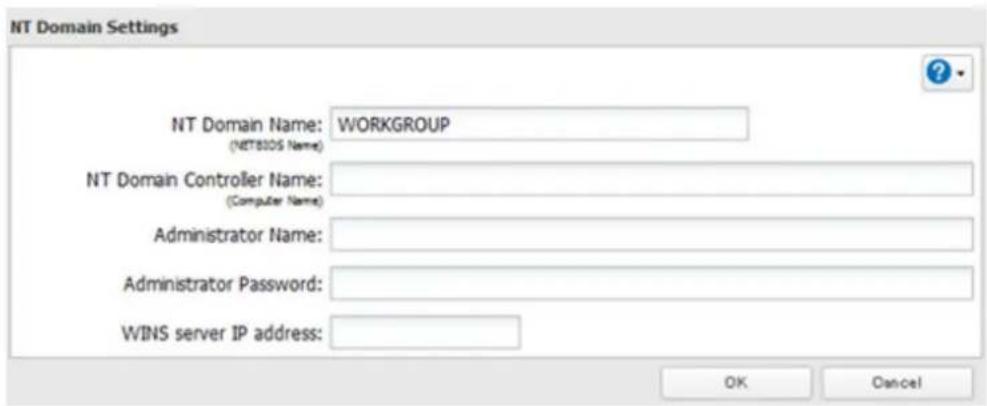
7 Enter settings and click [OK].
8
Click to the right of "Folder Setup (Configuration des dossiers)".

9
Click a shared folder for which you want to set access restrictions.
10
Click [Edit (Modifier)].
11
12
Select the level of access for the domain user or group.

13
Click [OK].
Remarques:
- If you change the TeraStation's name, you will no longer be able to use domain users and groups or access restrictions. To repair this, rejoin the domain.
• If both read-only and read and write permissions are given to a user, the user will have read-only access.
• If a domain username is more than 20 bytes long, the TeraStation truncates it to 20 bytes. - To use the TeraStation as a member server in an NT domain, the TeraStation should be logged in to the domain and accessed from a computer that is not a member of the domain with a valid domain account.
- If the TeraStation is a member server of an NT domain, you cannot connect as a guest user via AFP.
- When you change the user or group settings on the domain controller, these changes may not take effect immediately on the TeraStation until it is rebooted.
- If your TeraStation is a member server in an NT domain and you change the authentication method to "Workgroup (Groupe de travail)", the account on the domain controller will not be deleted automatically.
• If the TeraStation has joined a domain network, you cannot connect to it via FTP.
User Authentication with an External SMB Server
TeraStations on your network can be linked to an external authentication server for centralized management of user accounts and passwords. The authentication server should be another TeraStation or a LinkStation. Other external SMB authentication servers are not supported.
Remarques:
- Disable SMB2 before using external authentication.
- Access restrictions for local users and groups will still apply to shared folders if an external SMB server is used for authentication.
- The procedure below contains methods to automatically register external users. You can also manually add external users by converting them from local users. Refer to the "Conversion des utilisateurs locaux en utilisateurs externes" section below for more details on converting local users.
5 If a prompt appears, click [Yes (Oui)].
6 Enter a workgroup name. Select "Authenticate local and external SMB server users (Authentifier les utilisateurs locaux et externes du serveur SMB)" and enter the SMB server's IP address. You can also specify a server from another subnet.
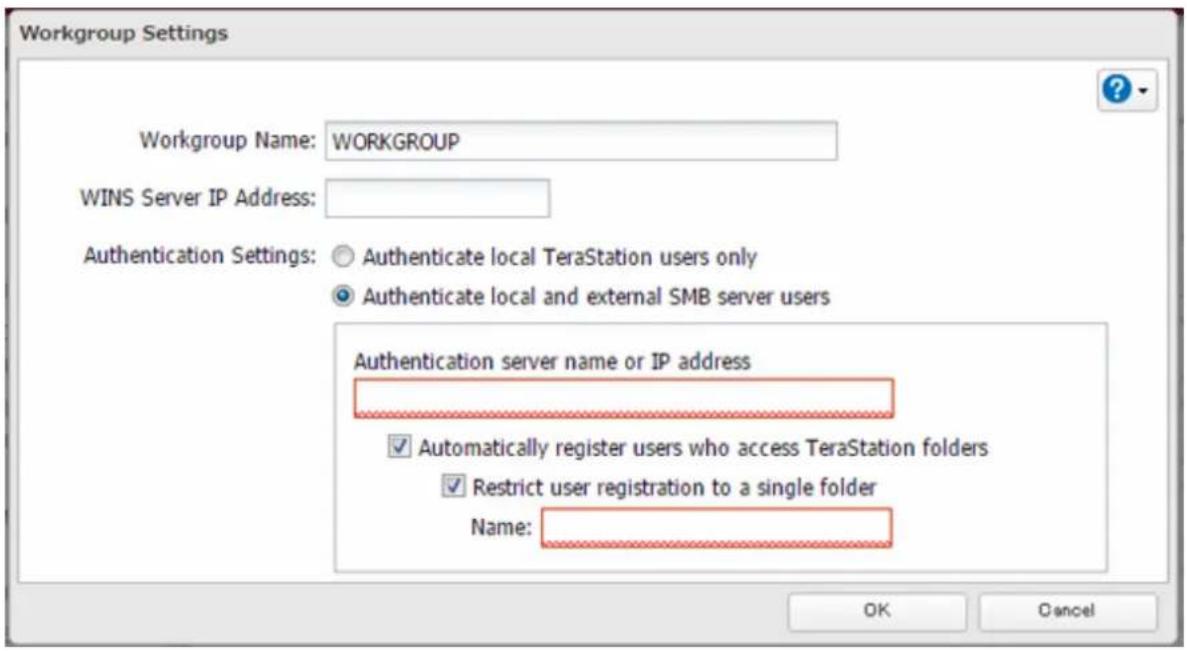
7 If "Automatically register users who access TeraStation folders (Enregistrer automatiquement les utilisateurs qui accèdent aux dossiers de l'unité TeraStation)" is checked, users that access any of the TeraStation's folders will be automatically registered as external users. This process only applies with folders that have access restrictions disabled. After new external users are added, disable this option to limit the number of authenticated user accounts.
8 If "Restrict user registration to a single folder (Limiter l'enregistrement de l'utilisateur à un seul dossier)" is checked, the TeraStation will automatically create a read-only shared folder. Enter the shared folder name. Users that access this specific folder will be automatically registered as external users. If this setting is de-selected at a later time, the TeraStation will automatically remove the folder.
Remarque: Connect to the authentication folder via SMB, not FTP or AFP. Automatic user registration may not work with OS X 10.8 (or later) the first time. If this occurs, try rebooting the TeraStation then access the authentication shared folder again.
9 Click [OK] to save any changes. When saving changes to the external authentication server settings, you may not to convert all current local users to external users. If a local user is converted to an external user, their user information (including passwords) will be removed from the NAS. External users cannot be reverted to local users.
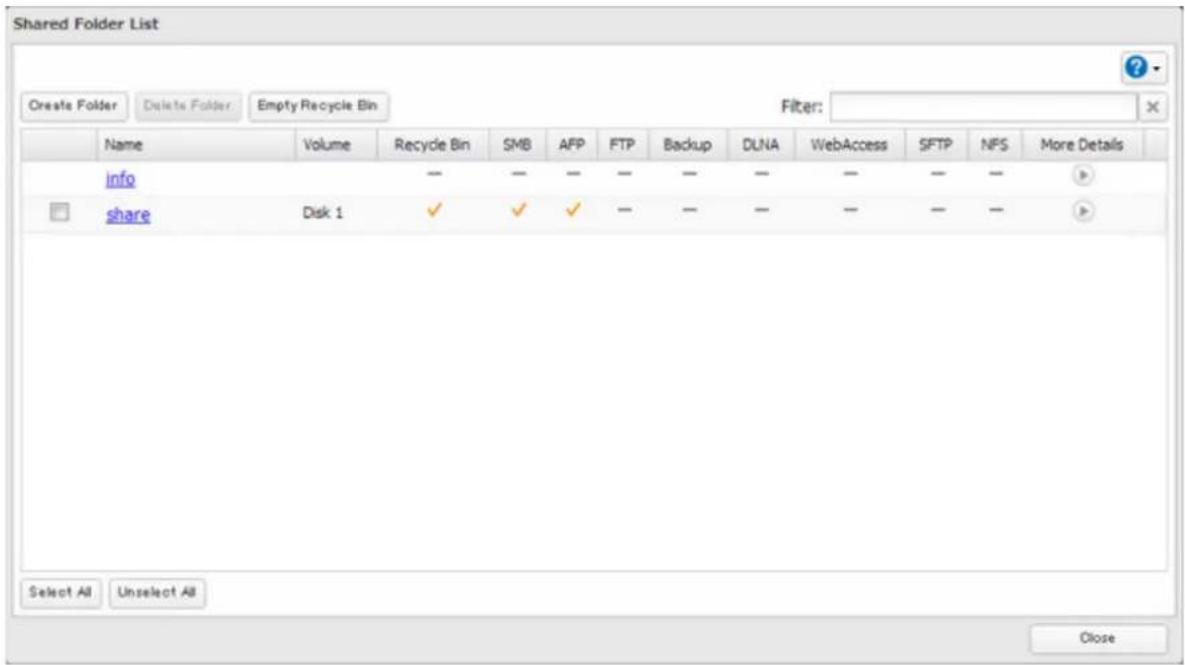
10 Click Light of "Folder Setup (Configuration des dossiers)".

11 Click a shared folder to set access restrictions on.

12 Click [Edit (Modifier)].
Access Restrictions:
![BUFFALO TeraStation TS7120r - Click [Edit (Modifier)]. - 1](/content/2026/03/430404/images/14a26bee274a24ccb0ec778b3f2973d6a1c4da4f40401528d565d82ddab113fe.jpg)
Enable
![BUFFALO TeraStation TS7120r - Click [Edit (Modifier)]. - 2](/content/2026/03/430404/images/a796c6038e6a995fa8418990370442b4055974b13044aa5ba04358f3db1b592f.jpg)
Disable
14 Click on the [External Users (Utilisateurs externes)] tab and select the level of access for each external user.
![BUFFALO TeraStation TS7120r - Click on the [External Users (Utilisateurs externes)] tab and select the level of access for each external user. - 1](/content/2026/03/430404/images/6f8f688384372006c489ad6a19d25976e4df69827cb8ab4c7db49e6b14a63de8.jpg)
: Read and write access allowed
![BUFFALO TeraStation TS7120r - Click on the [External Users (Utilisateurs externes)] tab and select the level of access for each external user. - 2](/content/2026/03/430404/images/64e3aaf8ca934a2157b166de0a0a5687861d16bf45456b38369045d979237d7d.jpg)
ad access allowed
: Access prohibited
15 Click [OK].
Remarques:
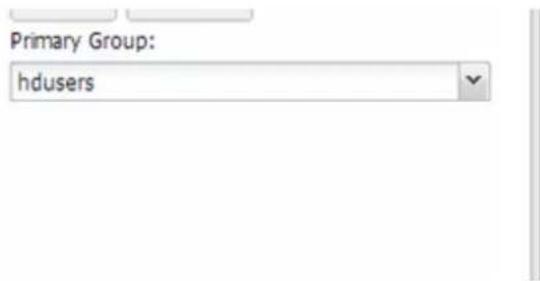
- Users that are automatically registered belong to the "hdusers" group. They can be added to other groups from within group settings. Added users will be listed in "Users (Utilisateurs)" - "External Users (Utilisateurs externes)". To delete a user that was registered automatically, select that user and click [Delete External User (Supprimer l'utilisateur autorisé externe)].
- If both read-only and read and write permissions are given to a user, the user will have read-only access.
• OS X 10.4 or earlier and Windows Server 2012 are not supported with external authentication. - To access access-limited shared folders from OS X 10.7, use AFP instead of SMB; under "LAN Protocol Support (LAN Support du protocole)", check "AFP (Mac)" on the destination folders to use AFP and click [OK].
- If access restrictions are set for users and groups from the authentication server, guest and anonymous connections will not be possible with AFP connections.
- FTP connections do not support authentication with an external SMB server.
- If using a Windows PC for external authentication, the default Windows SMB security settings may need to be changed. An easy way to do this is to run the File Sharing Security Level Change Tool, available from this product's download page on the Buffalo website. This utility will let you easily change or restore your Windows security settings to work with external authentication.
Converting Local Users into External Users
If using an external SMB server for authentication, you may convert any local users into external users. This way, the TeraStation will have a user list that matches the users in the external SMB server, and access restrictions for this TeraStation's shared folders may be assigned to the converted "external" users.
Follow the steps below to convert a local user into an external user. If a local user is converted, their user information (including passwords) will be removed from the TeraStation. External users cannot be reverted to local users.
Remarque: External authentication should be enabled before local users can be converted. For more information on external authentication, refer to the "Authentication utilisateur via un serveur SMB externe" section.
1 In Réglages, click [File Sharing (Partage de fichiers)].
2 Click Light of "Users (Utilisateurs)".
3 In the user list screen, check any users to be converted to an external user, then click [Convert to External User (Convertir en utilisateur autorisé externe)].
4 The "Confirm Operation (Confirmer l'opération)" screen will open. Enter the confirmation number, then click [OK].
Converted users are displayed under the "External Users (Utilisateurs externes)" tab. You can then configure access restrictions for external users.
RMM (RAID Mode Manager)
3 Cliquez sur "RAID Scanning (Analyse RAID)".

Remarques:
S.M.A.R.T.
Cartouches média
This will erase all data and settings and return the TeraStation to its factory defaults. Erased data cannot be restored. Several hours will be required for this process.
Erase TeraStation
5 Cliquez sur [OK].
Local Users 3 User(s)
9 Cliquez sur [OK].
natural_image
3D diagram of a mechanical assembly with layered components and internal channels (no text or symbols)natural_image
Cross-sectional diagram of an electronic device showing internal components and housing (no text or symbols)natural_image
Diagram of a file folder with an internal drive or storage unit, showing no text or symbols.6 Cliquez sur [OK].

Welcome to the Add Camera Wizard
This wizard helps you add and schedule a new camera.
You may need to run this wizard with administrative rights.
To continue, click Next.
About
Help
< Back
Next >
Cancel
Find cameras on my network to populate the information below.
Find Cameras
Select the manufacturer and model.
- Select Manufacturer -

- Select Model -

What is the IP Address?

What credentials are needed to access this camera?
User Name:

Password:

Test Camera
Camera Not Listed
Help
< Back
Next >
Cancel
natural_image
Simple icon of a yellow sticky note with a red eraser, no text or symbols present.Description
What is the name of this camera? (For example, 'Front Lobby')
Enter a brief description of this camera.

When do you want to record video?
Always
○ At selected times
Help
< Back
Next >
Cancel
Review the summary below before clicking Next to add the camera.
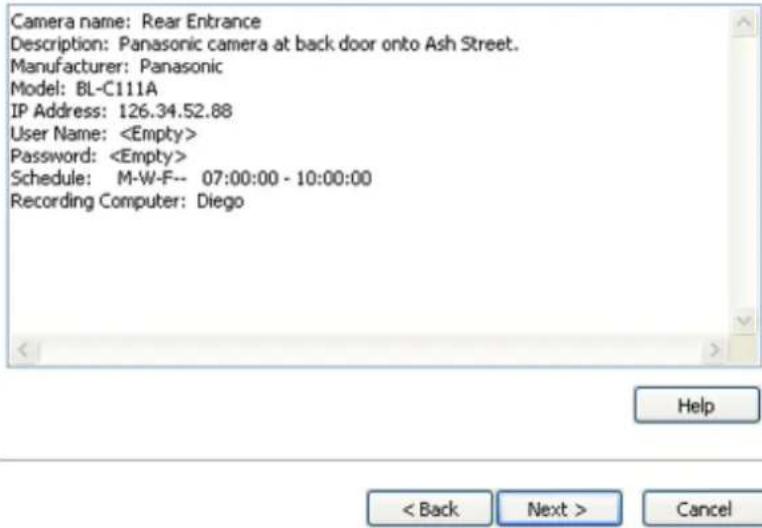
List of Cameras Added
Rear Entrance at 126.34.52.88 scheduled on M-W-F-- 07:00:00 - 10:00:00
Remove selected Camera
Do you want to add an additional camera?
○ Yes
No
Help
< Back
Next >
Cancel
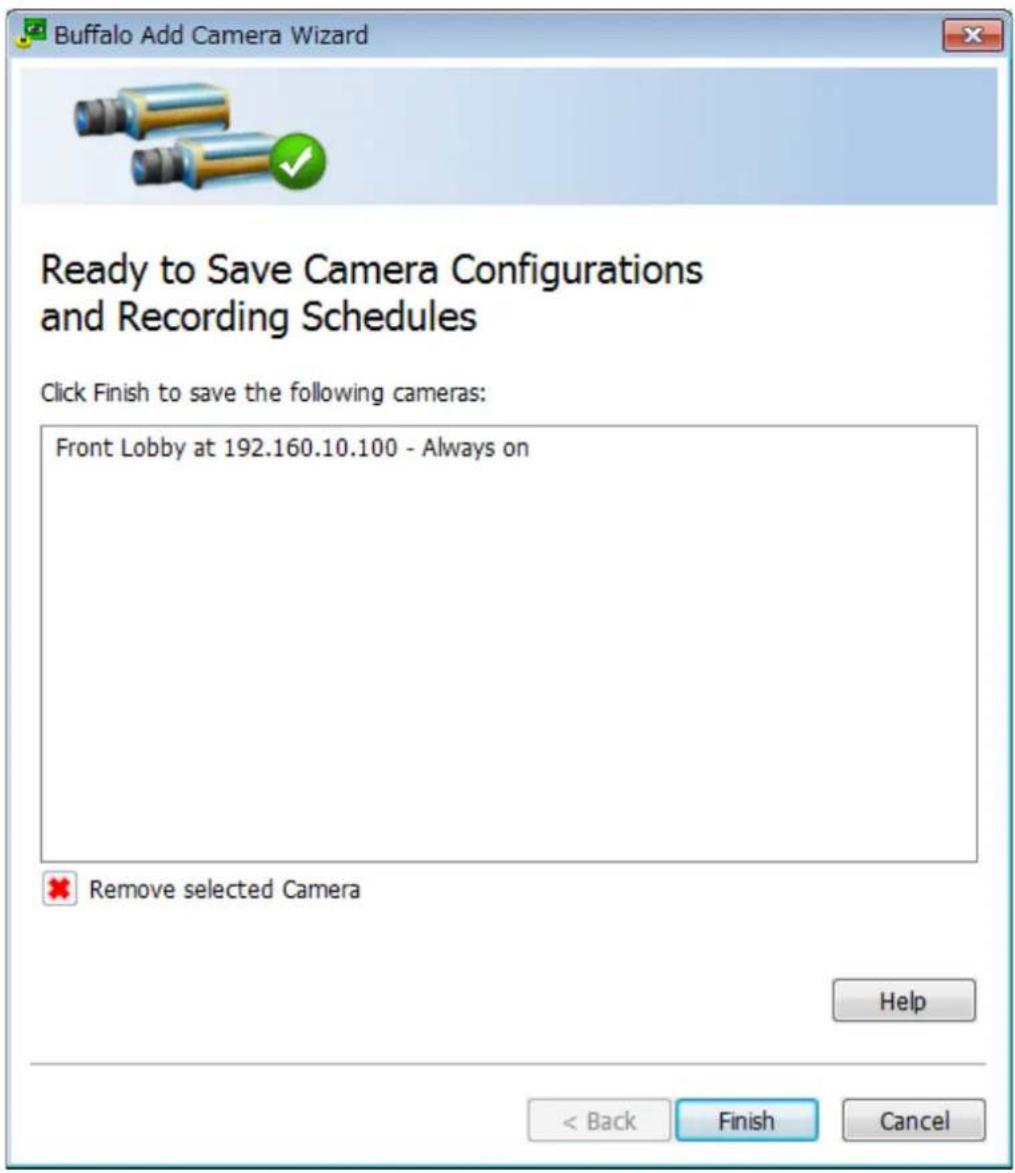
12 Cliquez sur [Finish (Terminer)].
When should the job run?
On selected days each week.
Live Viewer
Data Service Policies
Network Activity
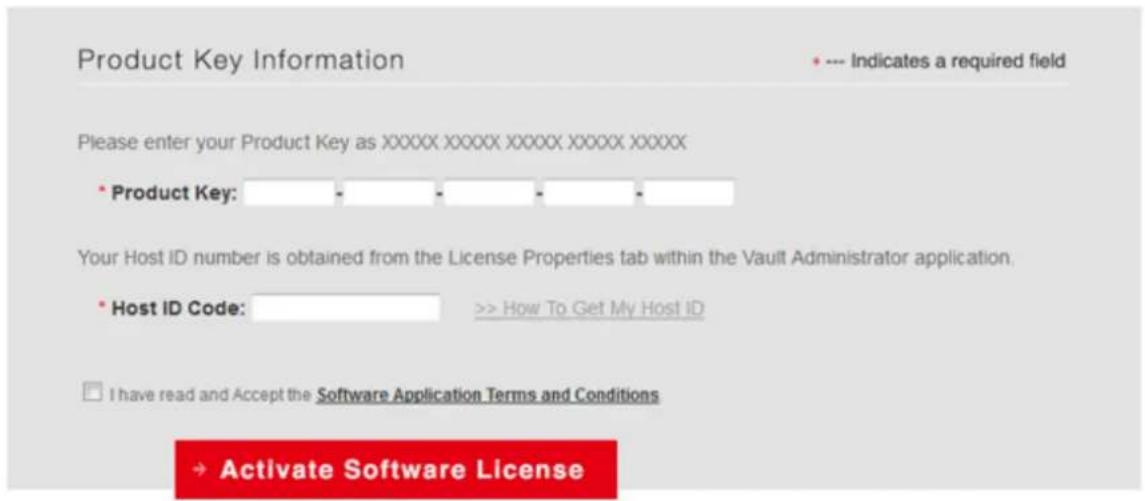
Purchased Product Key Manual Activation
Sleep Mode
Remarques:
Règles NFS
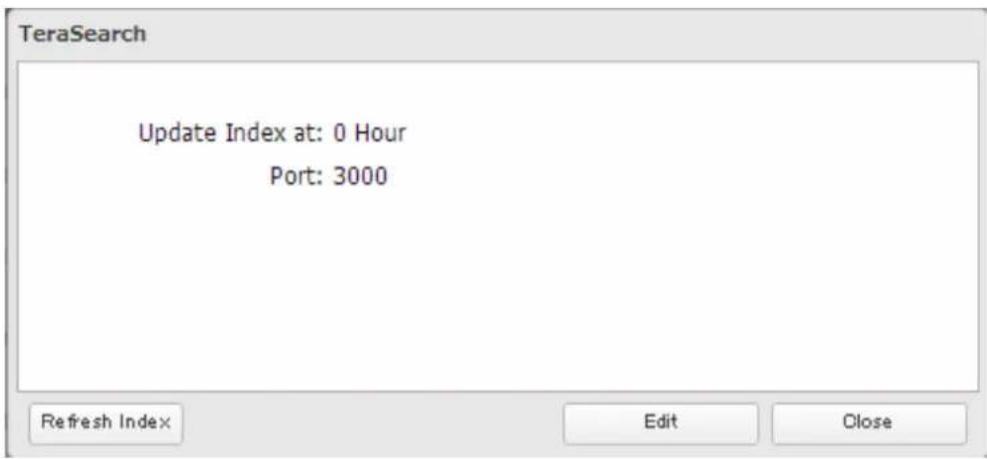
10 Cliquez sur "TeraSearch".
11 Cliquez sur [Refresh Index (Actualiser l'index)].
server.crt (Certificates SSL)
Select from the following options:
Save current configuration to a USB drive
Transfer settings from a USB drive
○ Create a USB drive for system recovery
Target USB drive:
USB Drive 2

Execute
Select from the following options:
Save current configuration to a USB drive
Transfer settings from a USB drive
○ Create a USB drive for system recovery
Target USB drive:
USB Drive 2

Execute
This initializes the TeraStation's settings. All settings are restored to their factory defaults. Saved data is not erased.
Initialize TeraStation
This TeraStation is using the latest firmware.

Trames jumbo
| Connection Transmission | ||||
 Jumbo Frame Jumbo Frame Compatible Hub Jumbo Frame Compatible PC Jumbo Frame Jumbo Frame Compatible Hub Jumbo Frame Compatible PC | ○ | Transfer data in jumbo frames. | ||
 Jumbo Frame Jumbo Frame Compatible Hub Jumbo Frame Incompatible PC Jumbo Frame Jumbo Frame Compatible Hub Jumbo Frame Incompatible PC | △ | Transfer data not using jumbo frames. | ||
 Jumbo Frame Jumbo Frame Incompatible Hub Jumbo Frame Incompatible PC Jumbo Frame Jumbo Frame Incompatible Hub Jumbo Frame Incompatible PC | △ | Transfer data not using jumbo frames. | ||
 Jumbo Frame Jumbo Frame Incompatible Hub Jumbo Frame Compatible PC Jumbo Frame Jumbo Frame Incompatible Hub Jumbo Frame Compatible PC | × | Any data cannot be transferred. | ||
Remarques:
Remarques:
natural_image
Close-up of electronic circuit boards and a battery pack with a magnified inset showing charging direction (no text or symbols)Ajouter une NIC
natural_image
Front view of a server rack with red directional arrows indicating compression or disassembly (no text or symbols present)natural_image
Interior view of an electronic device showing a green circuit board with a highlighted component (no text or symbols visible)OCe11102-N (dual-port)
OCe11102-I (dual-port)
OCe11102-F (dual-port)
Intel
X540T2 (dual-port)
E10G42BTDA (dual-port)
E10G41BFSR (single-port)
E10G42BFSR (dual-port)
E10G41 AT2 (single-port)
natural_image
Front view of a server rack with red directional arrows indicating compression or disassembly (no text or symbols present)natural_image
Interior view of an electronic device showing a green circuit board with a highlighted component (no text or symbols visible)This equipment has been tested and found to comply with the limits for a Class A digital device, pursuant to part 15 of the FCC Rules. These limits are designed to provide reasonable protection against harmful interference when the equipment is operated in a commercial environment. This equipment generates, uses, and can radiate radio frequency energy and, if not installed and used in accordance with the instruction manual, may cause harmful interference to radio communications. Operation of this equipment in a residential area is likely to cause harmful interference in which case the user will be required to correct the interference at his own expense.
This device complies with Part 15 of the FCC Rules. Operation is subject to the following two conditions: (1) This device may not cause harmful interference, and (2) this device must accept any interference received, including interference that may cause undesired operation.
Only use the cables and accessories that are included in the package. Don't use other accessories or cables unless specifically instructed to in the documentation.
UL and MET
CAUTION
RISK OF EXPLOSION IF BATTERY IS REPLACED BY AN INCORRECT TYPE.
DISPOSE OF USED BATTERIES ACCORDING TO THE INSTRUCTIONS.
Proposition 65
WARNING:
This product and its components contain chemicals known to the State of California to cause cancer and birth defects, or reproductive harm. Wash hands after handling.
This is a class A product. In a domestic environment, this product may cause radio interference, in which case the user may be required to take adequate measures.
Only use the cables and accessories that are included in the package. Don't use other accessories or cables unless specifically instructed to in the documentation.
Do not use USB cables that are 3 meters or longer to connect USB devices to this TeraStation series.
Español
RISK OF EXPLOSION IF BATTERY IS REPLACED BY AN INCORRECT TYPE.
DISPOSE OF USED BATTERIES ACCORDING TO THE INSTRUCTIONS.
Norsk
- Chapter 3 Sharing Files ...... 19
- Remarques:
- Chapter 3 Sharing Files
- Adding a Shared Folder
- Configure the desired settings, then click [OK].
- Recycle Bin
- Read-Only Shares
- Hidden Shares
- Adding Users
- Importing User Information
- Guidelines:
- Adding Groups
- Configuring Access Restrictions
- Local Users and Groups
- Click [OK].
- Active Directory
- Select "Active Directory (Active Directory)", then click [Next (Suivant)].
- Click [Yes (Oui)].
- Enter the desired settings, then click [OK].
- Click Light of "Folder Setup (Configuration des dossiers)".
- Click a shared folder that you want to set access restrictions for.
- Click [Edit (Modifier)].
- Select the level of access for the user or group.
- Click [OK].
- NT Domain
- 8
- 9
- 10
- 11
- 12
- 13
- User Authentication with an External SMB Server
- Click a shared folder to set access restrictions on.
- Click [Edit (Modifier)].
- Click on the [External Users (Utilisateurs externes)] tab and select the level of access for each external user.
- Click [OK].
- Converting Local Users into External Users
- RMM (RAID Mode Manager)
- S.M.A.R.T.
- Cartouches média
- Cliquez sur [OK].
- Welcome to the Add Camera Wizard
- Description
- List of Cameras Added
- Cliquez sur [Finish (Terminer)].
- Live Viewer
- Data Service Policies
- Network Activity
- Sleep Mode
- Règles NFS
- server.crt (Certificates SSL)
- Trames jumbo
- Ajouter une NIC
- Intel
- UL and MET
- CAUTION
- Proposition 65
- WARNING:
- Español
- Norsk
Brand : BUFFALO
Model : TeraStation TS7120r
Category : Server