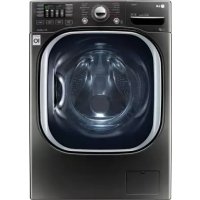
WM4370HKA - Washing machine LG - Free user manual and instructions
Find the device manual for free WM4370HKA LG in PDF.


Frequently Asked Questions - WM4370HKA LG
User questions about WM4370HKA LG
0 question about this device. Answer the ones you know or ask your own.
Ask a new question about this device
Download the instructions for your Washing machine in PDF format for free! Find your manual WM4370HKA - LG and take your electronic device back in hand. On this page are published all the documents necessary for the use of your device. WM4370HKA by LG.
USER MANUAL WM4370HKA LG
Please read this owner's manual thoroughly before operating and andy for reference at all times.
EN ENGLISH FR FRANÇAIS
WM4370H*A
PRODUCT FEATURES
INVERTER DIRECT-DRIVE MOTOR
The inverter motor, which is directly connected to the drum, produces little noise and vibration and offers great durability and a long lifespan.
SMART DIAGNOSISTM
Should you experience any technical difficulty with your washing machine, it has the capability of transmitting data by phone to the Customer Information Center. The call center agent records the data transmitted from your machine and uses it to analyze the issue, providing a fast and effective diagnosis (Refer to page 38).
TUB CLEAN
Regular cleaning of the tub on a monthly basis using Tub Clean can help keep the tub clean and fresh.
MAGNETIC DOOR PLUNGER
Safely and conveniently secure the door slightly ajar with the magnetic door plunger. This will promote air circulation and allow the interior of the machine to dry. To use this feature, after the load has been removed, do not close the door completely.
When the magnetic door plunger comes into contact with the metal washer cabinet, it will secure the door slightly open allowing the interior of the washer to dry.
LARGE CAPACITY STAINLESS STEEL DRUM
The large capacity stainless steel drum offers extreme durability and is tilted to improve efficiency and allow easier access for large items.
CHILD LOCK
Use this option to disable the controls during a wash cycle. This option can prevent children from changing cycles or operating the machine.
DETERGENT DISPENSER DRAWER
The four-compartment dispenser drawer makes it easy to separate the pre-wash detergent, the main laundry detergent, liquid bleach, and fabric softener into different compartments.
HIGH TEMPERATURE STEAM CYCLES
During LG's unique high-temperature steam cycles, the hot steam helps to remove tough stains.
TAG ON
The Tag On feature works on most NFC equipped smart phones by communicating with your Tag On equipped LG appliance. Using the LG ThinQ application, the Tag On feature allows you to diagnose your appliance, download new cycles, and see the status of your appliance by simply touching the smart phone to the Tag On logo of the appliance.
TABLE OF CONTENTS
2 PRODUCT FEATURES
4 IMPORTANT SAFETY INSTRUCTIONS
4 BASIC SAFETY PRECAUTIONS
5 GROUNDING INSTRUCTIONS
6 SAFETY INSTRUCTIONS FOR INSTALLATION
7 SAFETY INSTRUCTIONS FOR USE, CARE, CLEANING, AND DISPOSAL
8 PRODUCT OVERVIEW
8 Parts
8 Accessories
9 Control Panel Features
11 INSTALLATION
11 Installation Overview
12 Choosing the Proper Location
13 Unpacking and Removing Shipping Bolts
14 Connecting the Water Lines
15 Connecting the Drain Line
16 Leveling the Washer
17 Connecting to the Power Supply
17 Testing the Washer
18 PREPARATION
18 Sorting Wash Loads
19 - Fabric Care Labels
19 - Sorting Laundry
20 Using Detergent/Fabric Softener
20 - Recommended Detergent
20 - Loading the Dispenser
22 OPERATION
22 Using the Washer
23 Cycle Guide
24 Wash Cycles
24 - Allergiene™: Reducing Laundry Allergens
24 - Sanitary: Reducing Laundry Bacteria
24 Bright WhitesTM: White Fabrics
24 - Bulky/Large: Blankets or Bulky Items
24 - Cotton/Normal: Normal Items
24 - Heavy Duty: Heavily Spoiled Items
24 - Perm. Press: Wrinkle-Free Items
24 - Hand Wash/Wool: Items Labeled Wool or Hand-Wash
24 - Delicates: Sheer Items
24 - Towels
24 - Speed Wash: Washing Quickly
24 - Drain+Spin
25 Cycle Modifier Buttons
25 Setting Options Before Cycle
25 - Wash Temp.
25 - Spin Speed
25 - Soil Level
26 - Signal
26 - Pre Wash
26 -Rinse+Spin
26 - Extra Rinse
26 - Delay Wash
26 - Steam
27 - Cold WashTM
27 - Turbo WashTM
27 - Fresh Care
27 Setting Options During Cycle
27 - Child Lock
28 - Add Garments
28 - Drum Light
29 MAINTENANCE
29 Regular Cleaning
29 - Care After Wash
29 - Care in Cold Climates
30 Cleaning
30 - Tub Clean
31 - Cleaning the Detergent Dispenser Driver
32 - Cleaning the Water Inlet Filters
33 - Cleaning the Drain Pump Filter
34 - Cleaning the Door Seal
35 TROUBLESHOOTING
35 Checking Error Messages
36 Before Calling for Service
37 SPECIFICATIONS
38 SMART FUNCTIONS
38 LG ThinQ Application
39 Smart Diagnosis™ Function
40 WARRANTY
IMPORTANT SAFETY INSTRUCTIONS
READ ALL INSTRUCTIONS BEFORE USE
WARNING
For your safety, the information in this manual must be followed to minimize the risk of fire or explosion, electric shock, or to prevent property damage, injury to persons, or death.
Your safety and the safety of others are very important.
We have provided many important safety messages in this manual and on your appliance. Always read and obey all safety messages.
This is the safety alert symbol.
This symbol alerts you to potential hazards that can kill or hurt you and others. All safety messages will follow the safety alert symbol and either the word WARNING or CAUTION. These words mean:
WARNING
You can be killed or seriously injured if you don't follow instructions.
CAUTION
You may be slightly injured or cause damage to the product if you do not follow instructions.
All safety messages will tell you what the potential hazard is, tell you how to reduce the chance of injury, and tell you what can happen if the instructions are not followed.
BASIC SAFETY PRECAUTIONS
WARNING
To reduce the risk of fire, electric shock, or injury to persons when using this appliance, follow basic precautions, including the following.
- Use this appliance only for its intended purpose as described in this owner's Manual.
- Before use, the washer must be properly installed as described in this manual.
- Do not wash articles that have been previously cleaned in, washed in, soaked in, or spotted with gasoline, dry cleaning solvents, or other flammable or explosive substances, as they give off vapors that could ignite or explode.
- Do not add gasoline, dry cleaning solvents, or other flammable or explosive substances to the wash water. These substances give off vapors that could ignite or explode.
- Under certain conditions, hydrogen gas may be produced in a hot water system that has not been used for 2 weeks or more. HYDROGEN GAS IS EXPLOSIVE. If the hot water system has not been used for such a period, before using the washer, turn on all hot water faucets and let the water flow from each for several minutes. This will release any accumulated hydrogen gas. As the gas is flammable, do not smoke or use an open flame during this time.
- Do not allow children to play on or in the washer. Close supervision of children is necessary when the washer is used near children.
- Before the washer is removed from service or discarded, remove the lid to prevent children from climbing inside.
- Do not install or store the washer where it will be exposed to the weather or freezing temperatures.
- Do not tamper with controls.
-
Keep the area underneath and around your appliances free of combustible materials (lint, paper, rags, etc.), gasoline, chemicals and other flammable vapors and liquids.
-
Do not repair or replace any part of the washer or attempt any servicing other than as described in this manual. We strongly recommend that any service be performed by a qualified technician.
- See Installation Instructions for grounding requirements.
- ALWAYS follow the fabric care instructions supplied by the garment manufacturer.
- Do not place items exposed to cooking oil in your washer. Items contaminated with cooking oils may contribute to a chemical reaction that could cause a load to catch fire.
- Use fabric softeners or products to eliminate static only as recommended by the manufacturer.
- This washer is not designed for maritime use or for mobile installations such as in RVs, aircraft, etc.
- Turn off the water faucets and unplug the washer if the machine is to be left for an extended period of time, such as during vacations.
- Do not use dry articles containing foam rubber or similarly textured rubber-like materials.
- Packaging material can be dangerous for children. There is a risk of suffocation! Keep all packaging from children.
- Always check the inside of the washer for foreign objects before loading laundry. Keep the lid closed when not in use.
- Do not reach into the appliance if the tub or agitator is moving.
IMPORTANT SAFETY INSTRUCTIONS
READ ALL INSTRUCTIONS BEFORE USE
WARNING
For your safety, the information in this manual must be followed to minimize the risk of fire or explosion, electric shock, or to prevent property damage, injury to persons, or death.
GROUNDING INSTRUCTIONS
This appliance must be grounded. In the event of malfunction or breakdown, grounding will reduce the risk of electric shock by providing a path of least resistance for electric current. This appliance is equipped with a cord having an equipment-grounding conductor and grounding plug. The plug must be plugged into an appropriate outlet that is properly installed and grounded in accordance with all local codes and ordinances.
WARNING
Improper connection of the equipment-grounding conductor can result in risk of electric shock. Check with a qualified electrician or servicer if you are in doubt as to whether the appliance is properly grounded. Do not modify the plug provided with the appliance. If it does not fit the outlet, have a proper outlet installed by a qualified electrician. Failure to follow these warnings can cause serious injury, fire, electric shock, or death.
IMPORTANT SAFETY INSTRUCTIONS
READ ALL INSTRUCTIONS BEFORE USE
WARNING
For your safety, the information in this manual must be followed to minimize the risk of fire or explosion, electric shock, or to prevent property damage, injury to persons, or death.
SAFETY INSTRUCTIONS FOR INSTALLATION
WARNING
To reduce the risk of fire, electric shock, or injury to persons when using this appliance, follow basic precautions, including the following.
Refer to INSTALLATION INSTRUCTIONS for detailed grounding procedures. Installation instructions are packed with the washer for installer's reference. If the washer is moved to a new location, have it checked and reinstalled by a qualified service technician. Failure to follow this warning can cause serious injury, fire, electric shock, or death.
- Do not, under any circumstances, cut or remove the third (ground) prong from the power cord. Failure to follow this warning can cause serious injury, fire, electric shock, or death.
- For personal safety, this appliance must be properly grounded. Failure to follow this warning can cause serious injury, fire, electric shock, or death.
- The power cord of this appliance is equipped with a 3-prong (grounding) plug which mates with a standard 3-prong (grounding) wall outlet to minimize the possibility of electric shock from this appliance.
- This washer must be plugged into a 120 VAC, 60Hz grounded outlet. Failure to follow this warning can cause serious injury, fire, electric shock, or death.
- Have the wall outlet and circuit checked by a qualified electrician to make sure the outlet is properly grounded. Failure to follow this warning can cause serious injury, fire, electric shock, or death.
- Where a standard 2-prong wall outlet is encountered, it is your personal responsibility and obligation to have it replaced with a properly grounded 3-prong wall outlet. Failure to follow this warning can cause serious injury, fire, electric shock, or death.
- Do not install on carpet. Install washer on a solid floor. Failure to follow this warning can cause serious leak damage.
- Do not remove ground prong. Do not use an adapter or extension cord. Plug into a grounded 3-prong outlet. Failure to follow these warnings can cause serious injury, fire, electric shock, or death.
- The washer should always be plugged into its own individual electrical outlet which has a voltage rating that matches the rating plate. This provides the best performance and also prevents overloading house wiring circuits which could cause a fire hazard from overheated wires.
- Never unplug your washer by pulling on the power cord. Always grip plug firmly and pull straight out from the outlet. Failure to follow this warning can cause serious injury, fire, electric shock, or death.
Repair or immediately replace all power cords that have become frayed or otherwise damaged. Do not use a cord that shows cracks or abrasion damage along its length or at either end. Failure to follow this warning can cause serious injury, fire, electric shock, or death. - When installing or moving the washer, be careful not to pinch, crush, or damage the power cord. Failure to follow this warning can cause serious injury, fire, electric shock, or death.
- The washer must be installed and electrically grounded by a qualified service person in accordance with local codes to prevent shock hazard and assure stability during operation.
- The washer is heavy. Two or more people may be needed to install and move the appliance. Failure to do so can result in back or other injury.
- Store and install the washer where it will not be exposed to temperatures below freezing or exposed to outdoor weather conditions. Failure to follow this warning can cause serious leak damage.
- Do not install the washer in humid spaces to reduce the risk of electric shock. Failure to follow this warning can cause serious injury, fire, electric shock, or death.
- To reduce the risk of injury to persons, adhere to all industry recommended safety procedures including the use of long sleeved gloves and safety glasses. Failure to follow all of the safety warnings in this manual could result in property damage, injury to persons or death.
IMPORTANT SAFETY INSTRUCTIONS
READ ALL INSTRUCTIONS BEFORE USE
WARNING
For your safety, the information in this manual must be followed to minimize the risk of fire or explosion, electric shock, or to prevent property damage, injury to persons, or death.
SAFETY INSTRUCTIONS FOR USE, CARE, CLEANING, AND DISPOSAL
WARNING
To reduce the risk of fire, electric shock, or injury to persons when using this appliance, follow basic precautions, including the following.
- Unplug the washer before cleaning to avoid the risk of electric shock.
- Never use harsh chemicals, abrasive cleaners, or solvents to clean the washer. They will damage the finish.
- Do not put oily or greasy rags or clothing on top of the washer. These substances give off vapors that could ignite the materials.
- Do not wash items that are soiled with vegetable or cooking oil. These items may contain some oil after laundering. Due to the remaining oil, the fabric may smoke or catch fire by itself.
- Disconnect this appliance from the power supply before attempting any user maintenance. Turning the controls to the OFF position does not disconnect this appliance from the power supply. Failure to follow this warning can cause serious injury, fire, electric shock, or death.
- Do not combine laundry products for use in one load unless specified on the label.
- Do not mix chlorine bleach with ammonia or acids such as vinegar. Follow package directions when using laundry products. Incorrect usage can produce poisonous gas, resulting in serious injury or death.
-
Do not reach into the washer while parts are moving. Before loading, unloading, or adding items, press the START/PAUSE button and allow the drum to coast to a complete stop before reaching inside. Failure to follow this warning can cause serious injury, fire, electric shock, or death.
-
Do not allow children to play on or in the washer. Close supervision of children is necessary when the washer is used near children. As children grow, teach them the proper, safe use of all appliances. Failure to comply with these warnings could result in serious injury to persons or death.
- Destroy the carton, plastic bag, and other packing materials after the washer is unpacked. Children might use them for play. Cartons covered with rugs, bedspreads, or plastic sheets can become airtight chambers. Failure to comply with these warnings could result in serious injury to persons or death.
- Keep laundry products out of children's reach. To prevent injury to persons, observe all warnings on product labels. Failure to comply with these warnings could result in serious injury to persons or death.
- Remove the door to the washing compartment to avoid the danger of children or small animals getting trapped inside before your washer is removed from service or discarded. Failure to do so can result in serious injury to persons or death.
- Make sure the dispenser drawer is closed at all times when not being filled with laundry products. Failure to keep the drawer closed can result in personal injury or flooding.
- Do not allow water, bleach or other liquids to sit in the drum for extended periods. Doing so can corrode the drum or cause mildew or odors.
PRODUCT OVERVIEW
Parts
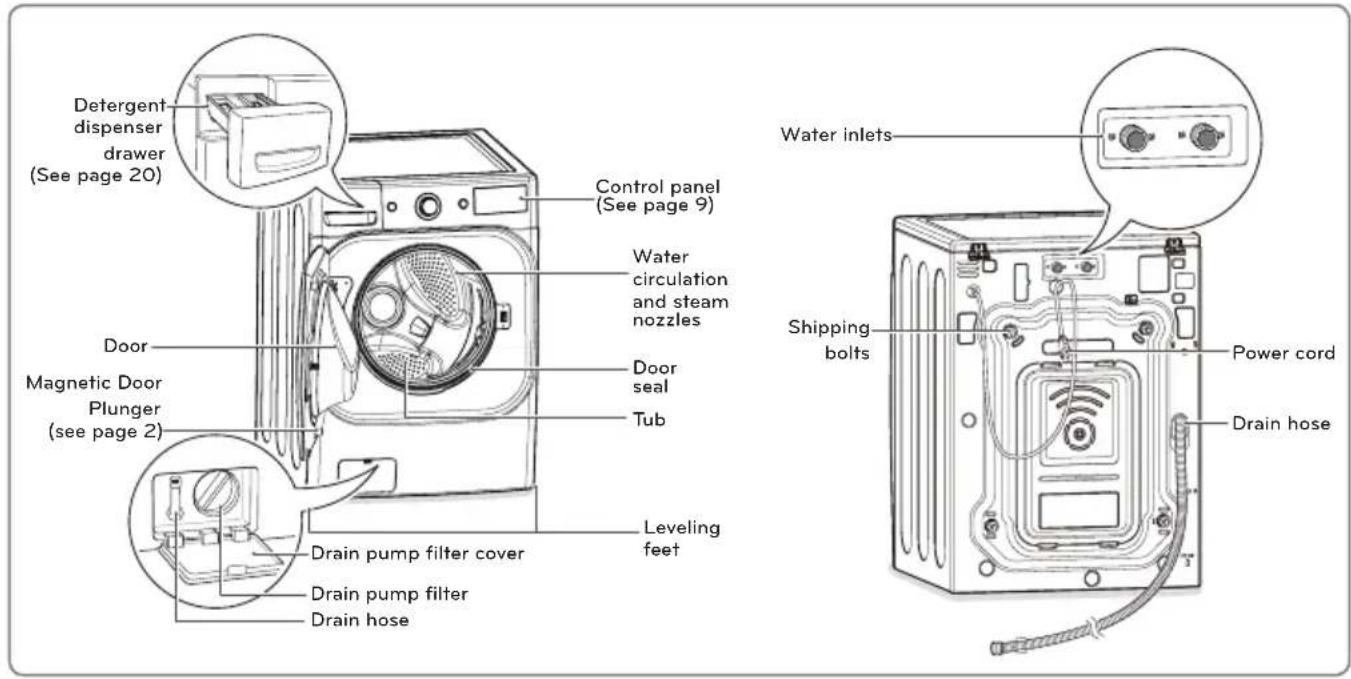
Accessories
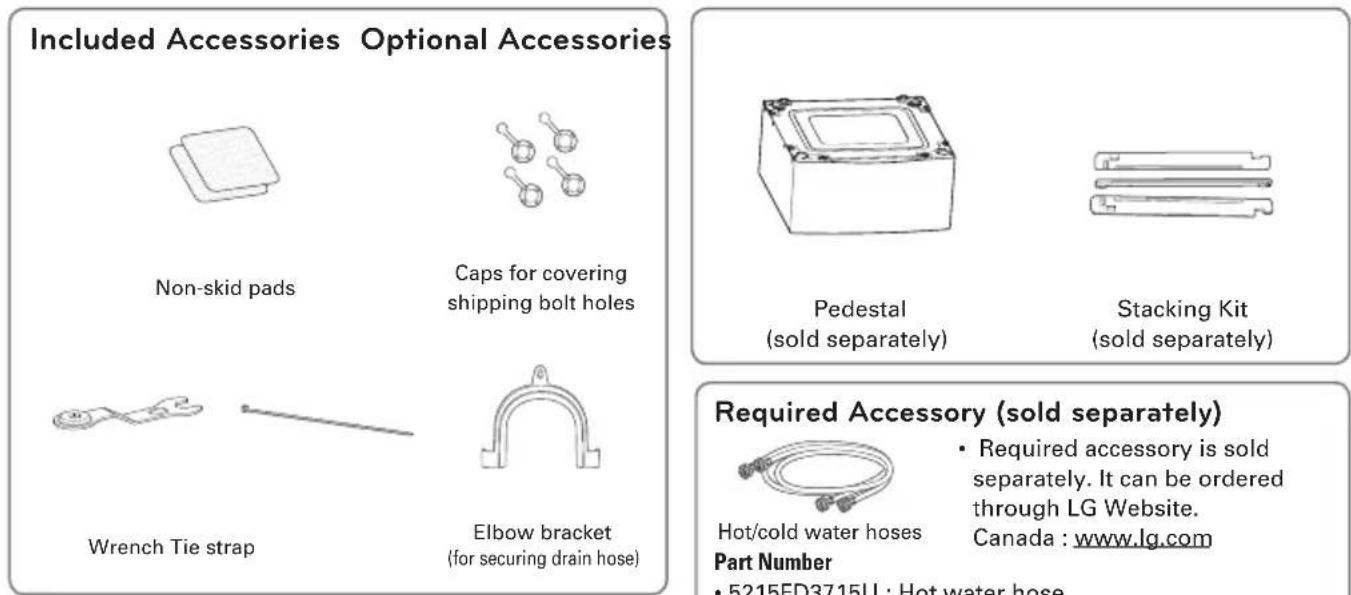
NOTE
- Contact LG Customer Service at 1-800-243-0000 (1-888-542-2623 in Canada) if any accessories are missing.
- For your safety and for extended product life, use only authorized components. The manufacturer is not responsible for product malfunction or accidents caused by the use of separately purchased unauthorized components or parts.
- The images in this guide may be different from the actual components and accessories, and are subject to change by the manufacturer without prior notice for product improvement purposes.
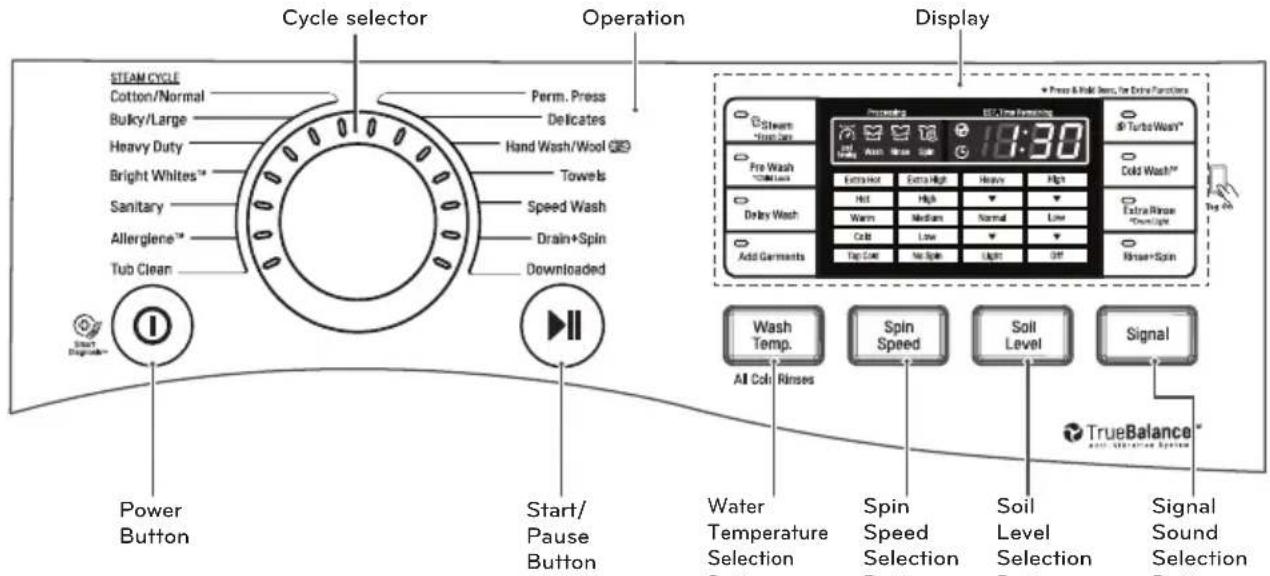
Control Panel Features
Operation
| Button Description | |
| ① | ·Turns the washing machine on and off. ·(During the wash cycle) stops operation, and cancels the settings. |
| Strategies Cotton/Normal Bulky/Large Heavy Duty Bright WhitesTM Sanitary AllergenTM Turb Clean | ·AllergieneTM -For cotton, underwear ·Sanitary -For underwear, diapers, etc. ·Heavy Duty -For heavily soiled cotton fabric ·Bulky/Large -For blankets or large bulky items ·Cotton/Normal -For general laundry, such as cotton T-shirts or towels ·Bright WhitesTM -For white fabrics ·Perm.Press -For wrinkle-free fabrics ·Hand Wash/Wool -For wool or hand-wash fabrics ·Delicates -For sheer and delicate fabrics ·Towels -For towels ·Drain+Spin -For items that only require draining and spinning ·Speed Wash -For small quantities of lightly soiled items ·Downloaded -This position is for downloadable cycles. The default cycle in this position is Small Load. (see page 38) ·Tub Clean -For tub clean (see page 30) |
| ·Starts or pauses the washing machine cycle. -If you do not press the button within 60 minutes of selecting a cycle, the washing machine will turn off automatically. | |
| Wash Temp. | ·(Press repeatedly) Selects the water temperature for the wash cycle (see page 25). -Select water temperature from 5 settings. |
| Spin Speed | ·(Press repeatedly) Selects the spin speed in the desired level (see page 25). -Selects spin speed from 5 settings. |
| Soil Level | ·(Press repeatedly) Selects a wash cycle by soil level (see page 25). -Selects soil level from 5 settings. |
| Signal | ·(Press repeatedly) Adjust the volume of the melody and button tones (see page 26). |
| Pre Wash *Child Lock | ·Pre-wash heavily soiled laundry (See page 26). ·(Press and hold during wash cycle) Lock/unlock the button (See page 27). |
| Turbo Wash* | ·Use this option to save time (See page 27). |
| Extra Rinse *Drum Light | ·(Press before wash cycle) Add an extra rinse to the selected cycle (See page 26). ·(Press and hold during wash cycle) The drum is equipped with a white LED light that illuminates when the washer is turned on (See page 28). |
| Rinse+Spin | ·(Press before wash cycle) Use this option to rinse detergent from load (See page 26). |
| Delay Wash | ·Set delay time of starting cycle (See page 26). |
| Steam *Fresh Care | ·(Press before starting wash cycle) Use this option for extra cleaning power (See page 26). ·(Press and hold 3 seconds) Tumbles clothes to prevent wrinkle (See page 27). |
| Cold WashTM | ·Use this option to consume less energy (See page 27). |
| Add Garments | ·Use this function to add garments or remove foreign objects like coins or keys after the cycle has started (See page 28). |
Display
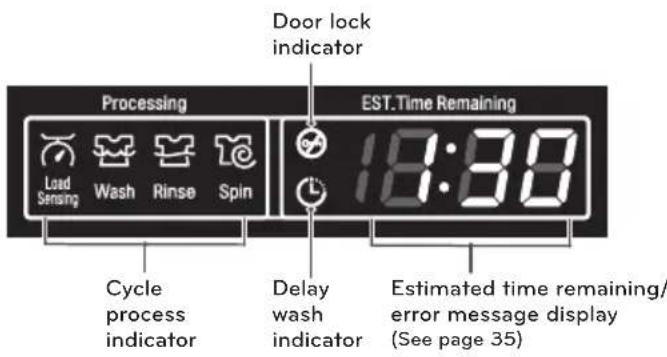
| Display Icon Description | |
| Load Sensing Wash Rinse Spin | This portion of the display shows which stage of the wash cycle is currently underway (Load Sensing, Wash, Rinse or Spin). |
| Indicates that the door is locked. The washer door will lock while the washer is operating. The door can be unlocked by pressing the Start/ Pause button to stop the washer. | |
| L | This indicator shows that the washer has been set for Delay Wash. The washer will start automatically after the set delay time has passed. |
| 1:30 | When the Start/Pause button is pressed, the washer automatically detects the wash load (weight) and optimizes the washing time, based on the selected cycle and options. The display will then indicate the estimated time remaining for the selected wash cycle. |
INSTALLATION
Installation Overview
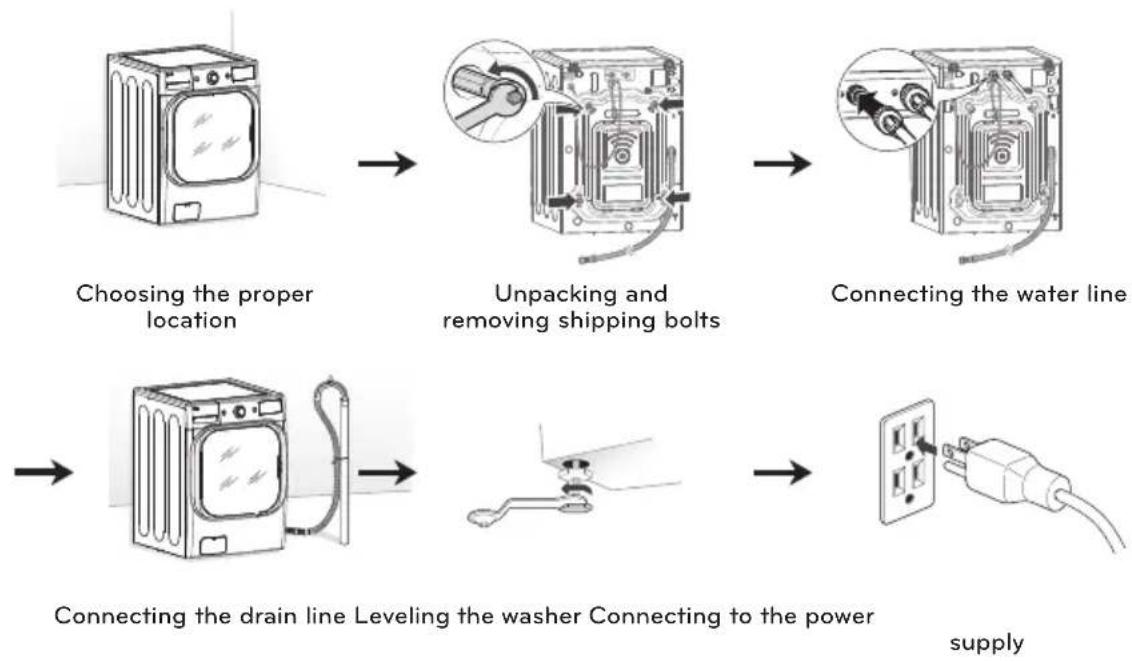
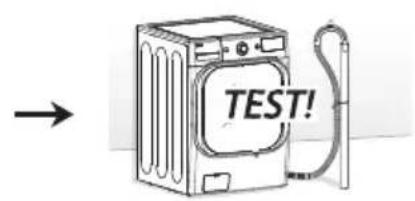
Testing the washer

WARNING
- Washer is heavy! Two or more people are required when moving and unpacking the washer. Failure to do so can result in back or other injury.
- Store and install the washer where it will not be exposed to temperatures below freezing or exposed to outdoor weather conditions. Failure to follow this warning can cause serious injury, fire, electric shock, or death.
- Properly ground washer to conform with all governing codes and ordinances. Failure to follow this warning can cause serious injury, fire, electric shock, or death.
- To reduce the risk of electric shock, do not install the washer in humid spaces. Failure to follow this warning can cause serious injury, fire, electric shock, or death.
- The base opening must not be obstructed by carpeting when the washer is installed on a carpeted floor.
- Do not remove ground prong. Do not use an adapter or extension cord. Plug into a grounded 3-prong outlet. Failure to follow this warning can cause serious injury, fire, electric shock, or death.
- Certain internal parts are intentionally not grounded and may present a risk of electric shock only during servicing. Service personnel - Do not contact the following parts while the appliance is energized: pump, valve, motor, control board.
Choosing the Proper Location
Install the washing machine on a solid floor that is strong and rigid enough to support the weight of the washing machine, even when fully loaded, without flexing or bouncing. If the floor has too much flex, you may need to reinforce it to make it more rigid. If the floor is not solid, it may cause severe vibration and noise.
1 Clean the floor before installation.
- Make sure to select solid and smooth ground.
2 Two or more people are needed for moving and unpacking the washing machine.
3 Allow for sufficient space between the walls and the washing machine for installation.
Space Requirements
You must allow sufficient space for water lines, the drain line, and airflow.

NOTE
- Be sure to allow for wall, door, or floor moldings that may increase the required clearances.
Clearances
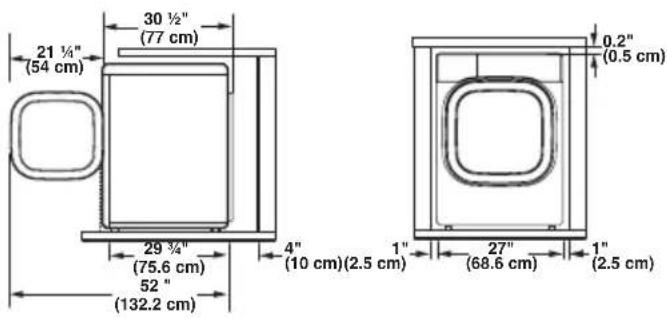

NOTE
- The floor must be strong and rigid enough to support the weight of the washer, when fully loaded, without flexing or bouncing. If your floor has too much flex, you may need to reinforce it to make it more rigid. A floor that is adequate for a top-loading washer may not be rigid enough for a front loading washer, due to the difference in the spin speed and direction. If the floor is not solid, your washer may vibrate and you may hear and feel the vibration throughout your house.
- Before installing the washer, make sure the floor is clean, dry and free of dust, dirt, water and oils so the washer feet can not slide easily. Leveling feet that can move or slide on the floor can contribute to excess vibration and noise due to poor contact with the floor.
- If a drip pan must be used, take extra care to follow the instructions provided with the drip pan and make sure the leveling feet are adjusted for firm and even contact with the pan. Use of drip pans and failure to properly level the machine may result in increased vibration and noise during operation.
Installing on a Pedestal or Stacking Kit
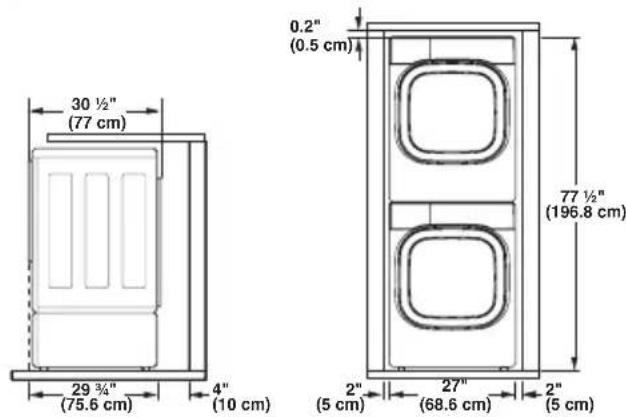

NOTE
Refer to the instructions packaged with the optional PEDESTAL or STACKING KIT before installing with a PEDESTAL or a STACKING KIT.
Unpacking and Removing Shipping Bolts
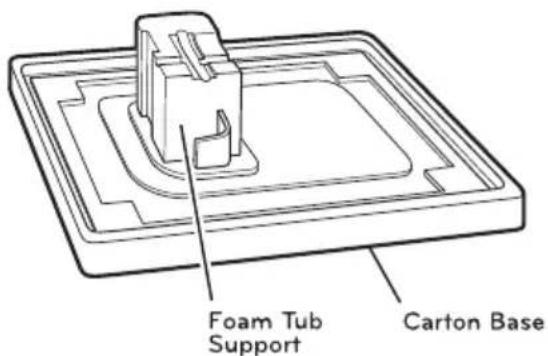
When removing the washer from the carton base, be sure to remove the foam drum support in the middle of the carton base.
If you must lay the washer down to remove the base packaging materials, always lay it carefully on its side.
Do NOT lay the washer on its front or back.
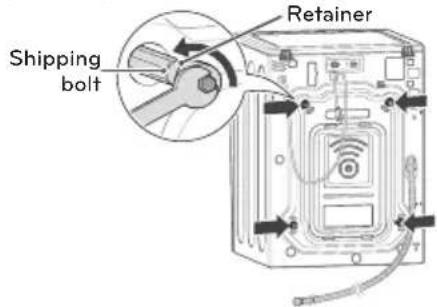
1 Starting with the bottom two shipping bolts, use the wrench (included) to fully loosen all four shipping bolts by turning them counterclockwise. Remove the bolt assemblies by wiggling them slightly while pulling them out.
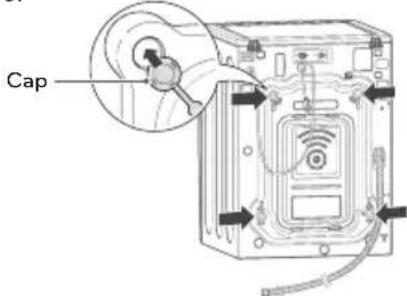
2 Locate the four hole caps included in the accessory pack and install them in the shipping bolt holes.
NOTE
- Save the bolt assemblies for future use. To prevent damage to internal components, DO NOT transport the washer without reinstalling the shipping bolts.
- Failure to remove shipping bolts and retainers may cause severe vibration and noise, which can lead to permanent damage to the washer. The cord is secured to the back of the washer with a shipping bolt to help prevent operation with shipping bolts in place.
Connecting the Water Lines
1 Check the rubber seals on both sides of the hose. - Insert a rubber seal into the threaded fittings on each hose to prevent leaking.
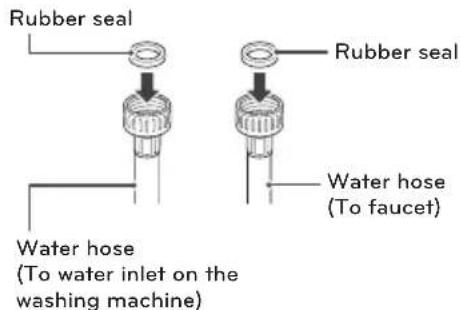
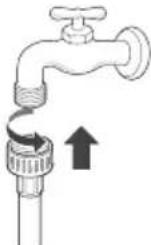
2 Connect the water supply hoses to the HOT and COLD water faucets tightly by hand and then tighten another 2/3 turn with pliers.
- Connect the blue hose to a cold water faucet and the red hose to a hot water faucet.

WARNING
- Do not overtighten. Damage to the coupling can result.
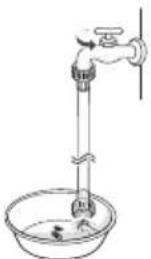
3 After connecting inlet hose to water faucets, turn on the water faucets to flush out foreign substances (dirt, sand or sawdust) in the water lines. Let water drain into a bucket, and check the water temperature.
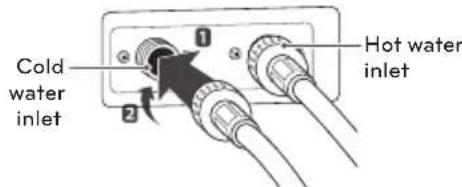
4 Connect the hoses to the water inlets tightly by hand and then tighten another 2/3 turn with pliers.
- Connect the blue hose to the cold water inlet and the red hose to the hot water inlet.

WARNING
- Do not overtighten the hoses. Overtightening can damage the valves resulting in leaking and property damage.
5 Check for leaks by turning on the faucets. - If water leaks, check steps 1 to 4 again.

NOTE
- For your safety, and for extended product life, use only authorized components. The manufacturer is not responsible for product malfunction or accidents caused by the use of separately purchased, unauthorized parts.
- Use new hoses when you install the washing machine. Do not reuse old hoses.
- LG recommends the use of LG hoses. Any leaking, property damage, to the washing machine caused by an improper installation or by the use of non-LG hoses is not covered under the terms of the LG warranty and is the sole responsibility of the customer and/or an installer.
Periodically check the hoses for cracks, leaks and wear, and replace the hoses every five years. - Do not stretch the water hoses intentionally, and make sure that they are not crushed by other objects.
Water supply pressure must be between 20 psi and 120 psi (138-827 kPa). If the water supply pressure is more than 120 psi, a pressure reducing valve must be installed.
To provide optimum washing performance the hot water temperature should be set at 120 - 135^ (48-57°C) and the cold at 60^ (15^)
Connecting the Drain Line
Secure the drain hose in place to prevent moving and leaking.
NOTE
- The drain hose should be properly secured. Failure to properly secure the drain hose can result in flooding and malfunction.
The end of the drain hose should not be less than 29 inches (73.7 cm) or more than 96 inches (244.8 cm) from the bottom of the washer. - The drain must be installed in accordance with any applicable local codes and regulations.
Make sure that the water lines are not stretched, pinched, crushed, or kinked.
Using a Standpipe
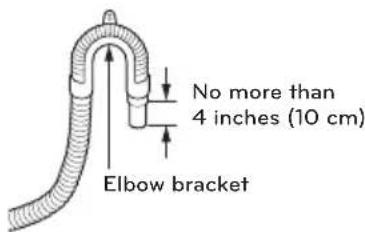
1 Clip the end of the hose into the elbow bracket.
- Connect the elbow bracket within 4 inches (10 cm) from the end of the drain hose. If the drain hose is extended more than 4 inches (10 cm) beyond the end of the elbow bracket, mold or microorganisms could spread to the inside of the washer.
2 Insert the end of the drain hose into the standpipe.
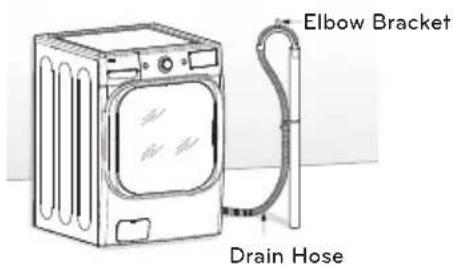
3 Use a tie strap to secure the drain hose in place.
Using a Laundry Tub
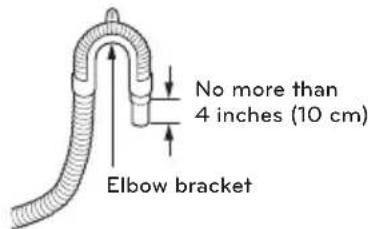
1 Clip the end of the hose into the elbow bracket.
- Connect the elbow bracket within 4 inches (10 cm) from the end of the drain hose. If the drain hose is extended more than 4 inches (10 cm) beyond the end of the elbow bracket, mold, or microorganisms could spread to the inside of the washer.
2 Hang the end of the drain hose over the side of the laundry tub.
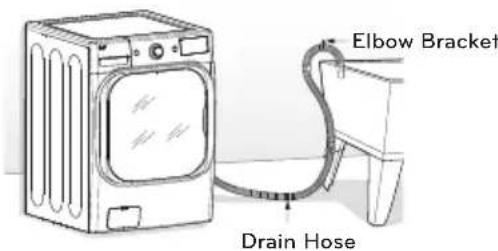
3 Use a tie strap to secure the drain hose in place.
Leveling the Washer
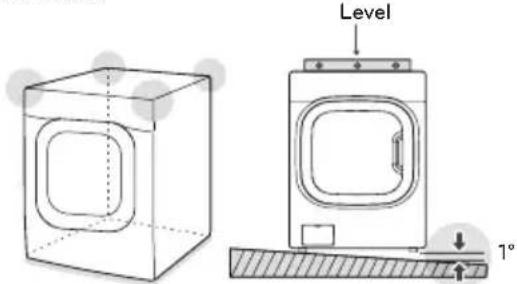
The washer tub of your new washing machine spins at very high speeds. To minimize vibration, noise, and unwanted movement, the floor must be perfectly level and solid.
1 Check that the washer is level.
- Rock the top edges of the washing machine or place a level on the washing machine. The slope beneath the washing machine must not exceed 1^ , and all four leveling feet must rest firmly on the floor.
2 Turn the lower leveling feet clockwise to level the washing machine.
- Turning the lower leveling feet clockwise raises the washing machine.
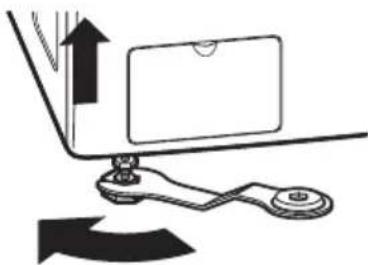
Raise
3 Turn the locknuts counterclockwise and tighten them when the washing machine is level.
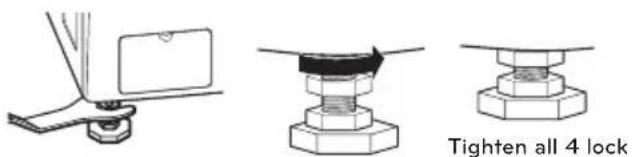
Tighten all 4 lock nuts securely using the wrench.
4 Check again that the washer is level.
- Push or rock the top edges of the washing machine gently to make sure that the washing machine does not rock.
- If the washing machine rocks, repeat steps 1 to 3.
WARNING
- Using the washing machine without leveling, it may result in malfunction caused by the production of excess vibration and noise.
- If you are installing the washing machine on the optional pedestal, you must adjust the leveling feet on the pedestal to level the washing machine. The washing machine's leveling feet should be minimized and turn the locknuts counterclockwise to secure.
- Use the leveling feet only when you level the washing machine. If you raise the leveling feet unnecessarily, it may cause abnormal vibration of the washing machine.
Using Non-Skid Pads (Optional)
If you install the washing machine on a slippery surface, it may move because of excessive vibration. Incorrect leveling may cause malfunction through noise and vibration. In the event of this, lay the nonskid pads under the leveling feet and adjust the level.
1 Clean the floor to attach the non-skid pads.
- Use a dry rag to remove and clean foreign objects or moisture. If moisture remains, the non-skid pads may slip.
2 Level the washer after placing it in the installation area.
3 Place the adhesive side of the non-skid pad on the floor.
- It is most effective to install the non-skid pads under the front legs. If it is hard to place the pads under the front legs, place them under the back legs.
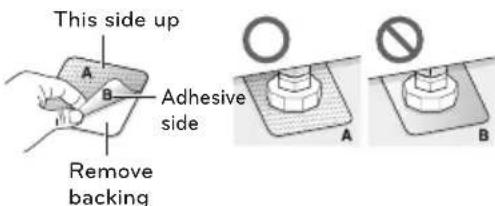
4 Check again that the washer is level.
- Push or rock the top edges of the washing machine gently to make sure that the washing machine does not rock. If the washing machine rocks, level the washing machine again.
Connecting to the Power Supply
Make sure to ground the washing machine to prevent a short circuit or an electric shock when plugging in.
Using a 3-Prong Outlet
Plug in the electrical outlet without additional grounding.
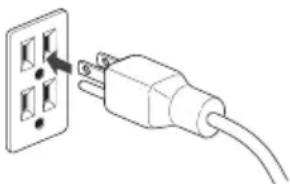

WARNING
- The power outlet must be within 60 inches (1.5 m) of either side of the washer.
- The appliance and outlet must be positioned so that the plug is easily accessible.
- Do not overload the outlet with more than one appliance.
- The outlet must be grounded in accordance with current wiring codes and regulations.
- Time-delay fuse or circuit breaker is recommended.
- It is the personal responsibility and obligation of the product owner to have a proper outlet installed by a qualified electrician.
- Do not use a worn or damaged power cord or power plug. Replace or repair it immediately. Failure to do so may result in death, fire, electric shock, or malfunction.
- Do not modify the power cord and take care not to damage it when installing or moving the washing machine. Failure to do so may result in death, fire, electric shock, or malfunction.
- Make sure that the washing machine is grounded.
- Connect this washing machine to a grounded outlet conforming to the rating prior to use. Failure to do so may result in fire, electric shock, or malfunction.
- Do not use adaptors or extension cords. The washing machine should always be plugged into its own individual electrical outlet which has a voltage rating that matches the rating plate. Failure to do so may result in fire, electric shock or disorder.
- Do not damage or cut off the ground prong of the power cord. Doing so may cause death, fire, electric shock, or product malfunction.
Testing the Washer
Check if the washing machine is properly installed and run a test cycle.
1 Load the washing machine with 6 pounds of laundry.
2 Press ⑥ and turn to the right.
3 Press Rnse + Spin.
4 Press
- The wash cycle starts.
5 Check if water is supplied, that the washing machine does not rock or vibrate excessively, and that it drains well during the spin cycle.
- If water leaks during water supply, see page 14, Connecting the Water Lines to connect them properly.
- If the washing machine rocks and vibrates excessively, see page 16, Leveling the Washer to level it again.
- If the drain does not work, see page 15, Connecting the Drain Line to install it properly.
PREPARATION
Sorting Wash Loads
Read and observe the following to prevent shrinkage or damage to clothes.
Check all pockets to make sure that they are empty.
- Items such as clips, matches, pens, coins, and keys can damage both the washer and your clothes.
Close zippers, hooks, and drawstrings to prevent these items from snagging or tangling on other clothes.
Pretreat heavily stained areas before washing. - Doing so will produce clean, stain-free results.
Combine large and small items in a load. Load large items first.
Large items should not be more than half of the total washload.
- The washer can be fully loaded, but the drum should not be tightly packed with items.
- The door of the washer should close easily.
Do not wash single items, except for bulky items such as blankets. Make sure to wash laundry in similar types of loads.
- Washing a single small item may result in the tub becoming unbalanced, vibrating and making a noise.
Do not wash waterproof clothes.
- This may cause abnormal vibration, or may cause the load to bounce, which could damage the tub.
Check if there are any other foreign objects in the door seal and take extra care that clothes do not get caught there.
- Foreign objects in the door seal may stain clothes, and water may leak if clothes get caught in the door seal.
Wash underwear or small, light items in a laundry net.
- Small, light items may get caught in the door seal, and a brassiere hook may damage other items or the tub.
Brush heavy soil, dust, or hair off fabrics before washing.
- Laundry may not wash clean if there is dirt or sand on the fabrics, or particles may rub against and damage sheer fabrics.
Wash blankets individually.
- Washing more than one blanket together may produce unsatisfactory results due to tangling or an unbalanced load.
Always separate fabrics according to their colors and wash them separately to prevent colors from running.
- Fabrics may damage or become stained due to fabric dyes running, or due to foreign objects transferring from one fabric to another.
For best performance, load clothes as shown.
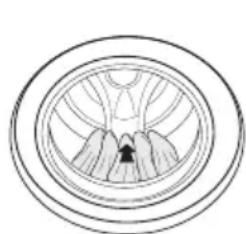
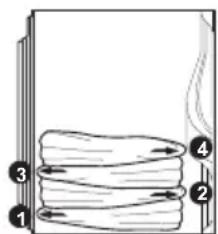
- Load clothes loosely, and do not overfill the drum. Clothes need room to circulate in order to get clean.
- Do not press down on items while stacking them in the drum.
Fabric Care Labels
Most articles of clothing feature fabric care labels that include instructions for proper care.
| Category Label Directions | ||
| Washing | Hand Wash | |
| Machine Wash, Normal Cycle | ||
| Use Permanent Press/Wrinkle Resistant washing machine setting (which has a cool down or cold spray before the slower spin) | ||
| Use Gentle/Delicate washing machine setting (slow agitation and/ or reduced wash time). | ||
| Do Not Wash | ||
| Do Not Wring | ||
| Water Temperature | ... | Hot |
| .. | Warm | |
| . | Cold/Cool | |
| Bleach symbols | Any Bleach (When Needed) | |
| Only Non-Chlorine Bleach (When Needed) | ||
| Do Not Bleach | ||
Sorting Laundry
It is recommended that you sort laundry into similar loads that are washable in the same cycle. Refer to the following chart for sorting clothes
| Colors | Whites / Lights / Darks |
| Soil | Heavy / Normal / Light |
| Fabric | Delicates / Easy Care / Sturdy Cottons |
| Lint | Lint Producers / Mint Collectors |
Using Detergent/Fabric Softener
Recommended Detergent
Make sure to use HE (High-Efficiency) detergent for front-loading washing machines. HE detergents dissolve more efficiently and produce fewer suds to ensure efficient washing and rinsing. Use the correct amount of detergent as indicated on the label of the detergent packaging.

Designed specially to use only HE (High-Efficiency) detergent

NOTE
Only use HE detergents, because using a regular detergent may produce excessive suds.
HE detergents produce fewer suds, dissolve more efficiently to improve washing and rinsing performance, and help to keep the interior of the washer clean.
- Use less detergent for soft water.
- Wipe up any spills immediately, as liquids could damage the finish and the control panel of the washing machine.
- Using too much detergent can cause a buildup in the tub resulting in unsatisfactory performance and machine malfunction.
- If you use a detergent that does not dissolve easily or a detergent with high viscosity, it will leave a residue on the tub, which may not rinse properly.
Loading the Dispenser
The detergent dispenser drawer of the washing machine has a dispenser compartment for each detergent type. Add each detergent to its appropriate compartment.
1 Pull out the detergent dispenser drawer.
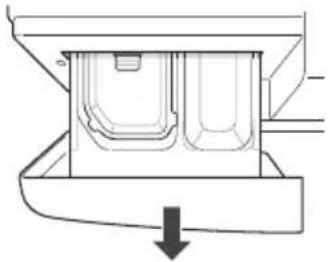
2 Add the appropriate detergent to its appropriate compartment.
- If you use a liquid detergent, check if the liquid detergent cup is in place.
- If you use a powdered detergent, remove the liquid detergent cup and put the powder in the main wash detergent compartment.
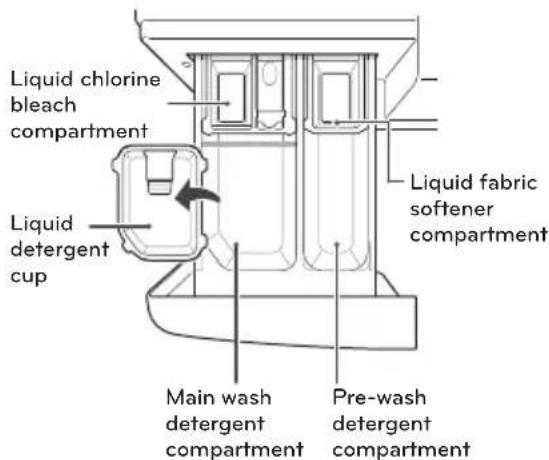
3 Close the detergent dispenser drawer slowly.
- Slamming the detergent dispenser drawer may result in the detergent overflowing into another compartment or pouring into the tub earlier than programmed.

NOTE
It is normal for a small amount of water to remain in the dispenser compartments at the end of the cycle.
Pre-wash Detergent Compartment
Add liquid or powdered detergent to this compartment when using the pre-wash option. Always use HE (High-Efficiency) detergent with the washing machine.

NOTE
- If liquid detergent is to be used for the main wash when using the pre-wash option, the liquid detergent cup accessory must be used in main wash dispenser to prevent the main wash liquid detergent from being dispensed immediately.
- The amount of detergent added for the pre-wash option is 12 the amount recommended for the main wash cycle. For example, if the main wash cycle requires one measure of detergent, add 12 measure for the pre-wash option.
Main Wash Detergent Compartment
This compartment holds laundry detergent for the main wash cycle, which is added to the load at the beginning of the cycle. Always use HE (High-Efficiency) detergent with your washing machine. Never exceed the manufacturer's recommendations when adding detergent. Using too much detergent can result in detergent buildup in clothing and the washer. Either powdered or liquid detergent may be used.

NOTE
- Liquid or powdered color-safe bleach may be added to the main wash compartment with detergent of the same type.
- When using liquid detergent, make sure the liquid detergent cup is in place. Do not exceed the maximum fill line.
- When using powdered detergent, remove the liquid detergent cup from the compartment. Powdered detergent will not dispense with the liquid detergent cup in place.
Liquid Bleach Compartment
This compartment holds liquid chlorine bleach, which will be dispensed automatically at the proper time during the wash cycle.

NOTE
- Do not add powdered or liquid color-safe bleach to this compartment.
- Always follow the manufacturer's recommendations when adding bleach. Do not exceed the maximum fill line. Using too much bleach can damage fabrics.
- Never pour undiluted liquid chlorine bleach directly onto the load or into the drum. Fabric damage can occur.
Fabric Softener Compartment
This compartment holds liquid fabric softener, which will be automatically dispensed during the final rinse cycle.

NOTE
- Always follow the manufacturer's recommendations when adding fabric softener. Do not exceed the maximum fill line. Using too much fabric softener may result in stained clothes.
- Dilute concentrated fabric softeners with warm water. Do not exceed the maximum fill line.
- Never pour fabric softener directly onto the load or into the drum.
OPERATION
Using the Washer
1
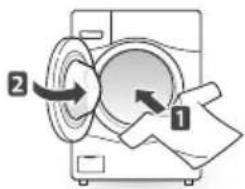
Load the laundry into the washing machine and close the door.
2
Press ①.
- The lights around the cycle selector knob will illuminate and a chime will sound.
3
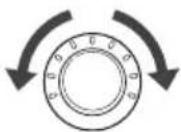
Turn to the desired cycle.
- The proper default option is automatically set according to the wash cycle. See page 23, Cycle Guide, for more detailed default options for each cycle.
- See page 24, Wash Cycles, for details on the wash cycles.
- To change the options, press the option button and select the desired option. See page 25, Setting Options before Cycle, for more details on options.
- Skip to step 4 to use the default setting without changing the options.
4
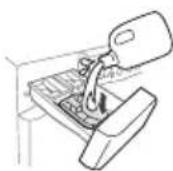
Add the proper amount of detergent and additions (bleach, softener) into the detergent dispenser drawer.
- See page 20, Using Detergent/Fabric Softener, for more details on using detergent.
5

Press
- The washing machine will start.
6
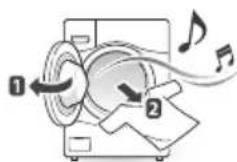
When the melody plays, the wash cycle is finished.
- When the washing cycle is finished, the door will unlock. Open the door and remove the laundry immediately.
- Make sure to check around the door seal when taking out the finished load. Small items may be caught in the door seal.

WARNING
- To reduce the risk of fire, electric shock, or injury to persons, read the IMPORTANT SAFETY INSTRUCTIONS before operating this appliance.

NOTE
- The front-loading washing machine rotates the laundry in a way that allows it to use less water while still fully saturating your clothing. It is normal to not be able to see water during the wash cycle.
- If the temperature or the water level inside the machine is too high, the door locks and cannot be opened. To open the door while washing, use the Rinse + Spin feature.
Cycle Guide
The cycle guide below shows the options and recommended fabric types for each cycle.
= Available option
| CYCLE FA | FABRIC TYPE | BASIC OPTION (★=DEFAULT) ADDITIONAL OPTIONS | |||||||
| Wash Temp. | Spin Speed | Soil Level | Pre Wash | Extra Rinse | Steam | Cold WashTM | Turbo WashTM | ||
| Tub Clean Per | odic use of this cycle helps to prevent mildew or a musty smell. | ● | |||||||
| AllergieneTM | Cotton, underwear, pillow covers, bed sheets, baby wear | Extra High High★ Medium Low No Spin | ● | ● | ● | ||||
| Sanitary Heavily soiled underwear, work clothes, diapers, etc. | Extra Hot★ | Extra High High★ Medium Low No Spin | Heavy ▼ Normal★ ▼ Light | ● | ● | ● | |||
| Bright WhitesTM | White Fabrics (less than 15 lb. (6.8 kg)) | Hot★ Warm Cold Tap Cold | Extra High High★ Medium Low No Spin | Heavy ▼ Normal★ ▼ Light | ● | ● | ● | ● | |
| Bulky/Large Large items such as blankets and comforters | Hot Warm★ Cold Tap Cold | Medium★ Low No Spin | Heavy ▼ Normal★ ▼ Light | ● | ● | ● | ● | ||
| Cotton/ Normal | Cotton, linen, towels, shirts, sheets, jeans, mixed loads | Extra Hot Hot Warm★ Cold Tap Cold | Extra High High★ Medium Low | Heavy ▼ Normal★ ▼ Light | ● | ● | ● | ● | |
| Heavy Duty | Heavy soiled Cotton Fabrics | Hot Warm★ Cold Tap Cold | Extra High★ High Medium Low | Heavy★ ▼ Normal★ ▼ Light | ● | ● | ● | ● | |
| Perm.Press Dress shirts/pants, wrinkle-free clothing, poly/ cotton blend clothing, tablecloths | Hot Warm★ Cold Tap Cold | High Medium★ Low | Heavy ▼ Normal★ ▼ Light | ● | ● | ● | ● | ||
| Hand Wash/Wool | Items labeled "hand-washable" | Warm★ Cold Tap Cold | Low ★ No Spin | Normal★ ▼ Light | ● | ||||
| Delicates Dress shirts/blouses, nylons, sheer or lacy garments | Warm Cold★ Tap Cold | Medium★ Low No Spin | Heavy ▼ Normal★ ▼ Light | ● | ● | ● | |||
| Towels | Towels Hot | Warm★ Cold Tap Cold | Extra High★ High Medium Low No Spin | Heavy ▼ Normal★ ▼ Light | |||||
| Speed Wash Lightly soiled clothing and small loads (less than 3 lb. (1.36 kg)) | Hot★ Warm Cold Tap Cold | Extra High★ High Medium Low No Spin | Heavy ▼ Normal★ ▼ Light | ● | ● | ● | |||
| Drain+Spin Drain, Spin Only | Extra High High★ Medium Low No Spin | ||||||||
- Cycle time depends on type and amount of load and detergent, water pressure and chosen additional options.
- If the Turbo Wash™ option is on, you cannot select "No Spin" as your Spin Speed. (If the Turbo Wash™ option is off, you can select "No Spin" as your Spin Speed.)
- Do not load more than 22 lb. (10 kg) in the washer. (1 thick, dry bath towel = 1 lb.)
Do not use the Sanitary cycle with more than 10 lb. (4.5 kg) of laundry.
Do not use the Hand Wash/Wool cycle with more than 8 lb. (3.6 kg) of laundry. - Do not overload the Bulky/Large cycle. If the washer does not function properly, manually redistribute the load or wash one item at a time.
Wash Cycles
You can wash laundry items more thoroughly by selecting the wash cycle that best suits the type of items to be washed. Turn the to the desired cycle. When you select a wash cycle, the light for the corresponding wash cycle will turn on. See page 22, Basic operation, for more details on operating methods.
Allergiene™ : Reducing Laundry Allergens
This cycle is a powerful, high temperature cycle designed specifically to reduce certain allergens.

NOTE
- Selecting the Allergiene™ cycle automatically incorporates steam into the wash cycle.
- The Allergiene™ cycle can significantly reduce allergens in bedding and clothing.
- The Allergiene™ cycle helps reduce dust mite populations and helps reduce allergens.
- Due to the higher energy and temperatures used, the Allergiene™ cycle is not recommended for wool, silk, leather, or any other delicate or temperature sensitive items
Sanitary: Reducing Laundry Bacteria
This wash cycle helps to remove heavily soiled on laundry through high temperature.
Bright Whites™: White Fabrics
This cycle is for washing white items only.
Bulky/Large : Blankets or Bulky Items
This cycle is for washing blankets or bulky items.
Cotton/Normal : Normal Items
Use this cycle to wash all normal items, except delicate fabrics such as wool or silk.

NOTE
If you press ① and then 出 without selecting another cycle, the washing machine proceeds to Cotton/Normal.
Heavy Duty : Heavily Soiled Items
This cycle is for washing heavily soiled laundry through more powerful tub rotation.
Perm. Press : Wrinkle-Free Items
This cycle is for washing items such as wrinkle-free clothes or tablecloths to minimize wrinkles.
Hand Wash/Wool : Items Labeled Wool or Hand-Wash
This cycle is for washing shrinkable woolen or handwashable items requiring delicate care. Only wash woolen items that are labeled machine washable or hand-washable.

NOTE
- Laundry weight should be less than eight pounds (3.6kg) to prevent damage to the fabric.
- Use only natural or wool-safe detergent harmless to fabrics and load 1/2 of the normal amount of detergent.
- The Hand Wash/Wool cycle uses a gentle tumble rotation angle and low speed spin for the ultimate fabric care.
Delicates : Sheer Items
This cycle is for washing lingerie or sheer and lacy clothes which can easily be damaged.
Towels
This cycle is for washing towels.
Speed Wash : Washing Quickly
Use the Speed Wash cycle to quickly wash lightly soiled clothing and small loads. For high wash and rinse efficiency, wash small loads of 2-3 lightly soiled garments.

NOTE
- Use very little detergent in this cycle. If you want more rinsing, you can add an extra rinse by using the Extra Rinse option button.
Drain+Spin
This cycle is for draining and spinning without the wash and rinse cycle, or for removing the load from the washing machine in the middle of the cycle.
Cycle Modifier Buttons
Each cycle has preset settings that are selected automatically. You may also customize the settings using the cycle modifier buttons. Press the button for that option to view and select other settings.
The washer automatically adjusts the water level for the type and size of wash load for best results and maximum efficiency. It may seem there is no water inside the drum in some cycles, but this is normal.
NOTE
- To protect your garments, not every wash/rinse temperature, spin speed, soil level, or option is available with every cycle. See the Cycle Guide for details.
Setting Options Before Cycle
You can select and add the desired optional functions before you start the washing machine.
Wash Temp.
Set the water temperature for the wash cycle. Set the appropriate temperature, as specified in the fabric care label.
1 Press ① and turn to the desired cycle.
2 Press Peatedly to select the desired water temperature:
- When an optional item is selected, an indication light for the corresponding optional item turns on.
3 Modify other cycle settings and add desired options or proceed to step 4 to begin the cycle.
4 Press
NOTE
Cold rinses use less energy.
- Your washer features a heating element to boost the hot water temperature for Extra Hot settings. This provides improved wash performance at normal water heater settings.
- Select the water temperature suitable for the type of load you are washing. Follow the fabric care label for best results.
Spin Speed
The spin speed for each cycle has been set automatically. To change the spin speed for a cycle, follow the instructions below.
- To protect clothing, follow manufacturers' instructions on fabric care labels.
1 Press ① and turn to the desired cycle.
2 Press Spiepeatedly to select the desired spin speed.
- When you select an option, an indicator light for the corresponding optional item turns on.
3 Modify other cycle settings and add desired options or proceed to step 4 to begin the cycle.
4 Press
NOTE
- The Spin Speed button also activates the Drain & Spin cycle to drain the tub and spin clothes; for example, if you want to remove clothes before the cycle has ended.
Soil Level
You can wash your laundry more thoroughly by setting the proper soil level on the washing machine.
1 Press ① and turn to desired cycle.
2 Press repeatedly to select a soil level.
- The indicator light for the corresponding selection turns on.
3 Modify other cycle settings and add desired options or proceed to step 4 to begin the cycle.
4 Press
NOTE
- Setting heavier soil levels may increase the cycle time. Setting lighter soil levels may decrease the cycle time.
Signal
The washing machine plays a melody when the wash cycle is finished. The buttons make a sound each time a button is pressed. Use this option to adjust the volume of the melody and button tones.
1 Press①.
2 Turn to the desired cycle.
3 Press. Adjust the melody and button tones as desired.
4 Modify other cycle settings and add desired options or proceed to step 5 to begin the cycle.
5 Press
Pre Wash
Prewash for 15 minutes when clothes are covered in dirt or dust. This feature is suitable for heavily soiled items.
1 Press ① and turn to the desired cycle.
2 Press Pre Wash Ligh
3 Modify other cycle settings and add desired options or proceed to step 4 to begin the cycle.
4 Press
Rinse+Spin
Use this cycle to rinse detergent from load.
1 Press Rnse+Spin
2 Modify other cycle settings and add desired options or proceed to step 3 to begin the cycle.
3 Press
Extra Rinse
You can add an extra rinse cycle to the default rinse cycle.
1 Press ① and turn to the desired cycle.
2 Press ExtraRinse light
3 Modify other cycle settings and add desired options or proceed to step 4 to begin the cycle.
4 Press
Delay Wash
Set the desired start time for a cycle.
1 Press ① and turn to the desired cycle.
2 Modify cycle settings and add desired options or proceed to step 3 to set the cycle start time.
3 Press opeatedly to select the desired start time.
- Deley Wash light will turn on.
- The set start time appears on the display panel.
Each press of the button increases the delay time by one hour, up to 19 hours.
4 Press
Steam
Adding the Steam option to these cycles help to enhance washing performance.
By using a hot steam fabrics get the cleaning benefits of a super hot wash.
1 Press ① and turn to the desired cycle.
2 Press The washer will automatically adjust the cycle settings.
3 Set any other desired options.
4 Press
WARNING
- Do not touch the door during steam cycles. The door surface can become very hot. Allow the door lock to release before opening the door.
- Do not attempt to override the door lock mechanism or reach into the washer during a steam cycle. Steam can cause severe burns.
NOTE
- The steam option cannot be used with all cycles.
- Steam may not be clearly visible during the steam cycles. This is normal. Too much steam could damage clothing.
- Do not use steam with delicate fabrics such as wool, silk, or easily discolored fabrics.
Cold Wash™
Adding the Cold Wash™ option reduces energy usage and provides the same washing performance as a warm water wash.
By using six different washing motions (tumbling, rolling, stepping, scrubbing, swing, and filtration) fabrics are cleaned while reducing energy usage.
1 Press ① and turn to the desired cycle.
2 Press Thewasher will automatically adjust the cycle settings.
3 Set any other desired options.
4 Press
NOTE
- When you select the Cold Wash™ option, wash time will be increased up to ten minutes.
- For high wash efficiency, load less than eight pounds of laundry.
Turbo Wash™
Adding the Turbo WashTM option reduces cycle time and provides good performance in normal cycle. By using the Turbo WashTM, We can save the time without sacrificing performance.
1 Press ① and turn to the desired cycle.
2 Press The washer will automatically adjust the cycle settings.
3 Set any other desired options.
4 Press
NOTE
- The Turbo Wash™ option cannot be used with all cycles.
- Turbo Wash™ is available in the beginning of the Cotton/Normal and Perm. Press cycles.
- Press and hold the Turbo Wash™ button to change the default settings.
Fresh Care
Use this function when you are not able to take out your clothes as soon as the wash cycle ends. This function provides periodic tumbling for up to about 19 hours to prevent wrinkles. Press the Start/ Pause or Power button to unload laundry at any time.
1 Press ① and turn to the desired cycle.
2 Press and hold for three seconds. - The light () will turn on.
3 Select any desired options. -Skip to step 4 if you would like to use the default settings without changing or adding any options.
4 Press
Setting Options During Cycle
You can add the desired options during the wash cycle.
Child Lock
This feature locks the controls to prevent children or others from changing the cycle settings by pressing the buttons during the cycle. The feature does not lock the door.
Enabling Child Lock
Press and hold for three seconds during the wash cycle.
- When Child Lock is enabled, a message and the remaining wash time are displayed,in turn,on the display panel of the washing machine.
Disabling Child Lock
Press and hold Pre Wash for three seconds during the wash cycle.
NOTE
- Once the washer has shut off, the Power button allows the machine to be turned on, but the controls are still locked. Press and hold the Pre Wash button for three seconds to disable Child Lock.
Add Garments
Use this function to add garments or remove foreign objects like coins or keys after the cycle has started.
1 Press Add Garments. The cycle pauses and the door unlocks.
2 Open the door, add garments or remove foreign objects, and close the door.
3 Press to restart the cycle. The cycle continues automatically.
NOTE
- After checking the water level/temperature conditions for safety, the door unlocks once the wash movement has stopped. (Door Lock LED turns off.)
- This may take several seconds depending on the water level. When a lot of water is in the tub, the door unlocks after water drains to a safe level.
- If the temperature in the tub is higher than 113^ (45^) , a short warning chime sounds and Add Garments is NOT allowed for safety.
- Add Garments is disabled during the Tub Clean cycle for safety.
- To preserve wash performance, wash time may be extended depending on when garments are added to a cycle.
WARNING
- Be careful when opening the door as wet laundry may drip or fall out when the door is opened.
- Do not attempt to force the door to open when locked. Doing so could result in damage to the machine, malfunction, or personal injury.
- Make sure the area around the door seal is clear before closing the door. If laundry gets caught between the door and the seal, it can damage the rubber gasket and may result in leaking.
Drum Light
The drum is equipped with a white LED light that illuminates when the washer is turned on. This light automatically turns off when the door is closed and the cycle starts. To turn on the light during a cycle.
1 Press ① and turn to the desired cycle.
2 Press
3 Press and hold three seconds during the wash cycle.
- The drum light will illuminate and then turn off automatically after four minutes.
-It is normal for clothing and the gasket to appear yellow under the LED light.
MAINTENANCE
Regular Cleaning
Care After Wash
After the cycle is finished, wipe the door and the inside of the door seal to remove any moisture. Leave the door open to dry the washer tub interior. Wipe the body of the washing machine with a dry cloth to remove any moisture.
WARNING
- Unplug the washer before cleaning to avoid the risk of electric shock. Failure to follow this warning can cause serious injury, fire, electric shock or death.
- Never use harsh chemicals, abrasive cleaners, or solvents to clean the washer. They will damage the finish.
- Do not use volatile substances (benzene, paint thinner, alcohol, acetone, etc.) or detergents with strong chemical components when cleaning the washing machine. Doing so may cause discoloration or damage to the machine, or it may cause a fire.
- Certain internal parts are intentionally not grounded and may present a risk of electric shock only during servicing. Service personnel - Do not contact the following parts while the appliance is energized: pump, valve, motor, control board.
Care in Cold Climates
Long-Term Storage
Follow these instructions when storing the washer for an extended period where it might be exposed to freezing temperatures.
1 Turn off the faucets connected with the water lines.
2 Unscrew the water lines from back of the washer.
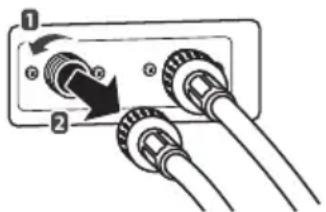
3 Empty any water out of the water lines.
4 Press ①.
5 Open the door and add 1 gallon (3.8 L) of nontoxic recreational vehicle (RV) antifreeze to the empty washer tub. DO NOT use automotive anti-freeze. Close the door.
6 Press Spie Draining and spinning.
7 Press
- Drain the water from the washing machine for 1 minute. Not all of the RV antifreeze will be expelled.
8 Press to turn off the washing machine and pull out the power plug.
9 Dry the tub interior of the washer tub with a soft cloth, and close the door.
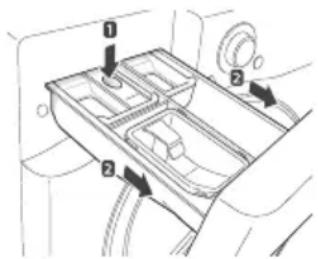
10 Press down hard on the disengage button and pull out the detergent dispenser drawer.
11 Drain the water from the detergent dispenser, drawer and dry out each compartment.
12 Store the washing machine in an upright position.
NOTE
- To remove the antifreeze after storing the washing machine, add detergent to the dispenser, and run one cycle. Do not load any laundry at this time.
Thawing Frozen Water Lines
1 Turn off the faucets connected with the water lines.
2 Pour hot water on the frozen faucets to thaw the water lines and pull them out.
3 Immerse the water lines in hot water to thaw them.
4 Connect the water lines with the water inlets of the washing machine and faucets.
- See page 14, Connecting the water lines for details.
5 Turn on the faucets.
6 Press ①.
7 Press Spin Speed
8 Press. - Verify the water fills properly.
Thawing Frozen Drain Lines
1 Pour hot water in the washer tub and close the door.
-Leave it for 10 minutes.
2 Press ① after 10 minutes.
3 Press for draining and spinning.
4 Press
- Check if the water drains.
Cleaning
Periodically clean the washing machine to help maintain its performance and to minimize the chance of malfunction.
Tub Clean
"Improper installation or use of the washing machine in a humid space for a long period of time potentially could lead to a buildup of detergent residue in the washing machine that may produce mildew or musty smells. If you clean the washer tub regularly on a monthly basis using Tub Clean it will minimize the possibility that detergent residue will build up and mildew or musty smells may occur."
1 Add tub cleaner or lime scale remover into the detergent dispenser drawer.
- Do not exceed the maximum detergent limit line when you add it. Detergent may remain in the washer tub after cleaning.
- When you use liquid chlorine bleach, load it into the liquid chlorine bleach compartment.
- When you use a powdered cleaner, pull out the liquid detergent cup and add it into the main wash detergent compartment.
- When you use cleaning tablets, place them directly into the washer tub. (Do not add tablet cleaner to the drawer.)
2 Press
3 Turn to
- message appears in the display.
- The indication light for Tub Clean turns on.
4 Press
NOTE
- Never load laundry while using Tub Clean. The laundry may be damaged. Make sure to clean the washer tub when it is empty.
- It is recommended to leave the door open after finishing the laundry to keep the tub clean.
It is recommended that Tub Clean should be repeated monthly. - If you notice mildew or musty smells, run Tub Clean for 3 consecutive weeks.
- Safely and conveniently secure the door slightly ajar with a magnetic door plunger. This will promote air circulation and help the machine to dry.
Automatic Alert
When the power is on and the L = L message blinks, it means the washer tub needs cleaning. Use Tub Clean to clean the washer tub. The automatic indication alert for cleaning the washer tub depends on the frequency of use, however, the message will generally blink every 1~2 months.
Removing Mineral Buildup
If you live in an area with hard water, mineral scale can form on the internal components of the washing machine. Take extra care to periodically clean the mineral buildup on the internal components to extend the lifespan of the washing machine.
Check if the descaler is suitable for cleaning the washer tub before using it and run the Tub Clean cycle. See page 30, Tub Clean, for details on tub clean.
NOTE
In areas with hard water, it is recommended to use a water softener.
- Make sure to remove all loads from the washer tub before cleaning the washer tub. Cleaning the washer tub together with a load may result in contamination of or damage to the laundry.
- If using a tub-cleaner to clean the washer tub, use Rinse+Spin to rinse the tub before loading laundry.
Removing Lime Buildup on Stainless Steel
Wipe lime buildup or other spots on stainless steel with a soft cloth soaked in stainless steel cleaner.
NOTE
- Never use steel wool or abrasive cleansers. Doing so may damage the washing machine.
Cleaning the Detergent Dispenser. Drawer
Leaving detergent in the detergent dispenser drawer for an extended period of time or using the washing machine for a long period of time may cause the build-up of scales in the detergent dispenser drawer. Pull out and clean the detergent dispenser drawer once a week.
1 Pull out the detergent dispenser drawer.
2 Press down hard on the disengage button and pull out the detergent dispenser drawer.
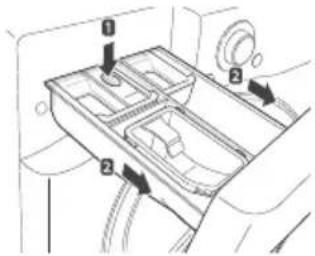
3 Remove the inserts from the drawer.
4 Clean them with warm water.
- Use a soft cloth or brush for cleaning and remove any residue.
5 Wipe any moisture with a dry towel or cloth after cleaning.
6 Replace the detergent dispenser drawer.
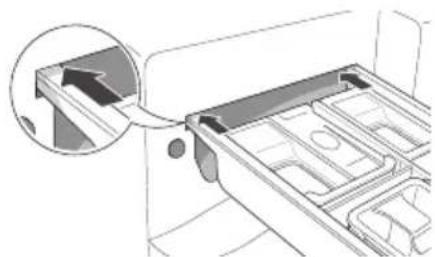
WARNING
- Do not spray water inside the washing machine. Doing so may cause fire or electric shock.
NOTE
- Use water only when cleaning the detergent dispenser drawer.
Cleaning the Water Inlet Filters
Clean the water inlet filters periodically to prevent clogging. Take extra care to clean the water inlet filters for areas using hard water. Water may not be supplied if there are foreign objects, such as rust, sand, or stones in the water inlet filters.
1 Press to turn off the washing machine and pull out the plug.
2 Turn off the faucets connected with the water inlets.
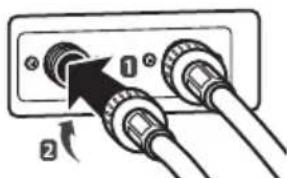
3 Remove the water inlets.
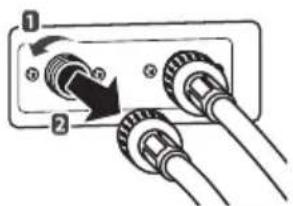
4 Pull out the water inlet filter.
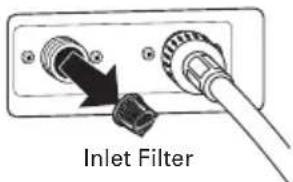
5 Remove foreign objects from the water filter inlet.
- Soak the water filter inlets in white vinegar or a lime scale remover or use a toothbrush to remove foreign objects and rinse thoroughly.
6 Press the water filter inlets back into place.
7 Reattach the water lines to the washing machine.
WARNING
- Unplug the power cord and turn off the faucets before cleaning. Failure to do so may cause electric shock.
- Do not use the washing machine without the inlet filters. If you use the washing machine without the inlet filters it will cause leaks and malfunction.
- If you use the washing machine in an area with hard water, the inlet filter may clog due to lime buildup. Contact your nearest LG customer service center if the inlet filter is not clean or is missing.
NOTE
- i E message will blink on the display when the water pressure in the detergent drawer is weak or an inlet filter is clogged with dirt. Clean the inlet filter.
Cleaning the Drain Pump Filter
The washing machine fails to drain if the drain pump filter is clogged. Periodically clean the drain filter to prevent clogging with foreign objects.
1 Press to turn off the washing machine and pull out the plug.
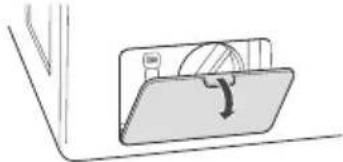
2 Open the drain pump filter cover.
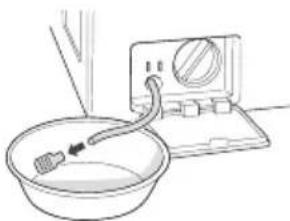
3 Unclip the drain hose and remove the plug from the drain hose to drain the remaining water.
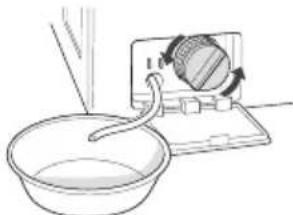
4 Twist the pump filter counterclockwise to remove.
5 Clean the pump filter and opening.
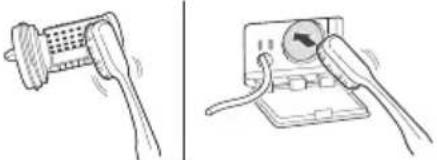
6 Recap the plug onto the drain hose and reattach the drain hose.
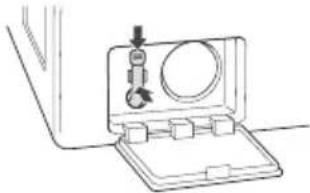
7 Insert the drain pump filter.
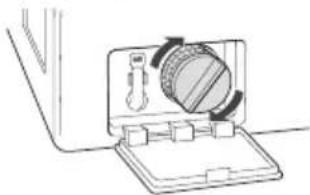
8 Close the drain pump filter cover.
WARNING
- Make sure to unplug the washer before cleaning. Failure to do so may cause electric shock.
- Opening the drain filter will result in water overflowing if there is water in the washer tub. Make sure to check if the water is completely drained before opening the drain filter.
- If you use the washing machine with the drain filter reassembled incorrectly after cleaning it, or if you use the machine without the filter, it may cause leaks or malfunction of the washing machine.
NOTE
- message will blink when the drain pump filter is clogged with dirt. Clean the drain pump filter.
Cleaning the Door Seal
Clean the door seal once a month to prevent buildup of dirt in the door seal.
1 Wear rubber gloves and protective goggles.
2 Dilute 3/4 cup (177 ml) of liquid chlorine bleach in 1 gallon (3.8 L) of water.
3 Soak a sponge or a soft cloth in this diluted solution and wipe all around the door seal.
4 Wipe any moisture with a dry towel or cloth after cleaning.
5 Leave the door open to allow the door seal to dry completely.
CAUTION
- Cleaning the door seal with undiluted liquid chlorine bleach may cause the door seal and washer to malfunction. Dilute the bleach by adding it to water before using it.
TROUBLESHOOTING
Checking Error Messages
If the following message appears on the display, check the following and take the appropriate corrective action.
| Message | Possible Causes Solutions | |
| UE | Item of clothing has gathered on one side of the tub. • There are not enough items in the machine. • Have your items gathered in one area, or is the load too small? • Did you wash a stuffed animal, a mat, or knitwear? • Did you wash two different blankets together? | • Rearrange items to help balance the load. • Stuffed animals or mats can become unbalanced during spinning and the washing machine may fail to drain. • Rearrange the knitwear to help balance the load and drain it again. • Put one blanket in at a time. |
| IE | Water is not supplied or the water pressure is low • Is the faucet turned off? • Is the water supply stopped or the faucet frozen? • Is the water pressure low or is an inlet filter clogged? • Is the water line properly connected with the cold water inlet? • Is the water line pinched or bent? | • Turn on the faucets. • If a faucet is frozen, thaw it with warm water. • If the inlet filter is clogged, clean it. (see page 32) • Connect the water line properly with the cold water inlet. (see page 14) • Check that the water lines are not pinched or bent. Take extra care that water lines are not twisted or pinched by other objects. |
| Water line leaks in connection • Are the water lines connected with the faucets properly? | • Connect the water lines properly with the faucets. (see page 14) | |
| dE! | The tub does not rotate • Is the door secured? | • Close and secure the door. If the message keeps appearing, unplug the power and contact your nearest LG service center. |
| dE2 | ||
| OE | The washing machine drains slowly or not at all • Is the drain hose installed over 3 1/4 feet (1 m) beyond the end of the elbow bracket? • Is the drain hose pinched or clogged inside? • Is the drain hose frozen? • Is the drain hose clogged with foreign objects? | • Lower the drain hose within 3 feet below the end of the elbow bracket. • Place the drain hose on a smooth surface to prevent bending. • If the drain hoses are frozen, thaw them in warm water. • Open the drain pump plug cap and remove the dirt. |
| PF | A power failure has occurred. | • Press◎ to turn off the washing machine and press it again to turn it on. |
| EE | Control Error. | • Unplug the power cord and contact your nearest LG service center. |
| FE | The water supply does not stop • Do the water supply and the drain keep repeating in turn? | • Unplug the power cord and contact your nearest LG service center |
| PE | The water level is not controlled • Is the water level too low or high compared with the size of the load? | • The water level sensor is not working correctly. • Unplug the power cord and contact your nearest LG service center. |
| LE | The tub does not rotate • Is the washing machine overloaded? | • Rearrange the load size and restart the washing machine. • If the load size is big, the tub may not rotate due to an overheated motor. Allow the washing machine to stand for a while and restart the cycle. Unplug the power cord and contact your nearest LG service center if the same error message appears. |
| tcl | • To clean up the tub, please run the Tub Clean cycle. | • Please empty the tub and insert bleach into the detergent dispenser and select the Tub Clean cycle. • If you want to skip the Tub Clean, turn the CYCLE SELECTOR KNOB or push option buttons to select desired cycle. In this case, you would see the message again until few washing times and it would be disappear until next point of time to clean the tub. |
| Sud | • If the washing machine detects too many suds, it displays this error code and adds a Suds Reducing cycle. This adds about two hours to the cycle time. If too many suds are detected during spinning, the washing machine stops to help prevent leaking. | • Do not add more than the manufacturer's recommended amount of detergent. |
Before Calling for Service
Check the following before calling for service.
| Problem Possible | Causes Solutions | |
| Clicking sound | ·Do you hear a sound when you close or lock and unlock the door? | ·This sound is normal and occurs when the door is closed, locked or unlocked. |
| Spraying or hissing sound | ·Is water spraying in the tub? | ·This sound is normal as water is spraying or circulating during the cycle. |
| Buzzing or gushing sound | ·Is the washing machine draining water? | ·This sound is normal as the drain pump drains water from the washing machine after the cycle. |
| Splashing sound | ·Is the washing machine washing a load of laundry? | ·This sound is normal as the load is moving up and down during the wash and rinse cycles. |
| Rattling and clanking noise | ·Are there any foreign objects such as keys, coins, or safety pins in the tub or drain filter? | ·Check if there are any foreign objects in the tub and drain the filter after stopping the cycle. ·Unplug the power cord and contact your nearest LG service center if the noise persists. |
| Thumping sound | ·Is the washing machine overloaded?·Is the load out of balance? | ·This sound is normal and occurs when the load is out of balance. Stop the cycle and rearrange the load for balancing. |
| Vibrating noise | ·Are the shipping bolts removed?·Is the load evenly distributed in the tub?·Is the washing machine level balanced?·Is the washing machine installed on a solid and smooth surface? | ·See page 13, Unpacking and removing shipping bolts to remove the shipping bolts. ·Stop the cycle and rearrange the load for balancing. ·See page 16, Leveling the washing machine to level the washing machine. ·Check if the floor is solid and level. |
| Water leaking around washer | ·Does water leak from a faucet or a water line?·Is a drain pipe or a drain hose clogged? | ·Check the faucets or water lines. -If the water lines are loosely connected, see page 14, Connecting water lines to connect them properly. ·Unclog the drain pipe or drain hose. Contact a plumber if necessary. |
| Excessive suds or failure to rinse | ·Did you use more than the recommended amount of detergent?·Is the soil level higher than the size of the load? | ·Use the recommended amount of detergent for load. ·If the contamination level is low, reduce the detergent quantity to less than the recommended level. Only use detergent with the HE (High-Efficiency) logo. |
| Staining | ·Did you add detergent directly to the tub?·Did you remove the load immediately after it finished?·Did you sort and wash the clothes by color or soil? | ·Make sure to load detergent into the detergent dispenser drawer. ·Remove the load immediately after it finishes. ·Sort and separate dark colors from light or white ones, and heavily soiled items from lightly soiled ones. See page 19, Sorting laundry for details |
| Wrinkling | ·Did you remove the load immediately after it finished? ·Did you overload the tub? ·Did you reverse the hot and cold water inlets? | ·Remove the load immediately after it finishes. ·Do not overload the tub. ·Hot water rinse can cause garments to wrinkle. Check the inlet hose connections. |
| Power is not turned on | ·Is the power cord plugged in properly? ·Has a house fuse blown, a circuit breaker tripped, or a power outage occurred? | ·Make sure that the plug is secured in a grounded 3-prong, 120 V (60 Hz) outlet. ·Reset the circuit breaker or replace the fuse. Do not increase the fuse capacity. If the problem is a circuit overload, have it corrected by a qualified electrician. |
| The door does not open when the cycle pauses or finishes | ·Is the temperature in the tub too high? ·Is the water level in washer high? | ·The washing machine has a safety lock built into the door to prevent burning. Leave the door closed and wait until the door lock icon disappears from the display. ·Allow the washer to complete the programmed cycle, or Press the SPIN button. |
| The wash cycle time is longer than usual | ·Is the washing machine overloaded? Are other options added to the wash cycle? | ·This is normal. The washing machine automatically adjusts the cycle time for the amount of laundry, water pressure, water temperature, and other operating conditions. |
| It is musty or moldy in the tub | ·Has the incorrect detergent been used? ·Did you clean the tub periodically? | ·Use only HE (High-Efficiency) detergent recommended for a front-loading washing machine. ·See page 30, clean the inside and outside of the washing machine periodically. |
| Banging noise when washer is filling with water (Water Hammer) | ·Plumbing in the home moves or flexes when the water valves in the washer shut off. ·Household water supply pressure is very high. | ·Water hammer is not caused by a defect in the washer. Install water hammer arrestors (purchased separately at hardware or home improvement store) between the fill hose and the washer for best results. ·Adjust household water supply regulator to a lower pressure or contact a plumber to have a regulator installed. |
| Odor | ·This odor is caused by the rubber attached to the washing machine. ·If the rubber door gasket and door seal area are not cleaned regularly, odors can occur from mold or foreign substances. ·Odors can occur if foreign substances are left in the drainage pump filter. ·Odors can occur if the drainage hose is not properly installed, causing siphoning (water flowing back inside the washing machine). ·Using the dry function, odors can occur from lint and other laundry matter sticking to the heater. (Dryer model only) ·A particular odor can occur from drying wet clothes with hot air. (Dryer model only) | ·It is the normal odor of new rubber and will disappear after the machine has been run a few times. ·Be sure to clean the gasket and door seal regularly and check under the door seal for small items when unloading the washer. ·Be sure to clean the drainage pump filter regularly. ·When installing the drainage hose, be sure that it doesn't become kinked or blocked. ·This is not a malfunction. ·The odor will disappear after a short while. |
SPECIFICATIONS
| Model WM4370H*A | |
| Description Front-Loading | Washer |
| Electrical requirements 120 | VAC @ 60 Hz. |
| Max. water pressure 20-120 | psi (138-827 kPa) |
| Dimensions 68.6 cm (W) X | 75.6 cm (D) X 98.3 cm (H), 132.2 cm (D with door open) |
| 27" (W) X 29 3/4" (D) X 38 11/6" (H), 52" (D with door open) | |
| Net weight 202.8 lbs (92 kg) | |
| Max. spin speed 1,300RPM | |
SMART FUNCTIONS
LG ThinQ Application
The LG ThinQ application allows you to communicate with the appliance using a smartphone.
Installing LG ThinQ Application
Search for the LG ThinQ application from the Google Play Store on a smart phone. Follow instructions to download and install the application.
LG ThinQ Application Features
For appliances with the Jogo
- The Tag On function can only be used with most smart phones equipped with the NFC (Near Field Communication) function and based on the Android OS (operating system).
Downloaded
Download new and special cycles that are not included in the basic cycles on the appliance. Appliances that have been successfully registered can download a variety of specialty cycles specific to the appliance. Only one cycle can be stored on the appliance at a time. Once cycle download is completed in the appliance, the product keeps the downloaded cycle until a new cycle is downloaded.
Tub Clean Coach
This function shows how many cycles remain before it is time to run the Tub Clean cycle.
Smart Diagnosis™
This function provides useful information for diagnosing and solving issues with the appliance based on the pattern of use.
Settings
Set the product nickname and delete product.
NOTE
- Press in the LG ThinQ application for a more detailed guide on how to use the Tag On function.
- The location of the smartphone's NFC module may vary depending on the phone, and NFC use may be restricted on some smartphones due to differences in transmission methods. Because of the characteristics of NFC, if the transmission distance is too far, or if there is a metal sticker or a protective case on the phone, transmission will not be good. In some cases, NFC-equipped phones may be unable to transmit successfully.
- The content found in this manual may differ from the current version of the LG ThinQ application, and the software may be modified without informing customers.
NFC function would vary depending on smart phones.
Smart Diagnosis™ Function
This feature is only available on models with the or logo.
Use this feature to help you diagnose and solve problems with your appliance.
NOTE
- For reasons not attributable to LGE's negligence, the service may not operate due to external factors such as, but not limited to, Wi-Fi unavailability, Wi-Fi disconnection, local app store policy, or app unavailability.
- The feature may be subject to change without prior notice and may have a different form depending on where you are located.
Using LG ThinQ to Diagnose Issues
If you experience a problem with your Wi-Fi equipped appliance, it can transmit troubleshooting data to a smartphone using the LG ThinQ application.
- Launch the LG ThinQ application and select the Smart Diagnosis™ feature in the menu. Follow the instructions provided in the LG ThinQ application.
Using Audible Diagnosis to Diagnose Issues
Follow the instructions below to use the audible diagnosis method.
- Launch the LG ThinQ application and select the Smart Diagnosis™ feature in the menu. Follow the instructions for audible diagnosis provided in the LG ThinQ application.
1 Press the Power button to turn on the appliance.
- Do not press any other buttons.
2 Hold the mouthpiece of your phone in front of the 念 or 念 logo.
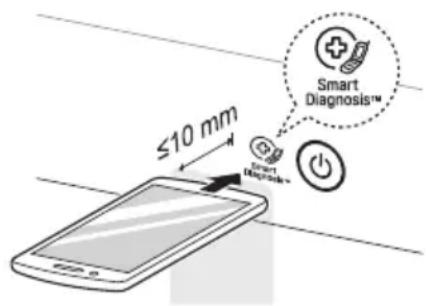
3 Press and hold the Wash Temp. button for 3 seconds or longer while continuing to hold your phone near the logo.
4 Keep the phone in place until the tone transmission has finished. The display will count down the time. Once the count down is over and the tones have stopped, the diagnosis will be displayed in the application.
NOTE
- For best results, do not move the phone while the tones are being transmitted.
LIMITED WARRANTY (CANADA)
ARBITRATION NOTICE: THIS LIMITED WARRANTY CONTAINS AN ARBITRATION PROVISION THAT REQUIRES YOU AND LG TO RESOLVE DISPUTES BY BINDING ARBITRATION INSTEAD OF IN COURT, UNLESS THE LAWS OF YOUR PROVINCE OR TERRITORY DO NOT PERMIT THAT, OR, IN OTHER JURISDICTIONS, IF YOU CHOOSE TO OPT OUT. IN ARBITRATION, CLASS ACTIONS AND JURY TRIALS ARE NOT PERMITTED. PLEASE SEE THE SECTION Titled "PROCEDURE FOR RESOLVING DISPUTES" BELOW.
WARRANTY:
Should your LG Washer ("Product") fail due to a defect in material or workmanship under normal home use during the warranty period set forth below, LG Canada will at its option repair or the Product upon receipt of proof of original retail purchase. This warranty is valid only to the original retail purchaser of the product and applies only to a Product distributed in Canada by LG Canada or an authorized Canadian distributor thereof. The warranty only applies to Products located and used within Canada. Coverage for "in Home" repairs, for products in-warranty, will be provided if the Product is within a 150km radius from the nearest authorized service center (ASC), as determined by LG Canada. If your Product is located outside a 150km radius from a ASC, as determined by LG Canada, it will be your responsibility to bring the Product, at your sole expense, to the ASC for in-warranty repair.
| WARRANTY PERIOD : (Note : If the original date of purchase can not be verified, the warranty will begin sixty(60) days from the date of manufacture). | |||
| Period | One (1) year from the date of original retail purchase | Ten (10) years from the date of original retail purchase | Five (5) years from the date of original retail purchase |
| Scope of Warranty | Parts and Labor (internal/functional parts only) | DD Motor (Stator, Rotor, Hall Sensor) | Stainless Steel Drum |
| Remark | LG will provide parts & labor to repair or replace defective parts. | Extended Component Warranty (Parts Only) (Consumer will be charged for Labor after one (1) year from the date of purchase) | |
Replacement products and parts are warranted for the remaining portion of the original warranty period or ninety (90) days, whichever is greater.
Replacement products and parts may be new or remanufactured.
Proof of original retail purchase specifying the Product model and date of purchase is required to obtain warranty service under this Limited Warranty.
LG Canada's sole liability is limited to the warranty set out above. Except as expressly provided above, LG Canada makes no and hereby disclaims all other warranties and conditions respecting the product, whether express or implied, including, but not limited to, any implied warranty or condition of merchantability or fitness for a particular purpose, and no representations shall be binding on LG Canada. LG Canada does not authorize any person to create or assume for it any other warranty obligation or liability in connection with the product. To the extent that any warranty or condition is implied by law, it is limited to the express warranty period above. LG Canada, the manufacturer or distributor shall not be liable for any incidental, consequential, special, direct or indirect damages, loss of goodwill, lost profits, punitive or exemplary damages or any other damage, whether arising
Directly or indirectly from any contractual breach, fundamental or otherwise, or from any acts or omissions, tort, or otherwise.
This warranty gives you specific legal rights. You may have other rights which may vary from province to province depending on applicable provincial laws. Any term of this warranty that negates or varies any implied condition or warranty under provincial law is severable where it conflicts with provincial law without affecting the remainder of this warranty's terms.
This limited warranty does not cover:
- Service trips to deliver, pick up, or install the product; instructing a customer on operation of the product; repair or replacement of fuses or correction of wiring, or correction of unauthorized repairs/installation.
- Failure of the product to perform during power failures and interruptions or inadequate electrical service.
- Damage caused by leaky or broken water pipes, frozen water pipes, restricted drain lines, inadequate or interrupted water supply or inadequate supply of air.
- Damage resulting from operating the Product in a corrosive atmosphere or contrary to the instructions outlined in the Product owner's manual.
- Damage to the Product caused by accidents, pests and vermin, lightning, wind, fire, floods, or acts of God.
- Damage resulting from the misuse, abuse, improper installation, repair, or maintenance of the Product. Improper repair includes use of parts not approved or specified by LG Canada.
- Damage or product failure caused by unauthorized modification or alteration, or use for other than its intended purpose, or resulting from any water leakage due to improper installation.
- Damage or Product failure caused by incorrect electrical current, voltage, commercial or industrial use, or use of accessories, components, or cleaning products that are not approved by LG Canada.
- Damage caused by transportation and handling, including scratches, dents, chips, and/or other damage to the finish of your product, unless such damage results from defects in materials or workmanship and is reported within one (1) week of delivery.
- Damage or missing items to any display, open box, discounted, or refurbished Product.
- Products with original serial numbers that have been removed, altered, or cannot be readily determined. Model and Serial numbers, along with original retail sales receipt, are required for warranty validation.
- Increases in utility costs and additional utility expenses.
- Replacement of light bulbs, filters, or any consumable parts.
- Repairs when your Product is used in other than normal and usual household use (including, without limitation, commercial use, in offices or recreational facilities) or contrary to the instructions outlined in the Product owner's manual.
- Costs associated with removal of the Product from your home for repairs.
- The removal and reinstallation of the Product if it is installed in an inaccessible location or is not installed in accordance with published installation instructions, including the Product owner's and installation manuals.
- Accessories to the Product such as door bins, drawers, handles, shelves, etc. Also excluded are parts besides those that were originally included with the Product.
All costs associated with the above excluded circumstances shall be borne by the consumer.
For complete warranty details and customer assistance, please call or visit our website:
Call 1-888-542-2623 (7 A.M to 12 A.M., 365 days a year) and select the appropriate option from the menu, or visit our website at www.lg.com
Write your warranty information below:
Product Registration Information:
Model:
Serial Number:
Date of Purchase:
PROCEDURE FOR RESOLVING DISPUTES(FOR CANADIAN PRODUCTS):
EXCEPT WHERE PROHIBITED AT LAW, ALL DISPUTES BETWEEN YOU AND LG ARISING OUT OF OR RELATING IN ANY WAY TO THIS LIMITED WARRANTY OR THE PRODUCT SHALL BE RESOLVED EXCLUSIVELY THROUGH BINDING ARBITRATION, AND NOT IN A COURT OF GENERAL JURISDICTION. EXCEPT WHERE PROHIBITED AT LAW, YOU AND LG BOTH IRREVOCABLY AGREE TO WAIVE THE RIGHT TO A JURY TRIAL AND TO BRING OR PARTICIPATE IN A CLASS ACTION.
Definitions. For the purposes of this section, references to "LG" mean LG Electronics Canada, Inc., its parents, subsidiaries and affiliates, and each of their officers, directors, employees, agents, beneficiaries, predecessors in interest, successors, assigns and suppliers; references to "dispute" or "claim" shall include any dispute, claim or controversy of any kind whatsoever (whether based in contract, tort, statute, regulation, ordinance, fraud, misrepresentation or any other legal or equitable theory) arising out of or relating in any way to the sale, condition or performance of the product or this Limited Warranty.
Notice of Dispute. In the event you intend to commence an arbitration proceeding, you must first notify LG in writing at least 30 days in advance of initiating the arbitration by sending a letter to LGECI Legal Team at 20 Norelco Drive, North York, Ontario, Canada M9L 2X6 (the "Notice of Dispute"). You and LG agree to engage in good faith discussions in an attempt to amicably resolve your claim. The notice must provide your name, address, and telephone number; identify the product that is the subject of the claim; and describe the nature of the claim and the relief being sought. If you and LG are unable to resolve the dispute within 30 days of LG's receipt of the Notice of Dispute, the dispute shall be resolved by binding arbitration in accordance with the procedure set out herein. You and LG both agree that, during the arbitration proceeding, the terms (including any amount) of any settlement offer made by either you or LG will not be disclosed to the arbitrator until the arbitrator determines the dispute.
Agreement to Binding Arbitration and Class Action Waiver. Upon failure to resolve the dispute during the 30 day period after LG's receipt of the Notice of Dispute, you and LG agree to resolve any claims between you and LG only by binding arbitration on an individual basis, unless you opt out as provided below, or you reside in a jurisdiction that prevents full application of this clause in the circumstances of the claims at issue (in which case if you are a consumer, this clause will only apply if you expressly agree to the arbitration). To the extent permitted by applicable law, any dispute between you and LG shall not be combined or consolidated with a dispute involving any other person's or entity's product or claim. More specifically, without limitation of the foregoing, except to the extent such a prohibition is not permitted at law, any dispute between you and LG shall not under any circumstances proceed as part of a class or representative action. Instead of arbitration, either party may bring an individual action in small claims court, but that small claims court action may not be brought on a class or representative basis except to the extent this prohibition is not permitted at law in your province or territory of jurisdiction as it relates to the claims at issue between you and LG.
Arbitration Rules and Procedures. To begin arbitration of a claim, either you or LG must make a written demand for arbitration. The arbitration will be private and confidential, and conducted on a simplified and expedited basis before a single arbitrator chosen by the parties under the provincial or territorial commercial arbitration law and rules of the province or territory of your residence. You must also send a copy of your written demand to LG at LG Electronics, Canada, Inc., Attn: Legal Department- Arbitration, 20 Norelco Drive, North York, Ontario M9L 2X6. This arbitration provision is governed by your applicable provincial or territorial commercial arbitration legislation. Judgment may be entered on the arbitrator's award in any court of competent jurisdiction. All issues are for the arbitrator to decide, except that, issues relating to the scope and enforceability of the arbitration provision and to the arbitrability of the dispute are for the court to decide. The arbitrator is bound by the terms of this provision.
Governing Law. The law of the province or territory of your purchase shall govern this Limited Warranty and any disputes between you and LG except to the extent that such law is preempted by or inconsistent with applicable federal or provincial/territorial law. Should arbitration not be permitted for any claim, action, dispute or controversy between you and LG, you and LG attend to the exclusive jurisdiction of the courts of the province or territory of your purchase for the resolution of the claim, action, dispute or controversy between you and LG.
Fees/Costs. You do not need to pay any fee to begin an arbitration. Upon receipt of your written demand for arbitration, LG will promptly pay all arbitration filing fees unless you seek more than $25,000 in damages, in which case the payment of these fees will be governed by the applicable arbitration rules. Except as otherwise provided for herein, LG will pay all filing, administration and arbitrator fees for any arbitration initiated in accordance with the applicable arbitration rules and this arbitration provision. If you prevail in the arbitration, LG will pay your attorneys' fees and expenses as long as they are reasonable, by considering factors including, but not limited to, the purchase amount and claim amount. Notwithstanding the foregoing, if applicable law allows for an award of reasonable attorneys' fees and expenses, an arbitrator can award them to the same extent that a court would. If the arbitrator finds either the substance of your claim or the relief sought in the demand is frivolous or brought for an improper purpose (as measured by the applicable laws), then the payment of all arbitration fees will be governed by the applicable arbitration rules. In such a situation, you agree to reimburse LG for all monies previously disbursed by it that are otherwise your obligation to pay under the applicable arbitration rules. Except as otherwise provided for, LG waives any rights it may have to seek attorneys' fees and expenses from you if LG prevails in the arbitration.
Hearings and Location. If your claim is for 25,000 or less, you may choose to have the arbitration conducted solely (1) on the basis of documents submitted to the arbitrator, (2) through a telephonic hearing, or (3) by an in-person hearing as established by the applicable arbitration rules. If your claim exceeds 25,000, the right to a hearing will be determined by the applicable arbitration rules. Any in-person arbitration hearings will be held at the nearest, most mutually-convenient arbitration location available within the province or territory in which you reside unless you and LG both agree to another location or agree to a telephonic arbitration.
Severability and Waiver. If any portion of this Limited Warranty (including these arbitration procedures) is unenforceable, the remaining provisions will continue in full force and effect to the maximum extent permitted by applicable law. Should LG fail to enforce strict performance of any provision of this Limited Warranty (including these arbitration procedures), it does not mean that LG intends to waive or has waived any provision or part of this Limited Warranty.
Opt Out. You may opt out of this dispute resolution procedure. If you opt out, neither you nor LG can require the other to participate in an arbitration proceeding. To opt out, you must send notice to LG no later than 30 calendar days from the date of the first consumer purchaser's purchase of the product by either (i) sending an e-mail to optout@lge.com, with the subject line: "Arbitration Opt Out;" or (ii) calling 1-800-980-2973. You must include in the opt out e-mail or provide by telephone: (a) your name and address; (b) the date on which the product was purchased; (c) the product model name or model number; and (d) the serial number (the serial number can be found (i) on the product; or (ii) online by accessing https://www/lg.com/ca_en/support/ repair-service/schedule-repair and clicking on "Find My Model & Serial Number").
In the event that you "Opt Out", the law of the province or territory of your residence shall govern this Limited Warranty and any disputes between you and LG except to the extent that such law is preempted by or inconsistent with applicable federal or provincial/territorial law. Should arbitration not be permitted for any claim, action, dispute or controversy between you and LG, you and LG agree to attain to the exclusive jurisdiction of the courts of the province or territory of your residence for the resolution of the claim, action, dispute or controversy between you and LG.
You may only opt out of the dispute resolution procedure in the manner described above (that is, by e-mail or telephone); no other form of notice will be effective to opt out of this dispute resolution procedure. Opting out of this dispute resolution procedure will not affect the coverage of the Limited Warranty in any way, and you will continue to enjoy the full benefits of the Limited Warranty. If you keep this product and do not opt out, then you accept all terms and conditions of the arbitration provision described above.
Conflict of Terms. In the event of a conflict or inconsistency between the terms of this Limited Warranty and the End User License Agreement ("EUL A") in regards to dispute resolution, the terms of this Limited Warranty shall control and govern the rights and obligations of the parties and shall take precedence over the EULA.
THIS LIMITED WARRANTY DOES NOT COVER THE FOLLOWING CASES
With regard to damages or failures resulting from misuse, improper installation, maintenance, natural disaster or repair (unauthorized technician or parts, as specified by LG), customer will be charged for the repair.
| Strange vibration or noise caused by not removing shipping bolts or tub support. | → | Tub support Carton base shipping bolts | Remove the shipping bolts and tub support. |
| Leakage caused by dirt (hair, lint) on gasket and door glass. | → | Clean the gasket & door glass. | |
| Not draining due to clogged pump filter. | → | Clean the pump filter. | |
| Water is not filling properly because water inlet valve filters are clogged or water inlet hoses are kinked. | → | Inlet Filter | Clean the inlet valve filter or reinstall the water inlet hoses. |
| Water is not filling properly because too much detergent use. | → | Dispenser | Clean the detergent disperser drawer. |
| Laundry is hot or warm after finished washing because the inlet hoses are installed in reverse. | → | Cold Water Inlet Hot Water Inlet | Reinstall the inlet hoses. |
| Water is not supplied because the water tap is not turned on. | → | water tap | Turn on the water tap. |
| Leakage caused by improper installation of drain hose or clogged drain hose. | → | Elbow Bracket Tie Strap | Reinstall the drain hose. |
| Leakage caused by improper installation of water inlet hose or use of non-LG hoses. | → | Reinstall the inlet hose. | |
| Lack of power caused by loose connection of power cord or electrical outlet problem. | Reconnect the power cord or change the electrical outlet. | ||
| Service trips to deliver, pick up, install the product or for instruction on product use. The removal and reinstallation of the Product. | Level 1° The warranty covers manufacturing defects only. Service resulting from improper Installation is not covered. | ||
| If all screws are not installed properly, it may cause excessive vibration (Pedestal model only). | Install 4 screws at each corner (Total 16EA). | ||
MANUEL D'UTILISATION
LAVEUSE

CARACTERISTIQUES DU PRODUIT
MOTEUR INVERSEUR A ENTRAINEMENT DIRECT
2 CARACTERISTIQUES DU PRODUIT
4 IMPORTANTES DIRECTIVES DE SECURITE
4 PRECAUTIONS DE SECURITE DE BASE
5 INSTRUCTIONS DE MISE À LA TERRE
6 PRECAUTIONS DE SECURITE POUR L'INSTALLATION
7 PRECAUTIONS DE SECURITE POUR L'UTILISATION, L'ENTRETIEN, LE NETTOYAGE ET LA MISE AU REBUT
8 APERCU DU PRODUIT
Compartment à assouplissant liquide
Drain+Spin: Evacuation et essorage
Application LG ThinQ
This product qualifies for ENERGY STAR in the
"factory default (Home Use)" setting.
Changing the factory default settings or enabling other features may increase power consumption that could exceed the limits necessary to quality for ENERGY STAR.
LG Customer Information Center
For inquiries or comments,
visit www.lg.com or call:
1-800-243-0000 U.S.A.
1-888-542-2623 CANADA
Register your product Online!
www.lg.com