
WK4PL10CN - Wine cellar ELECTROLUX - Free user manual and instructions
Find the device manual for free WK4PL10CN ELECTROLUX in PDF.
| Product type | Wine cellar |
| Brand | Electrolux |
| Model | WK4PL10CN |
| Capacity (Bordeaux bottles 750 ml) | 18 |
| Temperature range | 5 to 20 °C (adjustable in steps of 1 °C) |
| Climate classes | SN (10-32 °C), N (16-32 °C), ST (16-38 °C), T (16-43 °C) |
| Dimensions (H x W x D) | 455 x 596 x 571 mm (required installation space) |
| Weight (estimated) | approx. 30 kg |
| Power supply | 220-240 V, 50 Hz (check on rating plate) |
| Refrigerant | Isobutane (R600a) |
| Interior lighting | LED (switchable independently of door) |
| Control panel | Digital display with touch keys: ON/OFF, lighting, temperature +/-, lock |
| Number of shelves | 3 removable wooden shelves, horizontal configuration possible |
| Temperature memory function | Yes, retains setting in case of power failure |
| Key lock | Yes, can be activated/deactivated (long press on + and lighting) |
| Demo mode (display) | Yes, can be activated/deactivated (long press on + and -) |
| Door opening | Push left side (release mechanism) |
| Child safety | Can be used by children aged 3 to 8 under supervision |
| Maintenance and cleaning | Clean interior with warm water + baking soda solution; do not use abrasive products |
| Spare parts available (after model discontinuation) | Thermostats, sensors, boards, LEDs, handles, hinges, gaskets (10 years), etc. |
| Parts availability period | 7 years for most parts, 10 years for door gaskets |
| Warranty | To be confirmed according to the retailer; contact after-sales service |
Frequently Asked Questions - WK4PL10CN ELECTROLUX
User questions about WK4PL10CN ELECTROLUX
0 question about this device. Answer the ones you know or ask your own.
Ask a new question about this device
Download the instructions for your Wine cellar in PDF format for free! Find your manual WK4PL10CN - ELECTROLUX and take your electronic device back in hand. On this page are published all the documents necessary for the use of your device. WK4PL10CN by ELECTROLUX.
USER MANUAL WK4PL10CN ELECTROLUX
EN Wine Cellar User manual 2
WE'RE THINKING OF YOU
Thank you for purchasing an Electrolux appliance. You've chosen a product that brings with it decades of professional experience and innovation. Ingenious and stylish, it has been designed with you in mind. So whenever you use it, you can be safe in the knowledge that you'll get great results every time. Welcome to Electrolux.
Visit our website for:

Get usage advice, brochures, trouble shooter, service information: www.electrolux.com

Register your product for better service: www.electrolux.com/productregistration

Buy Accessories, Consumables and Original spare parts for your appliance: www.electrolux.com/shop
CUSTOMER CARE AND SERVICE
We recommend the use of original spare parts.
When contacting Service, ensure that you have the following data available.
The information can be found on the rating plate. Model, PNC, Serial Number.

Warning / Caution-Safety information.

General information and tips.

Environmental information.
Subject to change without notice.
1. SAFETY INFORMATION
Before the installation and use of the appliance, carefully read the supplied instructions. The manufacturer is not responsible if an incorrect installation and use causes injuries and damages. Always keep the instructions with the appliance for future reference.
1.1 Children and vulnerable people safety
- This appliance can be used by children aged from 8 years and above and persons with reduced physical, sensory or mental capabilities or lack of experience and knowledge if they have been given supervision or instruction concerning use of the appliance in a safe way and understand the hazards involved.
- This appliance may be used by children between 3 and 8 years of age and persons with very extensive and complex disabilities, if they have been properly instructed.
- Children of less than 3 years of age should be kept away from the appliance unless continuously supervised.
- Do not let children play with the appliance.
- Children shall not carry out cleaning and user maintenance of the appliance without supervision.
- Keep all packaging away from children and dispose of it appropriately.
1.2 General Safety
- This appliance is intended to be used in household and similar applications such as:
- Farm houses; staff kitchen areas in shops, offices and other working environments
- By clients in hotels, motels, bed and breakfast and other residential type environments
- Use this appliance for storage of wine only.
- WARNING: Keep ventilation openings, in the appliance enclosure or in the built-in structure, clear of obstruction.
- WARNING: Do not use mechanical devices or other means to accelerate the defrosting process, other than those recommended by the manufacturer.
- WARNING: Do not damage the refrigerant circuit.
- WARNING: Do not use electrical appliances inside the food storage compartments of the appliance, unless they are of the type recommended by the manufacturer.
- Do not use water spray and steam to clean the appliance.
- Clean the appliance with a moist soft cloth. Only use neutral detergents. Do not use abrasive products, abrasive cleaning pads, solvents or metal objects.
- Do not store explosive substances such as aerosol cans with a flammable propellant in this appliance.
- If the supply cord is damaged, it must be replaced by the manufacturer, its service agent or similarly qualified persons in order to avoid a hazard.
- This appliance is not intended for professional and commercial use
2. SAFETY INSTRUCTIONS
2.1 Service
- To repair the appliance contact an Authorised Service Centre. Use original spare parts only.
- Please note that self-repair or non-professional repair can have safety consequences and might void the guarantee.
- The following spare parts will be available for 7 years after the model has been discontinued: thermostats, temperature sensors, printed circuit boards, light sources, door handles, door hinges, trays and baskets. Please note that some of these spare parts are only available to professional repairers, and that not all spare parts are relevant for all models.
- Door gaskets will be available for 10 years after the model has been discontinued.
2.2 Installation

WARNING! Only a qualified person must install this appliance.
- Remove all the packaging.
- Do not install or use a damaged appliance.
- Obey the installation instruction supplied with the appliance.
• Always be careful when you move the appliance because it is heavy. Always wear safety gloves. - Make sure the air can circulate around the appliance.
- Wait at least 4 hours before connecting the appliance to the power supply. This is to allow the oil to flow back in the compressor.
- Do not install the appliance close to radiators or cookers, oven or hobs.
- The rear of the appliance must stand against the wall.
- Do not install the appliance where there is direct sunlight.
- Do not install this appliance in areas that are too humid or too colds, such as the construction appendices, garages or wine cellars.
- When you move the appliance, lift it by the front edge to avoid scratching the floor.
2.3 Electrical connection

WARNING! Risk of fire and electrical shock.

WARNING! When positioning the appliance, ensure the supply cord is not trapped or damaged.

WARNING! Do not use multi-plug adapters and extension cables.
• The appliance must be earthed.
- All electrical connections should be made by a qualified electrician.
- Make sure that the electrical information on the rating plate agrees with the power supply. If not, contact an electrician.
- Always use a correctly installed shock-proof socket.
- Do not use multi-plug adapters and extension cables.
- Make sure not to cause damage to the electrical components (e.g. mains plug, mains cable, compressor). Contact the Service or an electrician to change the electrical components.
- The mains cable must stay below the level of the mains plug.
- Connect the mains plug to the mains socket only at the end of the installation. Make sure that there is access to the mains plug after the installation.
- Do not pull the mains cable to disconnect the appliance. Always pull the mains plug.
- When positioning the appliance, ensure the supply cord is not trapped or damaged.
- Do not locate multiple portable socketoutlets or portable power supplies at the rear of the appliance.
2.4 Use

WARNING! Risk of injury, burns, electrical shock or fire.

The appliance contains flammable gas, isobutane (R600a), a natural gas with a high level of environmental compatibility. Be careful not to cause damage to the refrigerant circuit containing isobutane.
- Do not change the specification of this
- appliance.
- Do not put electrical appliances (e.g. ice cream makers) in the appliance unless they are stated applicable by the manufacturer.
- If damage occurs to the refrigerant circuit, make sure that there are no flames and sources of ignition in the room. Ventilate the room.
- Do not let hot items to touch the plastic parts of the appliance.
- Do not put soft drinks in the freezer compartment. This will create pressure on the drink container.
- Do not store flammable gas and liquid in the appliance.
- Do not put flammable products or items that are wet with flammable products in, near or on the appliance.
- Do not touch the compressor or the condenser. They are hot.
2.5 Internal light

WARNING! Risk of electric shock
- Concerning the lamp(s) inside this product and spare part lamps sold separately: These lamps are intended to withstand extreme physical conditions in household appliances, such as temperature, vibration, humidity, or are intended to signal information about the operational status of the appliance. They are not intended to be used in other applications and are not suitable for household room illumination.
2.6 Care and cleaning

WARNING! Risk of injury or damage to the appliance.
- Before maintenance, deactivate the appliance and disconnect the mains plug from the mains socket.
- This appliance contains hydrocarbons in the cooling unit. Only a qualified person must do the maintenance and the recharging of the unit.
- Regularly examine the drain of the appliance and if necessary, clean it. If the drain is blocked, defrosted water collects in the bottom of the appliance.
- Dusts behind the wine cellar and on the ground shall be timely cleaned to improve the cooling effect and energy saving.
- The interior of the wine cellar should be cleaned regularly to avoid odor.
- Check the door gasket regularly to make sure there are no debris.
- Please turn off the power before cleaning, remove all food, shelves, drawers, etc.
- Clean the door gasket with mild soap and water.
- Use a soft cloth or sponge to clean the inside of the wine cellar, with two tablespoons of baking soda and a quart of warm water. Then rinse with water and wipe clean, and open the door and dry it naturally before the power is turned on.
- For areas that are difficult to clean in the wine cellar(such as narrow sandwiches, gaps or corners), it is recommended to wipe them regularly with a soft rag, soft brush, etc. and when necessary, combined with some auxiliary tools (such as thin sticks) to ensure no contaminant accumulation in these areas.
- Do not use soap, detergent, scrub powder, spray cleaner, etc., as these may cause odors in the interior of the wine cellar.
-
Clean the bottle frame, shelves and drawers with a mild detergent and dry with a soft cloth.
-
Wipe the outer surface of the wine cellar with a soft cloth dampened with soapy water, detergent, etc., and then wipe dry.
- Do not use hard brushes, clean steelballs, wire brushes, abrasives, such as toothpastes, organic solvents (such as alcohol, acetone, banana oil, etc.), boiling water, acid or alkaline items clean wine cellar considering that this may damage the fridge surface and interior. Boiling water and benzene may deform or damage plastic parts.
- Do not rinse with water so as not to affect the electrical insulation properties.
2.7 Disposal

WARNING! Risk of injury or suffocation.
- Disconnect the appliance from the mains supply.
• Cut off the mains cable and discard it. - Remove the lid to prevent children and pets to be closed inside of the appliance.
- The refrigerant circuit and the insulation materials of this appliance are ozone-friendly.
- The insulation foam contains flammable gas. Contact your municipal authority for information on how to discard the appliance correctly.
- Do not cause damage to the part of the cooling unit that is near the heat exchanger.
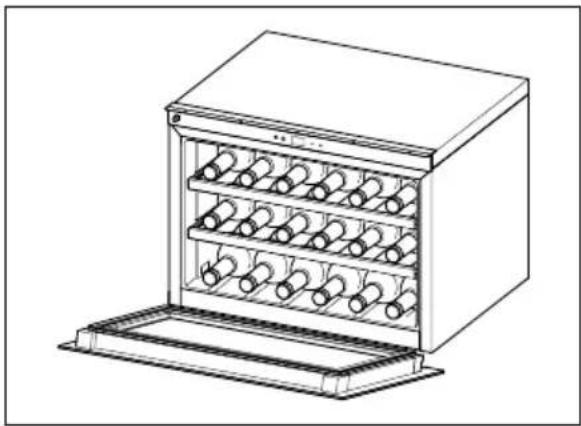
3. PRODUCT DESCRIPTION
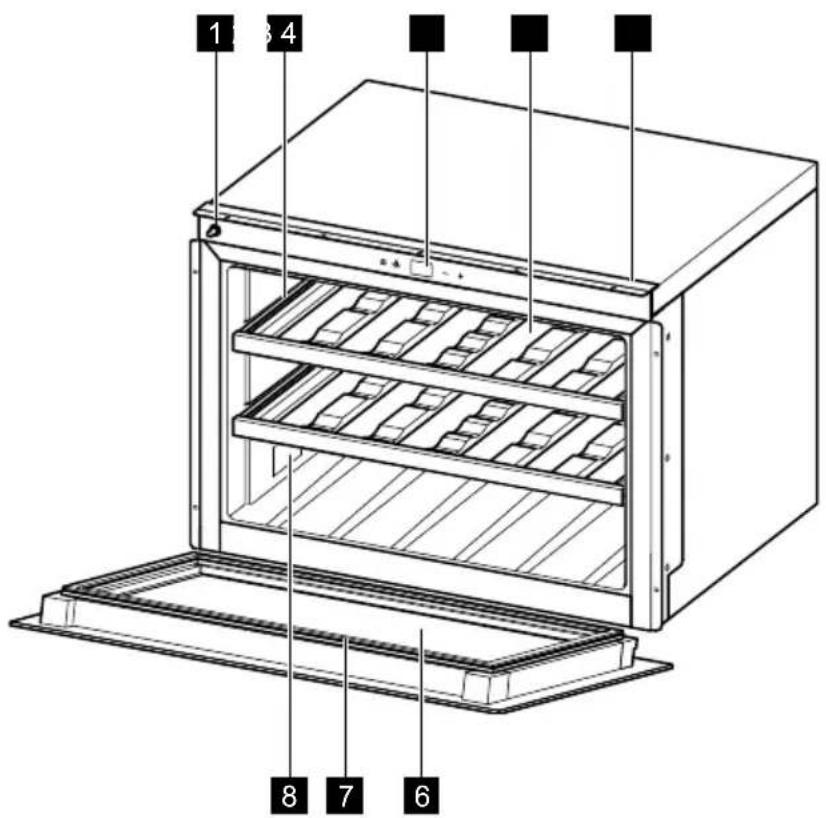
1 Door Release Mechanism
2 Telescopic runners
3 Control panel
4 Shelves
5 Fastening bar
6 Door
7 Gasket
8 Rating plate
4. CONTROL PANEL
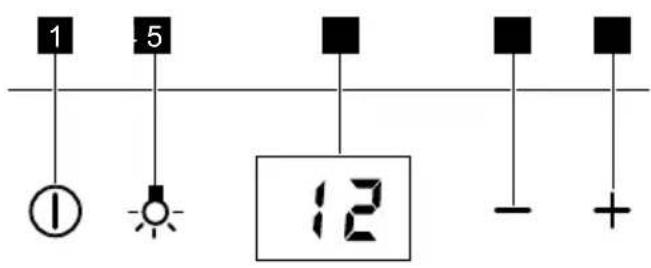
1 ON/OFF key
2 Light key
3 Display
4 Temperature colder key
5 Temperature warmer key
4.1 On/Off switch and temperature setting
To switch on the appliance press the ON/OFF key.
The display shows the set default temperature (12°C).
The temperature can be adjusted from 5° to 20°C (with steps of 1°C) by touching the -/+ key.
To switch off the appliance press the ON/OFF key for 5 seconds.
4.2 Light Key
When the door is opened, the LED light is on, when closed is off. If you want to keep the light on with the door closed, open the door, and press the light key.
If you want to restore the standard conditions, press the light key again.
4.3 Display
The display shows the temperature set, the error messages, if the demo mode is selected, if the keys are locked.
4.4 Lock keys mode
Press the + key and the light key for 3 seconds to activate the lock keys mode.
The appliance will continue to work with the last settings.
To deactivate the lock keys mode, do the same procedure.
By selecting this function, the message "bl" appears on display touching any key.
4.5 Demo Mode
DEMO MODE has been created for exhibitions and showroom purposes.
The display will be ON with possibility to change the temperatures but the Cooling motor will be OFF.
To activate or deactivate the DEMO MODE, Press + and - simultaneously for 3 seconds.
Display will show the ON for 5 seconds, then the temperature will be showed again.
It is possible to keep the inner led light turned ON also when the door is closed.
Press the Light key to activate the light ON mode.
5. USE
5.1 Daily Use
This appliance is intended to be used exclusively for the storage of wine
i Wine storage compartment is the one marked (on rating plate) with
Cleaning
Before using the appliance for the first time, wash the interior and all internal accessories with lukewarm water and some neutral soap in order to remove the typical smell of a brand-new product, then dry thoroughly.
- Opening the door for long periods can cause a significant increase of the temperature in the compartments of the appliance.
- Clean regularly surfaces that can come in contact with food and accessible drainage systems.
- Store raw meat and fish in suitable containers in the wine cellar, so that it is not in contact with or drip onto other food.
- If the refrigerating appliance is left empty for long periods, switch off, defrost, clean, dry, and leave the door open to prevent mould developing within the appliance.
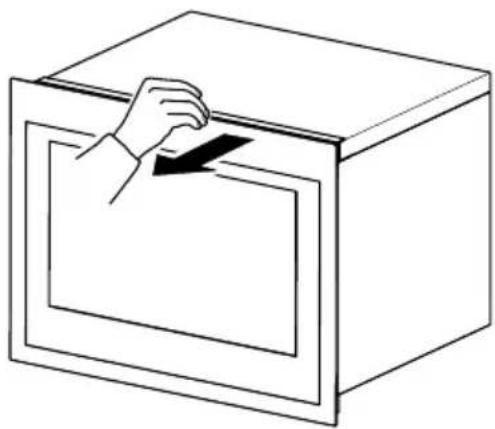
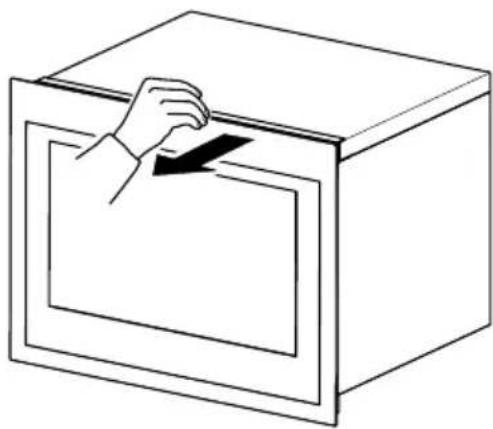
5.2 Door Opening
To open the door:
- push in the left side of the door panel, to open the door
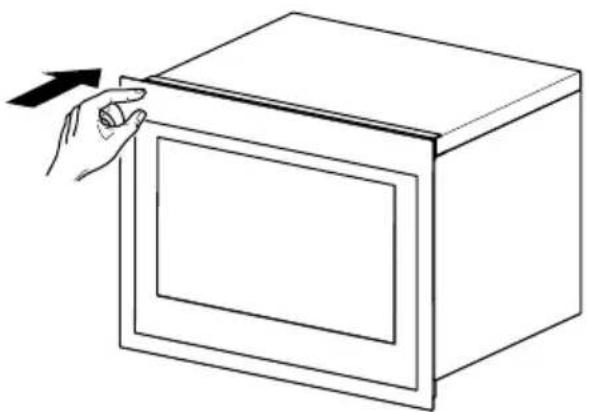
natural_image
Line drawing of a hand opening a square oven with an arrow indicating left motion (no text or symbols)- or pull it

natural_image
Line drawing of a hand placing a dark object into a rectangular box (no text or symbols)5.3 First Use
Before using the appliance for the first time, wash the interior and all internal accessories with lukewarm water and some neutral soap, then dry thoroughly.
Do not use detergents or abrasive powders, as these will damage the finishing.
To turn on the appliance, press ON/OFF key and adjust temperature according to the wine stored.
5.4 Temperature Recollection Function
In the event of a power cut, the wine cellar can remember the previous temperature setting, and when power is recovered, the temperature will go back to the original.
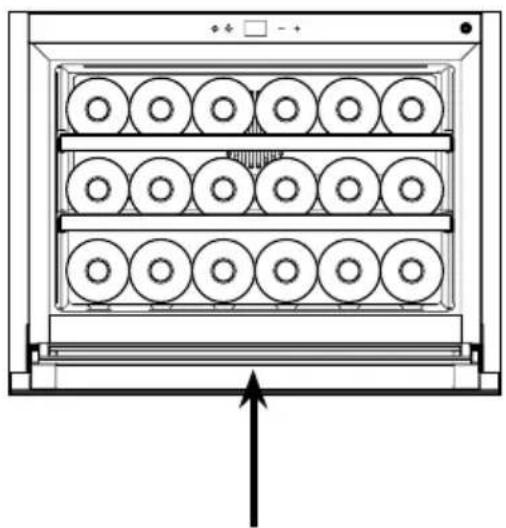
5.5 Wine Storage
natural_image
Line drawing of a multi-tiered stainless steel refrigerator with shelves and top platform (no text or symbols)The storage time for wine depends on ageing, the type of grapes, alcoholic content and level of fructose and tannin contained in it. At the time of purchase, check if the wine is already aged or if it will improve over time.
Preservation temperature suggested:
- Champagne/Prosecco and Sparkling wines +6 to +8°C
- White Wines +10 to +12°C
- Rosé wines +12 to +16°C
- Red Wines +14 to +18°C
(for 750 ml Bordeaux bottles)
Total: 18 bottles
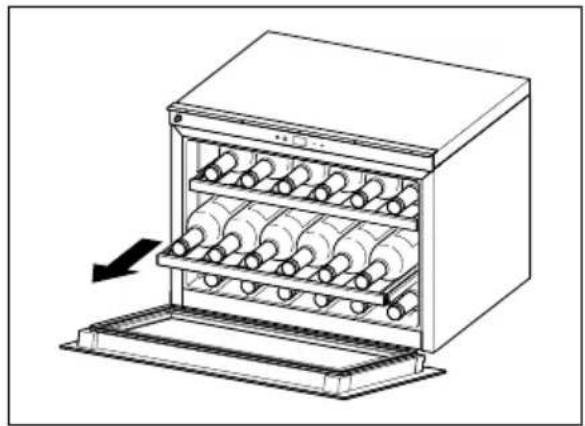
5.6 Wine Shelves
natural_image
Line drawing of a multi-tiered stainless steel oven with cooling fins and a black arrow indicating airflow direction (no text or symbols)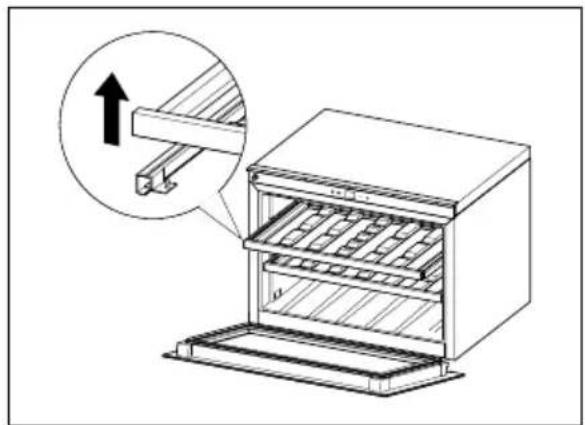
natural_image
Technical line drawing of a refrigerator with an inset showing a mechanical component (no text or symbols)- For easy access to the bottles, pull the shelves out of the rail compartment.

To prevent damaging the door, make sure that the door is fully opened when pulling shelves out.
• To remove or fit the wooden shelves lift or push the shelf.
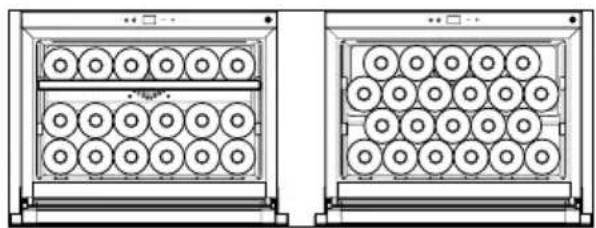
- Standard configuration
To store up to 18 bordeaux bottles placing 6 bottles each level.
natural_image
Diagram of a multi-tiered rack-mounted appliance with circular components, no text or symbols presentThe first level has been designed to accommodate larger and taller bottles.
natural_image
Two identical technical diagrams showing circular arrangements inside a rack or enclosure (no text or symbols)Suitable for large and tall bottles.
By removing the shelves is possible to increase the capacity as showed in the pictures.

WARNING! Please ensure in this case that the bottles do not come in contact with the backwall of the cavity.
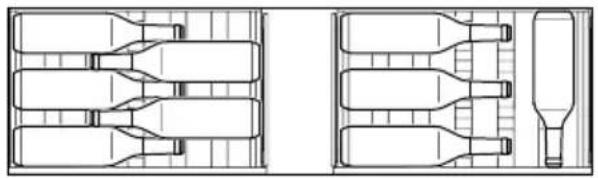
• Horizontal configuration
natural_image
Technical line drawing of two symmetrical mechanical or fluidic components with no text or symbols
natural_image
Technical line drawing of a mechanical device with a bottle inside, showing six circular components arranged in rows (no text or symbols)To easily store large and tall bottles on the second shelf, can be removed the upper shelf as showed in the picture.
6. HINTS AND TIPS
Normal operating sounds
The following sounds are normal during operation:
- A faint gurgling and bubbling sound from coils sound when refrigerant is pumped.
- A whirring and pulsating sound from the compressor when refrigerant is pumped.
- A sudden cracking noise from inside appliance caused by thermic dila-
tation (a natural and not dangerous physical phenomenon).
- A faint click noise from the temperature regulator when the compressor switches on or off.
Hints for energy saving
- Do not open the door frequently or leave it open longer than absolutely necessary.
7. INSTALLATION
7.1 Positioning
Adequate air ventilation should be around the appliance, to prevent overheating. To achieve sufficient ventilation follow the installation instructions.
Install this appliance at a location where the ambient temperature corresponds to the climate class indicated on the rating plate of the appliance:
| Climate class Ambient temperature |
| SN +10 °C to +32 °C |
| N +16 °C to +32 °C |
| ST +16 °C to +38 °C |
| T +16 °C to +43 °C |
Overall dimensions
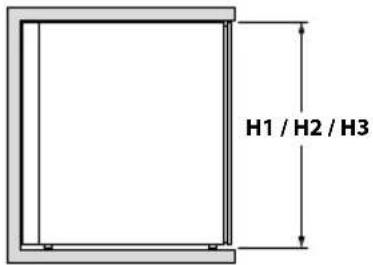
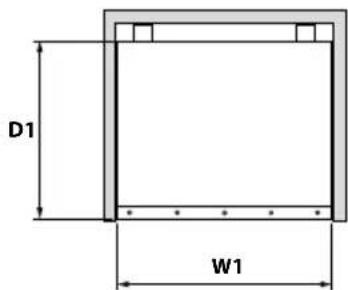
| Overall dimensions | H1 | 455 |
| W1 | 596 | |
| D1 566 | ||
Space required in use
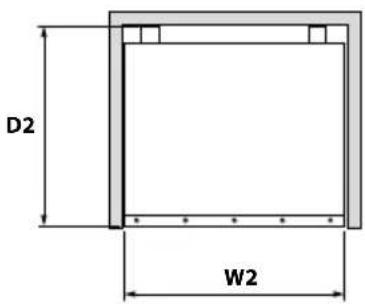
| Space required in use | H2 | 455 |
| W2 | 596 | |
| D2 571 | ||
Overall space required in use
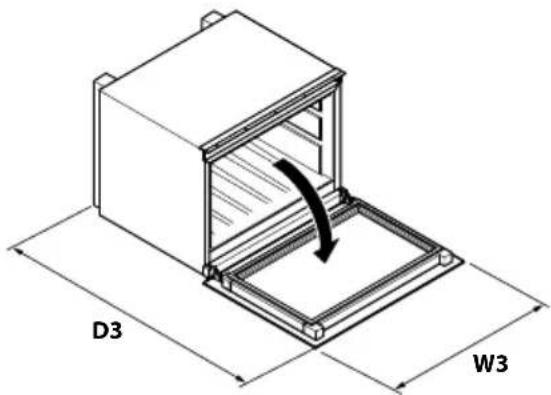
| Overall space required in use | H3 | 455 |
| W3 | 596 | |
| D3 1026 | ||
8. CARE AND MAINTENANCE

CAUTION! Unplug the appliance before carrying out any maintenance operation.

This appliance contains hydrocarbons in its cooling unit; maintenance and recharging must therefore only be carried out by authorized technicians.
8.1 Periodic cleaning
The equipment has to be cleaned regularly:

Do not pull, move or damage any pipes and/or cables inside the cabinet.
Never use detergents, abrasive powders, highly perfumed cleaning products or wax polishes to clean the interior as this will damage the surface and leave a strong odour.
- Clean the inside surfaces with a warm water and baking soda solution. The solution should be about 2 tablespoons of baking soda to a quart of water.
- Clean the shelves with a mild detergent solution.
- Wring excess water out of the sponge or cloth when cleaning area of the controls, or any electrical parts.
- Clean the inside and accessories with lukewarm water and some neutral soap.
- Regularly check the door seals and wipe clean to ensure they are clean and free from debris.
- Rinse and dry thoroughly.
8.2 Periods of non-operation
When the appliance is not in use for long periods, take the following precautions:
- disconnect the appliance from electricity supply.
- remove all items.
- clean the appliance and all accessories.
- leave the door open to prevent unpleasant smells.
9. TROUBLE SHOOTING GUIDE
You can solve many common Wine cellar problems easily, saving you the cost of a possible service call. Try the suggestions.
| Problem Possible cause Solution | ||
| Wine cellar does not operate. | Not plugged in.The appliance is turned off.The circuit breaker tripped.Demo Mode is active. | Please connect the appliance.Please turn ON the appliance.Turn on the circuit breaker.Deactivate the Demo mode (press +/- for 3sec.). |
| Wine cellar is not cool enough. | Check the temperature control setting.The door is not completely closed.The door gasket does not seal properly. | Verify the set temperature.Verify the closure of the door.Clean the door gasket with a humid sponge using neutral detergent and water. |
| The compressor operates continuously. | The room temperature is hotter than normal.The door is opened too often.The door is not completely closed.The door gasket does not seal properly. | Verify the room temperature.Do not keep the door open longer than necessary.Verify that the door is completely closed.Verify the gasket condition and in case clean it with a humid sponge using neutral detergent and water. |
| The light does not work. | Not plugged in.The circuit breaker tripped.The LED has burned out.The light button is not operating. | Please connect the appliance.Turn on the circuit breaker.Contact the service.Contact the service. |
| Too much vibration. | Check that the wine cellar is levelled. | Level the appliance. |
| Too much noise. | The rattling noise may co me from the flow of the refrigerant, which is normal.Contraction and expansion of the inside walls may cause popping and crackling noises.The wine cellar is not level.Fan is dirty. | Level the appliance.Clean the fan from powder.If the noises become louder contact the service. |
| The door does not close properly. | The wine cellar is not level.The door was fixed not properly.The gasket is dirty. | Level the appliance.Verify the closure of the door.Clean the door gasket with a humid sponge using neutral detergent and water. |
| Acoustic alarm | The door is not closed (the alarm lasts 30 min). | Close the door. |
| E3 is displayed | The door was left open for more than 30 min.Door reed switch is broken. | Close the door.Contact the service. |
| E1 is displayed and an acoustic alarm will sound every 5 minutes. | The temperature inside the wine cellar is outside the range of -20°C +60°CThe temperature sensor is out of order or disconnected. | Verify absence of heating from nearest appliances.Contact the service. |
| E2 is displayed | Warm coming from nearest appliances.Ambient temperature is out of the product climate class Range.Compressor or fan are out of order. | Verify absence of heating from nearest appliances.Verify if the product is installed in a place with ambient temperature within declared product climate class.Contact the service. |
10. TECHNICAL INFORMATION
Technical data
The technical information is situated in the rating plate on the internal side of the appliance and on the energy label.
The QR code on the energy label supplied with the appliance provides a web link to the information related to the performance of the appliance in the EU EPREL database. Keep the energy label for reference together with the user manual and all other documents provided with this appliance.
It is also possible to find the same information in EPREL using the link https://eprel.ec.europa.eu and the model name and product number that you find on the rating plate of the appliance. See the link www.theenergylabel.eu for detailed information about the energy label.
The technical information are situated in the rating plate, on the external or internal side of the appliance and in the energy label.
11. INFORMATION FOR TEST INSTITUTES
Installation and preparation of the appliance for any EcoDesign verification shall be compliant with EN 62552.
Ventilation requirements, recess dimensions and minimum rear clearances shall be as stated in this User Manual at Chapter 6. Please contact the manufacturer for any other further information, including loading plans.
12. ENVIRONMENTAL CONCERNS
The symbol 🔒 on the product or on its packaging indicates that this product may not be treated as household waste.
Instead it should be taken to the appropriate collection point for the recycling of electrical and electronic equipment.
By ensuring this product is disposed of correctly, you will help prevent potential negative consequences for the environment and human health, which could otherwise be caused by inappropriate waste handling of this product.
For more detailed information about recycling of this product, please contact your local council, your household waste disposal service or the shop where you purchased the product.
Packaging materials
The materials with the symbol 🐎 are recyclable. Dispose of the packaging in suitable collection containers to recycle it.
TABLE DES MATIÈRES
- INFORMATIONS DE SÉCURITÉ....17
- CONSIGNES DE SÉCURITÉ ....19
- DESCRIPTION DU DISPOSITIF....21
- PANNEAU DE CONTRÔLE....22
- UTILISATION....23
- HITS AND TIPS ....25
- INSTALLATION ......26
- SOIN ET ENTRETIEN....27
- GUIDE POUR LA RÉSOLUTION DES PROBLÈMES .....28
- CARACTÉRISTIQUES TECHNIQUES....29
- INFORMATIONS POUR LES INSTITUTS DE TEST....29
- EN MATIÈRE DE PROTECTION DE L'ENVIRONNEMENT .....29
PENSÉ POUR VOUS
natural_image
Line drawing of a hand opening a microwave oven with an arrow indicating the direction (no text or symbols)- ou le tirer
natural_image
Line drawing of a hand placing a dark object into a rectangular box (no text or symbols)natural_image
Line drawing of a multi-tiered refrigerator with cylindrical tanks (no text or symbols)natural_image
Line drawing of a multi-tiered stainless steel oven with cooling fins and a directional arrow indicating airflow (no text or symbols)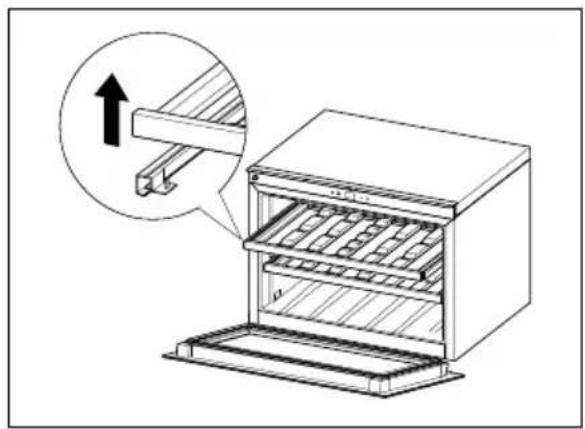
natural_image
Technical line drawing of a multi-tiered rack-mounted appliance with circular components and an upward arrow indicating motion (no text or symbols)natural_image
Two identical technical diagrams of a rack-mounted industrial enclosure with circular components inside (no text or symbols)natural_image
Technical line drawings of two mechanical components with internal channels and a separate view (no text or symbols)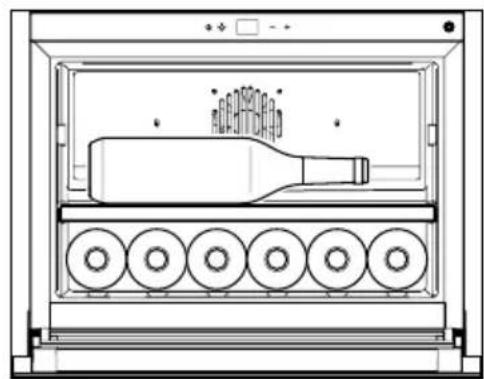
natural_image
Technical line drawing of an oven with a bottle inside, showing circular components and a tray (no text or symbols)
| Dimensionshors tout | H1 | 455 |
| W1 | 596 | |
| D1 566 | ||
natural_image
Line drawing of a hand opening a microwave oven with an arrow indicating the direction (no text or symbols)natural_image
Line drawing of a hand placing a dark object into a rectangular box (no text or symbols)5.3 Erste Benutzung

natural_image
Line drawing of a multi-tiered refrigerator with cylindrical tanks (no text or symbols)natural_image
Line drawing of a multi-tiered stainless steel oven with cooling fins and a downward arrow indicating airflow (no text or symbols)
natural_image
Technical line drawing of a refrigerator with an inset showing a mechanical component (no text or symbols)natural_image
Technical line drawing of a multi-tiered rack-mounted appliance with circular components and an upward arrow indicating motion (no text or symbols)natural_image
Two identical technical diagrams of industrial enclosures or storage units, showing circular arrangements inside each enclosure (no text or symbols)natural_image
Technical line drawings of two mechanical components with no visible text or symbols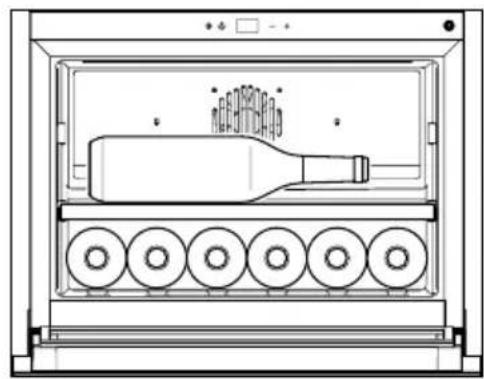
natural_image
Technical line drawing of an oven with a bottle inside and six circular wheels on the side (no text or symbols)
www.electrolux.com/productregistration

natural_image
Line drawing of a hand opening a cabinet with an arrow indicating left motion (no text or symbols)- oppure tirarlo
natural_image
Line drawing of a hand placing a black arrow on a cabinet (no text or symbols)5.3 Primo utilizzo

natural_image
Line drawing of a multi-tiered refrigerator with cylindrical tanks (no text or symbols)natural_image
Line drawing of a multi-tiered stainless steel oven with cooling fins and a downward arrow indicating airflow (no text or symbols)
natural_image
Two identical technical diagrams showing circular arrangements inside a rack or storage unit (no text or symbols)natural_image
Technical line drawing of a multi-layered mechanical component with no visible text or symbols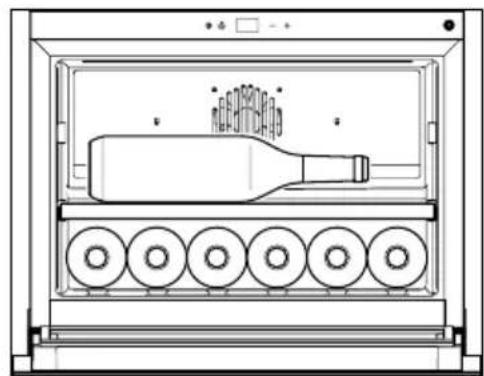
natural_image
Technical line drawing of an oven with a bottle inside, showing circular components and a tray (no text or symbols)
| Dimensioni complessive | H1 | 455 |
| W1 | 596 | |
| D1 566 |

