Rocker Fire - Kids tricycle EXIT - Free user manual and instructions
Find the device manual for free Rocker Fire EXIT in PDF.
| Product type | Children's tricycle |
| Brand | EXIT |
| Model | Rocker Fire |
| Recommended age | 6 to 12 years |
| Maximum load | 75 kg |
| Frame material | High quality steel (steel 37) with paint |
| Tire material | Vulcanized natural rubber |
| Number of wheels | 3 |
| Brake type | Hand brake (check before use) |
| Transmission | Steel chain with adjustable tensioners |
| Assembly required | Yes, by an adult (tools provided) |
| Frame maintenance | Clean with non-abrasive products, protect against rust |
| Tire maintenance | Check pressure regularly, avoid contact with oil/grease |
| Chain maintenance | Grease regularly with Teflon spray, adjust tension |
| Frame warranty | 2 years |
| Parts warranty (excluding wear) | 6 months |
| Safety | Closed shoes and helmet recommended, adult supervision mandatory |
| Use | On sidewalks, playgrounds or private grounds (not on public roads) |
| Compatible accessories | Only original Triker® accessories |
Frequently Asked Questions - Rocker Fire EXIT
User questions about Rocker Fire EXIT
0 question about this device. Answer the ones you know or ask your own.
Ask a new question about this device
Download the instructions for your Kids tricycle in PDF format for free! Find your manual Rocker Fire - EXIT and take your electronic device back in hand. On this page are published all the documents necessary for the use of your device. Rocker Fire by EXIT.
USER MANUAL Rocker Fire EXIT
text_image
EXIT TOYS.COMfor ZigZag ^® , Viper ^® and Rocker ^® (products byTriker ^® )

text_image
ZigZag VIPER ROCKER TRIKER®1.0 Welcome / introduction
Thank you for choosing to buy a Triker® product!
You are now the proud owner of a fantastic product, which will provide many years of enjoyment.
We are committed to design and produce solid, safe and fun products. The best available materials have been used to ensure that your Triker® product is strong, safe and durable.
This manual gives you instructions for assembling and maintaining your Triker® product, as well as the guarantee conditions. Please take note of the directions of use and keep this manual for future reference.
Feedback and comments are welcome at info@exittoys.com We very much appreciate your valuable contribution!
2.0 Why you should read this users manual
Your Triker® product should be assembled by an adult, who should be aware of the safety instructions and maintenance schedule. This manual ensures the best results from your Triker® product. It is important for you to know its characteristics and use.
All Triker ^® products are classified as a toy. This means it is not allowed on the public roads. Children should only use the Triker ^® products when accompanied by an adult.
Hazardous situations are virtually impossible when your Triker® is used according to this manual. Please bear in mind children's natural urge to play and that this could cause unexpected dangerous situations, for which the manufacturer and Triker® cannot be held responsible. Teach your children how to use the Triker® product and point out possible dangers to them.

Warning: when riding the Triker ^® we advise the rider should wear closed toe-cap shoes. The Triker ^® products are designed for the following age and weight categories:
- ZigZag: 4-7 years (max. 35 kg/ 77 lbs)
- Viper: 5-9 years (max. 50kg/ 110 lbs)
- Rocker: 6-12 years (max. 75 kg/ 165 lbs)
- Triker: 6-12 years (max. 80 kg/ 176 lbs)
Should you have any queries or problems, please contact your supplier or visit our website: www.exittoys.com
Triker ^® cannot be held responsible for any omission in this users' manual. Please always apply the highest safety precautions and wear a helmet when the user is using it.
We advise you to save this users manual. It contains our details should you wish to contact us in the future.
3.0 Maintenance
3.1 Frame
- Do not use any sharp objects when cleaning your Triker® product.
- Your Triker® product should not be exposed to extended periods outdoors (rain, sunlight).
- When cleaning, please use environmentally friendly products, never caustic cleaning material. Please protect against salt, and do not store in a humid atmosphere for long periods.
- All frame parts are made of high quality steel (steel 37) and spray painted in colour. This creates a tough layer of lacquer. To avoid rust, please keep the frame clean. If you want to protect the frame with a layer of grease, only use acid-free Vaseline. Small chips can be touched up with paint. Please obtain from you dealer.
3.2 Wheels/Tyres
- Attention! Like car tyres, the Triker® tyres on Viper, Rocker and Triker are made of vulcanised natural rubber, and therefore are sensitive to marking on the surface. Therefore protect the surface to maintain good contact between the tyre and the ground. Take care when using on floors that have been glued with solvents, like fitted carpets and especially PVC.
• Grease the bearings regularly (once a year). - Keep tyre pressure constant. Lower tyre pressure increases wear and makes riding your Triker® product harder. When tyre pressure is correct the Triker® product is light and easy to handle.
When the tyre pressure is too low the chances of a flat tyre increase and the tyre wears out quicker. When the tyre pressure is too high the tyre could become detached from the valve. This could lead to dangerous situations. (please note tyre pressures increases in bright sunlight and high temperatures!) Tyres should not touch oil, grease or fuel. Ensure that the valve-caps are always fitted on the valve.
3.3 Rubber mountings
- The two rubber mountings in between the frame of Viper, Rocker and Triker should be checked regularly for any damage, small cracks etc. Should you notice any cracks, please replace the rubber mounting. The rubber can be disposed of with normal waste. Visit our website for details of how to order new rubbers.
3.4 Drive chain
- On Rocker and Triker, the chain is made of steel and should be greased regularly for smooth running, we recommend the Teflon® spray. If the chain is tightened too much, the Triker® products will be difficult to ride, and could crack the axle. If the chain is not tight enough it could come off the gearwheel and damage the chain-cover. The chain tension can be adjusted by turning the chain-adjusters attached to both sides of the front-axle.
3.5 Miscellaneous
- Please check your Triker ^® product regularly for possible wear and tear. To ensure the original high safety standard remains intact, please replace any worn parts immediately. Your Triker ^® product should not be used, whilst being repaired. Spare-parts can be obtained from your Triker ^® dealer.
4.0 Guidelines for safe use
- Before using your Triker ^® product, please check that it is in good working order, that all bolts and screws are tight and that tyre pressure is as it should be. Please also check the brakes.
- Children using a Triker ^® product should always be supervised by an adult.
- Triker ^ products are not allowed on the public road, only on the pavement and private grounds. Your Triker ^ product is not approved for on the road use. Adapt your speed always according to the prevailing conditions. Riding down a slope (at an angle,) the Triker ^ products could topple. Riding downhill will build up a high speed, so please take note of a longer braking distance. The advice is not to take your Triker ^ products downhill.
For assembly instructions see the back of this manual.

- We advise that whilst riding the Triker ^® products the rider wears closed toe-cap shoes, laces tied and always wear a helmet. We advise you to wear protective clothing. This will help prevent grazes.
- Do not take bends at a too sharp an angle, this could cause the Triker® products to topple.
- Check the tyre pressures regularly. See for the correct pressures as indicated on the tyre itself.
- Triker ^® products cannot be used near staircases, slopes, swimming pools or any other water. Staircases should be shielded off, to avoid riders being able to ride up or down.
- Colliding and/or other stunts increase the chances of injury, and damage to your Triker® product. In this case neither Triker® nor the dealer can be held liable.
- Clothes and limbs could get caught in rotating parts and/or hinge points. Avoid loose clothing like scarves, laces etc., as these could cause accidents.
• Clothes could get soiled and/or damaged. - Avoid contact with the wheels whilst the Triker ^® product is being driven.
- A helmet is not compulsory, but in the interests of safety it is advisable.
- Make sure that the bucket seat is in the correct position, for safe use.
- Do not let the user mount or dismount the Triker ^® products whilst in motion.
- Do not let the user drive in the dark without lighting.
- Only one person can ride a Triker ^® product at any time. Do not overload your Triker ^® product. The maximum loading is 35kg for ZigZag, 50kg for Viper, 75kg for Rocker and 80 kg for Triker.
- Do not attach an engine or any other unapproved attachments to the Triker® products, except for specially designed equipment and accessories by Triker®.
- Do not allow your Triker ^® product to be pulled by any other vehicle.
- Triker ^® , the supplier of the Triker ^® products and/or the manufacturer do not accept any liability for any injury or any other damage sustained and any incurred costs as a result of (wrongfully and/or inappropriate) use of the Triker ^® products.
- Triker ^® products have not been designed for trick riding, stunts or aggressive use.
5.0 Guarantee Conditions
The Triker® product owner can only claim under the guarantee by submitting the original purchase receipt together with the completed guarantee certificate or by registering via our website www.triker.com.
The owner of a Triker® product can claim the following guarantee with the acceptance of the following restrictions:
• 2 years from date of purchase on the frame (regular use);
- A 6-month guarantee is given by Triker® and/or the manufacturer on all parts (regular use).
• Parts subject to wear and tear (such as chain and tyres): no warranty.
- The guarantee only applies for material/construction errors of the Triker® product and/or parts thereof.
The guarantee is not applicable c.q. expires when:
- The Triker® product has been handled without due care, has been involved in an accident, or when non-Triker® approved parts have been fitted.
- The Triker® product has not been assembled as per instructions and/or not correctly maintained.
- Parts fitted afterwards do not match technical specifications of the Triker® product or no original Triker® parts have been used and/or are not fitted correctly.
- Deficiencies due to climate, like rust, cracks in the rubber or usual weathering of the lacquer.
- The Triker® product is used for rental and/or otherwise used by non specified users.
All claims under the guarantee for the Triker® product have to be accompanied by a special Triker guarantee label and a copy of the guarantee certificate. The final decision whether or not the broken/damaged parts falls under the guarantee is made by an approved Triker engineer.
In case the guarantee request does not apply to the repair, all costs have to be paid by the owner.
For assembly instructions see the back of this manual.

6.0 Guarantee certificate
EN
GUARANTEE CERTIFICATE (Purchaser copy)
Date of Purchase:
Chassis-number:
Signature buyer:
Type Triker®: □ ZigZag
□ Viper
□Rocker®
□ Triker®
Colour:
Please also complete the guarantee certificate for Triker ^® and send it to the address printed on the back of this users manual.
GUARANTEE CERTIFICATE (Triker® copy)
Date of Purchase:
Chassis-number:
Type Triker®: □ ZigZag
□ Viper
□Rocker®
□ Triker ^®
Colour:
Name dealer:
Postal code:
Name user/child:
User's date of birth :
Street:
Town/City:
Town/City:
Purchaser:
□ Parent/guardian
□ Grandparent
□ Other:
Name purchaser:
Street:
Postal code:
Town/City:
Country :
Signature purchaser:
Warning! Pay attention for sharp and pointed parts when assembling the Triker.® products.
Warning! Danger of choking: this product contains small parts and is not suitable for children under the age of 4 years.

natural_image
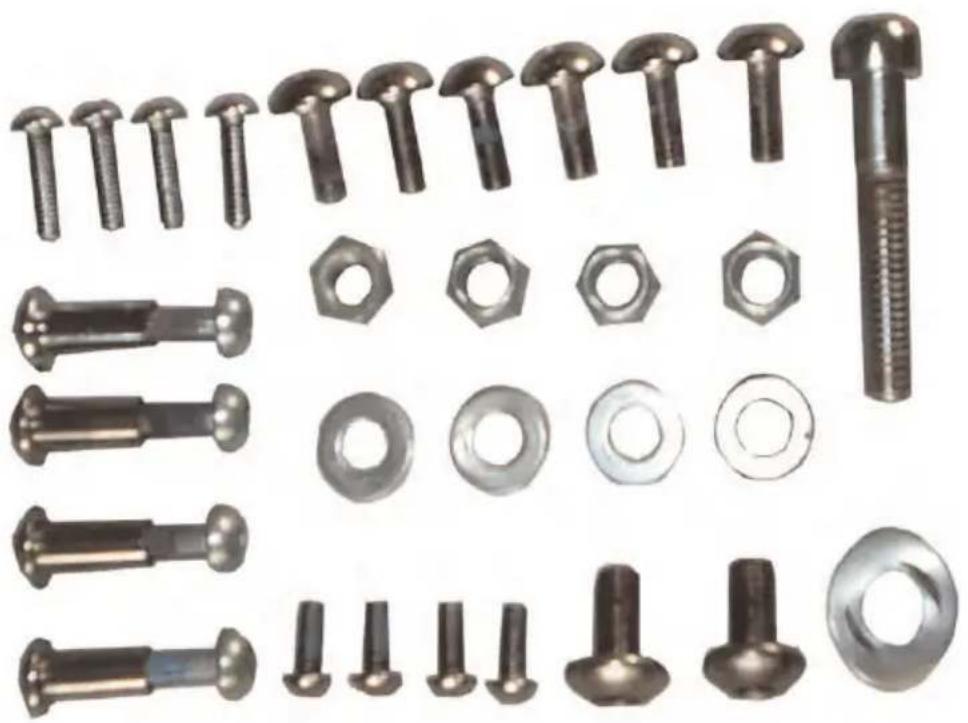
Collection of metallic screw fasteners arranged in a grid (no text or symbols visible)EN Bolts included: 4 seat bolts with long nuts; 4 small fender bolts; 4 handlebar top attachment bolts (rounded head); 4 front wheel attachment bolts (cylindrical head); 2 handlebar bottom attachment bolts.
NL Bijgeleverde schroeven: 4 schroeven voor de stoel (met lange moeren); 4 schroeven voor bevestiging van de stuurstang bovenaan (met ronde kop); 4 schroeven voor bevestiging van het voorwiel (met cylinderkop); 2 schroeven voor bevestigng van de stuurstang onderaan.
FR Vis livrés: 4 vis pour le siège (en 2 parties); 4 vis pour la fixation de la barre de stabilisation en haut (tête ronde); 4 vis pour fixer la roue avant (tête de cylindre); 2 vis pour fixer la barre de stabilisation en bas.
DE Gelieferte Schrauben: 4 Schrauben zum Zusammenbau vom Sitz (in 2 Teilen); 4 Schrauben zum Zusammenbau vom Lenker oben (runde Kopf); 4 Schrauben zum Zusammenbau vom Vorderrad (cylinder-Kopf); 2 Schrauben zum Zusammenbau vom Lenker unten.
natural_image
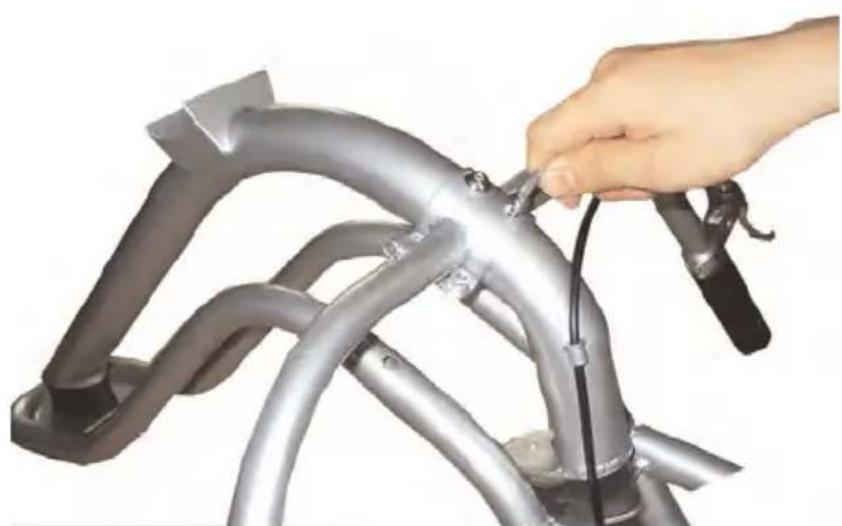
Close-up of a hand operating a bicycle brake system with metal frame and curved handle (no text or symbols visible)EN Turn the frame upside down and position the handlebar above the 2 holes. MAKE SURE THE BRAKE CABLE IS NOT TURNED AROUND ANY TUBING. Attach the handlebar with the 2 handlebar bottom attachment bolts.
NL Leg het frame ondersteboven en plaats de handstang boven de 2 gaatjes. ZORG ERVOOR DAT DE REMKABEL NIET ROND DE STANGEN IS GEDRAAID. Bevestig de handstang met de 2 onderste schroeven aan het frame.
FR Mettez le cadre à l'envers et positionnez la barre de stabilisation au-dessus des 2 trous. VEILLEZ QUE LE CABLE DE FREIN N'EST PAS TOURNE AUTOUR DES BARRES. Utilisez les 2 vis pour fixer la barre.
DE Setzen Sie den Hauptrahmen die Oberseite nach unten und legen Sie den Lenker über die 2 Löcher. VORSICHT, DIE HANDBREMS-ENKABEL NICHT UM DEN RAHMEN ODER DEN LENKER DRE-HEN. Befestigen Sie das Lenker jetzt mit 2 Schrauben.

natural_image
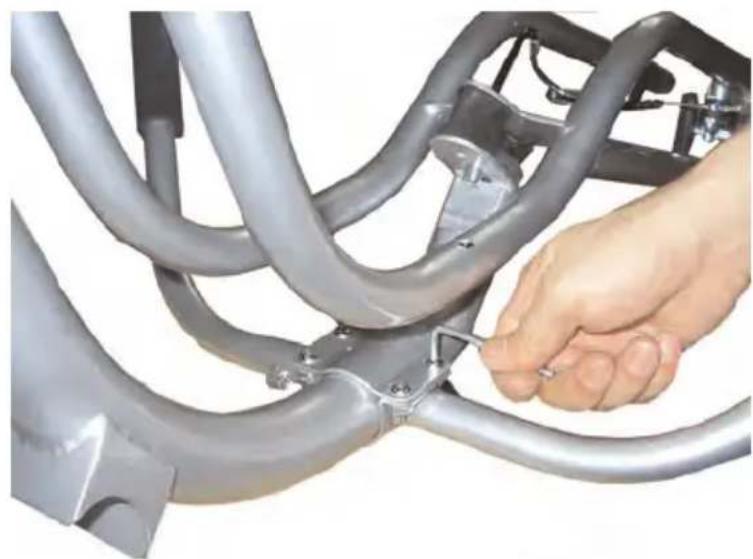
Close-up of a hand adjusting a metallic mechanical bracket with screws, no visible text or symbolsnatural_image
Close-up of a hand adjusting a metallic mechanical component with a circular head (no text or symbols visible)EN Insert the right wheel bolt into the crossbar and secure the bolt.
NL Plaats de schroef van het rechterwiel in de achterstang en draai de schroef vast.
FR Positionez le vis de la roue droîte et fixer le dans la barre arrière.
DE Befestigen Sie das Rad an der rechten Seite der Hinterachse.
natural_image
Hand holding a tool interacting with a dark, textured object resembling a curved object (no text or symbols visible)EN Insert the left wheel bolt into the crossbar and secure the bolt.
NL Plaats de schroef van het linkerwiel in de achterstang en draai de schroef vast.
FR Positionez le vis de la roue gauche et fixer-le dans la barre arrière.
DE Befestigen Sie das Rad an der linken Seite der Hinterachse.
natural_image
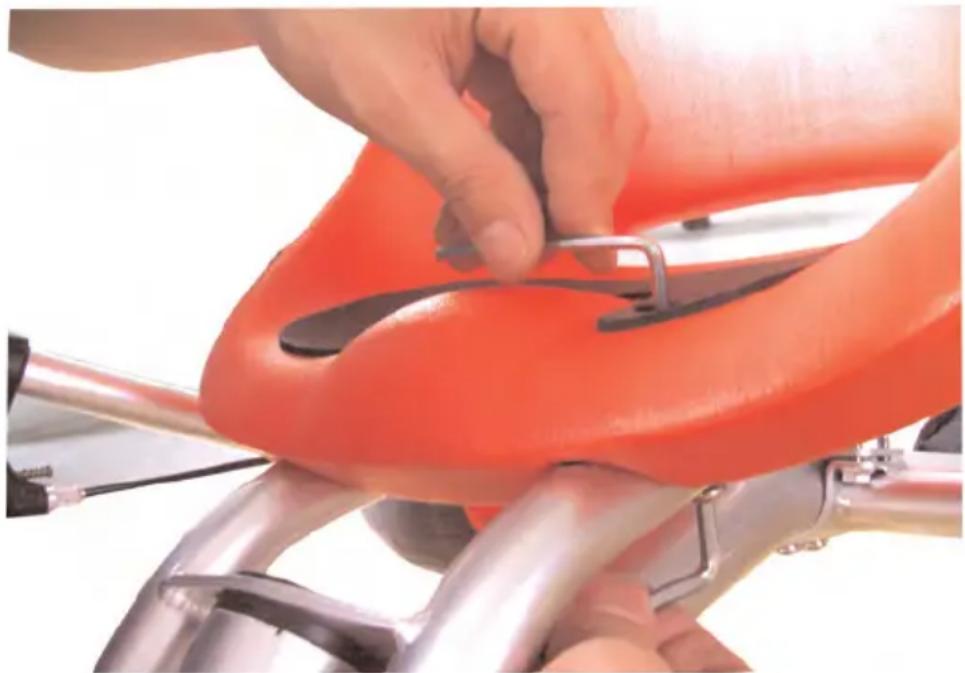
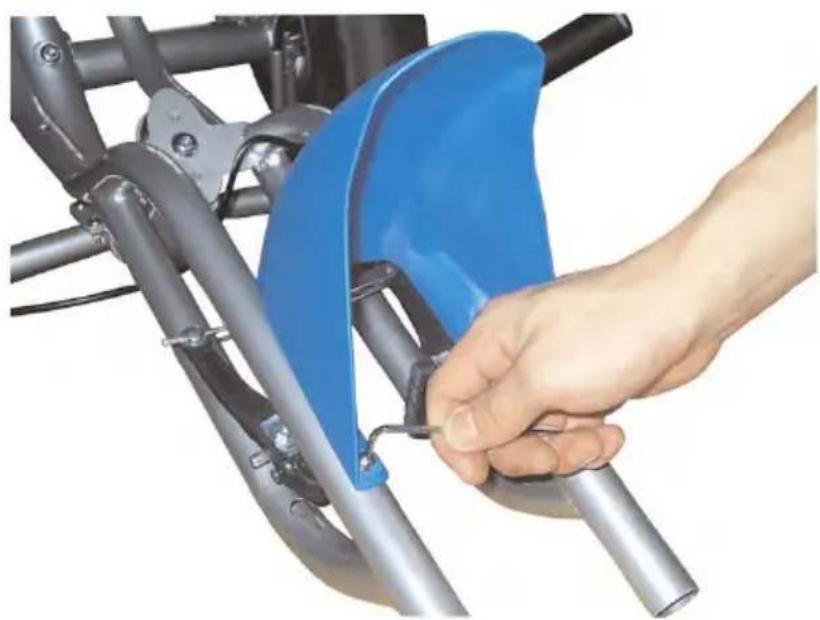
Close-up of hands installing a small metal component on an orange-colored cushioned object (no text or symbols visible)EN Put the seat on top of the frame and position it so that the holes align. You have several positions where you can fix the seat. Select the best position for your kid's size.
NL Plaats de stoel op het frame en plaats het zo dat de gaatjes overeenkomen. Er zijn verschillende posities mogelijk. Kies de beste positie voor uw kind.
FR Mettez le siège sur le cadre et alignez-le avec les trous. Il y a plusieurs possibilités, alors sélectionnez la position la meilleur pour votre enfant.
DE Legen Sie den Sitz auf den Hauptrahmen damit die Löcher aufeinander liegen. Es gibt mehrere Positionen. Wählen Sie den besten Position für Ihr Kind.
natural_image
Close-up of hands adjusting a red and silver bicycle seat component (no text or symbols visible)
EN Use the bolts with nuts to secure the seat. The nut goes through the bottom side, while the bolt goes through the top side. Using 2 Allen keys, secure the bolt into the nut. Attach the four bolts in this way.
NL Gebruik de schroeven met lange moeren om de zetel vast te zetten. De moeren gaan langs de onderkant, the schroeven langs de bovenkant. Gebruik 2 hexagonale sleutels om de schroeven vast te maken.
FR Utilisez les vis en 2 parties pour fixer le siège, utilisant 2 clés hexagonales.
DE Zur Befestigung des Sitzes, brauchen Sie die 4 Schrauben in 2 Teilen.
natural_image
Close-up of hands adjusting a red and black tire on a tricycle (no text or symbols visible)EN Insert the front wheel into the frame. Make sure the markers on frame and wheel are aligned so that the wheel is inserted correctly. When the wheel is inserted upside-down, the freewheel system will operate inversely and you cannot pedal.
NL Steek het voorwiel in de voorkant van het frame en zorg ervoor dat het wiel niet ondersteboven wordt geplaatst. Bij verkeerde montage zal de vrijloop ervoor zorgen dat je niet kan trappen.
FR Placer la roue avant dans le cadre et veillez que la roue n'est pas placée à l'envers, ce qui empêcherait de pédaller.
DE Befestigen Sie das Vorderrad an der Hauptrahmen und beobachten Sie das das Vorderrad nicht die Oberseite nach unten montiert ist. Sonnst werden Sie nicht fahren können.
natural_image
Close-up of a hand adjusting a red motorcycle seatbelt with metal tools (no visible text or symbols)EN Secure the front wheel at both sides with the 4 bolts provided.
natural_image
Close-up of a hand using a mechanical tool to adjust or install a component, with no visible text or symbols.EN Put the fender cover on top of the frame and align it with the holes. Then use the four fender bolts to tighten it.
natural_image
Close-up of a hand using a wrench to adjust the red bicycle wheel (no text or symbols visible)EN Attach the pedal to the crank. Make sure to attach the left pedal to the left crank and the right pedal to the right crank. On the pedal itself you will find an indication of which side it should go on. Use a wrench to tighten the pedal. On both sides, you should turn the wrench in a forward direction (lef pedal counterclockwise, right pedal clockwise).
Your ZigZag is equipped with a safety feature that limits the cambering of the seat (under the frame near the cambering axle). This stopper can be taken off to allow for more camber, with the risk of a pedal hitting the ground.
ONLY TAKE OUT THE CAMBERING STOPPER AT YOU OWN RISK.
natural_image
Close-up of a curved, translucent object against a black background, resembling a lens or abstract light source (no text or symbols visible)VIPER
natural_image
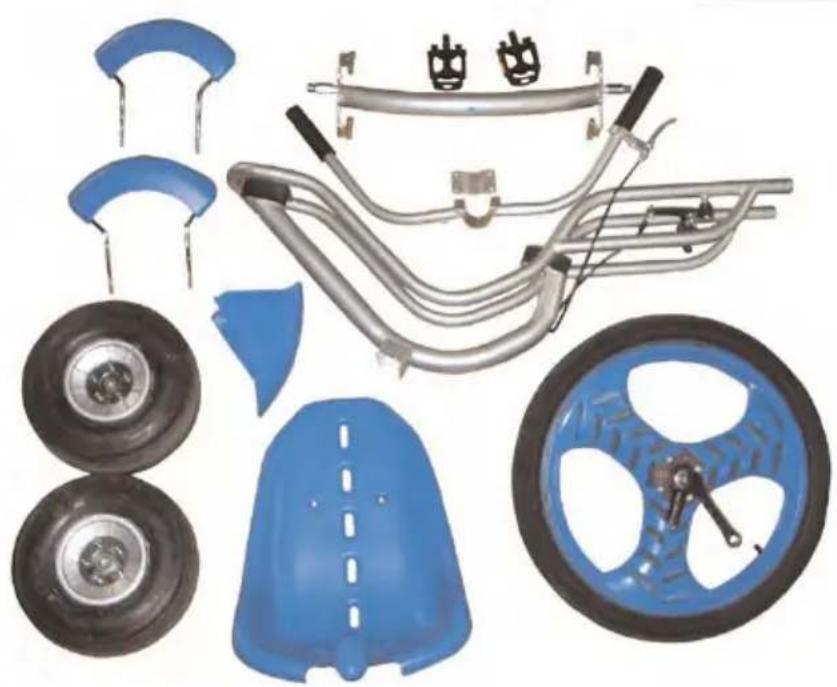
Collection of bicycle wheel components including wheels, steering wheel, and dashboard (no text or symbols visible)EN Please verify that the following parts are delivered for assembling your Viper®: framekit with handlebar and brake (+ handlebar attachment top piece); 1 rear crossbar; 2 rear wheels; 2 pedals; 1 front fender; 2 rear fenders; 1 front wheel with 2 cranks; 1 seat.
NL Controleer of de volgende onderdelen met uw Viper® werden mee-geleverd: framekit met handstang en rem (+ bevestigingsplaatje voor handstang); 1 achteras; 2 achterwielen; 2 pedalen; 1 spat-bordje vooraan; 2 spatbordjes achteraan; 1 voorwiel met 2 cranks; 1 zeteltje.
FR Vérifiez si les pièces suivantes sont livrés avec votre Viper® : cadre avec barre de stabilisation et frein (+ pièce de fixation de la barre); 1 axe arrière; 2 roues arrières; 2 pédales; 1 garde-boue avant; 2 gardes-boues arrières; 1 roue avant avec 2 manivelles; 1 siège.
DE Die folgenden Teile befinden sich in der Verpackung vom Viper®: Hauptrahmen und Bremse (+ Platte zur Zusammensetzung des Lenkers); 1 Hinterachse; 2 Hinterräder; 2 Pedalen; 1 Schutzblech vorne; 2 Schutzbleche hinten; 1 Vorderrad mit 2 Kurbel; 1 Sitz.

natural_image
Collection of metal bolts and nuts including screws, bolts, hexagons, and washers (no text or labels visible)EN Bolts included: 4 seat bolts with long nuts; 4 small fender bolts; 6 handlebar attachment bolts; 4 front wheel attachment bolts; 1 rear crossbar attachment bolts; 2 rear wheel bolts.
NL Bijgeleverde schroeven: 4 schroeven voor de stoel (met lange moeren); 6 schroeven voor bevestiging van de stuurstang; 4 schroeven voor bevestiging van het voorwiel; 1 schroef voor bevestiging van achteras; 2 schroeven voor bevestiging acterwielen.
FR Vis livrés: 4 vis pour le siège (en 2 parties); 6 vis pour la fixation de la barre de stabilisation; 4 vis pour fixer la roue avant; 1 vis pour la fixation de l'axe arrière; 2 vis pour fixer les roues arrières.
DE Gelieferte Schrauben : 4 Schrauben zum Zusammenbau vom Sitz (in 2 Teilen); 6 Schrauben zum Zusammenbau vom Lenker; 4 Schrauben zum Zusammenbau vom Vorderrad; 1 Schraube zum Zusammenbau vom Hinterachse; 2 Schrauben zum Zusammenbau vom Hinterräder.
natural_image
Hand adjusting a metallic bicycle frame with a black clip (no text or symbols visible)EN Turn the frame upside down and position the handlebar above the 2 holes. MAKE SURE THE BRAKE CABLE IS NOT TURNED AROUND ANY TUBING. Attach the handlebar with the 2 handlebar bottom attachment bolts.
NL Leg het frame ondersteboven en plaats de handstang boven de 2 gaatjes. ZORG ERVOOR DAT DE REMKABEL NIET ROND DE STANGEN IS GEDRAAID. Bevestig de handstang met de 2 onderste schroeven aan het frame.
FR Mettez le cadre à l'envers et positionnez la barre de stabilisation au-dessus des 2 trous. VEILLEZ QUE LE CABLE DE FREIN N'EST PAS TOURNE AUTOUR DES BARRES. Utilisez les 2 vis pour fixer la barre.
DE Setzen Sie den Hauptrahmen die Oberseite nach unten und legen Sie den Lenker über die 2 Löcher. VORSICHT, DIE HANDBREMS-ENKABEL NICHT UM DEN RAHMEN ODER DEN LENKER DRE-HEN. Befestigen Sie das Lenker jetzt mit 2 Schrauben.
natural_image
Close-up of a hand adjusting a metallic automotive chain component (no text or symbols visible)
natural_image
Close-up of a hand adjusting a metal bracket with a handle (no text or symbols visible)natural_image
Hand adjusting a car tire with a hand turning a wheel (no text or symbols visible)
natural_image
Close-up of hands adjusting a tire with metal fittings and a blue safety helmet (no visible text or symbols)
natural_image
Close-up of a hand adjusting a blue and silver tire on an aircraft leg (no text or symbols visible)EN Put the rear fenders in the fender holders and fasten them with the nuts provided.
NL Plaats de achterste spatbordjes in de spatbordhouders en bevestig deze met de moertjes.
FR Placer les gardes-boues arrières dans les portes-gardes-boues et fixer-les avec les écrous.
DE Setzen Sie die Schutzbleche an der Schutzblechhalter und befestigen Sie es mit den Muttern.
natural_image
Close-up of a hand using a blue mechanical lever to adjust a metal component (no text or symbols visible)EN Place the front fender on top of the front fork, align the holes and attach with the bolts provided.
natural_image
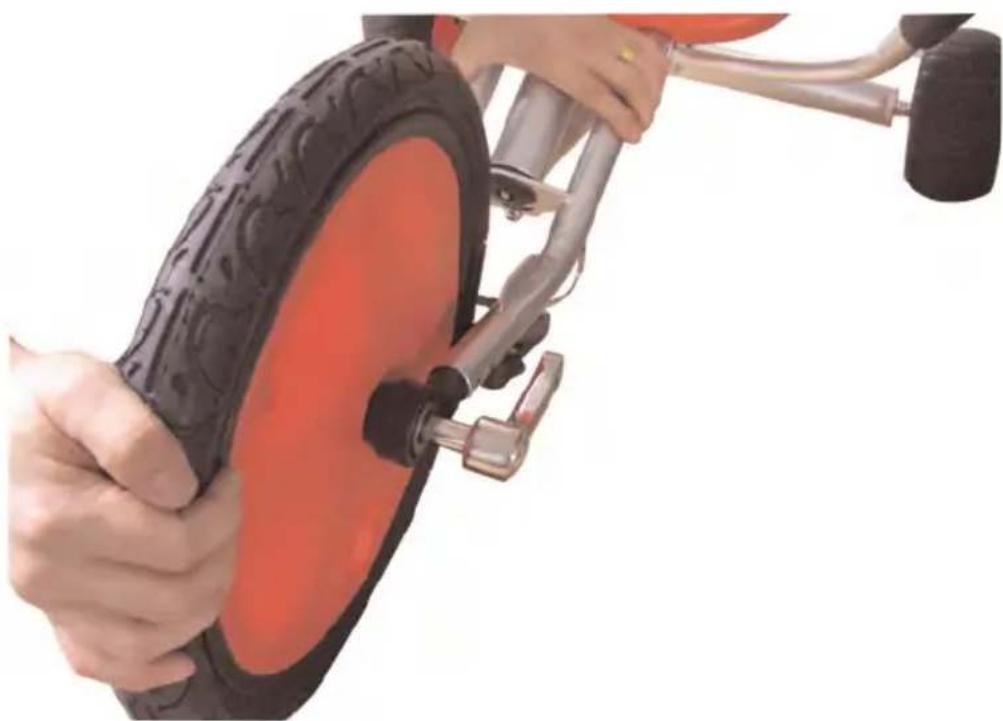
Close-up of hands adjusting a blue bicycle wheel rim with a tool (no visible text or symbols)EN Insert the front wheel into the frame. Make sure the markers on frame and wheel are aligned so that the wheel is inserted correctly. When the wheel is inserted upside-down, the freewheel system will operate inversely and you cannot pedal.
natural_image
Close-up of a blue bicycle wheel being adjusted by a hand using a metal tool (no text or symbols visible)EN Secure the front wheel at both sides with the 4 bolts provided.
natural_image
Close-up of hands using a blue bicycle pedal to adjust the mechanism (no text or symbols visible)EN Attach the pedal to the crank. Make sure to attach the left pedal to the left crank and the right pedal to the right crank. On the pedal itself you will find an indication of which side it should go on. Use a wrench to tighten the pedal. On both sides, you should turn the wrench in a forward direction (lef pedal counterclockwise, right pedal clockwise).
natural_image
Close-up of hands adjusting a blue and black safety belt buckle (no text or symbols visible)EN Use the bolts with nuts to secure the seat. The nut goes through the bottom side, while the bolt goes through the top side. Using 2 Allen keys, secure the bolt into the nut. Attach the four bolts in this way.
natural_image
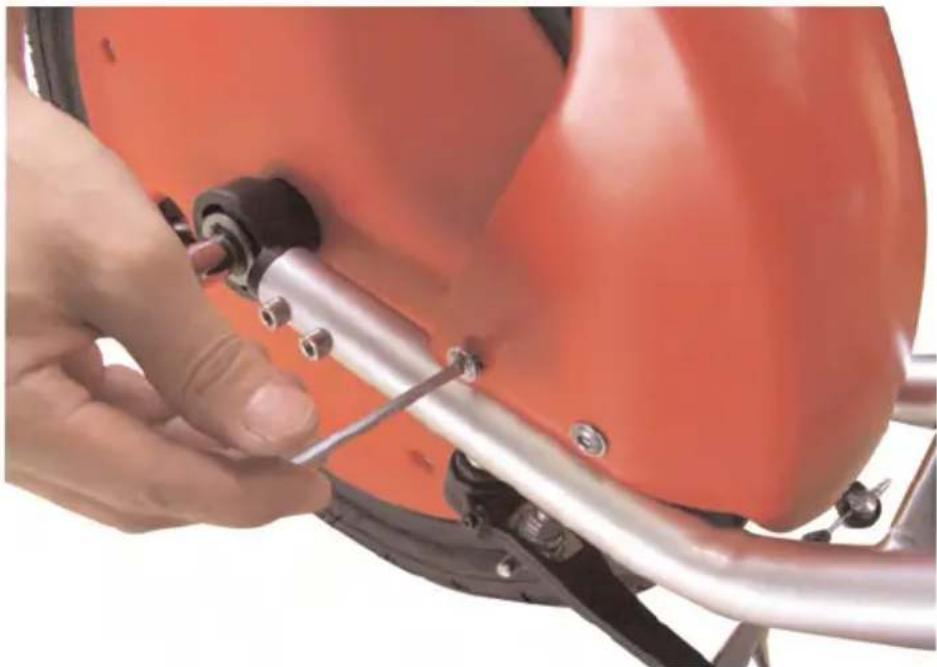
Close-up of hands using a tool to adjust or install a mechanical component (no visible text or symbols)EN Adjust the brake by tightening or releasing the brake cable. Make sure the brake does not run against the rim. Use the brake tension adjuster (bolts at the side of the brake) to adjust the tension.
NL Stel de remmen af door de remkabel losser of vaster aan te spannen. Zorg ervoor dat de rem niet tegen de velg komt. Gebruik de fijnafstelling (kleine schroeven aan de zijkant van de rem) om de spanning van de rem verder af te stellen.
FR Modifier la tension des freins en changeant la tension du cable. Veillez que le frein ne touche pas les jantes. Utilisez les correcteurs (petits vis à la côté des freins) afin de régler la tension exacte.
DE Justieren Sie die Spannung des Bremsekabeln. Verwenden Sie die kleine Schrauben am Seite des Bremsen zum feinen Justierung. Achtung: die Bremsen sollten nicht gegen die Felgen kommen.
ROCKER
TRIKER®
natural_image
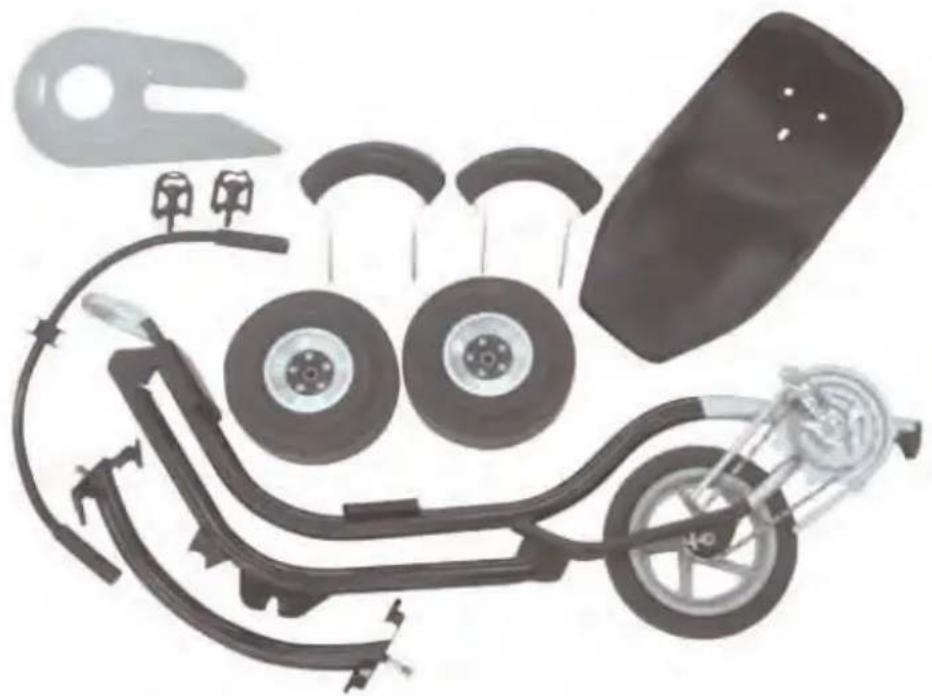
Exploded view diagram of a motorcycle showing internal components like wheel, dashboard, and exhaust system (no text or labels)EN Please verify that the following parts are delivered for assembling your Rocker®: 1 framekit, 1 handlebar, 1 rear crossbar; 2 rear wheels; 2 pedals; 2 rear fenders; 1 seat and 1 chaincover.
NL Controleer of de volgende onderdelen met uw Rocke® werden meegeleverd: 1 framekit, 1 handstang, 1 achteras, 2 achterwielen, 2 pedalen, 2 spatbordjes achteraan, 1 voorwiel, 1 stoeltje 1 kettingkast.
FR Vérifiez si les pièces suivantes sont livrés avec votre Rocker® : 1 cadre, 1 barre de stabilisation, 1 axe arrière, 2 roues arrières, 2 pédales, 2 gardes-boues arrières, 1 roue avant avec 2 manivelles, 1 siège.
DE Die folgenden Teile befinden sich in der Verpackung vom Rocker®: 1 Hauptrahmen, 1 Lenker, 1 Hinterachse, 2 Hinterräder, 2 Pedalen, 2 Schutzbleche hinten, 1 Vorderrad, 1 Sitz, 1 Schutzblech.

natural_image
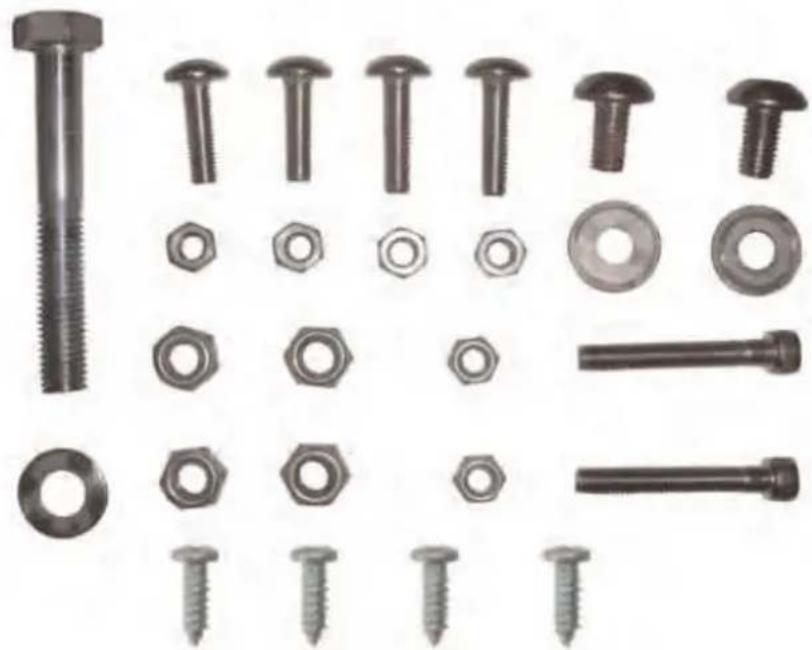
Collection of various types of metal bolts and nuts, including bolts, hexagons, and fasteners (no text or symbols visible)EN Bolts included: 4 seat bolts 2 long 2 short with 4 nuts; 2 handlebar attachment bolts 2 nuts; 2 rear wheel bolts 2 rings; 1 rear cross-bar attachment bolts 1 ring; 4 small rear fender nuts; 4 bolts for chaincover.
NL Bijgeleverde schroeven: 4 schroeven en 4 moeren voor de stoel (twee korte 2 lange); 2 schroeven en 2 moeren voor bevestiging van de stuurstang; 2 schroeven en 2 ringen voor bevestiging van de achterwielen; 1 schroef en 1 ring voor bevestiging van achteras; 4 moeren voor bevestiging achter spatborden; 4 schroeven voor kettingkast.
FR Vis livrés: 4 viset 4 écrous pour le siège (2 vis courts et 2 vis longs); 2 vis et 2 écrous pour la fixation de la barre de stabilisation; 2 vis et rondelles pour fixer les roues arrières ; 1 vis et rondelle pour la fixation de l'axe arrière; 4 écrous pour fixer les gardes-boues arrières; 4 vis pour fixer le cache chaîne.
DE Schraubbolzen eingeschlossen: 4 Kurzschluß der Sitzschraubbolzen 2 lang 2 kurz mit 4 Nüssen; 2 Lenkstangebefestigungsbolzen 2 Nüsse; 2 hintere Radschraubbolzen 2 Ringe; 1 hintere Querwelle Befestigungsbolzen 1 Ring; 4 kleine hintere
natural_image
Close-up of hands adjusting a curved mechanical component (no text or symbols visible)
natural_image
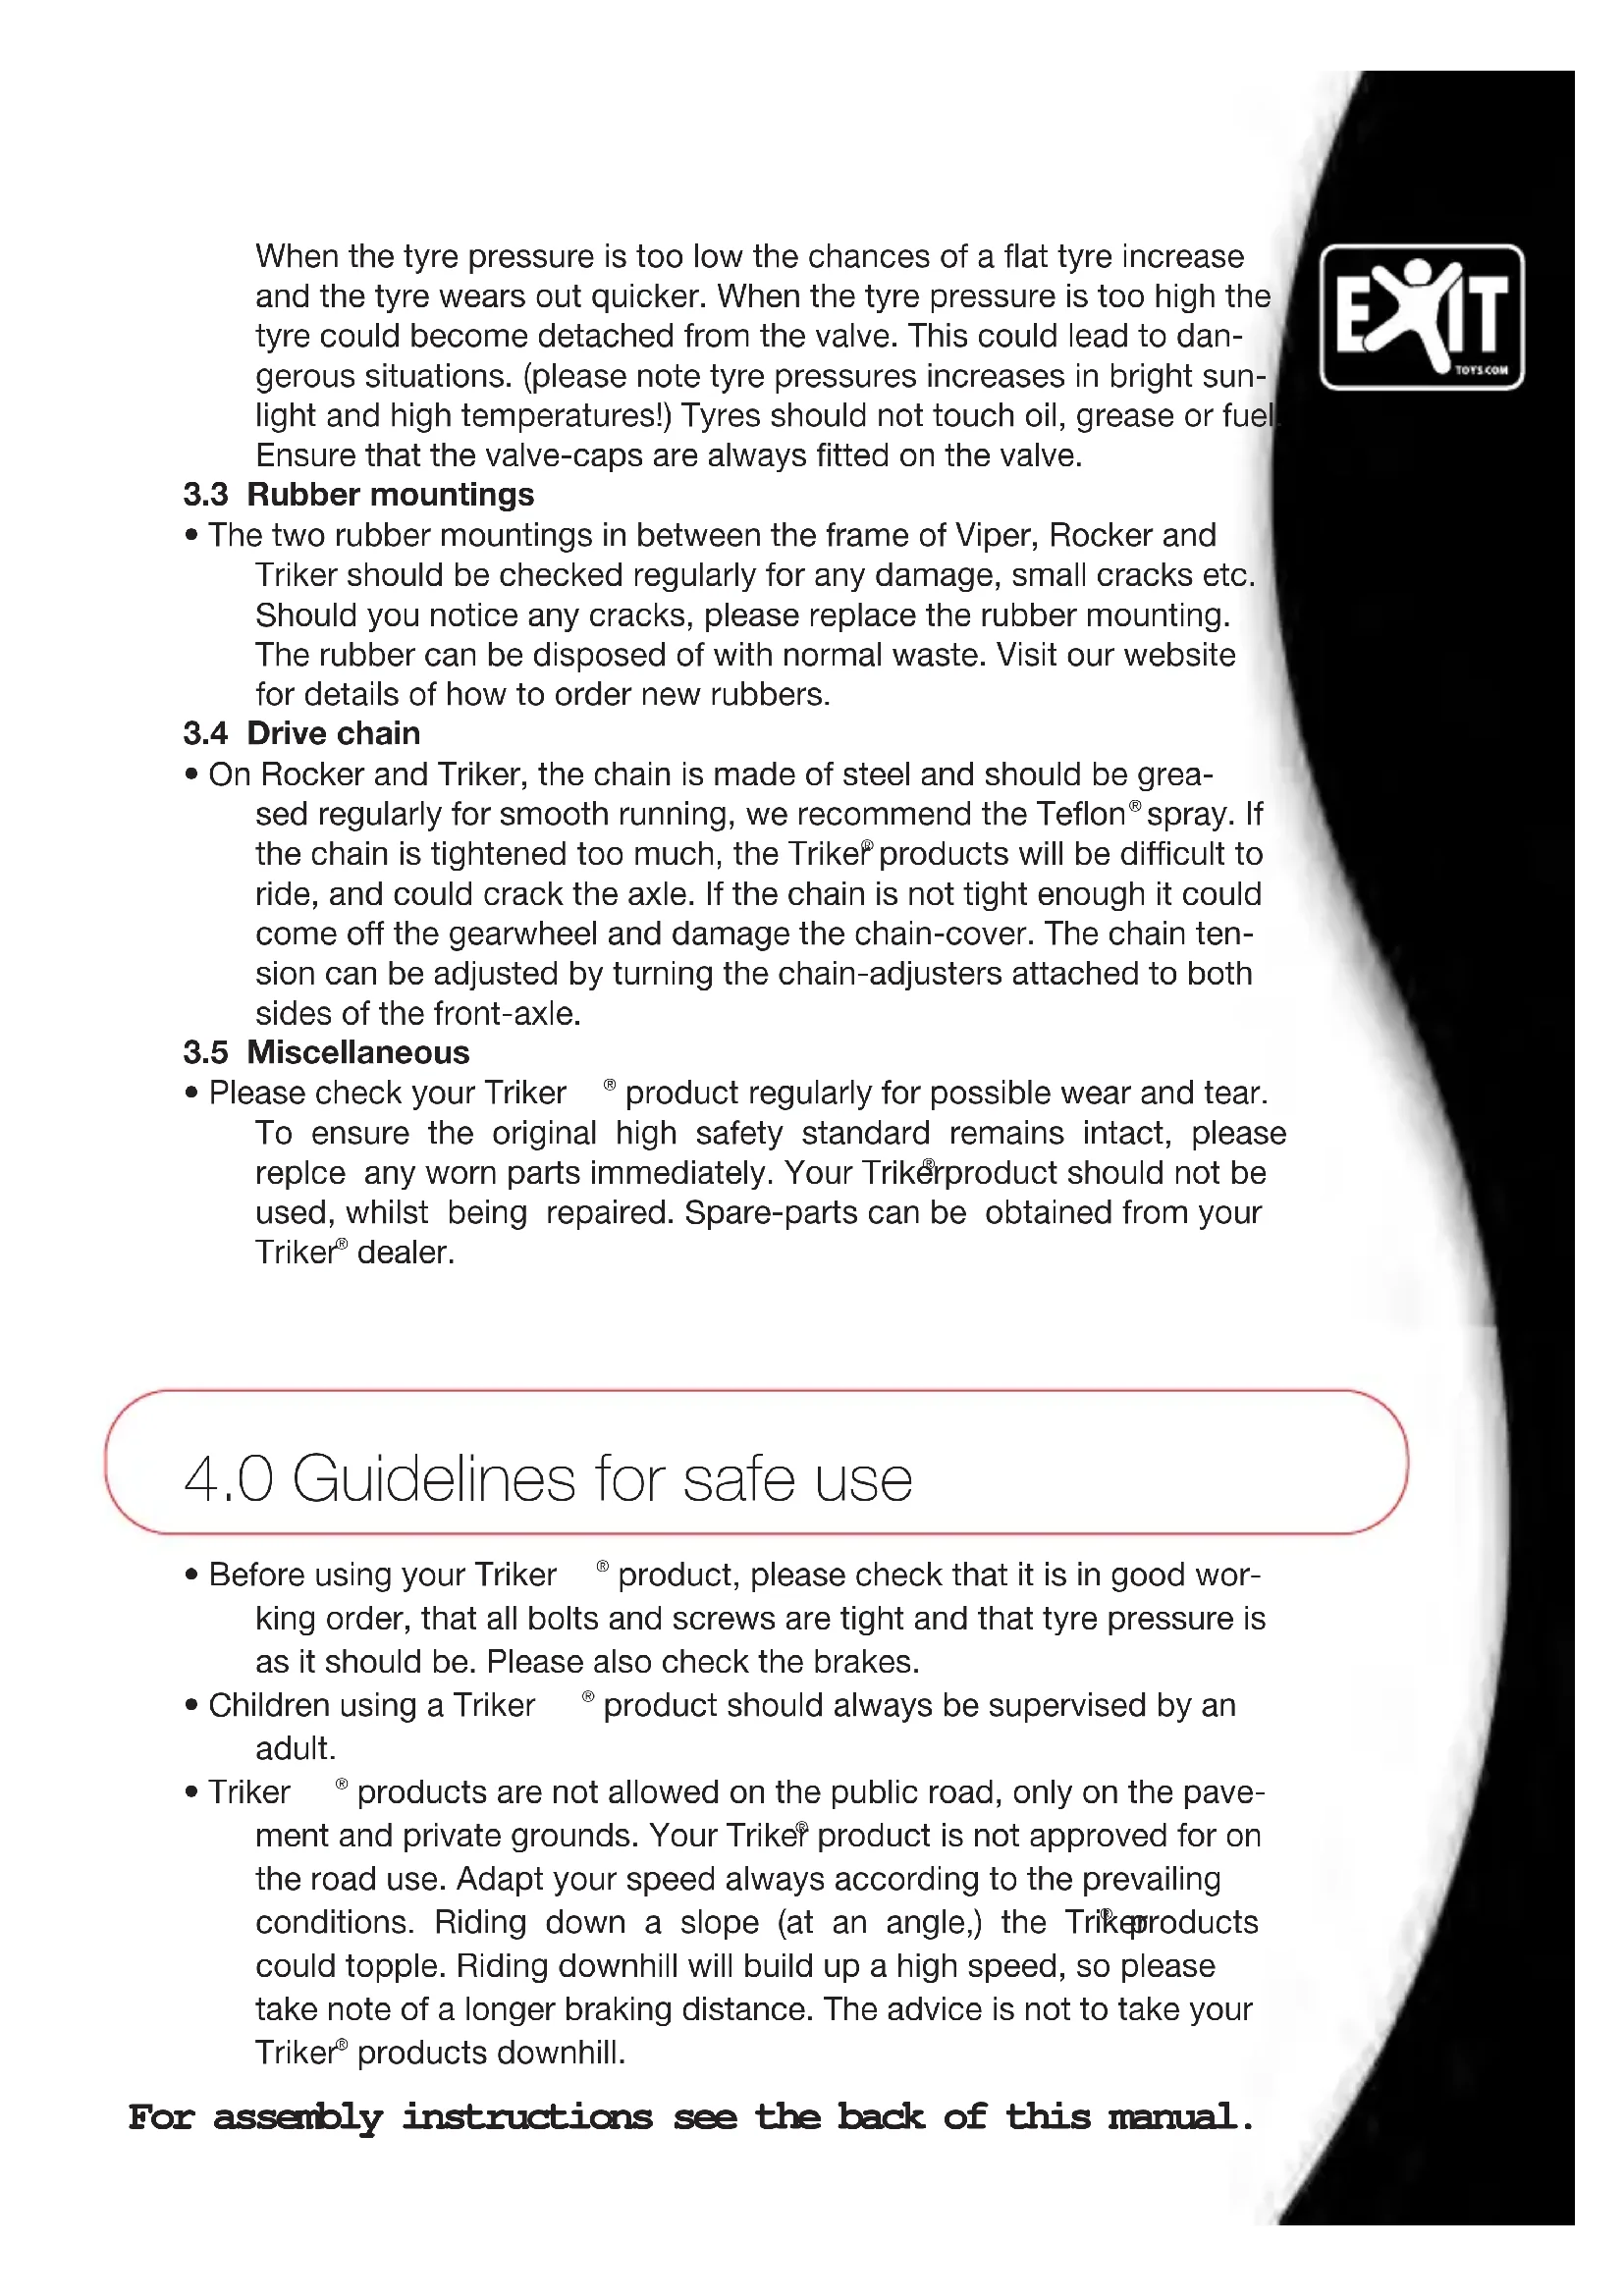
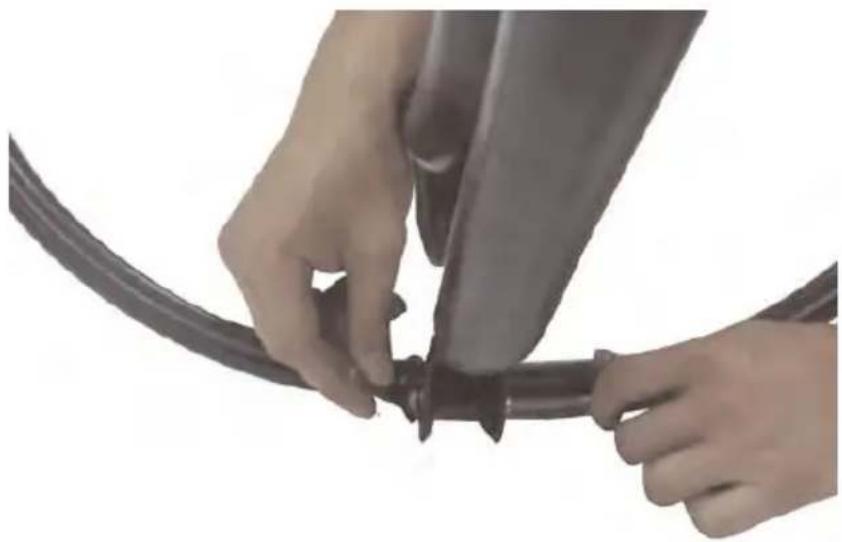
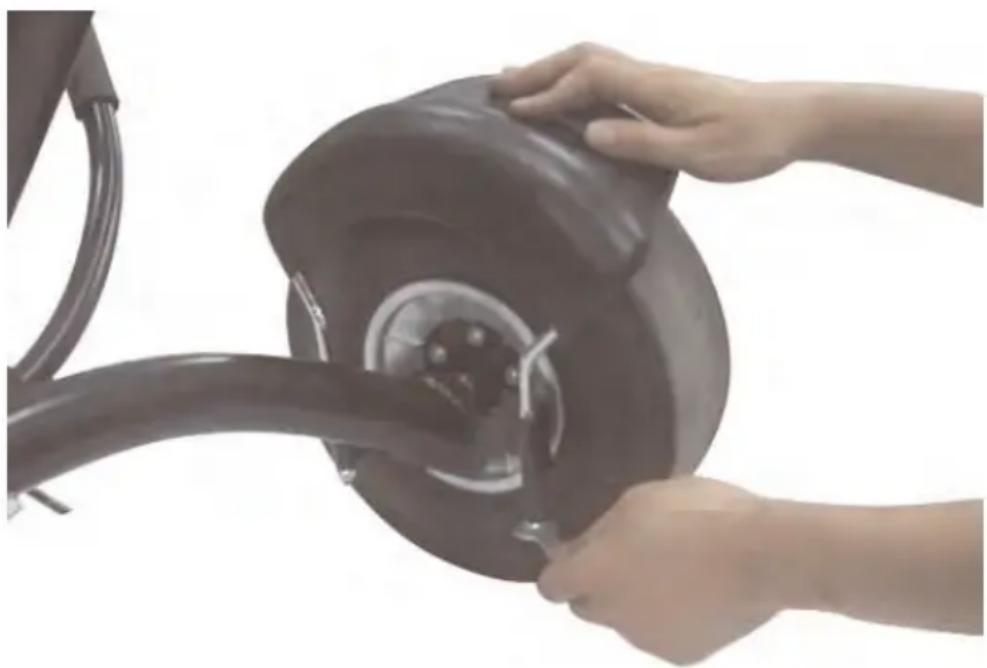
Close-up of hands installing or adjusting a curved metal pipe component (no text or symbols visible)EN Place the rear crossbar in the frame and fix it with the large bolt provided.
NL Plaats de achteras in the frame en bevestig dit met de grote bout.
FR Placer l'axe arrière dans le cadre et fixer-le avec le vis le plus grand.
DE Legen Sie die Hinterachse an der Hauptrahmen und befestigen Sie das mit den großen Schrauben.
natural_image
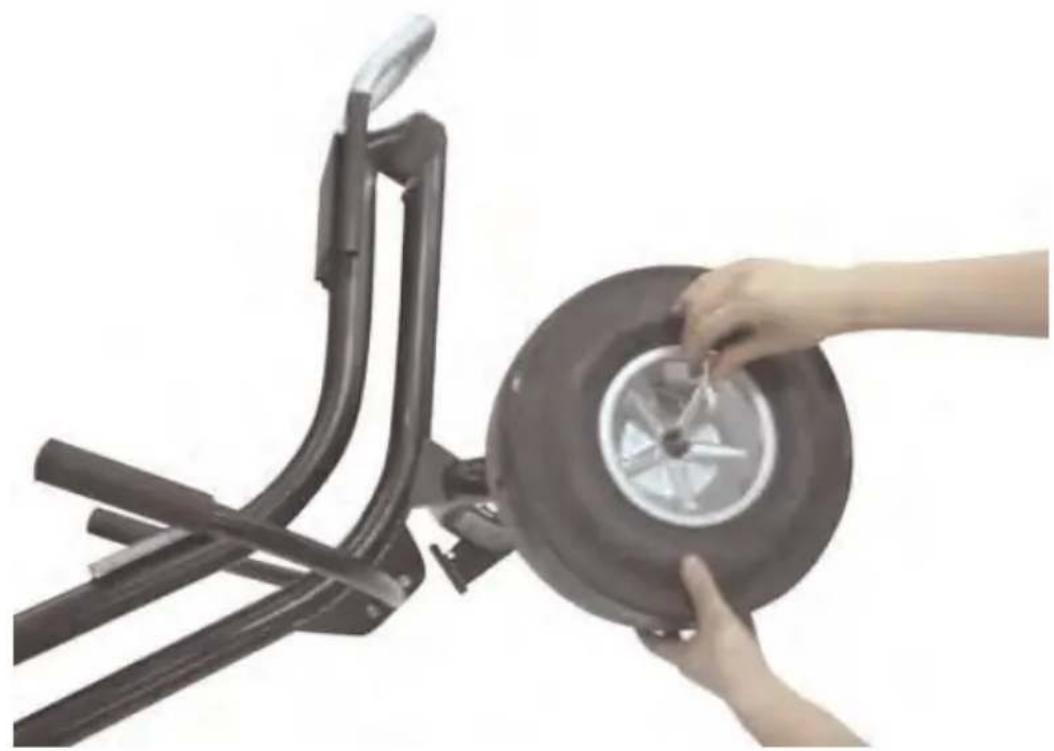
Person using a tire-mounted exercise bike to adjust the wheel (no text or symbols visible)natural_image
Close-up of a hand adjusting a large aircraft landing gear with a small wheel (no text or symbols visible)
natural_image
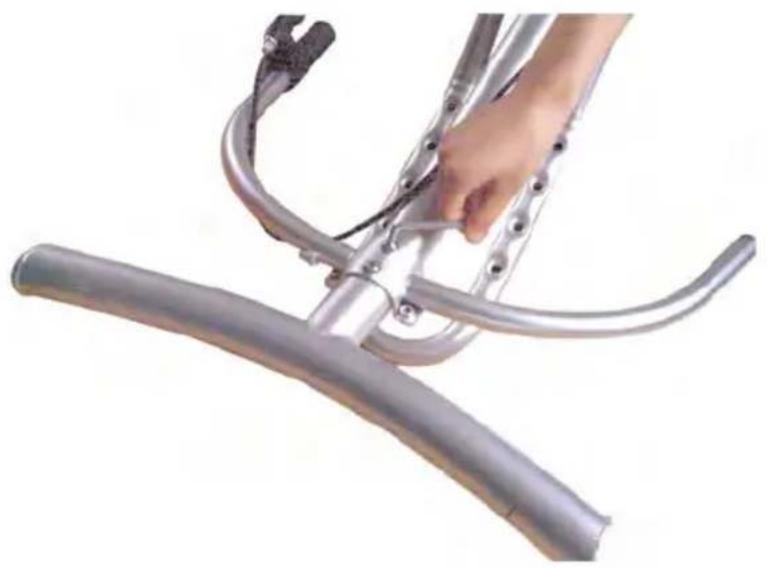
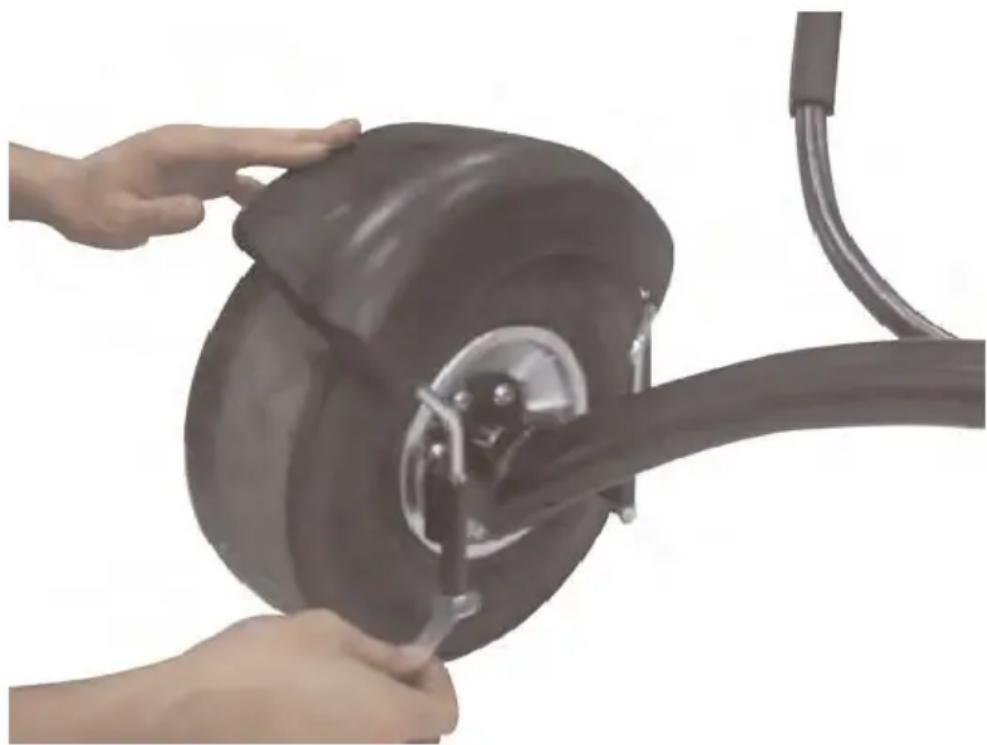
Close-up of hands adjusting a car brake system with a wheel and connecting rod (no text or symbols visible)EN Put the rear fenders in the fender holders and fasten them with the nuts provided.
NL Plaats de achterste spatbordjes in de spatbordhouders en bevestig deze met de moertjes.
FR Placer les gardes-boues arrières dans les portes-gardes-boues et fixer-les avec les écrous.
DE Setzen Sie die Schutzbleche an der Schutzblechhalter und befestigen Sie es mit den Muttern.
natural_image
Close-up of hands adjusting a car tire with a cable, no visible text or symbols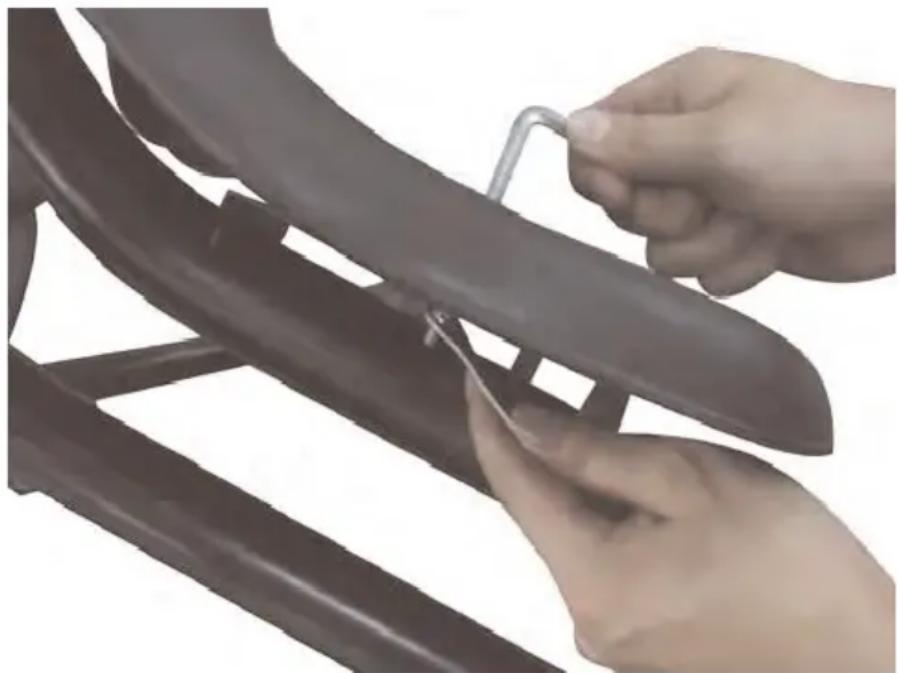
natural_image
Close-up of hands installing or adjusting a metal bracket component (no text or symbols visible)
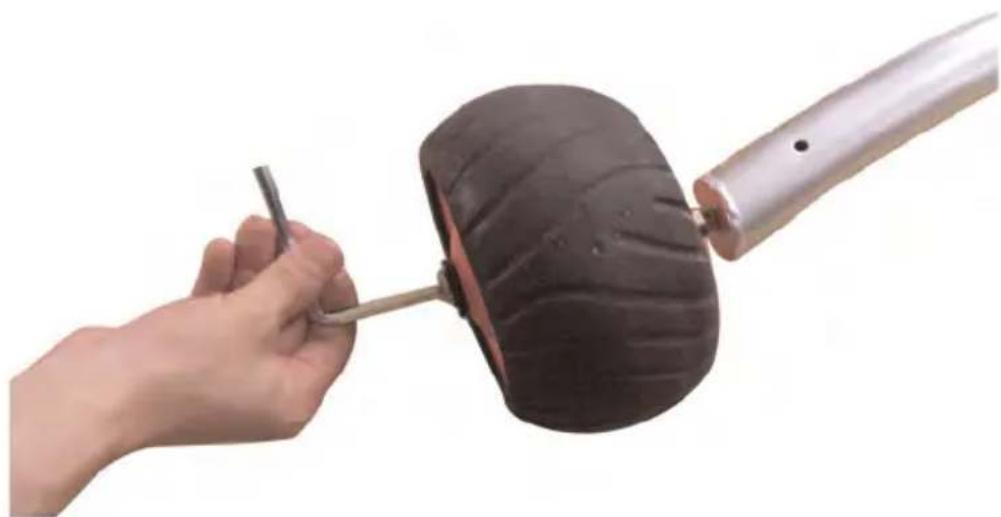
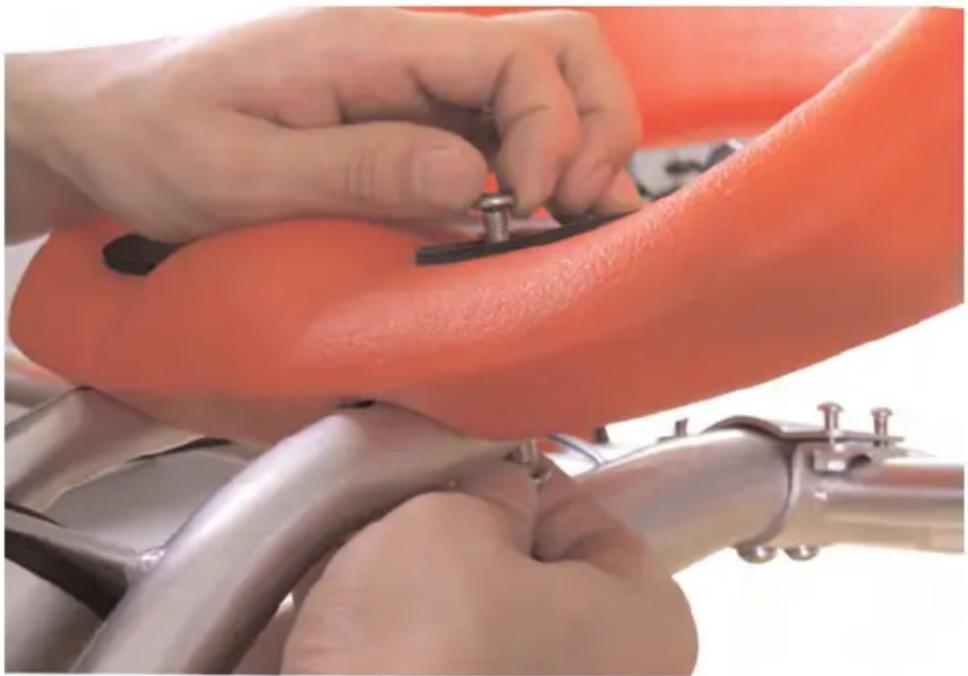
EN Use the 4 bolts (2 short, 2 long) with nuts to secure the seat. The nut goes through the bottom side, while the bolt goes through the top side. The short bolts are for the bottompart, the long bolts are for the back part. Using 2 Allen keys, secure the bolt into the nut. Attach the four bolts in this way.
natural_image
Close-up of hands installing or adjusting a metal bracket component (no text or symbols visible)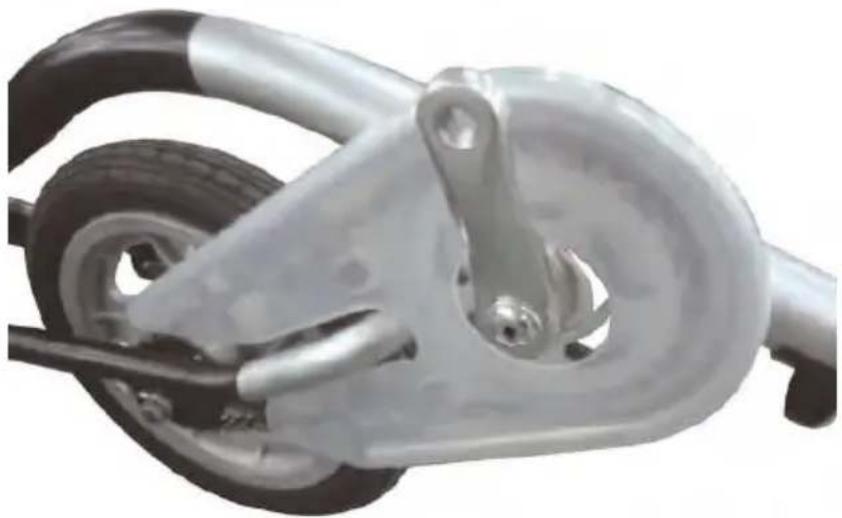
natural_image
Close-up of a mechanical pulley or steering wheel assembly (no visible text or symbols)natural_image
Close-up of hands using a handheld tool to adjust or install a silver industrial machine component (no visible text or symbols)EN Attach the pedal to the crank. Make sure to attach the left pedal to the left crank and the right pedal to the right crank. On the pedal itself you will find an indication of which side it should go on. Use a wrench to tighten the pedal. On both sides, you should turn the wrench in a forward direction (lef pedal counterclockwise, right pedal clockwise).
NL Bevestig de pedalen op de cranks. Zorg ervoor dat de linkerpedaal op de linkercrank komt en de rechter pedaal aan de rechterkant. De aanduiding van L en R staat aangegeven op de pedaal zelf. Draai de pedaal steeds in voorwaartse richting vast.
FR Fixer les pédale sur les manivelles. Veillez que le pédale de gauche est fixé sur la manivelle de gauche etc. Les indications de R et L se trouvent sur les pédales mêmes.
DE Befestigen Sie das Pedale an der Kurbeln. Das rechte und linke Pedale ist angezeignet auf dem Pedal selbst. Drehen Sie die Schrauben vom Pedal immer nach vorne.
Contact Us:
Dutch Toys Group