
Mint 4200 - Robot vacuum IROBOT - Free user manual and instructions
Find the device manual for free Mint 4200 IROBOT in PDF.
| Product type | Robot vacuum |
| Brand | iRobot |
| Model | Mint 4200 |
| Functions | Dry sweeping (Broom mode) and wet mopping (Mop mode) with disposable or microfiber cloths |
| Navigation | NorthStar system with Navigation Cube (beacon) for mapping and tracking |
| Power supply | Built-in rechargeable battery, 120 V AC wall charger |
| Battery life | Up to 3 hours in dry mode, up to 2 hours in wet mode |
| Charging time | 16 hours for first charge, then approximately 4 to 5 hours for a full charge |
| Maximum cleaning area | Approximately 20 to 30 m² per cycle (with NorthStar Cube) |
| Sensors | Stair detection, NorthStar navigation sensors, bumper |
| Floor types | Hard floors: tile, hardwood, vinyl, laminate. Not suitable for carpets or thick rugs |
| Approximate dimensions | 30 cm x 30 cm x 8 cm |
| Approximate weight | 2.5 kg |
| Box contents | Mint robot, NorthStar Navigation Cube, charger, removable cleaning pad, microfiber cloths (dry and wet), user manual |
| Maintenance | Clean wheels with a damp cloth; store on its side; remove battery for extended storage |
| Safety | Do not immerse in water; supervise children and pets; avoid wet slippery floors; do not use on carpet |
| Spare parts available | Cleaning pad, NorthStar Cube, rechargeable battery, charger, microfiber cloths |
| Warranty | 1 year limited (North America), extension possible |
Frequently Asked Questions - Mint 4200 IROBOT
User questions about Mint 4200 IROBOT
0 question about this device. Answer the ones you know or ask your own.
Ask a new question about this device
Download the instructions for your Robot vacuum in PDF format for free! Find your manual Mint 4200 - IROBOT and take your electronic device back in hand. On this page are published all the documents necessary for the use of your device. Mint 4200 by IROBOT.
USER MANUAL Mint 4200 IROBOT
natural_image
White square electronic device with a black diamond-shaped top and control buttons, placed on a black base (no visible text or symbols)
natural_image
Abstract wavy line logo with a diamond shape and 'TM' text (no readable text or symbols beyond the logo design)AUTOMATIC FLOOR CLEANER
Mint Automatic Floor Cleaner Owner's Manual
Model Number 4200
www.mintcleaner.com
1.888.543.6468
TABLE OF CONTENTS
Safety Instructions /PAGE 4
- Mint's Features / PAGE 6
Mint' Buttons and Lights /PAGE 7
How Mint Cleans / PAGE 9
Sweep and Mop Modes /PAGE 11
Operating Mint /PAGE 13
Battery and Charging /PAGE 16
Maintenance / PAGE 18
Customer Support / PAGE 19
Trouble Shooting / PAGE 20
Limited Warranty / PAGE 26
IMPORTANT SAFETY INSTRUCTIONS TO REDUCE THE RISK OF FIRE, ELECTRIC SHOCK, OR INJURY
CAUTION: DO NOT EXPOSE THE ELECTRONICS OF MINT, ITS BATTERY OR THE CHARGER. THERE ARE NO USER-SERVICEABLE PARTS INSIDE. REFER SERVICING TO QUALIFIED SERVICE PERSONNEL.
WARNING: READ AND SAVE THESE INSTRUCTIONS.
To avoid the risk of injury or damage, these basic precautions should always be followed:
Read all safety and operating instructions before using Mint.
Read and heed all warnings in this manual and on Mint, the Cube and the charger.
Only use Mint in accordance with the specifications outlined in this manual.
Do not attempt to repair or adjust any electrical or mechanical functions on this device. Tampering with these functions may create a hazardous condition, and it will void your warranty.
- Be aware that floors may be slippery after wet cleaning with Mint.
- Mint operates very quietly. Take care when walking in the area Mint is cleaning to avoid stepping on Mint and tripping.
USE RESTRICTIONS
- Mint is not a toy. Supervise children and pets when Mint is cleaning.
- Mint has electrical parts. Do not spray, rinse or submerge it in water. Clean with a dry cloth only.
◆ Mint is for household use only.
◆ Mint is for indoor use on hard surface floors only.
Do not use Mint to pick up large debris, liquid spills, bleach, paint, or other chemicals.
Do not use Mint near any objects that are burning or smoking.
Before using Mint, remove fragile objects from the cleaning area, including objects on furniture that can fall if the furniture is pushed or bumped.
- Move any power cords as well as cords for blinds and curtains out of the way to reduce the risk of objects being pulled down.
Do not operate Mint in areas with exposed electrical outlets in the floor.
Block off access to open balconies near the cleaning area with physical barriers.
Do not place anything on top of Mint.
- Follow instructions on Page 13 for attaching the cleaning cloth to ensure proper function of all sensors.
When mopping, do not use Mint in areas where wetness can damage unfinished or unsealed floors or delicate carpeting or rugs.
- Operate at room temperature. Do not expose Mint or its batteries to freezing or extreme heat.
BATTERY AND CHARGING
Charge using a standard U.S. (120V AC) outlet only.
Only use the included charger to charge Mint.
Only use rechargeable battery packs approved by the manufacturer.
Do not use a charger with a damaged cord or plug.
Do not handle or charge Mint when hands are wet.
◆ Always disconnect Mint from the charger before cleaning.
Proposition 65 Warning: This product contains chemicals known to the state of California to cause cancer and birth defects or other reproductive harm.
Notice: Mint contains a software interface for the purpose of enabling the manufacturer to provide updates to the internal firmware if any such updates are made available to users. Any attempt to access, retrieve, copy, modify, distribute or otherwise use any of the Mint software is strictly prohibited.
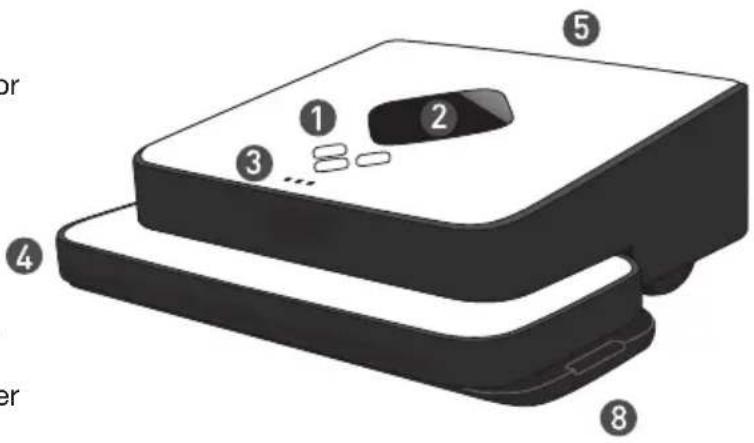
Mint's Features
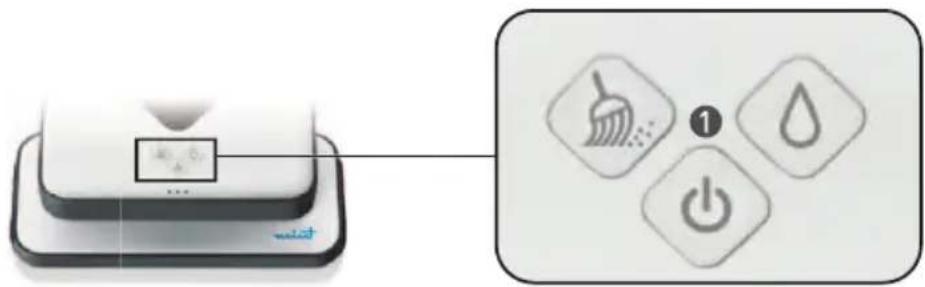
1 Control Buttons
2 NorthStar® Navigation Sensor
3 Navigation System Indicator
4 Bumper
5 Handle
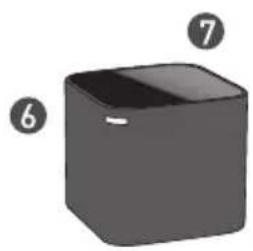
6 NorthStar® Navigation Cube
7 On/Off Button on back corner
natural_image
3D cube illustration with numbered circles (6, 7) pointing to its faces, no text or symbols present.8 Removable Cleaning Pad
9 Battery Charging Port
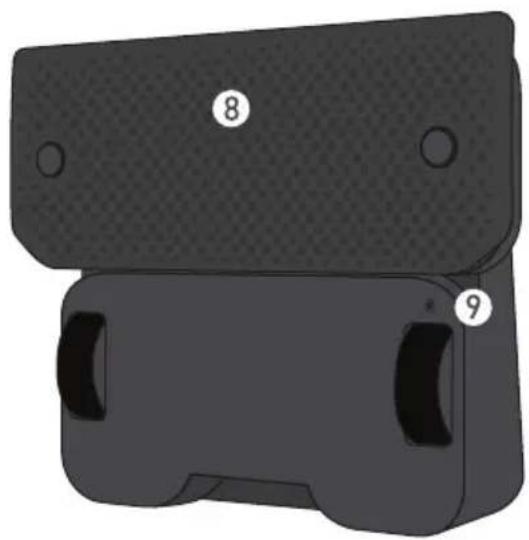
natural_image
3D rendered mechanical component with labeled parts 8 and 9 (no text or symbols beyond labels)Mint's Buttons and Lights
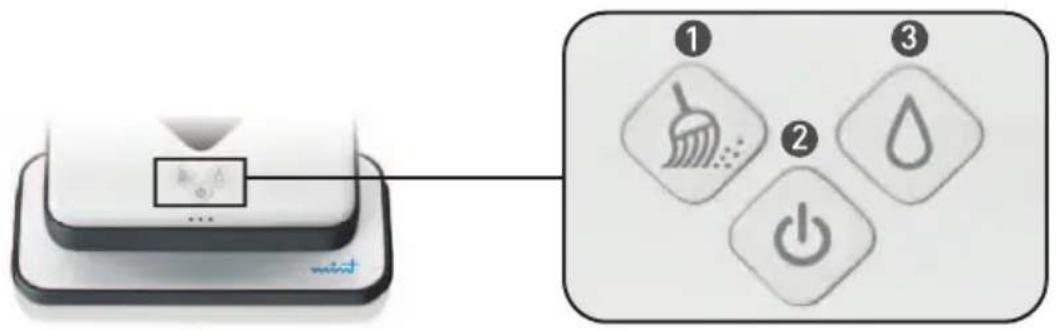
Mint's Buttons
flowchart
graph TD
    A["Device with triangular pointer"] --> B["Arrow pointing to the second icon"]
    B --> C["Icon ①: Brush brush, Dot dot, Dash arrow"]
    B --> D["Icon ②: Drop drop, Power button"]
    B --> E["Icon ③: Power button"]
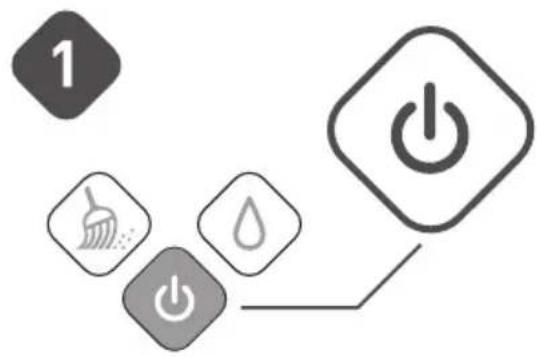
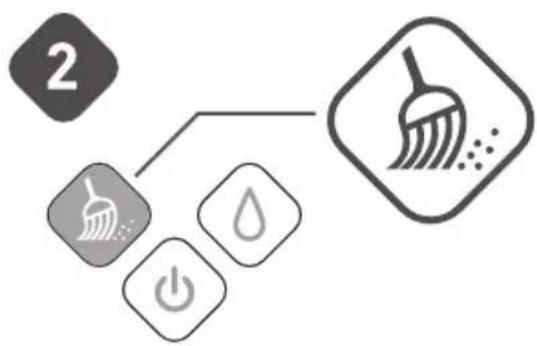
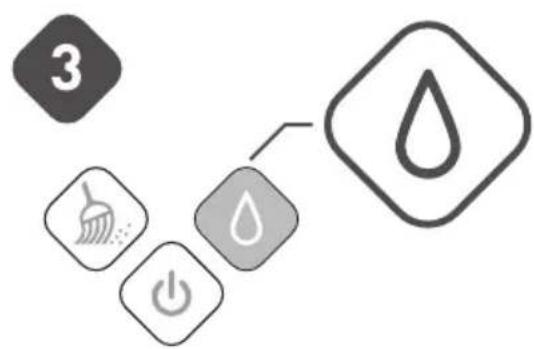
① Sweep Button
For cleaning with dry cloths
② Power Button Mc Button
Press once to turn Mint on
For cleaning with wet cloths
Hold for 2 seconds to turn Mint off
Mint's Lights
① + ③ Sweep + Mop Buttons
Selected Cleaning Mode
blue solid
② Power Button
Power On
blue solid
Battery Starting to Get Low
red blinking
Low Battery
(needs to be recharged)
red solid
Mint's Lights Cont'd
Navigation System Indicator Lights
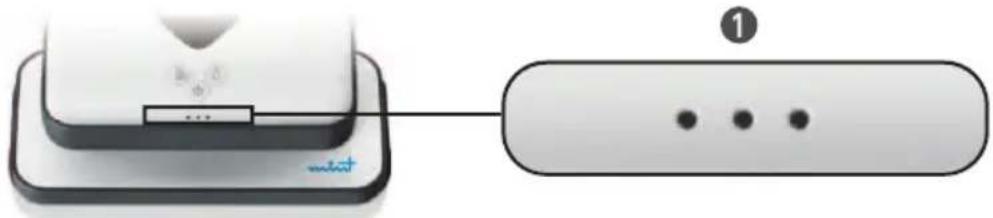
① Indicator Lights
Establishing Connection to NorthStar Navigation Cube
single blue light blinking
Locked onto NorthStar Navigation Cube
one or more solid blue lights
The number of lights indicates the strength of Mint's connection to the navigation system, with 3 being the strongest.
If there are no lights, Mint does not detect a signal from the NorthStar Navigation Cube.
Other Modes
Thinking
blue flashing lights in sequence
Sleep Mode
blue flashing lights with pause
Error
solid red middle light
See trouble shooting section for more information.
② NorthStar® Navigation Cube Lights
Power On, Broadcasting Signal
blue blinking
Power On, Connected to Mint
blue solid
natural_image
Diagram showing a device connected to a labeled rectangular block (no text or symbols present)Low Battery red solid
How Mint Cleans
Mint intelligently cleans your floor by mapping the room as it cleans.
Mint's Cleaning Cycle
- Mint starts by cleaning open areas, cleaning first to the right and returning later to clean the area to the left, covering the floor section by section.
When open areas are complete, Mint cleans along edges of furniture and walls with the side of the cleaning cloth.
When finished, Mint returns to where it started and parks itself.
Tip: The first time you clean, start Mint in an open area to get a sense of how it maneuvers.
NorthStar® Navigation
The NorthStar Navigation Cube acts as a beacon, emitting a signal that guides Mint's cleaning.
When Mint detects the signal, it tries to establish a connection to the NorthStar Navigation Cube, indicated by one flashing blue light on the Navigation System Indicator. Once Mint has locked onto the Cube, the light turns solid blue.
The Navigation System Indicator also indicates Mint's range. As Mint gets to the edge of its range (such as going out of the room or far from the NorthStar Navigation Cube) the number of lights will go down.
- Mint may occasionally drive back toward the NorthStar Navigation Cube to confirm its position before continuing on its cleaning path.
Mint builds a new map each time it starts a new cleaning cycle. Please note that if you stop or move Mint mid-cycle it will clear its map and create a new one when you restart it.
Note: Because the Cube is just one part of the NorthStar Navigation System, Mint can still clean without the Cube present, however the cleaning area will be smaller and Mint will not be able to perform edge cleaning at the end of the cleaning cycle.
Tip: Use Mint without the NorthStar Cube for a quick clean in small areas like bathrooms.
How Mint Cleans Cont'd
Mint's Moves
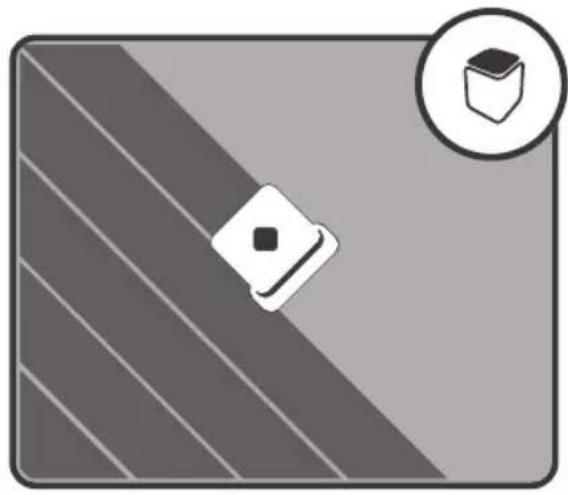
natural_image
Abstract geometric design with diagonal stripes and a central diamond shape, no text or symbols present.In open areas, Mint methodically cleans back and forth across your floor.
- Mint starts where you place it and works its way out from there, cleaning as far as it can reliably go and automatically adjusting to new areas it discovers.
As Mint encounters chair legs, furniture and other obstacles it cleans around them and then continues its cleaning pattern. Mint will periodically return to areas it skipped before continuing on.
natural_image
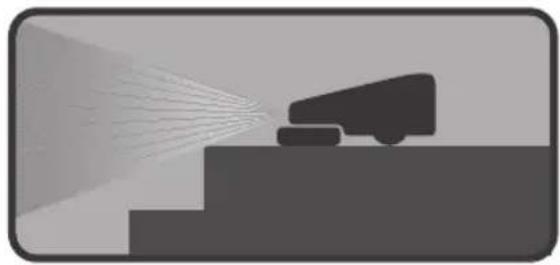
Silhouette of a vehicle emitting exhaust beams from a chimney, with no visible text or symbols.- Mint detects stairs and will maneuver away from drop offs and back to the cleaning area.
- Mint also detects area rugs and raised transitions to carpet so it can avoid driving onto them.
Note: If your carpet is flush with your hard surface floor, you may need to add a temporary barrier to provide Mint a boundary it can detect.

natural_image
3D-rendered corner wall corner with a small square object on the floor (no text or symbols)- Mint follows along walls and edges as it encounters them and at the end of its cleaning cycle.
Sweep and Mop Modes
Mint sweeps and mops hard surface floors using readily available dry and wet cleaning cloths or the included reusable microfiber cloths. See page 12 for additional information about cleaning cloths.
Sweep Mode
Sweep mode is intended for cleaning with a dry cloth.
In sweep mode, Mint moves ahead in a straight line when it begins cleaning, then cleans back and forth in parallel lines.
It is ideal for picking up dust, dirt and hair to maintain clean, grit-free floors every day.
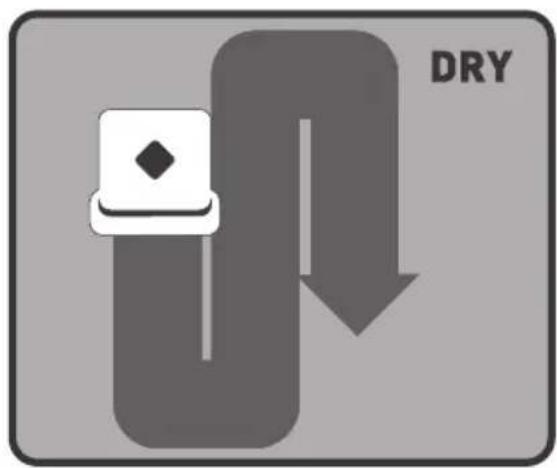
Mop Mode
Mop mode is intended for cleaning with a wet cloth.

natural_image
Abstract diagram with directional arrows and a central white square, labeled 'WET' at bottom (no other text or symbols)In mop mode, Mint drives forward a short distance to one side, backs up slightly then moves forward to the other side, alternating to the left and right as it progresses.
This mopping action helps dissolve and pick up the deeper dirt and grime on your floors.
- Mint automatically adjusts to a smaller cleaning area in mop mode to optimize cleaning while the cloth is wet.
Tip: Start with dry sweep mode to pick up surface grit and then follow with a wet cloth in mopping mode to get a deeper clean.
Sweep and Mop Modes Cont'd
Notice: Mint is not a vacuum and is not intended to pick up large debris. Pick up large debris before cleaning with Mint and check for gravel or sharp objects that could scratch the floor if captured under the cleaning pad.
Cleaning Cloths
- Mint is compatible with most disposable dry and pre-moistened wet cleaning cloths such as Swiffer® brand and store brands like Target®.
Please note that Mint is not compatible with Swiffer® WetJet® Refills.
Microfiber cloths that are designed to work with Mint can also be used. These cloths can be rewashed and reused. Different cloths are available for different types of cleaning. To learn more visit www.mintcleaner.com.
Tip: Always follow the use and care instructions included with any dry or wet cleaning cloths to care for your floors.
Floor Types
Mint is designed to clean hard surface floors including wood, tile, vinyl, linoleum and laminate.
Mint cleans best on smooth hard surfaces and may not perform on uneven tiles, heavily waxed floors or rough surfaces like slate or brick which can snag the cleaning cloth.
- Mint is intended for indoor, household use only.
- Mint is not a vacuum and is not intended for use on carpets.
Notice: Wet cloths may not be suitable for cleaning unsealed floors. Refer to the instructions included with wet cloths and solutions to determine if they are safe for your floor.
Operating Mint
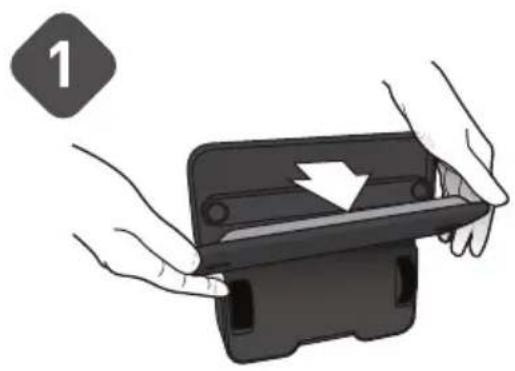
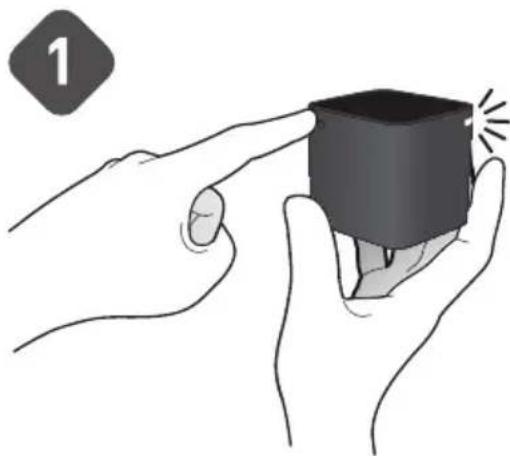
Put On a Cleaning Cloth
natural_image
Illustration of hands holding a black electronic device with a white arrow indicating a component (no text or symbols)- Set Mint on its end and remove the cleaning pad.
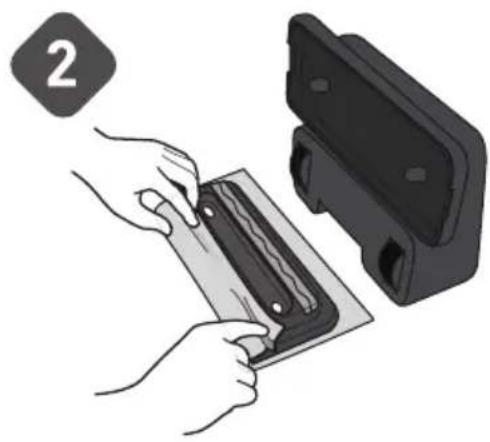
natural_image
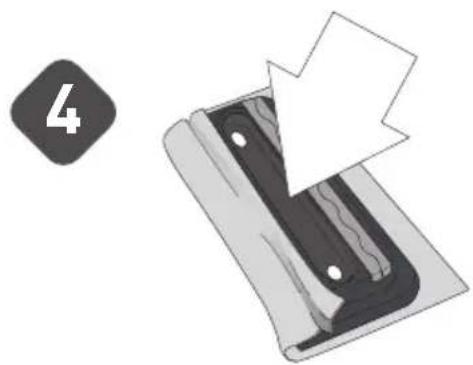
Illustration of hands installing or adjusting a component into a black plastic housing (no text or symbols visible)- Attach a dry or wet cleaning cloth to the cleaning pad:
- Lay the removable pad on an open cleaning cloth.
- Attach cloth by tucking it into the gripping strips on both sides.
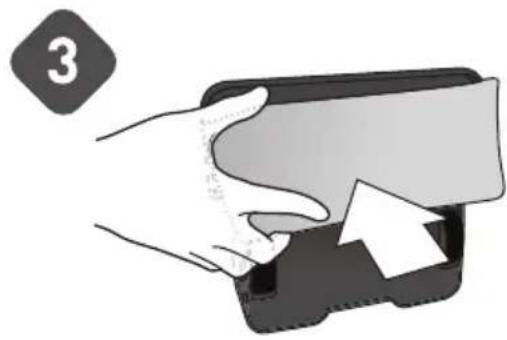
natural_image
Illustration of a hand inserting a card into a wallet with an arrow indicating the card's direction (no text or symbols present)◆ Re-attach the removable cleaning pad. Magnets will help it snap back into place.
natural_image
Illustration of a mechanical component with a numbered label '4' and an arrow pointing to a section (no text or symbols on the main diagram)Caution: Make sure the cleaning cloth does not drape into the middle channel between the gripping strips as this could impede sensor functions and safe operation.
Operating Mint Cont'd
Place the NorthStar® Cube
natural_image
Illustration of two hands holding a small black cube with a glowing effect (no text or symbols)- Press the button on the back corner of the NorthStar Navigation Cube to turn it on. A blue light will flash on the opposite corner when turned on, and then go solid when Mint locks onto it.
If you forget to turn the Cube on, Mint will send a signal to try to turn it on. If Mint is successful, the blue flashing light will appear on the Cube.
Note: You can set up additional Cubes (sold separately) to cover different areas in your home. If two Cubes are in range, Mint will lock onto the one with the strongest signal and clean that area. The other Cube will automatically shut off.
natural_image
Illustration of a black box on a conveyor belt with paper sheets, no text or symbols presentPlace the NorthStar Navigation Cube on a table or counter top, pointing the blue light away from walls and toward the middle of the room.
For Best Results
Place the NorthStar Navigation Cube where it has a clear view of the ceiling (for example, no cabinet or shelf directly above it).
Do not move the NorthStar Navigation Cube once Mint has started cleaning as it may impair Mint's cleaning performance.
Do not put the NorthStar Navigation Cube on the floor as the cleaner may run into it and move it.
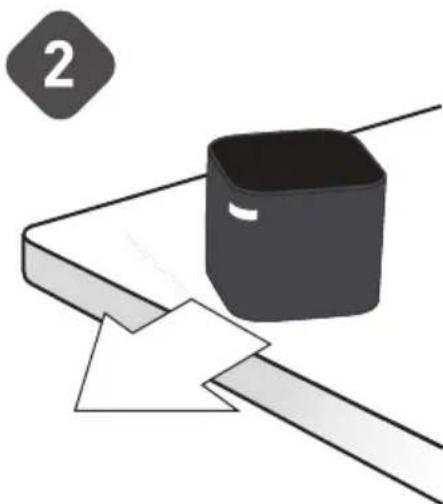
Start Cleaning
Place Mint on the floor near the NorthStar Navigation Cube.
- Turn Mint on using the power button. The button will light up blue when the cleaner is on.
flowchart
graph TD
    A["2"] --> B["Brush"]
    B --> C["Power"]
    C --> D["Drop"]
    D --> E["Clean Brush"]
To start cleaning with a DRY CLOTH just press the Sweep button.
flowchart
graph TD
    A["3"] --> B["1"]
    B --> C["2"]
    C --> D["3"]
    D --> E["4"]
- To start cleaning with a WET CLOTH just press the Mop button.
One blue light will start blinking on the Navigation System Indicator if Mint detects a signal from the Cube. The light will turn solid blue once it locks onto the Cube. If no lights appear, Mint does not detect a NorthStar signal.
When Mint finishes cleaning, it plays a short song, returns to where it started and parks itself. Mint will also do this if the battery runs low while cleaning.
To turn Mint off, press the power button for two seconds. A tune will play and the light will turn off.
To turn off the NorthStar Navigation Cube, press the button on the back corner. The light on the opposite corner will turn off.
Battery and Charging
Battery
Mint comes with a rechargeable battery. On a full charge, it will clean up to 3 hours sweeping with dry cloths and up to 2 hours mopping with wet cloths.
Charging
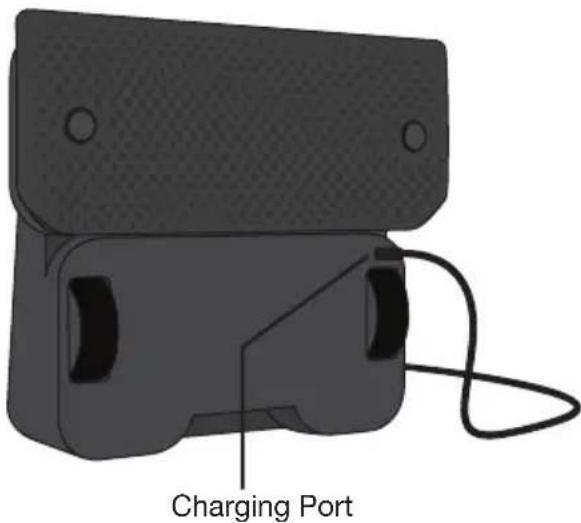
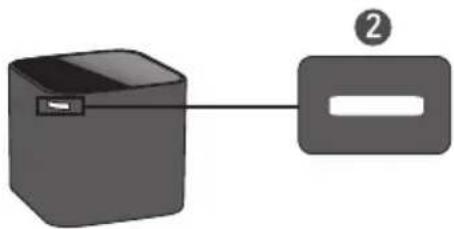
Stand Mint on its end to access the charging port.
Plug the charger into a standard electrical outlet and into Mint's charging port.
Charge Mint overnight or until a blue light appears on the power button.
- Keep Mint plugged in regularly to keep a full charge on the battery.
Tip: Charge Mint for 16 hours before the first time you use it and allow it to run down to red to maximize cleaning time.
Caution: Charge using a standard U.S. (120V AC) outlet only. Only use the included charger to charge Mint. Always disconnect Mint from the charger before cleaning.
Charging Indicators
① Power Button
These lights appear on the power button when the charger is plugged in:
Battery Charging
red pulsing
Battery Charged,
enough to use (80%)
blue pulsing
Battery Fully Charged
blue solid
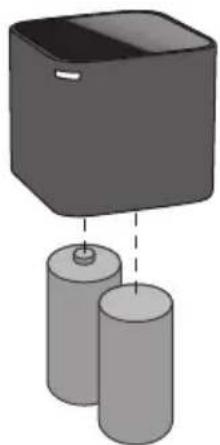
The NorthStar Navigation Cube
The Cube uses 2 C batteries. The battery door can be found on the bottom of the Cube.
natural_image
Diagram of a box with two cylindrical objects below, no text or symbols present
Please dispose of all batteries properly by finding a recycling resource near you.
Maintenance
To keep your Mint in the best working condition, follow these maintenance steps regularly.
Check tires to make sure they are in good condition before each use.
Use a damp cloth to wipe off dust and dirt on tires. Make sure that Mint is not plugged in and that the cloth is not dripping.
Use a dry cloth to wipe dust or dirt from Mint's exterior. Do not rinse or submerge in water.
Place Mint on its end (handle side down) when charging or storing between uses.
For long term storage, remove C batteries from the NorthStar Navigation Cube and remove the rechargeable battery from Mint by following these steps:
- Remove the battery door cover on the bottom of the cleaner with a screw driver.
- Disconnect the rechargeable battery pack from the small white plug and remove the battery.
◆ Replace the battery door and tighten the screw.
◆ Store Mint on end, in its original packaging.
Replacement Parts
Replacement parts are available including:
Removable magnetic pad
NorthStar Navigation Cube
◆ Rechargeable battery
Charger
To purchase or view a full list of available parts visit www.mintcleaner.com.
Customer Support
Visit www.mintcleaner.com for:
cleaning tips
◆ frequently asked questions
- trouble shooting
◆ information about parts and service
If you require additional assistance, call customer support at 1.888.543.6468
Register Your Mint Online
It's easy! Your registration allows us to share important product updates and helps us serve you better.
Visit www.mintcleaner.com/register
Trouble Shooting
Visit www.mintcleaner.com for additional tips and trouble shooting.
Problem
Mint won't start cleaning
Mint isn't cleaning where I want it to
Solution
Confirm the unit is powered on (a blue light will appear under the power button, bottom center. If a red light appears, the cleaner requires charging before it can clean).
Make sure the removable cleaning pad is securely attached and that the cleaning cloth is tucked cleanly into the gripping strips.
If the power is on, press the sweep button (left) to clean with a dry cloth or the mop button (right) to clean with a wet cloth. Mint should start cleaning in 2-3 seconds.
When Mint starts cleaning, it moves forward and starts cleaning the area to its right. Try starting Mint to the left of the area you'd like to clean.
Confirm the NorthStar Navigation Cube is on. A blue light will appear in one corner if the power is on. If no light appears, replace the batteries with 2 new C batteries.
Check the position of the NorthStar Navigation Cube and make sure there is no interference
Is there anything just above the NorthStar Navigation Cube, like a cabinet overhang?
◆ Move the Cube to an open area.
Is the NorthStar Navigation Cube close to a wall with the blue light facing the wall?
Turn the Cube so the blue light faces into the room.
Is there a moving ceiling fan above the NorthStar Navigation Cube?
◆ Turn off the fan (or move the Cube so it is not beneath the fan).
Is the ceiling in the room high or uneven?
◆ Move the Cube to an area with a lower and even ceiling.
- Try placing the NorthStar Navigation Cube in a new spot or facing it in a different direction.
Trouble Shooting Cont'd
Visit www.mintcleaner.com for additional tips and trouble shooting.
Problem
Mint is cleaning only a small area
(less than 200 square feet, for example)
Mint will not turn on
There is a red light on the cleaner
Solution
- Mint requires the NorthStar Navigation Cube to maximize its cleaning area. Make sure the Cube is in the area you want to clean.
◆ See previous page for best placement of the Cube.
Plug the included charger into the cleaner and charge the battery overnight or until the power button light turns blue while the charger is plugged in.
If the power does not turn on, make sure the rechargeable battery is securely connected:
Remove the battery door cover on the bottom of the cleaner with a screw driver.
- Disconnect and re-connect the rechargeable battery pack via the small white plug.
◆ Replace the battery door and tighten the screw.
◆ Press the power button.
If the red light is on the power button, the battery needs to be charged. Plug the charger that was provided into the cleaner and charge the battery overnight or until a blue light appears on the power button.
If the red light appears in the Navigation System Indicator (the 3 dots below the buttons), the cleaner has an error. Possible errors include:
- Mint is stuck and cannot free itself.
One of Mint's wheels has dropped off a ledge.
◆ Mint is unable to return to its starting point.
The NorthStar Navigation System is not functioning.
The NorthStar Navigation Cube was removed during the cleaning cycle.
In any of these cases, move the cleaner and restart it.
Trouble Shooting Cont'd
Visit www.mintcleaner.com for additional tips and trouble shooting.
Problem
Cleaner is stopped and blue lights are flashing
The Navigation System Indicator on Mint does not show any lights
The Navigation System Indicator on Mint keeps blinking blue
All of the lights are flashing on the cleaner
There is a red light on the NorthStar Navigation Cube
The NorthStar Navigation Cube won't turn on
The NorthStar Navigation Cube periodically shuts down
Solution
If Mint is left untouched for more than 5 minutes after it finishes a cleaning cycle, it goes into sleep mode and the blue indicator lights will appear in sequence. Press any button to wake it.
- Mint does not detect a NorthStar signal.
Make sure the NorthStar Navigation Cube is in the room and turned on (a blue light will show in one corner of the Cube).
Mint detects the signal from the NorthStar Navigation Cube and is trying to lock onto it. If Mint is cleaning, but the light is still blinking you may need to reposition the NorthStar Cube to improve the range of the signal.
An incompatible charger has been connected to Mint. Remove the incompatible charger and connect the charger that was included with Mint.
The batteries are low. Replace with 2 new C batteries.
The batteries may be dead. Replace with 2 new C batteries.
There may be interference with the NorthStar signal from some televisions and fluorescent lights.
Make sure the NorthStar Navigation Cube is not placed within 5 feet of a Plasma or LCD television.
If the Cube is in a room with fluorescent light, move the Cube to an area without fluorescent light or turn the fluorescent light off.
If Mint has traveled out of range for a while, the NorthStar Navigation Cube may turn itself off, but when Mint returns it will send a message to the Cube to turn it back on.
Limited Warranty
Evolution Robotics, Inc. (“ER”) warrants that this Mint automatic floor cleaner product (the “Product”) will be free from manufacturing defects in materials and workmanship for a period of 1 year (the “Warranty Period”) from the date of purchase to the original purchaser (the “Purchaser”). Please save your original sales receipt to validate the start of the Warranty Period.
If the Product becomes defective during the Warranty Period, ER will, at its option, repair, adjust, or replace the Product or its components. ER may, at its option, use new, reconditioned or substitute parts or Products. For warranty support, Purchaser must contact ER to obtain service instructions and warranty authorization by visiting www.mintcleaner.com or calling 1.888.543.6468. Purchaser may be required to deliver the defective Product to an authorized service center. If ER cannot reproduce the claimed defect Purchaser may be responsible for the costs of shipping and diagnostics. All returned parts and Product will become the property of ER. In general, you will need to deliver the Product in its original packaging or equally protective packaging to the address specified by customer support.
This Limited Warranty applies only to Products purchased in North America and operated under normal installation, use and service conditions. Warranty coverage will not apply to any damage or failure of the Product which ER determines is due to any other causes, including but not limited to: (i) failure to follow proper assembly, installation, operation, maintenance, and safety instructions as described in the owner's manual; (ii) use in environments or for purposes for which the Product was not designed; (iii) negligence, abuse, accident, or other physical damage; (iv) unauthorized repairs, alterations, or modifications; (v) use of any parts (such as a battery or charger) not provided by ER or combining the Product with other components not intended or recommended for use with the Product; (vi) wear and tear or cosmetic damage; (vii) causes beyond ER's control including fire, flood, wind, freezing, power failure, generalized corrosion, biological infestations, unusual atmospheric conditions, or acts of war or acts of God.
Warranty claims cannot be made where the serial number on the Product has been altered, removed or cannot be confirmed. Refurbished or reconditioned or resold Products are not eligible for warranty service.
No person or company is authorized to make any warranties other as provided herein. THIS LIMITED WARRANTY IS THE SOLE AND EXCLUSIVE WARRANTY PROVIDED BY ER IN CONNECTION WITH THE PRODUCT AND IS, WHERE PERMITTED BY LAW, IN LIEU OF ALL OTHER WARRANTIES, GUARANTEES, REPRESENTATIONS, OBLIGATIONS AND LIABILITIES, EXPRESS OR IMPLIED, STATUTORY OR OTHERWISE IN CONNECTION WITH THE PRODUCT OR ITS PERFORMANCE, INCLUDING WITHOUT RESTRICTION, ANY IMPLIED WARRANTY OR CONDITION OF QUALITY, MERCHANTABILITY, FITNESS FOR A PARTICULAR PURPOSE OR NON-INFRINGEMENT. ANY IMPLIED
WARRANTY OF MERCHANTABILITY OR FITNESS FOR A PARTICULAR PURPOSE TO THE EXTENT REQUIRED UNDER APPLICABLE LAW TO APPLY TO THE PRODUCT SHALL BE LIMITED IN DURATION TO THE PERIOD STIPULATED UNDER THIS LIMITED WARRANTY. IN NO EVENT WILL ER BE LIABLE FOR ANY SPECIAL, INDIRECT, INCIDENTAL, PUNITIVE OR CONSEQUENTIAL DAMAGES, LOSSES, OR EXPENSES HOWEVER CAUSED.
IN THE EVENT THE ABOVE REMEDIES FAIL, OR UNDER ANY OTHER THEORIES OF RECOVERY, ER's AGGREGATE LIABILITY, IF ANY, FOR DAMAGES, LOSS OR OTHERWISE, SHALL NOT EXCEED THE PURCHASE PRICE PAID TO ER FOR THE PRODUCT. This warranty gives you specific legal rights, which may vary from state to state.
Evolution Robotics, Inc.
1055 E. Colorado Blvd.
Pasadena, CA 91106
Notice: This device complies with Part 15 of the FCC Rules. Operation is subject to the following two conditions: (1) This device may not cause harmful interference, and (2) this device must accept any interference received, including interference that may cause undesired operation.
AUTOMATIC FLOOR CLEANER
Model Number 4200
www.mintcleaner.com
©2010 Evolution Robotics, Inc. All rights reserved. Evolution Robotics, the Evolution Robotics logo, Northstar, and Mint are trademarks of Evolution Robotics, Inc. All other trademarks are the property of their respective owners. Reproduction in any manner whatsoever without the written permission of Evolution Robotics, Inc. is strictly forbidden.
US Patent Numbers. 7,148,458, 7,720,554. Other patents pending.

natural_image
White square electronic device with a black diamond-shaped top and three buttons on its side, placed on a black base (no visible text or symbols)
natural_image
Abstract logo design featuring stylized wavy lines and a diamond shape, no readable text or symbolsLIMPIADOR DE PISOS AUTOMÁTICO
natural_image
3D cube illustration with numbered labels 6, 7, and 8 (no text or symbols on the cube itself)natural_image
3D rendered mechanical component with labeled parts (8 and 9), no readable text or symbols beyond labelsnatural_image
Diagram showing a device connected to a labeled rectangular block (no text or symbols present)natural_image
Pure diagram of a 3D object with diagonal stripes and a circular icon containing a shaded cube (no text or symbols)natural_image
Illustration of a vehicle emitting exhaust beams toward a truck on a mountain slope (no text or symbols)natural_image
Simple 3D illustration of a corner wall with a small square object on one end (no text or symbols)natural_image
Illustration of hands holding a black rectangular device with a white arrow pointing to it, no text or symbols presentnatural_image
Illustration of hands installing or adjusting a component into a black plastic housing (no text or symbols visible)natural_image
Illustration of a hand inserting a card into a wallet with an arrow indicating the card's direction (no text or symbols present)natural_image
Illustration of a mechanical component with a numbered arrow and label '4' (no text or symbols on the diagram itself)natural_image
Illustration of two hands holding a small black cube with a glowing effect (no text or symbols)natural_image
Simple diagram showing a black square object on a white surface with a diagonal line extending from it, no text or symbols present.natural_image
3D rendering of a black VR headset with attached cable and ports (no text or symbols)Puerto de recarga
① Botón de energía
natural_image
Diagram of a box with two cylindrical objects below, no text or symbols present
Visite www.mintcleaner.com/register
Evolution Robotics, Inc.
1055 E. Colorado Blvd.
Pasadena, CA 91106
natural_image
White square electronic device with a black diamond-shaped top and three buttons on its side, placed on a black base (no visible text or symbols)
natural_image
Abstract wavy line design with a diamond shape and a horizontal bar labeled 'MD' (no text or symbols beyond the label)NETTOYEUR HAUTE PRESSION AUTOMATIQUE
Assistance technique / PAGE 19
Dépannage / PAGE 20
natural_image
3D cube illustration with numbered labels 6, 7, and 8 (no text or symbols on the cube itself)natural_image
3D rendered mechanical component with labeled parts (8 and 9), no readable text or symbols beyond labels① Voyants lumineux
natural_image
Simple diagram showing a device connected to a rectangular block with an arrow and label (no text or symbols)natural_image
Pure diagram of a 3D object with diagonal stripes and a circular icon containing a shaded cube (no text or symbols)natural_image
Illustration of a vehicle emitting exhaust beams to a truck on a mountain slope (no text or symbols)natural_image
Simple 3D illustration of a corner wall with a small square object on the floor (no text or symbols)natural_image
Illustration of hands holding a black device with a white arrow indicating a change or movement (no text or symbols present)natural_image
Illustration of hands installing or adjusting a component into a black plastic housing (no text or symbols visible)natural_image
Illustration of a hand inserting a card into a wallet with an arrow indicating the card's direction (no text or symbols present)natural_image
Illustration of a mechanical component with a numbered arrow and label '4' (no text or symbols on the diagram itself)natural_image
Illustration of two hands holding a small black cube with a glowing effect (no text or symbols)natural_image
Illustration of a black square container on a ramp with a paper sheet, no text or symbols presentnatural_image
Diagram of a box with two cylindrical objects below, no text or symbols present
Consultez le site www.mintcleaner.com/register
Dépannage
Evolution Robotics, Inc.
1055 E. Colorado Blvd.
Pasadena, CA 91106

- Mint Automatic Floor Cleaner Owner's Manual
- TABLE OF CONTENTS
- IMPORTANT SAFETY INSTRUCTIONS TO REDUCE THE RISK OF FIRE, ELECTRIC SHOCK, OR INJURY
- WARNING: READ AND SAVE THESE INSTRUCTIONS.
- USE RESTRICTIONS
- BATTERY AND CHARGING
- Mint's Features
- Mint's Buttons and Lights
- ① Sweep Button
- ② Power Button Mc Button
- Mint's Lights
- ① + ③ Sweep + Mop Buttons
- ② Power Button
- Mint's Lights Cont'd
- ① Indicator Lights
- Other Modes
- ② NorthStar® Navigation Cube Lights
- How Mint Cleans
- Mint's Cleaning Cycle
- NorthStar® Navigation
- How Mint Cleans Cont'd
- Mint's Moves
- Sweep and Mop Modes
- Sweep Mode
- Mop Mode
- Sweep and Mop Modes Cont'd
- Cleaning Cloths
- Floor Types
- Operating Mint
- Put On a Cleaning Cloth
- Operating Mint Cont'd
- For Best Results
- Start Cleaning
- Battery
- Charging
- Charging Indicators
- ① Power Button
- The NorthStar Navigation Cube
- Maintenance
- Replacement Parts
- Customer Support
- Register Your Mint Online
- Trouble Shooting
- Problem
- Solution
- Trouble Shooting Cont'd
- Limited Warranty
- ① Botón de energía
- ① Voyants lumineux
- Dépannage
Brand : IROBOT
Model : Mint 4200
Category : Robot vacuum