
R1+ - Camera Removu - Free user manual and instructions
Find the device manual for free R1+ Removu in PDF.

Frequently Asked Questions - R1+ Removu
User questions about R1+ Removu
0 question about this device. Answer the ones you know or ask your own.
Ask a new question about this device
Download the instructions for your Camera in PDF format for free! Find your manual R1+ - Removu and take your electronic device back in hand. On this page are published all the documents necessary for the use of your device. R1+ by Removu.
USER MANUAL R1+ Removu
Get support www.removu.com/support
Find Store information www.removu.com/distributors
Facebook.com/removuglobal
Instagram.com/removu
Twitter.com/removuglobal
Youtube.com/removu
Unauthorized reproduction of this document in whole or in part is strictly prohibited. The content of this document may be changed at any time without prior notice.
1. Contents
Please make sure your package includes all of the following items.
Set

Wristband

USB Cable
User Manual
2. Parts
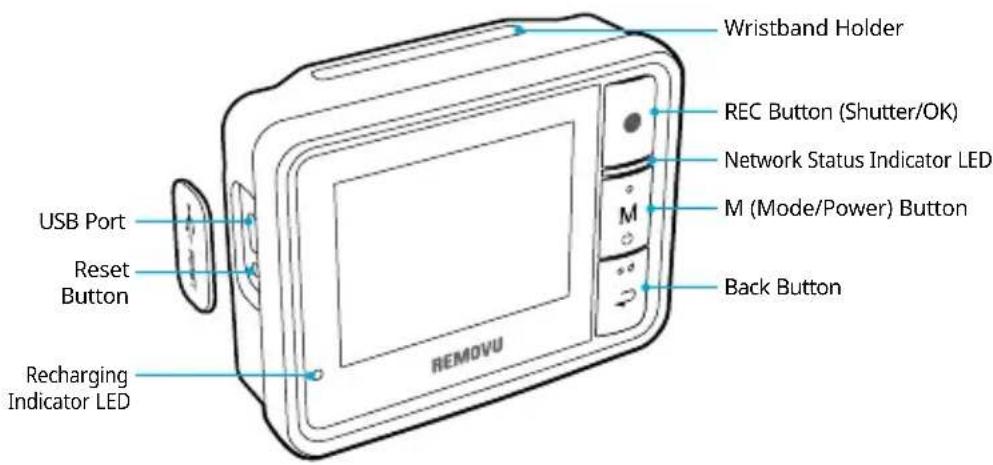
Names of Each Part
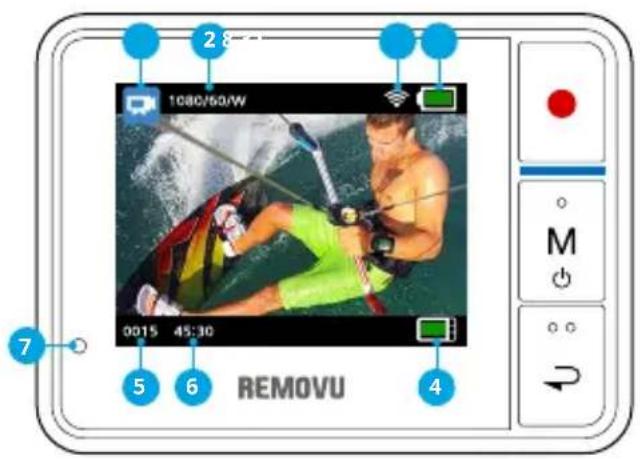
LCD Screen Indicators
- Camera Modes / FOV(Field of View) Indicator VIDEO Mode, PHOTO Mode, BURST Mode, TIME LAPSE Mode
- Resolution / FPS
- GoPro Battery Life
- R1+ Battery Life
- Saved Image / Video Counter
-
Remaining Recordable Hours / Number of Photos Counter
-
Recharging Indicator LED Red Light when recharging. It goes off when it is fully charged.
-
Wi-fi Signal Strength Indicator
3. How to use REMOVU
Charging the Battery
*The battery should be fully charged before using R1 + the first time.
- Connect the device to a computer USB port using the micro USB cable included in the package.
- R1+ can also be charged with a USB power adapter. (Adaptor's not included) We recommend using GoPro, or Apple iphone adaptors.
Turning it On / Off
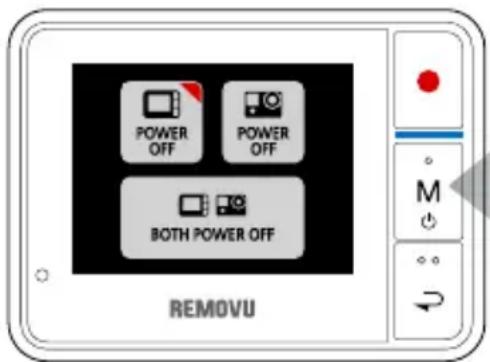
- Turning it On: Press and hold the M button for about 2 seconds to turn the device on.
- Turning it Off: Press and hold the M button until the Power control menu appears.
You will be given 3 options to choose from.
- REMOVU Power Button: Turns On / Off
- GoPro Power Button: Turns On / Off
- Power Button for both: Turns Off both
*The RED triangle at the top-right corner of the buttons indicate that the device is turned on.
Navigating Your Device
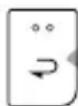
After the device is powered on and Wi-Fi connection is established, it goes into the Live View mode auto
matically. From there, you can simply navigate through different functions using the Back button. The order of appearance of the functions are illustrated below.
- Live View Mode 2. Hide OSD 3. Screen Saver
- Clock 5. Playback Mode 6. Settings Mode
To Adjust Settings
The settings can be adjusted in the Setting Mode. Please navigate to the settings mode using the M (Mode/Power) button, and enter the menu by pressing the REC (Shutter/Select) button.
How to connect your camera HERO3, 3+
HERO3, 3+ Wi-Fi SSID, and Password setup

- Go to GoPro support page on GoPro Website to upgrade your GoPro Camera to the latest firmware version.
- While upgrading, you will be asked to set up Wi-Fi SSID, Password. Please make sure to remember your password and SSID.
Connecting your GoPro HERO3, 3+ to REMOVU
- Please go to the GoPro App settings menu on your HERO3, 3+ to turn on the Wi-Fi fuction.
- Turn on your REMOVU R1+.
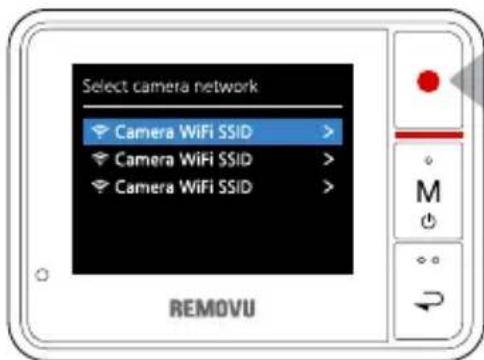
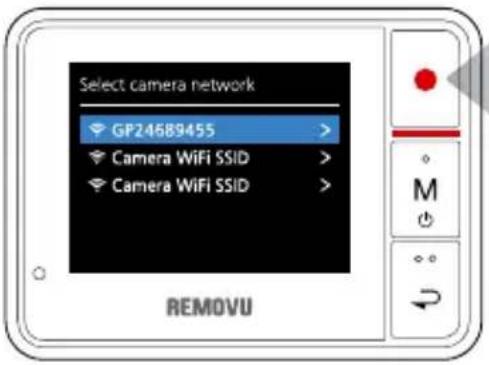
- When the Select Camera Network Screen appears, select your GoPro's SSID which you have created.
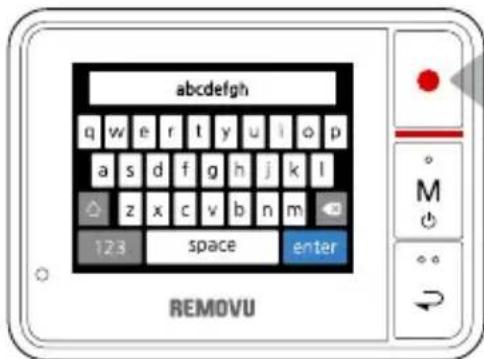
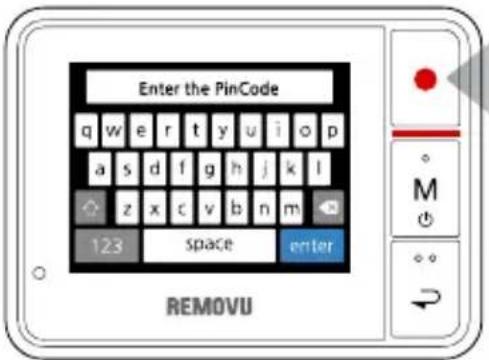
- Please type the password and press enter.
- You will see Blue LED light when the connection is successfully established.
How to connect your camera HERO4, 4 session
- Please go to the GoPro App settings menu on your HERO4, 4 session to turn on the Wi-Fi function by choosing GoPro App mode in "pair" option.
- Turn on your REMOVU R1+.
- When the Select Camera Network Screen appears, select your camera's network.
- Enter the pin number appears on your GoPro on your R1+.
- Name your camera network. The network name needs to be at least 8 letters.
- Set your password. The password needs to be at least 8 digits.
- Enter Select camera network menu again to find your newly created camera network.
- Select your camera on the network list and enter the password you created.
4. Firmware Upgrade
Please visit our website at www.removu.com/firmware to get the latest firmware. The detailed upgrade instructions can also be found on the page.
5. Trouble Shooting Guide
- If "No firmware to update" message appears after firmware update,
Solution: Connect your device to a PC and delete all files stored in the storage. Then copy the .bin firmware file to the memory and reboot.
- If "Low firmware versions" message appears after firmware update,
Solution: Connect your device to a PC and delete all files in the storage. Reboot to check the version of the firmware.
- If you can't see your on the camera network list,
Solution: In order to establish Wi-Fi connection between R1+ and GoPro, the GoPro needs to have its SSID. The SSID can be generated through the GoPro App. Before using with R1+, please establish connection between GoPro HERO4 and GoPro App to generate the SSID.
- If the diplay gets darker or backlight goes off,
Solution: It means that the battery is running low, so please recharge the device.
- If your device freezes while using,
Solution: Press the reset button located next to the charging port. If the problem persists, please contact customer support.
- If the device does not boot, or shuts down automatically while booting,
Solution: Please connect your device to your PC, and have all files deleted in the storage. If there aren't any files, please contact customer support.
6. Warranty Information
Standard Limited Warranty
Essel-t Co., LTD. ("essel-t") warrants that essen-t's devices and accessories ("Products") are free from defects in material and workmanship under normal use and service for the period commencing upon the date of purchase by the first consumer purchaser and continuing for 18 months period of time after that date.
Exclusions and Limitations
This Limited Warranty is conditioned upon proper use of Product by Purchaser. This Limited Warranty does not cover:
(a) Defects or damage resulting from accident, misuse, abnormal use, abnormal conditions, improper storage, exposure to liquid, moisture, dampness, sand or dirt, neglect, or unusual physical, electrical or electromechanical stress;
(b) Scratches, dents and cosmetic damage, unless caused byessel-t;
(c) Defects or damage resulting from excessive force or use of a metallic object when pressing on a touch screen;
(d) Equipment that has the serial number or the enhancement data code removed, defaced, damaged, altered or made illegible;
(e) Ordinary wear and tear;
(f) Defects or damage resulting from the use of Product in conjunction or connection with accessories, products, or ancillary/ peripheral equipment not furnished or approved byessel-t;
(g) Defects or damage resulting from improper testing, operation, maintenance, installation, service, or adjustment not furnished or approved byessel-t;
(h) Defects or damage resulting from external causes such as collision with an object, fire, flooding, dirt, windstorm, lightning, earthquake, exposure to weather conditions, theft, blown fuse, or improper use of any electrical source;
(i) The battery has been charged by a battery charger not specified or approved by essel-t for charging the battery;
1. Inhalt
Ensemble Bracelet Câble USB
REMOVUR1+ 6nRg 6n6n6n6n6n6n6n6n6n6n6n6n6n6n6n6n6n6n6n6n6n6n6n6n6n6n6n6n6n6n6n6n6n6n6n6n6n6n6n6n6n6n6n6n6n6n6n6n6n6n6
REMOVU® by essen-t co., Ltd.
Copyright 2015 essel-t co., Ltd. All Rights Reserved. Patents Pending.
REMOVU® is a trademark of essen-t co., Ltd.
registered in the U.S. and other countries.
GoPro® is a trademark of GoPro Inc.,
registered in the U.S. and other countries.