NS27LCD - Television INSIGNIA - Free user manual and instructions
Find the device manual for free NS27LCD INSIGNIA in PDF.


| Product Type | 27-inch LCD TV |
| Brand | Insignia |
| Model | NS-27LCD |
| Screen Size | 27 inches (diagonal) |
| Display Technology | LCD |
| Dimensions (W × H × D) | 71.4 × 60.6 × 23.5 cm |
| Weight | 19 kg |
| Power Supply | 100-240 V AC, 50/60 Hz |
| Power Consumption | 140 W |
| Operating Temperature | 5 to 40 °C |
| Storage Temperature | 0 to 50 °C |
| Input Connectors | HDMI, Component (Y Cb/Pb Cr/Pr), Composite AV, S-Video, VGA (D-SUB), RF Antenna, S/PDIF Audio |
| Output Connectors | AV Output (video + audio L/R), Headphone, Digital S/PDIF |
| Remote Control | Programmable universal, AA batteries (×2) |
| Main Features | Parental control, closed captions, sleep timer, picture and sound modes, zoom, freeze, MTS/SAP |
| TV Standards | NTSC-M, ATSC |
| Available Channels | VHF 2-13, UHF 14-69, Cable 1-125, CADTV 1-135, DTV 2-69 |
| Maintenance | Clean with a soft, lint-free cloth; avoid solvents and volatile substances |
| Safety | Unplug before cleaning; do not expose to water or heat source; use a polarized outlet |
Frequently Asked Questions - NS27LCD INSIGNIA
User questions about NS27LCD INSIGNIA
0 question about this device. Answer the ones you know or ask your own.
Ask a new question about this device
Download the instructions for your Television in PDF format for free! Find your manual NS27LCD - INSIGNIA and take your electronic device back in hand. On this page are published all the documents necessary for the use of your device. NS27LCD by INSIGNIA.
USER MANUAL NS27LCD INSIGNIA
Setting up your TV 7
Using your TV 12
Programming the remote control 16
Maintaining. 18
Tobacco smoking. 19
Trophobooting 18
Specifications 18
Appendix 19
Legal notices 22
Francals. 23
Espanol 44
Safety information
Waming
To reduce the risk of electric shock, do not remove the cover or hook. No user requires extra inside. Refer concerning to:
back. No user serviceable parts inside: Refer servicing to qualified service personnel
To reduce the risk of fire or electric shock, do not expose your
TV to rain or moisture.
Caution
To prevent electric shock, match the wide blade on the power switch to the wide blade on the electric switch. If the wide blade
cord plug to the wide slot on an electric outlet. If the plug does not fit, consult a licensed electrician to replace the obsolete.
outlet. Do not modify the power cord plug, or you will defeat

This symbol indicates that dangerous voltage
constituting a risk of electric shock is presentwithin your TV . This label is located on the back
of your TV.

This symbol indicates that there are important
operating and maintenance instructions in the literature concerning your TV.
Warning
Your TV contains tin-lead solder and a fluorescent lamp
containing a small amount of mercury. Disposal of these materials may be regulated for environmental reasons. For
disposal or recycling information, contact your local authorities
or the Electronic Industries Alliance at www.eia.org.
Read instructions
all of the safety and operating instructions
e you use your TV
Retain instructions
In safety and operating instructions for
reference.
Follow warnings and instructions
w all warnings on your TV and in the
Rating instructions. Follow all operating and
nstructions.
INSIGNIA
Water and moisture
Do not use your TV near water. For example, do not use it near a bath tub, wash bowl, kitchen sink, or laundry tub, in a wet basement, or near a swimming pool.
Cleaning
Unplug your TV before cleaning. Do not use liquid or aerosol cleaners. Use only a damp cloth to clean the exterior of your TV.
Ventilation
Slots and openings in the cabinet and the back or bottom are provided for ventilation, reliable operation, and protection from overheating.
These openings must not be blocked or covered. Do not block the openings by placing your TV on a bed, sofa, rug, or other similar surface. Do not place your TV near or over a radiator or heat register. Do not place your TV in a built-in installation, such as a bookcase or rack, unless you provide correct ventilation or follow the manufacturer's instructions.
Heat
Make sure that your TV is located away from
heat sources such as radiators, heat registers, heat sinks or other sources (including water).
stovets, or other products (including amplifiers) that produce heat.
Grounding or polarization
Do not defeat the safety purpose of the polarized or grounding-type plug. A polarized plug has two blades with one wider than the other. A
grounding type plug has two blades and a grounding prong. The wide blade or grounding prong are provided for your safety. If the plug
does not fit, contact an electrician to replace the obsolete outlet.
Power cord protection
Route power cords so that they are not likely to be walked on or pinched by items placed on or against them. Pay particular attention to cords at plugs, convenience receptacles, and the point where they exit from your TV.
Attachments
Do not use attachments not recommended by Insigna because they may cause hazards.
Stand
Do not place your TV on an unstable cart, stand,
tripod, bracket, or table. Your TV may fall, causing serious personal injury and serious damage to your TV. Use only with a cart, stand, tripod, bracket, or table recommended by the manufacturer, or sold with your TV. If you mount your TV to the wall, follow the manufacturer's instructions and use a mounting accessory recommended by the manufacturer. Your TV and cart combination should be moved with care.
Quick stops, excessive force, and uneven
surfaces may cause your TV and cart
combination to overturn.
Lightning
For added protection for your TV's receiver
during a lightning storm, or when it is left
unattended and unused for long periods of time,
unplug it from the power outlet and disconnect
the antenna or cable system. This helps prevent
damage to your TV from lightning and power line surges.
INSIGNIA
Insignia NS-27LCD 27° LCD TV
Servicing
Do not attempt to service your TV yourself because opening or removing covers may expose you to dangerous voltage or other hazards. Refer all servicing to qualified service personnel.
Replacement parts
When replacement parts are required, make sure that the service technician uses replacement parts specified by the manufacturer that have the same characteristics as the original part. Unauthorized substitutions may result in fire, electric shock, personal injury, or other hazards.
Overloading
Do not overload power outlets and extension cords because this can result in a risk of fire or electric shock.
Object and liquid entry
Never push objects of any kind into your TV through openings because objects may touch dangerous voltage points or short out parts that could result in a fire or electric shock. Never spill liquid of any kind on your TV.
Damage requiring service
Unplug this TV from the power outlet and refer servicing to qualified service personnel under the following conditions:
- When the power supply cord or plug is damaged or frayed.
If liquid has been spilled or objects have fallen into your TV.
If your TV has been exposed to rain or water.
If your TV does not operate normally by following the operating instructions. Adjust only those controls that are covered by the operating instructions because incorrect adjustment of other controls may result in damage and will often require extensive work by a qualified technician to restore your TV to its normal operation.
If your TV has been dropped or damaged in any way. - When your TV exhibits a distinct change in performance.
Replacement parts
When replacement parts are required, make sure that the service technician uses replacement parts specified by the manufacturer that have the same characteristics as the original part. Unauthorized substitutions may result in fire, electric shock, personal injury, or other hazards.
Safety check
After completing any service or repair to this TV, ask the service technician to perform routine safety checks to determine that your TV combo is in correct operating condition.
Power source
Operated your TV only from the type of power source indicated on the marking label. If you are not sure of the type power supplied to your home, consult your TV dealer or local power company.
Lightning
For added protection for your TV's receiver during a lightning storm, or when it is left unattended and unused for long periods of time, unplig it from the power outlet and disconnect the antenna or cable system. This helps prevent damage to your TV from lightning and power line surges.
Screen protection
Your TV's screen is made of glass. Do not drop your TV or hit the glass screen. If the screen breaks, be careful of broken glass.
Pixel defect
Your TV's screen is designed to display finely detailed pictures. Occasionally, a few non-active pixels may appear on the screen as fixed points of blue, green, or red. This is not a defect and does not affect your TV's performance.
Outdoor antenna grounding
If an outside antenna or cable system is connected to your TV, make sure that the antenna or cable system is grounded to provide some protection against voltage surges and built-up static charges. Article 810 of the National Electrical Code, ANSI/NFPA No. 70, provides information with respect to correct grounding of the mast and supporting structure, grounding of the lead-in wire to an antenna discharge unit, size of grounding conductors, location of the antenna-discharge unit, connection to grounding electrodes, and requirements for the grounding electrode.
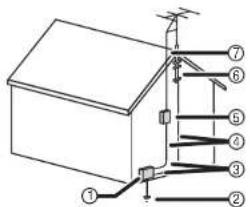
1 Electric service equipment
2 Power service grounding electrode system
3 Ground clamps
4 Grounding conductors
5 Antenna discharge unit
6 Grounding clamp
7 Antenna lead-in wire
Note to CATV system Installer
This reminder is provided to call the CATV system installer's attention to Article 820-40 of the NEC that provides guidelines for correct grounding and in particular, specifies that the cable ground must be connected to the grounding system of the building as close to the point of cable entry as practical.
Features
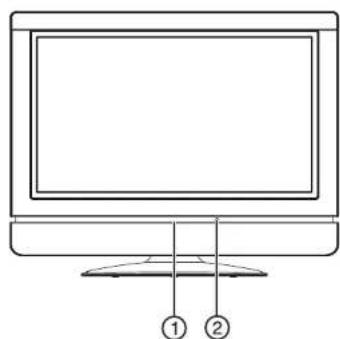
Front
| Control Description | |
| 1 Power Indicator Lights when your TV is turned on. | |
| 2 Remote sensor Receives signals from the remote control. | |
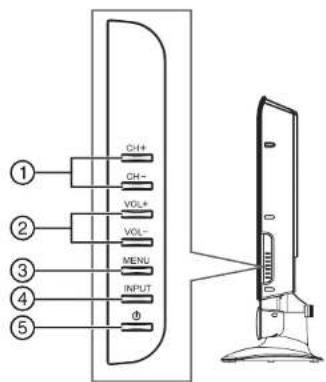
Side
| Control Description | |
| 1 CH+/CH- Press to change the channel. | |
| In the on-screen menu system, press to select menus and options. | |
| 2 VOL+/VOL- Press to increase or decrease the volume. | |
| In the on-screen menu system, press to adjust a setting or change a value. | |
| 3 MENU Press to open the on-screen menu system. | |
| 4 INPUT Press to select the video input. | |
| 5 Power Press to turn your TV on or off. | |
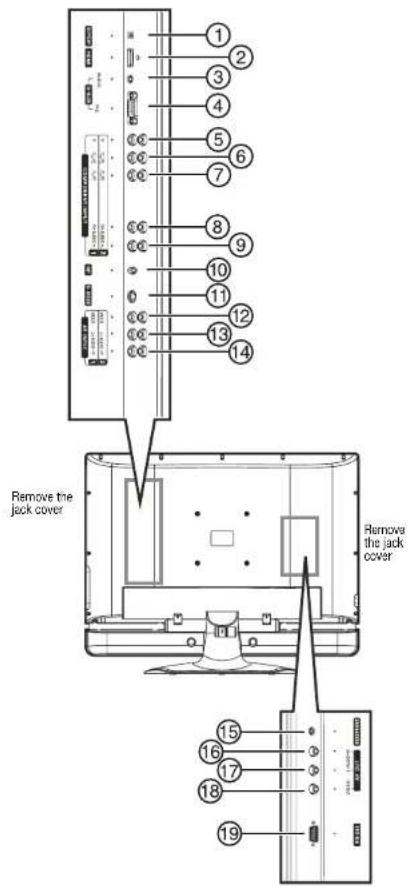
Back Jacks
| Jack | |
| 1 | S / P D I F |
| 2 | H D M I |
| 3 | D-SUB AUDIO input |
| 4 | D-SUB PIC (video) input |
| 5 | COMPONENT INPUT Y |
| 6 | COMPONENT INPUT Cb/Pb |
| 7 | COMPONENT INPUT Cr/Pr |
| 8 | COMPONENT INPUT R AUDIO |
| 9 | COMPONENT INPUT L AUDIO |
| 10 | RF (antenna input) |
| 11 | S-VIDEO |
| 12 | AV INPUT VIDEO |
| 13 | AV INPUT L AUDIO |
| 14 | AV INPUT R AUDIO |
INSIGNIA
Insignia NS-27LCD 27 LCD TV
Jack
15 HEADPHONE
16 AV OUT R AUDIO
17 AV OUT L AUDIO
18 AV OUTVIDEO
19 RS232 control interface
Remote control
Note
Remote control is a universal remote control. If it does not go to work with your TV, press the TV button.
Note
For Instructions on programming the remote control, see "Programming the remote control" on page 16.
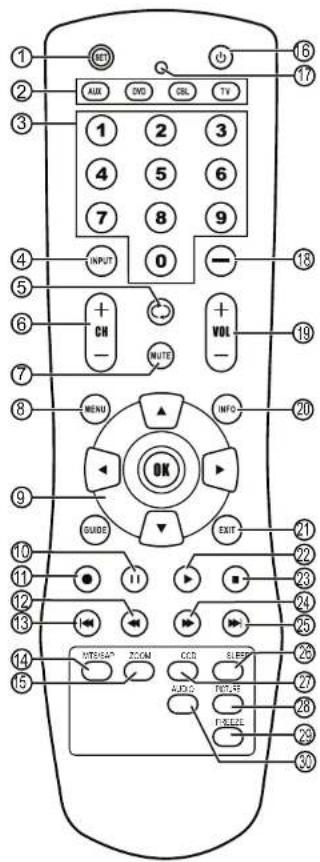
| Button Description | |
| 1 SET Press to program the remote control. For more information, see "Programming the remote control" on page 16. | |
Button Description
| 2 Device buttons TV–Press to select the TV. DVD–Press to select a connected DVD player. CBL–Press to select cable or satellite TV. AUX–Press to select a device assigned to this button. | |
| 3 Number buttons Press to enter channel numbers. In the on-screen menu system, press to enter your parental controls password. | |
| 4 INPUT Press to select the video input. | |
| 5 Press to go to last viewed | channel. |
| 6 + CH – Press to change TV channels. | |
| 7 MUTE Press to mute the sound. | |
| 8 MENU Press to open the on-screen menu system. | |
| 9 | Press the arrows to move down, up, left, or right in the on-screen menu system. Press the OK button to confirm changes or to toggle options on and off in the on-screen menu system. |
| 10 | When playing a DVD, press to freeze the screen image. Press again to unfreeze the image. |
| 11 | Press to start a recording on a connected device, such as a VCR. |
| 12 | Press to fast-reverse on a DVD or CD if a DVD or CD player is connected. |
| 13 | Press to skip the previous chapter on a DVD or previous track on a CD if a DVD or CD player is connected. |
| 14 | MTS/SAP Press to select one of the preset audio modes. You can select MONO, STEREO, or SAP. |
| 15 | ZOOM Press to select the aspect ratio. |
| 16 | Press to turn on your TV or put it into Standby mode. |
| 17 | LED Lights when you are programming the remote control. For more information, see "Programming the remote control" on page 16. |
| 18 | Press to select a sub-channel. For more information, see "Selecting a digital sub-channel" on page 13. |
| 19 | + VOL – Press to adjust the volume. |
| 20 | INFO Press to display status information. |
| 21 | EXIT Press to close the on-screen menu system. |
| 22 | Press to start DVD or CD playback if a DVD or CD player is connected. |
| 23 | Press to stop DVD or CD playback if a DVD or CD player is connected. |
| Button Description | |
| 24 Press to fast forward on a DVD or CD if a DVD or CD player is connected. | |
| 25 | Press to skip the next chapter on a DVD or next track on a CD if a DVD or CD player is connected. |
| 26 SLEEP Press to set the sleep timer. For more information, see "Setting the sleep timer" on page 14. | |
| 27 CCD Press to turn closed captions on and off. For more information, see "Viewing closed captions" on page 14. | |
| 28 PICTURE Press to select the picture mode. | |
| 29 FREEze Press to freeze the video image. Press again to unfreeze the image. Do not freeze the video image for long periods of time. You may damage the TV screen. | |
| 30 AUDIO Press to select the sound mode. | |
Using the remote control
To use the remote control:
- Point the remote control towards the remote sensor on the front of your TV.
The following illustration shows the remote control range.
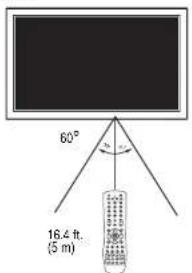
Notes
- Do not expose the remote control to shock or liquids.
- Do not use the remote control in an area with high humidity.
- Do not place the remote control in direct sunlight.
- Do not place objects, such as furniture, between the remote control and the remote sensor.
- The remote control may not work if direct sunlight or bright light shines on the remote sensor. Either move your TV or change the angle at which you use the remote control.
Setting up your TV
Installing remote control batteries
To install the remote control batteries:
1 Remove the battery cover.
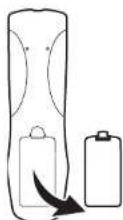
2 Insert two AA batteries into the battery compartment. Make sure that you match the + and - symbols on the batteries with the + and - symbols in the battery compartment.
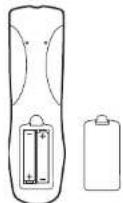
3 Replace the cover.
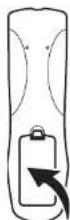
Notes
- Do not mix batteries of different types.
- Do not mix old and new batteries.
- Remove batteries when the charge is depleted.
- Battery chemicals can cause a rash. If the batteries leak, clean the battery compartment with a cloth. If chemicals touch your skin, wash immediately.
- If the remote control is not going to be used for an extended period of time, remove the batteries.
Connecting your TV to an electrical outlet
To connect your TV to an electrical outlet:
- Plug the power cord into an electrical
outlet.
Notes
- Make sure that you use the correct type of power. See the label on your TV.
- If you do not intend to use your TV for an extended period of time, unplug the power cord from the electrical outlet.


INSIGNIA
Insignia NS-27LCD 27 LCD TV
Connecting speakers
To connect speakers to your TV:
1 Unplug the TV power cord and all devices connected to your TV.
2 Connect the speakers to the speaker jacks on the back of your TV. Make sure that you connect the black part of the speaker wire to the - jack and the red part of the speaker wire to the + jack on the back of your TV.
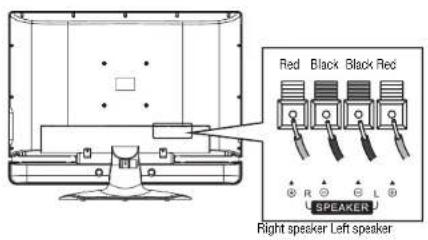
Note
The location of the speaker jacks on your TV may vary from the illustration.
Connecting an outside antenna
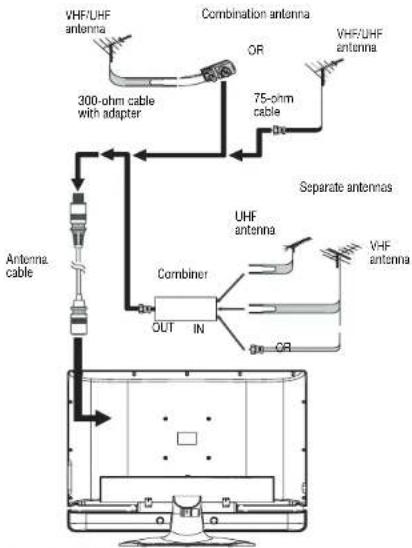
Antenna cables come in two types: 75 ohm and 300 ohm.
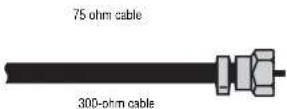

If your antenna cable has a 75 ohm connector, connect the cable to the coaxial jack on the back of your TV.
If your antenna cable has a 300 ohm connector, connect the cable to a 300-75 ohm adapter (not included), connect the adapter to a 75 ohm cable, then connect the other end of the 75 ohm connector to the coaxial jack on the back of your TV.
Use the following illustration to connect an outside antenna.
Connecting cable TV
Your TV has a 75 ohm jack for connecting cable TV.
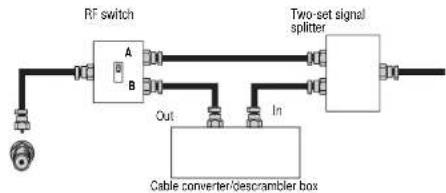
Some cable TV providers scramble the signals for "premium" (pay) channels. To view these channels you need a converter/descrambler box. If you do not have a converter/descrambler box, you can connect your cable TV directly to your TV. If you have a converter/descrambler box, you can connect your cable TV using an RF switch (not supplied). For more information about connecting a converter/descrambler box, contact your cable TV provider.
To connect cable TV without a converter/descrambler box:
1 Connect one end of a 75 ohm cable to the coaxial jack on the back of your TV.
2 Connect the other end of the cable to the cable TV wall outlet.
To connect cable TV with a converter/descrambler box:
- Use the following illustration to connect a converter/descrambler box. (The RF switch and the signal splitter are not provided.) Set the RF switch to the A position to watch unscrambled channels using your TV remote control. Set the RF switch to the B position to watch scrambled channels using the converter/descrambler controls.
Connecting a sound system
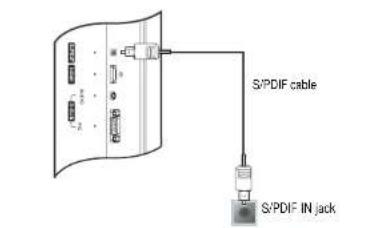
Use the following illustration to connect an audio processor or Hi-Fi system.
Warning Make sure that you turn off and unplug your TV before installing devices.
Note For home theater systems, use an S/PDIF cable to achieve full sound capabilities.
Audio processor
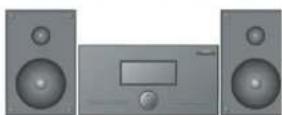
Hi-Fi system
Connecting a VCR
You can connect a VCR with a standard audio/video cable or with a S-Video cable. The S-Video cable does not carry sound. If you use an S-Video cable, you need to use an audio cable to connect sound.
Note For better video, use the S-Video jack if your VCR has an S-Video connection.
Warning Make sure that you turn off and unplug your TV before installing devices. Use the following illustration to connect a VCR.
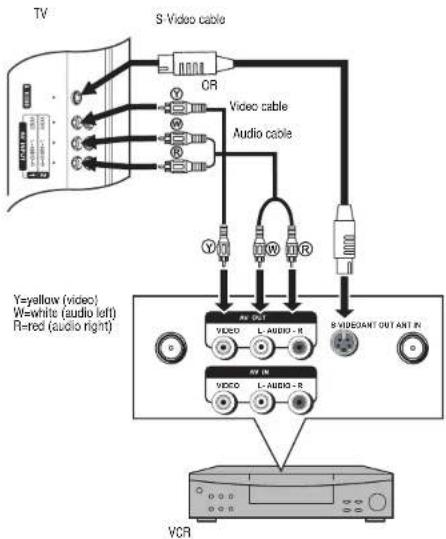
To play the VCR:
1 Turn on your TV.
2 Press the INPUT button one or more times to select Composite1 (or S-Video if you connected the VCR to the S0-Video jack).
3 Turn on your VCR.
4 Insert a videotape, then press the PLAY button.
INSIGNIA
Insignia NS-27LCD 27 LCD TV
Connecting a VCR (for recording)
Warning
Make sure that you turn off and unplug your TV before installing devices.
Use the following illustration to connect a VCR for recording TV programs.
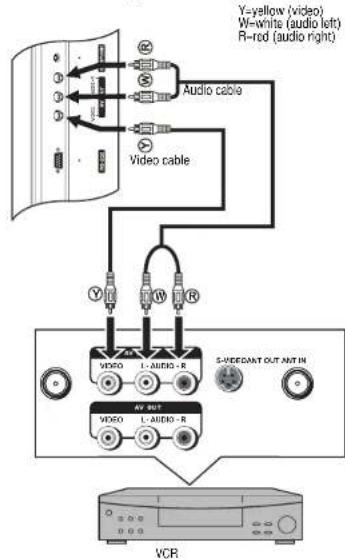
TV
Connecting an amplifier
Use the following illustration to connect an external amplifier.

To record a program:
1 Turn on your TV.
2 Select a program you want to record.
3 Turn on the VCR.
4 Insert a videotape, then press the record button on the VCR.
Connecting a camcorder
Warning
Make sure that you turn off and unplug your TV before installing devices.
Use the following illustration to connect a camcorder to your TV.
To connect a camcorder:
1 Plug the audio/video cable into the AUDIO L, AUDIO R, and VIDEO jacks ont the back of your TV.
2 Plug the other end of the audio/video cable into the audio and video out jacks on the camcorder.
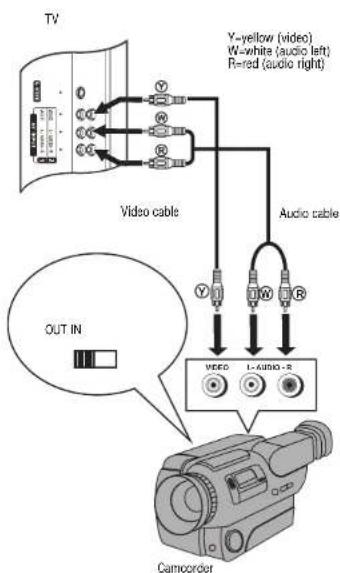
To playback from the camcorder:
1 Turn on your TV.
2 Press the INPUT button one or more times to select Composite2.
3 Turn on the camcorder, then set it to output mode. See your camcorder documentation for more information.
4 Insert a tape into the camcorder, then press the Play button.
Connecting a DVD player
Warning
Make sure that you turn off and unplug your TV before installing devices.
Use the following illustration to connect a DVD player to your TV.
To connect a DVD player:
- Plug the HDMI cable into the HDMI jack on the back of your TV and to the HDMI out jack on the back of the DVD player.
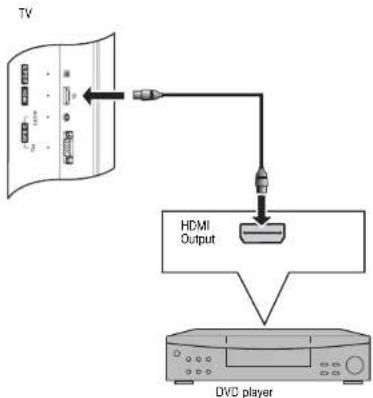
Note
If the DVD player has DVI output only, use a DVI to HDMI adapter cable (not supplied) to connect the DVD player to the HDMI jack on the back of your TV. Then connect the audio cable to the D-SUB AUDIO IN jack on the back of your TV.
To play a DVD:
1 Turn on your TV.
2 Press the INPUT button one or more times to select HDMI.
3 Turn on the DVD player.
4 Insert a DVD, then press the Play button.
INSIGNIA
Connecting a DTV receiver
Warning Make sure that you turn off and unplug your TV before installing devices.
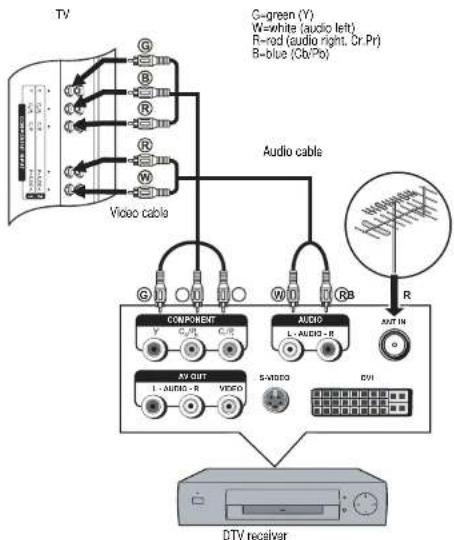
To watch your DTV:
1 Turn on your TV.
2 Press the INPUT button one or more times to select Component1.
3 Turn on your DTV receiver.
Connecting a computer
Warning Make sure that you turn off and unplug your TV before installing devices.
Use the following illustration to connect a computer to your TV.
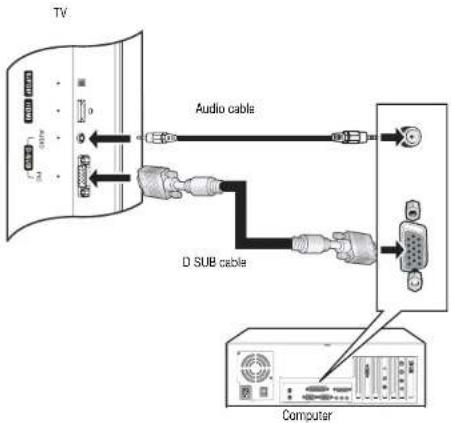
To watch TV on your computer monitor:
1 Turn on your TV.
2 Press the INPUT button one or more times to select VGA.
3 Turn on your computer, then set up your computer for external VGA input. See your computer documentation for more information.
Using your TV
Turning your TV on and off
To turn on your TV:
1 Make sure that the power cord is connected to your TV and an electrical outlet.
2 Press the button to turn on your TV.
3 Press the button again to turn off your TV
Selecting the TV source
To select the TV source:
1 Press the MENU button.
2 Press the or button one or more times to highlight Setup, then press the OK or button to open the Setup menu.
3 Press the button one or more times to highlight Tuning Band, then press the OK or button to access the tuning band options.
4 Select Air for an outside antenna. Select Cable, Cable HRC, Cable IRC, or Cable Auto for cable TV. We recommend that you select Cable Auto for cable TV. For more information about cable TV selections, contact your cable TV provider.
5 Press the EXIT button to close the on-screen menu system.
Setting up the channel list
After you select your TV source (antenna or cable), you need to set up the channel list. When you set up your channel list, your TV searches for all available channels in your area and stores a list of the channels. When your press the CH-or ^+ button, your TV skips the channels that do not have a signal.
Automatically setting up channels
To automatically set up the channel list: 1 Press the MENU button.
2 Press the button one or more times to highlight Setup, then press the OK or button to open the Setup menu.
3 Press the button one or more times to highlight Auto Ch Search.
4 Press the OK or button to start the search.
Note
You can press the Exit button to stop the search.
Manually adding or deleting channels from the channel list
After you create a channel list using the Auto Ch Search option, you can manually add or delete channels from the channel list.
To add or delete channels:
1 Press the MENU button.
2 Press the button one or more times to highlight Setup, then press the OK or button to open the Setup menu.
3 Press the button one or more times to highlight Manual Ch Set, then press the OK or button to access the Manual Ch Set options.
4 Press the button to select a channel, then press the OK button to add or delete a channel.
5 Press the EXIT button to close the menu.
Changing channels
To change channels:
- Press the CH - or + button on the remote control to go to the next lower or higher channel.
Or
Press the number buttons to select a channel. For example, if you want channel 83, press 8, then press 3.
Or
Press the button to go to the last viewed channel.
Selecting a digital sub-channel
Most digital TV channels have more than one channel. The main channel carries the signal for the main TV program. The sub-channels carry signals for additional or alternate programming, such as a radio or news broadcast.
For example, if the main channel number is 8, the sub-channel number might be 8-1, 8-2, and 8-3.
To select a sub-channel:
1 Press the number buttons for the main channel, for example 8.
2 Press the - button, the press the sub-channel button, for example 1.
Adjusting the volume
To adjust the volume:
- Press the VOL - or + button to decrease or increase the volume.
- Press the MUTE button to turn off the sound. Press the MUTE button again to turn the sound back on.
Displaying status information
To display status information:
- Press the INFO button. Your TV displays status information, such as the channel number or signal source.
Selecting the video input source
To select the video input source:
- Press the INPUT button one or more times to select the video source. You can select: TV-TV signal
- Composite1-AV INPUT1 jacks
- Composite2-AV INPUT2 jacks
- Component1-COMPONENT INPUT1
- jacks
- Component2-COMPONENT INPUT2
- jacks
VGA-D-SUB jack (computer)
HDMI-HDMI jack
S-Video-S-Video jack
Checking the DTV signal strength
To check the DTV signal strength:
1 Press the MENU button.
2 Press the button one or more times to highlight Setup, the press the OK or button to open the Setup menu.
3 Press the button one or more times to highlight DTV Signal, then press the OK or button. Your TV shows the DTV signal strength.
Adding a channel label
To add a label to a channel:
1 Press the MENU button.
2 Press the button one or more times to highlight Setup, then press the OK or button to open the Setup menu.
INSIGNIA
Insignia NS-27LCD 27" LCD TV
3 Press the button one or more times to highlight Channel Labels, then press the OK or button to open the Channel Labels Menu.
4 Press the button to move the highlight or cursor. Press the button to toggle between NTSC or ATSC or to select a channel number or character.
5 Press the OK button to return to the previous menu or press the EXIT button to close the menu system.
Freezing the picture
You can freeze (still) the screen image.
Warning
protect your TV, do not freeze the screen image for long 1000s of time.
To freeze or unfreeze the picture: Press the FREEZE button.
Setting the clock
You can automatically set the clock from a digital channel signal. Your TV searches for a digital channel that has time information encoded. If the clock is not correct after you automatically set it, you can manually set the clock.
Automatically setting the clock
To automatically set the clock:
1 Press the MENU button.
2 Press the button one or more times to highlight Feature, then press the OK or button to open the Feature menu.
3 Press the button one or more times to highlight Time Set, then press the OK or button to open the Time Set menu.
4 Press the button one or more times to highlight Time Set Mode, then press the OK or button to select Auto.
5 Press the button one or more times to highlight Time Zone, then press the OK or button to select a time zone: Pacific, Alaska, Hawaii, Eastern, Central, or Mountain.
6 Press the EXIT button to close the on-screen menu system.
Manually setting the clock
To manually set the clock:
1 Press the MENU button.
2 Press the button one or more times to highlight Feature, then press the OK or button to open the Feature menu.
3 Press the button one or more times to highlight Time Set, then press the OK or button to open the Time Set menu.
4 Press the button one or more times to highlight Time Set Mode, then press the OK or button to select Manual.
5 Press the or button to select Year, Date, or Time, then press the OK, , or button to set the year, date, or time.
6 Press the EXIT button to close the on-screen menu system.
Setting the sleep timer
The sleep timer lets you select the amount of time before your TV turns off automatically.
To set the sleep timer:
1 Press the MENU button.
2 Press the button one or more times to highlight Feature, then press the OK or button to open the Feature menu.
3 Press the button one or more times to highlight Sleep Timer, then press OK or button to select the amount of time. To turn off the timer, select Off.
Note
You can also press the SLEEP button to set the sleep timer.
Viewing closed captions
You can view closed captions in two modes: CAPTION and TEXT. Each mode has four channels. CAPTION mode shows dialogue and commentaries for TV programs while providing a clear picture of the program. TEXT mode shows information not related to the program, such as TV program schedules and weather forecasts. In TEXT mode, part of picture may be covered by the text.
Note
For digital broadcast systems, you can press the CCD button on the remote control to select the closed caption mode.
To view closed captions:
- Press the CCD button one or more times to select a closed caption mode. You can select:
·CC1
CC2
CC3
CC4
·T
F
- Off
Setting parental controls
Your TV has a V-chip that lets you control the type of programs your children can watch. Parental controls include two ratings: MPAA (based on age) and TV Parental Guidelines (based on content and age). A TV program may have an MPAA or TV Parental Guidelines rating, so you should set controls for both ratings. Before you can select ratings, you need to set up a parental controls password.
To set up a password:
1 Press the MENU button.
2 Press the button one or more times to highlight Feature, then press the OK or button to open the Feature menu.
3 Press the button one or more times to highlight Parental Control, then press the OK or button to open the Parental Control menu.
Insignia NS-27LCD TV
4 Press the or button one or more times to highlight Password Change, the press the OK or button to access the Password Change option.
5 Press the number buttons to enter the old password. If you have not set a password, enter 0000.
6 Press the number buttons to enter a new password, then enter the new password again to confirm.
Caution
Write down your password and save it for future use.
Note
If you forget your password, enter 1397 for the old password, then enter a new password.
MPAA ratings
Rating Description
NONE Not rated.
G General audiences.
PG Parental guidance suggested. Some material may not be suitable for children.
PG-13 Parental guidance strongly suggested. Some material may not be suitable for children under 13 years of age
R-Restricted. Not suitable for children under 17 years of age unless accompanied by a parent or guardian.
NC-17 Not suitable for children under 17 years of age.
X Adults only.
TV Parental Guidelines ratings
Rating Description
NONE Not rated
TV-Y All children.
TV-Y7 Children over seven years of age.
TV-G General audiences.
TV-PG Parental guidance suggested.
TV-14 Parents strongly cautioned.
TV-MA Mature audiences only
Some of the age based TV Parental Guidelines ratings also have content based ratings.
Rating Description
FV Fantasy violence.
L Adult language.
S Sexual situations
V Violence.
D Sexually suggestive dialog.
To set the ratings:
1 Press the MENU button.
2 Press the or button one or more times to highlight Feature, then press the OK or button to open the Feature menu.
3 Press the or button one or more times to highlight Parental Control, then press the OK or button to open the Parental Control menu.
4 Press the or button one or more times to highlight Parental Control Set, then press the OK or button to access the rating feature.
5 Enter the password.
6 Press the or button to select a rating, then press the OK button to block or unblock the rating. When you block a rating, that rating and all higher ratings are blocked.
Using the on-screen menu system
Your TV has an on-screen menu system that lets you adjust TV settings, such as video and audio settings.
To use the on-screen menu system:
1 Press the MENU button.
2 Press the or button one or more times to select a menu.
3 Press the or button to navigate to an option or adjust an option.
4 Press the OK or button to confirm an adjustment, open a sub-menu, or toggle a setting.
5 Press the MENU button to return to a previous menu or press the EXIT button to close the on-screen menu system.
INSIGNIA
Insignia NS-27LCD 27 LCD TV
On-screen menus
| On-screen menu | Options |
| Video Note: Options may vary in different modes. | Picture Mode-Selects the picture mode: User, Nature, Soft, or Bright. You can also press the PICTURE button to select the picture mode. Contrast-Increases the picture level to adjust the white areas of the picture. Decreases the picture level to adjust the black areas of the picture. Brightness-Increases the brightness to add more light to dark areas of the picture. Decreases the brightness to add more dark to light areas of the picture. Color-Adjusts the overall color of the picture. Sharpness-Increases the sharpness level to show cleaner and clearer images. Decreases the level to show a smoother picture. Aspect Ratio-Selects the screen aspect ratio: Wide, Cinema, Normal, or Zoom. You can also press the ZOOM button to select the aspect ratio. Advanced Video Menu-Provides access to advanced features: • Noise Reduction-Reduces picture noise (snow). • Tint-Increases the color level to add more green to skin tones. Decreases the color level to add more purple to skin tones. • Color Temperature-Selects one of three automatic color adjustments: Cool for more blue, Warm for more red, and Normal. • 3D Y/C-Turns the 3D comb filter on or off. VGA Set/Component Set-If your TV is connected to a computer or to component video, adjusts the following options: • H-Pos-Adjusts the horizontal position of the image. • V-Pos-Adjusts the vertical position of the image. • Clock-Adjusts the sample frequency. • Phase-Improves the focus of a stable image. • Setting-Reset's VGA mode to the factory defaults. |
| Audio Note: Options may vary in different modes. | Sound Mode-Selects the sound mode: User, News, Music, or Movie. You can also press the AUDIO button to select the sound mode. Bass-Adjusts the low sounds (bass). Treble-Adjusts the high sounds (trable). Balance-Adjusts the right and left speaker volumes. Earphone Vol-Adjust the earphone volume. Digital Audio Output-Selects the audio mode for the S/PDIF jack. • RAW: AC-3 in and AC-3 out. PCM in PCM out. • PCM: AC-3 in PCM out. PCM in PCM out. MTS-Selects the multi-channel TV sound (MTS): Mono, Stereo, or SAP (second audio program). You can also press the MTS/SAP button to select the MTS mode. Audio Language-Selects an alternate language if the program has more than one language. |
| On-screen menu | Options |
| Setup Tuning Band-Selects the TV signal source. For more information, see "Selecting the TV source" on page 12.DTV Signal-Displays the digital TV signal strength. For more information, see "Checking the DTV signal strength" on page 13.Auto Ch Search-Automatically sets up a list of the channels available in your area. For more information, see "Automatically setting up channels" on page 13.Manual Ch Set-Lets add or delete channels from the channel list. For more information, see "Manually adding or deleting channels from the channel list" on page 13.Channel Labels-Lets you add a label to a channel. For more information, see "Adding a channel label" on page 13. | |
| Feature Source-Selects the video source. You can select:·TV·Composite1·Composite2·Component1·Component2·VGA·HDMI·S-Video·You can also press the INPUT button to select the video source.Time Set-Sets the clock. For more information, see "Setting the clock" on page 14.Sleep Timer-Sets the sleep timer. For more information, see "Setting the sleep timer" on page 14.Parental Control-Access V-chip controls. For more information, see "Setting parental controls" on page 14.Closed Caption Options-Customizes closed captions for digital broadcasting systems. You can adjust Size, Font, Text Color, Text Opacity. Background Color, Background Opacity, Edge Effect, and Edge Color.CC when Mute-When this option is turned on, your TV automatically displays closed captions when the volume is muted.Menu Language-Select the language for the on-screen menu system. You can select English, French, or Spanish. | |
Programming the remote control
Programming a device connected to your TV
The remote control can control four devices, such as a VCR, DVD player, cable or satellite receiver, amplifier or tuner, or similar device.
To program the remote control:
1 Find the code for the device you want to program. See "Appendix" on page 19. If there is more than one code listed for a device, write down all the codes.
2 Turn on the device you want to program, and load media if required, for example a DVD.
3 Press a device key on the remote control, for example, DVD, CBL, or AUX.
4 Press and hold the SET button on the remote control until the LED blinks twice, then release the button.
5 Enter the first five-digit code for your device. The LED blinks once as each digit is entered. If the code is correct, the LED blinks twice.
Note
If the LED does not blink twice, repeat steps 3 through 5 using a different code.
6 Aim the remote at the device, then press the button. The device should turn off.
Note
If the device does not turn off, repeat steps 4 through 6 using a different code. If you cannot find a code that works, see "Searching for a code" on page 17.
7 Repeat steps 1 through 6 to program additional devices.
8 Press the SET button to save the code and exit.
Searching for a code
To search for a code:
1 Press a device key.
2 Press and hold the SET button until the LED blinks twice, the release the button.
3 Enter 991, then the device group number (0=cable, 1=TV, 2=VCR, 3=audio). The LED blinks twice.
4 Aim the remote control at the device, then press the button. If the device responds, go to step 7.
5 If the device does not respond, press the CH+ button. Your remote control will try the next code. Keep pressing the CH+ button until the device responds. You can press the CH- button to try a previous code.
6 To search for a code for another device, repeat steps 1 through 5.
7 Press the SET button to save the code and exit.
Checking the code
If you programmed a device by searching for a code, you may want to know what four-digit code the remote is using.
To check the code:
1 Press the device button on the remote control.
2 Press and hold the SET button until the LED blinks twice, then release the button.
3 Enter 990. The LED blinks twice.
4 Press 1 and count the LED blinks. This is the first digit of the code. For example, if the LED blinks twice, the first digit is 2. If the LED does not blink, the first digit is 0.
5 Repeat step 4 using 2 for the second digit, 3 for the third digit, 4 for the fourth digit, and 5 for the fifth digit.
6 Press the SET button to exit.
Programming the volume lock
The remote control comes preset to let you control the volume of each connected device. You can change the volume lock so that one device's volume controls volume in all modes. After you lock the volume control, you can unlock the volume control for a specific device so you can control the volume for that device independently.
To lock the volume control:
1 Press and hold the SET button until the LED blinks twice, then release the button.
2 Enter 993, then press the device button for the device you want to control the volume. The LED blinks twice. When you press the VOL+, VOL-, or MUTE button on the remote control, the device you selected controls the volume regardless of which device you are using.
To unlock the volume control:
1 Press and hold the SET button until the LED blinks twice, then release the button.
2 Enter 993, then press VOL+ button. The LED blinks four times. The volume control is unlocked.
To unlock a single device's volume control:
1 Press the device key
2 Press and hold the SET button until the LED blinks twice, then release the button.
3 Enter 993, then press VOL- button. The LED blinks four times. The volume control for the device you selected is unlocked.
Troubleshooting the remote control
| Symptom Possible solution | |
| LED does not blink when a button is pressed | Replace the batteries. |
| LED blinks when a button is pressed, but device does not respond | Make sure that you are at less than 15 feet (4.6 meters) from the device and that you point the remote control at the remote sensor on the device. |
| LED blinks one long blink | You pressed an incorrect button. Start the procedure over again. |
| Remote control does not control a device or only controls some features of the device | Make sure that the device has a remote sensor, then try another code. |
| No volume on a device See "Programming the volume lock" on page 17. | |
INSIGNIA
Insignia NS-27LCD 27 LCD TV
Maintaining
- Do not use your TV in areas that are too hot or too cold because the cabinet may warp or the screen may malfunction.
Storage temperatures are 32 to 122^ (0o to 50^) - Working temperatures are 41^ to 104^ (5° to 40°C).
- Do not place your TV in direct sunlight or near a heat source.
Cleaning your TV
Clean the screen and cabinet with a soft, lint-free cloth. If the screen or cabinet is especially dirty, moisten a soft, lint-free cloth in a weak detergent solution, squeeze the excess moisture from the cloth, then wipe the screen or cabinet with the cloth. Use a clean cloth to dry the screen or cabinet.
Caution
Avoid volatile substances, such as insect sprays, solvents, and thinners.
Do not leave your TV in contact with items made from rubber or PVC for long periods.
They may damage your TV.
Caution
Do not let liquids drip into the cabinet.
Troubleshooting
Warning
Do not try to repair your TV yourself. Refer all service to a qualified service technician.
Symptom Possible solution
| No power • Make sure that the power cord is connected to your TV and an electrical outlet. • Unplug the power cord, wait 60 seconds, then plug the cord back in and turn on your TV. | |
| No picture • Make sure that the video cables are connected securely to the back of your TV. • Adjust the contrast and brightness. • Make sure that the correct video mode is selected. • Make sure that the incoming signal is compatible. | |
| Good picture but no sound | • Increase the volume. • Make sure that the sound is not muted. • Make sure that the correct audio mode is selected. |
| Good sound but poor color | • Adjust the contrast, color, and brightness settings. |
| Poor picture • Make sure that the room is not too bright. Light reflecting off the screen can make the picture difficult to see. • If an S-VHS camera or a camcorder is connected while another connected device is turned on, the picture may be poor. Turn off one or more devices. | |
Symptom Possible solution
| Horizontal dotted line • Your TV may be too close to another electrical device, such as a hair dryer or neon light. Turn off the device or move your TV. | |
| Remote control does not work | • Press the TV button. • Replace the batteries. Make sure that the + and - symbols on the batteries align with the + and - symbols in the battery compartment. • Clean the remote sensor on the front of your TV. • Bright or fluorescent lighting may interfere with the remote control signal. Turn off the light or move your TV. |
| Snowy picture or noise • | Make sure that the A/V cables are connected correctly and securely. |
| VGA picture is not stable or synchronized | • Make sure that you have selected the correct VGA mode on your computer. |
| No output from one of the speakers | • Adjust the balance in the Sound menu. |
| Control buttons do not work | • Unplug the power cord, wait few seconds, then plug the cord back in and turn on your TV. |
| Some parts of the screen do not light up | • The plasma screen is manufactured using a high level of precision technology. Sometimes parts of the screen may be missing picture elements or have luminous spots. This is not a malfunction. |
| After images appear • Do not display a still image, such as a logo, game, computer image, for an extended period of time. This can cause a permanent after image to be burned into the screen. This type of damage is not covered by your warranty. | |
| TV makes snapping sounds | • Snapping sounds occur when your TV's cabinet expands or contracts from variation in temperature. This is not a malfunction. |
Specifications
- Design and specifications are subject to change without notice.
- Weight and dimensions listed are approximate.
| Power supply AC 100-240 V 50/60 Hz | |
| Power consumption | 140 W |
| Screen | 27-inch |
| Channel coverage | VHF: 2-13 UHF: 14-69 CATV: 1-125 CADTV: 1-135 DTV: 2-69 |
| Weight | 41.9 lbs. (19 kg) |
| Dimensions W × H × D | 28.25 × 24 × 9.25 inches (71.4 × 60.6 × 23.5 cm) |
| Temperature Storage temperatures are 32° to 122°F (0° to 50°C). Working temperatures are 41° to 104°F (5° to 40°C). |
| TV system NTSC-M, ATSC |
| Accessories User guide Remote control |
Appendix
VCR codes
| ABS 21972 | |
| Admiral 20048, 20209 | |
| Alko 20278 | |
| Aiwa 20037, 20479 | |
| Alienware 21972 | |
| America Action 20278 | |
| American High 20035 | |
| Amoisonic 20479 | |
| Anam 20162, 20037, 20240, 20278 | |
| Anam National 20162 | |
| Asha 20240 | |
| Audiovox | 20037, 20278 |
| Beaumark | 20240 |
| Bell & Howell | 20104 |
| Broksonic | 20184, 20121, 20209, 20002,20479 |
| Calix 20037 | |
| Canon | 20035 |
| Carver | 20081 |
| CCE 20072, 20278 | |
| Changhong | 20048, 20081 |
| Citizen | 20037, 20278 |
| Colt | 20072 |
| Craig | 20037, 20047, 20240, 20072 |
| Curtis Mathes | 20060, 20035, 20162 |
| Cybernex | 20240 |
| CyberPower | 21972 |
| Daewoo | 20045, 20104, 20278 |
| Dell | 21972 |
| Denon | 20042 |
| DirecTV 20739 | |
| Durabrand 20039, 20038 | |
| Electrohome 20037 | |
| Electrophonic | 20037 |
| Emerex | 20032 |
| Emerson | 20035, 20037, 20184, 20240,20045, 20121, 20043, 20209, 20002, 20278, 20479 |
| Fisher | 20047, 20104 |
| Fuji | 20035, 20033 |
| Fujitsu | 20045 |
| Gateway | 21972 |
| GE | 20060, 20035, 20240 |
| General | 20045 |
| Go Video | 20432 |
| GoldStar | 20037, 20209, 20038, 20225 |
| Haojie | 20240 |
| Harman/Kardon | 20081, 20038 |
| Harwood | 20072 |
| Hewlett Packard | 21972 |
| HI-Q | 20047 |
| Hitachi | 20037, 20042, 20055 |
| Howard Computers | 21972 |
| HP | 21972 |
| Hughes Network Systems | 20042, 20739 |
| iBUYPOWER | 21972 |
| JVC | 20045, 20067 |
| KEC 20037, 20278 | |
| Kenwood | 20067, 20038 |
| KLH 20072 | |
| Kodak | 20035, 20037 |
| Kolin | 20043 LG 20037, 20045, 20042, 20209,20038 |
| Logik | 20072 |
| LXI | 20037 |
| Magnavox | 20035, 20039, 20081 |
| Magnin | 20240 |
| Marantz | 20035, 20081 |
| Marta 20037 | |
| Matsushita | 20035, 20162 |
| Media Center PC | 21972 |
| MEI | 20035 |
| Memorex | 20035, 20162, 20037, 20048,20039, 20047, 20240, 20104, 20209, 20479 |
| MGA | 20240, 20043 |
| MGN Technology | 20240 |
| Microsoft 21972 | |
| Mind | 21972 |
| Minolta | 20042 |
| Mitsubishi 20067, 20043 | |
| Motorola | 20035, 20048 |
| MTC 20240 | |
| Multitech | 20072 |
| NEC 20035, 20037, | 20048, 20104,20067, 20038 |
| Newave | 20037 |
| Nikko | 20037 |
| Noblex | 20240 |
| Northgate | 21972 |
| Olympus | 20035 |
| Optimus | 21062, 20162, 20037, 20048,20104, 20432 |
| Orion | 20184, 20209, 20002, 20479 |
| Panasonic | 21062, 20035, 20162, 20616,20225 |
| Panney | 20035, 20037, 20240, 20042,20038 |
| Pentax | 20042 |
INSIGNIA
Insignia NS-27LCD 27 LCD TV
| Philco 20035, 20479 |
| Philips 20035, 20081, 20739, 20618 |
| Pilot 20037 |
| Pioneer 20042, 20067 |
| Polk Audio 20081 |
| Profitronic 20240 |
| Proscan 20060 |
| Protec 20072 |
| Pulsar 20039 |
| Qisheng 20060 |
| Quasar 20035, 20162 |
| Radix 20037 |
| Randex 20037 |
| RCA 20060, 20035, 20240, 20042,20880 |
| Realistic 20035, 20037, 20048, 20047,20104 |
| ReplayTV 20616 |
| Runco 20039 |
| Sampo 20037, 20048 |
| Samsung 20240, 20045, 20432 |
| Sanky 20048, 20039 |
| Sansui 20067, 20209, 20479 |
| Sanyo 20047, 20240, 20104 |
| Scott 20184, 20045, 20121, 20043 |
| Sears 20035, 20037, 20047, 20042,20104 |
| Sharp 20048, 20209 |
| Shintom 20072 |
| Shogun 20240 |
| Singer 20072 |
| Sonic Blue 20616 |
| Sony 20035, 20032, 20033, 20636,21972 |
| STS 20042 |
| Sylvania 20035, 20081, 20043 |
| Systemax 21972 |
| Tagar Systems 21972 |
| Tashiko 20037 |
| Tatung 20045, 20067 |
| Technics 20035, 20162 |
| Teco 20035, 20037, 20048, 20038 |
| Teknika 20035, 20037 |
| Tivo 20636, 20618, 21503, 20739 |
| TMK 20240 |
| Toshiba 20045, 20042, 20067, 20043,21503, 21008, 21972 |
| Totevision 20037, 20240 |
| Touch 21972 |
| Unitech 20240 |
| Vector 20045 |
| Vector Research 20038 |
| Victor 20067 |
| Video Concepts 20045 |
| Videomagic 20037 |
| Videosonic 20240 |
Digital video disc codes
| Viewsonic | 21972 |
| Wards 20060, 20035, 20048, 20047,20081, 20240, 20042, 20072 | |
| White Westinghouse | 20209, 20072 |
| XR-1000 | 20035, 20072 |
| Yamaha | 20038 |
| Zenith 20039, 20033, 20209, 20479 | |
| ZT Group 21972 | |
| Aiwa | 20641, 21912 |
| Akai | 20770 |
| Allegro 20869 | |
| Apex Digital | 20672, 20717, 20797, 21061,20796, 21056, 21937, 20794, 21020, 21915 |
| Blaupunkt | 20717 |
| Blue Parade | 20571 |
| Broksonic | 20695 |
| Changhong | 20627, 21061 |
| CineVision | 20869 |
| Coby | 21086 |
| Curtis Mathes | 21087 |
| CyberHome | 21024, 21023, 21129, 20816, 21117 |
| Daewoo | 20833, 21172, 20869 |
| Denon | 20490 |
| DVD2000 | 20521 |
| Emerson | 20591, 20675 |
| Enterprise | 20591 |
| Fisher | 21919 |
| Funai | 20675 |
| Gateway | 21158, 21073 |
| GE | 20522, 20717 |
| Go Video | 20744, 20833, 21099, 20783,21075, 20869, 21730 |
| Greenhill | 20717 |
| Harman/Kardon | 20582, 20702 |
| Hitachi | 20573, 20664, 21919 |
| Hiteker 20672 | |
| Initial | 20717 |
| Integra 20627, 21924 | |
| JBL | 20702 |
| JVC | 20558, 20623, 20867 |
| Kenwood | 20490, 20534 |
| KLH 20717, 21020, | 21149 |
| Koss | 20651, 21980 |
| Lasonic | 20798 |
| LG | 20591, 20869, 20801 |
| Liquid Video | 21980 |
| Lite-On | 21158, 21058 |
| Loewe 20511 | |
| Magnavox | 20503, 20539, 21976, 21914, 20675 |
| Marantz 20539 | |
| Memorex 20695 | |
| Microsoft 20522 | |
| Mintek 20717 | |
| Mitsubishi 21521, 20521 | |
| Nesa 20717 | |
| Norcent 21003 | |
| Onkyo 20503, 20627, 21924, 20792 | |
| Oritron 20651, 21980 | |
| Panasonic 20490, 21762, 21990 | |
| Philips 20503, 20539, 20646, 21914 | |
| Pioneer 20525, 20571 | |
| Polaroid 21086, 21061 | |
| Polk Audio 20539 | |
| Portland 20770 | |
| Proscan 20522 | |
| Qwestar 20651 | |
| RCA 20522, 20571, 20717, 20822 | |
| Rio | 20869 |
| Rotel | 20623 |
| Sampo 20752, 20698 | |
| Samsung 20490, 20573, 21932, 21075, 20820 | |
| Sansui 20695 | |
| Sanyo 20695 | |
| Sharp | 20630, 20752 |
| Sharper Image | 21117 |
| Sherwood | 20770 |
| Shinco | 20717 |
| Shinsonic | 20533 |
| Sonic Blue | 20869, 21099 |
| Sony | 20533, 20864, 21033, 21904, 21903 |
| SVA | 20717 |
| Sylvania | 20675 |
| Symphonic | 20675 |
| Teac | 20717, 21984, 20809 |
| Technics | 20490 |
| Theta Digital | 20571 |
| Toshiba 20503, 20695 | |
| Urban Concepts | 20503 |
| Xbox | 20522 |
| Yamaha | 20490, 20539, 20545 |
| Zenith | 20503, 20591, 20869 |
Cable converter codes
| ABC 000003, 000008, 00014 | |
| Americast | 00899 |
| Bell & Howell | 00014 |
| Bell South 00899 | |
| Clearmaster | 00883 |
| ClearMax | 00883 |
| Coolmax | 00883 |
| Daeryung 01877, 00877, 00477, 00008 | |
| Digi | 00637 |
| Director | 00476 |
| Dumont | 00637 |
| Gehua | 00476 |
| General Instrument | 00476, 00810, 00276, 00003,00014 |
| GoldStar | 00144 |
| Hamlin 00009, 00273 | |
| Hitachi | 00014 |
| Jerrold | 00476, 00810, 00276, 00003,00012, 00014 |
| KNC | 00008 |
| LG | 00144 |
| Memorex 00000 | |
| Motorola | 00476, 00810, 00276, 01254,01376 |
| MultiVision | 00012 |
| Pace | 01877, 00237 |
| Panasonic 00000, 00008, 00107 | |
| Panther | 00637 |
| Paragon 00000 | |
| Philips | 00317, 01305 |
| Pioneer 01877, 00877, 00144, 00533 | |
| Pulsar | 00000 |
| Quasar 00000 | |
| RadioShack | 00883 |
| Regal | 00279, 00273 |
| Runco | 00000 |
| Samsung 00000, 00144 | |
| Scientific Atlanta | 01877, 00877, 00477, 00008 |
| Sony | 01006 |
| Starcom | 00003, 00014 |
| Supercable | 00276 |
| Supermax | 00883 |
| Tocom | 00012 |
| Torx 00003 | |
| Toshiba 00000 | |
| Trans PX | 00276 |
| Tristar | 00883 |
| TS | 00003 |
| V2 | 00883 |
| Viewmaster | 00883 |
INSIGNIA
Insignia NS-27LCD 27 LCD TV
Vision 00883
Vortex View 00883
Zenith 00000, 00525, 00899
Legal notices
FCC statement
Radio-TV interference
This equipment has been tested and found to comply with the limits for a Class B digital device, pursuant to Part 15 of the FCC Rules. These limits are designed to provide reasonable protection against harmful interference in a residential installation. This equipment generates, uses, and can radiate radio frequency energy and, if not installed and used in accordance with the instructions, may cause harmful interference to radio communications. However, there is no guarantee that interference will not occur in a particular installation. If this equipment does cause harmful interference to radio or television reception, which can be determined by turning the equipment off and on, the user is encouraged to try to correct the interference by one or more of the following measures:
1 Reorient or relocate the receiving antenna.
2 Increase the separation between the equipment and receiver.
3 Connect the equipment into an outlet on a circuit different from that to which the receiver is connected.
4 Consult the dealer or an experienced radio/TV technician for help.
This Class B digital apparatus complies with Canadian ICES-003.
This equipment may generate or use radio frequency energy. Changes or modifications to this equipment may cause harmful interference unless the modifications are expressly approved in the owner's manual. The user could lose the authority to operate this equipment if an unauthorized change or modification is made.
Copyright
© 2006 Insignia. Insignia and the Insignia logo are trademarks of Best Buy Enterprise Services, Inc. Other brands and product names are trademarks or registered trademarks of their respective holders. Specifications and features are subject to change without notice or obligation.
Bass (Graves) - Regles graves (notes basses).
Configuration Tuning
Scientific Atlanta 01877,00877,00477,00008
Sony 01006
Starcom 00003,00014
Supercable 00276
Supermax 00883
Tocom 00012
Torx 00003
Toshiba 00000
Trans PX 00276
Tristar 00883
TS 00003
V2 00883
Viewmaster 00883
Televisor con Pantalla LCD de 27" Insignia NS-27LCD
Vision 00883
Vortex View 00883
Zenith 00000, 00525, 00899
Avisos legales
Distributed by Insignia™ Products
7601 Penn Avenue South,
Richfield, MN USA 55423-3645
www.Insignia-Products.com
© 2005 Insignia™ Products
All rights reserved. All other products and brand names are trademarks of their respective owners.
- Safety information
- Waming
- Caution
- Warning
- Read instructions
- Retain instructions
- Follow warnings and instructions
- INSIGNIA
- Water and moisture
- Cleaning
- Ventilation
- Heat
- Grounding or polarization
- Power cord protection
- Attachments
- Stand
- Lightning
- Servicing
- Replacement parts
- Overloading
- Object and liquid entry
- Damage requiring service
- Safety check
- Power source
- Screen protection
- Pixel defect
- Outdoor antenna grounding
- Note to CATV system Installer
- Features
- Jack
- Remote control
- Note
- Button Description
- Using the remote control
- To use the remote control:
- Notes
- Setting up your TV
- Installing remote control batteries
- To install the remote control batteries:
- Connecting your TV to an electrical outlet
- To connect your TV to an electrical outlet:
- Connecting speakers
- Connecting an outside antenna
- Connecting cable TV
- To connect cable TV without a converter/descrambler box:
- To connect cable TV with a converter/descrambler box:
- Connecting a sound system
- Connecting a VCR
- To play the VCR:
- Connecting a VCR (for recording)
- Connecting an amplifier
- Connecting a camcorder
- To connect a camcorder:
- To playback from the camcorder:
- Connecting a DVD player
- To connect a DVD player:
- To play a DVD:
- Connecting a DTV receiver
- To watch your DTV:
- Connecting a computer
- To watch TV on your computer monitor:
- Using your TV
- Turning your TV on and off
- Selecting the TV source
- Setting up the channel list
- Automatically setting up channels
- Manually adding or deleting channels from the channel list
- To add or delete channels:
- Changing channels
- To change channels:
- Selecting a digital sub-channel
- To select a sub-channel:
- Adjusting the volume
- To adjust the volume:
- Displaying status information
- To display status information:
- Selecting the video input source
- To select the video input source:
- Checking the DTV signal strength
- To check the DTV signal strength:
- Adding a channel label
- To add a label to a channel:
- Freezing the picture
- Setting the clock
- Automatically setting the clock
- Manually setting the clock
- Setting the sleep timer
- To set the sleep timer:
- Viewing closed captions
- To view closed captions:
- Setting parental controls
- To set up a password:
- MPAA ratings
- X Adults only.
- TV Parental Guidelines ratings
- Rating Description
- To set the ratings:
- Using the on-screen menu system
- To use the on-screen menu system:
- On-screen menus
- Programming the remote control
- Programming a device connected to your TV
- To program the remote control:
- Searching for a code
- To search for a code:
- Checking the code
- To check the code:
- Programming the volume lock
- To lock the volume control:
- To unlock the volume control:
- To unlock a single device's volume control:
- Maintaining
- Cleaning your TV
- Troubleshooting
- Specifications
- Appendix
- VCR codes
- Legal notices
- FCC statement
- Radio-TV interference
- Copyright
- Configuration Tuning
- Avisos legales
Brand : INSIGNIA
Model : NS27LCD
Category : Television