
Performa - Glucometer Accu-Chek - Free user manual and instructions
Find the device manual for free Performa Accu-Chek in PDF.
| Product type | Glucometer |
| Brand | Accu-Chek |
| Model | Performa |
| Dimensions (L × W × H) | 94 × 52 × 21 mm |
| Weight (with battery) | Approx. 59 g |
| Power supply | 3 V lithium battery, type CR2032 |
| Battery life | Approx. 1000 measurements (estimated) |
| Sample type | Fresh capillary, venous, arterial, neonatal whole blood |
| Blood volume required | Approx. 0.6 µL |
| Measurement time | Approx. 5 seconds |
| Measurement range | 0.6 to 33.3 mmol/L (10 to 600 mg/dL) |
| Memory | 500 blood glucose results + 20 control results (with time and date) |
| Calculated averages | 7, 14, 30 and 90 days |
| Automatic power-off | 2 minutes after last use |
| Main functions | Blood glucose measurement, pre/post-meal marking, measurement reminders, hypoglycemia indicator, control test, infrared data transfer |
| Care and cleaning | Clean the exterior with a soft cloth dampened with 70% isopropyl alcohol, diluted dish soap, or 10% bleach solution |
| Safety | Self-test on every startup, error messages (E-1 to E-10), automatic shutdown in case of malfunction |
| Spare parts and repairability | CR2032 battery easily replaceable; Accu-Chek Performa test strips and control solutions available separately |
| Storage conditions of the meter | Temperature: -25 to 70 °C |
| Display | Liquid crystal display (LCD) |
| Warranty | According to the legal provisions of the country of purchase |
Frequently Asked Questions - Performa Accu-Chek
User questions about Performa Accu-Chek
0 question about this device. Answer the ones you know or ask your own.
Ask a new question about this device
Download the instructions for your Glucometer in PDF format for free! Find your manual Performa - Accu-Chek and take your electronic device back in hand. On this page are published all the documents necessary for the use of your device. Performa by Accu-Chek.
USER MANUAL Performa Accu-Chek
Introduction 3
Chapter 1: Your New System 5
Chapter 2: Blood Glucose Tests. 9
Chapter 3: Meter Memory, Setup, and Data Transfer. 17
Chapter 4: Control Tests. 27
Chapter 5: Maintenance and Troubleshooting 31
Chapter 6: Technical Information 37
Index 43
The Accu-Chek Performa System
The Accu-Chek Performa meter is designed to be used with the Accu-Chek Performa test strip to quantitatively measure glucose in fresh venous, arterial, neonatal, and capillary whole blood as an aid in monitoring the effectiveness of glucose control. Capillary whole blood for testing of blood glucose can be obtained from fingertip and approved alternative sites (for example, forearm). Refer to the Alternative Site Testing (AST) section of this manual for approved alternative sites and associated limitations. The Accu-Chek Performa meter with the Accu-Chek Performa test strips provide a complete test system that is meant for in vitro diagnostic use by healthcare professionals in clinical settings and by people with diabetes at home. The system is not for use in diagnosis or screening of diabetes mellitus. Healthcare professional blood sample collection and preparation is described in the test strip package insert.
For use only with the Accu-Chek Performa test strips and control solutions
Suitable for self-testing
The system includes:
- Accu-Chek Performa meter with battery
- Accu-Chek Performa test strips*
- Accu-Chek Performa control solutions
Some items may not be included in the kit. They are a separate purchase.

WARNING

- Choking hazard. Small parts. Keep away from children under the age of 3 years.
- Keep new and used batteries away from children. Ingestion or insertion into the body may cause chemical burns, perforation of soft tissues, and death. Severe burns may occur within 2 hours of swallowing. If you think a battery might have been swallowed or placed inside any part of the body, seek medical attention immediately.
- If the battery compartment does not close securely, stop using the product and keep it away from children. Contact Roche.
- Any object coming into contact with human blood is a potential source of infection (see: Clinical and Laboratory Standards Institute: Protection of Laboratory Workers from Occupationally Acquired Infections; Approved Guideline - Third Edition; CLSI document M29-A3, 2005).
Why Regular Blood Glucose Testing Is Important
Testing your blood glucose regularly can make a big difference in how you manage your diabetes every day.
We have made it as simple as possible.
Important Information About Your New Meter
- The meter comes with a preset time and date. You may need to change the time to your time zone.
- If you follow the steps in this manual but still have symptoms that do not seem to match your test results, or if you have questions, talk to your healthcare professional.
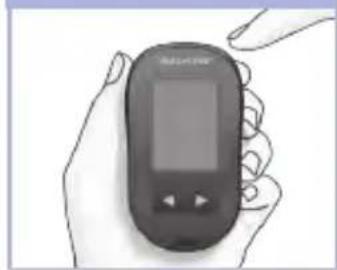
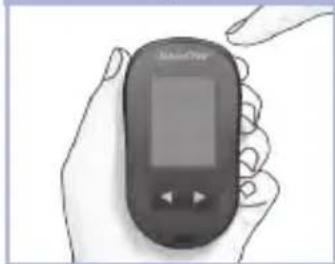
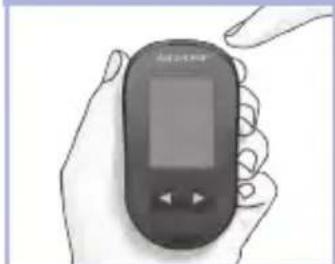
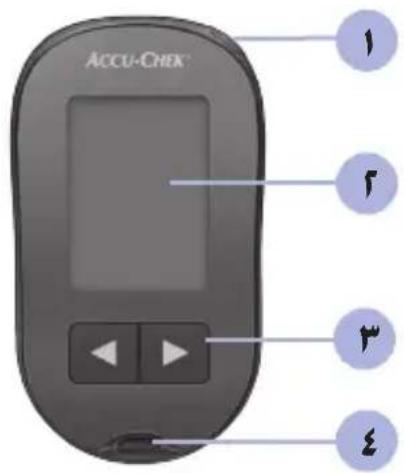
The Accu-Chek Performa Meter
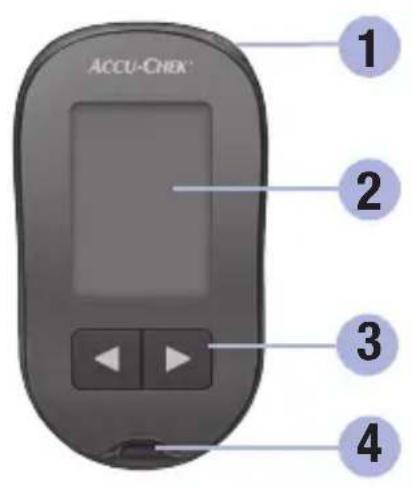
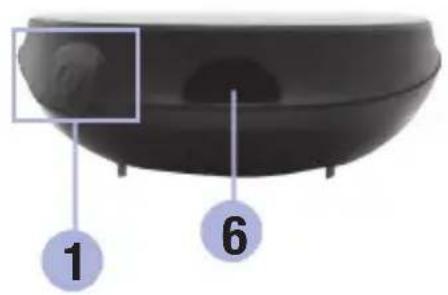
- Power/Set Button
Turns meter on or off and sets options.
- Display
Shows results, messages, and test results stored in memory.
- Right Arrow and Left Arrow Buttons


Press to enter memory, adjust settings, and scroll through test results.
- Test Strip Slot
Insert test strip here.
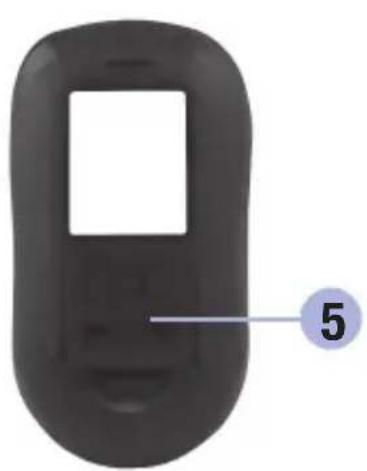
- Battery Door
- Infrared (IR) Window
Transfers data from meter to computer.
1 Your New System

(for example)

9


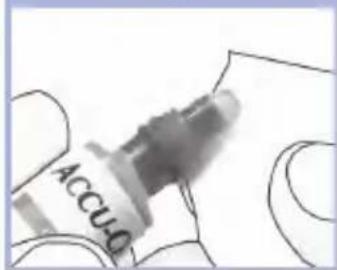
7. Test Strip Container*
9. Yellow Window
- Insert this end into meter.
Touch blood drop or control solution here.
10. Control Solution Bottle*
11. Battery
*Some items may not be included in the kit. They are a separate purchase.
Using the Accu-Chek Performa System
- Use only Accu-Chek Performa test strips.
- Use the test strip immediately after removing it from the test strip container.
- Do not apply blood or control solution to the test strip before inserting it into the meter.
- Close the test strip container tightly immediately after removing a test strip to protect the test strips from humidity.
- Store the unused test strips in their original test strip container with the cap closed.
- Check the use by date on the test strip container. Do not use the test strips after that date.
- Store the test strip container and meter in a cool, dry place such as a bedroom.
- Refer to the test strip package insert for test strip storage and system operating conditions.

WARNING
Do not store test strips in high heat and moisture areas (bathroom or kitchen)! Heat and moisture can damage test strips.
1 Your New System
Button Functions
Here are the functions of the power/set and arrow buttons on the meter. These functions are used throughout this manual. For more information on using these buttons during meter setup, see Chapter 3, Meter Memory, Setup, and Data Transfer.
| Button Function Action | ||
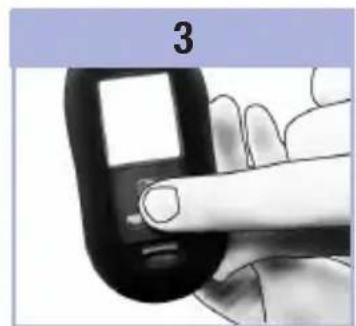
| ①(power/set button) | Turn the meter on or off. | Press and release Ⓞ. |
| Enter the set-up mode. | Turn the meter on. Press and hold Ⓞ until set-up appears on the display. | |
| Set the chosen feature. | Press and release Ⓞ. | |
| Exit the set-up mode at any time. | Press and hold Ⓞ until the flashing test strip symbol appears on the display. | |
| Check the display segments. | Turn the meter off. Press and hold Ⓞ to see the complete display. If one of the segments is missing or looks different from the picture, do not use the meter. Contact Roche. | |
| or 8888888888888888888888888888888888888888888888888888888888888888888888888888888888888888888888888888 | ||
| ( right arrow and left arrow buttons) | Adjust settings for time and date, beeper, test reminders, and hypoglycemic alert. | Press and release Ⓞ or Ⓞ Press and hold Ⓞ to scroll faster. |
| Enter memory. Press and release | or Ⓞ | |
| Mark a blood glucose result. Press and release | or Ⓞ | |
Performing a Blood Glucose Test with Blood from Your Fingertip
NOTE
Blood samples taken from the palm are equivalent to blood samples taken from the fingertip. To receive Alternative Site Testing (AST) instructions and an AST cap for obtaining blood from the palm, contact Roche.

WARNING
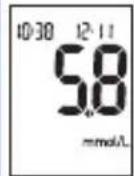
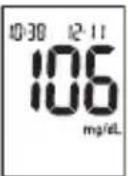
Blood glucose results can be displayed in either mg/dL or mmol/L. The back label of the meter shows the unit of measurement. If the meter shows the wrong unit, contact Roche. If you do not know which unit of measurement is correct for you, contact your healthcare professional. Using the wrong unit of measurement may cause misinterpretation of your actual blood glucose level and may lead to improper therapy.

2 Blood Glucose Tests
Before you perform your first blood glucose test, set up the meter correctly. You need the meter, a test strip, a lancing device, and a lancet.
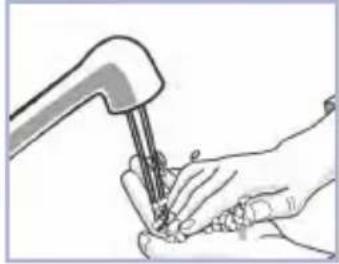
1
Wash and dry your hands.
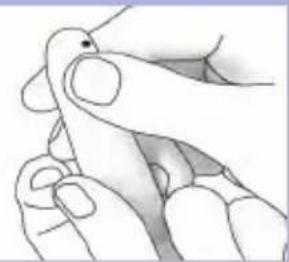
2
Prepare the lancing device.

3
Check the use by date on the test strip container. Do not use test strips past the use by date.

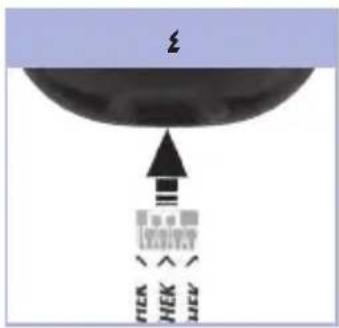
4
Insert the test strip into the meter in the direction of the arrows. The meter turns on and beeps.

5
When the blood drop symbol flashes, perform a fingerstick with the lancing device.
6
Gently squeeze your finger to assist the blood flow.
This helps you get a blood drop.

7
Touch the blood drop to the front edge of the yellow window of the test strip.
Do not put blood on top of the test strip. The meter beeps and flashes when there is enough blood in the test strip.

8
The test result appears on the display.
To assign a marker to the test result, leave the test strip in the meter. See Chapter 2, Marking Blood Glucose Results and Setting the Post-Meal Test Reminder.
Otherwise, remove and discard the used test strip. After a successful test, the meter turns itself off 5 seconds after the test strip is removed.
2 Blood Glucose Tests
Performing a Blood Glucose Test with Blood from Your Palm, Forearm, or Upper Arm (Alternative Site Testing)
You have the option of obtaining a blood sample from other sites on your body besides the fingertip.
Alternative sites include the palm, forearm, and upper arm.
Blood obtained from the fingertip and palm can be used at any time to perform a blood glucose test.
If blood from the forearm or upper arm is used, there are certain times when testing is not appropriate. This is because your blood glucose level changes faster in your fingertip and palm than in the forearm and upper arm. These differences may cause you to misinterpret your actual blood glucose level, leading to improper therapy and potential adverse health effects.
Read the next section before you try testing from the forearm or upper arm.
| You may perform a forearm or upper arm test | • immediately before a meal. • while fasting. |
| You may NOT perform a forearm or upper arm test | • up to 2 hours following a meal, when blood glucose values can rise quickly. • after injecting bolus insulin, when blood glucose values can decrease rapidly. • after exercise. • if you are sick. • if you think your blood glucose is low (hypoglycemia). • if you sometimes do not notice when your blood glucose is low. |
If you are interested in AST, talk to your healthcare professional first.
To obtain an AST cap and detailed AST instructions, contact Roche.
2 Blood Glucose Tests
Marking Blood Glucose Results and Setting the Post-Meal Test Reminder
You can mark a blood glucose result to indicate a special event. If you select a test result marker, it is automatically stored in memory. When you review the test results in memory, these markers can help you remember what was different about the test result.
| Symbol Function | |
| Pre-Meal Marker Marking blood glucose results with a pre-meal marker provides more information about your test results to help you and your healthcare professional in the management of your diabetes. | |
| Pre-Meal Marker with Post-Meal Test Reminder When a pre-meal result is marked with a post-meal test reminder, the meter beeps 1 or 2 hours after you test to remind you to do a post-meal test. | |
| Post-Meal Marker Marking blood glucose results with a post-meal marker provides more information about your test results to help you and your healthcare professional in the management of your diabetes. The post-meal marker automatically appears with the test result if a test is performed 15 minutes before or after the post-meal test reminder is programmed to beep. Set the post-meal test reminder time to 1 or 2 hours in the set-up mode. The meter will beep 1 or 2 hours after the pre-meal test to remind you to do a post-meal test. | |
| * | General Marker You might want to use the general marker to mark an event such as an AST result or exercise. |
Here is how to mark a test result and initiate a post-meal test reminder:
- Perform a blood glucose test. The blood glucose result appears on the display.
- Leave the test strip in the meter. Press and release or to toggle through the test result markers and post-meal test reminder.
- When the marker or test reminder that you wish to select appears on the display, remove the test strip from the meter.
Unusual Blood Glucose Results
If your blood glucose result does not match how you feel, check this list to help solve the problem.
| Troubleshooting Checks Action | |
| 1. Were the test strips expired? | Discard the test strips if they are past the use by date.Repeat the blood glucose test with an unexpired test strip. |
| 2. Was the cap on the test strip container closed tightly? | Replace the test strips if you think the test strip container was uncapped for some time. Repeat the blood glucose test. |
| 3. Was the test strip used immediately after it was removed from the test strip container? | Repeat the blood glucose test with a new test strip. |
| 4. Were the test strips stored in a cool, dry place? | Repeat the blood glucose test with a properly stored test strip. |
| 5. Did you follow the directions? See Chapter 2, Blood Glucose Tests, and repeat the blood glucose test. Contact Roche if you still have problems. | |
| 6. Are the meter and test strips working properly? | Perform a control test. See Chapter 4, Performing a Control Test, for instructions. |
| 7. Are you still unsure of the problem? Contact Roche. | |
2 Blood Glucose Tests
Symptoms of Low or High Blood Glucose
Being aware of the symptoms of low or high blood glucose can help you understand your test results and decide what to do if they seem unusual.
Low blood glucose (hypoglycemia): Symptoms of hypoglycemia may include, but are not limited to, anxiety, shakiness, sweating, headache, increased hunger, dizziness, pale skin color, sudden change in mood or irritability, fatigue, difficulty concentrating, clumsiness, palpitations, and/or confusion.
High blood glucose (hyperglycemia): Symptoms of hyperglycemia may include, but are not limited to, increased thirst, frequent urination, blurred vision, drowsiness, and/or unexplained weight loss.

WARNING
If you are experiencing any of these symptoms, or other unusual symptoms, test your blood glucose from the fingertip or palm. If your blood glucose result is displayed as LO or HI, contact your healthcare professional immediately.
Memory
Storing Blood Glucose and Control Results
The meter automatically stores up to 500 blood glucose results and up to 20 control results with the time and date of the result and any test result marker which you can review at any time. Test results are stored from the newest to the oldest, so set the time and date correctly in the meter. Having the correct time and date setting helps ensure appropriate interpretation of stored blood glucose results by you and your healthcare team.
NOTE
- The memory is not lost when the battery is replaced; however, confirm that the time and date are still correct. See Chapter 3, Setting the Time and Date.
- Once 500 blood glucose results are in memory, adding a new test result causes the oldest one to be deleted.
- If more than 500 blood glucose tests are performed within a 90-day period, only the most recent 500 test results are included in the 90-day average.
- Control results are stored in memory, but cannot be reviewed on the meter. To view stored control results, first transfer them to a compatible software application. Contact Roche for product availability.
Control results are not included in the 7-, 14-, 30-, and 90-day averages. - Only test results that have been assigned a pre-meal or post-meal marker are included in pre-meal and post-meal averages. All blood glucose results are included in the general 7-, 14-, 30-, and 90-day averages.
3 Meter Memory, Setup, and Data Transfer
Memory
Viewing Test Results in Memory
With the meter on or off, press and release Enter memory. The most recent test result appears on the display.
| Button Function Action | ||
| (left arrow button) | Previous test results | Press to view previous test results from newest to oldest. |
| memory 18:00 12:11 ↑ ↑ ↑ ↑ 14:30 12:11 ↑ ↑ ↑ 8:30 12:11 | ||
| (right arrow button) | General averages | Press to view 7-, 14-, 30-, and 90-day averages. n = number of test results in the average |
| memory n21 ↑ ↑ ↑ ↑ 7day 14ave ↑ ↑ ↑ 142 14ave ↑ ↑ ↑ 89 30ave | ||
| (right arrow button) | Pre-meal averages Post-meal averages | Continue to press to view 7-, 14-, 30-, and 90-day pre-meal and post-meal averages. |

WARNING
Do not change your therapy based on an individual test result in memory. Talk to your healthcare professional before changing therapy based on test results in memory.
Setup
Using the Set-Up Mode
The following features can be customized as required.
| Symbol Function Action Factory Pre-set | |||
| Time and date Set the time and date. | |||
| Beeper | Select On or OFF. Setting the beeper to OFF does not affect test results. The beeper must be On to use the test reminders feature. | On | |
| Post-meal test reminder | Select 1 hour or 2 hours. The meter will beep 1 or 2 hours after the pre-meal test to remind you to do a post-meal test. | 2HR | |
| Test reminders | Select On or OFF. You can set up to 4 test reminders per day. | A-1 8:00 A-2 12:00 A-3 18:00 A-4 22:00 | |
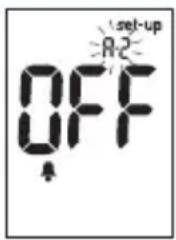
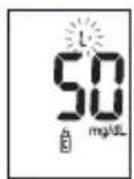
| Hypoglycemic alert | Select On or OFF. The hypoglycemic alert can be set to a level between 50 and 90 mg/dL or 2.8 and 5.0 mmol/L to let you know when your blood glucose is possibly too low. | OFF | |
3 Meter Memory, Setup, and Data Transfer
Setup Setting the Time and Date

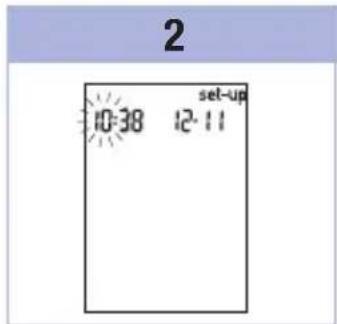

Press and release (power/set button) to turn the meter on. The flashing test strip symbol appears on the display.
Press and hold until set-up appears on the display. The hour flashes.
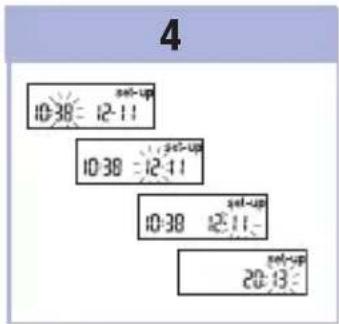
Press and release to decrease or increase the hour. Press and release to set the hour. The minutes flash.
Repeat step 3 to set minutes, day, month, and year. To set up more options, press and release. To exit, press and hold until the flashing test strip symbol appears on the display.
Setup
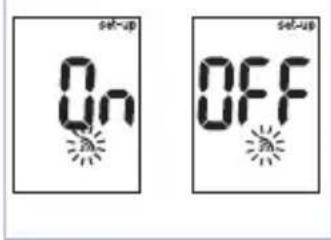
Setting the Beeper On or OFF
NOTE
The beeper prompts you:
to apply blood or control solution to the test strip.
- when enough blood or control solution is drawn into the test strip.
- when the blood glucose or control test is complete.
- when a button is pressed.
- when it is time to perform a test (if you set the test reminders or post-meal test reminder).
- if an error occurred while performing a blood glucose or control test (even if the beeper is off, it still beeps for an error).
1
2
3
Press and release to switch between and OFF.
To set up more options, press and release
To exit, press and hold until the flashing test strip symbol appears on the display.
Press and release to turn the meter on.
The flashing test strip symbol appears on the display.
Press and hold ① until set-up appears on the display.
Press and release repeatedly until the flashing beeper symbol and On or OFF appear on the display.
3 Meter Memory, Setup, and Data Transfer
Setup Setting the Post-Meal Test Reminder
NOTE
The post-meal test reminder:
- beeps 1 or 2 hours after the blood glucose test to remind you to do a post-meal test.
beeps every 2 minutes up to 3 times. -
turns off by inserting a test strip or pressing any button.
-
If a test was performed within 15 minutes of a test reminder, the test reminder does not beep.
- If the meter is on at the test reminder time, the test reminder does not beep.
- Exposure to cold conditions may disable test reminders until the meter is turned on.

1
Press and release to turn the meter on.
The flashing test strip symbol appears on the display.
Press and hold ① until set-up appears on the display.

2

3
Press and release repeatedly until set-up and the flashing 1Hr or 2Hr appear on the display.
Press and release to select 1Hr or 2Hr.
Press and release to set the option.
To set up more options, press and release ①.
To exit, press and hold until the flashing test strip symbol appears on the display.
This display appears when a post-meal test reminder occurs.
Setup
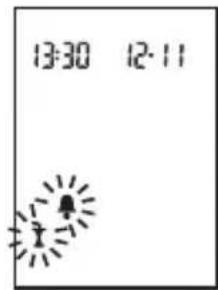
Setting the Test Reminders
NOTE
Test reminders:
beep at the same time each day.
beep every 2 minutes up to 3 times.
- turn off by inserting a test strip or pressing any button.
- If a test was performed within 15 minutes of a test reminder, the test reminder does not beep.
- If the meter is on at the test reminder time, the test reminder does not beep.
- Exposure to cold conditions may disable test reminders until the meter is turned on.
- If a test reminder is off in set-up mode, any subsequent test reminders are also off. For example, if you set A-1 but turn off A-2, then A-3 and A-4 will automatically be off.
1
Press and release to turn the meter on.
The flashing test strip symbol appears on the display.
Press and hold ① until set-up appears on the display.

2

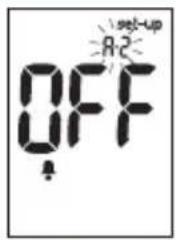
Press and release repeatedly until the bell symbol, OFF, set-up, and the flashing A-1 appear on the display.

3
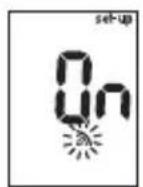
Press and release or to switch between On and OFF.
Press and release to set your choice.
If On is selected, the hour flashes.

4
Press and release to adjust the hour.
Press and release to set the hour.
The minutes flash.
3 Meter Memory, Setup, and Data Transfer
5
6
Press and release to select 00,15,30,or 45. These are the only choices. Press and release to set the minutes. The bell symbol, OFF, and the flashing A-2 appear on the display.
Either set the A-2 test reminder or press and release to set up more options. To exit, press and hold until the flashing test strip symbol appears on the display.
Setup
Setting the Hypoglycemic Alert

WARNING
- This function is no substitute for hypoglycemia training by your healthcare professional.
- Consumer: Before you set the hypoglycemic alert, talk to your healthcare professional to help you decide what blood glucose level is your hypoglycemic level.
- Healthcare professionals: The hypoglycemic level may vary from person to person. It is recommended to turn the hypoglycemic alert OFF when using the meter in a professional setting.

1
Press and release oto turn the meter on.
The flashing test strip symbol appears on the display.
Press and hold until set-up appears on the display.
2

3
Press and release repeatedly until set-up, OFF, and the flashing appear on the display.
Press and release to switch between On and OFF.
Press and release to set your choice.
If you select On, set-up appears and flashes.

4

or
Press and release to adjust the level.
Press and release to set the level.
To exit, press and hold until the flashing test strip symbol appears on the display.
The set-up mode is complete.
3 Meter Memory, Setup, and Data Transfer
Data Transfer
Transferring Results to a Computer
We offer a variety of software to help you transfer your results. For information on Accu-Chek software, contact Roche.
You can transfer your stored results to a computer to track, identify patterns, and print.

WARNING
Transferring data to a computer from meters used for multiple-patient testing is NOT recommended since individual patient results cannot be identified.
Transferring Data Directly to a Computer Using Specialized Software and an Infrared Cable
- Install the software according to the instructions.
- To transfer the results to a computer, connect the infrared cable according to the instructions.
- Run the software program and follow the instructions for data transfer. Make sure the software is ready to accept data from the meter.
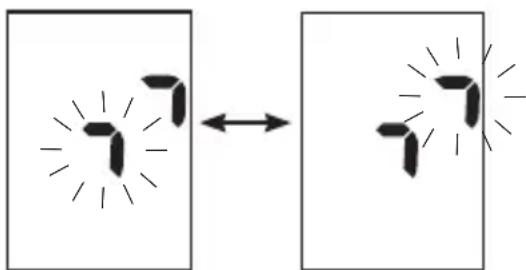
- With the meter off, press and hold both and until 2 arrows on the display alternately flash.
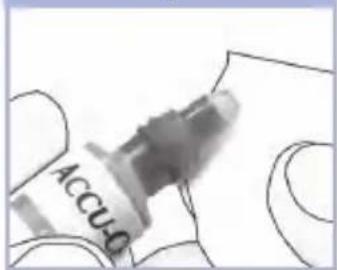
- Locate the infrared (IR) window on the top of the meter.
- Locate the IR window on the infrared cable.
- Place the meter on a flat surface. Point the 2 IR windows toward each other. They should be 3 - 10cm apart.
- Do not move the infrared cable or meter during the data transfer.
- Follow the prompts on the software.
- The software program may shut off the meter automatically when the data transfer is complete. Should this occur, follow the prompts on the computer screen.

NOTE
- If the data did not transfer successfully, try again. Contact Roche if you still have problems.
- To make the most of the transfer feature, make sure the meter is set to the correct time and date.
When to Perform a Control Test
Performing a control test lets you know the meter and test strips are working properly. You should perform a control test when:
- you open a new test strip box.
- you left the test strip container open.
- you think the test strips are damaged.
- you want to check the meter and test strips.
- the test strips were stored in extreme temperatures, humidity, or both.
- you dropped the meter.
- your test result does not match how you feel.
- you want to check if you are performing the test correctly.
About the Control Solution
- Use only Accu-Chek Performa control solution.
- Close the control solution bottle tightly after use.
- Write the date you open the control solution bottle on the bottle label. The control solution must be discarded 3 months from the date the control solution bottle was opened (discard date) or on the use by date on the bottle label, whichever comes first.
- Do not use control solution that is past the use by or discard date.
- Refer to the control solution package insert for control solution storage conditions.
- The meter automatically recognizes the difference between the control solution and blood.
The control results are not displayed in memory. - The control solution can stain fabric. Remove stains by washing with soap and water.
4 Control Tests
Performing a Control Test
You need the meter, a test strip, and control solution Level 1 or Level 2.

1
Check the use by date on the test strip container. Do not use test strips past the use by date.

Insert the test strip into the meter in the direction of the arrows. Place the meter on a flat surface.

3
Select the control solution to test. You will enter the level later in the test.
4
Remove the cap from the control solution bottle. Wipe the tip of the bottle with a tissue.
Squeeze the bottle until a tiny drop forms at the tip.
5

6
When you see flash, there is enough control solution in the test strip.
Wipe the tip of the bottle with a tissue. Cap the bottle tightly.
Touch the drop to the front edge of the yellow window of the test strip until you see flash. Do not put control solution on top of the test strip.
7
or

(for example)
The control result, the bottle symbol, and a flashing L appear on the display. Do not remove the test strip yet.
Press to mark the control result as a Level 1. Press second time to mark the control result as a Level 2.
8


or


(for example)
Press and release to set the control level in the meter.
OK and the control result alternate on the display if the control result is in range.
Err and the control result alternate on the display if the control result is not in range.
Remove and discard the used test strip.
After a successful test, the meter turns off 5 seconds after the test strip is removed.
4 Control Tests
Understanding Out-of-Range Control Results

WARNING
The control ranges are printed on the test strip container label. If the control result is out of range, check this list to help solve the problem.
| Troubleshooting Checks Action | |
| 1. Were the test strips or control solutions expired? | Discard the test strips or control solution if either is past the use by date. If the control solution was opened more than 3 months ago, discard it. Repeat the control test with an unexpired test strip and an unexpired control solution. |
| 2. Did you wipe the tip of the control solution bottle before use? | Wipe the tip of the bottle with a tissue. Repeat the control test with a new test strip and a fresh drop of control solution. |
| 3. Were the caps on the test strip container and the control solution bottle always closed tightly? | Replace the test strips or control solution if you think either was uncapped for some time. Repeat the control test. |
| 4. Was the test strip used immediately after it was removed from the test strip container? | Repeat the control test with a new test strip and a fresh drop of control solution. |
| 5. Were the test strips and control solutions stored in a cool, dry place? | Repeat the control test with a properly stored test strip or control solution. |
| 6. Did you follow the directions? Read Chapter 4, Control Tests, and repeat the control test. | |
| 7. Did you choose the correct control solution level, either 1 or 2, when you performed the control test? | If you chose the wrong control solution level, you can still compare the control result to the range printed on the test strip container. |
| 8. Are you still unsure of the problem? Contact Roche. | |
Meter Maintenance
The meter automatically tests its own systems every time you turn it on and lets you know if something is wrong. See Chapter 5, Display and Error Messages.
If you drop the meter or think the results are not accurate, contact Roche.

WARNING
Keep new and used batteries away from children. See the warning in the Introduction of this User's Manual for additional information.
Changing the Battery

Open the battery door on the back of the meter by pushing the tab in the direction of the arrow and pulling the door up.

Remove the old battery. Insert the new battery with the (+) side facing up.
Put the battery door back in place and snap it closed.
NOTE
- The meter uses one 3-volt lithium battery, coin cell type CR2032. This type of battery can be found in many stores. It is a good idea to have a spare battery available.
- All results remain saved in the memory.
5 Maintenance and Troubleshooting
Cleaning the Meter
Keep the meter free of dust. If you need to clean or disinfect it, follow these guidelines carefully to help you get the best performance possible.

WARNING
- Do not allow liquid to enter any openings in the meter.
- Do not spray a cleaning solution directly onto the meter.
-
Do not immerse the meter in liquid.
-
Make sure the meter is turned off.
-
Gently wipe the meter's surface with a soft cloth slightly dampened (wring out any excess liquid) with one of these cleaning solutions:
-
70% isopropyl alcohol
- Mild dishwashing liquid mixed with water
- 10% household bleach solution (1 part bleach plus 9 parts water) made the same day
Display and Error Messages

WARNING
- Never make therapy decisions based on an error message.
- If you have any concerns or see any other error display, contact Roche.
| Display Action | |
| The meter will not turn on or the display is blank. | ·Battery is dead. Insert new battery. ·Display is damaged. Contact Roche. ·Meter is defective. Contact Roche. ·Extreme temperatures. Move the meter to a more temperate area. |
| Battery power is low. Change the battery soon. | |
| The meter is in set-up mode, waiting for you to change or confirm settings. | |
| The meter is ready for you to insert a test strip. | |
| The meter is ready for a drop of blood or control solution. | |
| HI | Blood glucose may be higher than the measurement range of the system. See Chapter 2, Unusual Blood Glucose Results. |
| LO | Blood glucose may be lower than the measurement range of the system. See Chapter 2, Unusual Blood Glucose Results. |
5 Maintenance and Troubleshooting
| Display Action | |
| ○ | Blood glucose is below the defined hypoglycemic (low blood glucose) level. See Chapter 2, Unusual Blood Glucose Results. |
| * | A general marker was assigned to this test result. |
| ● | A pre-meal marker was assigned to this test result. |
| ¥ | A post-meal marker was assigned to this test result. |
| ●▲ | A pre-meal marker was assigned to this test result and the post-meal test reminder has been activated. |
| E-1 | The test strip may be damaged or not properly inserted. Remove and reinsert the test strip, or replace it if damaged. |
| E-3 | Your blood glucose may be extremely high or a meter or a test strip error has occurred. ·If your test result matches how you feel, contact your healthcare professional immediately. ·If your test result does not match how you feel, repeat the blood glucose test. See Chapter 2, Unusual Blood Glucose Results. ·If the E-3 code still appears for your blood glucose test, your blood glucose result may be extremely high and above the system's reading range. Contact your healthcare professional immediately. ·If the second test result does not match how you feel, perform a control test with the control solution and a new test strip. ·If the control result is within the acceptable range, review the proper testing procedure and repeat the blood glucose test with a new test strip. ·If the control result is not within the acceptable range, see Chapter 4, Understanding Out-of-Range Control Results. |
| E-4 | Not enough blood or control solution was drawn into the test strip for measurement or was applied after the test had started. Discard the test strip and repeat the blood glucose or control test. |
| E-6 | Blood or control solution was applied to the test strip before the flashing drop symbol appeared on the display. Discard the test strip and repeat the blood glucose or control test. |
| E-7 | An electronic error occurred, or in rare cases, a used test strip was removed and reinserted. Turn the meter off and on, or take the battery out for 20 seconds and reinsert it. Perform a blood glucose or control test. |
| E-8 | The temperature is above or below the proper range for the system. Refer to the test strip package insert for system operating conditions. Move to an area with the appropriate conditions, wait 5 minutes, and repeat the blood glucose or control test. Do not artificially heat or cool the meter. |
| E-9 | The battery is almost out of power. Change the battery now. If the message reappears after the battery has been replaced, remove the battery again, press any meter button, then reinsert the battery. |
| E-10 | The time and date settings may be incorrect. Make sure the time and date are correct and adjust, if necessary. |
5 Maintenance and Troubleshooting
Product Limitations
See the literature packaged with the test strips and control solution for the latest information on product specifications and limitations.
| Specifications | |
| Blood volume Sample type Measuring time Measurement range Test strip storage conditions System operating conditions Relative humidity operating range | Refer to the test strip package insert. |
| Meter storage conditions Temperature: -25-70 °C | |
| Memory capacity | 500 blood glucose results and 20 control results with time and date |
| Automatic power off 2 minutes | |
| Power supply One 3-volt lithium battery (coin cell type CR2032) | |
| Display LCD | |
| Dimensions 94 × 52 × 21 mm (LWH) | |
| Weight Approx. 59 g (with battery) | |
| Construction Hand-held | |
| Protection class III | |
| Meter type | The Accu-Chek Performa meter is suitable for continuous operation. |
| Control solution storage conditions Refer to the control solution package insert. | |
6 Technical Information
Electromagnetic Compatibility - This meter meets the electromagnetic immunity requirements as per EN ISO 15197 Annex A. The chosen basis for electrostatic discharge immunity testing was basic standard IEC 61000-4-2. In addition, the meter meets the electromagnetic emissions requirements as per EN 61326. The meter's electromagnetic emission is thus low. Interference from the meter to other electrically-driven equipment is not anticipated.
Performance Analysis - Refer to the test strip package insert.
Test Principle - Refer to the test strip package insert.
Product Safety Information
WARNING
- Choking hazard. Small parts. Keep away from children under the age of 3 years.
- Strong electromagnetic fields may interfere with the proper operation of the meter. Do not use the meter close to sources of strong electromagnetic radiation.
- To avoid electrostatic discharge, do not use the meter in a very dry environment, especially one in which synthetic materials are present.
Discarding the Meter
WARNING
- During blood glucose testing, the meter itself may come into contact with blood. Used meters therefore carry a risk of infection. Before discarding the meter, remove the battery or batteries. Discard used meters according to the regulations applicable in your country. Contact the local council and authority for information about correct disposal.
- The meter falls outside the scope of the European Directive 2002/96/EC - Directive on waste electrical and electronic equipment (WEEE).
- Discard used batteries according to local environmental regulations.
Explanation of Symbols
These symbols may appear on the packaging, on the type plate, and in the instructions for the Accu-Chek Performa meter.
| i | Consult instructions for use |
| ! | Caution, refer to safety-related notes in the instructions for use accompanying this product. |
| γ | Temperature limitation (store at) |
| Manufacturer | |
| REF | Catalogue number |
| IVD | In vitro diagnostic medical device |
| GTIN | Global Trade Item Number |
| €0123 | This product fulfils the requirements of the European Directive 98/79/EC on in vitro diagnostic medical devices. |
| +1 | 3-volt coin cell type CR2032 |
| Keep new and used batteries away from children. |
6 Technical Information
Guarantee
The statutory provisions on rights in consumer goods sales in the country of purchase shall apply.
Additional Supplies
Test Strips
Accu-Chek Performa test strips
Control Solutions
Accu-Chek Performa control solutions
Information for Healthcare Professionals

WARNING
Healthcare Professionals: Follow the infection control procedures appropriate for your facility. Refer to the test strip package insert for additional healthcare professional information.
Sample Handling
Always wear gloves when handling blood-contaminated items. Always adhere to the recognized procedures for handling objects that are potentially contaminated with human material. Follow the hygiene and safety policy of your laboratory or institution. Prepare the selected blood collection site per facility policy.
Refer to the test strip package insert for additional information regarding acceptable sample types, anticoagulants, and handling instructions.
Recommending Alternative Site Testing to Patients
Decisions about whether to recommend Alternative Site Testing (AST) should take into account the motivation and knowledge level of the patient and his or her ability to understand the considerations relative to diabetes and AST. If you are considering recommending AST for your patients, you need to understand that there is a potential for a significant difference between fingertip or palm test results and test results obtained from the forearm or upper arm. The difference in capillary bed concentration and blood perfusion throughout the body can lead to sample site-to-site differences in blood glucose results. These physiological effects vary between individuals and can vary within a single individual based upon his or her behavior and relative physical condition.
Our studies involving alternative site testing of adults with diabetes show that most persons will find their glucose level changes more quickly in blood from the fingertip or palm than in blood from the forearm or upper arm. This is especially important when blood glucose levels are falling or rising rapidly. If your patient is used to making therapy decisions based upon fingertip or palm test results, he or she should consider the delay, or lag time, affecting the test results obtained with blood from the forearm or upper arm.
*Data on file
6 Technical Information
A
alternative site testing 12, 41
B
battery, changing 31
battery door 5
battery, installing 31
battery type 31, 37
beeper, setting 21
blood glucose results, unusual 15
blood glucose test 9
button, power/set 5, 8
C
computer, transferring results to 26
control results, understanding out-of-range 30
control solution 27
control test, performing 28
D
display check 8
display messages 33
E
error messages 34
G
general marker 14
guarantee 40
H
healthcare professionals 40
high blood glucose 16
hyperglycemia 16
hypoglycemia 16
hypoglycemic alert, setting 25
L
low blood glucose 16
M
maintenance, meter 31
marking test results 14
memory, meter 17
meter, cleaning 32
meter, discarding 38
P
post-meal marker 14
post-meal test reminder 14, 22
pre-meal marker 14
product limitations 37
product safety information 38
product specifications 37
S
settings, meter 19
supplies 40
symbols 39
symptoms, hypoglycemia/hyperglycemia 16
T
technical information 37
test reminders, setting 23
test strips 6, 7
time and date, setting 20
troubleshooting 33
U
use by date 7, 27
Notes
Notes
Notes
FR
Table des matieres
Retirez et eliminez la bandelette reactive usagee.
pile, installation 31
gblj jc jlae aag.aaagaiiaaaii J
[1 - \left( {x + 1}\right) \left( {x + 2}\right) \cdots x\left( {x + 1}\right) + x\left( {x + 2}\right) = \frac{x}{2}]
RV.1 dJbJI gJ
#
17 p91 S w log-10
9
£1.15 puei joo aeliso golgo jogll
- 12c! CuiLiJg
#
A
17 pJ,sw Eaij
17 pJI sW gIoo Ela
9 pJ S w s g i o Eaij
- a^2| a > 0| ,c < 0
17 pJ 5w ELa j/pa J 5w log a .
17 pJ 5w 5gim wol jalai
10 hui: pJ 5w logjij
#
11
1
#
V.V 1
10 0eell sJw gio wie
17.12 a.s.s.s.l.o.s.s.l.s.s.i
1 1
1
C
A. all jLg
ai a ai 的最小值为 k .
C
四边形 AOBC 为正方形
3
1V Wz.
#
12
14
19 190
j
A. 0.12 311/J_2 1 = 311
#
V.7 jLj
Lioe 20 Jol
Jololil Jw Lg.Lc 101111111111111111111111111111111111111111111
a a
a a a a a a a a a a a a a a a a a a a a a a a a a a a a a a a a a a a a a a a a a a a a a a a a a a a a a a a a a aaa
aagll aall lsl
1g1 sgljogog
2
JgIoo aLj; sIb c Jl; j, p
aLj; jI oJ 2001. Lj
aJbJIcH aJI bJI cJI JJI

gj gjj JgJg0 22
JJgW.4, j1s21 sJg!
a28 aJg0 g gjwll

F
jLg jLj1 1234567890
.ogwJl oJj
CbW Jc wJdJI jIg>
.
1

1
oic 100000000000000000000000000000000000000000000000000000000000
= 1
aLw 1c logw y b j 8gbo g nss 5 Lc hao aai g g g g
JI JI 1000
aJg aeg sIg 2 aagai ggo Ic
- S1 = ( a1 + a2 + a3) = 76
Logi: aLwll jgSi j u. jaeill Logie oI s 1sodl aeil gieli agg . gimo chaw lc wll jgs e n .V
1 1
LJI Jai jai jai jg jg slal 2 a 1J Ls
. colj jLd Juaa w gllg q
JgJgJgJgJgJgJgJgJgJgJgJgJgJgJgJgJgJgJgJgJgJgJgJgJgJgJgJgJgJgJgJgJgJgJgJgJgJgJgJgJgJgJg
jigssllddwLggl
21 × 3 = 510
a1< 11111111111111111111
. Roche sLac oocog Loo Jy
LiluU aunag aLoS Jai aLac Jgadl
Jalawal jgs Jg
1
paJ Ssw loga jai b

aannnnn nn nnnnnnnnnnnnnnnnnnnnnnnnnnnnnnnnnnnnnnnnnnnnnnnnnnnnnnnnnnnnnnnnnnnnnnnnnnnnnnnnnnnnnnnnnnnnnnnnnnnnnnnnnnnnnnnnnnnnn
iilll 11111111111111111111111
Lg 11111111111111111
aIJI JSLJg CILl I Jldw wai jLg plasil alJg pJg Sllb


0
.5gimall
SliOyog ①
59 = ·s + 1
①
joo joo joo joo
aLcJolgJl
.
1

Ji j
OFF J 1 L
15 0g 1c h
On
set-up 1


15
12x1y
J set-up
1c 00g OFF
.


10
J 1
y_1( x) = 12x + 1,13x + 3 = 0
a aLgolj
jgghao ① glc h
set-up
.
1
5i h Lol 1:5
Lh aA-2,
Jzall h JyRg
0 1c h2eol. gssu 1y jyjg b ygbo aLw Lc JgJgJgJgJg
#
0
.20g1.10g1.10g1.
a
.
SliOg
.
aLg.
A-2. OFF
1
1234567890
4k > 3 ②
10JL 1
1 1
1
a>2jLlJ 1J 1J 1J 1J 1J 1J 1J 1J 1J 1J 1J 1J 1J 1J 1J 1J 1J 1J 1J 1J 1J 1J 1J 1J 1J 1J 1J 1J 1J 1J 1J 1J 1J 1
JgJ 1
- 5i joc aIj Jg g jg jg
-
x^2 + y^2 = 1 有无穷多的解 ( 2x) ^2 - . 2y) ^2 = 4
L

2
. a( a + b) = 10
Sij0jog 1c In
.
.

0000 1
OFF 1 Lg On
Lj0g Jc
a,b = 12
m = 311
J 1 J L J 0FF J 1 J 0
1111 1
( 0,2) 9 1c
1c h2o1 2g
5

1
Jc 00g c h
Jgolggi Offg
.
ccl0 C0 0
a1 = 23,a2 = - 43,b1 = 56,b2 = - 78
jL2x1
.
jg ①
set-up
中
1
1

gJbH 10ghj5
.aaJg, gJg, gJg
OJLJn oJn JhJ
.og ① Jc hJ 5J
① Jc hJ 2gJ
hJoo joo Joo
aJoo Joo

g hj .acLwJ oJ g J aLa j
. 15iOoJ 0 Lc hj 0
. acLwJ
.

8b0 1c h2
Ic set-up 1c21 g b
. aLw
. oCi LcWJ ai

j)0g 1c h zai j(hui/1j
1
1010x1 hio g plu
LgIb0gLoS aJIJI LJIJI Jus
| الإستعمال | |||
| س practicable الحرفية و نetwork. | الإستعمال | ||
| On | OFF 2 .OFF 3 .OFF 4 .OFF 5 .OFF 6 .OFF 7 .OFF 8 .OFF 9 .OFF 10 .OFF 11 .OFF 12 .OFF 13 .OFF 14 .OFF 15 .OFF 16 .OFF 17 .OFF 18 .OFF 19 .OFF 20 .OFF 21 .OFF 22 .OFF 23 .OFF 24 .OFF 25 .OFF 26 .OFF 27 .OFF 28 .OFF 29 .OFF 30 .OFF 31 .OFF 32 .OFF 33 .OFF 34 .OFF 35 .OFF 36 .OFF 37 .OFF 38 .OFF 39 .OFF 40 .OFF 41 .OFF 42 .OFF 43 .OFF 44 .OFF 45 .OFF 46 .OFF 47 .OFF 48 .OFF 49 .OFF 50 .OFF 51 .OFF 52 .OFF 53 .OFF 54 .OFF 55 .OFF 56 .OFF 57 .OFF 58 .OFF 59 .OFF 60 .OFF 61 .OFF 62 .OFF 63 .OFF 64 .OFF 65 .OFF 66 .OFF 67 .OFF 68 .OFF 69 .OFF 70 .OFF 71 .OFF 72 .OFF 73 .OFF 74 .OFF 75 .OFF 76 .OFF 77 .OFF 78 .OFF 79 .OFF 80 .OFF 81 .OFF 82 .OFF 83 .OFF 84 .OFF 85 .OFF 86 .OFF 87 .OFF 88 .OFF 89 .OFF 90 .OFF 91 .OFF 92 .OFF 93 .OFF 94 .OFF 95 .OFF 96 .OFF 97 .OFF 98 .OFF 99 .OFF 100 .OFF 101 .OFF 102 .OFF 103 .OFF 104 .OFF 105 .OFF 106 .OFF 107 .OFF 108 .OFF 109 .OFF 110 .OFF 111 .OFF 112 .OFF 113 .OFF 114 .OFF 115 .OFF 116 .OFF 117 .OFF 118 .OFF 119 .OFF 120 .OFF 121 .OFF 122 .OFF 123 .OFF 124 .OFF 125 .OFF 126 .OFF 127 .OFF 128 .OFF 129 .OFF 130 .OFF 131 .OFF 132 .OFF 133 .OFF 134 .OFF 135 .OFF 136 .OFF 137 .OFF 138 .OFF 139 .OFF 140 .OFF 141 .OFF 142 .OFF 143 .OFF 144 .OFF 145 .OFF 146 .OFF 147 .OFF 148 .OFF 149 .OFF 150 .OFF 151 .OFF 152 .OFF 153 .OFF 154 .OFF 155 .OFF 156 .OFF 157 .OFF 158 .OFF 159 .OFF 160 .OFF 161 .OFF 162 .OFF 163 .OFF 164 .OFF 165 .OFF 166 .OFF 167 .OFF 168 .OFF 169 .OFF 170 .OFF 171 .OFF 172 .OFF 173 .OFF 174 .OFF 175 .OFF 176 .OFF 177 .OFF 178 .OFF 179 .OFF 180 .OFF 181 .OFF 182 .OFF 183 .OFF 184 .OFF 185 .OFF 186 .OFF 187 .OFF 188 .OFF 189 .OFF 190 .OFF 191 .OFF 192 .OFF 193 .OFF 194 .OFF 195 .OFF 196 .OFF 197 .OFF 198 .OFF 199 .OFF 200 .OFF 201 .OFF 202 .OFF 203 .OFF 204 .OFF 205 .OFF 206 .OFF 207 .OFF 208 .OFF 209 .OFF 210 .OFF 211 .OFF 212 .OFF 213 .OFF 214 .OFF 215 .OFF 216 .OFF 217 .OFF 218 .OFF 219 .OFF 220 .OFF 221 .OFF 222 .OFF 223 .OFF 224 .OFF 225 .OFF 226 .OFF 227 .OFF 228 .OFF 229 .OFF 230 .OFF 231 .OFF 232 .OFF 233 .OFF 234 .OFF 235 .OFF 236 .OFF 237 .OFF 238 .OFF 239 .OFF 240 .OFF 241 .OFF 242 .OFF 243 .OFF 244 .OFF 245 .OFF 246 .OFF 247 .OFF 248 .OFF 249 .OFF 250 .OFF 251 .OFF 252 .OFF 253 .OFF 254 .OFF 255 .OFF 256 .OFF 257 .OFF 258 .OFF 259 .OFF 260 .OFF 261 .OFF 262 .OFF 263 .OFF 264 .OFF 265 .OFF 266 .OFF 267 .OFF 268 .OFF 269 .OFF 270 .OFF 271 .OFF 272 .OFF 273 .OFF 274 .OFF 275 .OFF 276 .OFF 277 .OFF 278 .OFF 279 .OFF 280 .OFF 281 .OFF 282 .OFF 283 .OFF 284 .OFF 285 .OFF 286 .OFF 287 .OFF 288 .OFF 289 .OFF 290 .OFF 291 .OFF 292 .OFF 293 .OFF 294 .OFF 295 .OFF 296 .OFF 297 .OFF 298 .OFF 299 .OFF 300 .OFF 301 .OFF 302 .OFF 303 .OFF 304 .OFF 305 .OFF 306 .OFF 307 .OFF 308 .OFF 309 .OFF 310 .OFF 311 .OFF 312 .OFF 313 .OFF 314 .OFF 315 .OFF 316 .OFF 317 .OFF 318 .OFF 319 .OFF 320 .OFF 321 .OFF 322 .OFF 323 .OFF 324 .OFF 325 .OFF 326 .OFF 327 .OFF 328 .OFF 329 .OFF 330 .OFF 331 .OFF 332 .OFF 333 .OFF 334 .OFF 335 .OFF 336 .OFF 337 .OFF 338 .OFF 339 .OFF 340 .OFF 341 .OFF 342 .OFF 343 .OFF 344 .OFF 345 .OFF 346 .OFF 347 .OFF 348 .OFF 349 .OFF 350 .OFF 351 .OFF 352 .OFF 353 .OFF 354 .OFF 355 .OFF 356 .OFF 357 .OFF 358 .OFF 359 .OFF 360 .OFF 361 .OFF 362 .OFF 363 .OFF 364 .OFF 365 .OFF 366 .OFF 367 .OFF 368 .OFF 369 .OFF 370 .OFF 371 .OFF 372 .OFF 373 .OFF 374 .OFF 375 .OFF 376 .OFF 377 .OFF 378 .OFF 379 .OFF 380 .OFF 381 .OFF 382 .OFF 383 .OFF 384 .OFF 385 .OFF 386 .OFF 387 .OFF 388 .OFF 389 .OFF 390 .OFF 391 .OFF 392 .OFF 393 .OFF 394 .OFF 395 .OFF 396 .OFF 397 .OFF 398 .OFF 399 .OFF 400 .OFF 401 .OFF 402 .OFF 403 .OFF 404 .OFF 405 .OFF 406 .OFF 407 .OFF 408 .OFF 409 .OFF 410 .OFF 411 .OFF 412 .OFF 413 .OFF 414 .OFF 415 .OFF 416 .OFF 417 .OFF 418 .OFF 419 .OFF 420 .OFF 421 .OFF 422 .OFF 423 .OFF 424 .OFF 425 .OFF 426 .OFF 427 .OFF 428 .OFF 429 .OFF 430 .OFF 431 .OFF 432 .OFF 433 .OFF 434 .OFF 435 .OFF 436 .OFF 437 .OFF 438 .OFF 439 .OFF 440 .OFF 441 .OFF 442 .OFF 443 .OFF 444 .OFF 445 .OFF 446 .OFF 447 .OFF 448 .OFF 449 .OFF 450 .OFF 451 .OFF 452 .OFF 453 .OFF 454 .OFF 455 .OFF 456 .OFF 457 .OFF 458 .OFF 459 .OFF 460 .OFF 461 .OFF 462 .OFF 463 .OFF 464 .OFF 465 .OFF 466 .OFF 467 .OFF 468 .OFF 469 .OFF 470 .OFF 471 .OFF 472 .OFF 473 .OFF 474 .OFF 475 .OFF 476 .OFF 477 .OFF 478 .OFF 479 .OFF 480 .OFF 481 .OFF 482 .OFF 483 .OFF 484 .OFF 485 .OFF 486 .OFF 487 .OFF 488 .OFF 489 .OFF 490 .OFF 491 .OFF 492 .OFF 493 .OFF 494 .OFF 495 .OFF 496 .OFF 497 .OFF 498 .OFF 499 .OFF 500 . OFF 501 . OFF 502 . OFF 503 . OFF 504 . OFF 505 . OFF 506 . OFF 507 . OFF 508 . OFF 509 . OFF 510 . OFF 511 . OFF 512 . OFF 513 . OFF 514 . OFF 515 . OFF 516 . OFF 517 . OFF 518 . OFF 519 . OFF 520 . OFF 521 . OFF 522 . OFF 523 . OFF 524 . OFF 525 . OFF 526 . OFF 527 . OFF 528 . OFF 529 . OFF 530 . OFF 531 . OFF 532 . OFF 533 . OFF 534 . OFF 535 . OFF 536 . OFF 537 . OFF 538 . OFF 539 . OFF 540 . OFF 541 . OFF 542 . OFF 543 . OFF 544 . OFF 545 . OFF 546 . OFF 547 . OFF 548 . OFF 549 . OFF 550 . OFF 551 . OFF 552 . OFF 553 . OFF 554 . OFF 555 . OFF 556 . OFF 557 . OFF 558 . OFF 559 . OFF 560 . OFF 561 . OFF 562 . OFF 563 . OFF 564 . OFF 565 . OFF 566 . OFF 567 . OFF 568 . OFF 569 . OFF 570 . OFF 571 . OFF 572 . OFF 573 . OFF 574 . OFF 575 . OFF 576 . OFF 577 . OFF 578 . OFF 579 . OFF 580 . OFF 581 . OFF 582 . OFF 583 . OFF 584 . OFF 585 . OFF 586 . OFF 587 . OFF 588 . OFF 589 . OFF 590 . OFF 591 . OFF 592 . OFF 593 . OFF 594 . OFF 595 . OFF 596 . OFF 597 . OFF 598 . OFF 599 . OFF 600 . OFF 601 . OFF 602 . OFF 603 . OFF 604 . OFF 605 . OFF 606 . OFF 607 . OFF 608 . OFF 609 . OFF 610 . OFF 611 . OFF 612 . OFF 613 . OFF 614 . OFF 615 . OFF 616 . OFF 617 . OFF 618 . OFF 619 . OFF 620 . OFF 621 . OFF 622 . OFF 623 . OFF 624 . OFF 625 . OFF 626 . OFF 627 . OFF 628 . OFF 629 . OFF 630 . OFF 631 . OFF 632 . OFF 633 . OFF 634 . OFF 635 . OFF 636 . OFF 637 . OFF 638 . OFF 639 . OFF 640 . OFF 641 . OFF 642 . OFF 643 . OFF 644 . OFF 645 . OFF 646 . OFF 647 . OFF 648 . OFF 649 . OFF 650 . OFF 651 . OFF 652 . OFF 653 . OFF 654 . OFF 655 . OFF 656 . OFF 657 . OFF 658 . OFF 659 . OFF 660 . OFF 661 . OFF 662 . OFF 663 . OFF 664 . OFF 665 . OFF 666 . OFF 667 . OFF 668 . OFF 669 . OFF 670 . OFF 671 . OFF 672 . OFF 673 . OFF 674 . OFF 675 . OFF 676 . OFF 677 . OFF 678 . OFF 679 . OFF 680 . OFF 681 . OFF 682 . OFF 683 . OFF 684 . OFF 685 . OFF 686 . OFF 687 . OFF 688 . OFF 689 . OFF 690 . OFF 691 . OFF 692 . OFF 693 . OFF 694 . OFF 695 . OFF 696 . OFF 697 . OFF 698 . OFF 699 . OFF 700 . OFF 701 . OFF 702 . OFF 703 . OFF 704 . OFF 705 . OFF 706 . OFF 707 . OFF 708 . OFF 709 . OFF 710 . OFF 711 . OFF 712 . OFF 713 . OFF 714 . OFF 715 . OFF 716 . OFF 717 . OFF 718 . OFF 719 . OFF 720 . OFF 721 . OFF 722 . OFF 723 . OFF 724 . OFF 725 . OFF 726 . OFF 727 . OFF 728 . OFF 729 . OFF 730 . OFF 731 . OFF 732 . OFF 733 . OFF 734 . OFF 735 . OFF 736 . OFF 737 . OFF 738 . OFF 739 . OFF 740 . OFF 741 . OFF 742 . OFF 743 . OFF 744 . OFF 745 . OFF 746 . OFF 747 . OFF 748 . OFF 749 . OFF 750 . OFF 751 . OFF 752 . OFF 753 . OFF 754 . OFF 755 . OFF 756 . OFF 757 . OFF 758 . OFF 759 . OFF 760 . OFF 761 . OFF 762 . OFF 763 . OFF 764 . OFF 765 . OFF 766 . OFF 767 . OFF 768 . OFF 769 . OFF 770 . OFF 771 . OFF 772 . OFF 773 . OFF 774 . OFF 775 . OFF 776 . OFF 777 . OFF 778 . OFF 779 . OFF 780 . OFF 781 . OFF 782 . OFF 783 . OFF 784 . OFF 785 . OFF 786 . OFF 787 . OFF 788 . OFF 789 . OFF 790 . OFF 791 . OFF 792 . OFF 793 . OFF 794 . OFF 795 . OFF 796 . OFF 797 . OFF 798 . OFF 799 . OFF 800 . OFF 801 . OFF 802 . OFF 803 . OFF 804 . OFF 805 . OFF 806 . OFF 807 . OFF 808 . OFF 809 . OFF 810 . OFF 811 . OFF 812 . OFF 813 . OFF 814 . OFF 815 . OFF 816 . OFF 817 . OFF 818 . OFF 819 . OFF 820 . OFF 821 . OFF 822 . OFF 823 . OFF 824 . OFF 825 . OFF 826 . OFF 827 . OFF 828 . OFF 829 . OFF 830 . OFF 831 . OFF 832 . OFF 833 . OFF 834 . OFF 835 . OFF 836 . OFF 837 . OFF 838 . OFF 839 . OFF 840 . OFF 841 . OFF 842 . OFF 843 . OFF 844 . OFF 845 . OFF 846 . OFF 847 . OFF 848 . OFF 849 . OFF 850 . OFF 851 . OFF 852 . OFF 853 . OFF 854 . OFF 855 . OFF 856 . OFF 857 . OFF 858 . OFF 859 . OFF 860 . OFF 861 . OFF 862 . OFF 863 . OFF 864 . OFF 865 . OFF 866 . OFF 867 . OFF 868 . OFF 869 . OFF 870 . OFF 871 . OFF 872 . OFF 873 . OFF 874 . OFF 875 . OFF 876 . OFF 877 . OFF 878 . OFF 879 . OFF 880 . OFF 881 . OFF 882 . OFF 883 . OFF 884 . OFF 885 . OFF 886 . OFF 887 . OFF 888 . OFF 889 . OFF 890 . OFF 891 . OFF 892 . OFF 893 . OFF 894 . OFF 895 . OFF 896 . OFF 897 . OFF 898 . OFF 899 . OFF 900 . OFF 901 . OFF 902 . OFF 903 . OFF 904 . OFF 905 . OFF 906 . OFF 907 . OFF 908 . OFF 909 . OFF 910 . OFF 911 . OFF 912 . OFF 913 . OFF 914 . OFF 915 . OFF 916 . OFF 917 . OFF 918 . OFF 919 . OFF 920 . OFF 921 . OFF 922 . OFF 923 . OFF 924 . OFF 925 . OFF 926 . OFF 927 . OFF 928 . OFF 929 . OFF 930 . OFF 931 . OFF 932 . OFF 933 . OFF 934 . OFF 935 . OFF 936 . OFF 937 . OFF 938 . OFF 939 . OFF 940 . OFF 941 . OFF 942 . OFF 943 . OFF 944 . OFF 945 . OFF 946 . OFF 947 . OFF 948 . OFF 949 . OFF 950 . OFF 951 . OFF 952 . OFF 953 . OFF 954 . OFF 955 . OFF 956 . OFF 957 . OFF 958 . OFF 959 . OFF 960 . OFF 961 . OFF 962 . OFF 963 . OFF 964 . OFF 965 . OFF 966 . OFF 967 . OFF 968 . OFF 969 . OFF 970 . OFF 971 . OFF 972 . OFF 973 . OFF 974 . OFF 975 . OFF 976 . OFF 977 . OFF 978 . OFF 979 . OFF 980 . OFF 981 . OFF 982 . OFF 983 . OFF 984 . OFF 985 . OFF 986 . OFF 987 . OFF 988 . OFF 989 . OFF 990 . OFF 991 . OFF 992 . OFF 993 . OFF 994 . OFF 995 . OFF 996 . OFF 997 . OFF 998 . OFF 999 . |
051
a
a a a a a a a a a a a a a a a a a a a a a a a a a
2 = 90
J 10
= 9 - 51 In wg = 0
J 1
Roche
g9.g.1g.1g.1g.Lg.Lc Jnill hwgio n aagll gol jLiljLs Loe Log aagll JLo hwgio n aogio IgJwgo aagll 8gl aagll JLaLd, jLl jia
.1ogg.gg.12g.VJLs pLc J5.LgLc Jannil Iwgi no jai gwiwo ci
pJ 5w sGgE Lai g J a
a 1
gJJI. Ic Jaaia 8 lg:5g .pJl Jsw ggiwo jolalai jolacn janaa : (paJl Jsw bga) pJl Jsw ginnoo jolasil
g 1
.1gJJI. aJJI Jaa .J<JJ
jucacjcuaia 1g:gsiog. pJl S w gimo elai jocai i: (pJl S w eLai) pJI S w gimo elai
JgJgJgJgJgJgJgJgJgJg
向日
L0 1
aaiii aaii jgjgl Jai (g) Hg (jao
P
aagj1 10o jliy jsiJg jii21 ciLi cai
aewllwlcipssgwsogwoswaaagbi paaaw gwiwo wglslj
La Jus Lys
a. gJ 1
JL
a
aLl Jg oocwlaol aolaldoe j, pll s w gnnnns
a aalaae eae aee aee ae aee aee aee aee aee aee aee aee aee aee aee aee aee aee aee aee aee aee aee aee aee aee aee aee aee aee aee aee aee aee aee aee aee aee aee aee aee aee aee aee aee aee aee aee aee aee
g 1 g 1 g 1 g 1 g 1 g 1 g 1 g 1 g 1 g 1 g 1 g 1 g 1 g 1 g 1 g 1 g 1 g 1 g 1 g 1 g 1 g 1 g 1 g 1 g 1 g 1 g 1 g 1
()
aLwJg aI aI aI g o n aai . 2011 1 1 1 1 1 1 1 1 1 1 1 1
.1 1
1 1
-
-
-
-
-
-
-
-
-
- 10.
-
-
-
-
-
-
-
-
a 1 1 1 1 1 1 1 1 1 1 1 1 1 1 1 1 1 1 1 1 1 1 1 1
aibl
.1J 1 J 1 J 1 J 1 J 1 J 1 J 1 J 1 J 1
P

9
aLgLwLall
J 1 J 1 J 1 J 1 J 1 J 1 J 1
- "LgJgJgJg:LoJgSJJgSJJg
aio jolisig poi iil jyj yai jy aai Jc Lao 111111111111111111111111
j1s21 h jw w no o jg 0 1
J 1 J 1 J 1 J 1 J 1 J 1 J 1 J 1 J 1 J 1 J 1 J 1 J 1 J 1 J 1
aI 1J 1 J 1 J 1 J 1 J 1 J 1 J 1 J 1 J 1 J 1 J 1 J 1 J 1 J 1 J 1 J 1 J 1 J 1 J 1 J 1 J 1 J 1 J 1 J 1 J 1 J 1 J 1 J 1 J 1 J 1 J 1 J 1 J 1 J 1 J
| . . . . . . . . . . . . . . . . . . . . . . . . . . . . . . . . . . . . . . . . . . . . . . . . . . . . . . . . . . . . . . . . . . . . . . . . . . . . . . . . . . . . . . . . . . . . . . . . . . . . . . . . . . . . . . . . . . . . . . . . . . . . . . . . . . . . . . . . . . . . . . . . . . . . . . . . . . . . . . . . . . . . . . . . . . . . . . . . . . . . . . . . . . . . . . . . . . . . . . . . .. . . . . . . . . . . . . . . . . . . . . . . . . . . . . . . . . . . . . . . . . . . . . . . . . . . . . . . . . . . . . . . . . . . . . . . . . . . . . . . . . . . . . . . . . . . . . . . . . . . . . . . . . . . . . . . . . . . . . . . . . . . . . . . . . . . . . . . . . . . . . . . . . . . . . . . . . . . . . . . . . . . . . . . . . . . . . . . . . . . . . . . . . . . . . . . . . . . . . . . . . . . . . . . . . . . . . . . . . . . . . . . . . . . . . . . . . . . . . . . . . . . . . . . . . . . . . . . . . . . . . . . . . . . . . . . . . . . . . . . . . . . . . . . . . . . . . . . . . . . . . ? . . . . . . . . . . . . . . . . . . . . . . . . . . . . . . . . . . . . . . . . . . . . . . . . . . . . . . . . . . . . . . . . . . . . . . . . . . . . . . . . . . . . . . . . . . . . . . . . . . . ; . . . . . . . . . . . . . . . . . . . . . . . . . . . . . . . . . . . . . . . . . . . . . . . . . . . . . . . . . . . . . . . . . . . . . . . . . . . . . . . . . . . . . . . . . . . . . . . . . . . - . . . . . . . . . . . . . . . . . . . . . . . . . . . . . . . . . . . . . . . . . . . . . . . . . . . . . . . . . . . . . . . . . . . . . . . . . . . . . . . . . . . . . . . . . . . . . . . . . . . -100% -100% -100% -100% -100% -100% -100% -100% -100% -100% -100% -100% -100% -100% -100% -100% -100% -100% -100% -100% -100% |
Lgog-1-05pIbipss
Lgogjg-1-g-1y
jg jL121 1
a
.
Lg 150
.
1111 1111 1111 1111 1111 1111 1111 1111 11


- 1
11.
m = 311 ;
9. 5
LioJ1JgLo gI pO
Joo Joo Joo Joo Joo Joo Joo Joo Joo Joo Joo Joo Joo Joo Joo Joo Joo Joo Joo Joo Joo Joo Joo Joo Joo Joo Joo Joo Joo Joo
1
#
Lgog-0


J 1
0
1.
.
111 111 111 111 111 111
LioJ1321
Lgolol gss
Jg Jg Jg Jg Jg Jg Jg Jg Jg Jg Jg Jg Jg Jg Jg Jg Jg Jg Jg Jg Jg Jg Jg Jg Jg Jg Jg Jg Jg Jg
1 1
gJ 1 J 2
class
1 1
Lebanon / Saudi Arabia / United Arab Emirates
Master Distributor in the Middle East: Accu-Chek Enquiry Line: +971 (0) 4 8169 000 www.accu-chekarabia.com/arabic/
Maroc
STERIFIL SA
Tél: 05 22 97 55 97
e-mail: sterifil@sterifil.com
LAST UPDATE: 2019-04
MISE À JOUR : 2019-04
ULTIMA ATUALIZAZão: 2019-04
-2-5-19:###

Roche Diabetes Care GmbH
Sandhofer Strasse 116
68305 Mannheim, Germany
www.accu-chek.com


0123
ACCU-CHEK and ACCU-CHEK PERFORMA are trademarks of Roche.
© 2019 Roche Diabetes Care
07054246050(01)-0519

- The Accu-Chek Performa System
- WARNING
- Why Regular Blood Glucose Testing Is Important
- Important Information About Your New Meter
- The Accu-Chek Performa Meter
- Your New System
- Test Strip Container*
- Yellow Window
- Control Solution Bottle*
- Battery
- Using the Accu-Chek Performa System
- Button Functions
- Performing a Blood Glucose Test with Blood from Your Fingertip
- NOTE
- Blood Glucose Tests
- Performing a Blood Glucose Test with Blood from Your Palm, Forearm, or Upper Arm (Alternative Site Testing)
- Marking Blood Glucose Results and Setting the Post-Meal Test Reminder
- Here is how to mark a test result and initiate a post-meal test reminder:
- Unusual Blood Glucose Results
- Symptoms of Low or High Blood Glucose
- Memory
- Storing Blood Glucose and Control Results
- Meter Memory, Setup, and Data Transfer
- Viewing Test Results in Memory
- Setup
- Setting the Beeper On or OFF
- The beeper prompts you:
- 3
- Setup Setting the Post-Meal Test Reminder
- The post-meal test reminder:
- Setting the Test Reminders
- Test reminders:
- Setting the Hypoglycemic Alert
- Data Transfer
- Transferring Results to a Computer
- Transferring Data Directly to a Computer Using Specialized Software and an Infrared Cable
- When to Perform a Control Test
- About the Control Solution
- Control Tests
- Performing a Control Test
- 7
- 8
- Understanding Out-of-Range Control Results
- Meter Maintenance
- Changing the Battery
- Maintenance and Troubleshooting
- Cleaning the Meter
- Display and Error Messages
- Product Limitations
- Technical Information
- Product Safety Information
- Discarding the Meter
- Explanation of Symbols
- Guarantee
- Additional Supplies
- Information for Healthcare Professionals
- Sample Handling
- Recommending Alternative Site Testing to Patients
- A
- B
- C
- D
- E
- G
- H
- L
- M
- P
- S
- T
- U
- Notes
- FR
- Table des matieres
- #
- 9
- j
- × 3 = 510
- 1
- 4k > 3 ②
- 5
- pJ 5w sGgE Lai g J a
- 向日
- Lebanon / Saudi Arabia / United Arab Emirates
- Maroc
Brand : Accu-Chek
Model : Performa
Category : Glucometer