
ASLG 165 - Battery charger Westfalia - Free user manual and instructions
Find the device manual for free ASLG 165 Westfalia in PDF.

| Product type | Battery charger |
| Brand | Westfalia |
| Model | ASLG 165 |
| Power supply | AC adapter, 100-240 V, 50/60 Hz |
| Charging output | DC 4.2 V, 1 A (estimated for a Li-ion 18650 battery) |
| Number of slots | 4 (estimated for a standard charger) |
| Compatible battery types | Li-ion 18650, 18500, 26650 (estimated) |
| Dimensions (L x W x H) | Approximately 15 x 10 x 3 cm (estimated) |
| Weight | Approximately 200 g (estimated) |
| Housing material | Flame-retardant plastic |
| LED indicators | Yes, charge/fault indicator |
| Short-circuit protection | Yes |
| Overcharge protection | Yes |
| Reverse polarity protection | Yes |
| Ventilation | Ventilation slots to prevent overheating |
| Operating temperature | 0 °C to 40 °C |
| Maximum operating altitude | 2000 m (according to the manual) |
| Maintenance | Clean with a dry cloth; do not use solvents |
| Spare parts | Replaceable power cord |
| Repairability | Have it repaired by a qualified technician using original parts |
| General information | Indoor use only; do not expose to moisture |
| Batteries not included | Yes, batteries sold separately |
Frequently Asked Questions - ASLG 165 Westfalia
User questions about ASLG 165 Westfalia
0 question about this device. Answer the ones you know or ask your own.
Ask a new question about this device
Download the instructions for your Battery charger in PDF format for free! Find your manual ASLG 165 - Westfalia and take your electronic device back in hand. On this page are published all the documents necessary for the use of your device. ASLG 165 by Westfalia.
USER MANUAL ASLG 165 Westfalia
Original Instructions
18 V Li-Ion Battery Charger 2,4 A ASLG 165
Article No. 93 61 17
CE


natural_image
Illustration of a person in camouflage using a tool to dig or write through water, with no visible text or symbols
Dear Customers
Instruction manuals provide valuable hints for using your new device. They enable you to use all functions, and they help you avoid misunderstandings and prevent damage.
Please take the time to read this manual carefully and keep it for future reference.
text_image
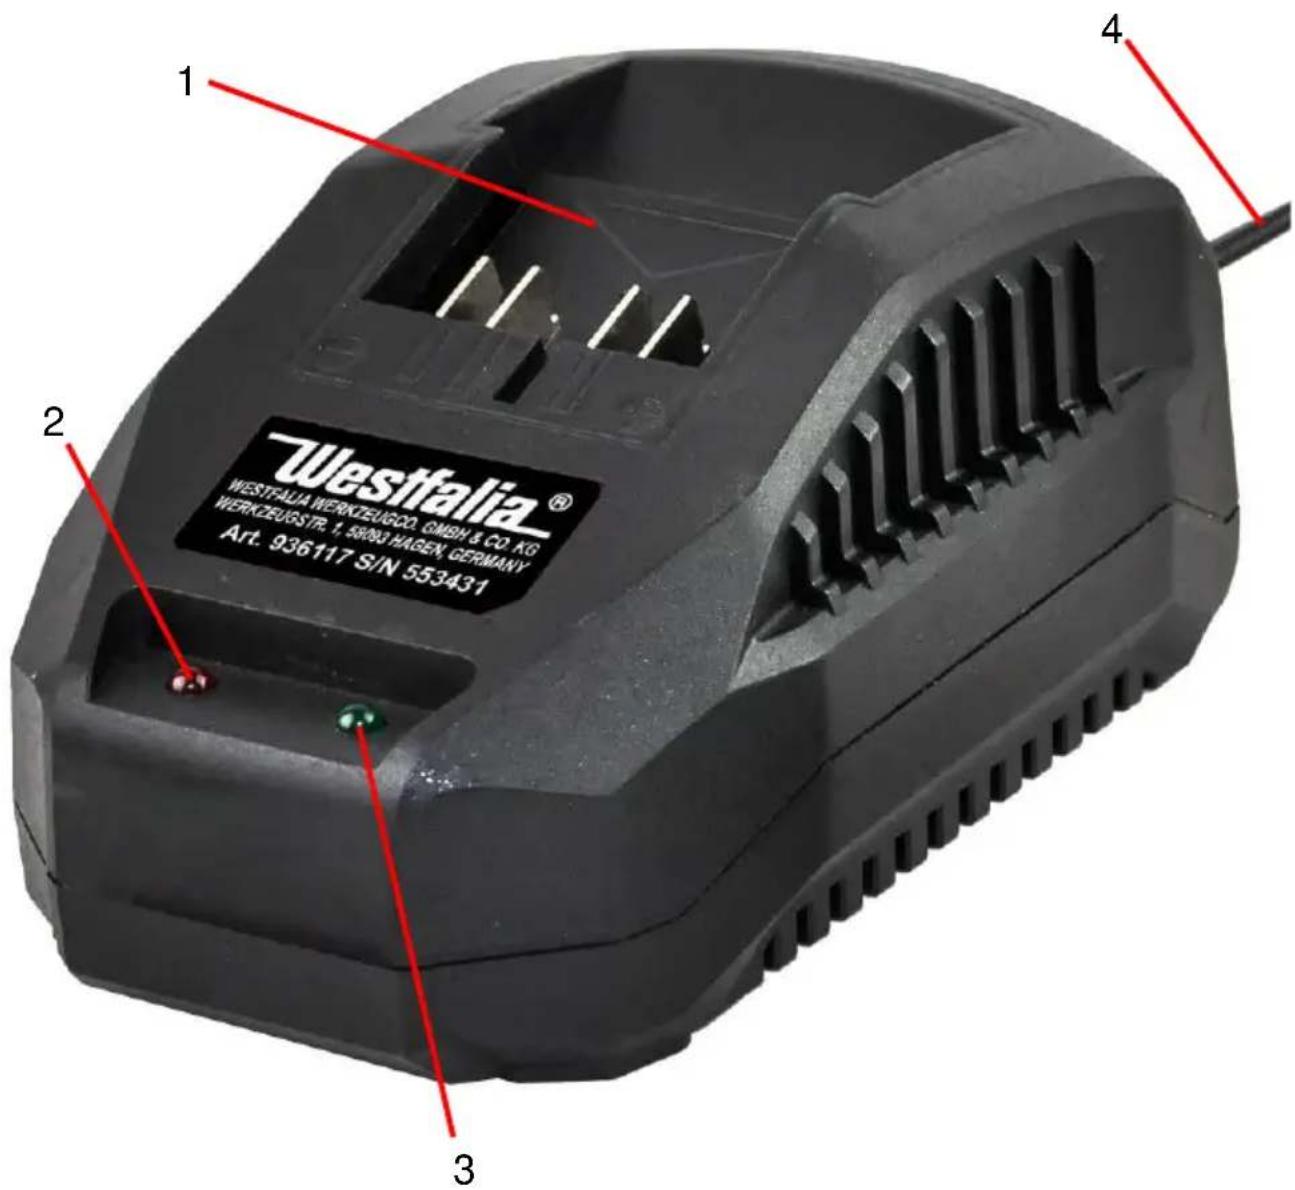
Westfalia® WESTFALIA WERKEUGODG. GMBH & CO. KG WERKEUGSTR. T. 58003 HAGEN, GERMANY Art. 936117 SIN 553431


Unpacking your Charger....Page 11
Setting up the Battery Charger ...... Page 11
Charging the Battery......Page 11
Notes about Battery Charging ...... Page 12
Battery Disposal Page 12
Maintenance and Cleaning......Page 13
Troubleshooting......Page 14
Technical Data ...... Page 15

natural_image
Pure electrical circuit lines without any symbolsPlease note the included General Safety Notes and the following safety notes to avoid malfunctions, damage or physical injury:

- Please read this manual carefully and use the unit only according to this manual.
■ Dispose of used packaging material carefully or store it out of the reach of children. There is a danger of suffocation!
■ Persons with limited physical, sensorial or mental abilities are not allowed to use the unit, unless they are supervised and briefed for their safety by a qualified person.
■ Battery chargers are for indoors use only. Ensure that the power supply and charger are protected against moisture at all times.
Additional Battery and Charger Safety Notes
WARNING: Li-Ion batteries, if incorrectly used, stored or charged are a fire, burn and explosion hazard.
Use the battery charger correctly
- Refer to the section of this manual relating to use of the battery charger before attempting to charge the battery.
- Do not attempt to use the charger with any batteries other than those supplied. Failure to follow these instructions may cause overheating or fire.
- When battery pack is not in use, make sure the battery pack cannot be shorted accidentally. Keep the battery clean at all times. Keep it away from other metal objects, like paper clips, coins, keys, nails, screws or other small metal objects that can make a connection from one terminal to another. Shorting the battery terminals together may cause burns or a fire.
- Allow batteries to cool for 15 minutes after charging or heavy use. Failure to follow these instructions may cause overheating or fire.
Safety Notes
- Use only chargers recommended by the manufacturer to charge the batteries. If a charger is not suitable for a certain kind of battery there is a risk of fire. Only use Li-Ion batteries provided with a product or specifically designed to be compatible.
■ Use power tools only with specifically designated battery packs. Use of any other battery packs may create a risk of injury and fire.
- The unit is designed for operation in altitudes of up to 2000 m above sea level.
- Keep the battery out of reach of children.
- When not in use batteries should be stored at room temperature (approximately 20°C).
- Do not open, disassemble, crush, heat above 60^ C or incinerate. Do not dispose of in fire or similar.
■ Recharge only with the charger specified by the manufacturer. A charger that is suitable for one type of battery pack may create a risk of fire when used with another battery pack.
- If liquid contacts eyes, additionally seek medical help. Liquid ejected from the battery may cause irritation or burns.
- Have your power tool serviced by a qualified repair person using only identical replacement parts. This will ensure that the safety of the power tool is maintained.

Batteries do not belong in the household garbage.
For battery disposal please check with your local council.
natural_image
Pure electrical circuit lines without any symbolsUnpacking Your Charger
- Carefully unpack and inspect your charger. Familiarise yourself with all its features and functions.
- Ensure that all parts of the charger are present and in good condition. If any parts are missing or damaged, have such parts replaced before attempting to use this charger.
Setting up the Battery Charger
- If fitted, remove any battery from the battery charger.
- Insert the battery charger mains plug into a suitable mains socket.
Note: The red LED (2) on the battery charger will illuminate to indicate that the battery charger is ready to charge the battery.
WARNING: Only use this charger to charge compatible batteries that are specifically designed for this tool.
WARNING: The charger is designed for indoor use only, and must not be used in damp or wet conditions.
Charging the Battery
WARNING: Failure to follow the correct procedure when charging batteries will result in permanent damage.
Note: The normal charging can be gathered from the technical data (p. 15). However, if the battery has been left in a discharged state for some time, it may take slightly longer to charge the battery.
- Slide a fully or partially discharged battery onto the battery charger.
- Once charging commences, the red LED (2) will illuminate and the green LED will flash.
- When the battery is fully charged, the green LED (3) will illuminate.
If the Battery is defective the red LED flashes.
Note: Make sure the battery and battery charger are lined up correctly. If the Battery does not slide onto the battery charger easily, don't force it. Instead, remove the battery; check the top of battery and the battery charger slot are clean and undamaged and that the contacts are not bent.
Battery Charge Level: The battery has a built-in charge indicator. Pressing on the (Test) button to the right will indicate the charge level.
The right LED indicates a high charge level and the left a low charge level that will mean the battery pack will require charging soon.
IMPORTANT: When a low charge level is indicated be aware the tool may stop operating while using the tool. In some instances this may be dangerous. It is recommended to always ensure the battery pack has a good charge level.
Notes about Battery Charging
- The battery should be charged at ambient temperatures between 10^ C and 40^ C (ideally around 20^ C ).
■ After charging, allow 15 minutes for the battery to cool before use.
- Ensure that the charger is disconnected from the mains supply after use, and is stored correctly.
- Do not leave batteries on charge for extended periods and never store batteries on charge.
- The battery charger monitors battery temperature and voltage while charging. Remove the battery once charging has been completed to maximise charge cycles of the battery and not waste power.
- Batteries can become faulty over time, individual cells in the battery can fail and the battery could short. The charger will not charge faulty batteries. Use another battery, if possible, to check correct functionality of the charger and purchase a replacement battery if a faulty battery is indicated.
- Do not store Lithium-Ion battery packs in a discharged state long term. This can damage the Lithium-Ion cells. For long-term storage, store batteries in a high charge state disconnected from the power tool.
- The capacity of batteries will reduce over time. After 100 charge cycles, the battery's operation time and the maximum torque performance of the tool will slightly reduce. This decline will continue until the battery has minimal capacity after 500 charge cycles. This is normal and not a fault with the battery pack.
Battery Disposal
-
Run the tool until the battery is completely discharged.
-
Remove the battery from the tool.
Operation
-
Wrap heavy insulating tape around the battery terminals or enclose in a sealable plastic bag to prevent possible shorting.
-
Dispose of the battery through your local waste removal authority.
Maintenance and Cleaning
■ Remove the battery before undertaking any cleaning or maintenance work.
- Use only a moist cloth to clean the unit. Do not use aggressive chemicals which may dissolve plastic parts, or abrasives. Always keep the ventilation slots clean and free from obstructions.
- The battery can be recharged up to 500 times if treated carefully. However, over time the battery's performance can deteriorate. If necessary you can purchase a 2.0 Ah replacement battery under the article number 87 84 74 and a 4.0 Ah replacement battery under the article number 87 84 75 from Westfalia.
Troubleshooting
| Problem | Possible Cause | Solution |
| Red and green LEDs do not illuminate to indicate the Battery is charging correctly | Battery not correctly connected to Charger | Clean Battery Socket of Charger and Battery Contacts and fully slide on to Charger so it clicks in a locked Position |
| Charger not powered | Recheck Mains Connection | |
| Battery Pack has low capacity | Battery not being fully charged | Do not remove Battery until a full Charge is indicated |
| Battery Pack has been charged over 100 times and Capacity has started to reduce | This is normal for battery packs. Contact Westfalia purchase a replacement battery pack | |
| Netzteil | Power Supply Unit | |
| Eingang | 230 V~ 50 Hz | Input |
| Leistung | 70 W | Power |
| Ausgang | 14,4-18 V--- | Output |
| Ladezeit Akku 2 AhArt.: 87 84 74 | 60 min | Charging TimeBatt. 2 Ah, Art.: 87 84 74 |
| Ladezeit Akku 4 AhArt.: 87 84 75 | 120 min | Charging TimeBatt. 4 Ah, Art.: 87 84 75 |
| Ladestrom | 2400 mA | Charging Current |
| Abmessungen | 14 x 9 x 6 cm | Dimensions |
| Gewicht | 0,4 kg | Weight |
| Kabellänge | 1,8 m | Cable Length |
| Schutzklasse | II | Protection Class |

natural_image
Pure electrical circuit lines without any symbols
natural_image
Pure electrical circuit lines without any symbolsdeclare by our own responsibility that the product
Article No. 93 61 17
is according to the basic requirements, which are defined in the European Directives and their amendments.
2011/65/EU Restriction of the Use of certain hazardous Substances in electrical and electronic Equipment (RoHS)
Hagen, 13 ^th of July 2021
Jhomo Jilingbeil
Thomas Klingbeil,
natural_image
Symbol of a trash bin crossed with no text or labels
Werter Kunde,
Please help avoid waste materials.
If you at some point intend to dispose of this article, then please keep in mind that many of its components consist of valuable materials, which can be recycled.
Please do not discharge it in the rubbish bin, but check with your local council for recycling facilities in your area.