Optimax AIR94 - Air purifier Oreck - Free user manual and instructions
Find the device manual for free Optimax AIR94 Oreck in PDF.
Frequently Asked Questions - Optimax AIR94 Oreck
User questions about Optimax AIR94 Oreck
0 question about this device. Answer the ones you know or ask your own.
Ask a new question about this device
Download the instructions for your Air purifier in PDF format for free! Find your manual Optimax AIR94 - Oreck and take your electronic device back in hand. On this page are published all the documents necessary for the use of your device. Optimax AIR94 by Oreck.
USER MANUAL Optimax AIR94 Oreck
natural_image
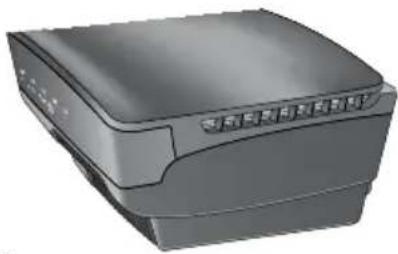
Illustration of a gray industrial air purifier unit with attached power outlet (no text or symbols visible)
This product earned the ENERGY STAR® by meeting strict energy efficiency guidelines set by the US EPA. US EPA does not endorse any manufacturer claims of healthier indoor air from the use of this product
The energy efficiency of this ENERGY STAR qualified model is measured based on a ratio between the mode's CADR for dust and the electrical energy it consumes, or CADR/Watt.
Important!
Read this manual carefully, and keep for future reference.
Enjoy
Congratulations on your purchase of the Oreck OptiMax ^TM air purifier. Use this manual to learn the features, operation and maintenance of the Oreck Air Purifier.
Call
Welcome to our Call, Click customer service program.
To contact Oreck:

USA: 1·800·989·3535
Canada: 1•888•676•7325
Click

On the web, point and click at: www.oreck.com and click locate a store on the top right.
Canada: www.oreckcanada.com

text_image
ORECK®Contents
Safety 1
General Warnings 1
Placement Warnings .... 1
Features 3
Operate 5
Maintain 6
Replacing the Filter 6
Trouble Shoot 7
Warranty 8
French 9
Spanish 20
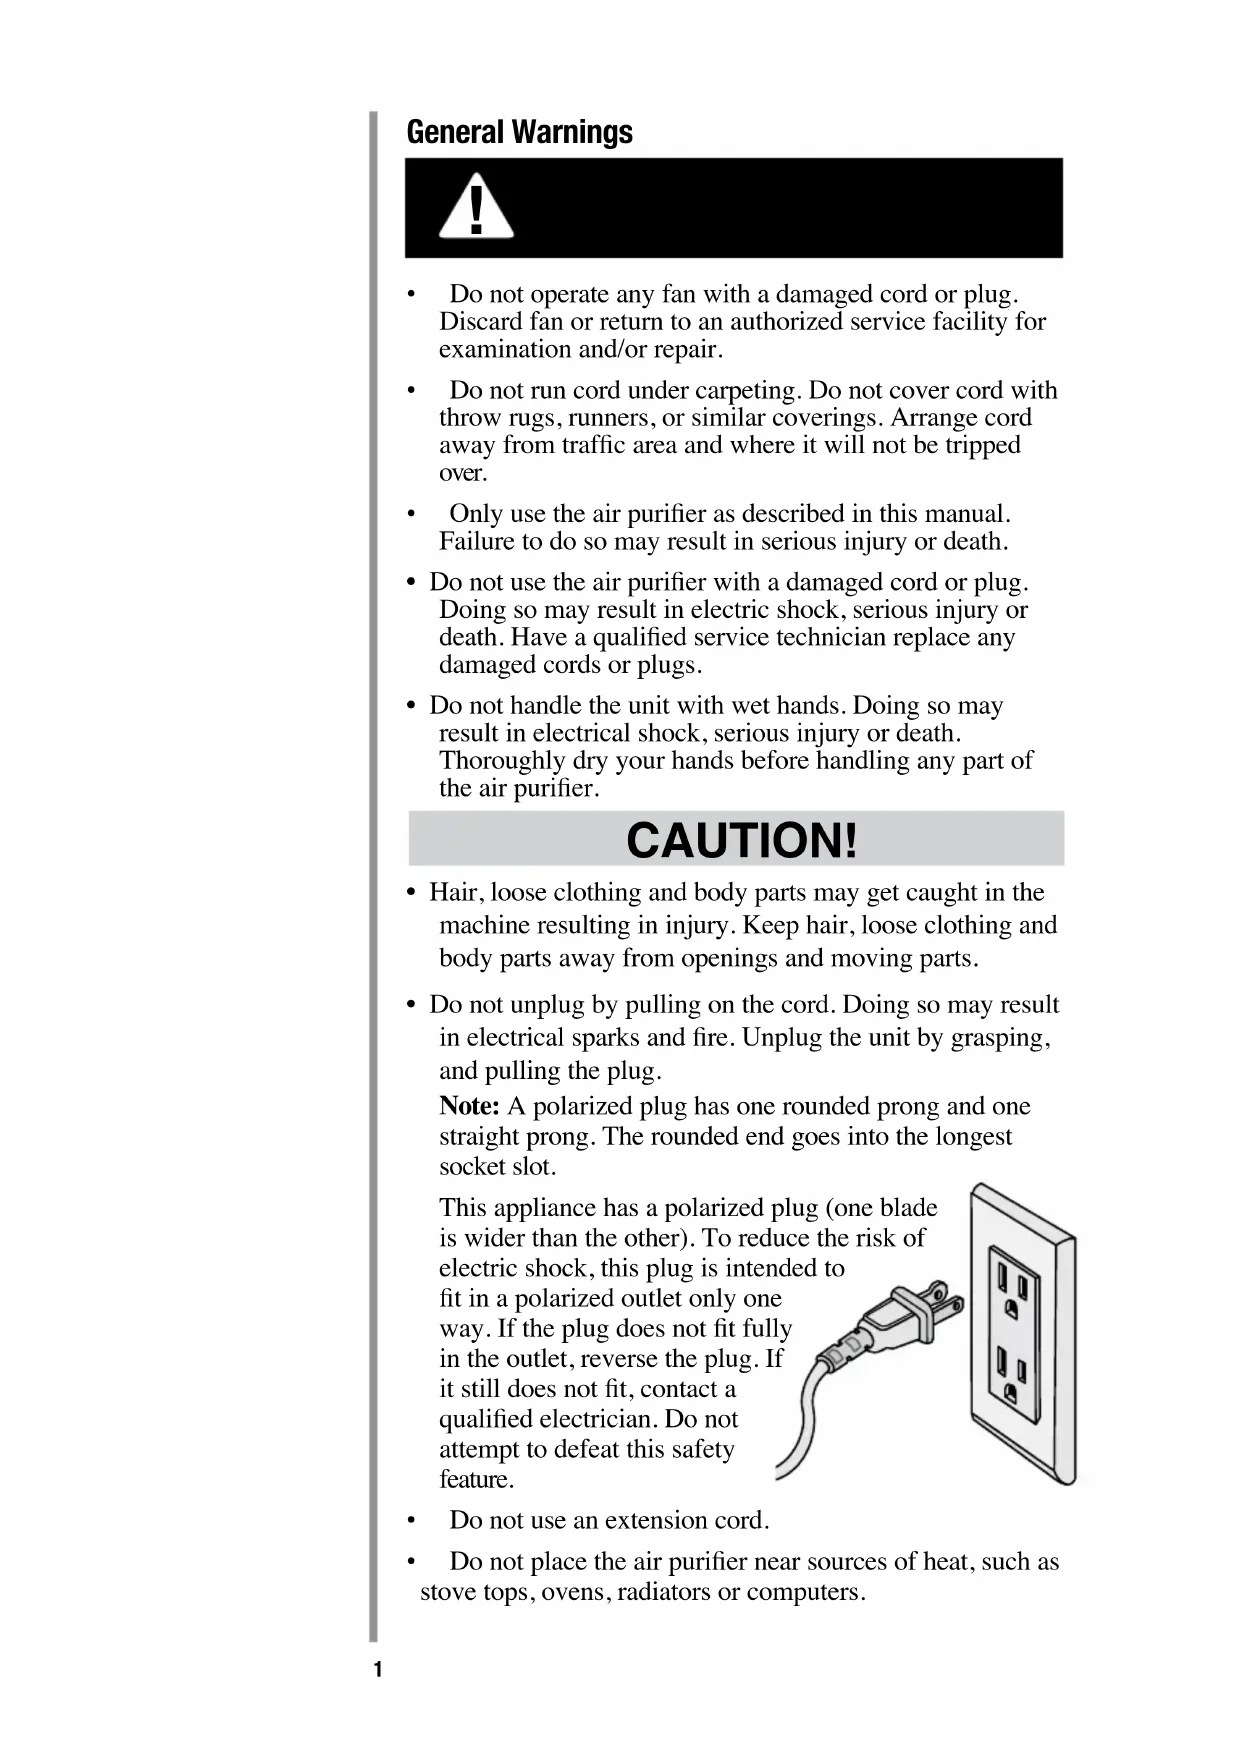
General Warnings

- Do not operate any fan with a damaged cord or plug. Discard fan or return to an authorized service facility for examination and/or repair.
- Do not run cord under carpeting. Do not cover cord with throw rugs, runners, or similar coverings. Arrange cord away from traffic area and where it will not be tripped over.
- Only use the air purifier as described in this manual. Failure to do so may result in serious injury or death.
- Do not use the air purifier with a damaged cord or plug. Doing so may result in electric shock, serious injury or death. Have a qualified service technician replace any damaged cords or plugs.
- Do not handle the unit with wet hands. Doing so may result in electrical shock, serious injury or death. Thoroughly dry your hands before handling any part of the air purifier.
CAUTION!
- Hair, loose clothing and body parts may get caught in the machine resulting in injury. Keep hair, loose clothing and body parts away from openings and moving parts.
- Do not unplug by pulling on the cord. Doing so may result in electrical sparks and fire. Unplug the unit by grasping, and pulling the plug.
Note: A polarized plug has one rounded prong and one straight prong. The rounded end goes into the longest socket slot.
This appliance has a polarized plug (one blade is wider than the other). To reduce the risk of electric shock, this plug is intended to fit in a polarized outlet only one way. If the plug does not fit fully in the outlet, reverse the plug. If it still does not fit, contact a qualified electrician. Do not attempt to defeat this safety feature.

text_image
plug (one blade duce the risk of ended to e ly If• Do not use an extension cord.
- Do not place the air purifier near sources of heat, such as stove tops, ovens, radiators or computers.
- This equipment should be inspected frequently and collected dirt removed from it regularly to prevent excessive accumulation that may result in flashover or a risk of fire.
- Unplug or disconnect the appliance from the power supply before servicing.
Placement Warnings

WARNING!
- Do not use the air purifier outdoors or on wet surfaces. Doing so may result in electric shock, serious injury or death. Use only indoors and under dry conditions.
- Do not use the air purifier in an enclosed space where flammable, combustible or explosive gases are present.
- Do not use in an area where toxic vapors, flammable dust or oxygen tanks are present. Doing so may result in serious injury or death. Check the location and make sure these elements are not present.
- Warning: Product contains chemicals known to the State of California to cause cancer and birth defects or other reproductive harm.
CAUTION!
- Do not place open flames, including candles, directly in front of the air purifier.
- Keep objects away from the air intake grille.
It is important to consider the following when deciding on where to locate the air purifier:
- Position the air purifier on a flat, solid, stable surface. Never place the unit on soft surfaces such as a bed or sofa.
- Position the air purifier where the dirty air is not drawn across your head or body while sitting or sleeping.
- Position the air purifier so the plug on the power cord easily reaches a standard electrical outlet for a polarized plug.
- Never allow children to insert hand in lighted opening.
READ AND SAVE THESE INSTRUCTIONS
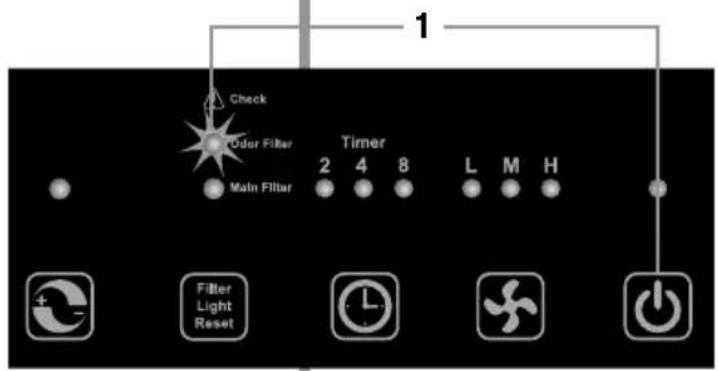
Features
-
Air Purifier Door: Easily removed to gain access to the filter.
-
Main Filter: Captures particles from the air that passes through the filter.
-
Odor Filter: Reduces odors from the air that passes through the filter.
-
Intake Grille: Where air enters the unit.
-
Check Main Filter Light: Indicates the main filter may need to be replaced when lit.
-
Check Odor Filter Light: Indicates the Odor Filter may need to be replaced when lit.
-
Air Revitalizer Button: This button activates the Air Revitalizer which is designed to run continuously, but may be turned OFF if desired. The Air Revitalizer provides additional air freshness via the release of negative ions.
-
Check Light Reset Button: This button resets both the main filter and odor filter lights.
-
Timer: Sets the run time for two, four or eight hours, before automatically turning OFF.
-
Fan Speed: The fan runs at three speeds. The lights indicate the current fan speed.
• L: Low for the Silence Technology ^®
• M: Medium for typical use
• H: High for maximum cleaning
-
Power: Turns the unit OFF and ON.
-
Exhaust Grille: Directs the flow of air as it exits the unit.

Buttons respond to light touch. They do not need heavy pushing.
Operate
- Check the air purifier for the filters. Be sure the supplied filters are properly in place and all plastic is removed before turning the unit on.

natural_image
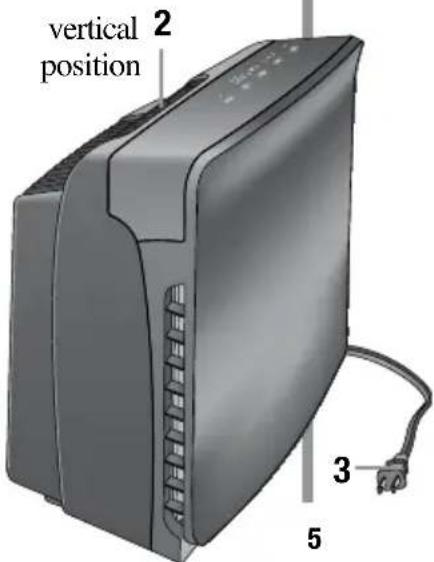
Two rectangular containers with textured surfaces, one labeled 'SHORT' and the other showing a grid pattern (no readable text or symbols)- Place the air purifier on a hard surface such as the floor, a table or desk. Be sure the grilles are not blocked by other objects, and there are no candles or flames near the unit. The air purifier can be placed in a horizontal or vertical position.
natural_image
3D rendering of a gray industrial printer or scanner device (no visible text or symbols)horizontal position
-
Plug in into nearest standard electrical outlet that accepts a polarized plug.
-
Lightly Press the power button to turn the air purifier on. Press the power button again to turn the air purifier off.
-
Select the fan speed. To select the speed, lightly press and release the fan speed button until the desired speed is reached.
L = low, Silence Technology®, M = medium or H = high.
- Adjust the timer feature. The time can be selected from two, four or eight hours. The unit will turn off once it runs for the selected hours.
Note: The unit will run continuously if all the timer lights are off.
-
The Check Filter Lights will light up when the filters may need to be replaced. Press and hold the button for several seconds until the filter indicator shuts off.
-
Choose to turn the Air Revitalizer feature on or off. Due to the sensitivity of the smart panel, a slight delay may occur for the electronics to respond.
text_image
vertical position 2 3 5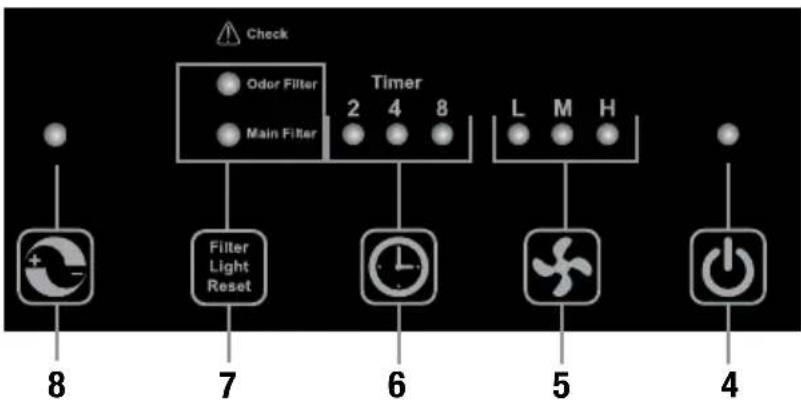
flowchart
graph TD
    A["Check"] --> B["Oxid Filter"]
    A --> C["Main Filter"]
    B --> D["Filter Light Reset"]
    C --> E["Timer"]
    D --> F["7"]
    E --> G["6"]
    F --> H["5"]
    G --> I["4"]
    H --> J["5"]
    I --> K["4"]
IMPORTANT: This unit is equipped with a smart panel that senses your touch. Heavy pushing is not recommended.
Maintain
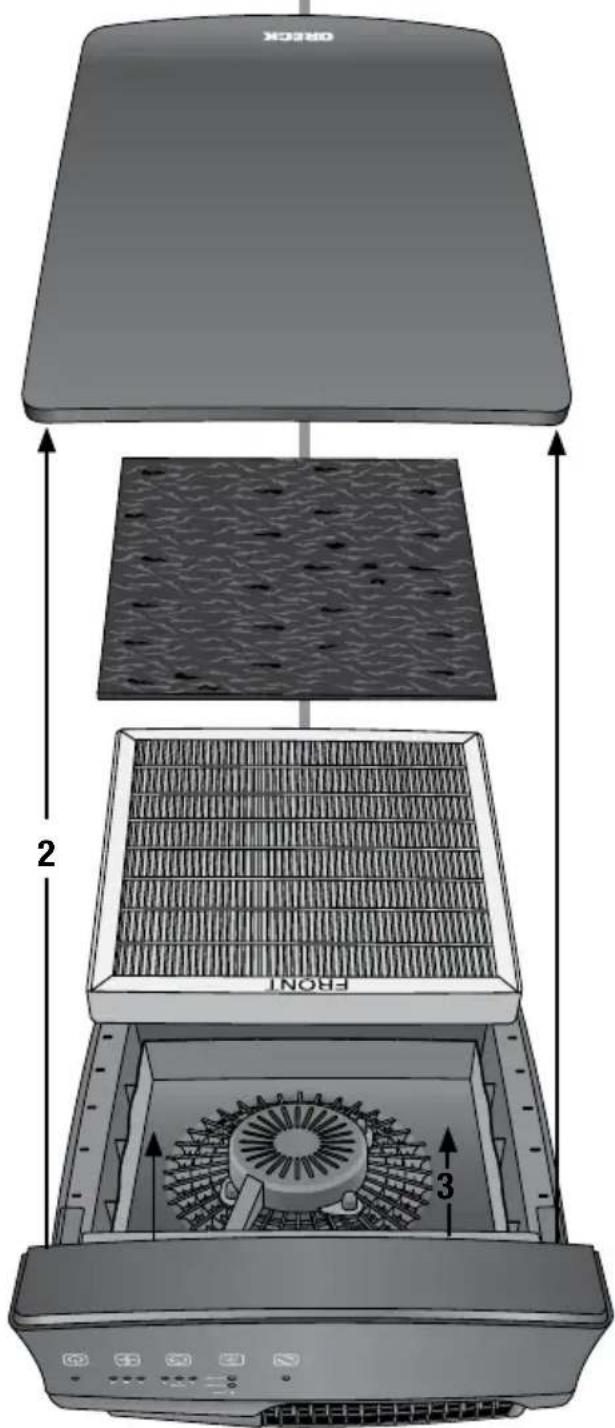
Replacing the Filter
text_image
ORIEX 2 FROH1 3Under normal operating conditions the Main Filter should be changed every six months. Replace Odor Filter every three months. The filters may need to be changed more often in heavy use such as smoke or dusty environments. You should have spare filters available for later replacement.
Note: The filters are NOT washable.
- When the filter light is illuminated, turn the unit off and unplug it from the power outlet.
- Remove the door by holding the base of the unit, pull door, rotate forward and pull out.
- Remove the used filter. Note: the Odor filter is attached with Velcro® to the main filter. The Odor Filter is an optional feature. The unit will continue to clean the air without it.
- Remove the packaging from the new filter(s).
- The odor filter is reversible and attaches to the Velcro® applied to the front of the main filter. Place the filter(s) in the unit according to the air flow direction arrow as indicated on the main filter. Place new filter(s) into the unit.
- Replace the door by aligning and inserting the two door tabs, located at the bottom of the door, into the holes provided on the unit frame. Rotate the top of the door toward the top of the unit and insure the door snaps into place on both sides.
text_image
Check Odor Filter Main Filter 2 4 8 L M H 1 + - Filter Light Reset L M H PowerTrouble Shoot
Service problems that appear to be major can often be solved with some troubleshooting. Review the troubleshooting guide below before contacting a service center.
All other servicing should be done by an Oreck authorized service center.
| Problem Check Solution | ||
| Unit does not turn ON. | Power CordFan speedFront CoverFilters | Plug in Power Cord.Set the fan speed to the desired level.Make sure the front cover is securely fastened.Make sure the unit has the filters installed properly. |
| Unit has high noise level. | Check for a dirty filter. | Replace the filter. |
| Unit still does not operate properly. | Check all the points above. | Contact Oreck for service.See the inside front cover of this manual for contact information. |
Warranty
ORECK MANUFACTURING COMPANY: (Oreck Manufacturing Company gives you the following limited warranty for this product only if it was originally purchased for residential use, not for resale, from Oreck or an Oreck Authorized Retail Dealer.)
Oreck will repair or replace, free of charge, to the original purchaser, any part that is found to be defective in material or workmanship within three (3) years following the date of purchase for all residential models. NOTE: If the unit is used commercially, a one (1) year overall warranty applies.
This limited warranty does not cover the replacement of expendable or consumable parts such as filters, cartridges, and other parts subject to normal wear unless they are defective in material or workmanship.
This limited warranty does not apply to any part subjected to accident, abuse, commercial use, alteration, misuse, damage caused by act of God, the use of voltages other than on the data plate of this product or service of this product by other than Oreck or a participating Factory Authorized Service Center.
Oreck does not authorize any person or representative to assume or grant any other warranty obligation with the sale of this product.
Oreck's limited warranty is valid only if you retain proof of purchase from Oreck or an Oreck Authorized Retail Dealer for this product. If you purchase this product from any other source, your purchase is “AS IS,” which means Oreck grants you no warranty, and that you, not Oreck, assume the entire risk of the quality and performance of this product, including the entire cost of any necessary servicing or repairs of any defects.
Oreck's liability for damages to you for any costs whatsoever arising out of this statement of limited warranty shall be limited to the amount paid for this product at the time of original purchase, and Oreck shall not be liable for any direct, indirect, consequential or incidental damages arising out of the use or inability to use this product. Some states do not allow the exclusion or limitation of incidental or consequential damages, so the above limitation or exclusion may not apply to you.
ALL EXPRESS AND IMPLIED WARRANTIES OTHER THAN THE LIMITED WARRANTY SET FORTH ABOVE, FOR THIS PRODUCT, INCLUDING IMPLIED WARRANTIES OF MERCHANTABILITY AND FITNESS FOR A PARTICULAR PURPOSE ARE EXPRESSLY DENIED.
This warranty gives you specific legal rights, and you may also have other rights which vary from state to state.
ORECK®
natural_image
Illustration of a gray industrial air purifier unit with cooling fins and a connected power outlet (no text or symbols visible)
natural_image
Illustration of a wall-mounted electrical socket with multiple slots (no text or symbols)natural_image
Illustration of a grid-patterned panel with a textured square on top, enclosed in a rectangular box (no text or symbols)
natural_image
Illustration of a gray industrial printer with control panel (no text or symbols visible)position horizontale
natural_image
Illustration of a gray industrial air purifier unit with attached power plug (no text or symbols)
natural_image
Isometric illustration of a wall-mounted electrical outlet with multiple socket slots (no text or symbols)natural_image
Illustration of a woven mat partially covered in a rectangular box, with a textured square above (no text or symbols)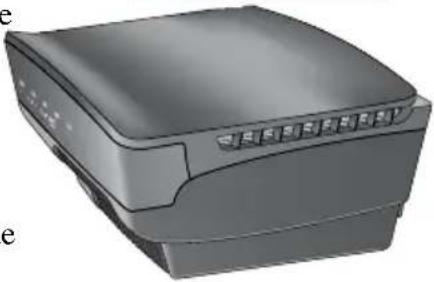
natural_image
3D rendering of a gray printer with control buttons and ventilation slots (no visible text or symbols)posición horizontal
© 2011 Oreck Holdings, LLC.
All rights reserved. All marks, text, logo's, product configurations and registered trademarks are owned and used under the authority of Oreck Holdings, LLC.