SOLOWORKER DAB+ - Radio PerfectPro - Free user manual and instructions
Find the device manual for free SOLOWORKER DAB+ PerfectPro in PDF.
Frequently Asked Questions - SOLOWORKER DAB+ PerfectPro
User questions about SOLOWORKER DAB+ PerfectPro
0 question about this device. Answer the ones you know or ask your own.
Ask a new question about this device
Download the instructions for your Radio in PDF format for free! Find your manual SOLOWORKER DAB+ - PerfectPro and take your electronic device back in hand. On this page are published all the documents necessary for the use of your device. SOLOWORKER DAB+ by PerfectPro.
USER MANUAL SOLOWORKER DAB+ PerfectPro
Operating instruction
Mode d'emploi
Gebruiksaanwijzing
Bedienungsanleitung
Bruksanvisning

Digital Radio

CDR·D·S
SOLOWORKER
natural_image
Line drawing of a handheld electronic device with buttons and display (no text or symbols)WARNING!
WARRANTY BECOMES VOID ONCE THE DEVICE CABINET HAS BEEN OPENED OR ANY MODIFICATIONS OR ALTERATIONS TO THE ORIGINAL DEVICE HAVE BEEN MADE
Important safety instructions
- Read these instructions.
- Keep these instructions.
- Heed all warnings.
- Follow all instructions.
- Do not use this apparatus near water.
-
Clean only with dry cloth.
-
Do not install near any heat sources such as radiators, heat registers, stoves, or other apparatus (including amplifiers) that produce heat.
-
Do not defeat the safety purpose of the polarized or grounding-type plug. A polarized plug has two blades with one wider than the other. A grounding type plug has two blades and a third grounding prong. The wide blade or the third prong are provided for your safety. If the provided plug does not fit into your outlet. Consult an electrician for replacement of the obsolete outlet.
-
Protect the power cord from being walked on or pinched particularly at plugs, convenience receptacles, and the point where they exit from the apparatus.
-
Only use attachments/accessories specified by the manufacturer.
-
Use only with the cart, stand, tripod, bracket, or table specified by the manufacturer, or sold with the apparatus. When a cart is used, use caution when moving the cart/ apparatus combination to avoid injury from tip-over.
-
Unplug this apparatus during lightning storms or unused for long periods of time.

-
Refer all servicing to qualified service personnel. Servicing is required when the apparatus has been damaged in any way, such as power-supply cord or plug is damaged. liquid has been spilled or objects have fallen into the apparatus, the apparatus has been exposed to rain or moisture, does not operate normally, or has been dropped.
-
To Reduce the Risk of Fire or Electric Shock, Do not Expose This Appliance To Rain or Moisture.
-
The Shock Hazard Marking and Associated Graphical Symbol is provided on the rear of unit.
-
Excessive sound pressure on ear-and headphones could impair the hearing ability. Higher setting that idle on the equalizer leads to higher signal voltages on the output for ear and headphones.
-
The power plug should be close to the radio, and easy to be approached that during the emergency, to disconnect the power from the radio, just unplug the power plug from the AC power slot.
-
Where the MAINS plug or an appliance coupler is used as the disconnect device, the disconnected device shall remain readily operable.
-
This apparatus is provided with protection against splashing water (IP64).
-
Use only the AC/DC adaptor which is provided by the manufacturer.
-
The batteries shall not be exposed to excessive heat such as sunshine, fire or the like.
-
To prevent possible hearing damage, do not listen at high volume levels for long periods.
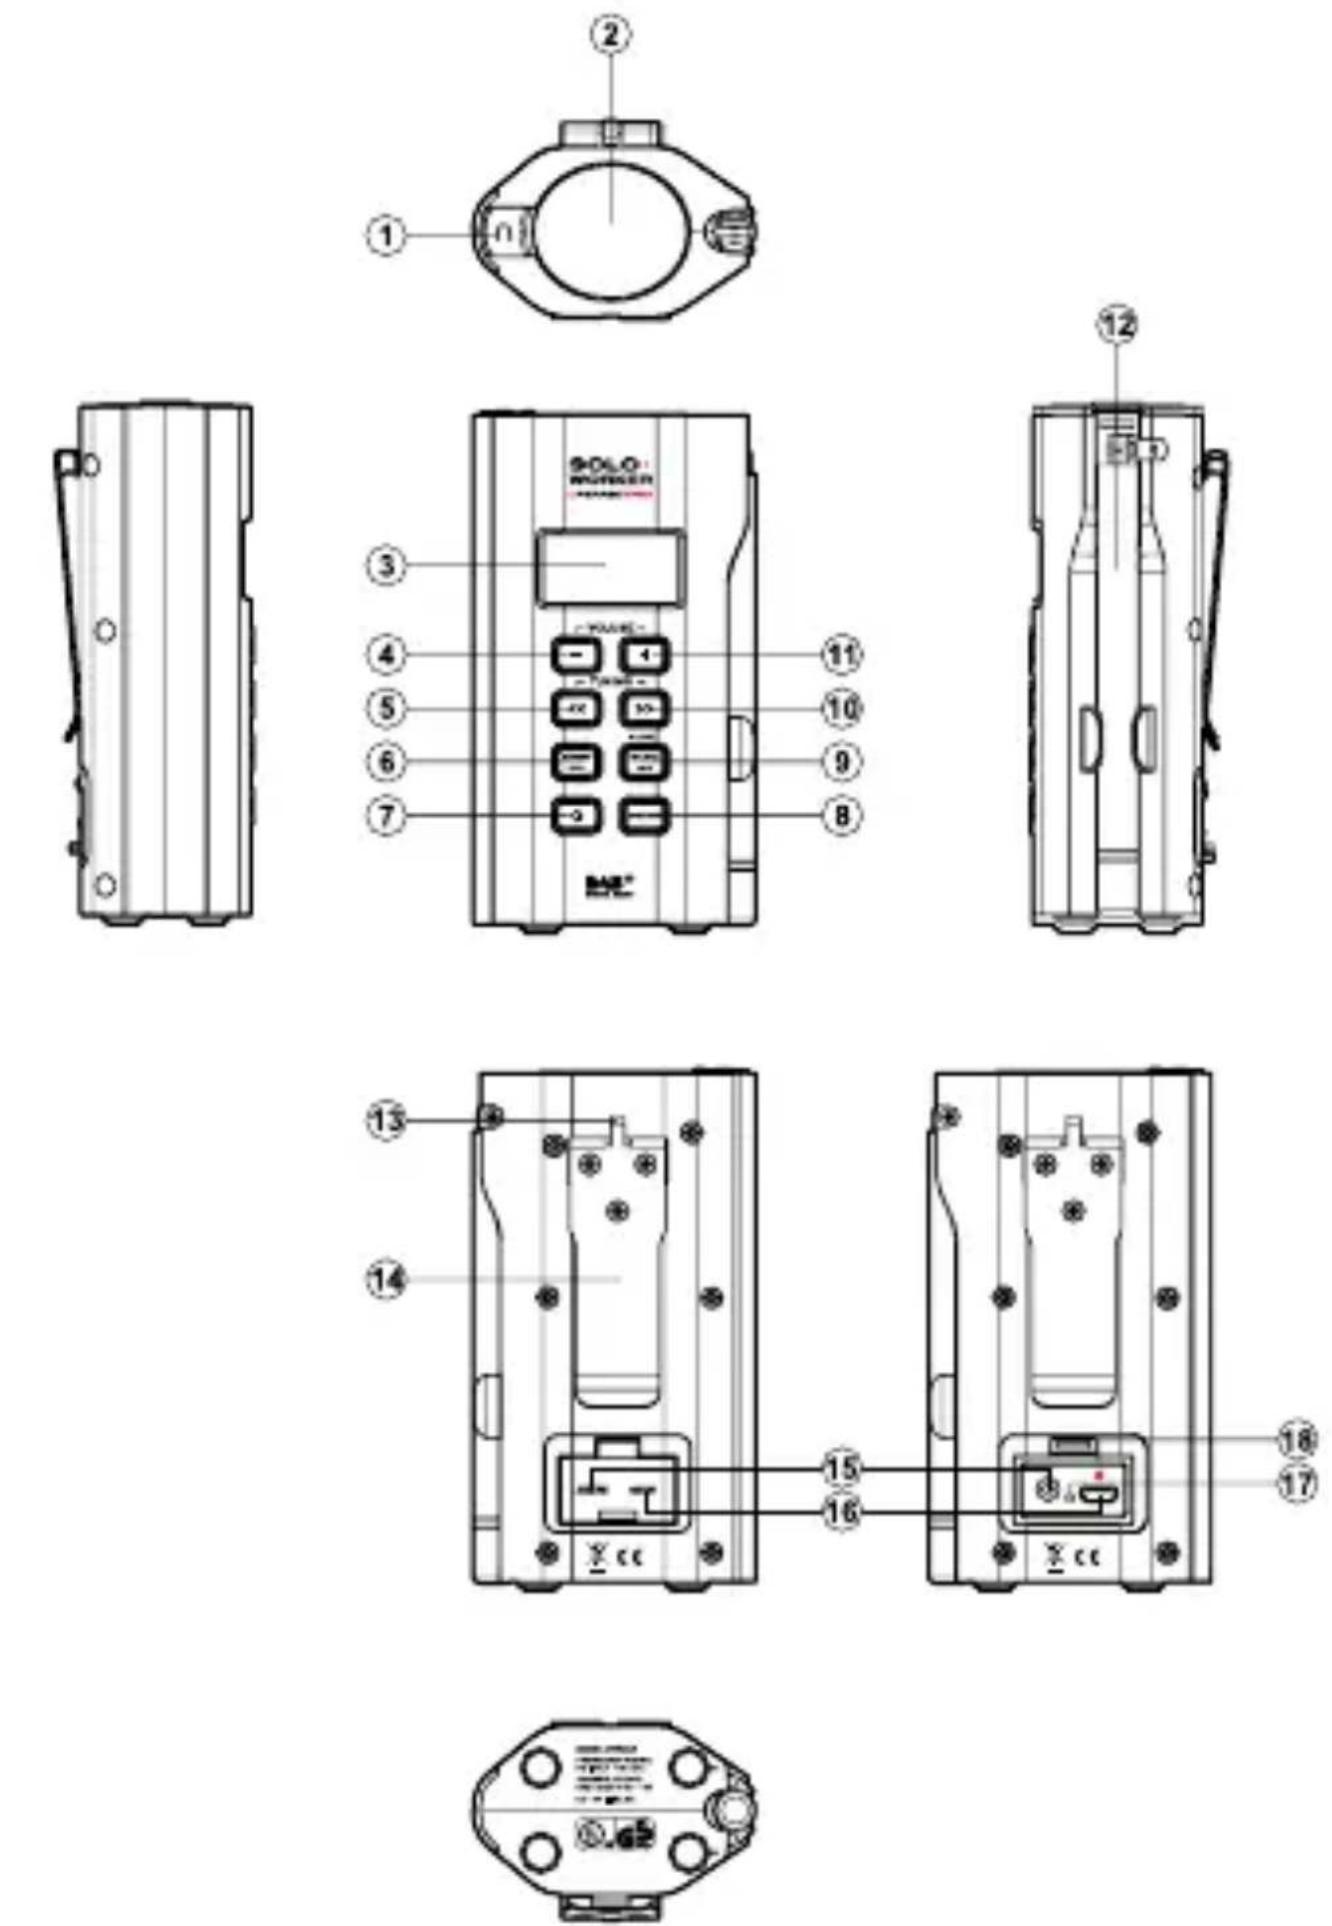
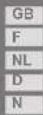
Controls
① Headphone socket
② Loudspeaker
\* 360 DEGREES SOUND
The unique Neodymium speaker located on top of the radio provides a 360 degrees sound image.
Suggestion: If preferred, place the radio in a corner or close to a wall for additional sound reflection.
③ LCD display
④ Volume down
⑤ Tuning down button
⑥ Menu/Preset button
⑦ Power button
⑧ Band button
⑨ Select/Info button
⑩ Tuning up button
⑪ Volume up button
12 Rod antenna
13 Strap holder
(Note: the strap holder on top of the clip is intended for a key ring/hook)
⑭ Clip
15 Aux in socket
⑯ DC IN socket (micro-USB)
⑰ Battery charging LED indicator
18 Upside indicator for the micro-USB plug
Charging the radio
This unit features a built in 1850mAh Lithium rechargeable battery to power the radio.
Before operating the radio for the first time please fully charge the battery with a supplied 5V/500 mA AC adaptor.
Carefully insert the mini-usb plug into the DC IN socket on the rear of your radio. A red dot on the mini-usb plug indicates the upside of the mini-usb plug. This red dot is also indicated above the mini-usb socket. Plug the adaptor into a standard mains outlet and the radio will begin charging the built in battery.
The LED charging indicator next to the DC IN socket will shine bright red showing charging in progress. This LED indicator will shine faint when the battery is fully charged. The radio can only be charged with radio off. Charging time is approx. 4 hours.
The battery life is approx. 4 to 10 hours* listening through the speaker and approx 6 to 15 hours* with headphones.
Reduced power, distortion, ‘stuttering’ sounds or battery power indicator in “low”☐ are all signs that the battery needs to be recharged. Please note that the battery power icon does not display on the LCD when charging the battery.
IMPORTANT:
The mains adaptor is used as the means of connecting the radio to the mains supply. The mains socket used for the radio must remain accessible during normal use. In order to disconnect the radio from the mains completely, the mains adaptor should be removed from the mains socket outlet completely.
Safety Note:
Never use charge or operate the radio on AC mains power in rainy or moist conditions to prevent moist from entering the radio. Always keep the rubber cover on the back well closed under these conditions.
\* Note to battery life:
This is a rough indication only as actual achieved battery life depends on many factors such as: selected volume, music type (bass heavy music consumes more energy), selected music source or radio band, selected EQ settings, temperature and age of the battery.
Initial operation-DAB
- Carefully straighten up the rod antenna* and press the Power button.
- The display will show “Welcome to Digital Radio” and start to scan the entire DAB+ channel range and stop at the first found station. If the radio has been used before, the last used station will be selected. Press the Select button to play the station.
- Press the Tuning up/down button to display station list and find desired station. Press the Select button to select the station. The radio will tune to the station and display the station name.
- Adjust the volume control for comfortable listening.
Note:
Due to the conductivity of the human body the reception of DAB stations may not be possible or become unstable when the antenna touches your body or is very close to your body.
Service information-DAB
The Service Information display-Technical information on the current status of the station being broadcast.
While listening to DAB, continually press the Select/Info button to cycle through information on:
a. Radio text-Displays text messages such as the artist or track name, phone in number, traffic alerts, etc.
b. Program type (PTY)-Displays the type of station being listened to such as Pop, Classic, News etc.
c. Multiplex Name-Displays the name of the DAB multiplex to which the current station belongs as well as its broadcast frequency.
d. Signal strength-Displays the signal strength for the station being listened to.
e. Bit rate and audio type-Displays the digital bit rate and audio coding information for the station being listened to.
f. Date-Displays the current date.
Menu functions-DAB
Press and hold the Menu button to enter the menu list. Press the Tuning up/down button to choose from the following options: EQ setting/Full scan/Manual tune/DRC value/Station order/Prune/System.
GB
A) Full scan: scan the whole DAB network in your area. Radio will tune to the first station found after the scanning is completed.
B) Manual tune: press the Tuning up/down button to scroll through the whole DAB channel. Press the Select button to select required channel.
C) EQ setting: The sound on your radio can be adjusted to suit your personal taste for the material that you are listening to. The radio has 5 preset equalizer modes. Alternatively, you may set the treble and bass levels to your own preferences. Press the Tuning up/down buttons to cycle through the preset mode. Press the Select button to confirm your selection.
a) Normal: no tone modification is applied
b) Rock
c) Soul & Jazz
d) Classical
e) Spoken word
f) Personal: select this mode and you can go to 'Personal setup' to adjust the treble/bass tone.
Personal setup: If you find the preset equalizer functions not to your liking, you may set up a custom treble and bass as following:
1) Follow the step above to enter 'Personal setup'.
2) Press the Tuning up/down button to select Treble or Bass. Then press the Select button to enter the adjustment mode.
3) Press the Tuning up/down button to adjust the treble or bass level (-10 and +10). Press the Select button to confirm the setting.
Note:
To quickly cancel the effect of Personal, press the Tuning up/down button until 'Normal' is highlighted on the display and press the Select button. The treble and bass settings will be memorized for the next time that you wish to use the Personal setup.
D) DRC (Dynamic Range Control): The DRC facility can make quieter sounds easier to hear when your radio is used in a noisy environment. Use the Tuning up/down button to highlight the required DRC setting. Current setting is marked with an asterisk.
DRC Off: No compression applied.
DRC High: Maximum compression applied.
DRC Low: Medium compression applied.
Note:
Not all DAB broadcasts are able to use the DRC function. If the broadcast does not support DRC, then the DRC setting in the radio will have no effect.
E) Station order: your radio has 3 station order settings from which you can choose. The station order settings are as following.
Alphanumeric: sorts the station list alpha-numerically 0...9 A...Z
Ensemble: organizes the station listed by DAB multiplex.
Valid: shows only those stations for which a signal can be found.
The current setting is indicated by an asterisk.
F) Prune: If you move to a different part of the country, some of the stations which were listed may no longer be available. Also, from time to time, some DAB services may stop broadcasting, or may change location or frequency.Stations which cannot be found, or which have not been received for a very long time are shown in the station list with a question mark.
The Prune stations function will delete the marked DAB stations from your station list.
1) Press the Select button to enter prune station function.
2) Press the Tuning up/down button to select YES to cause the stations lists to be pruned, eliminating unavailable stations. If you do not wish to prune stations, select NO and the display will revert to the previous menu.
G) System: press the Select button to select from the following settings
- Time/Date
Manual setting the clock
1) Press the Tuning up/down button until 'Set Time/Date' is highlighted. Then press the Select button to enter the time setup. The day digits will flash.
2) Press the Tuning up down/button to select correct day. Press the Select button to confirm the setting. The month digits will flash.
3) Follow the same procedure above for the month/year/hour/minute setting. If the radio has been set to use a 12 hour format, there will be an option for setting AM or PM for the clock time
Automatically updating the clock
1) Press the Tuning up/down button until ‘Auto update’ is highlighted. Then press the Select button to enter the auto-update menu.
2) Press the Tuning up/down button to choose an update option from ‘Update from Any’, ’Update from DAB’, ‘Update from FM’, ‘No update.’ Press the Select button to confirm your choice. The radio will then exit to the main menu display.
Setting the clock format:
The clock display: The clock display can be set to 12 or 24 hour format.
1) Press the Tuning up/down button until 'Set format' is highlighted on the display. Press the Select button to enter the clock format menu. The current clock format is marked with asterisk.
2) Press the Tuning up/down to select either 12 or 24 format. Press the Select button to confirm your choice.
- Contrast: the contrast of the display can be adjusted. Press the Tuning up/down button to adjust the contrast.
The contrast level indication on the screen will change at the same time. When you find the setting that gives the best legibility for the location in which the radio is used, press the Select button to save the setting.
- Language: your radio can be configured to a different language.
Press the Tuning up/down button until your required language is highlighted on the display. Press the Select button to confirm your choice. - Factory reset: by performing a factory reset, all user entered settings will be erased.
Press the Tuning up/down button to select YES or NO.
Select YES to erase all saved settings and all settings will revert to factory default.
- Software upgrade
Software updates for your radio may be available in the future. As software updates become available software and information on how to update your radio can be found at www.perfectpro.eu
Important:
Do not perform software updates unless instructed by our technician.
- SW version: The software display cannot be altered and is just for your reference. Press the Select button to view the software version installed in the radio. Press the Select button again to revert to the previous menu.
Operating your radio-FM (Manual tuning)
- Carefully straighten the rod antenna and turn on the radio by pressing the Power button.
- Press the Band button to select FM radio mode.
- Press the Tuning up/down button to control the frequency that the radio will tune to. The frequency will change in steps of 50kHz. When the end of the waveband is reached the radio will recommence tuning from the opposite end of the waveband.
- Press the Volume buttons to adjust the sound level as needed.
Scan tuning-FM
- Press and hold the Tuning up/down button.
- The radio will search in an upwards or downwards direction until it finds a station of sufficient signal strength.
Service information FM RDS
Your radio has a range of display options when in FM mode:
- Press the Info button cycle through the different options.
a. Radio text-Displays scrolling text messages such as artist/track name, phone in number etc.
b. Program type-Displays the information for the station being listened to e.g. Pop, Classic. News, etc.
c. Frequency-Displays the frequency of the FM signal.
d. Audio type-Displays the audio type of the station being listened to
e. Date-Displays the current date.
Note:
If no RDS information is available, then the radio will only be able to display the frequency.
There will be no text or program type information available under these conditions. The radio only provides displays when there is information available.
GB
Menu functions-FM
- Repeatedly press and release the Menu button until the radio reverts to normal display (i.e. without showing 'MEM Browse' or 'MEM Store' at the bottom of the display).
- Press and hold the Menu button to enter FM menu list. Then press the Tuning up/down button to scroll through the following options: EQ setting/FM Scan zone/FM audio/System (for the functions of EQ setting and System, please refer to the above sections described in DAB mode).
A) FM scan zone: Your radio includes a local/distant option for the auto-search function. By setting the radio to the 'local' scan option, weaker signals from more distant transmitters can be ignored by the radio, making stronger signals easier to find. Press the Tuning up/down button to choose between 'Local' (Strong stations only) and 'Distant' (All stations including distant radio stations) options. Then press the Select button to confirm the setting. The current setting is indicated with an asterisk.
B) FM audio: If the FM radio station being listened to has a weak signal, some hiss may be audible. It is possible to reduce this hiss by forcing the radio to play the station in mono rather than auto. Press the Tuning up/down button to select the options between ‘Mono’ and ‘Auto’. Then press the Select button to confirm your selection.
Presetting stations-DAB/FM
You may store your preferred DAB and FM radio stations to the preset station memories. There are 40 memory presets in your radio 20 for DAB and 20 for FM. Presets are memorized by your radio in the event of a power failure.
- Tune to the required station following the above steps.
- Repeatedly press and release the Menu button until 'MEM Store' is shown at the bottom of the display.
- Press the Tuning up/down button to select your required preset number. The preset number flashes on the top right corner indicating the preset is still empty. Press the Select button to store the currently tuned station. The display will show 'Saved' when the station is stored to the preset station memory. Repeat this procedure for the remaining presets.
Alternatively, you can simply press the Select button (without the use of Tuning up/down button to select your required preset number) to preset the currently tuned station. The station will be stored in the remaining empty preset in sequence (i.e. if preset 1 to 4 are used, the station required to be preset will be stored in preset 5 automatically).
Note:
Stations stored in preset memories may be overwritten by following the above procedure.
GB
Recalling a preset station-DAB/FM
- Press the Band button to select the required mode.
- Repeatedly press and release the Menu button until 'MEM Browse' is shown at the bottom of the display.
- Press the Tuning up/down button to select your required station.
Note:
The display will only show the preset number which has preset stored.
Playing music via auxiliary input socket
A 3.5mm Auxiliary input socket is provided on the rear of the unit to permit an audio signal to be fed into the unit from any devices that features a headphone or audio output, such as an iPod, MP3 or CD player.
- Press the Band button to select Aux in mode.
- Connect a stereo or mono audio source (for example, iPod, MP3 or CD player) to the Auxiliary input socket (marked 'AUX IN').
-
Adjust the Volume control on your iPod, MP3 or CD player to ensure an adequate signal and then adjust the volume on the speaker for comfortable listening.
-
After use, disconnect your player in order to listen to your radio conventionally.
Note:
Never use the Aux-In socket in rainy or moist conditions to prevent moist from entering the radio. Always keep the rubber cover on the back well closed under these conditions.
Headphone socket
The 3.5 mm stereo headphone socket located on the top of your radio is provided for use with stereo headphones or an earpiece. Connecting headphones automatically mutes the built in speaker.
Important:
Excessive volume levels from earphones and headphones may cause damage to your hearing.
Note:
Never use the headphone socket in rainy or moist conditions to prevent moist from entering the radio. Always keep the rubber cover on top well closed under these conditions.
Key lock
The key lock function is used to prevent unintentional operation of the radio.
- Press and hold the Select button until 'Keys Locked' is shown on the display. The power button and all other buttons will be disabled to prevent accidental operation.
- To disable the key lock function, press and hold the Select button again until 'Keys Unlocked' is shown on the display.

Safety information for internal rechargeable Lithium-ion battery
GB
The internal rechargeable lithium-ion battery used in this device is able to supply power for a long period of time. However, even lithium-ion batteries reach a point where they cannot be recharged. If the battery does not recharge after several attempts, it may be drained (has a low charge), please contact info@perfectpro.eu for repair information.
However, if you do not want us to replace the battery, you will need to dispose of used batteries/device in accordance to the laws and regulations in your area. In addition, you can contact your local electronics retailers or recycling center for disposal.
User Safety Precautions
- Check the room temperature range is 0^ C - 45^ C (32°-113° Fahrenheit) before charging the battery.
- Do not attempt to disassemble the plastic covering or any parts of the device, as the materials inside may be toxic and may damage skin and clothes.
- Do not puncture, crush, modify, throw or cause any unnecessary shock to your battery, as the battery used in this device may present a risk of fire, explosion, or chemical burn if mistreated.
- Do not leave, charge or use the battery in a car under direct sunlight, near fire or a heated source.
- Do not immerse, throw, wet the battery in water/seawater.
- Do not use or charge the battery if it appears to be abnormally hot, discoloration, deformation or abnormal conditions is detected during use, charge or storage.
- Do not leave a charging battery unattended. Keep the battery away from babies and children.
WARRANTY
This radio has a 2 year limited warranty.
WARNING! Warranty becomes void once the radio cabinet has been opened or any modifications or alterartions to the radio have been made!
The terms of the warranty of this radio do not cover the following:
- Damage caused by misuse, abuse, neglect, alterations, accidents or unauthorised repair.
- Normal wear and tear.
- Breaking or bending of the antenna.
Specification
Power Requirement:
Mains (via supplied AC adaptor)
AC 100-240 V 50/60 Hz
DC 5V 500 mA
Built-in Battery: 3.7V/1850 mAH
Speaker: 4 ohm
Frequency Coverage:
FM: 87.50–108 MHz
DAB+ Band III: 5A-13 F
The company reserves the right to amend the specification without notice.

natural_image
Symbol of a trash bin crossed with a diagonal line, no text or numbers presentIf at any time in the future you should need to dispose of this product please note that: Waste electrical products should not be disposed of with household waste. Please recycle where facilities exist. Check with your Local Authority or retailer for recycling advice. (Waste Electrical and Electronic Equipment Directive)
AVERTISSEMENT!
LA GARANTIE N'AURA PLUS D'EFFET À PARTIR DU MOMENT OÙ LE BOITIER DE L'APPAREIL A ÉTÉ OUVERT OU LORSQUE DES MODIFICATIONS OU ALTÉRATIONS ONT ÉTÉ FAITES SUR L'APPAREIL ORIGINAL.
Press the Tuning up/down button to select YES or NO.
Select YES to erase all saved settings and all settings will revert to factory default.