TX103 - Turntable TECHNAXX - Free user manual and instructions
Find the device manual for free TX103 TECHNAXX in PDF.
| Product type | Vintage turntable with CD player, cassette, FM radio and Bluetooth |
| Brand | Technaxx |
| Model | TX-103 |
| Dimensions | 44.5 x 33.5 x 23.5 cm |
| Weight | 7 kg |
| Power supply | DC 12V / 2A (AC adapter included) |
| Power consumption | Max 24W |
| Turntable speeds | 33, 45, 78 rpm |
| Drive type | Belt drive, semi-automatic tonearm |
| Stylus | Cartridge 402-M208-015 (replaceable) |
| Speakers | 2 x 4W stereo (10 x 10 x 2 cm) |
| Bluetooth | Version 2.1, range ~8 m, profiles A2DP/EDR/HFP |
| Radio | FM 88-108 MHz |
| CD player | CD-DA/CD-R/CD-RW, supports MP3/WMA |
| Cassette player | 2 channel 4 track, speed 4.8 cm/s |
| Digitization | Vinyl, cassette, CD, AUX to USB/SD in MP3 128 kbps |
| Supported storage | USB and SD card up to 32 GB (FAT32) |
| Playable audio formats | MP3, WMA |
| Inputs | AUX 3.5 mm |
| Outputs | Headphone 3.5 mm, RCA (L/R) |
| Standby function | Automatic after 15 min or manual (standby button) |
| Material | MDF + PVC |
| Warranty | 2 years |
| Technical support | Phone 01805 012643 (14 cts/min), email support@technaxx.de |
| Package contents | TX-103, 45 rpm adapter, AC adapter, manual |
| Care and cleaning | Soft dry cloth, do not use chemicals |
| Safety | Do not open, avoid moisture, unplug before cleaning |
| Spare parts and repairability | Stylus (ref. 402-M208-015); contact support for other parts |
Frequently Asked Questions - TX103 TECHNAXX
User questions about TX103 TECHNAXX
0 question about this device. Answer the ones you know or ask your own.
Ask a new question about this device
Download the instructions for your Turntable in PDF format for free! Find your manual TX103 - TECHNAXX and take your electronic device back in hand. On this page are published all the documents necessary for the use of your device. TX103 by TECHNAXX.
USER MANUAL TX103 TECHNAXX
Technaxx® \* User Manual
Nostalgia Bluetooth
All-in-One Record Converter TX-103
The manufacturer Technaxx Deutschland GmbH & Co.KG hereby declares that this device, to which this user manual belongs, complies with the essential requirements of the standards referred to the Directive RED 2014/53/EU. The Declaration of Conformity you find here: www.technaxx.de/ (in bar at the bottom
"Konformitätserklärung"). Before using the device the first time, read the user manual carefully.
Service phone No. for technical support: 01805 012643 (14 cent/minute from German fixed-line and 42 cent/minute from mobile networks).
Free Email: support@technaxx.de
Keep this user manual for future reference or product sharing carefully. Do the same with the original accessories for this product. In case of warranty, please contact the dealer or the store where you bought this product. Warranty 2 years
natural_image
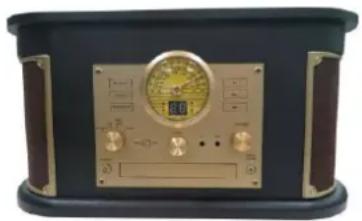
Front view of a vintage analog radio or instrument with gold dial and control knobs (no visible text or symbols)Features
- Digitizing vinyl records/cassette/CD or AUX–IN to USB or SD card up to 32GB - Music playback & recording via Bluetooth 2.1
- Playback of MP3/WMA music files from USB/CD/SD/Bluetooth devices - Recording of MP3 music files on USB or SD card up to
32GB ● No computer/notebook required ● RCA output for connection to HiFi systems ● Record player with automatic/manual
stop & 3 speeds: 33, 45, 78rpm ● Built-in stereo loudspeakers
●Built-in cassette & CD players ● Built-in FM radio ● 3.5mm
AUX-IN & 3.5mm headphone jack ● High quality nostalgia design with functional handling
Contents
Features 1
Contents 2
Technical specifications 3
Product Overview 5
First start 8
CD Mode 13
USB/SD Mode 16
Bluetooth Mode 18
Tape Mode 19
AUX Mode 20
Radio Mode 21
Stand-by function 22
FAQ's 22
Before usage
- Choose the installation location of your unit carefully. Avoid placing it in direct sunlight or close to a source of heat. Also avoid locations subject to vibrations and excessive dust,heat, cold or moisture. ● Do not install the unit in a inclined position, It is designed to be operated in a horizontal position only. - If the unit is brought directly from a cold to a warm location, moisture may condense inside the player, and cause damage it. When you first install the unit, or when you move it from a cold to a warm location, wait for 30 minutes before operating the unit. ● The ventilation holes should not be covered. Make sure there is enough space above and beside the amplifier/receiver. Do not place a CD player or other equipment on top of the device. ● Do not open the cabinet. This might cause a damage to circuitry or electrical shock. ● If you are not going to use the player for long time, be sure do disconnect the player from the AC power source. When removing the power plug, never yank the cord. ● To prevent fire or shock hazard, disconnect your unit from the AC power source when cleaning. Use caution when cleaning and wiping the plastic parts. Do not attempt to clean the unit with the chemical solvents as this might damage the finish.
Technical specifications
| Bluetooth | V2.1; profil A2DP,EDR & HFP; distance ~8m open areas | |
| Bluetooth transmitting frequency 2.4GHz | ||
| Radiated output power max. 2.5mW | ||
| Mode | Phono, Cassette, CD, USB, Bluetooth, SD, AUX-IN, FM radio | |
| Speakers | 2x 4W stereo loudspeakers (10x10x2cm), input ≤ 60mV/30kΩ, impedance 4Ω, frequency range 60Hz-16kHz | |
| Radio | 88-108MHz (FM); antenna cable | |
| CD | Playing & recording function; format: CD-DA/CD-R/ CD-RW/ MP3/WMA; frequency 20Hz-20Hz ± 3dB; S/N >60dB | |
| Cassette | Playing & recording function; 4 track 2 channel format; 1x playhead; ≦C-90; speed 4.8cm per second; frequency 127Hz-3.6kHz / S/N≥25dB | |
| Phono | Turnable: EP/LP/SP; DC motor; speeds: 33/45/78rpm; S/N≥45dB; needel cartridge (402-M208-015); belt-drive & semi-automatic play tone pickup arm | |
| AUX-IN & Headphone | 3.5mm jack | |
| RCA output | Cinch (Left & Right) | |
| Input voltage / current | DC 12V / 2A | |
| Power consumption | Max. 24W | |
| Weight / Dimensions | 7kg / (L) 44.5x (W) 33.5 x (H) 23.5cm | |
| USB flash drive & SD card | ||
| Size | max. 32GB | |
| Playing format | MP3, WMA | |
| Recording format | MP3 128kbps | |
| Folders | 99 maximum | |
| Files | 999 maximum | |
| Recording time | Use of 4GB memory equals max. ~65 hours recording time | |
| SD card memory | SD, SDHC, Micro SD, Micro SDHC, corresponding class 10 | |
| Package Contents | ||
| Nostalgia Bluetooth All-in-One LP Converter TX-103, 45rpm single Puck adapter, power adapter, User Manual | ||

Hints for Environment Protection: Packages materials are raw materials and can be recycled. Do not disposal old devices or batteries into the domestic waste. Cleaning: Protect the device from contamination and pollution (use a clean drapery). Avoid using rough, coarse-grained materials or solvents/aggressive cleaner. Wipe the cleaned device accurately. Distributor: Technaxx Deutschland GmbH & Co.KG, Kruppstr. 105, 60388 Frankfurt a.M., Germany (aus dem BT-X32 nehmen)
Product Overview
text_image
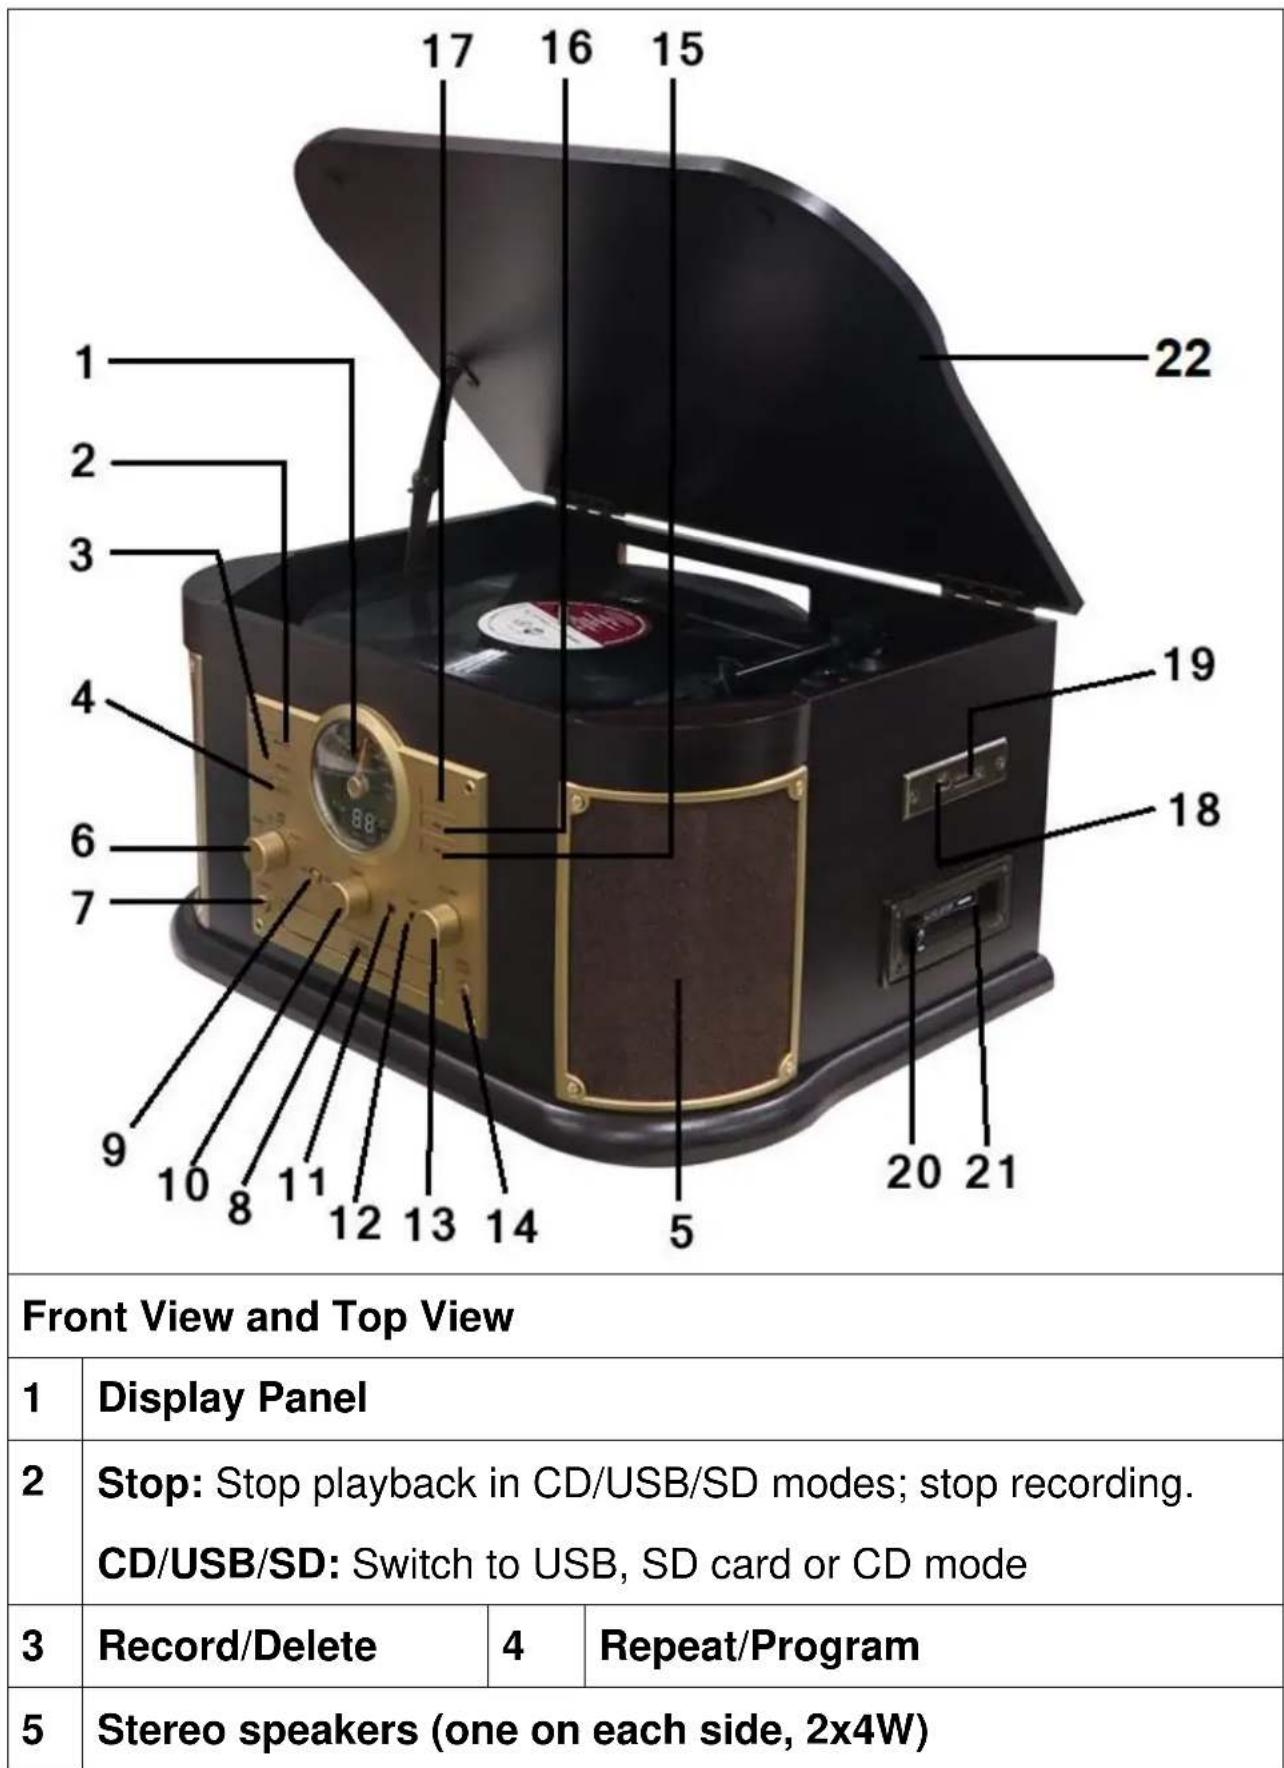
17 16 15 22 1 2 3 4 6 7 9 10 8 11 12 13 14 5 19 18 20 21 Front View and Top View 1 Display Panel 2 Stop: Stop playback in CD/USB/SD modes; stop recording. CD/USB/SD: Switch to USB, SD card or CD mode 3 Record/Delete 4 Repeat/Program 5 Stereo speakers (one on each side, 2x4W)| 6 | Function Knob: Rotate the knob to select Phono, CD (USB/SD), AUX/Tape or Radio/BT | ||
| 7 | Power | 8 | Compact Disc Tray |
| 9 | Slide switch: Select FM/BT in RADIO mode | 10 | Tuning Knob: Tune to a radio station in RADIO mode |
| 11 | 3.5mm Earphone jack | 12 | 3.5mm AUX-IN jack |
| 13 | Volume knob | 14 | Open/Close CD tray |
| 15 | “<<”Press to select previous track or press and hold to fast CD/USB/SD/BT reverse | ||
| 16 | “>>”Press to select next track or press and hold to fast forward in CD/USB/SD/BT modes | ||
| 17 | Play/Pause: Playback in CD/USB/SD/BT mode. The Play Indicator illuminates during playback of CD/USB/SD | ||
| 18 | USB port | 19 | SD card slot |
| 20 | Tape operation button (Eject/Fast Forward cassette) | ||
| 21 | Cassette Tray | 22 | Dust Cover |
text_image
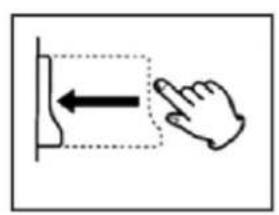
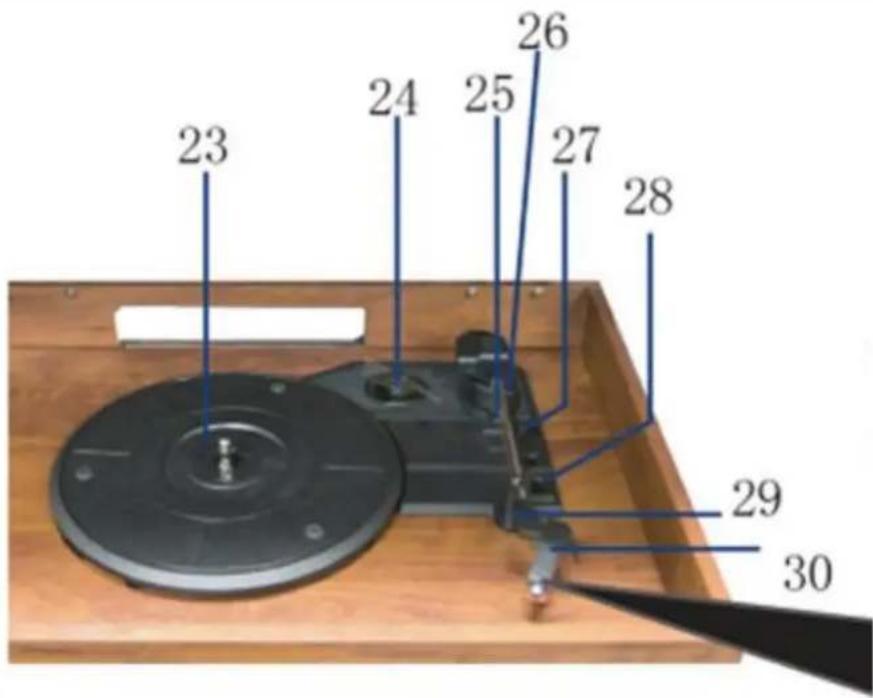
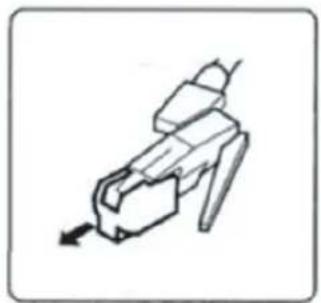
23 24 25 26 27 28 29 30Before use, detach stylus guard (white plastic cover) by pulling it straight off the front of the cartridge in the direction of the arrow.
natural_image
Simple line drawing of a mechanical component or tool with an arrow indicating direction (no text or symbols)| 23 | Turntable | 24 | 45 RMP adapter |
| 25 | Tone arm | 26 | Cue-Lever: Use this lever to lift the tone arm |
| 27 | Auto switch (stopp for records) | 28 | Speed selector |
| 29 | Tone arm lock | 30 | Cartridge with stylus |
Back view
text_image
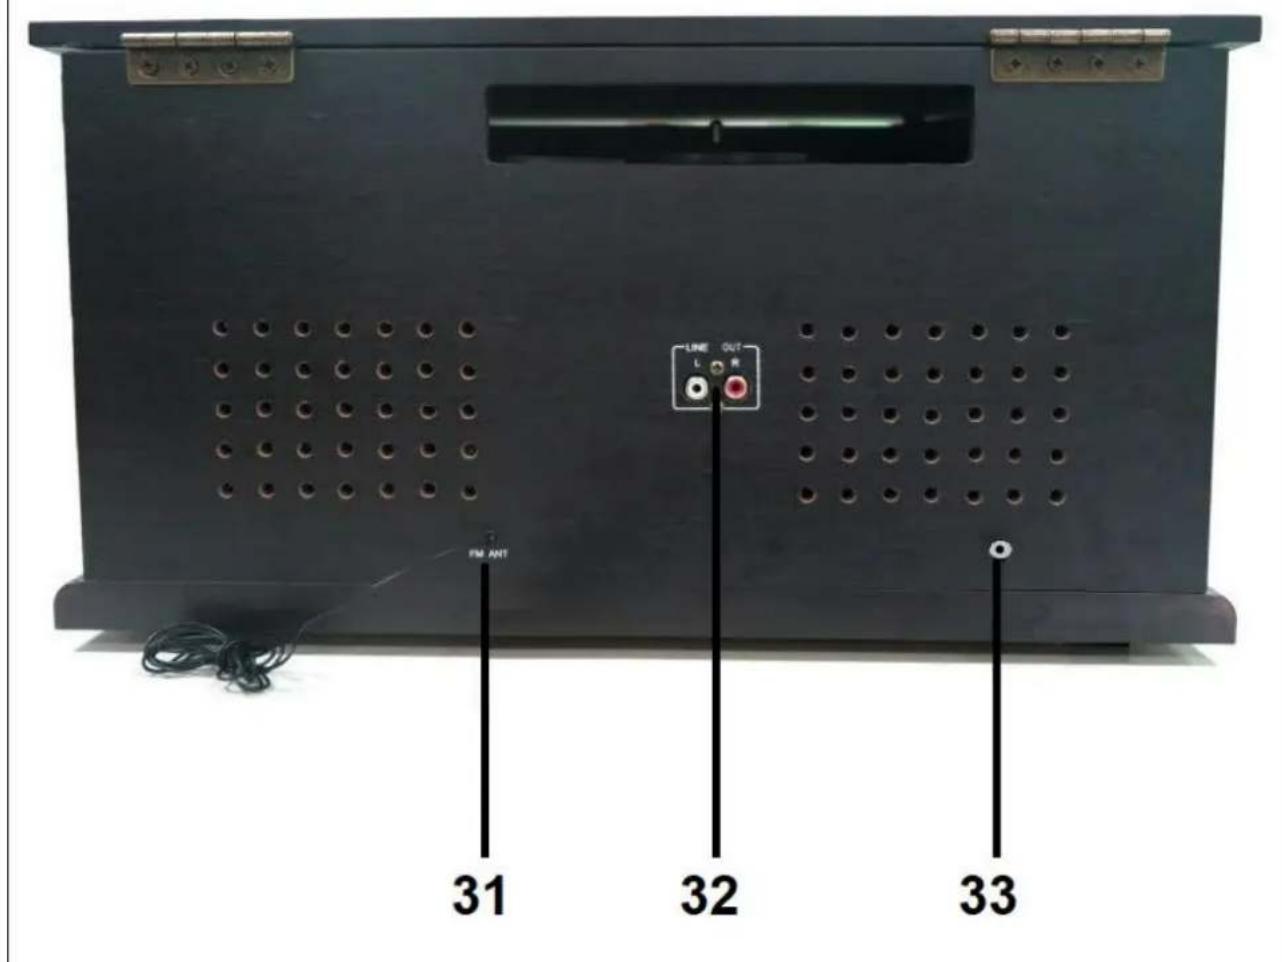
LINE OUT L R FM ANT 31 32 33| 31 | FM antenna | 32 | RCA (left & right) output |
| 33 | Hollow plug socket (DC12V/2A) | ||
First start
Carefully read the manual. Plug the power adapter into a 100-240V AC outlet and the other end into the TX-103 (33). Be reminded: "Non-connected devices always work faulty". Power on the device by pressing the Power button (7). After that start the mode you like to playback.
Phono mode (Vinyl)
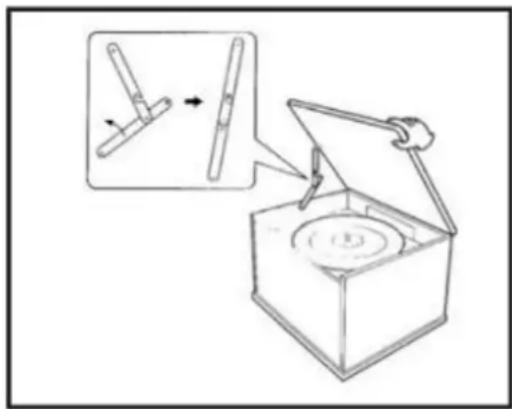
Open the Turntable Cover
- Lift the Turntable cover all the way up until it stops.
● Lower the cover slowly until the latch engages.
If the latch does not engage, pull the lower bar by hand.
● The cover will now stay open.
Close the Turntable Cover
- Lift the cover all the way up until it stops.
● The latch should disengage. Slowly lower the cover.
- Lift the cover all the way up until it stops. - The latch should disengage. Slowly lower the cover.
If the latch does not disengage, push out the lower bar by hand.
● Make sure you hold the cover carefully to avoid pinching your fingers as it closes.
natural_image
Diagram of a mechanical device with an open box and a close-up inset showing a lever mechanism (no text or symbols)Vinyl records hints
- Do not touch the records grooves. Only handle records by their edges or the label. Ensure that your hands are clean, as skin oil will gradually deteriorate the record
- Keep your records away from dust and store in a dry, cool place.
- Keep your records in sleeves when not in use to avoid dust and scratches.
- Store records upright. Records stored horizontally will bend and warp.
- Do not store records in the trunk of a car.
- Store records in an area with a stable temperature and low humidity.
- To clean, gently wipe the surface in a circular motion using a soft anti-static Cloth.
natural_image
Hand drawing a paper with a pencil, showing a curved arrow indicating rotation (no text or symbols)Playing a record (!IMPORTANT!)
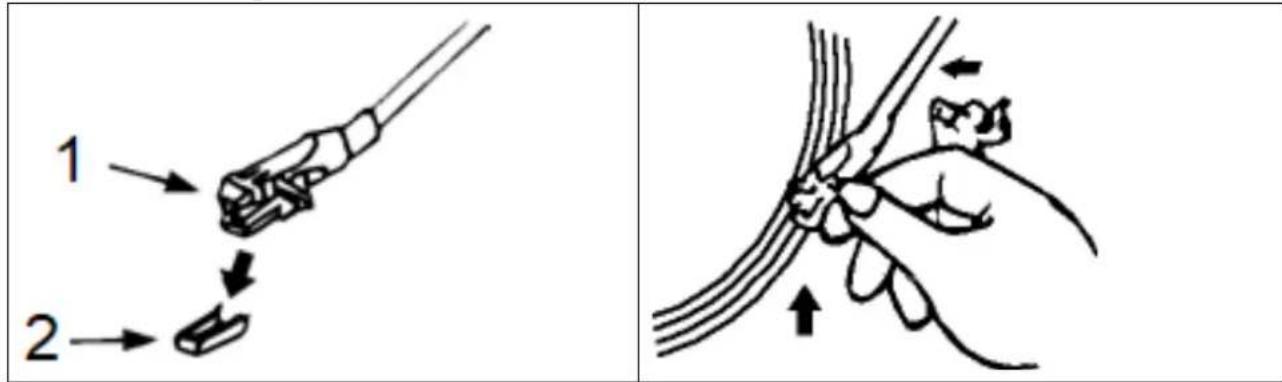
When using the turntable, make sure to remove the stylus protector (2). It should easily slide off the cartridge stylus assembly (1). Furthermore make sure to unclip the tone arm lock before use and to secure it again after use.
text_image
1 2● Turn On the unit and adjust the volume to an appropriate level.
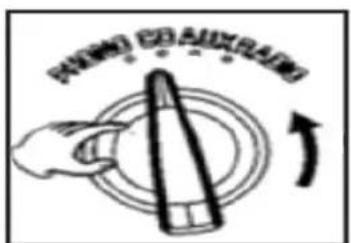
- Turn the Function knob to the PHONO position.
- Place a record on the turntable platter and select the correct player speed: 33/45/78rpm according to the vinyl being played. When playing a 45rpm record, use the included 45 adaptor.
text_image
PARSLEY COAUXRAINS- Set the auto/manual stop control: Set the Auto Stop switch to ON to stop the turntable turning when the record is finished. If the switch is set to OFF, the turntable will continue turning.
- Remove the stylus guard and unlock the tone arm lock.
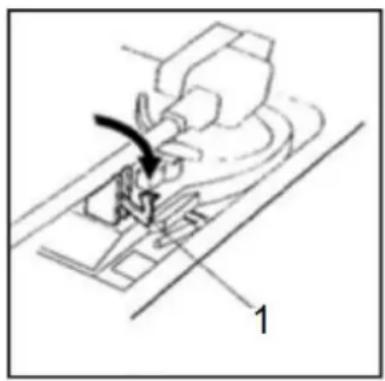
- Push the lift lever up to raise the tone arm and then gently move the tone arm to the desired position over the record.
natural_image
Line drawing of a sewing machine needle and base, showing the needle being inserted (no text or symbols)1 = Clamper
The platter will begin to spin when the Tone Arm is moved toward the record. Push the Lift Lever forward to lower the Tone Arm slowly onto the desired position on the record. The record will begin playing.
- If the auto switch is turned to ON, the record will stop playing automatically. If it is set to OFF, the record will not stop automatically.
- When the record is finished, push the Lift Lever backwards to raise the Tone Arm and gently move it back to its rest position.
- When you have finished playing records, engage the Tone Arm lock to protect it from accidental movement. Press the Power button to switch the unit OFF. Unplug it from the power supply if it is not going to be used for a while.
NOTE: Should your record stop before the last track finishes, set the Stop switch to OFF. Your record will now play to the end, but you will have to stop the turntable rotation manually.
1 Tone Arm / 2 Cue Lever
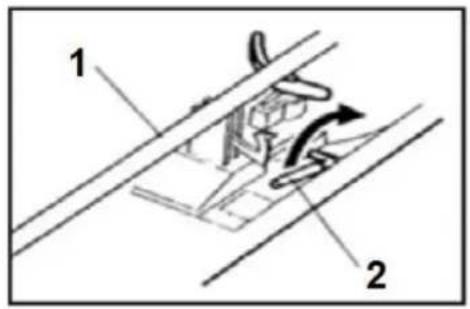
text_image
1 2
natural_image
Illustration of a hand holding a tool with an arrow indicating rotation (no text or symbols)Replacing the Stylus
It is recommended that the stylus is replaced as soon as you notice a change in the sound quality. Prolonged use of a worn-out stylus may damage the record. Wear and tear on the stylus will be accelerated when playing 78 RPM records.
A: Removing the stylus from the cartridge
Place a screwdriver at the tip of the stylus heads hell and push downwards in the direction shown in sketch “A”. Remove the stylus head shell by pulling it forwards and pushing downwards.
B: Installing the new stylus
Hold the tip of the stylus head shell and insert it by pressing in the direction illustrated by “B”. Push the stylus head shell upwards in the direction illustrated by “C” until the stylus locks into the tip position.
(1) Guide pins inside
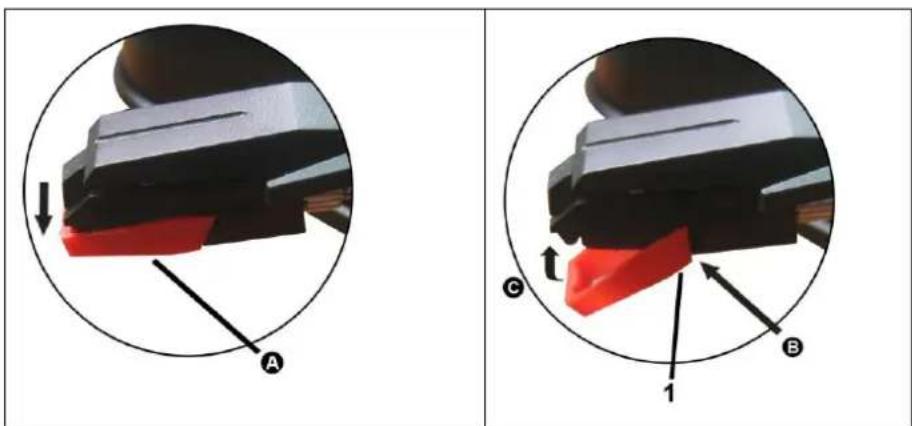
text_image
A C B 1Caution
- Do not bend the stylus. - To avoid injury, do not touch the needle.
- Turn off the unit's power before you replace the stylus. - Keep out of reach of children. - Handle with care as the stylus is delicate. Use of a bent or broken stylus may damage the record and cause malfunction. - Do not expose the stylus to extreme heat. - Contact a qualified repair person if you are having difficulties changing
CD Mode
Compact Discs hints
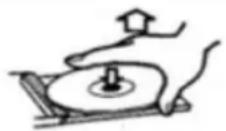
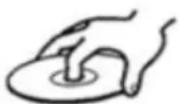
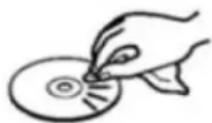
- This Turntable is compatible with conventional audio CDs and properly finalized CD-R and CD-RW discs. • Always place the disc in the disc tray with the label side facing up. (Compact discs can be played or recorded on one side only.) • To remove the disc from its storage case, press down on the centre of the case and lift the disc out, holding it carefully by the edges. Should the disc become dirty, wipe the surface in a circular motion from the centre whole outwards with a soft, dry cloth.

text_image
How to remove the disc How to hold the disc How to clean the disc- Never use chemicals such as record sprays, antistatic sprays or fluid, benzene or thinner to clean the disc. Such chemicals will do irreparable damage to the discs plastic surface.
- Place the disc back in its case after use to avoid dust and scratches.
- Do not expose discs to direct sunlight or high temperatures for extended periods of time. Long exposure to high temperatures will warp the disc.
● Playing warped discs may damage the unit.
- Printable discs are not recommended for use with this unit as the label side may be sticky and damage the unit. • Do not use protective coating spray on the discs. • Do not write on discs with ball point or hard tipped pens. Only use oil-based felt tipped pens. • Do not use stabilizers. Using commercially available CD stabilizers may cause damage to this unit. • Do not use CD's with an irregular shape as they may damage the Unit.
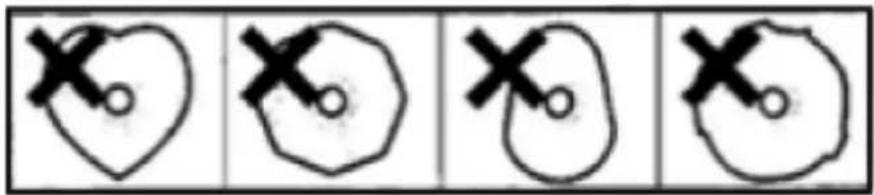
text_image
Four-panel sequence showing hand-drawn symbols: heart, irregular polygon, irregular shape, and circular outline with X marks- If you have any doubts about the care and handling of a disc, read the precautions supplied with the disc, or contact the manufacturer directly.
Playing a CD
- Turn the unit ON by pressing the Power button. Set the function knob (PHONO/CD/AUX/RADIO) to CD. - “- -” will blink for a few seconds. When no disc is loaded “no” will appear on the display screen.

text_image
PUNIONED FOR AUDIO SLARING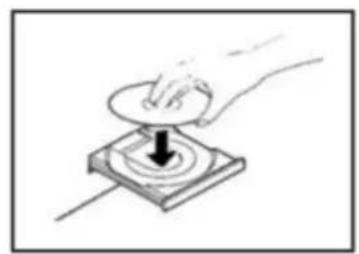
natural_image
Hand pressing a button on a square base with a black arrow indicating press direction (no text or symbols)● Place a disc on the tray with the printed label facing up.
- Do not place more than one disc in the tray at a time.
● The disc must be placed in the centre of the disc tray. If the disc is not properly inserted, it may not be possible to get the disc out once it has closed.
- Do not force the tray by hand when it is opening and closing.
- Press the OPEN/CLOSE button (▲) to close the tray.
● The total number of tracks will appear on the display screen. - The system will start playback automatically after several seconds, or press the PLAY/PAUSE button (▶II) to start playback.
- Disc playback starts from the first track, and the PLAY indicator will illuminate.
● During playback, the number of the track playing will display on the screen. - Turn the Volume knob to adjust the volume.
- Press the PLAY/PAUSE button (▶II) during playback. Playback will stop at the current position and the track number will blink on the display screen.
- To resume playback, press the PLAY/PAUSE button (▶II) again.
- Press the STOP button (■) to stop playback.
To Skip to the Next or Previous Track
- During playback, repeatedly press the NEXT/PREVIOUS buttons (▶▶/◀◀) until the desired track is found. The selected track will play from the beginning.
- In STOP mode, press the NEXT/PREVIOUS buttons (▶▶/◀◀) repeatedly until the desired track is found. Press the PLAY/PAUSE button (▶II) within 5 seconds to start playback from the selected track.
- When the PREVIOUS (◀◀) button is pressed during playback, the track being played will restart from the beginning. To return to the beginning of the previous track, press the PREVIOUS button (◀◀) twice.
Search for Part of a Track
- During playback, hold down the NEXT or PREVIOUS buttons (▶▶/◀◀) for fast forward/backward, then release when the desired section is found.
Repeat Function
- During playback, press the REPEAT button once to repeat a single track. The “REP” LED indicator light will blink.
- During playback, press the REPEAT button one more time to repeat all tracks. The “REP” LED indicator light will stay lit.
Program Function
- In STOP mode, press the PROGRAM button. The display will show "01".
- Press (▶▶/◀◀) to select a track and press the PROGRAM button again to save the track.
- Press (▶▶/◀◀) to select another track and press the PROGRAM button again. Repeat this step to continue saving tracks.
- To play back the programmed tracks, press the PLAY/PAUSE (▶II) button.
- To erase the programmed track, press the STOP (■) button twice.
USB/SD Mode
USB/SD Card Playback
● Turn ON the unit and adjust the volume to an appropriate level.
- Insert a USB device into the USB port. Alternatively insert a SD card into the SD card slot, making sure to insert it straight without bending.
● Turn the function knob to CD position.
- To play music from the USB drive, press and hold the “■ /USB/SD” button for 2 seconds until “Ud” flashes on the display and let go of the button. Music playback will start automatically.
- To play music from an SD card, press and hold the “■ /USB/SD” button for 2 seconds again until “Sd” flashes on the display and let go of the button. Music playback will start automatically.
Playback controls
- To pause playback, press the PLAY/PAUSE (▶II) button once to halt playing. Press it again to continue playback.
- To play the previous track, press ◀ once or hold down continuously to rapidly progress through previous tracks.
- To play the next track, press ▶ once or hold down continuously to rapidly advance through tracks.
- To delete a file on your media storage device, while in playback mode, press and hold the REC/DEL button until the “DEL” LED light flashes along with “dL” on the display. Then press REC/ DEL again and the “DEL” LED will flash rapidly and the file will be deleted.
- To delete a file on your media storage device: While in STOP mode, select the track by pressing ▶▶ or ◀◀ , press and hold the REC/DEL button until the “DEL” LED light flashes along with “dL” on the display. Then press the REC/DEL again and the “DEL” LED will flash rapidly and the file will be deleted.
- To stop playback of the music track, press the ■/USB/SD button.
Recording onto a USB flash drive/SD Card
This equipment has the capacity to encode your traditional music media (vinyl records, cassette tapes or CDs via AUX IN) into digital format and record it onto a USB device or SD card as MP3 file(s).
- Insert a storage device (USB or SD card) into the relevant slot.
- Get your traditional music media ready for playback: Either place a record on the turntable, insert a cassette tape into the cassette slot, insert a CD into a CD player or connect a different recording medium to the AUX IN socket.
- Set the function switch to the appropriate function: PHONO, CD or AUX.
NOTE: If you are recording via Cassette, make sure an AUX IN cable is not connected to AUX socket.
- Press the REC button to start recording. “rE” will appear on the display screen and the “REC” LED will illuminate. A few seconds later the “REC” LED will start flashing and recording will begin.
Then start playing your traditional music media.
- Press the STOP button to stop recording. The music track(s) will be saved directly on the USB flash drive/SD card as MP3 file(s).
NOTE: ● The recording volume level can be adjusted with the Volume control knob. ● The recording speed is 1:1. Recording will take as long as playing the record, cassette tape or CD. ● The recording format is preset at MP3 bit rate 128 kbps.
Bluetooth Mode
Bluetooth playing
Select the function switch to the “FM/Bluetooth” position and slide the slide switch to Bluetooth. The LED of display window will show “bt”.
Then you should turn on your phone or other media device and start the Bluetooth searching function, receive carrier will receive the Bluetooth identification number for: "Technaxx TX-103", when your Bluetooth device is connected, the speaker will beep.
And at the same time, select the ▶▶ or ◀◀ or ▶ll or ■, which can make you pause, interrupt or stop the songs. To quit the function, set the slide switch from Bluetooth to FM or simply turn the function switch.
Attention: If you reboot the machine, you should repeat those steps to get the Bluetooth function restarted. Under the Bluetooth function situation, it's not available for the hands-free function. The last connected device connects automatically.
Tape Mode
Cassette Tape hints
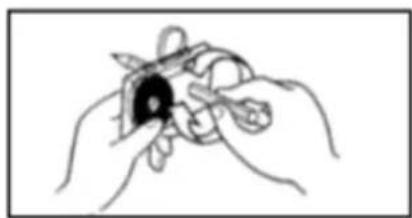
● Metal and Chrome (cobalt) tapes have identification holes.
- Use your finger or a pencil to turn the cassette tape's hub and take up any slack tape.
- Avoid touching the tape. Finger prints attract dust and dirt.
- Avoid dropping or subjecting cassettes to excessive shock or force.
natural_image
Line drawing of two hands holding a small object with a bow (no text or symbols)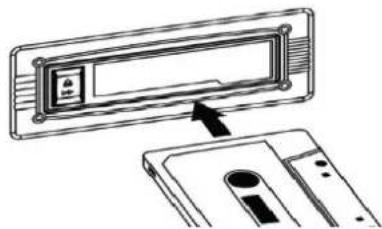
natural_image
Diagram showing a physical device with a labeled component and an arrow pointing to it (no text or symbols present)IMPORTANT when using the cassette deck: ● Make sure to insert the cassette in the correct direction.
● To avoid damaging the cassette, we strongly recommend taking it out of the equipment after playing the cassette.
Playing a cassette
● Turn ON the unit and adjust the volume to an appropriate level.
- Turn the Function knob to Cassette/AUX and the display will show "tP"
text_image
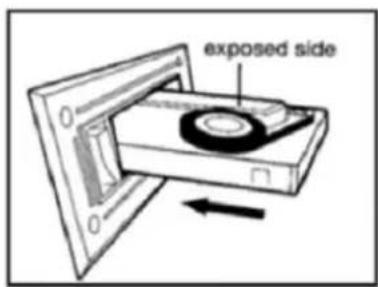
exposed sideexposed side =
- Insert a pre-recorded tape into the cassette slot with the tape side to the right. By pushing slightly, the tape will slide into place and begin playing automatically.
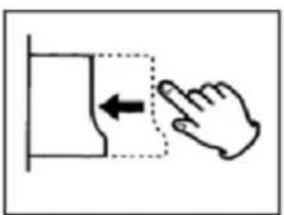
NOTE: ● To fast forward the cassette tape, press the Tape Operations button halfway down while the cassette is playing. ● To resume normal playback, release the Tape operations button. ● To stop playback, press the Tape Operations button completely. Playback will be stopped and the cassette will be ejected.
natural_image
Simple line drawing of a hand pressing a button with an arrow indicating left motion (no text or symbols)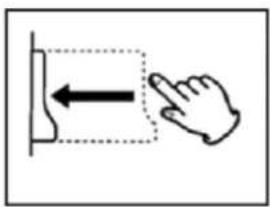
text_image
Diagram showing hand pressing a button with an arrow indicating left motion and a dashed box highlighting the button area.AUX Mode
Playing Music from an AUX input
● Turn the unit ON by pressing the Power button.
- Set the Function knob (PHONO/CD/AUX/RADIO) to the AUX position.
- Connect one end of the 3.5mm AUX-IN cable (not included) into the 3.5mm AUX-IN Jack on the front panel of the unit and the other end to your audio device's (CD player, Tablet, MP3 player, Smartphone etc.).
- Press PLAY on the external audio source.
NOTE: ● The volume output is affected by the volume level on the source. Ensure that the source volume is set to about 70-80% to avoid sound distortion. ● Playback cannot be controlled from the front panel when using AUX IN mode. Playback must be controlled from your connected audio device.

text_image
PANING CANO ↑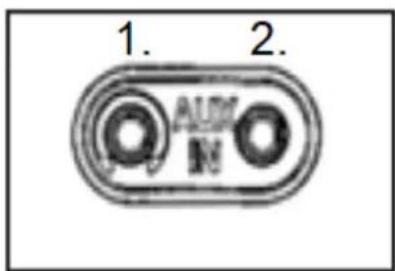
text_image
1. 2. AUX N-
Headphone
-
AUX-IN
Connecting to headphones
- Adjust the volume to an appropriate level before you put on your headphones.
● Plug in your 3.5mm headphone jack to the headphone socket.
Connecting to an external amplifier
- This feature enables you to play turntable music through amplifier or external speakers. You will need an RCA cable to make this connection (not included).
- Plug one end of the Red and White RCA jacks into the LINE OUT ports at the back of the TX-103 and the other end into R (red) and L (white) sockets at the back of the amplifier or external speakers.
Radio Mode
FM Antenna
While in FM mode, tune in to an FM station and extend the antenna to find a position that provides the best reception. The antenna may need to be repositioned if you move the unit to a new location.
Playing the Radio
● Turn ON the unit and adjust the volume to an appropriate level.
● Turn the Function knob to the RADIO position.
- Set the slide switch (9) to FM
- Extend the antenna to obtain the best reception.
● Turn the Tuning knob to your desired radio station.
If reception is poor: FM Broadcast: Extend and move the FM antenna until you receive the station clearly.

text_image
按钮 按钮Stand-by function
- When the delve is not playing music on Phono, CD, USB, SD, AUX, Tape, long press “REP/PROG/STBY” button for 4 seconds, the unit will enter into standby mode. Then short press “▶‖” button, it will work again.
- The Unit will enter into standby mode automatically after approx. 15 minutes when it is not playing music. Then short press “▶” button, it will work again.
FAQ's
Device will not power on Make sure that the unit's power cord is connected to an appropriate electrical outlet and the wall socket is switched on.
There is no sound Rotate the power/volume knob clockwise to increase the volume.
The cassette tape will not play Make sure the function knob is set to your desired function. Make sure it is properly inserted.
The vinyl record will not play Make sure the function knob is set to you desired function. Make sure you have selected the right speed (33, 45 or 78 RPM).
Nothing will play via the AUX IN connection → Make sure the cable is firmly connected and check if external device is clean and undamaged. Check the function knob is set to your desired function. Check that volume of external device is at 70-80%.
Nothing will play via the USB device or SD card → Make sure the memory device is properly inserted in the USB port (or SD card slot) and the correct function is selected. The media may need to be formatted.
NOTE: If normal operation cannot be obtained, unplug the power cord from the power outlet and plug it in again.
Important Hints
- Unpacking and handling: Open the carton carefully and remove the packing. Remove the poly-bag and retain all packaging for future use. Keep all packaging away from small children and animals.
- Positioning the music centre: Place the equipment on a stable surface, away from any heat sources, and ensuring adequate ventilation around the music centre.
- Ventilation and heat sources: Do not place material over any ventilation slots during use, this will cause the device to overheat and fail. Do not place the device in direct sunlight or near heat sources such as radiators or fires.
- Candles and open flames: Do not place lighted candles or tea lights on top of, or at the sides of the music centre. Do not allow any naked flames near the cabinet.
- Connections: When connecting the music centre to the mains supply, do not place wires that can be tripped over. Do not trap or place heavy objects on the mains lead.
- Moisture: Do not place the equipment in wet or damp conditions, such as steamy kitchens, bathrooms or basements. Do not allow water or other fluids to enter the equipment. Do not touch the mains plug or adaptor with wet hands. Should moisture enter the music centre, disconnect from the power supply.
- Cleaning and care: Disconnect the music centre from the mains power supply. Use a soft dry cloth, or for stubborn stains use a soft cloth with a dilute mild detergent. Do not use alcohol-based fluids or abrasive materials.
DO NOT
- Do not use this unit for anything other than its intended to use. ● Do not drop/ bump/shake the device ● Do not use the unit if it has been damaged in any way. ● Do not open/repair/disassemble the device ● Do not store the device in high temperature environment/close to open fire/in humid, damp or erosive environments/into water. ● Stop using when unusual smell/heating distortion/color-change of the shell material or other abnormal situation happens. ● Keep away from children/persons without enough mental ability/persons without enough knowledge to use this product.
natural_image
Front view of a vintage analog audio instrument with dial and control knobs (no visible text or labels)Besonderheiten
natural_image
Simple line drawing of a mechanical component or tool with an arrow indicating direction (no text or symbols)text_image
FM ANT LINE OUT L R 31 32 33natural_image
Diagram of a mechanical device with an open box and a close-up inset showing a lever mechanism (no text or symbols)natural_image
Hand drawing a paper with a pencil, showing a curved arrow indicating rotation (no text or symbols)natural_image
Illustration of a hand holding a plant stem with arrows indicating movement or force (no text or symbols)natural_image
Line drawing of a sewing machine needle with a hand operating the needle (no text or symbols)1 = Riegel
natural_image
Illustration of a hand holding a tool with an arrow indicating rotation (no text or symbols)Austausch der Nadel
natural_image
Close-up of a mechanical component with red and black parts, circled in blue (no visible text or symbols)
text_image
C B 1Achtung
text_image
How to remove the disc How to hold the disc How to clean the discHow to remove the disc = Entfernen der CD How to hold the disc = Halten der CD How to clean the disc = Reinigung der CD
text_image
Four hand-drawn diagrams showing a heart shape with X marks, each containing a circle and a cross symbol.natural_image
Hand pressing a button on a square electronic device with a downward arrow (no text or symbols)natural_image
Line drawing of two hands holding a small object with scissors (no text or symbols)
natural_image
Diagram showing a device with an arrow pointing to a rectangular panel, no text or symbols presenttext_image
exposed sidetext_image
Diagram showing a hand pressing a button with an arrow indicating left motion, enclosed in a dashed box.
text_image
Diagram showing a hand pointing at a vertical interface with an arrow indicating leftward movement.AUX-Modus
text_image
PANING (ED) AND RATING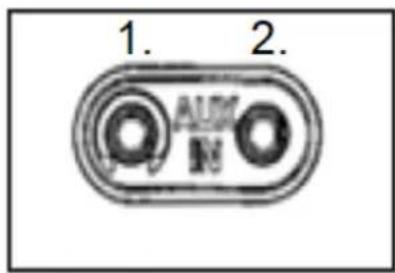
text_image
1. 2. AUM Nnatural_image
Hand pressing a button on a control panel (no text or symbols visible)Stand-by-Funktion
natural_image
Front view of a vintage portable electronic instrument with digital display and control knobs (no visible text or labels)Caractéristiques
natural_image
Simple line drawing of a mechanical component or tool with an arrow indicating direction (no text or symbols)text_image
LINE OUT L R FM ANT 31 32 33natural_image
Diagram of a mechanical device with an open lid and internal components, showing a close-up view of the component (no text or symbols present)natural_image
Hand drawing a paper with an arrow indicating rotation (no text or symbols)natural_image
Illustration of a hand holding a thin plant stem with arrows indicating movement or force (no text or symbols)natural_image
Line drawing of a hand using a sewing machine to adjust or install a small object (no text or symbols present)natural_image
Illustration of a hand holding a tool with an arrow indicating rotation (no text or symbols)natural_image
Two circular diagrams showing a mechanical component with red and black parts, labeled A and B, and directional arrows indicating movement (no text or symbols beyond labels)Attention
text_image
How to remove the disc How to hold the disc How to clean the discHow to remove the disc = Comment retirer le disque How to hold the disc = Comment tenir le disque How to clean the disc = Comment nettoyer le disque
natural_image
Four hand-drawn diagrams showing a heart shape, irregular polygon, irregular oval, and irregular outline with X marks (no text or symbols)natural_image
Hand pressing a button on a square electronic component (no text or symbols visible)Lecture USB/carte SD
natural_image
Line drawing of two hands holding a small object with a bow (no text or symbols)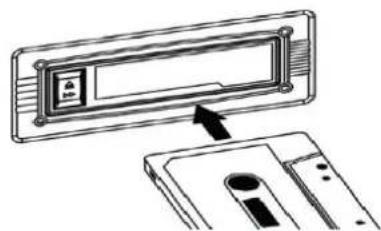
natural_image
Diagram showing a device with an arrow pointing to a component, no text or symbols presenttext_image
exposed sidenatural_image
Simple line drawing of a hand pressing a button with an arrow indicating left motion (no text or symbols)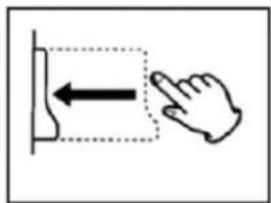
natural_image
Simple line drawing of a hand pressing a button with an arrow indicating left motion (no text or symbols)Mode AUX
text_image
PASSING RED ANIDRATED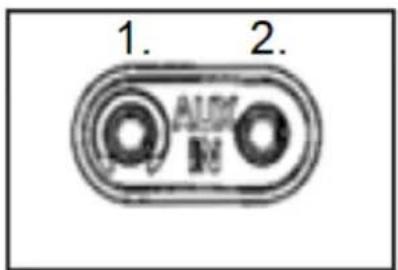
text_image
1. 2. AUX M- Casque
- AUX-IN
Connector un casque
natural_image
Front view of a vintage analog instrument with dial and control buttons (no visible text or symbols)Características
natural_image
Simple line drawing of a mechanical component or tool with an arrow indicating direction (no text or symbols)natural_image
Diagram of a mechanical device with an open box and a close-up inset showing a lever mechanism (no text or symbols)natural_image
Illustration of a hand holding a small object with an arrow indicating rotation (no text or symbols)natural_image
Diagram of a sewing machine needle insertion operation, showing hand positioning and cutting tool (no text or symbols)1 = Pinza
text_image
How to remove the disc How to hold the disc How to clean the discHow to remove the disc = Cómo sacar el disco How to hold the disc = Cómo sostener el disco How to clean the disc = Cómo limpiar el disco
text_image
Four hand-drawn diagrams showing a heart shape with X marks, each containing a circle and a cross symbol.natural_image
Hand pressing a button on a square base with a downward arrow (no text or symbols)natural_image
Line drawing of two hands holding a small object with scissors, no text or symbols present
natural_image
Diagram showing a device with an open lid and a separate slot, no text or symbols presenttext_image
exposed sidenatural_image
Simple line drawing of a hand pressing a button with an arrow indicating left motion (no text or symbols)
text_image
Diagram showing hand pressing a button with an arrow indicating leftward movementModo AUX
natural_image
Front view of a vintage portable electronic device with dual dials and control knobs (no visible text or symbols)Cechy
natural_image
Simple line drawing of a mechanical component or tool with an arrow indicating direction (no text or symbols)text_image
Diagram illustrating a mechanical device with an open box and a magnified inset showing the component being inserted into a cylindrical component.natural_image
Hand drawing a paper with a pencil and arrow, no text or symbols presenttext_image
FLOW CAUDRANGEnatural_image
Illustration of a sewing machine needle stitching fabric (no text or symbols)1 = Uchwyt
How to remove the disc

How to hold the disc
How to clean the disc
text_image
Four-panel sequence showing hand-drawn symbols with X and o, possibly indicating correct or incorrect states.text_image
FRAVING (E) MIDSTANDING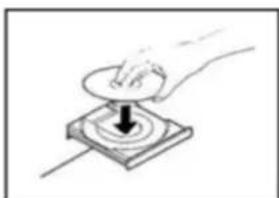
natural_image
Hand pressing a button on a square electronic component with a downward arrow (no text or symbols)natural_image
Line drawing of two hands holding a small object with a bulb, no text or symbols present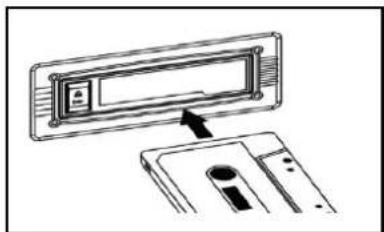
natural_image
Diagram showing a device with an open lid and a close-up view of its internal components (no text or symbols)text_image
exposed sidenatural_image
Simple line drawing of a hand pressing down on a rectangular object with an arrow indicating left motion (no text or symbols)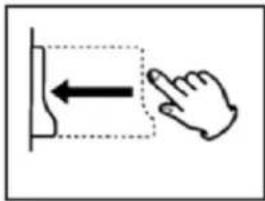
natural_image
Simple line drawing of a hand pressing a button with an arrow indicating left motion (no text or symbols)Tryb AUX
text_image
WARNING (ED) ANDERATING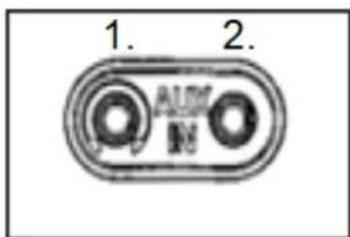
text_image
1. 2.-
Słuchawka
-
AUX-IN
natural_image
Front view of a vintage analog instrument with dual dials and control knobs (no visible text or labels)Bijzonderheden
natural_image
Simple line drawing of a mechanical component with an arrow indicating direction (no text or symbols)text_image
LINE OUT L R FM ANT 31 32 33| 31 | FM antenne | 32 | Tulp (links & rechts)uitgang |
| 33 | Holle contactdoos (DC12V/2A) | ||
text_image
Diagram illustrating a mechanical device with an open box and a magnified inset showing the component being adjusted.natural_image
Hand drawing a paper with a pencil and arrow, no text or symbols presenttext_image
FLOWING ON AUXTRADINGnatural_image
Illustration of a hand using a sewing machine to adjust or install a small component (no text or symbols visible)1=Klem
natural_image
Illustration of a hand holding a tool with an arrow indicating rotation (no text or symbols)De naald vervangen
natural_image
Close-up of a mechanical component with red and black parts, circled in a circle (no visible text or symbols)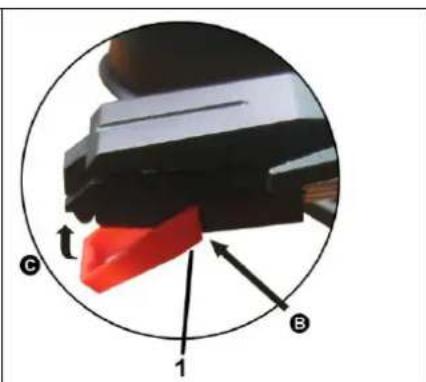
natural_image
Close-up of a mechanical component with labeled parts (C, B, 1) and directional arrows, no readable text or symbols beyond labels.Opgelet
text_image
How to remove the disc How to hold the disc How to clean the discnatural_image
Four hand-drawn diagrams showing a heart shape with cross marks, each containing a circle and an X symbol (no text or labels)natural_image
Hand pressing a button on a square base with a black arrow indicating downward motion (no text or symbols)natural_image
Line drawing of two hands holding a small object with scissors (no text or symbols)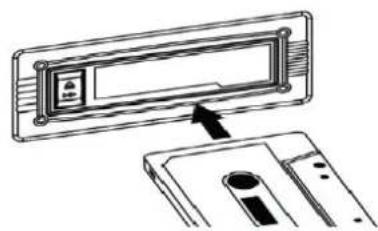
natural_image
Diagram showing a device with an arrow pointing to a rectangular panel, no text or symbols presenttext_image
exposed sideexposed side = blootgestelde kant
natural_image
Simple line drawing of a hand pressing a button with an arrow indicating left motion (no text or symbols)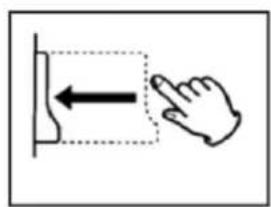
natural_image
Simple line drawing of a hand pressing a button with an arrow, no text or symbols presentAUX modus
text_image
PANING ON MIXTRATING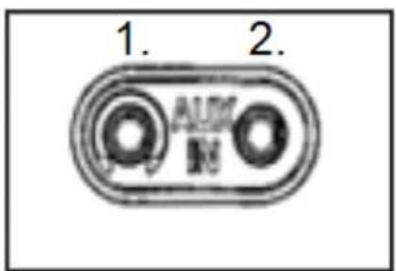
text_image
1. 2. AUX Mnatural_image
Hand pressing a button on a control panel (no text or symbols visible)Stand-by functie
natural_image
Front view of a vintage analog audio instrument with dual dials and control knobs (no visible text or labels)Vlastnosti
natural_image
Simple line drawing of a mechanical component or tool with an arrow indicating motion (no text or symbols)text_image
LINE OUT L R FM ANT 31 32 33| 31 | FM anténa | 32 | Výstup RCA (levý & pravý) |
| 33 | Puste gniazdo wtykowe (DC12V / 2A) | ||
První spuštění
natural_image
Line drawing of a mechanical device with an open lid and internal components, showing a close-up inset of the component (no text or symbols)natural_image
Hand drawing a paper with a pencil, showing a curved arrow indicating rotation (no text or symbols)natural_image
Illustration of a hand using a sewing machine to adjust or install a component, with no visible text or symbols.1 = svorka
natural_image
Illustration of a hand holding a tool with an arrow indicating rotation (no text or symbols)Výměna jehly
natural_image
Close-up of a mechanical component with red and black parts, circled in a circle (no visible text or symbols)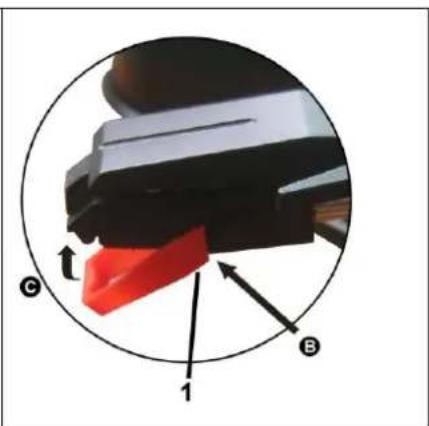
text_image
Diagram showing a mechanical component with labeled parts C, B, and 1, including directional arrows indicating movement or force.Upozornění
text_image
How to remove the disc How to hold the disc How to clean the discHow to remove the disc = Jak disk vyndat
How to hold the disc = Jak disk držet
How to clean the disc = Jak disk čistit
text_image
Four-panel sequence showing heart-shaped and irregular shapes with X marks, likely illustrating a pattern or selection.text_image
PAWING ED AUDITATION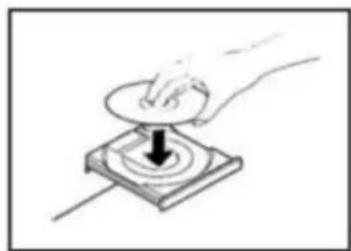
natural_image
Hand pressing a button on a square base with a downward arrow (no text or symbols)natural_image
Line drawing of two hands holding a small object with a bow (no text or symbols)
natural_image
Diagram showing a device with an open lid and a separate slot, no text or symbols presenttext_image
exposed sideexposed side = vystavená strana
text_image
Diagram showing a hand pressing a button with an arrow indicating leftward movement, enclosed in a dashed box.