
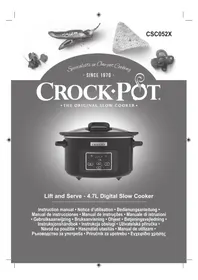
MultiMeal - Saucepan CROCK POT - Free user manual and instructions
Find the device manual for free MultiMeal CROCK POT in PDF.

| Product type | Electric multicooker |
| Brand | CROCK POT |
| Model | MultiMeal |
| Capacity of the bowls | 2 x 3.5 L (3.7 QT) or 1 x 7.5 L (8 QT) depending on model |
| Number of pots | 2 (simultaneous operation possible) or 1 large |
| Cooking functions | Slow cook, Sear/Sauté, Steam, Rice/Grains, Keep warm, Cook (depending on model) |
| Power | 120 V ~, 60 Hz |
| Bowl material | Non-stick ceramic |
| Lid material | Tempered glass |
| Steamer rack included | Yes |
| DualSync technology | Yes (end-of-cooking synchronization) |
| Timer | Yes, adjustable |
| Auto keep warm | Yes (up to 4 hours max recommended) |
| Preheating function | Yes (for Sear and Cook modes) |
| Cleaning | Bowls and steamer rack dishwasher safe; base wipe with damp cloth |
| Repairability | Not user repairable (contact manufacturer) |
| Safety | Auto shut-off, polarized plug, do not immerse base |
| Dimensions (approx.) | 45 x 30 x 25 cm |
| Weight (approx.) | 7-8 kg |
Frequently Asked Questions - MultiMeal CROCK POT
User questions about MultiMeal CROCK POT
0 question about this device. Answer the ones you know or ask your own.
Ask a new question about this device
Download the instructions for your Saucepan in PDF format for free! Find your manual MultiMeal - CROCK POT and take your electronic device back in hand. On this page are published all the documents necessary for the use of your device. MultiMeal by CROCK POT.
USER MANUAL MultiMeal CROCK POT
crock-pot multicooker BRAND
multicooker multicuiscer
BRAND MARQU
。
For more information visit us at
www.crock-pat.com
For product questions contact:
Crock-Pot Customer Service
1-800-323-9519
Distributed by Sunbeam Products, Inc. 6655 Peachtree Dunwoody Rd.
Atlanta, GA 30328.
Distributed in Canada by Newell Brands Canada ULC, located at 20 B Hereford Street, Brampton, Ontario L6Y 0M1.
Scan for mono-rho and
100-10VDCsBalmer torus diure
etvidens praliques !
IMPORTANT SAFEGUARDS
When using electrical appliances, basic safety precautions should always be followed to reduce the risk of fire, electric shock, and/or injury to persons including the following:
1. Read all instructions before using this product.
2. To protect against electric shock, do not place or immerse cord, plugs, or appliance in water or other liquid.
3. This appliance is not intended for use by children or by persons with reduced physical, sensory, or mental capabilities, or lack of experience and knowledge. Close supervision is necessary when any appliance is used near children. Children should be supervised to ensure that they do not play with the appliance. Keep the appliance and its cord out of reach of children.
4. Unplug from outlet when not in use, before pulling on or laking off parts and before cleaning. Allow to cool before putting on or taking off parts, and before cleaning. To disconnect, sum any controls to OFF, then unplug power cord into the outlet.
5. Do not operate any appliance with a damaged cord or plug or after the appliance malfunctions, or has been damaged in any manner. Do not attempt to replace or splice a damaged cord. Return appliance to the manufacturer (see warranty) for examination, repair or adjustment.
6. Do not plug in or turn on the Multi-Cooker without having the Cooking Pot inside the Multi-Cooker.
7. Plug cord into the wall outlet.
8. Avoid spillage on the power cord connector.
9. The use of accessory attachments not recommended by the appliance manufacturer may cause injuries.
10. Do not use outdoors or for commercial purposes.
T1. Do not let cord hang over edge of table or counter, or touch hot surfaces
12. Do not place on or near wet surfaces, or heat sources such as a hot gas or electric burner, or in a heated oven.
13. Extreme caution must be used when moving an appliance containing hot liquids.
14. This appliance generates heat during use. Do not touch hot surfaces. Use handles or knobs.
TS. The heating base is subject to residual heat after use. Do not touch heating base after a cooking cycle. Allow to cool
before handling.
16. Do not use appliance for other than intended use. Misuse can cause injuries. This appliance is not intended for deep
flying foods.
17 Intended for household countertop use only. Keep 6 inches (152 mm) clear from the wall and on all sides. Always use
appliance on a dry, stable, level surface.
18. CAUTION: To protect against electrical shock and product damage, do not cook directly in the heating base. Cook only in the removable cooking pot provided.
19. WARNING: Spilled food can cause serious bums. Keep appliance and cord away from children. Never drape cord over
edge of counter, never use bullet below counter, and never use with an extension card.
20. Do not move or cover the Multi-Cooker while it is in operation.
21. On not generate the Multi-Cooker without food or liquid in the Cooking Pot
22. Place the Multi-Cooker so that the Steam Release Vent is positioned away from the body. Steam can result in serious
burns.
23. Be careful when fitting and removing lid after cooking. Always tilt the lid away from you, as steam is hot and can result in serious burns. Never place face over the Multi-Cooker.
24. Do not use the lid to carry the Multi-Cooker.
25. Do not use the Cooking Pot for food storage or place in the freezer.
- The Multi-Cooker Lid is made of tempered glass. The lid is fragile and may crack or break it dropped. Handle with care. Always inspect the lid for chips, cracks, or any other damage. Do not use the glass lid if it is damaged, as it may shatter during use.
SAVE THESE INSTRUCTIONS HOUSEHOLD USE ONLY

This appliance has a polarized plug, (one blade is wider than the other). As a safety feature to reduce the risk of electrical shock, this plug is intended to fit in a polarized outlet only one way. If the plug does not fit fully in the outlet, reverse the plug. If it still does not fit, contact a qualified electrician. Do not attempt to defeat this safety feature or modify the plug in any way. If the plug fits loosely into the AC outlet or if the AC outlet feels warm do not use that outlet.
POWER CORD INSTRUCTIONS:
A short power-supply cord is used to reduce the risk resulting from it being grabbed by children, becoming entangled in, or tripping over a longer cord.
NOTICES
- Some countertop and table surfaces are not designed to withstand the prolonged heat generated by certain appliances. Do not set the heated multi-cooker on a finished wood table. We recommend placing a hot pad or trivet under your multi-cooker to prevent possible damage to the surface.
- During initial use of this appliance, some slight smoke and/or odor may be detected. This is normal with many heating
appliances and will not recur after a fee. - Please use caution when placing your cooking pol on a ceramic or smooth glass cook top stove, counterllop, table or other surface. It may scratch some surfaces if caution is not used. Always place heat resistant protective padding under the cooking pol before sealing on a table, counterllop or other surface.
- Steam release from the lid rim or lid vents may occur during cooking.

GETTING TO KNOW YOUR CROCK-POT® MULTIMEAL MULTICOOKER!
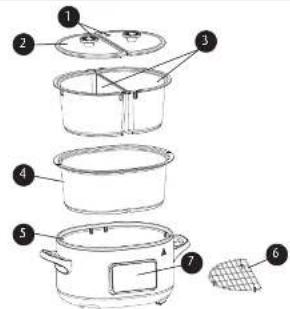
- Steam Vents
2.1k
1.1JQI20
3.7Q1PbS 4.8OT(Select models only)
4.601POT[sechmodelonly] - Unit 892 4.111
- WIRE RACK
- Control Panel

CONTROL PANEL
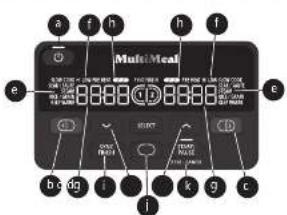
a) Power Bullion and Light
b) Left 3.7OT Pos Button
C)Right 3.7OT Pot Button
d) Down and Up Buttons
e) Cook Modes
Cook Temporalars
Cook Times
h)Pre-Heat Status Bar
Synch Finish Button (DualSync Technology)
ii Single 8OT Pot Button (Select mode's only)
k) Start/Pause Button (Hold to Cancel)

COOKING FUNCTIONS
Cooking Functions
Your MultMeal Multicooker has five (5) cooking functions
1. SLOW COOK: Gradually cooks food at low temperatures over an extended period of time, resulting in tender, flavorful
- SEAR / SAUTE: Quickly heats and browns food to lock in flavor and create a delicious, caramelized exterior.
- STEAM: Cently cooks food using hot vapor, preserving nutrients and flavors while ensuring even cooking.
- RICE / GRAIN: Automatically costs perfect fluffy rice or grains with precise timing and temperature control
- KEEP WARM: Maintains a consistent low temperature to keep cocked food warm without overcooking.
- BAKE: Evenly cooies dishes with dry heat. Perfect for baking cakes, bread, or casseroes. (only on select models).

| Part | Dishwasher Safe | Oven Safe | Microwave Safe | Stovetop Safe |
| Lid | Yes | No | No | No |
| Ceramic Pot(s) | Yes | Yes | No | No |
Pol Tips
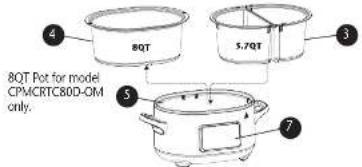
For modes sold with the additional BQT pot, ALWAYS remove the BQT pot from the multicooler before cooking with both 3.70T pots.
Only copk with the pols provided with your Mullicooker.
o. Multicoper pots are safe for use in the oven
g. Use only non-melal ulensins inside Mullicooker pots to prevent scratches and damage to the non-slick coating
o. Do not use traditional stoneware in this unit, only the metal pots
Lid Tips
a. List for the Multipliers are NOL rates
- For proper steam ventilation, avoid retting objects of any kind on the lid
Food Handling Tips
- For best results, ensure ingredients have properly thawed before cooking in the multicooker.
Control Panel Tips
0 In some cases, you may want to change a cook function you've selected. To choose a different cook mode, press the SELECT button again to reselect cook modes.
Cooking Tips
o Your Multicooker can perform various cooking tasks but it's different from regular slow cookers. You may need to alter the cooking time for some slow cooking recipes.
0 Sear larger cuts and quantities of meat in stages. This will prevent the meat from steaming or boiling.
a Avoid overcrowding pots to prevent unwanted moisture build-up when cooking.
Max water volume for STEAM function is 1.5 cups or 350 ml.
6 PREPARING YOUR MULTICOOKER FOR USE
Before using your new Crock-Pot MultiMeal Multicooker:
- Remove all packaging components.
- Wash the lids, pots, and wire rack in warm, soapy water. Make sure to dry thoroughly. (For models sold with the additional 80T pot, make sure to remove, wash, and dry as well.)
- Place both 3.7QT pots OR the single BQT pot (model: CPMRC80D-OM only) inside your MultiMeal Multicooker.
IMPORTANT: For models sold with the additional BQT pot, ALWAYS remove the 8QT (4) pot from the Multicooker before cooking with both 3.7QT (3) pots.
- Plug in the power cord into a 120V outlet.
S. You're now ready to begin using your Crock-Pot MultiMeal Multicooker!
HOW TO USE
Turning On Your Multicooker
- Press the POWER button. The control panel will illuminate.
Cooking With Your Multicooker
- Press to select the Left Pot cook settings or for the right Pot cook settings. The respective Pot indicator will illuminate when selected and the cook mode will flash.
a. NOTE: For models sold with an BQT pot, press (2) to use the single large BQT pot accessory. The BQT Pot Indicator (and Left cook modes will illuminate.
IMPORTANT: Do NOT operate this unit without both pots securely fitted inside when using the dual pot mode. This can lead to poor cooking performance and expose extremely hot surfaces. -
Use the UP and DOWN buttons to cycle through the cook modes. Once you reach your desired mode, press SELECT to confirm and continue.
a. NOTE: FOR SLOW COOK AND SEAR: SAUTE MODES, you must choose the HI or LOW temperature setting. Use the LIUP and LOWIN arrows to relate between HI and LOWIN. Then, press SLI FCT to confirm and interpret.
OR AND DOWN ORN TO FOGGE BETWEEN LOW. THEN, PESSE SELECT TO COMMIT AND CONTINUE.
b. NOTE: (For model C/FRCT, S/O = ON; In BAK mode, you can choose HI for 500 P or LOW for 300 P temperature settings. For the combined RICE/STEAM mode, choose HI for rice or grains and LOW to steam. -
Once the mode and the temperature (if applicable) are selected, use the UP and DOWN buttons to set your desired cook time. Press SELECT to save your cook settings or press START to begin cooking!
a. NOTE: If SEAR / SAUTE function is selected (and select models with BAKE), you must preheat the unit before
Ingredients are added for instructions on how to preheat, see Preheat Function section below.
b. NOTE: See our cook charts online or on page 11-14 for suggested cook times and temperatures
- Repeat Steps 1-3 for your second poll!
a. NOTE: If you opted to select SELECT in Step 3 for your initial pot set up, those settings have been saved. Press START at this time to begin dual-pot cooking! - Once cooking is completed, your multicooker will beep and flash 'Done' on the control panel. Some modes (SLOW
COOK, STEAM, RICE, BAKE) will automatically start the KEEP WARM function to keep your food ready until serving time.
a. NOTE: We do NOT recommend using the KEEP WARM setting for more than four (4) hours.
6. (Optional) If only one pot has finished cooking and you wish to remove its ingredients, make sure to return the pot to its base. This will maintain the cooking quality of the unfinished pot and prevent the heating plate from being exposed
To lice, this will maintain the cooling quality of the unillinated pot and prevent the heating plate from being exposed. 7. To turn off unit, press the POWER button.
Steam Function
The steam lucnur utilises steam to cook food gently and evenly. It's ideal for steaming vegetables, seafood, and baking. The fire place is used and fires the other way which amounts to heat the food quickly or fast.
This function involves adding water to the pot which generates steam to cook the food placed on the wire rack. It's a healthy cooking method that helps retain nutrients and flavors in the food.
To steam foods properly.
1. Add water to a single 3.7QT ppt.
NOTE: Maximum water volume for STEAM function is 1.5 cups or 350 ml.
2. Place wire rack inside pot.
3. Select the STEAM function to begin steaming.
Preheat Function
The preheat feature makes sure your multicooler reaches the right temperature before cooking. Preheating before cooking makes the outcome of your recipes more consistent and helps them cook faster.
Using the Preheat Function
- Select the SEAR / SAUTE function (or BAKE on select models).
a. NOTE: The preheat function is only available for the SEAR / SAUTE function (and select models with BAKE).
-
Press the START button.
-
The preheat status bar will illuminate. Your cook time will hold until completed.
a. TIP: To save time, prepare any necessary ingredients while waiting for the unit to preheat.
- Listen for a beep. This means prehealing is complete.
CAUTION!! Foods and pots will be very hot! Always use oven mitts to remove the pots and remove foods using tongs or
WAPINNS: Always place lid steam vents towards the back of the unit (away from body) to prevent steam bursts. Refer to
WARNING: Always place for steam vents towards the back of the door, the 1 and 2 lid joints to ensure the steam vents are placed correctly.
3. Add ingredients as necessary.
6. Securely fit both lots onto the pot(s).
7. Press the START button to begin the timer.
a. NOTE: If the START button is NOT pressed within two (2) minutes of preheat completing, the unit will auto-start.
8 SYNC FINISH FEATURE
Use the optional SYNC FINISH feature to sync both pots to finish at the same time, even if cook modes and times are different for each pot. See Sync Finish chart below.
Using the Sync Finish Feature
- Press the SYNC FINISH button at any time before pressing START.
a. NOTE: For best results, avoid using SYNC FINISH if the difference in cook time for each pot is more than two (2) hours.
b. NOTE: SYNC FINISH cannot be used with SEAR/SAUTE as it requires constant supervision.
General Guidance for Sync Finish Feature
- It is recommended to use the SYNC function for recipes with less than a 2-hour difference to ensure best food quality and proper food handling guidance.
NOTE: For recipes that are greater than a 2-hour difference:
o The side with longer cook time will start first. The side with shorter cook time will start cooking after two (2) hours
have passed and then switch to keep warm (counting up time on display) until the longer side is completed. When the longer side completes cooking, both sides will switch to keep warm and count up together.
NOTE: When using BAKE and Sync Finish, there can minor differences in completion times due to the BAKE function prehealing. - Rice will always be cooked within the first 15 minutes and will shift to keep warm for the rest of the duration.
- Visit https://www.foodsafety.gov/ or https://www.fs.usda.gov/ for more information on all safe food handling
Sync Finish Chart
| Time | Side 1 | Side 2 |
| 8:00 | LOW | Standby |
| 9:00 | LOW | Standby |
| 10:00 | LOW | HIGH |
| 11:00 | LOW | HIGH |
| 12:00 | LOW | HIGH |
| 13:00 | LOW | HIGH |
| 14:00 | LOW | HIGH |
| 15:00 | LOW | HIGH |
| 16:00 | LOW | HIGH |
| 17:00 | LOW | Keep Warm |
| 18:00 | Keep Warm | Keep Warm |
9 CLEANING AND USER MAINTENANCE
Before cleaning, ALWAYS turn your unit off, unplug it from the electrical outlet, and allow it to cool.
CAUTION:NEVERimmersheHealingBaseinwaterorotherliquid.
This appliance has no user serviceable parts. Any servicing beyond that described in the Cleaning Section should be performed by an Authorized Service Representative only. See warranty available online.
Cleaning Your Multicooker
- Wash lid(s), steam rack, and pots in the dishwasher or with a cloth in hot, soapy water.
a. Important notes on cleaning your mucicooper
Handwashing is recommended to extend the lifespan and quality of the ceramic nonstick coating.
NOTE: Do NOT use abrasive cleaners or scouring pads. A cloth, sponge, or rubber spatula will usually remove residue.
To remove water spoils and other stains, use a non-abrasive cleaner or vinegar. - Multicooker lid will not withstand sudden temperature changes. Do not wash hot lid(s) with cold water.
- Dry all parts thoroughly
- Clean the outside of the multicooler with a soft cloth and warm, soapy water. Wipe dry.
Storing Your Multicooker
- Ensure the unit is cleaned thoroughly and unplugged from the electrical outlet.
- Place both 3.7QT pots inside of your unit
a. NOTE: For units with the 8QT pot, place 8QT pot inside of your multicooker. Next, stack 3.7QT pots side by side
insidc of the 8Q1 pot.
- Place steam rack inside pots
- Place Ix(s) securely on top of pots.
- Store in a cool, d
10 TROUBLESHOOTING
To cancel
Press and hold the START/PAUSE button for 3 seconds. This will stop any items from cooking and cancel settings that had been entered.
o if you have not started the cocking process, this will cancel the latest pot's settings that were entered. For example,
If you entered settings for Pot 1 first, and then entered the settings for Pot 2, then pressing and holding START?
PAUSE for 3 seconds will only cancel Pot 2's settings. To cancel the first pot settings, press the respective Pot button then press and hold START/PAUSE for 3 seconds.
n if cooking has begun, this will stop and cancel all entered settings for all pots. The control panel will return to standby mode, displaying dashes and alternating the Pot indicators.
To temporarily pause cooking:
Press or to temporarily pause cooking on a single pot, without interrupting the second. The cook mode will
begin to flash, indicating the respective pol has paused cooling. Press START/PAUSE to resume the single paused pol.
To temporarily pause both pots while they are actively cooking, or to pause cooking in the 801 pot, press START!
PAOSE:16RESUE,PRESTART/PAOSE again.
6 NOTE: For models sold with an 8QT Pot, the C2T button will also pause cooling for the 8QT Pot. For models without this button, press .paue cooking for the BQT Pot.
To change the selected cook mode, time, or temperature for your pots:
After cooking has started:
Press on dependi ng on which pot you need to update. The cook mode will begin to flash, indiciating the
respective Pot has temporarily paused cooking.
- NOTE: the other pot will not pause. Only the respective pot selected. For the BQT pot or to pause both pots, press START/PAUSE. The cook mode(s) will begin to flash.
o To update cook mode - Press UP or DOWN to cycle through modes then press SELECT once desired mode is flueup. The following three settings are used: 1) time settings using the UP or DOWN buttons to toggle and press SELECT to confirm, Press START to resume cooling.
To update cook temperature (only applicable on SLOW COOK, SEAR / SAUTE, and select models with BAKE) - press
SELECT until the cook temperature is flashing, Press UP or DOWN to toggle HI and LO temperatures, then press
SELECT. You will need to reset the cook time, then press START to resume cooking.
To update cook time - Press SELECT until the time is flashing. Then press UP or DOWN to cycle through time. Then press START to resume cooking.
Before cooking has started:
Press 1 or 2 depending on which pot you need to update. The cook mode will begin to flash
NOTE: the other pot settings will still be saved if already selected.
NOTE: For the 80T pot, press. if your 80T pot was purchased separately, and you have already selected the 80T mode. press the cow's mode will begin to flash.
o To update cook mode - Press UP or DOWN to cycle through modes then press SELECT once desired mode is flashing. Then complete temperature and/or cook time settings using the UP or DOWN buttons to toggle and press ON. The following text box shows how to use these settings.
o To update cook temperature (only applicable on SLOW COOK, SEAR / SAUTE, and select models with BAKE) - press SELECT until the cook temperature is flashing. Press UP or DOWN to toggle HI and LO temperatures, then press OK to confirm.
To update cook time - Press SELECT until the lime is flashing. Then press UP or DOWN to cycle through time. Then press START to resume cooking.
To turn your multicooker off:
Press the power button.
11
COOKING CHARTS
Welcome to the cooking charts section for your MultiMeal Crockpot! Whether you're a novice or seasoned chef, these charts are designed to simplify your cooking experience, providing suggested cooking times and settings for a variety of ingredients and dishes.
Visit https://www.loodsafety.gov/ or https://www.fsis.usda.gov/ for more information on all sale food handling.
| Temperature Chart | ||
| Mode Temp | settings Used for | |
| SLOW COOK | HI, LOW High and low temps: | Slowly cook proteins, soups or stews for rich and tender results. You may need to alter the cooking time for some traditional slow cooking recipes. |
| SEAR/SAUTÉ | HI, LOW | High-temp: For quick scar on proteins and reducing sauces. Low-temp: For sautéing veggies and simmering liquids. |
| RICE/STEAM | NOTE: On select models, Steam! Rice functions are combined as one. If Steam/Rice is separate: Apply preset Temperatures. | High-temp: Use the high-temp setting to cook grains like white and brown rice, quinoa, oats or more. Find our full grains chart on page 12. For white rice, follow a 1:1 rice to liquid ratio; for 1 cup of uncooked rice, the cook time would be 15 minutes. Low-temp: Use the low-temp setting to steam veggies, fish, dumplings, or more! Add 1.5 cup of cold water. |
| BAKE (ON SELECT MODELS) | HI, LOW High (350°F) and low (300°F) temps: Bake desserts, breads, proteins, or veggies. NOTE: We recommend using loaf pans or ramekins placed on the included Wire Rack when baking looos. | |
| KEEP WARM | Preset temperature | Keep meals ready until serving time. |
Slow Cooking Chart
| Slow Cooking Time | ||
| Meat Weight Low Cook | Time | High Cook Time |
| Large Pork Roast* 6-7 Lbs 9:30 | h 7:30 h | |
| Pork Loin 3-4 Lbs 6:00 h 5:00 | h | |
| Poultry** 6 Lbs 7-30 | h 5:00 h | |
| Beef Roast 3-4 Lbs 8:30 h 5:45 | h | |
| Stew Meat 3 Lbs 6:00 h 4:45 | h | |
| Fish*** 2 Lbs 2:30 h 4:45 h | ||
| Grain Cooking Chart | |||
| Grain per 1 Cup | Rinse | Water per Cup | Program Time |
| Quinoa | No | 2 Cups | 12 Minutes |
| Oats | No | 1.5 Cups | 8 Minutes |
| Buckwheat | Yes | 1 Cup | 12 Minutes |
| Bulgur Wheat | Yes | 1.5 Cups | 15 Minutes |
| Pearl Barley | Yes | 2.5 Cups | 32 Minutes |
NOTE: Cook times are estimates and may vary based on food type, preparation, and external temperatures. Visit: https://www.foodsafety.gov/ or https://www.fsis.usda.gov/ for more information on safe internal cooking temperatures "pork but, pork shoulder
Whole chicken, here in turkey breast
*** If fish is added in after multicooker has been fully heated to sinner point, it will cook within 15-30 minutes.
| 3.7QT Rice Cooking Chart | |||
| Rice Type | Uncooked Rice | Water | Program Time |
| Long Grain White Rice or Basmati White Rice | 1 Cup | 1 Cup | 15 min |
| 2 Cups | 2 Cups | 18 min | |
| 3 Cups | 3 Cups | 20 min | |
| 4 Cups | 4 Cups | 22 min | |
| 5 Cups | 5 Cups | 25 min | |
| Long Grain Brown Rice or Basmati Brown Rice | 1 Cup | 1.5 Cups | 32 min |
| 2 Cups | 3 Cups | 35 min | |
| 3 Cups | 4.5 Cups | 38 min | |
| 4 Cups | 6 Cups | 41 min | |
| 5 Cups | 7.5 Cups | 44 min | |
| Rice Cooking Tips | Cook times may vary depending on the starting temp of your water and if soak the rice.For more firm rice use less water, for more fluffly, sticky rice add more water. Program time includes preheating and slimmer time. | ||
| 8QT Rice Cooking Chart (Only for Select Models) | |||
| Rice Type | Grain (cups) | Water (cups) | Program Time (min) |
| Long Grain White Rice | 3 cups | 3 cups | 18 min |
| 4 cups | 4 cups | 20 min | |
| 12 cups | 12 cups | 28 min | |
| Basmati White Rice | 3 cups | 3 cups | 18 min |
| 6 cups | 6 cups | 25 min | |
| Long Grain Brown Rice | 2 cups | 3 cups | 35 min |
| 10 cups | 15 cups | 44 min | |
| Buckwheat | 2 cups | 2 cups | 15 min |
| Rice Cooking Tips: | Cook times may vary depending on the starting temp of your water and if soak the rice. For more firm rice use less water, for more fluffy, sticky rice add more water. Program time includes preheating + simmer time. | ||
| Steam Cooking Chart | |||
| Food Amount Preparation | Program Time | ||
| Artichokes 2 Individual Trimmed 40-50 Minutes | |||
| Asparagus 1 bunch or 16 oz trimmed 7-10 Minutes | |||
| Broccoli, fresh 2 heads or 16 oz 2 inch florets 15 Minutes | |||
| Carrots, Baby | 16 oz | Whole | 15-20 Minutes |
| Cauliflower | 2 heads or 16 oz 2 inch florets | 15-20 Minutes | |
| Corn | 4 ears | Husked | 20 Minutes |
| Eggs, Soft boiled | 5 | 10-15 Minutes | |
| Eggs, Hard Boiled | 5 | 15-20 Minutes | |
| Green Beans | 16 oz | Trimmed | 15-20 Minutes |
| Peas | 16 oz | Trimmed | 10-12 Minutes |
| Potatoes | 1.5lbs | Quartered | 25-30 Minutes |
| Sweet Potatoes | 1lb | Cut into 2 inch slices | 25-30 Minutes |
| Squash | 1lb | Cut into 1 inch slices | 12-15 Minutes |
| Chicken | 12oz or 2 breast | Whole | 10-15 Minutes |
| Shrimp | 1/2 lb | Unpeeled | 8-10 Minutes |
| Fish | 6oz | Whole filet | 8 Minutes |
| Steam Tips: | Fill pot to just below the steam rack. For longer steam times, add more water. | ||
12 BAKING RECIPIES
Cup Cakes with Boxed Mix
- 3 1/2 cups boxed white cake mix
0.5 cup cold water
Rack Requirements: Rack with 6 silicone ramekins
Program Temperature: HI
Instructions
- Place all ingredients into a mixing bowl.
- Divide between 6 silicone tarnsins or containers.
Brownies with Boxed Brownie Mix
Ingredients
124 cups boxed brownie mix
1
- 2 lbsp water
Rack Requirements: Rack with loaf pan
Program Time: 40 Minute
- Place all ingredients into a mixing bowl and stir to
- Line loaf pan with parchment paper or grease with
- Place mix into leaf pan.
Bread
Ingredients:
3% cups all purpose flour
- 1 bp
1 cup warm water
Rack, Program Time & Temperature:
Rack with parchment paper, 40 minutes, HI
- Rack with loaf pan, 35 minutes, HI
No rack with loaf pan, line pot with foil or parchment, 25 mm diameter, 100 g
Instructions
- Lamone all ingredients together.
- Kevlcr 3 mneun hn shnck and elastic. 3. [fie]e or an and loh hwe uol whch in
- Sett and shce as required alwe to proof for 45
minutes - Prior to baking, brush with egg wash to encourage even browning
Savory Casserole
Ingredients:
12tbsp 0
- 3/2 cup finely chopped onion
- 2 pieces of bacon, chopped
-1 close of garlic, chopped
1 cup cooked rice
- 1/4 cup sweet potato, peeled and coarsely grated
- 1 cup broccoli florets, chopped
- ½ cup frozen peas
-1 cup grated cheddar
3 large errors
- 2 thnchopped chives
- Bail & proper
Rack Requirements: No rack
Program Time: 10 Minute Saute, 5 Minute Bake
Program Temperature: LOW
Instructions
- Select SEAR/SAUTLE, LOW and adjust time to 10 minutes. Allow the unit to pre-heat.
- Add oil, onions, bacon, garlic and stir to sauté for 2-3 minutes until softened.
- Stir in the cooked rice, sweet potato and broccoli. Cover with the lid and allow to finish cooking, aiming for a medium time.
- Remove the lid, stir well and allow the mixture to cool for a few minutes.
- Add the eggs to a small mixing bowl, season with salt and pepper and beast with a fork until mixed.
- Add in the grated cheese and half of the chopped chives to the egg mixture, stir.
- Str in the frozen peas to the pot, pour over the egg mixture into the poC. Cover with the lid.
- Select BAKE, LOW and adjust time to 5 minutes.
- Once preheat has finished, select START and alter cascode to bake.
- Once cooked, remove the pot and lid and set aside on a wire rack to cool before removing.
- Cut into slices and garnish with remaining chives.
Chocolate Chip Brioche Baked Pudding
Yields: 2 Settings
- 3 oz chocolate chip brioche bread, roughly torn into 1 inch chunks
- 14 cup chocolate chips
Large egg
1 tbsp brown sugar - ½ tbsp maple syrup
- 1 Lsp vanilla extract
- 2 tbsp butter, melted
cup whole mill
cup heavy cream
Rack Requirements: Rack with bow!
Program Time: 35-40 Minutes
Program Temperature: HI or LOW
Instructions
1. Crease the bowl with butter or cooking spray.
2. Place torn binchec into the bowl and scatter chocolate chips over the bread.
3. Mix the remaining ingredients together in a separate bowl and pour the mixture over the bread, pressing down with a spoon to submerge the bread in the mixture.
4. Set aside for 10 minutes to soak.
5. Preheat the unit with the rack inside the pot.
6. Coat the rack with the garlic and place the bowl onto the rack and cover with the lid.
7. Bake until risen and slightly wobbly, roughly 35 minutes.
8. Remove and allow to cool.
Baked Potatoes
Inddes:
WHILE pALNT
Racks Requirements: Rack
Program Time: 75 Minutes
Program Temperature: HI
Instructions
1.Prepare potatoes by poting hole all over the surface
with a fork.
2. Place pot at 1000 rpm.
3. Bake until tender, roughly 75 minutes.
4. Remove from the rack and allow to cool
Individual Strawberry Cheesecakes
Yields: 2 Cheesecakes
Ingredients:
- 2sick melted butter
- Boc green cheese, softened
2 medium eggs
412bsp sugar
- 3 oz sour cream
- 1 Lsp vanilla ext
- 2 tsp cornstarch
- 3½ tbsp strawberry syrup
Rack Requirements: Rack with ramekins
Program Time: 35 Minutes
Program Temperature: LOW
Instructions
- Line the bottom of the ramkins or springform tins with baking paper for easy removal of the cheesecakes.
- Place the cracker crumbs and melted butter into a
BOW.MIX WELL. - Divide between the two面条 and splitiform strips, pressing down with a spoon to form a uniform bottom layer.
- Mix the remaining ingredients together besides the strawberry syrup in a separate bowl until smooth. Divide the mixture between the ramekins and spread on top of the graham cracker crumb crust.
- Program the unit and allow to preheat with the rack in the pot.
- Carefully add cheesecake melikins to the rack. Cover with the lid and allow to bake.
- Once the bake time lapses, remove the lid and allow the cheesecakes to cool for 10 minutes before removing and allowing to cool completely.
- Once completely cool, remove from springform tin or serve in the ramekin.
- Druizle with strawbery syrup before serving.
Homemade Pizza
Yields: 2 Cheesecakes
Ingredients:
150g store bought pizza dough or homemade
1
- 5 dicer of nonpani
- finish of dried organ
Rack Requirements: Rack with parchment paper or foil
Program Time-15 Minutes
Program Temperature: Hi
Instructions
1. Use foil or parchment paper to help remove the pizza easily. Place foil or parchment paper down and roll out desired dough shape, brushing with oil before placing dough onto the parchment paper or foil.
2. Spread tomato sauce or paste onto the rolled out
dougn
3. Layer cheese and pepperoni. Add oregano.
4. Allow unit to preheat with the rack in the pot.
3. Place the parchment paper or 150 with the pizza on
top carefully onto the face.
6. Once baking is complete, allow to cool for several minutes before removing.
Baking Tips
- When basting directly in the pot or without a rack, line the pot with foil or parchment paper to reduce the heat.
High sugar content perines are recommended to bake.
in a dish or pan to prevent excessive browning on the bottom.
For added browning, finish dishes in an oven or broiler for 25 minutes. - Create a foil sling to remove finished recipes when baking complexes.
Recommended Bakeware Dish Dimensions
| Dish Type Recommended Dish Size | |
| Mini Loaf Pan x 1 per side 16cm x 7cm | |
| Mini Loaf Pan x 1 per side 15cm x 4cm | |
| Disposable Mini Loaf cake cases x 3 per side 11cm x 4cm | |
| Silicone Cup cake cases, 3 per side 8.5cm x 5.5cm | |
| Dessert rameikins pots x 2 per side 10cm x 6cm | |
| Cheesecake mini spring form cake tins x 2 per side 10.1cm x 5cm | |
| Heatproof pudding bowl for rack x 1 per side 14.5cm x 8cm | |
| Flan tins x 2 tins per side 11cm x 2.5cm | |
| Small metal pudding molds x 3 per side | 8.5cm x 3 cm |

ADDITIONAL TIPS
Caution! Foods and pots will be very hot Always use oven mitts to remove the pots and remove foods using tongs or utensils.
- In between uses, be sure to wipe down the inside of your unit first, unplug and let unit cool. Then use a soft cloth to wipe clean. For best results in your 3.7QT pots, stir often and cut any larger ingredients into smaller pieces.
- REMINDER: For model number CPMCRTCBOD-OM, the 3.7QT pots and the BQT pot should NOT be stacked when cooking. Only stack pots when storing your unit. We recommend using pots placed on the Included Wire Rack when baking. If not using the rack, be sure to use a lower temperature setting like BAKE LOW and adjust cook times as needed.
For more information, visit: https://www.crock-pol.com
o Additional operating instructions and warranty details located in the instruction manual, under the 'Support' tab located at the top right corner of the website).
For recipes & Lips: Visit the "Recipes & Tips" Lab located on the home page menu.

WARRANTY
Please visit www.crock-pol.com for warranty information for your Crock-PoP product.
How to Obtain Warranty Service
In Canada
If you have any questions regarding this warranty or would like to obtain warranty service or support, please call 1-800-323-9519 or visit the Crock-Pott website. In Canada, this warranty is offered by Newell Brands Canada Inc., which provides a complete range of products and services.
If you would like a physical copy of the warranty for your Crock-Pot product, feel free to print the warranty available on website listed above, or call us at the phone number listed above or write our Customer Service Department at the address listed above, and we'd be happy to send you a copy.
CONSIGNES IMPORTANTES
INSTRUCTIONS RELATIVES AU CORDON

- crock-pot multicooker BRAND
- IMPORTANT SAFEGUARDS
- SAVE THESE INSTRUCTIONS HOUSEHOLD USE ONLY
- POWER CORD INSTRUCTIONS:
- NOTICES
- GETTING TO KNOW YOUR CROCK-POT® MULTIMEAL MULTICOOKER!
- CONTROL PANEL
- COOKING FUNCTIONS
- PREPARING YOUR MULTICOOKER FOR USE
- Before using your new Crock-Pot MultiMeal Multicooker:
- HOW TO USE
- Turning On Your Multicooker
- Cooking With Your Multicooker
- Steam Function
- Preheat Function
- Using the Preheat Function
- SYNC FINISH FEATURE
- Using the Sync Finish Feature
- General Guidance for Sync Finish Feature
- CLEANING AND USER MAINTENANCE
- Cleaning Your Multicooker
- Storing Your Multicooker
- TROUBLESHOOTING
- To cancel
- To temporarily pause cooking:
- To change the selected cook mode, time, or temperature for your pots:
- After cooking has started:
- Before cooking has started:
- To turn your multicooker off:
- 11
- COOKING CHARTS
- BAKING RECIPIES
- Cup Cakes with Boxed Mix
- Brownies with Boxed Brownie Mix
- Bread
- Savory Casserole
- Chocolate Chip Brioche Baked Pudding
- Baked Potatoes
- Individual Strawberry Cheesecakes
- Homemade Pizza
- ADDITIONAL TIPS
- WARRANTY
- CONSIGNES IMPORTANTES
- INSTRUCTIONS RELATIVES AU CORDON
Brand : CROCK POT
Model : MultiMeal
Category : Saucepan