V90 - Vacuum Cleaner Sauber - Free user manual and instructions
Find the device manual for free V90 Sauber in PDF.

Frequently Asked Questions - V90 Sauber
User questions about V90 Sauber
0 question about this device. Answer the ones you know or ask your own.
Ask a new question about this device
Download the instructions for your Vacuum Cleaner in PDF format for free! Find your manual V90 - Sauber and take your electronic device back in hand. On this page are published all the documents necessary for the use of your device. V90 by Sauber.
USER MANUAL V90 Sauber
Handy vacuum cleaner (EN)
natural_image
White SAUBER Gasoline brush cleaner with black handle and 'TURSOVAC WET & CRY' branding (no additional text or symbols visible)Inhoud – Content – Inhalt – Teneur
Instruc on manual – English ...... - 8 -
WERKINGSMODUS:
1. De muurbeugel vastmaken
natural_image
Illustration of a device with attached cables and a plug, showing internal components (no text or symbols)natural_image
Illustration of a hand holding a small object with a checkmark indicating a step, showing different actions (no text or symbols present)SAFETY INSTRUCTIONS:
-
This appliance can be used by children aged from 8 years and above and persons with reduced physical, sensory or mental capabilities or lack of experience and knowledge if they have been given supervision or instruct on concerning use of the appliance in a safe way and understand the hazards involved. Children shall not play with the appliance. Cleaning and user maintenance shall not be made by children without supervision.
-
The appliance is only to be used with the charger provided with the appliance.
-
Use the included charger to charge the vacuum cleaner and do not use the charger for other purposes.
-
The appliance must only be supplied at safety extra low voltage corresponding to the marking on the appliance.
-
Do not use the machine in a damp environment or outdoors. The unit is intended for domes c use only. Store the machine in a dry place.
-
If any blockage is found in nozzle, the appliance can be re-operated only a er the blockage is removed.
-
Do not store or use the appliance close to high temperature places.
-
Do not let children use the appliance.
-
Keep infants away from the machine.
-
If abnormal noise, smell, smoke, or any other irregularity occurs during opera on, turn o the appliance and unplug it. Then contact your point of sales for repair. Do not repair by yourself.
-
Do not use the machine if the charger, the power cord or other parts of the machine are damaged. Have the machine repaired by an authorized technician.
-
Never immerse the machine or charger in water! Do not use aggressive chemicals, abrasives or solvents such as benzene to clean the machine.
-
Charge only at ambient temperatures between 10^ C and 40^ C.
- Charge only using the charger provided with the appliance. Using the wrong charger could result in an electric shock or overhea ng of the ba ery.
- Your charger has been designed for a specific voltage. Always check that the mains voltage corresponds to the voltage on the range plate.
- Warning! Never a empt to replace the charger unit with a regular mains plug.
- Do not expose the charger to water.
- Do not open the charger.
- Ba eries:
- Never a empt to open for any reason.
- Do not expose the ba ery to water.
- Do not expose the battery to heat.
- Do not store in loca ons where the temperature may exceed 40°C.
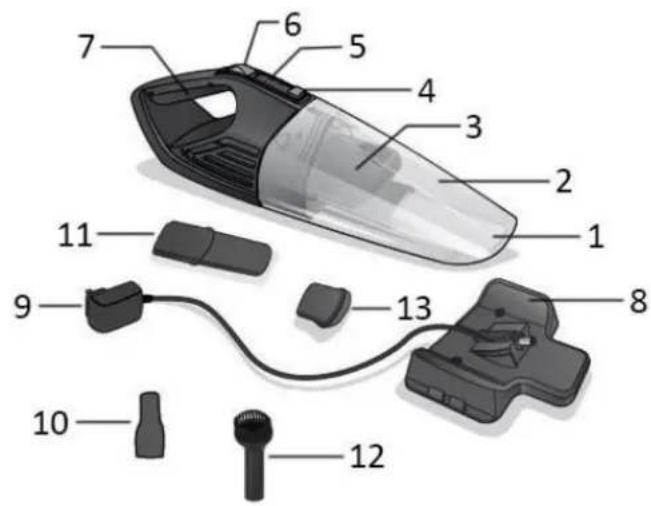
COMPONENTS LIST
- Suc on nozzle
- Dust container
- Filter assembly
- Container opening bu on
- Indicator light
- ON/OFF switch
- Handle
- Charging base / wall-mounted bracket
- charger
- Brush a achment
- Crevice tool
- Brush
- Rubber tool
OPERATING MODE:
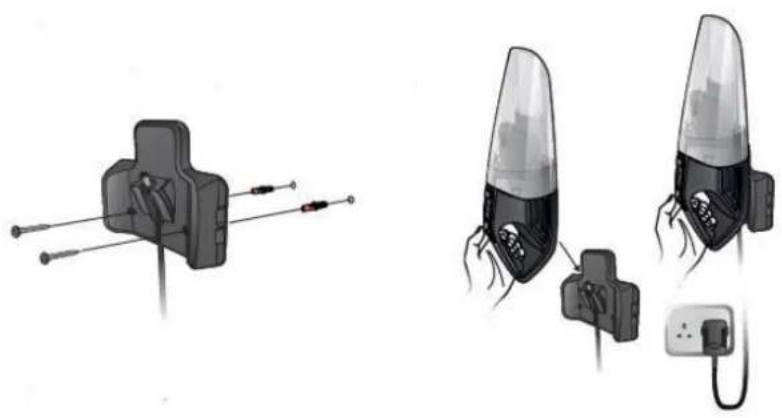
1. Fixa on of the wall-mounted bracket
The charging base can be mounted onto the wall. Measure the distance between the holes situated at the bracket and drill two holes in the wall with the proper distance. Put the plas c expansion bolts into the holes and screw the screws into the expansion bolts. Align the holes with the screws and mount the bracket onto the wall.
natural_image
Illustration of two types of cable connectors with attached wires, no text or symbols present2. Charging the device
• Always make sure the vacuum cleaner is turned o before connec ng to the charger.
- Place the vacuum cleaner into the charging base and plug the charger into a suitable socket outlet. Make sure the suc on nozzle is facing upwards and the charging pin is inserted into the li le socket on the vacuum cleaner. During the charging process the indicator light will blink in red. When the vacuum cleaner is fully charged, the red light will stop blinking and illuminate s ll.
• The complete cycle of charging lasts 3–4 hours.
• The suc on power will decrease when the ba ery gets low.
- Don't let the device uncharged for a long me, because the inner accumulators may be damaged.
- In order to ensure that it is always ready for use, the device could be left on charge with the charger when not being used.
• The charger may become warm during charging --- this is normal.
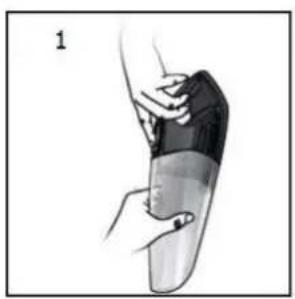
3. Opera on
- Turn on the vacuum cleaner by pushing the ON/OFF switch to position "I". The indicator light illuminate green during use. (When the bayery is low, the indicator light will blink in green.)
- For vacuuming out seams and gaps, the crevice tool can be used. For cleaning o stubborn dust, insert the brush a achment into the suc on nozzle and then a ach the brush for use.
- The appliance can suck up small quantity of liquids (< 40°C), and in this situation, please use the rubber tool.
• After use, switch off the vacuum cleaner by pushing the ON/OFF switch to position "O".
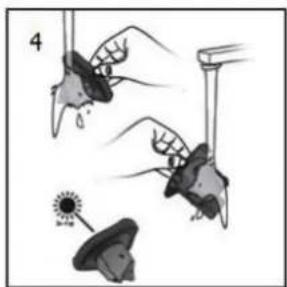
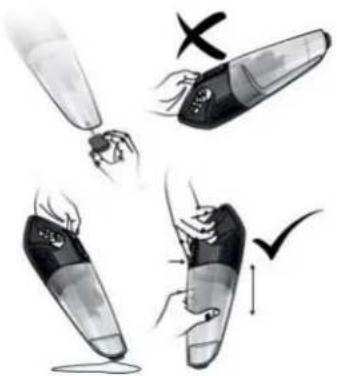
Cau on: When operating the device, never hold the vacuum cleaner by making the suc on nozzle face upwards in case liquids and minor dust enter into the motor unit.
natural_image
Illustration of four hand-drawn steps showing a device being cleaned or damaged, with no visible text or symbols.Empty the container and clean the Iter when:
• The suc on power decreases.
- Crumb comes out from the suc on nozzle.
• Each me a er use.
- Placing the device in its charging base.
CLEANING AND MAINTENANCE
- Press the container opening bu on to separate the dust container from the motor unit.
- Gently pull the Iter assembly out of the dust container.
- Empty the dust container.
- The dust container and Iter assembly can be shaken clean or rinsed by warm water (< 40 °C). Make sure the parts are completely dry before they are re-installed.
- Do not immerse the motor unit in water or any other liquids. Use only a so moist cloth to clean the outside of the unit. Do not allow any kind of liquid to enter the unit.
Notes:
• All the parts of the vacuum cleaner are NOT dishwasher safe.
- Do not use aggressive chemicals or abrasives.
- Do not use the device if the Iter is broken or worn out.
• The unit does not contain parts serviceable by you, do not disassemble it and do not try to repair it yourself.
natural_image
Illustration of a hand holding a segmented object, possibly a medical or anatomical device (no text or symbols visible)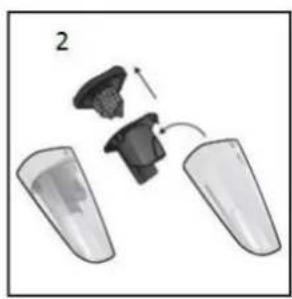
natural_image
Diagram showing two plastic containers with a small object inside, no text or symbols present
natural_image
Simple 3D illustration of a conical object with small particles at one end (no text or symbols)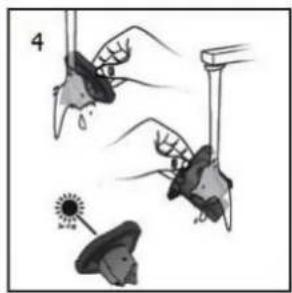
natural_image
Illustration of hands using a tool to interact with objects, including a sun and a butterfly (no text or symbols)TECHNICAL DATA
Ba ery Voltage: 7.4Vd.c.
| Manufacturer's name or trademark, commercial registra on number and address | Shenzhen Teka Technology Co., Ltd. Building A, No. 21, XiFu Road, Red Star Community, SongGang Street, Baoan District, Shenzhen, Guangdong Province, 518105, P.R. China. |
| Model iden er | TEKA006-0960500EUC |
| Input voltage | 100-240V |
| Input AC frequency | 50/60Hz |
| Output voltage | 9.6Vdc |
| Output current | 0.5A |
| Output power | 4.8W |
| Average ac ve e ciency | 77.89% |
| E ciency at low load (10%) | -- |
| No-load power consump on | 0.069W |
GUARANTEE AND CUSTOMER SERVICE
Before delivery our devices are subjected to rigorous quality control. If, despite all care, damage has occurred during produc on or transporta on, please return the device to your dealer. In addi on to statutory legal rights, the purchaser has an op on to claim under the terms of the following guarantee:
For the purchased device we provide 3 years guarantee, commencing from the day of sale. If you have a defect ve product, you can directly go back to the point of purchase.
Defects which arise due to improper handling of the device and malfunc ons due to interven ons and repairs by third par es or the ng of non-original parts are not covered by this guarantee. Always keep your receipt, without the receipt you can't claim any form of warranty. Damage caused by not following the instruction
manual, will lead to a void of warranty, if this results in consequent damages then we will not be liable. Neither can we hold responsible for material damage or personal injury caused by improper use if the instruction on manual is not properly executed. Damage to accessories does not mean free replacement of the whole appliance. In such case please contact our service department. Broken glass or breakage of plastic parts is always subject to a charge. Defects to consumables or parts subjected to wearing, as well as cleaning, maintenance or the replacement of said parts are not covered by the warranty and are to be paid.
ENVIRONMENT FRIENDLY DISPOSAL
Recycling – European Direc ve 2012/19/EU
This marking indicates that this product should not be disposed with other household wastes. To prevent possible harm to the environment or human health from uncontrolled waste disposal, recycle it responsibly to promote the sustainable reuse of material resources. To return your used
device, please use the return and collect on systems or contact the retailer where the product was purchased.
They can take this product for environmental safe recycling.
Emerio Holland B.V.
Zomervaart 1A
2033 DA Haarlem
The Netherlands
Customer service:
T: +31(0)23 3034369
E: info@saubereurope.com
www.saubereurope.com
Spare parts:
www.buyspareparts.eu
BETRIEBSMODUS:
natural_image
Illustration of two types of cable connectors with attached wires, no text or symbols presentnatural_image
Illustration of a hand holding a small object with a checkmark indicating a step, showing different actions (no text or symbols present)natural_image
Illustration of a hand holding a segmented object, possibly a medical or robotic device (no text or symbols visible)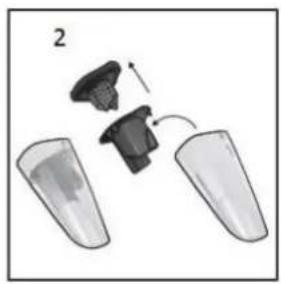
natural_image
Diagram showing a mechanical assembly with two components and an arrow indicating motion (no text or symbols)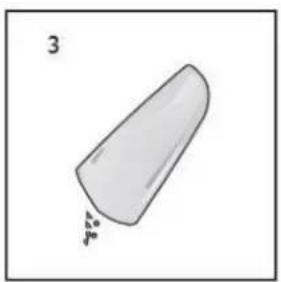
natural_image
Simple line drawing of a conical object with a label '3' and a small triangular mark at the base (no text or symbols on the object itself)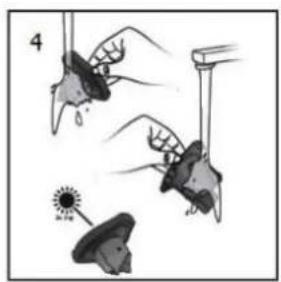
natural_image
Illustration of hands holding objects with a sun icon, no text or symbols presentTECHNISCHE DATEN
MODE D'UTILISATION :
1. Fixa on du support mural
natural_image
Illustration of two types of cable connectors with wires, one showing a cable connector and the other showing a plug inserted into a socket (no text or symbols present)natural_image
Illustration of four-step cleaning or packaging process showing hand positioning and mark marks (no text or symbols)natural_image
Illustration of a hand holding a small object, possibly a device or tool, with no visible text or symbols.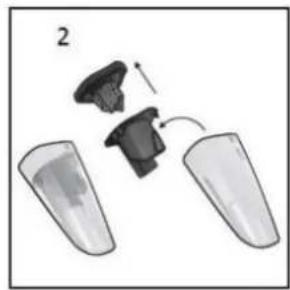
natural_image
Diagram showing two plastic containers with a black plastic clip and an arrow indicating motion (no text or symbols)
natural_image
Simple 3D illustration of a conical object with small particles at one end (no text or symbols)