
PGG01B - Glue gun Tacklife - Free user manual and instructions
Find the device manual for free PGG01B Tacklife in PDF.
| Product Type | Cordless Hot Glue Gun |
| Brand | Tacklife |
| Model | PGG01B |
| Power Supply | Built-in Rechargeable Lithium-Ion Battery |
| Battery Capacity | 2600 mAh |
| Charging Time | 3 hours |
| Heating Time | 90 seconds |
| Operating Temperature | 170 °C |
| Glue Stick Diameter | 7 mm |
| Auto Shut-off | After 10 minutes of inactivity |
| Indicator Lights | Temperature LED (red/green) and battery level LED (red/green) |
| Package Contents | 1 glue gun, 1 USB cable, 20 glue sticks, 1 user manual |
| Weight | 300 g (approx.) |
| Dimensions | 20 x 5 x 5 cm (approx.) |
| Body Material | Heat-resistant plastic |
| Nozzle | Metal with removable thermal guard |
| Compatible Adhesive Type | 7 mm diameter hot melt glue sticks |
| Safety | Auto shut-off, overheat protection, protected nozzle |
| Maintenance | Clean with a dry cloth, do not use solvents |
| Repairability | Spare parts available; professional repair recommended |
Frequently Asked Questions - PGG01B Tacklife
User questions about PGG01B Tacklife
0 question about this device. Answer the ones you know or ask your own.
Ask a new question about this device
Download the instructions for your Glue gun in PDF format for free! Find your manual PGG01B - Tacklife and take your electronic device back in hand. On this page are published all the documents necessary for the use of your device. PGG01B by Tacklife.
USER MANUAL PGG01B Tacklife
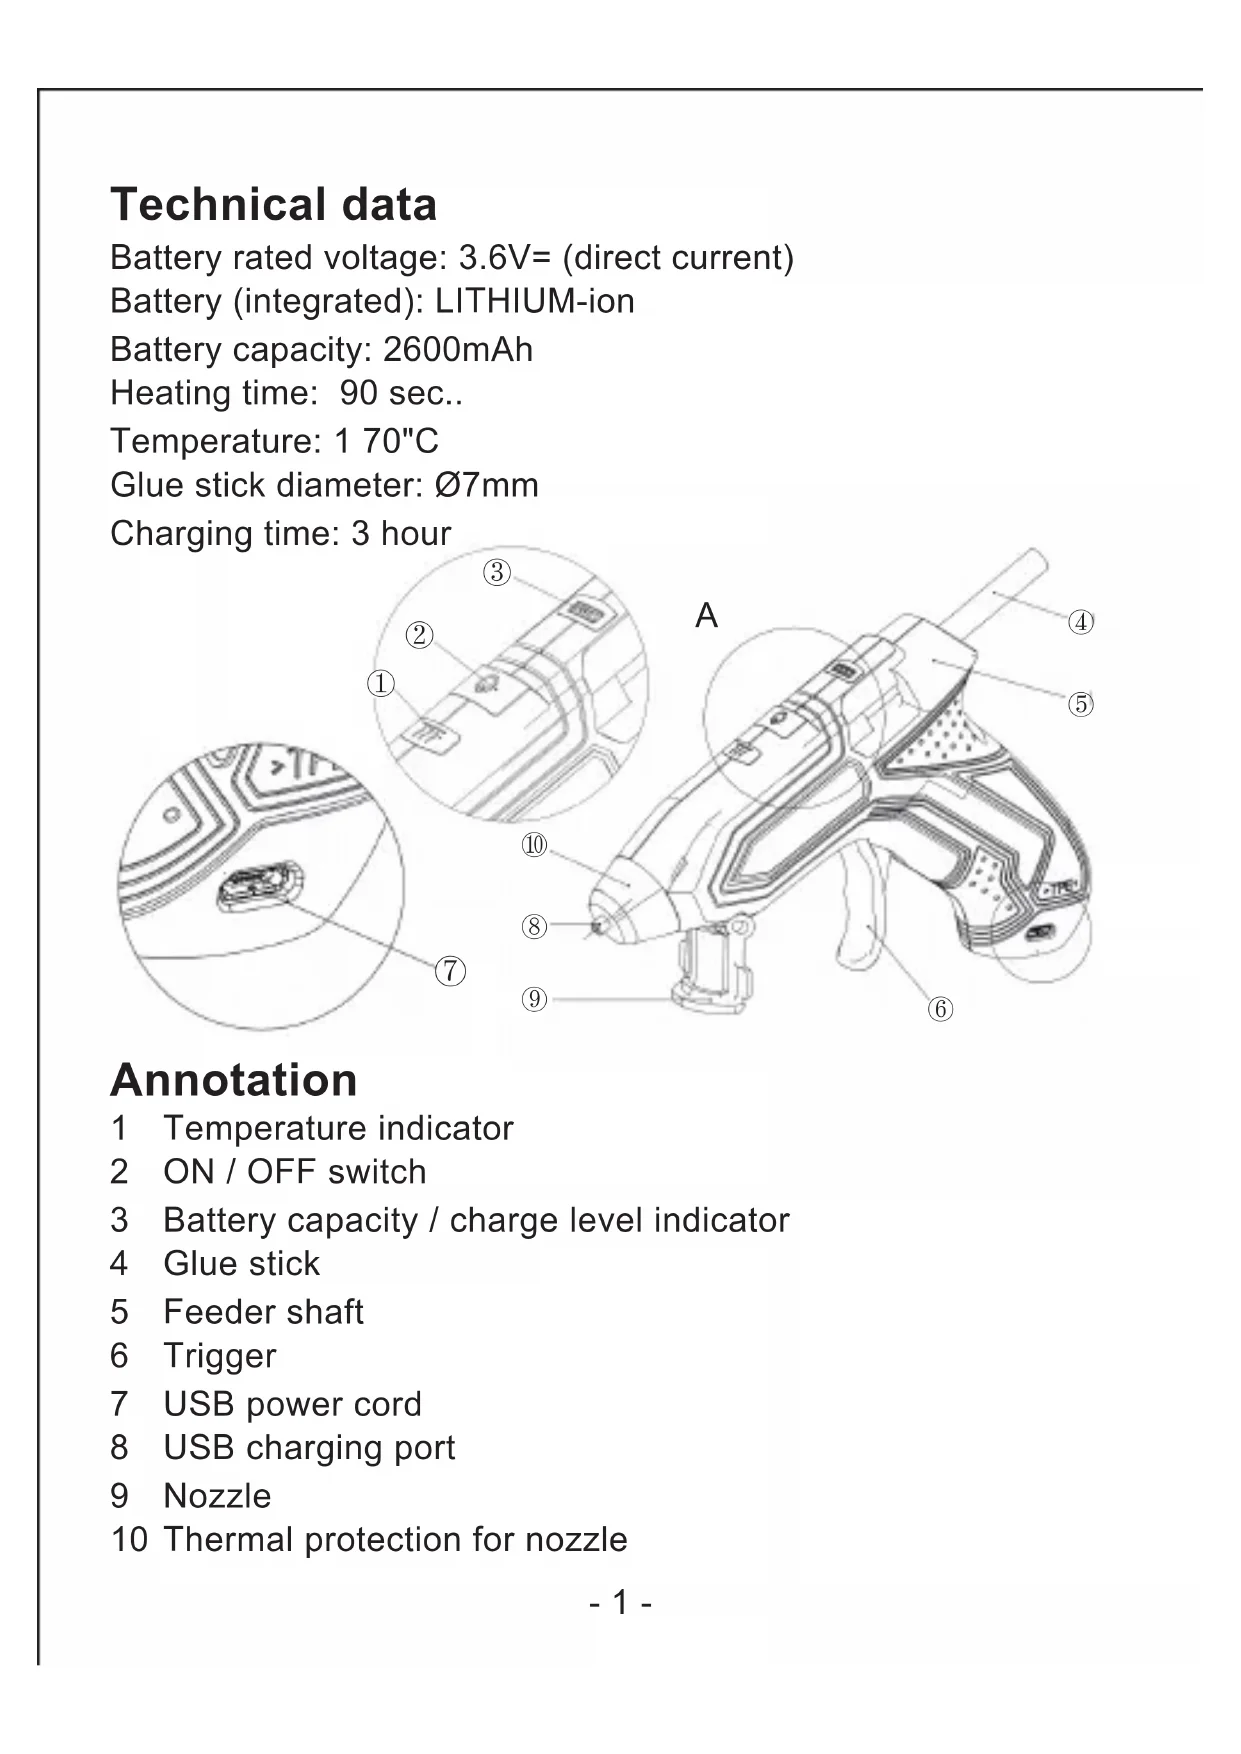
Battery rated voltage: 3.6V = (direct current)
Battery (integrated): LITHIUM-ion
Battery capacity: 2600mAh
Heating time: 90 sec..
Temperature: 170^ C
Glue stick diameter: 0.7 ~mm
Charging time: 3 hour
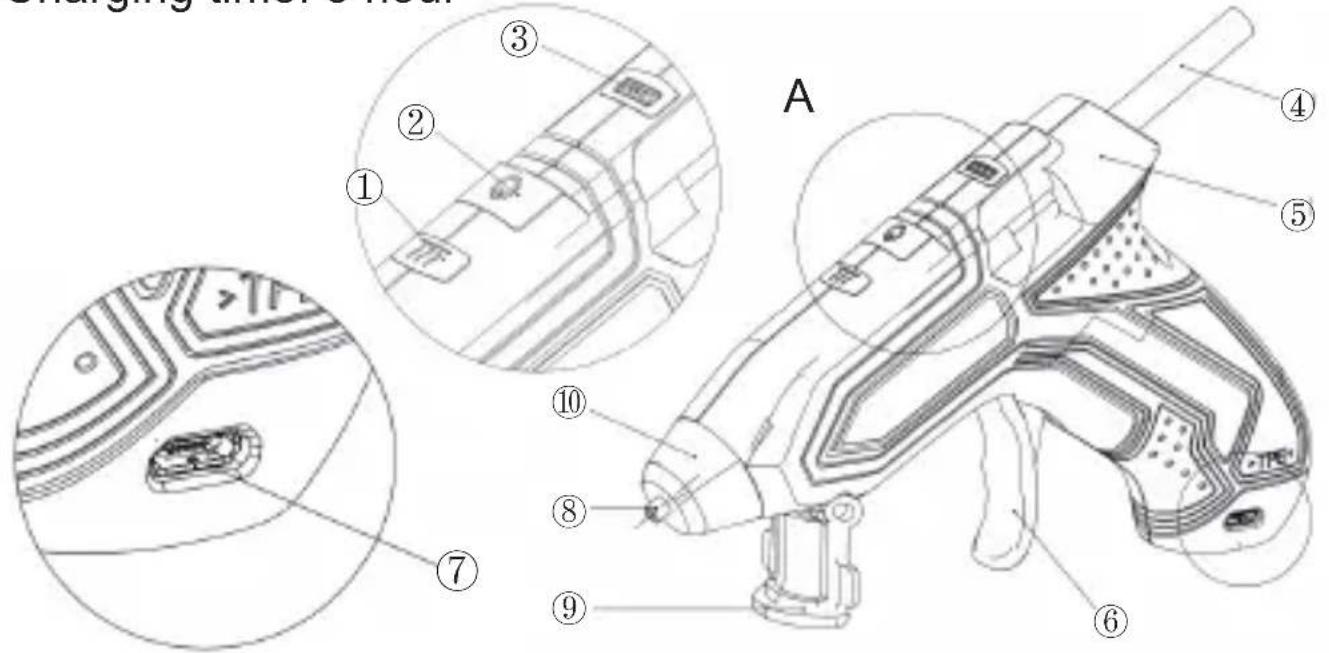
Annotation
1 Temperature indicator
2 ON/OFF switch
3 Battery capacity / charge level indicator
4 Glue stick
5 Feeder shaft
6 Trigger
7 USB power cord
8 USB charging port
9 Nozzle
10 Thermal protection for nozzle
Package contents
1) 1 Cordless hot glue gun
2) 1 USB data cable
3) 20 glue sticks
4) 1 operating instructions
WARNING!
- Read all safety warnings and all instructions.
- Failure to Follow the warnings and safety instructions may result in electric shock, fire and / or serous injury.
Use and handling of the cordless power tool
a) Charge the appliance using only the charger recommended by the manufacturer. Chargers are often designed for a particular type of rechargeable battery. There is a risk of fire if other types of rechargeable battery are used.
b) Only the rechargeable battery units supplied are to be used with the power tools. The use of other rechargeable batteries may result in injury or a fire hazard.
c) When they are not being used, store re chargeable batteries away from paper clips, coins, keys, nails, screws or other small metal objects that could cause the contacts to be bridged. Short-circuiting the contacts of a rechargeable battery may result in burns or fire.
d) Fluid may leak out of rechargeable batteries if they are misused. If this happens, avoid contact with the fluid. If accidental contact occurs, rinse the affected area with water. Seek additional medical help if any of the fluid gets into your eyes. Escaping battery fluid may cause skin irritation or burns.
Safety guidelines for battery chargers
- This appliance may be used by children aged 8 years and above and by persons with limited physical, sensory or mental capabilities or lack of experience and knowledge, provided that they are under supervision or have been told how to use the appliance safely and are aware of the potential risks. Children must not use the appliance as a plaything. Cleaning and user maintenance tasks may not be carried out by children unless they are supervised.

The temperature of adhesive reach a temperature of around 105^
WARNING!
- Never operate the charger with a damaged power cord or power pf: g. A damaged power cord causes danger to life by electric shock.
Battery level display
The battery level display (3) indicates the charge level using 2 coloured LEDs.
Green LED:
The battery is fully charged. the cordless hot glue gun is ready for use
Red LED:
Battery unsaturated
Initial operation
Inserting a glue stick:
-
- Push the glue stick (4) into the feeder shaft (5).
-
- Allow the appliance heat up for about 90 seconds. The appliance is now ready for use.
Switching on:
-
- To turn on the cordless hot glue gun, press the ON / OFF switch (2) until the temperature indicator (1) lights up red. The glue is heated up.
- The temperature indicator (1) lights up green as soon as the appliance has reached working temperature.
Switching off:
-
- To turn off the cordless hot glue gun, press the ON / OFF switch (2) until the temperature indicator (1) goes off.
- After use, place the cordless hot glue gun down carefully and allow it to cool down fully before you store the appliance. The hot nozzle (10) can cause damage and / or burns.
Maintenance and cleaning
- The appliance must always be kept clean, dry and free from oil or grease.
- Never permit fluids to penetrate inside the appliance.
- Use a soft cloth to clean the appliance housing.
- Never use benzine, solvents or cleansers which can damage plastic.
Automatic switch off:
The cordless hot glue gun switches itself off after 10 minutes to save energy.
× Switch the cordless hot glue gun back on and check the temperature indicator (1) and the battery level display (3) to see whether the appliance needs to be recharged or heated further.
WARNING!
Have your appliance repaired by qualified specialists only. Always use original spare parts. This will ensure the ongoing safety of the appliance.
WARNING!
Power cords should only be replaced by the manufacturer of the power tool or the manufacturer's authorized customer service agent. This will ensure the ongoing safety of the appliance.
WARNING!
The appliance is only to be used with the power supply unit provided with the appliance.
- the battery must be removed from the appliance before it is scrapped;
- the appliance must be disconnected from the supply mains when removing the battery;
- the battery is to be disposed of safely.
Technische Daten
ADD: No.31, Qing Linxi Road, Longgang District,
Shenzhen, Guangdong, China 518172
Made in China

Intertek
RoHS


Brand : Tacklife
Model : PGG01B
Category : Glue gun