Easy Parasol - Parasol Sun Garden - Free user manual and instructions
Find the device manual for free Easy Parasol Sun Garden in PDF.

Frequently Asked Questions - Easy Parasol Sun Garden
User questions about Easy Parasol Sun Garden
0 question about this device. Answer the ones you know or ask your own.
Ask a new question about this device
Download the instructions for your Parasol in PDF format for free! Find your manual Easy Parasol - Sun Garden and take your electronic device back in hand. On this page are published all the documents necessary for the use of your device. Easy Parasol by Sun Garden.
USER MANUAL Easy Parasol Sun Garden
natural_image
Line drawing of a desk lamp with a curved arm and base (no text or symbols)Bedienungsanleitung
Easy SunPARASOLn Ampelschirm
Einleitung
natural_image
Diagram showing a lamp mechanism with a rotating arm and a mechanical component (no text or symbols)natural_image
Technical line drawing of a mechanical device with a gauze and lever mechanism (no text or symbols)4.8 Bodenhülse
natural_image
Diagram showing a lamp with a curved arm and a cylindrical lamp emitting a fan (no text or symbols)4.9 Schutzhülle
natural_image
Simple line drawing of a leaf-like shape with a stem and two legs, no text or symbols present.natural_image
Line drawing of a simple umbrella with a base and support structure (no text or symbols)natural_image
Geometric diagram of a dome-shaped structure with diagonal lines and a coiled cable (no text or symbols)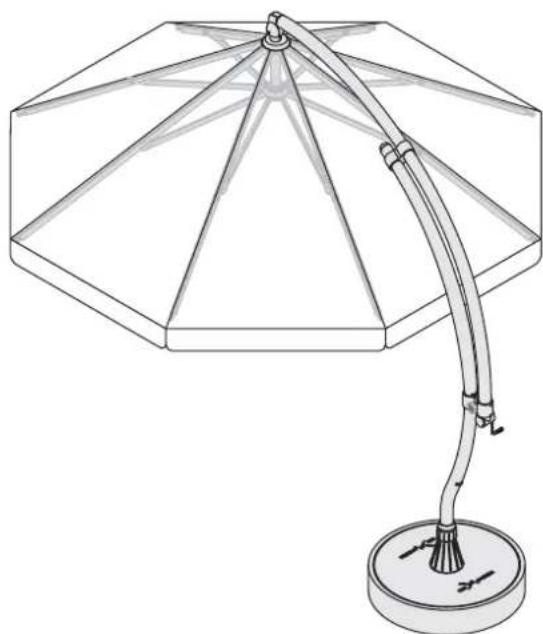
natural_image
Line drawing of a desk lamp with a conical shade and base (no text or symbols)11.0 Lagerung
natural_image
Line drawing of a desk lamp with adjustable arm and base, no text or symbols presentPrüfliste Easy Sun PARASOL Ampelschirm:
natural_image
Line drawing of a desk lamp with a curved arm and base (no text or symbols)Operation Manual
Easy SunPARASOLn Sunshade
Introduction
SUN-GARDEN offers you, with the Easy SunPARASOLnSunshade, a high quality technically advanced and long-lasting product. It is constructed to the current technological state of the art and recognised safety standards.
The following operation manual should help you to enjoy using your sunshade for a long time ahead.
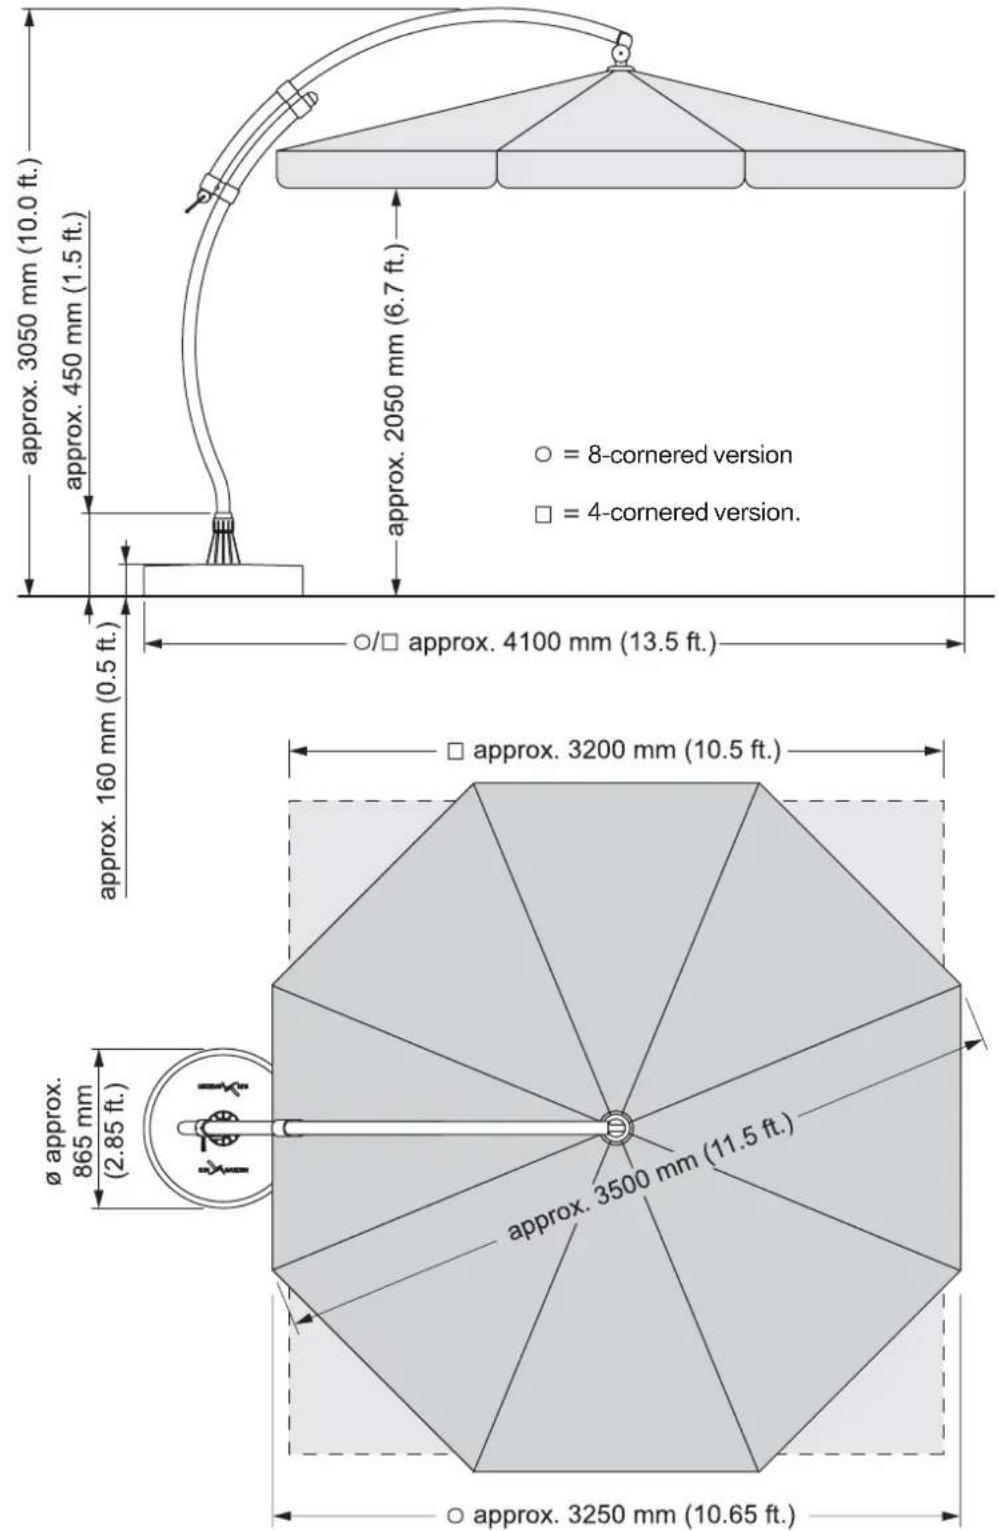
This operation manual applies both to the 4-cornered and 8-cornered version of the sunshade, as the only difference between the sunshades is the shape of the sunshade frame and the canopy. Many sketches in the operation manual show the 8-cornered version of the sunshade.
They are used for clarity and can equally be applied to the 4-cornered version. All operation and working sequences are identical for both versions.
The manual contains information about the following topics:
- Safety
- Installation
- Operation
- Care
Please read the operation manual carefully before using the sunshade. Damages caused by non-observance of the instructions are excluded from any liability and guarantee.
The sunshade has been designed as protection from the sun, and is intended for this use only.
Use the sunshade only
• for its intended use as a sunshade
• in a technically correct condition
Malfunctions, which could influence the safety and function of the sunshade must be rectified immediately.
All repairs described in the manual can be carried out by the user. Any further complicated repairs should not be carried out by the user. The repair information is intended or those persons who are competent to use the tools described safely. Only carry out this repair work using suitable tools.
We reserve the right to make alterations without prior notice due to technical improvements. The following manual may neither be reprinted or copied without the prior consent of SUN-GARDEN.
Contents
1.0 Safety information ...... 2
1.1 Important symbols ...... 2
1.2 Safety information 2
2.0 Type supplied and included in delivery.... 3
3.0 Sunshade construction ..... 4
4.0 Fittings .... 5
4.1 General 5
4.2 Nameplate 5
4.3 Canopy material 5
4.4 Sunshade frame 6
4.5 Operating elements: the winch handle 6
4.6 Operating elements: the block ..... 6
4.7 Sliding tube stop 7
4.8 Floor sleeve 7
4.9 Protective cover 7
5.0 Sunshade space requirements ....8
6.0 Setting up the Sunshade ..... 9
7.0 Fitting the winch handle ...... 9
8.0 Operating the sunshade ..... 10
8.1 Opening the sunshade 10
8.2 Adjusting the sunshade inclination ..... 11
8.3 Closing the sunshade 11
8.4 Turning the sunshade in the parasol base or bottom pole 12
9.0 Pulling on the protective cover ..13
10.0 Care of your Easy Sun Parasol sunshade 13
10.1 Cleaning the canopy material ..... 13
10.2 Removing sunshade cover 14
10.3 Impregnating the canopy material ..... 15
10.4 Cleaning the sunshade 15
11.0 Storage....15
12.0 Maintenance 16
12.1 Periodical maintenance 16
12.2 Yearly maintenance 16
13.0 Service Centre / spare part supply 17
14.0 Disposal 17
15.0 Specifications ....17
16.0 Guarantee ....18
Guarantee certificate 19
1.0 Safety information
1.1 Important symbols
Special information is labelled with the following graphics in the manual:

Caution!
This symbol identifies information which refers to danger of injury and accident.

Note
This symbol identifies general tips for handling.

Note
This symbol identifies information which can avoid damage to the sunshade.
1.2 Safety information

Caution: Tipping hazard!
- Only use original SUN-GARDEN Parasol base or Bottom pole. Any liability with regard to the stability of Easy Sun PARASOL sunshades can only be accepted with the use of original SUN-GARDEN Parasol base or Bottom pole.

Caution: Tipping hazard!
- Only set the sunshade up on firm foundations.
• Always ensure that the Parasol base or Bottom pole is firmly seated. - Always close the sunshade and put the cover on if the wind rises above a „moderate breeze“, if there is snowfall or if it is raining.
Wind strength description (Beaufort scale):
"Moderate breeze" = Beaufort force 4 Bft Effects on land = twigs and small branches move, paper and dust is raised Effects on sea = small, but long waves, more white horses
- Do not hang any objects (e.g. clothing) on the sunshade frame.

Caution: Risk of accidents!
- Before opening the sunshade ensure that no persons are present in the opening area.
- Before closing the sunshade ensure that no persons are present below the sunshade.
- The sunshade is not a toy! Ensure that children do not use either the sunshade, the canopy or the base for playing or climbing.

Caution: Fire hazard!
- Do not use open fire (e.g. garden barbecue or grill) beneath or right next to the sunshade.

Caution: Risk of injury!
- Only carry out repairs to your sunshade when you are competent to use the tools required safely.
2.0 Type supplied and included in delivery

Note
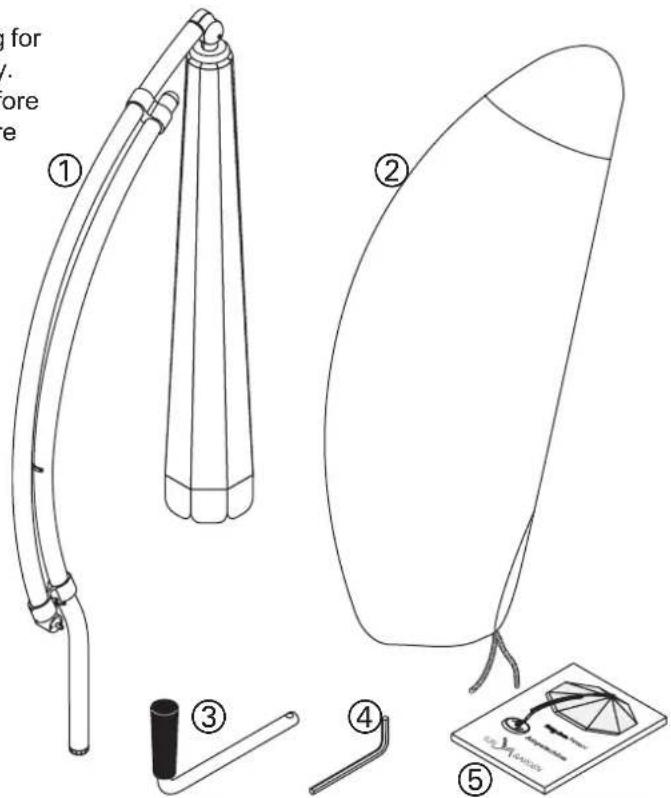
All our products undergo rigorous testing for quality and completeness before delivery. Check the contents of the packaging before starting assembly. If any components are missing or faults can be seen please contact your dealer. If possible you should keep the packaging for any guarantee work which may be necessary.
The sunshade is delivered in stable cardboard packaging.
Dimensions: 3000 x 800 x 200 mm (118'' x 31.5'' x 7.8'')
Total weight: 24 kg (53 lbs.)
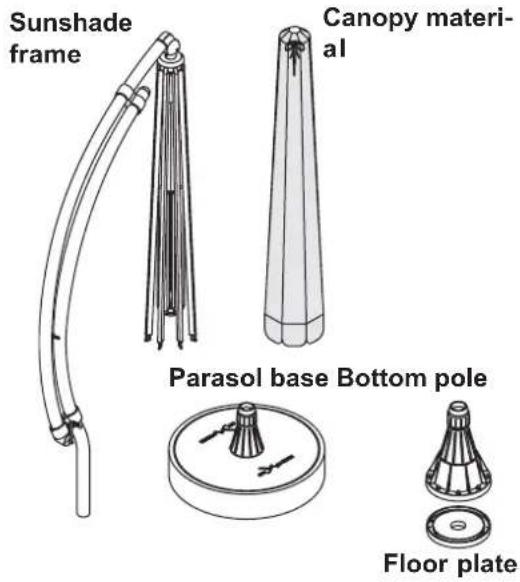
The following components are contained in the packaging:
① one sunshade
② one protective cover
③one winch handle
④one Allen key; Size 4 mm (0.15")
⑤one operation manual
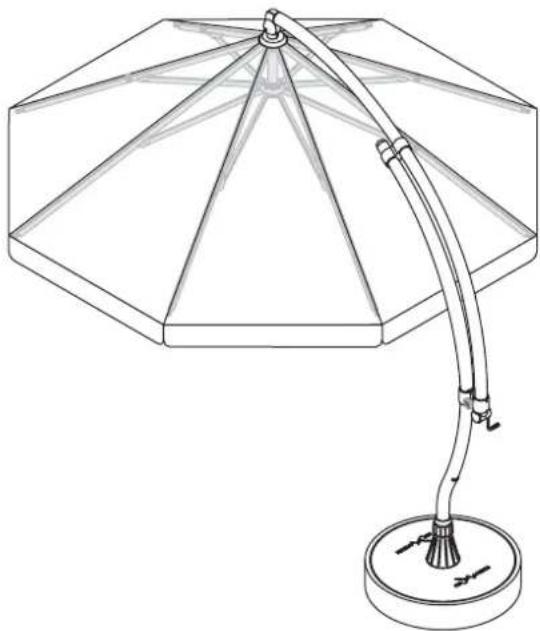
3.0 Sunshade construction

* The Bottom pole / Parasol base is NOT included in delivery with the sunshade (optional extra).
4.0 Fittings
4.1 General
Material such as plastic, plastic coated aluminium and non-rusting steel have been used for all mechanical components of the sunshade. This enables the sunshade to have a very high degree of weather resistance, functionality and service life.
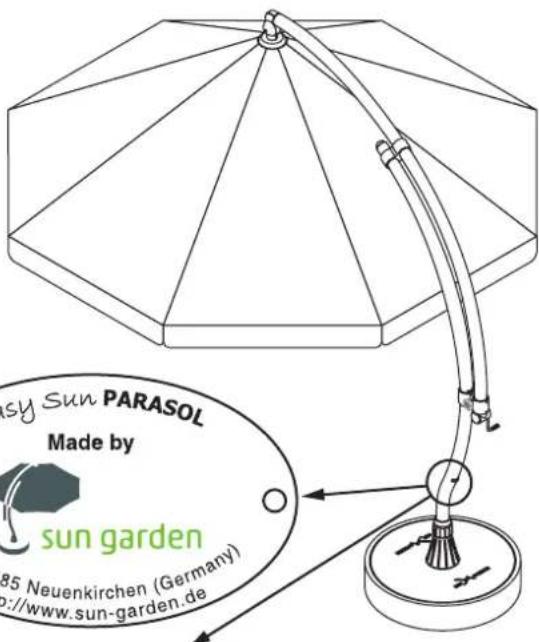
4.2 Nameplate
The nameplate is attached to the stand tube in the vicinity of the lower slider tube stop. The following information is printed on the nameplate:
- Sunshade model
- Manufacturer
• Manufacturer's address
• Manufacturer's Internet address
Sticker with Serial No.
4.3 Canopy material
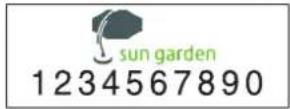
The canopy material is manufactured in Polyester fabric or Polypropylene depending on the version. Both fabric types are treated to be water-repellent. Coloured canopies are tested for light and colour fastness (DIN 54 004).
The canopy material can be removed from the sunshade easily for cleaning. Please observe the information in the chapter entitled "Care".

Note
The sunshade canopy material is treated to be water-repellent. This treatment is however not intended to prevent water penetration in heavy rainfall.
The Easy Sun PARASOL is not an umbrella.
4.4 Sunshade frame
The sunshade frame is used to tension the canopy material. It consists of the frame arms and two frame seats.
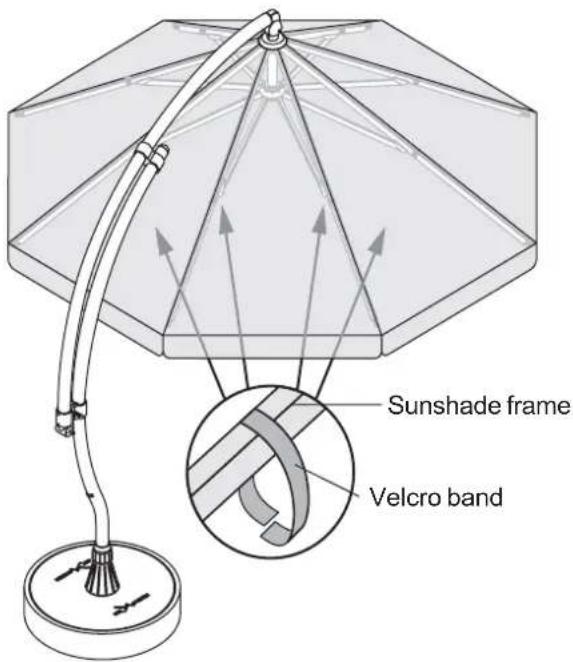
The canopy material is fixed to the sunshade frame with velcro bands and screws.
Opening the frame is done by a cable which is operated by the winch handle.
natural_image
Line drawing of a simple lamp with a conical shade and base, no text or symbols present4.5 Operating elements: the winch handle
The winch handle, manufactured in stainless steel, is used to open and close the sunshade. Handling is improved by the winch handle having a rotating handle on bearings.
The winch handle length is designed so that the sunshade can be opened or closed without needing too much strength.

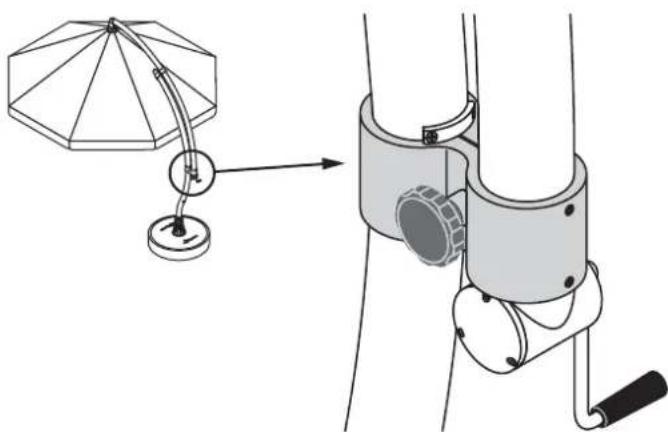
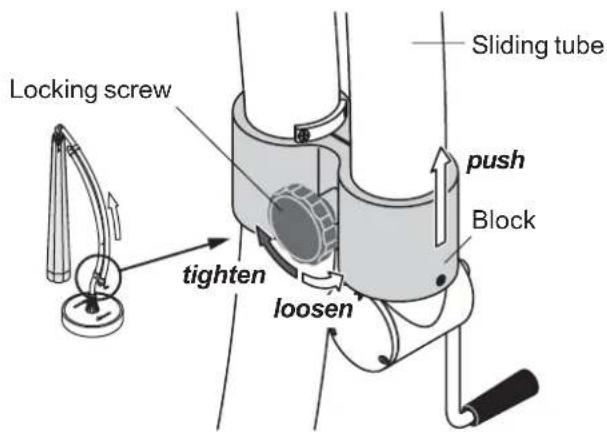
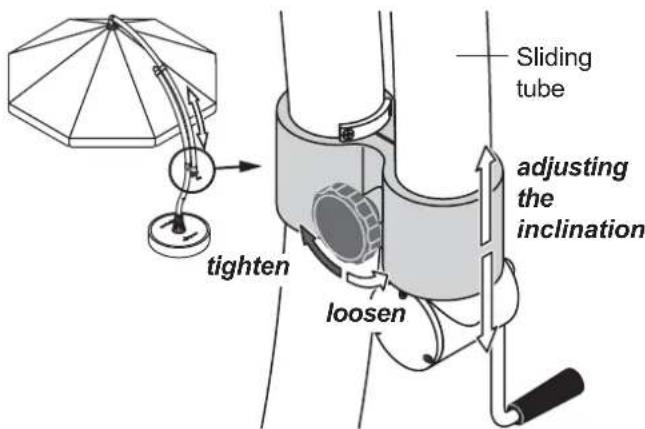
4.6 Operating elements: the block
The sunshade sliding tube is held in the required position by the block.
After loosening the locking screw the sunshade inclination can be altered and adapted to the angle of the sun.
natural_image
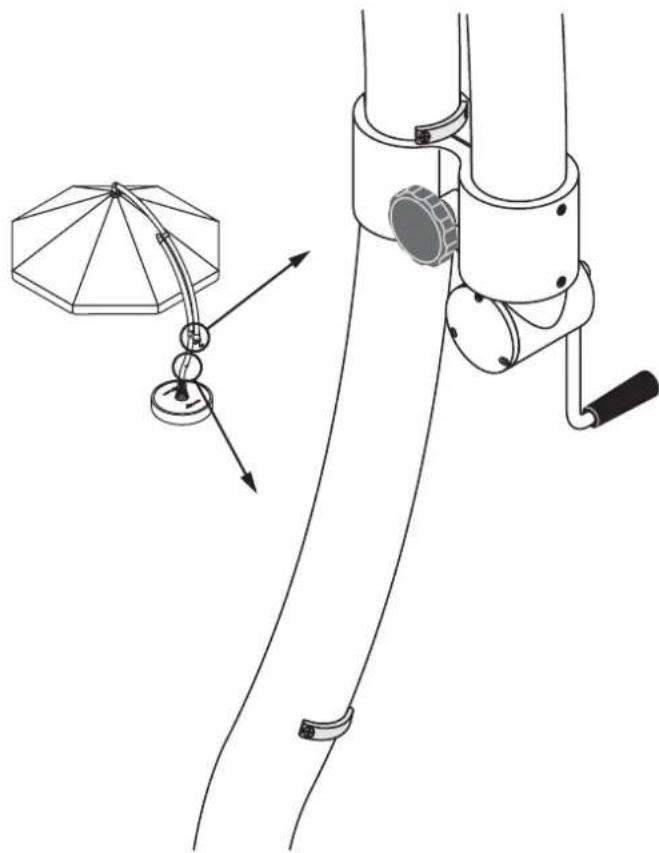
Diagram showing a lamp mechanism with a rotating base and a mechanical arm assembly (no text or symbols)4.7 Sliding tube stop
The sliding tube stops limit the sunshade inclination.
They prevent the sunshade being adjusted to too great an inclination.
natural_image
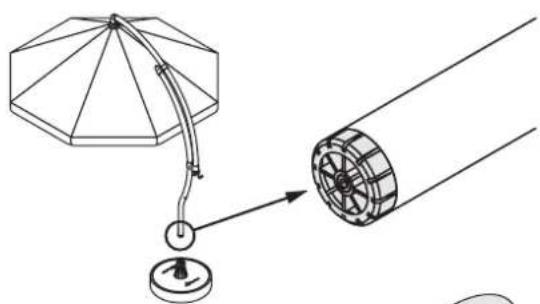
Technical line drawing of a mechanical device with a gasket and lever mechanism (no text or symbols)4.8 Floor sleeve
The floor sleeve is fitted to the bottom of the sunshade stand tube.
It is used to centre the stand tube in the floor stand and ensures that the sunshade is stably mounted.
natural_image
Diagram showing a lamp with a curved arm and a cylindrical lamp emitting light, illustrating the setup (no text or symbols present)4.9 Protective cover
The protective cover, made of weather-resistant PE fabric, protects the sunshade from damage to the frame arms and the canopy material in any weather.
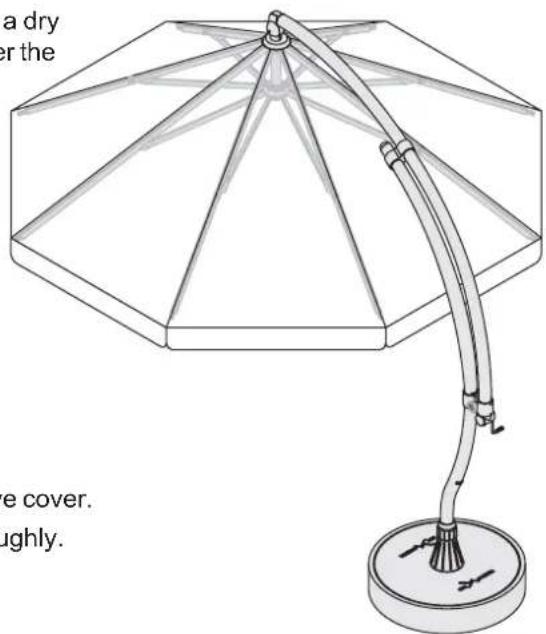
Despite this the sunshade should not be left out in the open in extreme weather conditions such as storms or heavy frost, but should be kept in a dry and protected location.

natural_image
Simple line drawing of a leaf-like shape with a stem and two legs, no text or symbols present.5.0 Sunshade space requirements
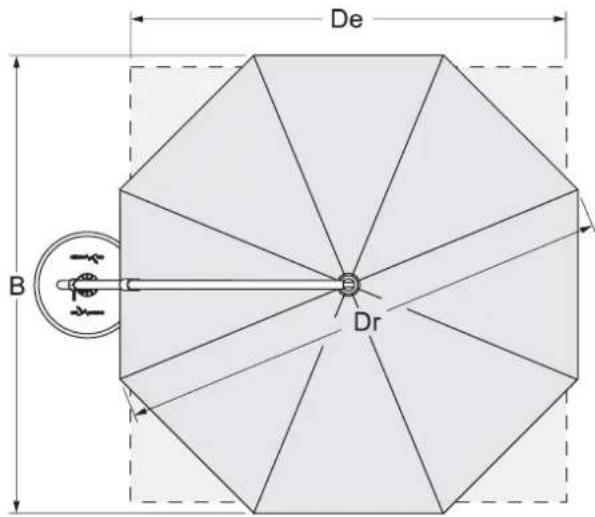
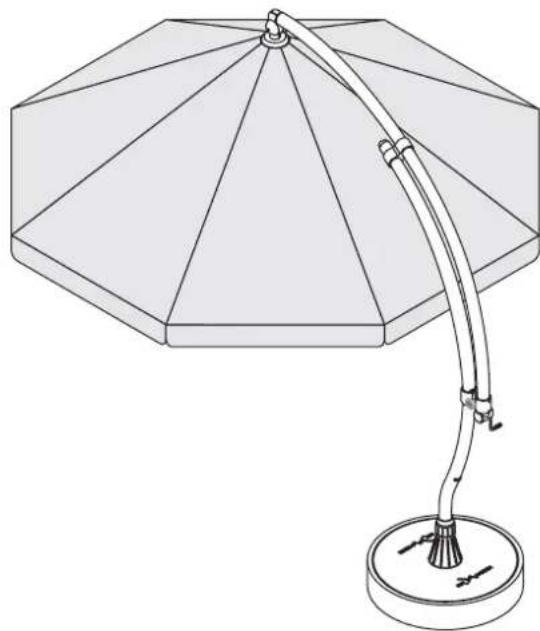
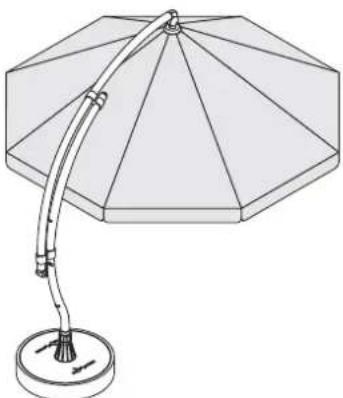
When selecting the location for your Easy Sun PARASOL sunshade make sure there is enough space between it and any nearby buildings, trees etc.
The following sketches show you the space required by an opened sunshade.
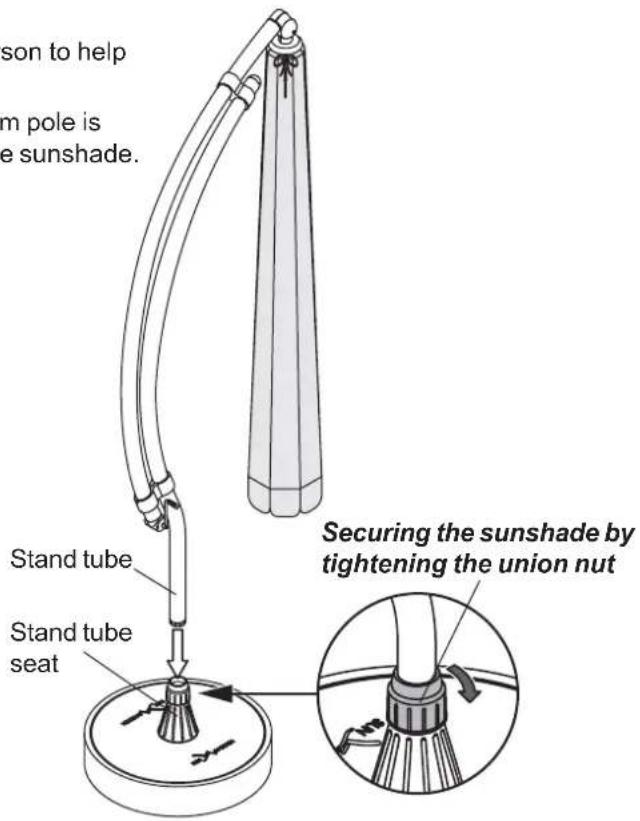
6.0 Setting up the Sunshade

Caution: Danger of accident!
- It is easier if you can get a second person to help when setting up the sunshade.
- Ensure that the Parasol base or Bottom pole is secure and stable before setting up the sunshade.
Place the sunshade with its stand tube into the stand tube seat of the Parasol base or Bottom pole.
→ Push the stand tube in as far as the stop in the stand tube seat.
Turn the sunshade backwards and forwards until the floor sleeve engages in the stand tube seat (centred).
If the floor sleeve has engaged correctly, the sunshade can no longer be turned.
Clamp the sunshade by tightening the union nut in the stand tube seat.

Note
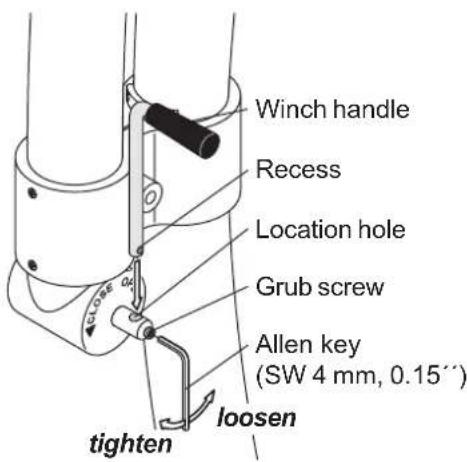
7.0 Fitting the winch handle
Loosen grub screw with Allen key (SW 4 mm, 0.15").
Place the winch handle in the location hole so that the recess in the handle is facing the grub screw.
- Tighten grub screw.
When tightening, ensure that the grub screw engages exactly into the recess.

Note
Overtightening of the grub screw causes damage to the Allen screw.
8.0 Operating the sunshade
8.1 Opening the sunshade

Caution: Danger of accident!
- Ensure that no persons or objects are in the vicinity of the opening area before opening the sunshade.
→ Loosen the block locking screw.
- Push the sunshade sliding tube to the upper stop and secure by tightening the locking screw.
Open the sunshade by turning the winch handle in a clockwise direction (OPEN).

8.2 Adjusting the sunshade inclination
Loosen the block locking screw.
→ Push the sunshade sliding tube to the required position and secure by tightening the locking screw.
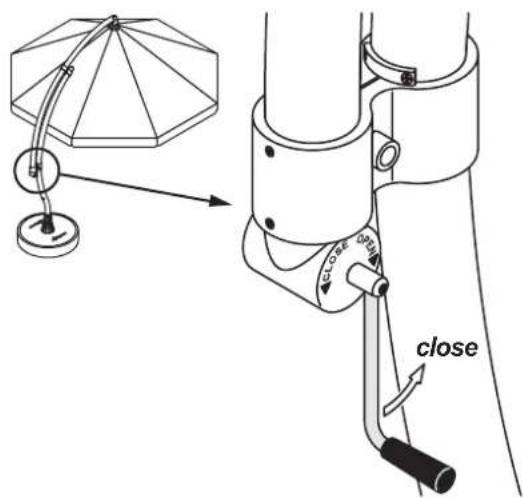
8.3 Closing the sunshade

Caution: Danger of accident!
- Before opening or closing the sunshade ensure that no persons or objects are under the sunshade.
- Close the sunshade by turning the winch handle in an anticlockwise direction (CLOSE).

Note
To avoid water stains you should only close the sunshade in a dry condition and use the protective cover.
- If the sunshade is closed when wet, open it as soon as possible and let it dry out.
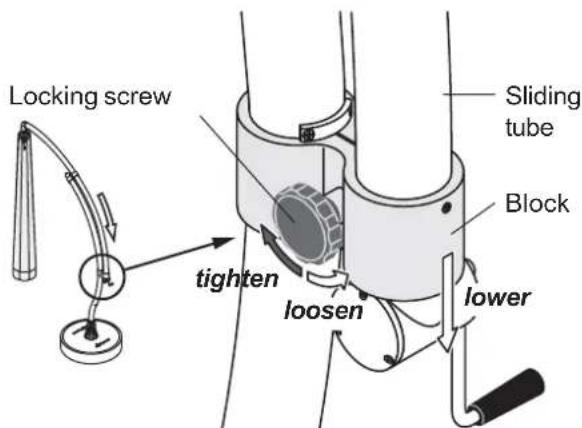
Loosen the block locking screw.
→ Push the sunshade sliding tube down as far as the lower stop.
Secure by tightening the locking screw.
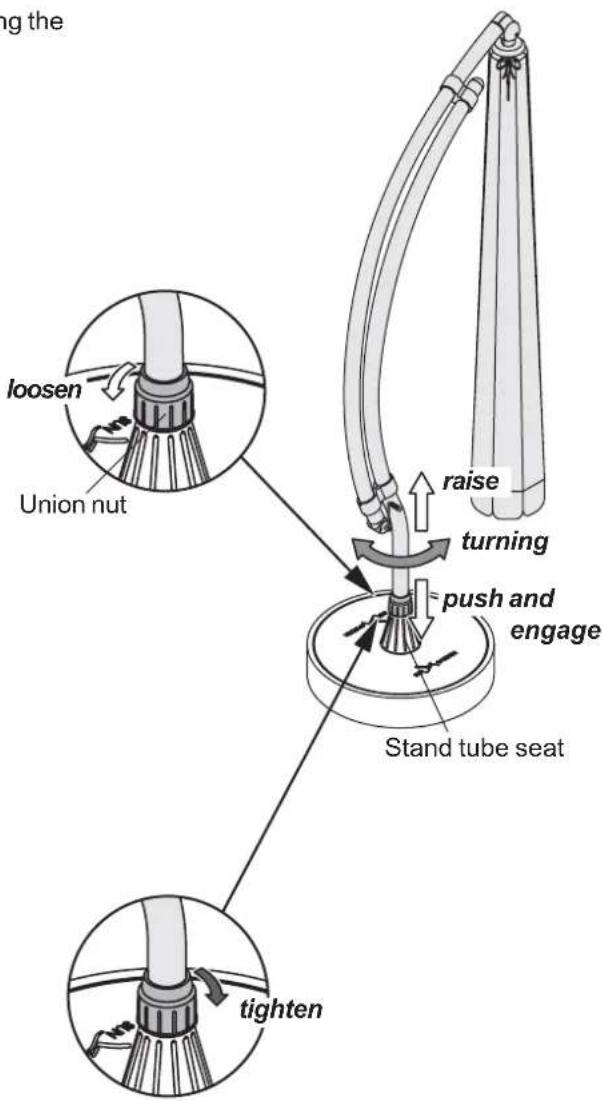
8.4 Turning the sunshade in the parasol base or bottom pole

Caution: Danger of accident!
- Get help from a second person when turning the sunshade.
- Only turn the sunshade when it is closed.
→ Close the canopy (see chapter 8.3).
Loosen the union nut on the stand tube mounting until the sunshade can be turned (approx. 2 turns).
- Lift the sunshade up approx. 5 cm (Floor sleeve disengages out of stand tube seat).
Turn the sunshade into the required position.
Press the sunshade back into the stand tube seat until it engages.
Turn the sunshade backwards and forwards until the floor sleeve engages in the stand tube seat (centred).

Note
If the floor sleeve has engaged correctly, the sunshade can no longer be turned.
Clamp the sunshade by tightening the union nut in the stand tube seat.
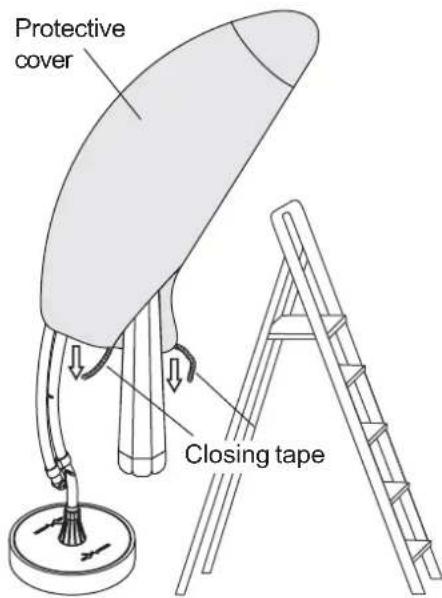
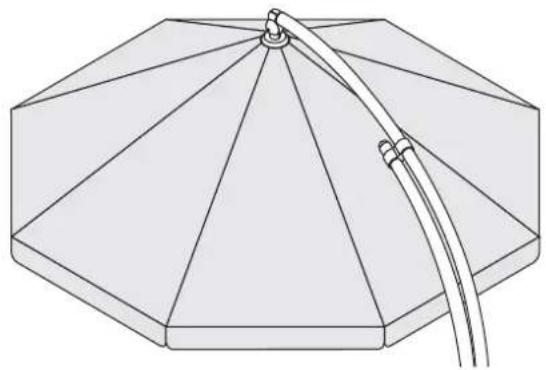
9.0 Pulling on the protective cover
The sunshade and canopy material should be protected against soiling and damage by pulling on the protective cover when not in use.
- When doing this use a stepladder and get help from a second person.

Caution: Danger of accident!
- Only set the stepladder up on firm foundations. Get a second person to hold the stepladder two prevent accidents.
Pull the protective cover over the sunshade from the top.
◇ Close the protective cover by looping the closing tape around the sunshade and knotting it.
10.0 Care of your Easy SunEASY SOL SUNSHADE

Note
- Do not use any sharp-edged tools such as knives or metal scrapers, or any aggressive cleaners or solvents, to clean your sunshade.
- Do not use large quantities of water when cleaning, in other words do not use hosepipes or high-pressure cleaners.
10.1 Cleaning the canopy material
The canopy material can be cleaned of dust and light soiling using a brush or a damp cloth. If heavy soiling is present the canopy must be removed from the sunshade frame and cleaned. You can find information about cleaning the canopy material on the label sewed onto the canopy.
natural_image
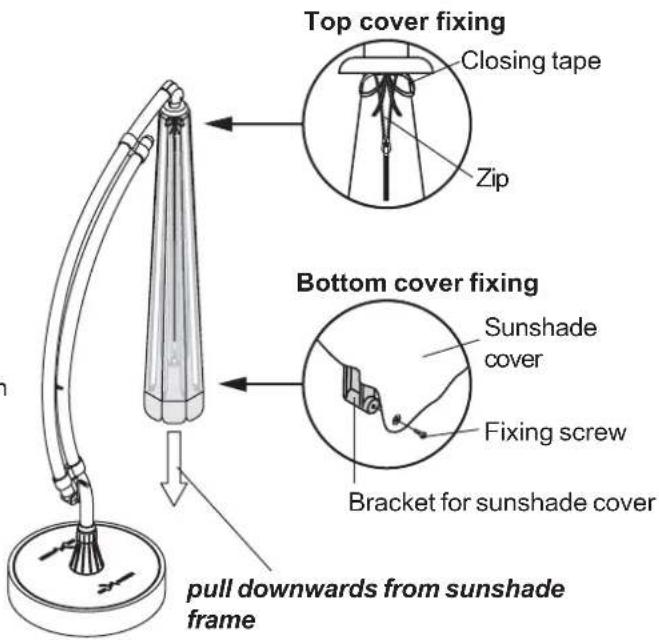
Line drawing of a simple umbrella with a base and support structure (no text or symbols)10.2 Removing sunshade cover
Tools required:
☐ Phillips screwdriver No. 2
Stages:
→ Open the sunshade about half-way.
Release all material velcro bands on the sunshade frame from the inside.
Cose sunshade and remove all screws in the sunshade cover bottom fixing with a Phillips screwdriver.
Open zip and closing tape in top cover fixing and remove cover downwards from sunshade frame.
Reassembly of the canopy material takes place in the same manner but in reverse order
10.3 Impregnating the canopy material
The canopy material must be impregnated with water-repellent material after cleaning. You can use any commercially available impregnating material.

Note
Only use impregnating materials suitable for the material in your canopy. Observe the instructions for use provided with the impregnator.
10.4 Cleaning the sunshade
Clean all plastic and aluminium components with a damp cloth. You can best remove heavy soiling with a mild cleanser free of scouring agents.

Note
To avoid damage to component surfaces please observe the instructions for use provided with the cleanser.
natural_image
Geometric diagram of a dome-shaped structure with diagonal bracing and two coiled cables attached (no text or symbols)
natural_image
Line drawing of a desk lamp with a curved tube and base (no text or symbols)11.0 Storage
All sunshade and floor stand components must be stored in a dry and frost-free location during long periods of non-use and over the winter months.

Note
• To avoid water stains you should only fold down your Easy Sun PARASOL sunshade, cover it with the protective cover and store it in a dry condition.
- If possible you should use the original sunshade packaging for storage.
Storing the sunshade:
- Clean the stand, sliding tube, canopy material and protective cover.
- Allow the canopy material and protective cover to dry thoroughly.
- Pull on the protective cover and store the sunshade.
12.0 Maintenance
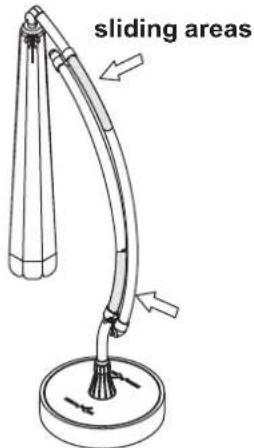
12.1 Periodical maintenance
The sliding areas of the stand and slide tube hould be cleaned with a damp cloth.
Dust and dirt in this area can lead to difficulty in adjusting the inclination and to damage to the tube surface.
12.2 Yearly maintenance
You should carry out a thorough inspection of your sunshade using the following checklist, either after the first assembly or before storing the sunshade over longer periods.
Checklist Easy Sun PARASOL sunshade:
| Test NOT in working order | |
| Check canopy material for damage Replace canopy material | 2 |
| Check block function(function see chapters 4.6 and 8.2) | Replace block^1 |
| Check winch handle for damage | Replace winch handle^1 |
| Check sliding tube stops for damage Replace sliding tube stops | 1 |
| Check winch handle function (smooth running) Replace drum axle | 1 |
| Check brake function(when opening or closing the sunshade must remain stable in any position) | Replace winch housing cover^1 |
| Check sunshade frame for damage Replace frame arm | 1 |
| Check sunshade frame seat(see chapter 4.4) | Replace frame seats^1 |
| Check floor sleeve for damage(see chapter 4.8) | Replace floor sleeve^1 |
| Give the whole sunshade a visual check replace damaged components | 1 |
1) Call Service Centre
2) See care chapter
13.0 Service Centre / spare part supply
If you have any questions about setting up, require our repair service or wish to order spare parts, please contact one of our Service Centres (see Service Centre / ordering spare parts information sheet) or visit our Internet site at www.sun-garden.de.
14.0 Disposal
The sunshade consists of metal and plastic components.
You should dispose of any of these materials in accordance with the regional or national environmental and disposal regulations. If you have any questions about disposal, please contact your local authority or one of our service centres (see information sheet entitled Service centres / spare parts disposal).
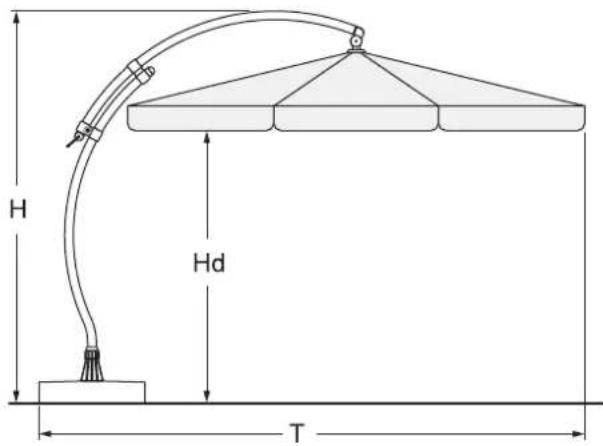
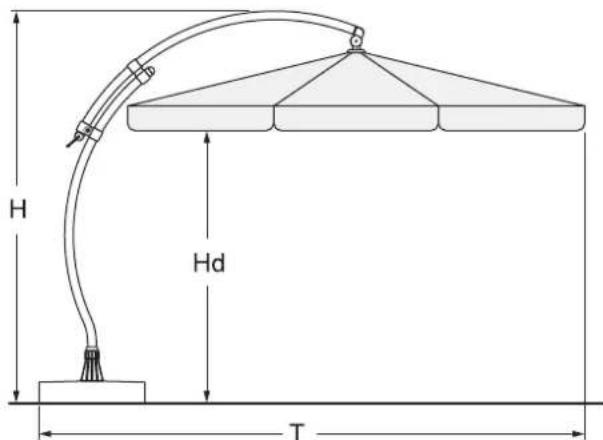
15.0 Specifications
Total height (H):
sliding tube retracted = approx. 2950 mm (9.7 ft.)
sliding tube extended = approx. 3050 mm (10.0 ft.)
Clear head
height (Hd) = approx. 2050 mm (6.7 ft.)
Depth (T) / closed:
Parasol base = approx. 1200 mm (3.95 ft.)
Bottom pole = approx. 1000 mm (3.3 ft.)
Depth (T) / opened / 4-cornered version:
Parasol base = approx. 4100 mm (13.5 ft.)
Bottom pole = approx. 3850 mm (12.6 ft.)
Depth (T) / opened / 8-cornered version:
Parasol base = approx. 4100 mm (13.5 ft.)
Bottom pole = approx. 3850 mm (12.6 ft.)
Width (B) / closed:
Parasol base = approx. 880 mm (2.9 ft)
Bottom pole = approx. 500 mm (1.65 ft.)
Width (B) / opened:
4-cornered version = approx. 3200 mm (10.5 ft.)
8-cornered version = approx. 3250 mm (10.65 ft.)
Canopy material dimensions:
4-cornered version (De ^2 ) = approx. 3200 mm (10.5 ft.)
8-cornered version (Dr) = approx. 3500 mm (11.5 ft.)
Stand and
sliding tube diameters = approx. 70 mm (2.76")
Weight:
complete sunshade = approx. 19.00 kg (42.2 lbs.)

Weight / canopy:
Polyester - 4-cornered version = approx. 1.85 kg (4 lbs.)
Polyester - 8-cornered version = approx. 1.65 kg (3.6 lbs.)
Polypropylene - 4-cornered version = approx. 2.40 kg (5.3 lbs.)
Polypropylene - 8-cornered version = approx. 2.10 kg (4.6 lbs.)
16.0 Guarantee
Sun Garden GmbH, Emsdettener Straße 233, 48485 Neuenkirchen, gives a product guarantee of two years on the basis that Sun Garden GmbH will replace or repair, as they see fit, parts which have become defective due to material or production faults.
The following are excluded from the guarantee:
a.) Damages which occur as a result of non-observance of the assembly or operating manuals or of unauthorised repairs.
b.) Products from which the fabrication number has been removed or destroyed.
c.) Damages arising due to acts of God.
The guarantee certificate, completely filled out, and proof of purchase (till receipt) is required for proof of guarantee claims.
The guarantee becomes active on the day of purchase.
Please proceed as follows to process any guarantee claims arising:
- Fill out the guarantee certificate completely, including a short description of any faults.
- Provide your proof of purchase with the guarantee certificate.
- Bring the complete item (individual components see „Included in delivery“) back to your dealer, who will then deal with your guarantee claim.
This guarantee does not restrict the purchaser's defective goods rights with respect to post-fulfilment, repudiation, reduction or damage compensation against the seller.

Note
Please use the original packaging to transport the article if possible to avoid any further damage.
Guarantee certificate
Nameplate information:
Purchaser's address:
Model:
Fabrication-No.:
Date of Purchase:
Dealer's adress:
Dealer's stamp and signature:
Short description of faults:
natural_image
Line drawing of a desk lamp with a curved arm and base (no text or symbols)Instructions de service
Easy SunPARASOLn
Introduction
Attention: Risque de blessure!

natural_image
Diagram showing a lamp mechanism with a magnified view of the lamp (no text or symbols present)natural_image
Technical line drawing of a mechanical device with a gasket and lever mechanism (no text or symbols)4.8 Douille de sol
natural_image
Diagram showing a lamp with a curved arm and a cylindrical lamp with a fan, illustrating the use of light to measure the lamp's position (no text or symbols present)natural_image
Simple line drawing of a leaf-like shape with a stem and two legs, no text or symbols present.natural_image
Line drawing of a simple umbrella with a base, no text or symbols presentnatural_image
Geometric diagram of a dome-shaped structure with diagonal bracing and two metal rods attached (no text or symbols)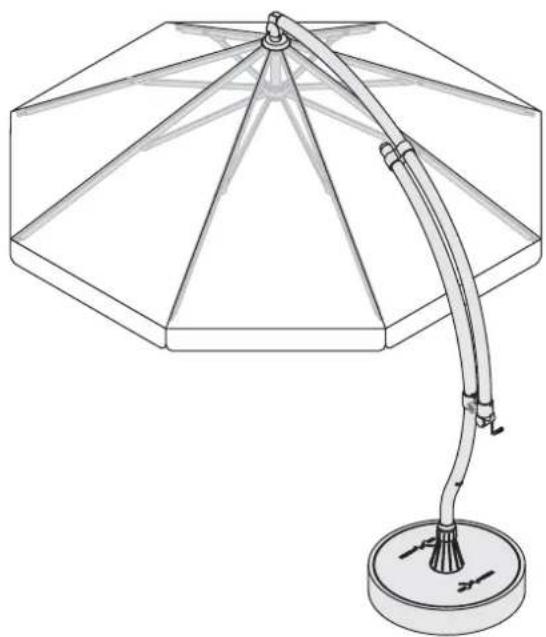
natural_image
Line drawing of a desk lamp with a curved tube and base (no text or symbols)11.0 Entreposage
Pied fixe = ca. 1000 mm
Pied fixe = ca. 3850 mm
Pied fixe = ca. 3850 mm
Pied fixe = ca. 500 mm
version 4 pans = ca. 3200 mm
version 8 pans = ca. 3250 mm
version 8 pans (Dr) = ca. 3500 mm
coulissant = ca. 70 mm
Poids: Parasol complet = ca. 19,00 kg
Polyester - version 4 pans = ca. 1,85 kg
Polyester - version 8 pans = ca. 1,65 kg
Polypropylene - version 4 pans = ca. 2,40 kg
Polypropylene - version 8 pans = ca. 2,10 kg