AD3 200 - Scooter Adiva - Free user manual and instructions
Find the device manual for free AD3 200 Adiva in PDF.
| Product type | Scooter |
| Brand | Adiva |
| Model | AD3 200 |
| Displacement | 198.00 cc |
| Power | 19.0 HP (14.6 kW) at 8000 rpm |
| Fuel system | Electronic injection |
| Cooling | Liquid |
| Transmission | Belt automatic (CVT) |
| Dimensions (L × W × H) | 2169 × 1080 × 1796 mm |
| Dry weight | 215 kg |
| Seat height | 759 mm |
| Front tires | 130/60-13 tubeless |
| Rear tires | 150/70-13 tubeless |
| Front brakes | Dual disc 220 mm |
| Rear brake | Disc 240 mm |
| Engine oil capacity | 1.5 L (drain 1.3 L) |
| Recommended engine oil | SAE 5W-50 (API SJ) |
| Transmission fluid | SAE 90, capacity 0.23 L |
| Fuel | Unleaded gasoline 90 RON min. |
| Top case capacity | 90 L (roof folded 56 L), max load 9 kg |
| Roof | Folding, stows in top case |
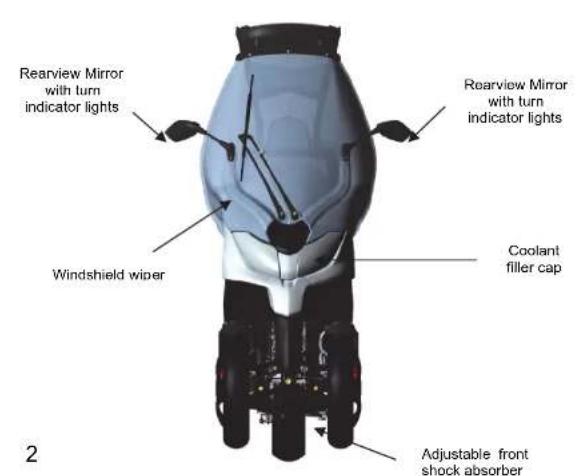
| Windshield wiper | Yes, 2 speeds |
| USB port | Yes, 5 V charger under seat |
| Battery | 12 V DC, maintenance-free |
| Spark plug | NGK CR7E |
Frequently Asked Questions - AD3 200 Adiva
User questions about AD3 200 Adiva
0 question about this device. Answer the ones you know or ask your own.
Ask a new question about this device
Download the instructions for your Scooter in PDF format for free! Find your manual AD3 200 - Adiva and take your electronic device back in hand. On this page are published all the documents necessary for the use of your device. AD3 200 by Adiva.
USER MANUAL AD3 200 Adiva
This manual is to be regarded as an integral part of the vehicle, and is to remain with the vehicle in case of sale.
The essential features described herein remaining unaltered, ADIVA S.p.A. reserves the right to make any changes whenever deemed necessary to improve the quality and technical characteristics of its models.
ADIVA Co. Ltd. shall not be held responsible for any errors contained in its technical or information manuals.
The right to reproduce this manual, in whole or in part and by any means whatsoever, is reserved worldwide.
The mention or representation of third parties' products is for information only and constitutes no engagement on the part of ADIVA Co. Ltd., which assumes no responsibility as to the use of such products.
First edition: APRIL 2013
| NAME: | ||
| ADDRESS: | ||
| STATE: SUBURB: COUNTRY: | ||
| DATE OF OWNERSHIP: | ||
VEHICLE IDENTIFICATION NUMBER (VIN)
FRAME / CHASSIS NUMBER:
ENGINE NUMBER:
COLOUR:
| FREQUENCY ITEM | WHICHEVER COMES FIRST | ODOMETER READING | ||||||||
| X 1000 km | 1 | 5 | 10 | 15 | 20 | 25 | 30 | REFER TO PAGE | ||
| X 1000 mi | 0.6 | 3 | 6 | 9 | 12 | 15 | 18 | |||
| MONTH | 1 | 6 | 12 | 18 | 24 | 30 | 36 | |||
| * | AIR CLEANER | R | R | R | R | R | R | 18 | ||
| SPARK PLUGS | I | R | I | R | I | R | 19 | |||
| * | THROTTLE OPERATION | I | I | I | I | I | I | 18 | ||
| * | VALVE CLEARANCE | I | A | I | A | I | A | - | ||
| * | FUEL LINE | I | I | I | - | |||||
| CRANKCASE BREATHER | C | C | C | C | C | C | C | - | ||
| * | ENGINE OIL | R | R | R | R | R | R | R | 16 | |
| * | ENGINE OIL SCREEN | C | R | C | R | C | R | - | ||
| * | ENGINE OIL FILTER | R | R | R | R | R | R | R | - | |
| * * | ENGINE OIL MESH FILTER | C | C | C | - | |||||
| * | TRANSMISSION OIL | R | R | R | R | R | R | R | 17 | |
| * | DRIVE BELT | I | I | I | R | I | I | - | ||
TABLEEAUPOUR L'ENTRETIEN
| FREQUENCY ITEM | WHICHEVER COMES FIRST | ODOMETER READING | ||||||||
| X 1000 km | 1 | 5 | 10 | 15 | 20 | 25 | 30 | REFER TO PAGE | ||
| X 1000 mi | 0.6 | 3 | 6 | 9 | 12 | 15 | 18 | |||
| MONTH | 1 | 6 | 12 | 18 | 24 | 30 | 36 | |||
| ** | CLUTCH SHOE WEAR | I | I | I | - | |||||
| BRAKE FLUID | I | R | I | R | I | R | 12 | |||
| BRAKE PAD WEAR | I | I | I | I | I | I | - | |||
| BRAKE SYSTEM | I | I | I | I | I | I | - | |||
| * | BRAKE LIGHT SWITCH | I | I | I | I | I | I | - | ||
| ** | STEERING BEARINGS | I | I | I | I | I | I | - | ||
| * | HEADLIGHT AIM | I | I | I | I | I | I | - | ||
| * | NUTS, BOLTS, FASTENERS | I | I | I | I | I | I | - | ||
| ** | WHEELS/TIRES | I | I | I | I | I | I | 20 | ||
| ** | COOLANT | I | R | I | R | I | R | 22 | ||
HUILE MOTEUR ET LUBRIFIANTS
VISCOSITE HUILE MOTEUR
VISCOSITE CONSEILLEE DU MOTEUR: SAE 5W-50
Bouche transmission 17
Bougie 19
Béquille centrale 2
Béquille latérale 2
Bouchon essue-glace 2
This instruction manual has been drawn up with a view to providing a clear and simple guide to operation. Also covered are simple maintenance operations as well as the periodic checks to be performed by an ADIVA Dealer or Authorized Workshop.
The booklet also contains indications on how to perform simple repairs. Operations other than those described in this manual require special equipment and/or specific technical skills. We strongly recommend having these operations performed by a ADIVA Dealer or Authorized Workshop for proper service, maintenance and repairs. This will also prevent any dispute over warranty claims if the vehicle is still within the stipulated warranty period.
SAFETY INFORMATION
- READ THIS USER MANUAL CAREFULLY BEFORE OPERATING THE VEHICLE
- ALWAYS wear your safety helmet (approved) correctly fastened whenever operating the vehicle under any circumstances, suitable protective clothing and eyewear are highly recommended, and DO NOT carry loose items while vehicle is in motion.
- Always obey posted traffic signs, speed limit and use signals while riding.
DO NOT operate the vehicle whilst under the influence or drugs or alcohol or in a state of fatigue or drowsiness. - Take caution, slow down on wet or slippery surfaces and on unfamiliar terrain.
DO NOT exceed the weight capacity of this vehicle - The stability and handling of this motorcycle may be adversely affected by overloading the storage compartment.
DO NOT install accessories or replacement parts not approved by ADIVA - Failure to follow the above warnings could lead to an accident causing serious injuries and even death.
- Use unleaded fuel only 90RON and above

The SAFETY ALERT symbol with the exclamation mark in the triangle means ATTENTION! BE ALERT! YOUR SAFETY CAN BE AFFECTED
- Contents 1
- Vehicle map 2
- Before Riding 3
- Riding 4
- Spare Parts 5
- Vehicle Component use and functions 6
Dashboard 6-7
USB Port 7
Operation of the Ignition Switch 8
Saddle and Trunk lock 8
Storage compartment (Trunk) 9
Handlebar and Cockpit components,
switches and buttons 11
Battery/Fuse compartment 11
Fuel Tank cap 11
Brakes 12
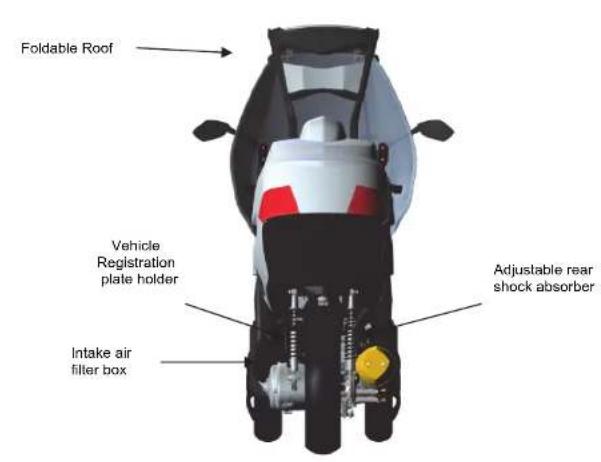
Foldable roof 13
- Inspection and maintenance before riding 14
Routine Inspection 14
Engine Oil inspection 15
Engine Oil Change 16
Transmission Fluid Change 17
Air Intake Filter 18
Throttle Valve Handle Clearance Adjustment .. 18
Spark Plug 19
Inspection of Battery 19
Fuses 20
Tyre Inspection and Steering 20
Front and Rear Suspension 21
Turn Signals and Horn 21
Front and Rear Lights 21
Brake Lights 21
Cooling system 22
Page
- Starting the engine 23
- Periodic Maintenance Schedule 24-26
- Engine Oil 27
- Transmission Oil 27
- Specifications 28-29
- Troubleshooting 30
- Index 31
- Warranty 32
This manual describes the proper usage and maintenance methods of this vehicle for safe riding and trouble free motoring. Please read this manual carefully.
Congratulations on your ownership of the ADIVA AD3 commuter vehicle. For the trouble free enjoyment of your new AD3 experience, please read this manual carefully and follow instructions pertaining to the periodic maintenance of the vehicle.
The Pre-Delivery and Inspection of this vehicle will be done by your ADIVA dealer before handing the vehicle to you.
- For your safety, we recommend that you do a complete inspection of your vehicle upon the initial 300 kilometers paying attention to the tyre pressures, alignment of the 2 front wheels, suspension, headlamp, tail lamp, handling and any leakage you may encounter from the vehicle.
If you find any unusual occurrences during the first 300 kilometers, bring your vehicle immediately to your dealer for a complete inspection.
- YOUR AD3 REQUIRES A 1st SERVICE AND INSPECTION UPON THE INITIAL 1000KM of use. It is important to have your original dealer or an approved ADIVA workshop to service your vehicle in order to maintain the warranty. Any ADIVA vehicles serviced in an unauthorised workshop during the warranty period may void the warranty for your vehicle.
- DO NOT modify or add additional accessories to your AD3 that are not approved by ADIVA.
DO NOT USE any solvents or alcohol based liquids to clean the windscreen or any transparent surfaces
SAFE RIDING
Make a safety inspection of your vehicle and ensure that all components for safe riding is in good working order.
Reminder:
- Wear an approved safety helmet with a properly secured chin strap and safety attire when riding
Always hold the steering handle with both hands while riding, never use just one hand when the vehicle is moving. - Wear suitable shoes
- Observe the speed limit and signs
- Perform periodic maintenance and inspection in accordance with the schedule (page 24 to 26)

Warning:
- To avoid getting burned by the exhaust when taking a passenger, make sure your passenger puts his/her feet on the foot board when boarding and alighting the vehicle
- after running the engine, the exhaust and engine components will be very hot, take caution when conducting inspection and maintenance

Caution:
Modifications to your vehicle can affect its structural integrity and affect the performance resulting in shorter service life. Any modification to the exhaust system may affect the emissions and noise resulting in non-compliance with your local laws. Any modifications to your vehicle will void the warranty.
Suggestion
The initial 1000km of the vehicle is the wear-in period for the engine and components. To maximise the service of your vehicle and prolong its service life, avoid rapid acceleration and sudden stop and go to the vehicle. Do not over accelerate and keep the vehicle to under 60km/hr if possible.

Caution:
Handling the Vehicle differs with and without a load. Overloading the Vehicle can cause instability and rider's safety. DO NOT overload the Vehicle and adhere to the specified loading capacity of the trunk (9kg). Do not load objects in areas not specified for loading to avoid damage to your vehicle. The Foldable Roof is not designed to carry a load. DO NOT place heavy objects or strap any articles on the roof. Using the roof to transport any load is dangerous and can collapse while riding causing accidents and serious injury.
When using fuel for your vehicle, fill with only Unleaded Petrol at 90RON and above. Petrol should also have not more than 10% Ethanol content.

CAUTION!
When adding fuel into the petrol tank, keep away from flames and do not fill while using any electronic device. Avoid placing flammable materials or materials that is soaked with corrosive agents under the seat compartment.
VEHICLE IDENTIFICATION DATA:
Frame(Chassis) number
- Engine Number
Registration number
Tampering with the frame number and engine number may be punishable by laws of your country.
USE GENUINE SPARE PARTS
To maintain your vehicles best performance, each part is inspected and goes through stringent quality control measures to ensure that it conforms to the design requirements.
ADIVA Genuine Parts are made from the same high quality materials use for the original vehicle. All parts must meet the same quality control standards before they are distributed to Authorised ADIVA dealers and suppliers.
Using inferior after-market parts and substitutes may cause unnecessary loss in vehicle performance or damage to the vehicle's engine and components.
Always use only ADIVA Genuine parts to keep your vehicle in its original running condition so to ensure its long service life.

Warning: Use of non-approved parts for your vehicle can result in void of warranty
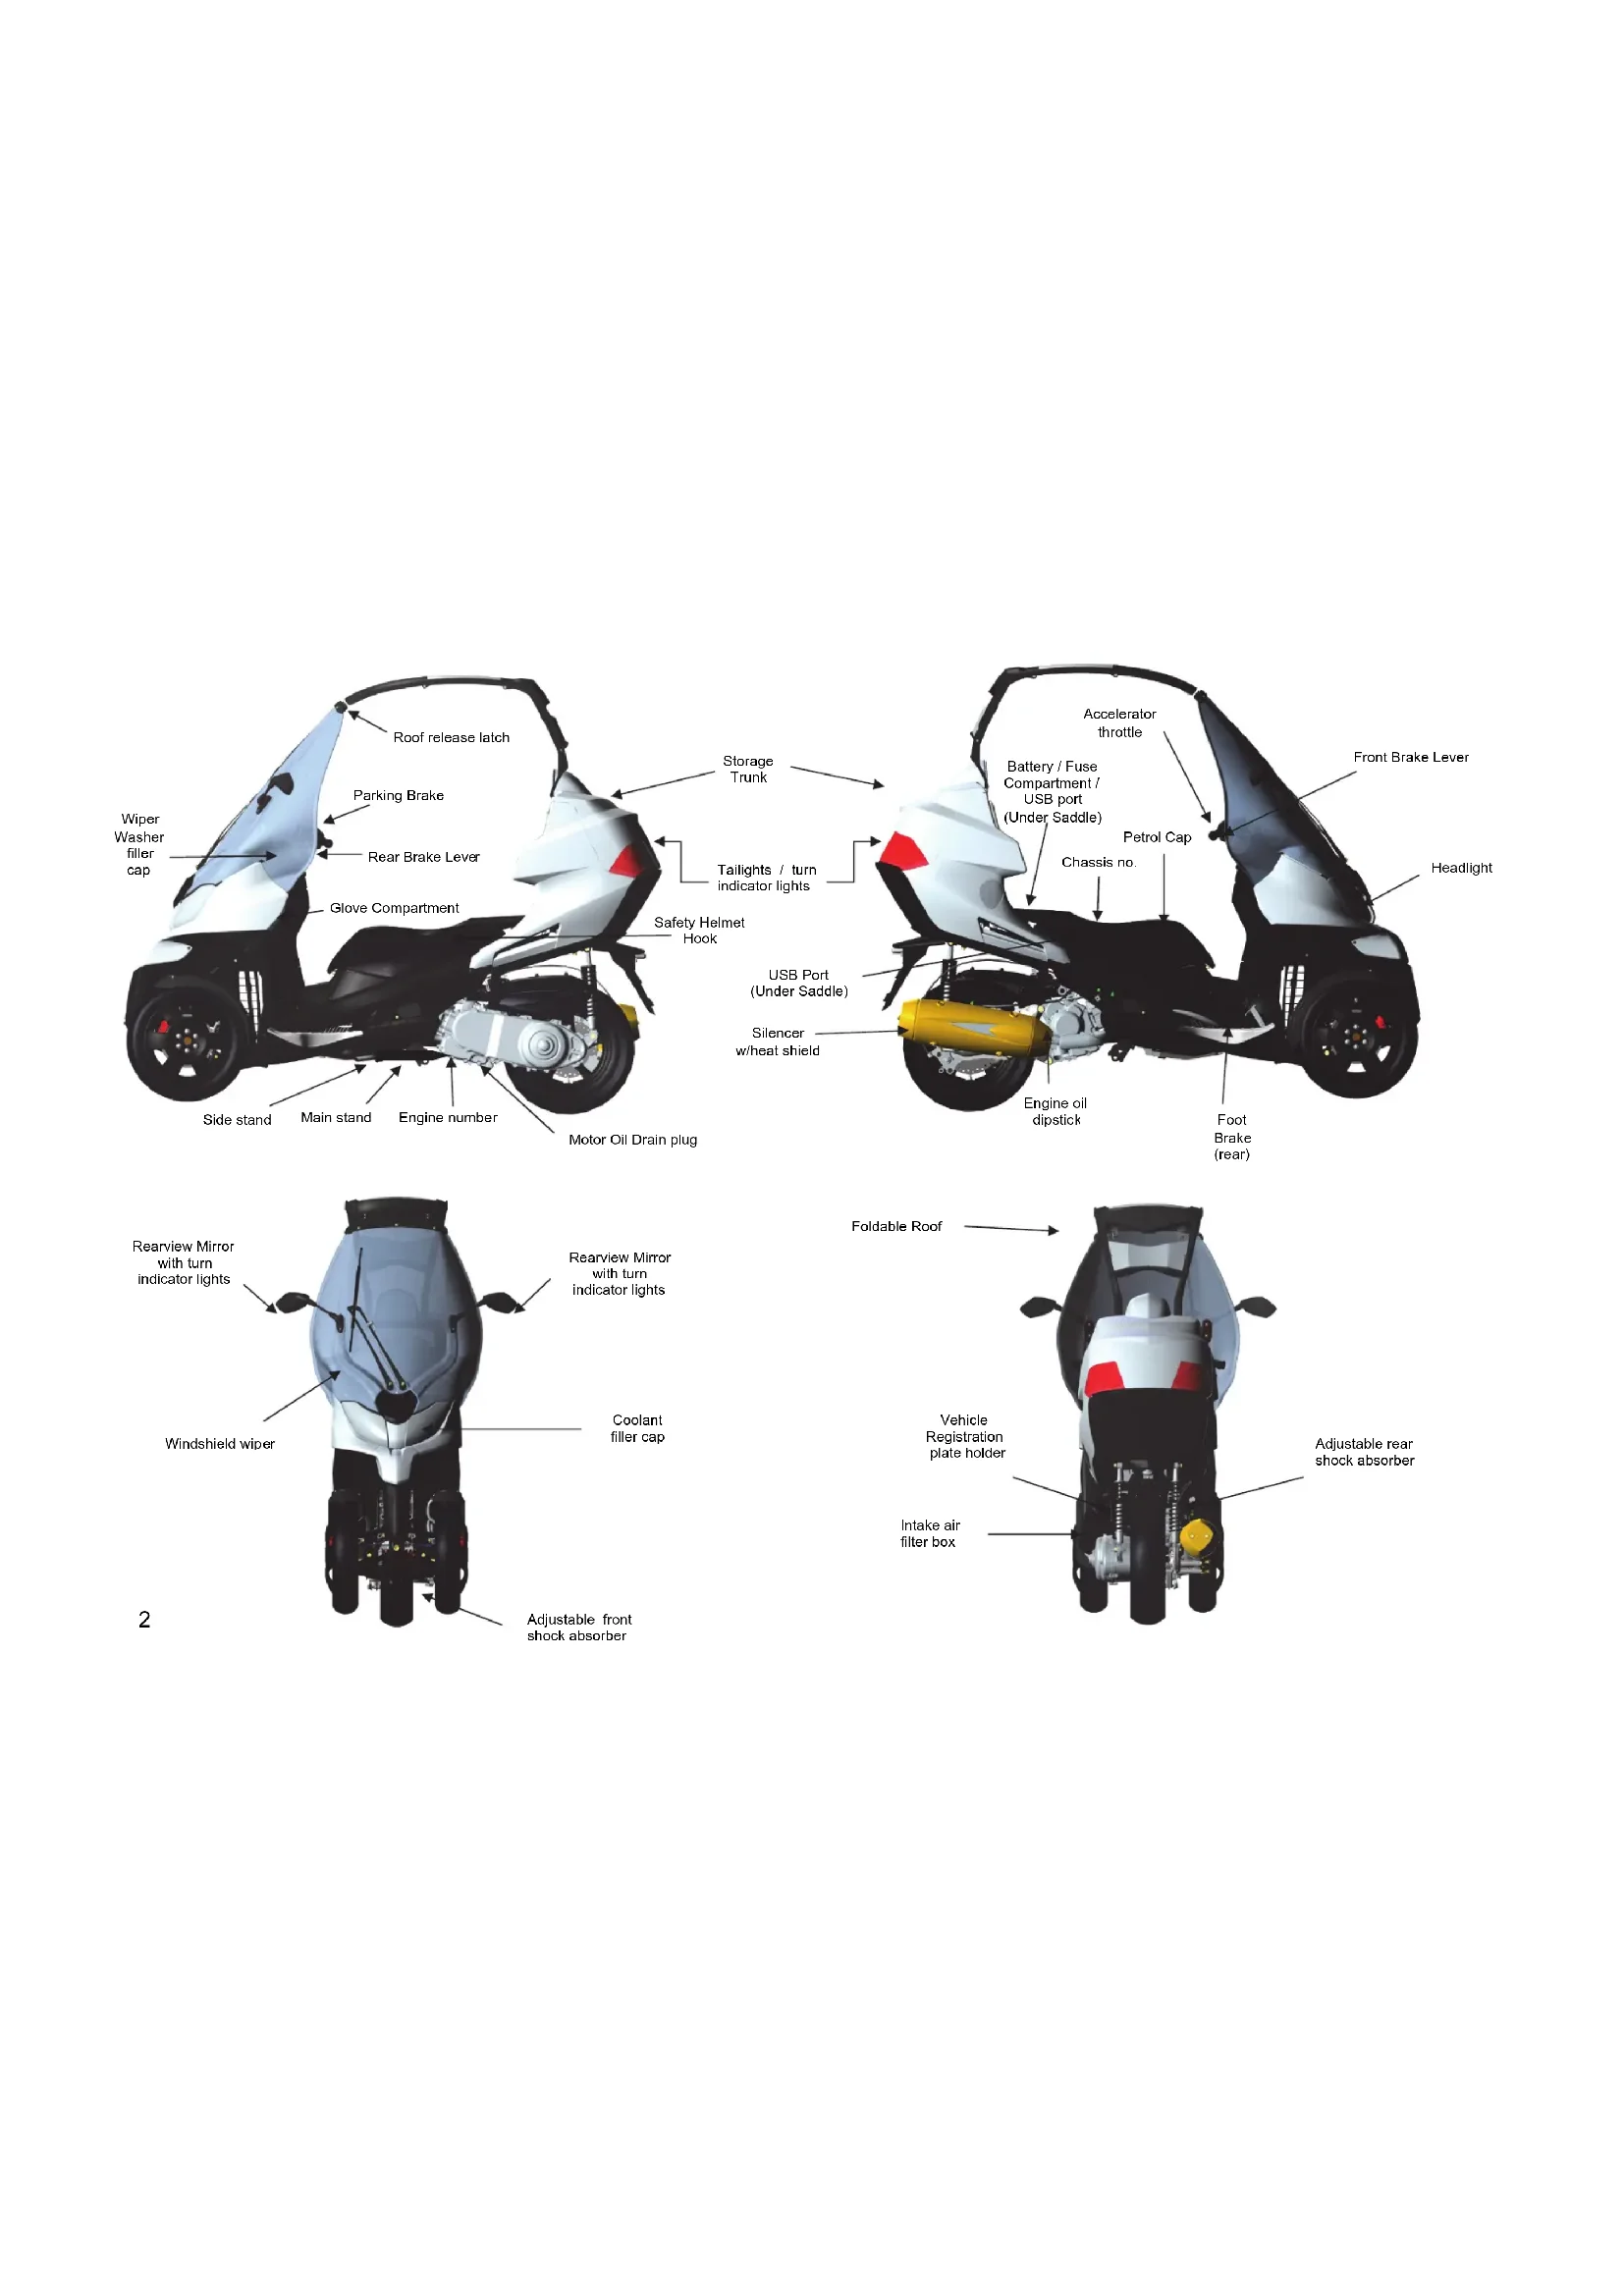
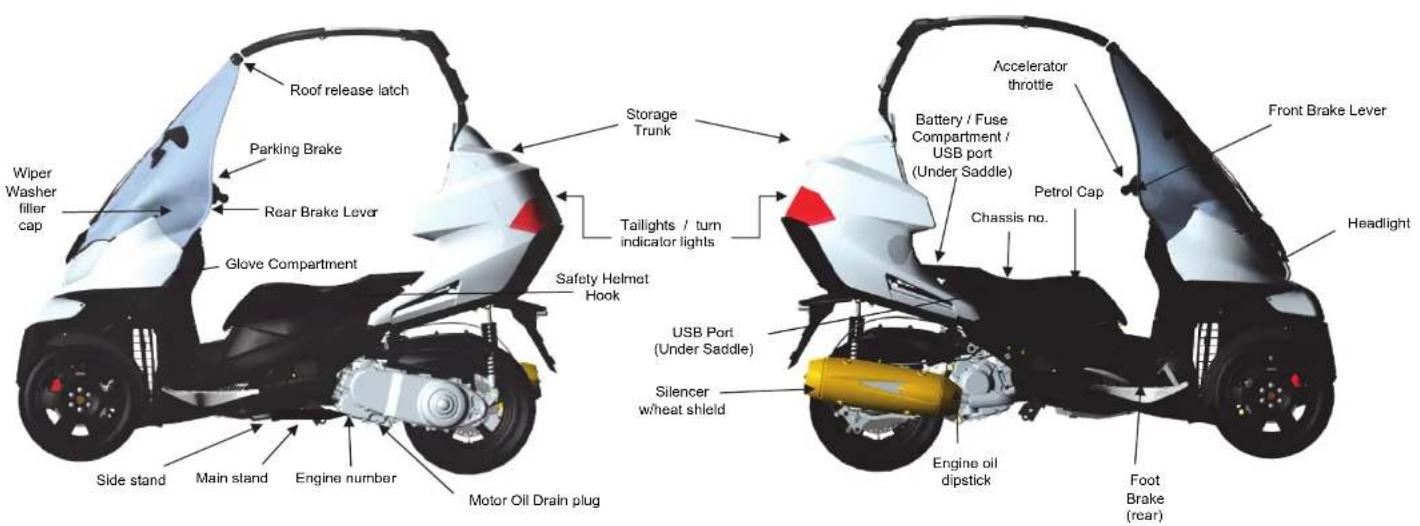
VEHICLE COMPONENT USE AND FUNCTIONS
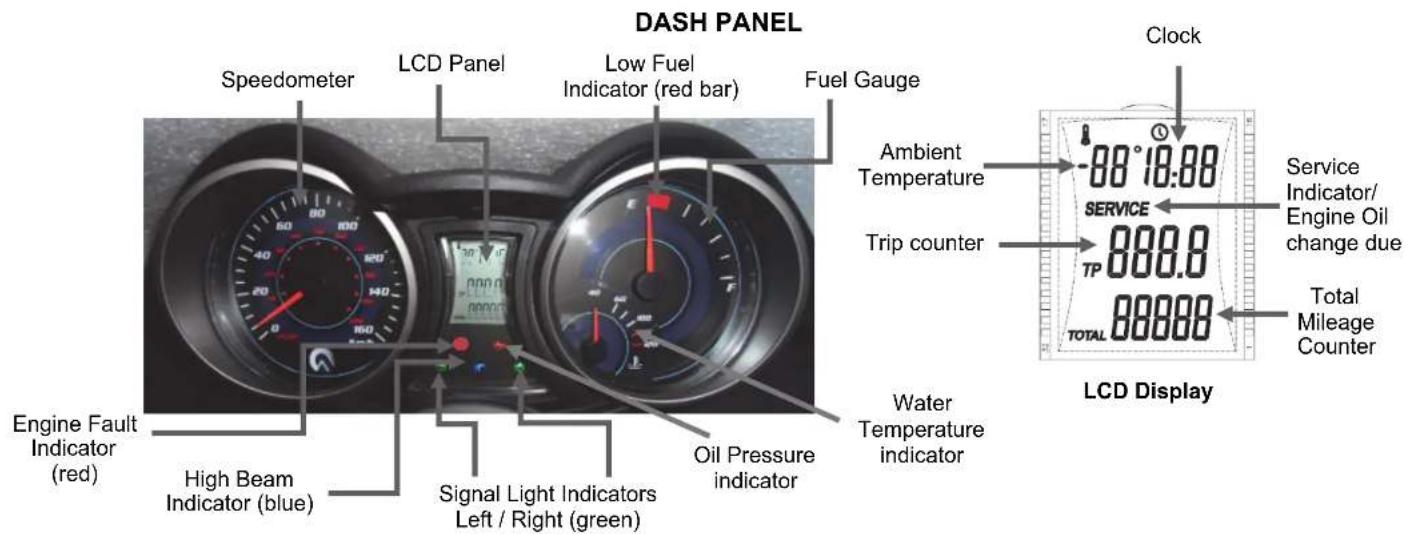
Speedometer
: This shows speed in Kilometers and Miles per hour (outer ring for Kmph and inner ring for MPH)
Odometer
: The odometer shows the total kilometers this vehicle has been driven
High Beam Indicator (Blue)
: This is to indicate the High Beam is activated on the headlight
Turn Signal Indicator (Green)
: Left and Right flashes in accordance when the signal switch is activated Left or Right
Fuel gauge
: Does not indicate fuel level when the ignition switch is turned off. When Indicator reaches the red bar, it is strongly suggested that you fill the vehicle as soon as possible. Fuel reserve indicator on red is approximately
- 7 I i t r e s o n l y
Water Temperature Gauge
: Does not indicate temperature when ignition switch is turned off. If temperature mark should reach the red line, look for a safe place to park and turn off your engine, consult your local dealer for assistance Immediately. Warning: Prolonged use of your vehicle in an overheated state can lead to serious engine failure
SERVICE INDICATOR
The 'SERVICE' indicator alerts the user it is time to carry out scheduled maintenance operations. The icon lights up every 2,000 km. The icon flashes every 1,000 km to remind you to check engine oil. This indicator will cease when the dealer or authorised service centre resets the display after carrying out maintenance.

Warning: Have the vehicle serviced only by an Authorized ADIVA Dealer or Workshop to avoid Warranty disputes
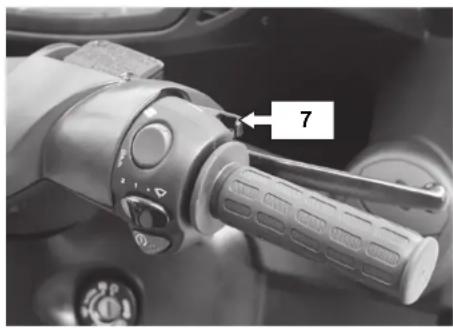
SETTING THE CLOCK
Setting the current time can be done only when the vehicle is stationary, by holding down the "MODE" (7) button until only the clock functions remain active on the display and all other functions have been turned off. Initially the hours and minutes will flash and by briefly pressing the "MODE" (7) button you can change the hours. Pressing the button for a bit longer will allow you to change the minutes (flashing).
Holding down the "MODE" (7) button for more than 2 seconds will return display to normal operating mode.
Warning: When the display is in "set" mode, the system will automatically return to standard operating mode if no button is pushed for a period of 20 seconds. This will also happen if the motor is turned on.
PARTIAL RESET OF THE ODOMETER
It is possible to reset the odometer whether the motor is running or not. If the vehicle is running, resetting can be done by holding down the "MODE" (7) button for about 3 seconds, until the display shows 000.0. If the vehicle has stopped, press the "MODE" (7) button for 3 to 6 seconds. Upon releasing the button the system will automatically reset the odometer to zero.
USB PORT
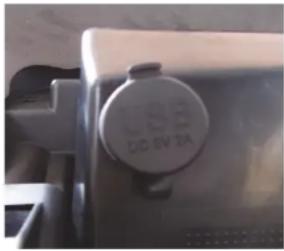
- The USB port is located under the saddle next to the Battery compartment of your vehicle
- This is strictly a USB charge port in accordance with USB specifications (5V DC)
- DO NOT insert data storage devices. This is not a for data transfer.

Warning: DO NOT attempt to plug in any devices while riding, you may loose control of your vehicle and cause accidents. If you intend to ride while charging a device, make sure the device stored under your seat or has an extended USB cable so the device can be locked inside the trunk. NOT recommended for use in wet weather conditions.
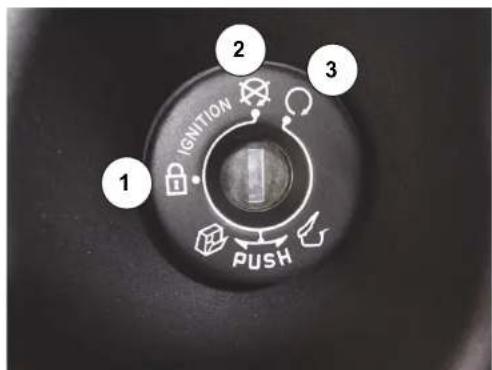
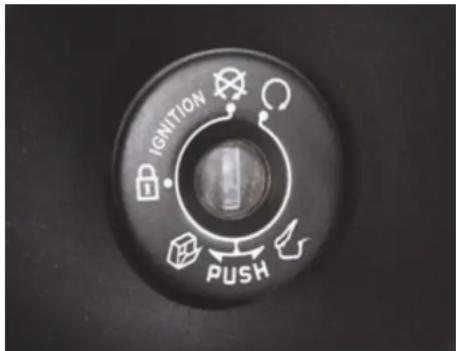
IGNITION SWITCH
LIGHTS:
IGNITION SWITCH / STEERING LOCK
| POS. | REF. | FUNCTION | |||||
| 1 | STEERING: | locked | G LIGHTS: | N | disabled | Can be removed T | O | N | : | |
| 2 | STEERING: | unlocked | G LIGHTS: | N | disabled | Can be removed T | O | N | : | |
| Saddle | open: | enabled | |||||
| Trunk open: | enabled | ||||||
| 3 | IGNITION: enabled | Cannot be removed | |||||
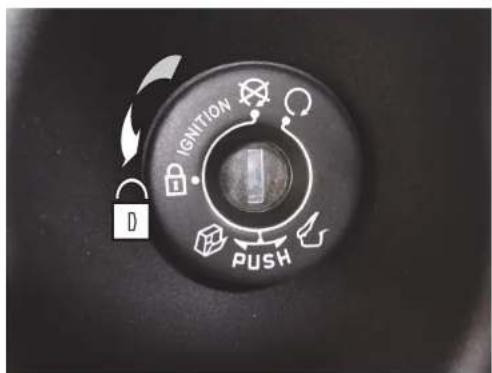
STEERING LOCK
To lock the steering:
- Place the vehicle on the central or side stand.
- Turn the handlebar to the left.
- Push and turn the key to the position "counter clockwise" position
- Remove the key.
To Unlock:
Place the Vehicle on side or centre stand Insert the key
Turn the key Clockwise to "off"

OPENING THE TRUNK AND SADDLE
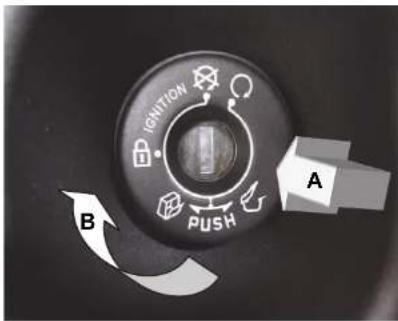
TRUNK OPENING
To open the rear storage compartment proceed as follows:
- Place the vehicle on the central or side stand.
- Turn the key to the OFF position
- Push inward (arrow A) turn the the key (arrow B) from the OFF position clockwise to the trunk opening position
To close the trunk, return to close position and push lid until you hear a "click".
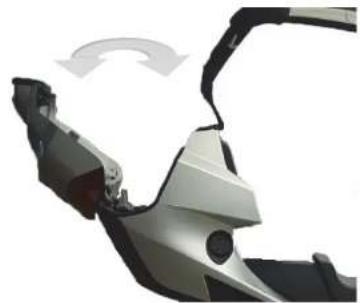

Warning: The trunk capacity is 90lt, with roof folded in 56lt. However, maximum recommended weight is 9kg. eeding this weight may affect the stability and proper control of the vehicle. DO NOT overload the Trunk.

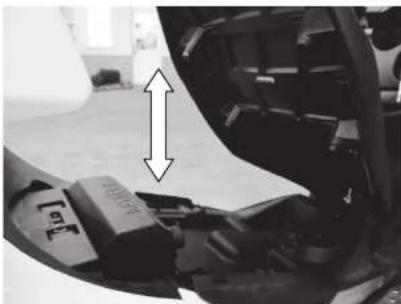
SADDLE OPENING
To open the saddle, proceed as follows:
- Place the vehicle on the central or side stand.
- Turn the key to the OFF position
- Push inward (arrow A) turn the the key (arrow B) from the OFF position counter-clockwise to the "open saddle" opening position
HANDLEBAR / COCKPIT COMPONENTS, SWITCHES AND BUTTONS
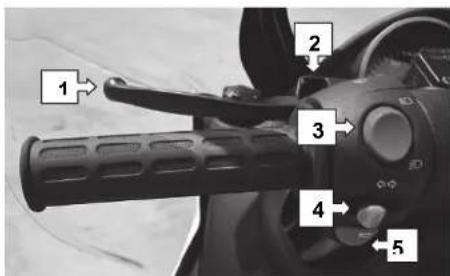
LEFT HANDLE BAR CONTROLS
1 Rear Brake Lever
- 2 Wiper washer
3 High / Low Beam (Headlight)
- 4 Turn Signal Left / Right switch (Push to off)
- 5 Horn activation Button
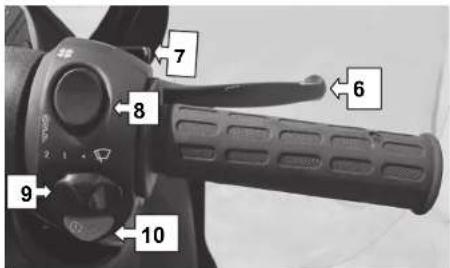
RIGHT HANDLEBAR CONTROLS
6 Front Brake Lever
- 7 MODE switch
8 Accessory Switch (no connection)
9 Wiper on / off switch (2 Speeds)
10 Starter Switch for Ignition
COCKPIT
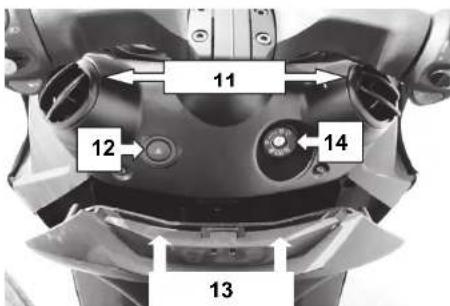
11 Air Vents (adjustable open / close, left / right)
12 "Hazard" light activation button
Switch on before turning "OFF" the ignition for continuous operation, to switch off, on must in "ON" position
13 Glove compartment, pull latch handle to open
- 14 Ignition switch (on / off, handle lock, open saddle and rear trunk lid)
UNDER THE SADDLE
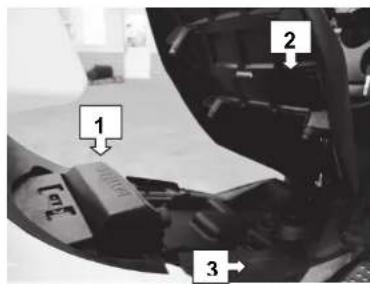
SADDLE COMPARTMENT
1 Battery Compartment
2 Petrol Cap
3 Frame (Chassis) number

Caution: DO NOT place corrosive or flammable materials under the seat
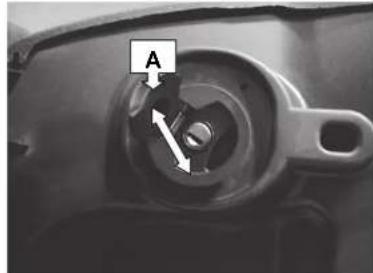
PETROL CAP
To Open, lift the keyhole cover Tab (A)
- Insert the Ignition Key and turn Anti-Clockwise, cover will unlatch
- To Close, Push cover down and turn Key Clockwise

Caution: DO NOT overfill, Petrol must be below the bottom rim of the refill opening. Engine must be shut off and place the stand on the ground. Make sure the keyhole Tab(A) is returned to close position or closing the seat may damage the Tab
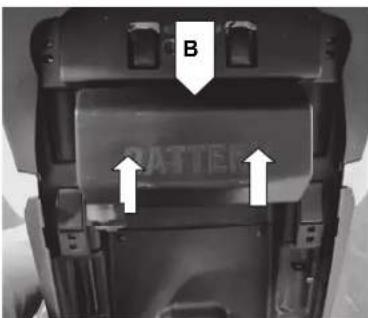
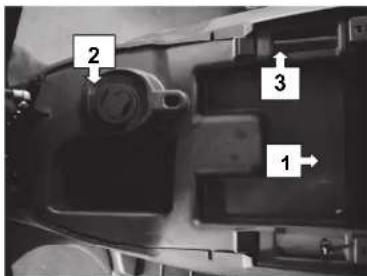
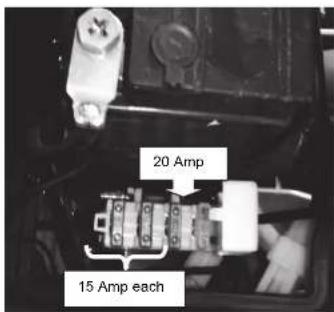
BATTERY / FUSE COMPARTMENT
- To open, press the front cover (arrows) and lift
To close, push cover into place. Ensure the rear tab is secure (B)

Warning: Ensure the battery compartment lid is securely placed. Exposure of the battery lead terminals can cause short circuits if it comes into contact with liquids or electrically conductive materials. Ensure that the correct Fuse rating is used, never use a higher rating fuse as a replacement as it may damage the wiring or electronic circuits and even set fire!
BRAKING
- Avoid unnecessary braking, use rear and front wheel brakes simultaneously when braking
Slow down and use engine break to assist in long downward slopes, do not brake constantly or brakes will overheat and possibly fail - Avoid applying pressure on the brake lever when riding, brakes may overheat and braking efficiency will be reduced
- Throttle down when braking to a complete stop Never apply brakes suddenly on wet and slippery roads, slow down and brake early to avoid skidding and falling
- Apply more pressure on the front brake than the rear brake when slowing down, too much pressure on the rear brake may cause the vehicle to pull to one side
- Check the Brake reservoir regularly to ensure Brake fluid is above the "MIN" mark
- Use only High quality Brake fluid DOT 4 for replacement or top-up, DO NOT MIX WITH OTHER GRADES OR USE ALTERNATIVES!
- Have your authorised ADIVA Dealer check your brake during periodic maintenance to ensure the brake pads have sufficient padding to activate the brakes. If you encounter a 'metallic' noise during braking, bring your vehicle for inspection immediately

Caution: The parking brake (not available in some countries) will not hold the AD3 upright in a parking position, the de stand or centre stand is re quired to park the vehicle
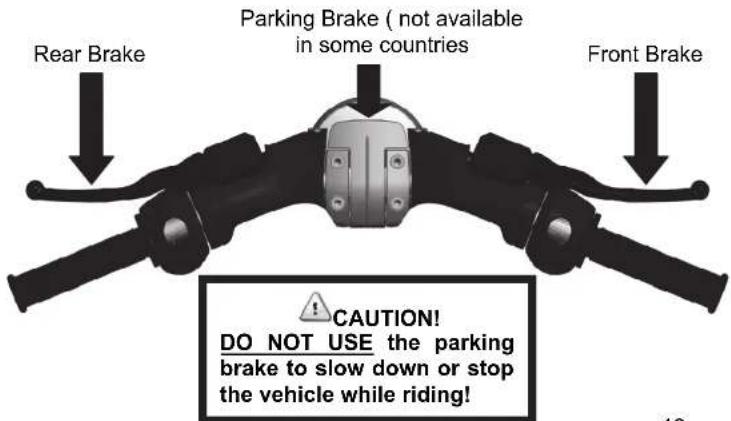
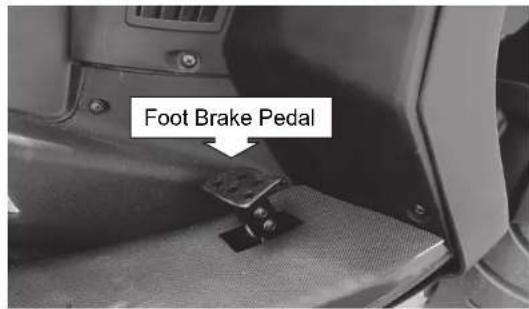
Foot pedal: front and rear brake simultaneously.
a p p r o N 0 t
FOLDABLE ROOF
FOLDING THE ROOF INTO THE TRUNK
- Park the vehicle on the centre stand and open the trunk compartment (compartment should be empty for this operation)
- Release the latches (A) by pressing with your thumb and finger to disengage the safety-lock (B) fig. 1
- Fold the forward panel of the roof downwards under the rear panel fig. 2
- Push the roof with both hands towards the rear of the vehicle and allow the hinges (D) to fold inwards the trunk fig. 3
- Continue the operation until the roof is completely inside the trunk as shown in fig. 4
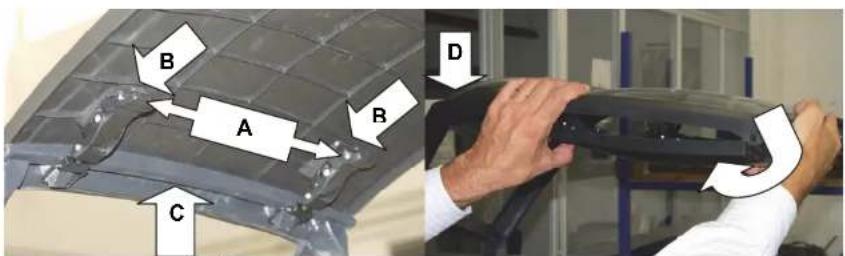
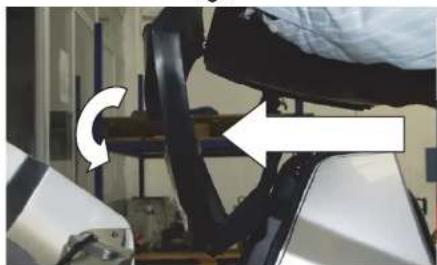
fig.1
fig.3
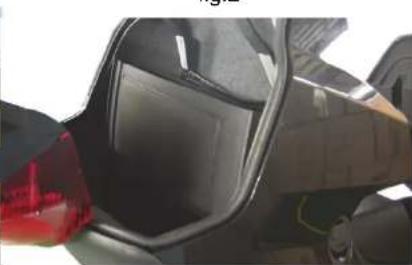
fig.4
- To unfold the roof, reverse the process
- Align the front of the roof with the windscreen Arrow C (fig. 1)
- Ensure that the latch is secure and the safety lock (B) is engaged with a "click"

CAUTION!
Use extra care when folding and unfolding the roof. Make sure your fingers are not holding onto the hinges while folding or it may cause injury. Use extreme care when latching the roof into place. If latch should come loose while riding, slowly move your vehicle to a safe parking place and re-inspect the latch. If the latch is faulty, fold the roof into the trunk and DO NOT USE. Your authorised ADIVA dealer will be able to correct the problem.
DO NOT LOAD the roof with any objects
INSPECTION AND MAINTENANCE BEFORE RIDING
RUNNING-IN
During the first 1,000km avoid riding more than 80 percent of the maximum allowable speed. Avoid opening the throttle wide and covering long distances at a constant speed. After the first 1,000km gradually increase the speed to the maximum performance taking care not to go above the speed limit set by your local laws.
PRELIMINARY CHECKS
Time taken in checks will increase your safety and that of others. Avoid riding unless you are certain that your Vehicle is in perfect working order.
Throttle: Ensure that throttle operation is smooth and even in all handlebar positions. If necessary lubricate and adjust the throttle control.
Fuel and lubricants: Check the fuel, engine oil, transmission oil and brake fluid levels. Top up if necessary. Check for leakages by inspecting the ground under the vehicle. If any leakage is found, take the vehicle to an Authorized ADIVA Dealer or Workshop.
Side and centre stands: Check that the springs keep the stands in 'home' (horizontal) position.
Brakes: Check the wear of the linings, the operation of the levers and the level of the fluid in the reservoirs.(see page 12)
Lights: Replace any faulty bulbs. Check the operation and orientation of the headlight, rear lights and turn indicators.
Windscreen wiper: Check that the wiper blade is in good condition in order to ensure good visibility in case of need.
Windscreen: Check that the windscreen is clean in order to ensure good visibility.

Caution: Use only a soft cotton rag and a mild detergent for cleaning the windscreen and any transparent surfaces. Do not use products that contain alcohol or solvents.
Wheels and tyres: Check the tyre pressures and the wear of the treads. (see page 20)
Steering: Ensure that the steering rotates smoothly throughout its travel (Left to Right).
Fastenings: Check the fastening of all main components and in particular of the wheel and suspension nuts, roof latches.
ENGINE OIL INSPECTION
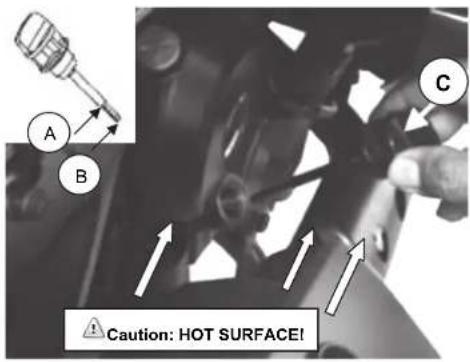
- Place your vehicle on the centre stand on level ground
- Oil should be checked only after the vehicle has been left standing for at least 5 to 10mins
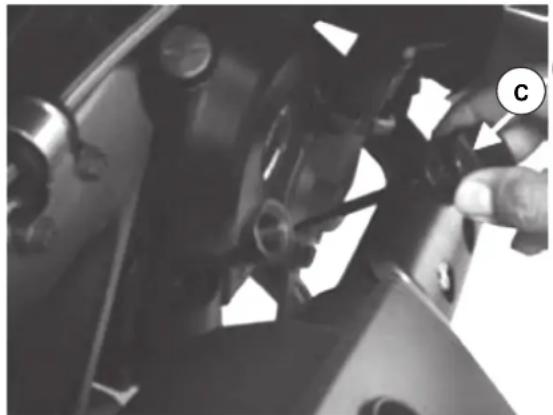
- The engine oil dipstick is located on the right side of the engine compartment
Take caution the exhaust or engine may be hot when accessing the dipstick (C) - Carefully turn counter-clockwise to loosen and remove the dipstick
- Clean the dipstick and re-insert without turning in
- Remove the dipstick and check the oil level
The oil level should be between "A" and "B", if insufficient, top up with recommended oil at little at a time until the oil level is sufficient taking care not to over fill. - Replace the dipstick with care not to damage the rubber seal and start the engine for 3 to 5mins, turn off, allow the oil to settle
- Remove the dipstick and check the oil level, top-up if necessary
- Engine oil capacity 1.5 litres, oil change capacity 1.3 litres
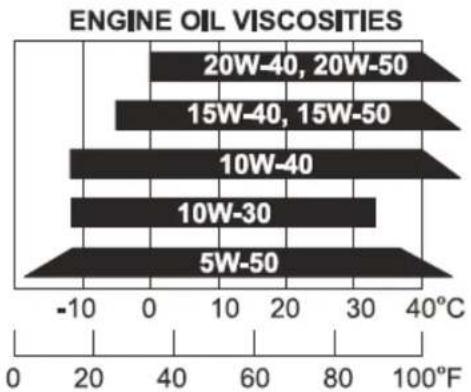
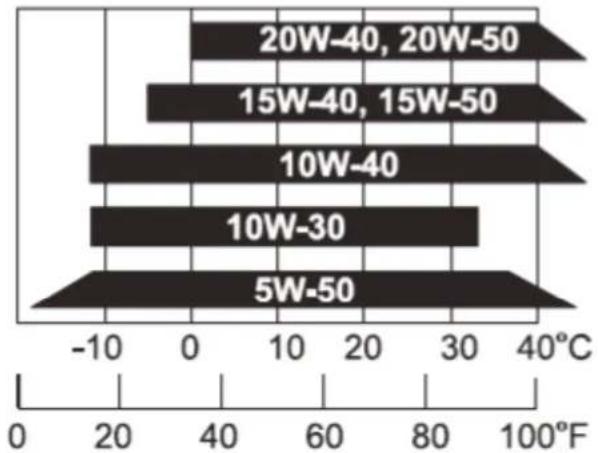
Engine oil viscosity: SAE 5W-50
- If engine oil viscosity is not available, select a suitable engine according to the chart
- Use only premium quality 4-stroke engine oil for your engine to ensure longer service life. It is not advisable to mix synthetic and non-synthetic oils as the additives may interact and cause the mixture to de-stabilise. Consult your ADIVA dealer for advice.
- Use only oils that have a SJ rating above the API service classification
Engine oil change
Park your Vehicle with the centre stand on level ground in a well ventilated area
If your engine is Hot, wait for it to return to normal temperature before operation
- We recommend you wear protective gloves when handling liquids
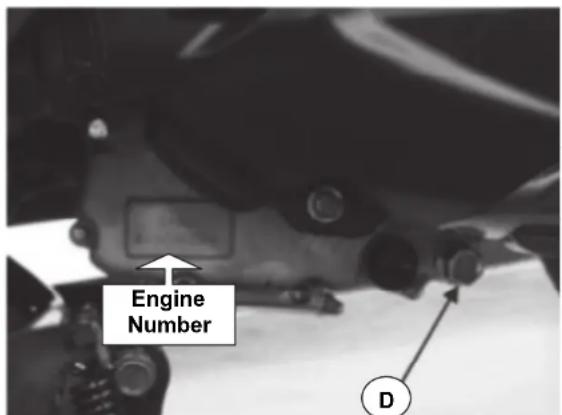
- Place a suitable container (±2 litres, shallow) under the drain plug (D), Remove the refill dipstick (C)
- Open the drain plug (D) (counter-clockwise) with a suitable wrench
- Slowly turn the drain plug till the oil starts to trickle out, when the flow is stabilised, you may remove the whole drain plug and allow the oil to drain completely
Inspect the drain plug and washer, clean with a rag and replace and tighten to specified torque (2.0 3.0kgf - m or 174 260 Ibf-in)
- Add oil through the refill according to the amounts listed below and replace the dipstick. NEVER START THE ENGINE WITHOUT THE DIPSTICK IN PLACE!
- Start the engine for 2 - 3 mins while on the main stand. Check oil again and top up if necessary so the oil level reaches the 'A' mark of the dipstick (page 15)
Engine Oil Capacity: 1.5 Litres, Oil change Capacity: 1.3 Litres

CAUTION:
Use only specified Motor Oils (refer to page 15 & 27 for recommended oils). Running the engine with insufficient oil pressure can cause serious damage to your engine and its components.
The engine and related components can be very hot, use care when inspecting or removing the refill dipstick and drain plug. Allow the engine and its components to cool sufficiently before attempting this operation to prevent any injuries. Wear protective gloves and eyewear at all times during the operation. Never start the engine without the dipstick in place. If you are unsure how to change the oil, do not attempt this operation. Bring to your nearest ADIVA dealer or authorised workshop.
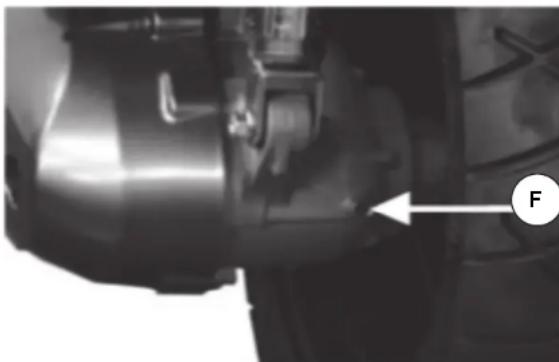
TRANMISSION FLUID CHANGE
Park your Vehicle on the centre stand on level ground in a well ventilated area
If your engine is Hot, wait for it to return to normal temperature before operation.
- We recommend you wear protective gloves when handling liquids
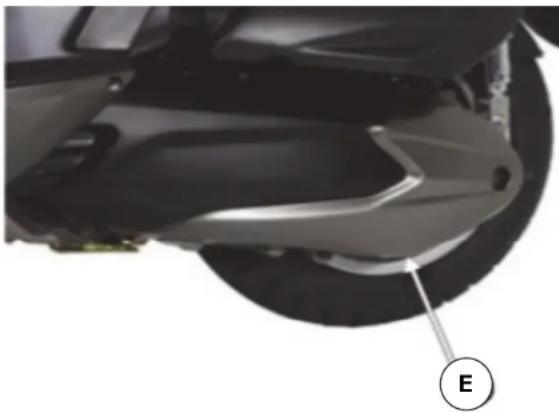
- Place a suitable container (± 1 litre) under the drain plug (E), Remove the refill plug (F)
- Open the drain plug (E) (counter-clockwise) with a suitable wrench
- Slowly turn the drain plug till the fluid starts to trickle out, when the flow is stabilised, you may remove the whole drain plug and allow the oil to drain completely
Inspect the drain plug and washer, clean with a rag, replace and tighten to specified torque (0.8 1.2kgf - m or 69 104 Ibf-in)
- Add Fluid (SAE90)* see below through the refill according to the amounts listed and replace the refill plug and tighten to specified torque (0.8 1.2kgf - m or 69 104 lbf-in)
TRANSMISSION FLUID TYPE: SAE 90
TRANSMISSION FLUID CAPACITY: 0.23L
TRANSMISSION FLUID CHANGE CAPACITY: 0.21L

Caution: Use only a specified viscosity and high quality Transmission fluid. Use of unspecified fluids can seriously damage your engine's transmission and components! If you are unsure how to change the fluid, do not attempt this operation. Bring to your nearest Authorised ADIVA dealer or Workshop.
AIR IN-TAKE FILTER
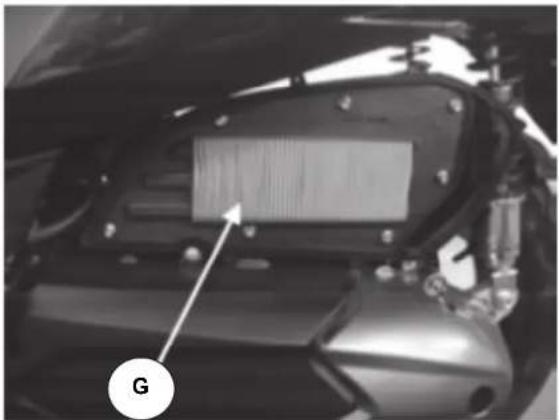
The air filter element (G) should be serviced at regular intervals by an Authorised ADIVA Dealer or Workshop unless you have the proper tools, technical data or technically qualified to do so.
Have the air filter element serviced more regularly when riding in unusually dusty or wet environments
Caution
Use only ADIVA Genuine Part when replacing the Air-Filter Element. Using non-ADIVA, Unapproved or wrong Air-Filter Element may cause premature engine wear and performance malfunction
Throttle Valve Handle Clearance Adjustment
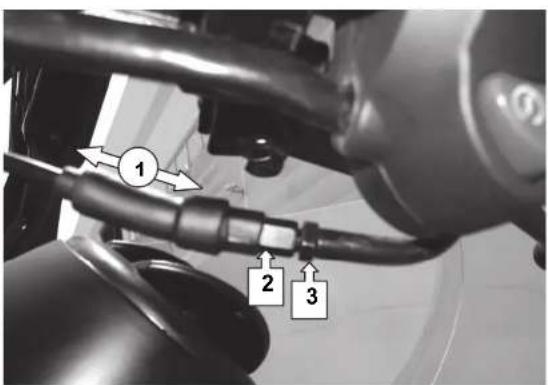
- Before you ride each day, check the Throttle "free-play" and check for smooth Throttle grip rotation from fully open to fully closed position and with the handle bar at full left and full right positions.
If required locate the Throttle adjustment under the right handlebar and make necessary adjustments to the specified illustration on the right. - Slide the sleeve (1) left to reveal the adjustment nuts (2 & 3).
after adjustment, make sure the nuts are
fastened using (3) as a "lock" nut
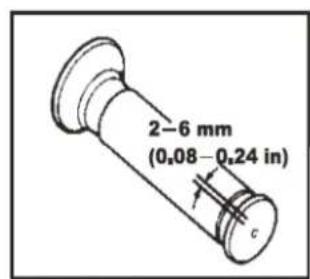
Caution Always test your throttle rotation after adjustment and before riding
Throttle Free Play: 2.00mm to 6.0mm (0.08 to 0.24 inches)
SPARK PLUG
BATTERY AND FUSES
RECOMMENDED BATTERY: YT14B-BS (YUASA)
The Spark Plug is located inside the left side panel above the passenger footboard.
Remove the carbon deposits from the spark plug with a small soft wire brush or a spark plug cleaning machine. After cleaning (or replacing with new) re-adjust the Spark Plug gap to the specified limit by using a Spark Plug gap thickness gauge. The Spark Plug should be changed periodically.
When removing carbon deposits, observe the porcelain tip for signs if the Spark Plug is suitable for your engine and type of riding. Under normal usage, the porcelain tip should be light brown or tan in colour.
If the porcelain tip is white or glazed, the spark plug has been operating too hot and your engine will require a "cooler" plug. Consult your ADIVA dealer for advice when selecting another heat range.

Caution: Use only specified Spark Plug or heat range for your engine.
nproper fit or heat range can severely damage your engine and
void the warranty
Recommended Spark Plug: CR7E (NGK)
The Battery (12 Volt DC) is located under the rear section of the seat compartment. Your AD3 uses a maintenance free battery which does not require top-up of battery fluid.
For maintenance, check the battery terminals (A) for any signs of corrosion. If corrosion is present, use a soft wire brush and clean rag to remove the contaminants then apply lightly with Dielectric grease only.
If you remove the battery, ensure that the polarity is correct when replacing the battery. Red Cable indicates Positive terminal + and Negative or Ground -is the Black Cable.
Fuses are to the left of the Battery next to the negative terminal. Check for signs of corrosion and replace if necessary. Ensure that the same rating is used when replacing any fuses. Using wrong rating can cause electrical and electronic failure and even fire.

Warning: DO NOT open or puncture the battery casing! The contents are highly corrosive and poisonous and can cause serious harm to skin and lungs, even death. Use extreme care when disposing the used battery, DO NOT place near or throw into flames
TYRES
Warning!
Failure to follow these warnings may result in tyre failure. The tyres of your vehicle are a crucial link between your vehicle and the road. Your passenger and your safety depends upon the condition of your vehicle's tyres.
Follow these instructions:
- Check the tyre condition and pressure and adjust the inflation pressure before each ride using a good quality pressure gauge
- Avoid overloading your vehicle
- Replace the tyre when worn to the specified limit or if there are any damage such as cracks or cuts.
- always use proper tyre size and type of tyres specified in this manual.
Balance the wheel after tyre installation - Read this section of the user manual carefully
Failure to perform a reasonable break-in of the tyres can cause tire slip and loss of control.
Use extra care when riding on new tyres as the grip will be limited, perform proper break-ins of the tyres, avoid hard acceleration and braking for the first 160km (100miles)
NOTE: Check the tyre inflation pressure and tyre tread condition periodically. For maximum safety and good tyre life, the tyre pressures should be inspected more often.
TYRE PRESSURE
Insufficient air pressure not only accelerates tyre wear but also affects the stability of your vehicle. Under-inflated tyres make smooth cornering difficult and over-inflated tyres decrease the amount of contact with the ground which can lead to skidding and loss of control. Make sure the tyre pressure of your vehicle are within the specified limits at all times.
NOTE: Tyre pressures should only be adjusted when the tyres are COLD.
TYRE SIZE Rider only with passenger
Front Left and Right : 130/60-13 32PSI(2.2BAR) 32PSI(2.2BAR)
Rear Tyre : 150/70-13 32PSI(2.2BAR) 35PSI(2.4BAR)
NOTE: Ensure the 2 front tyres have the exact pressure in each tyre to ensure stability and ease of control for your vehicle. Make sure your engine is off and the key is removed before checking or inflating your tyres!
STEERING
Your AD3 is fitted with a complex and unconventional front steering and suspension system. It is advisable to make frequent inspections of your front tyres for any signs of uneven wear between each tyre. Before riding, move your Handlebar left to right to feel if there is any slack in the movement of your steering. If you notice uneven wear between the two front tyres or if you encounter the vehicle pulling to one side while riding, your vehicle must be inspected by an authorised ADIVA Dealer or Workshop for wheel alignment. DO NOT attempt to adjust the alignment yourself

Warning: Under no circumstances should you attempt to re-align the front wheels, the process requires special tools and technical knowledge. Improper alignment and fastening of the steering system can cause failure or accidents and is extremely dangerous. Only an Authorised ADIVA dealer or workshop can provide this operation.
SUSPENSION SYSTEM
ADJUSTMENT
Your AD3 uses Three Adjustable Shock Absorbers. One in the front and Two in the rear. The absorbers have been factory set to provide sufficient damping for an average rider without passenger (approx 80kg).
Should you require hardening the suspension, use the suspension adjustment tools provided and make necessary adjustments. However, do not over tighten the springs as it may cause instability and discomfort while riding.
The front suspension requires the outer retaining ring (A) to be loosened before making the adjustment (B).
Rear Suspension is a 5 step compression(C) of the spring. Ensure that both left and right rear suspension are the same settings.
If you are not familiar with the settings, consult your ADIVA dealer for assistance.

Caution: Do not over-compress the suspension springs as it can lead to discomfort and instability. Damping will be reduced considerably and affect the handling of your vehicle. Adjust the rear shock absorber to a higher setting when carrying a passenger. Allowing the suspension to "bottom out" will damage the shock absorbers and fittings.
TURN SIGNALS, FRONT AND REAR LIGHTS, BRAKE LIGHTS AND HORN
Before riding your vehicle, turn the ignition to "ON" position and inspect the safety components as follows:
- Turn on your left and right signal switch and make sure both front and rear turn signal lights are in working order.
- Inspect your Headlamp low and high beam is in working order
- Inspect your brake lights by depressing the front and rear brake levers to ensure both are in working order
- Inspect the light covers for cracks and clean any dirt that may cover the visibility of the light signal.
- Press the horn button to make sure the horn is working.

Caution: Use your turn signal indicators before turning or switching lanes to warn other road users of your intentions. Slow down by lightly depressing your brake lever to activate your brake lights to warn other drivers you are slowing or stopping your vehicle. Practice safe riding at all times.
COOLANT
COOLANT
The coolant reserve tank is located in the front centre of your vehicle
Park your vehicle with the centre stand on level ground
The front fairing cover is fastened via magnetic plates, pull lightly to open
Inspect the coolant level by locating the "min" and "max" lines on the tank
Before opening the cover, ensure the engine not running and the contents is cold
Top up if necessary, DO NOT overfill above the "max" line or the coolant will overflow when the engine is hot
Use only high quality ethylene glycol anti-freeze that contains corrosion protection inhibitors specifically formulated for aluminium engines. A 50:50 ratio of anti-freeze and distilled water is required for the cooling system
Warning!
Removing the coolant Tank cap or any cooling system hoses when hot
can cause the coolant to spray out and seriously scald you.
Allow the engine and coolant to cool down before refilling.

CAUTION
Use only low-mineral drinking water or distilled water as part of the anti-freeze solution. Water that is high in mineral content or salt may be harmful to the aluminium engine and seals. Using coolant with silicate inhibitors may cause premature wear of the water pump and seals or blockage of radiator passages. Using tap water can cause engine damage.
If you are using the vehicle in an environment where it will encounter freezing temperatures, you should have a higher concentration of anti-freeze installed by your ADIVA Dealer to provide additional protection against freezing of the engine. The higher concentration should not exceed 60% anti-freeze to distilled water.
During warmer climates, bring the anti-freeze ratio back the standard ratio. A concentration of less than 40:60 (40% anti-freeze) will not provide proper corrosion protection
STARTING THE ENGINE
Always follow proper procedure described here when starting your engine
- Place the vehicle centre stand and fold up the side stand.
- Insert the key into the ignition and turn clockwise to the "ON" position
- The speedometer indicator will turn a full sweep and back to zero
- Depress the rear brake lever and push the start button
- When the engine starts, release the start button immediately, continuous activation of the start button will damage the starter motor and gears
- For safety, a cut-off switch is installed in the side stand and the vehicle will not start if the stand is in the down position
- Depressing the rear brake lever on the handlebar is required to start the engine, the foot pedal brake(not available in some countries) does not have this capability
Caution:
To prevent damage to the starter motor, do not operate the starter for more than five seconds at a time. If the vehicle fails to start immediately, check the fuel level and battery condition, side stand position, and allow the starter motor to cool down before attempting to start the engine again.
Caution:
To protect the catalytic converter in your vehicle's exhaust system, avoid idling for extended periods of time and do not use leaded petrol
MAINTENANCE SCHEDULE
Perform the pre-ride inspection (see page 15) at each scheduled maintenance period. The interval should be judged by odometer reading or months, whichever comes first.
Maintenance schedule legend (see pages 26 and 27):
INSPECT AND CLEAN, ADJUST, LUBRICATE, OR REPLACE IF NECESSARY
C: CLEAN
R: REPLACE
A:ADJUST
L: LUBRICATE
The maintenance schedule on the following two pages specifies the maintenance required to keep your AD3 (200 / 300) vehicle in peak operating condition. Maintenance work should be performed by an Authorised ADIVA Dealer or Workshop. This will also prevent any Warranty claim disputes.
- Should be serviced by your authorised ADIVA dealer or Workshop, unless you have proper tools, service data and is technically qualified
** We recommend that these items be serviced only by your authorised ADIVA Dealer or Workshop and recommend that your ADIVA Dealer test ride the vehicle after the service is completed
MAINTENANCE CHART
| FREQUENCY ITEM | WHICHEVER COMES FIRST | ODOMETER READING | ||||||||
| X 1000 km | 1 | 5 | 10 | 15 | 20 | 25 | 30 | REFER TO PAGE | ||
| X 1000 mi | 0.6 | 3 | 6 | 9 | 12 | 15 | 18 | |||
| MONTH | 1 | 6 | 12 | 18 | 24 | 30 | 36 | |||
| * | AIR CLEANER | R | R | R | R | R | R | 18 | ||
| SPARK PLUGS | I | R | I | R | I | R | 19 | |||
| * | THROTTLE OPERATION | I | I | I | I | I | I | 18 | ||
| * | VALVE CLEARANCE | I | A | I | A | I | A | - | ||
| * | FUEL LINE | I | I | I | - | |||||
| CRANKCASE BREATHER | C | C | C | C | C | C | C | - | ||
| * | ENGINE OIL | R | R | R | R | R | R | R | 16 | |
| * | ENGINE OIL SCREEN | C | R | C | R | C | R | - | ||
| * | ENGINE OIL FILTER | R | R | R | R | R | R | R | - | |
| * * | ENGINE OIL MESH FILTER | C | C | C | - | |||||
| * | TRANSMISSION OIL | R | R | R | R | R | R | R | 17 | |
| * | DRIVE BELT | I | I | I | R | I | I | - | ||
MAINTENANCE CHART
| FREQUENCY ITEM | WHICHEVER COMES FIRST | ODOMETER READING | ||||||||
| X 1000 km | 1 | 5 | 10 | 15 | 20 | 25 | 30 | REFER TO PAGE | ||
| X 1000 mi | 0.6 | 3 | 6 | 9 | 12 | 15 | 18 | |||
| MONTH | 1 | 6 | 12 | 18 | 24 | 30 | 36 | |||
| ** | CLUTCH SHOE WEAR | I | I | I | - | |||||
| BRAKE FLUID | I | R | I | R | I | R | 12 | |||
| BRAKE PAD WEAR | I | I | I | I | I | I | - | |||
| BRAKE SYSTEM | I | I | I | I | I | I | - | |||
| * | BRAKE LIGHT SWITCH | I | I | I | I | I | I | - | ||
| ** | STEERING BEARINGS | I | I | I | I | I | I | - | ||
| * | HEADLIGHT AIM | I | I | I | I | I | I | - | ||
| * | NUTS, BOLTS, FASTENERS | I | I | I | I | I | I | - | ||
| ** | WHEELS/TIRES | I | I | I | I | I | I | 20 | ||
| ** | COOLANT | I | R | I | R | I | R | 22 | ||
ENGINE OIL AND LUBRICANTS
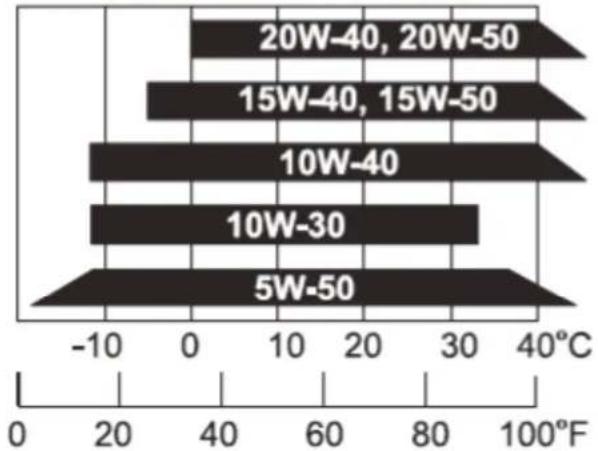
ENGINE OIL VISCOSITIES
RECOMMENDED ENGINE OIL VISCOSITY: SAE 5W-50
If this viscosity is not available, select an alternative engine oil according to the chart on the left
Engine Oil capacity: 1.5 litres
Engine Oil change : 1.3 litres
TRANSMISSION FLUID
RECOMMENDED TRANSMISSION FLUID VISCOSITY: SAE 90
TRANSMISSION FLUID CAPACITY: 0.23 litres
TRANSMISSION FLUID CHANGE : 0.21 litres
COOLANT
GLYCOL ANTI-FREEZE THAT CONTAINS CORROSION PROTECTION INHIBITORS EPSCIFICALLY FORMULATED FOR ALUMINIUM ENGINES.
50:50 RATIO OF ANT-FREEZE AND DISTILLED WATER. FOR EXTREMELY COLD, RATIO: 60:40 (60% ANTI-FREEZE)
SPECIFICATIONS
AD3 200cc AD3 300cc
| Engine and transmission Fuel system: Injection Injection Fuel control: OHC OHC | Displacement: | 198.00 cc | 299.00 cc |
| Engine type: | Single cylinder, four-stroke | Single cylinder, four-stroke | |
| Power: | 19.0 HP (14.6 kW)) @ 8000 RPM | 29.50 HP (21.5 kW)) @ 8500 RPM | |
| COMPRESSION RATIO | 11 | 10.8 | |
| Ignition: | C.D.I. | C.D.I. | |
| Cooling system: | Liquid | Liquid | |
| Gearbox: | Automatic | Automatic | |
| Transmission type | Belt | Belt | |
| Clutch: | Wet, multiplate | Wet, multiplate | |
| Driveline: | CVT | CVT |
| CHASSIS | OVERALL LENGTH (mm) 2169 | 2169 | |
| OVERALL WIDTH (mm) 1080 | 1080 | ||
| OVERALL HEIGHT (mm) 1796 | 1796 | ||
| WHEELBASE (mm) 1546 | 1546 | ||
| SADDLE HEIGHT (mm) 759 | 759 | ||
| DRY WEIGHT AMOUNT(kg) 215 | 215 215 | ||
| FRAME PIPE UNDER BONE PIPE UNDER BONE | |||
| TYPE (FR/RR) TUBELESS/TUBELESS TUBELESS/TUBELESS | |
| DIAMETER (FR/RR) 130/60-13 / 150/70-13 130/60-13 / 150/70-13 |
| TYPE (FR/RR) | DISK / DISK | DISK / DISK |
| DIAMETER FR/RR (mm) | 220 X 2 / 240 | 220 X 2 / 240 |
| SUSPENSION | TYPE (FR/RR) | ARM LINK TYPE / DOUBLE SWING | ARM LINK TYPE / DOUBLE SWING |
*Specifications are subject to change without notice
TROUBLESHOOTING
The engine does not start

- Has the ignition key been inserted and turned "ON"?
- Has the rear brake levers been pulled inwards?
- Is there electrical power supply, did the speedometer activate to a full sweep and back to zero?
- Check if the battery is flat
Is there fuel in the tank?
Is your side stand folded UP? If UP, try folding down and up again (cut-off switch may have loss contact due to contaminants) - Inspect the spark plug, clean it and check the spark gap.
- Check the filter and wash or replace it as necessary.
The engine misfires
- Inspect the spark plug, clean it and check the spark gap.
- Check the fuel feed.
- Have the ignition and timing checked by your Authorised ADIVA Dealer or Workshop.
The engine loses power and knocks
- Check the fuel feed.
- Check the silencer end section. It may be obstructed. If necessary replace it.
- Have the ignition and timing checked by your Authorised ADIVA Dealer or Workshop.
The engine smokes
- Blue smoke: oil consumption is excessive. Contact an Authorized ADIVA Workshop to have the engine checked.
- Black smoke: carburetion is incorrect. Contact an Authorized ADIVA Workshop and have the carburetion tuned up.
Braking is poor
Is there brake fluid in the reservoir? Top up if necessary and bring to your Authorized ADIVA Workshop for inspection immediately.
- Check the wear of the brake pads.
A
Air Filter 18
B
Battery 11, 19, 30
Brake Lever 10, 12, 21, 23
Brake Lights 21
Brakes 10, 12
C
Centre stand 2
Clock 6
Clock setting 7
Control Buttons 10
Coolant 22, 27
Coolant filler cap 2, 22
D
Dipstick 15, 16
E
Engine number 2, 16
F
Foot brake pedal 2, 12
Frame number 2,5
Front brake lever 2, 10
Fuel 4,14
Fuel tank cap 2, 11
Fuses 11
INDEX
H
Handlebar 10, 12
1
Ignition 8
L
Lights 21
M
MAP 2
Maintenance 14,24,25,26
Maintenance chart 25, 26
Motor oil drain plug 2, 16
Motor oil filler 16
0
Oils and Lubricants 15,27
P
Parking Brake 12
R
Rear brake lever 10, 12
Roof 13
s
Saddle 11
Safety Helmet Hook 2
Shock absorber 21
Side stand 2
Silencer 2
Spark plug 19
Specifications 28, 29
Speedometer
S t
Steering Lock 8
Storage 9,10
Switches 10
W
Windscreen 2,14
Windscreen Wiper 2,14
Wiper filler cap 2
Wiper washer switch 10
T
Tailight 2, 21
Throttle adjustment 18
T r
Transmission drain plug 17
Transmission filler 17
Troubleshooting
Trunk 10
Turn signal
Tyres 20
indicators
m
s
S
0
U
USB Port 7
WARRANTY
Content of the Warranty
- The components of the vehicle produced by this company will be repaired at no expense to the owner in case of defects in materials or workmanship, within the period of the Warranty (hereinafter referred to as "Warranty for repair").
The Warranty for repair consists of replacement or repair of parts. The parts replaced become a possession of this company. This Warranty does not cover freight, shipping or delivery expenses, import / export duties and taxes required to clear customs for replacement parts.
2. Warranty period
The guarantee period is 1 year or 10,000 kilometres whichever comes first from the new vehicle registration or purchase notification only for parts applicable for Warranty. However, all the following parts belonging to the vehicle are excluded.
- Spare parts, grease and oil
- Parts subject to other Warranty service
3. Other Warranty service
The following parts are Warranted according to the Warranty standards established by the respective manufacturers and are not covered by this Warranty
Please contact the ADIVA store where the vehicle was purchased.
- Tyres
- Batteries
- Optional parts installed by ADIVA Store, etc.
- Items which cannot be covered under Warranty such as rubber, plastic, vinyl parts, brake lines, lighting, wear and tear parts e.g. brake pads
WARRANTY
- The following conditions are not covered by this Warranty for repair or replacement.
u) Defects caused by lack of maintenance or incorrect use.
v) Defects caused by a different use other than that indicated in the user's manual and by any use exceeding technical limitations as shown by this company (maximum loading capacity, riding capacity, engine revolutions, etc.).
w) Defects caused by any changes violating your country's laws and ordinances and which are not allowed by this company (engine tune-up, body modification, removal of lamps, expansion of bodywork and components, etc....).
x) Defects caused by use in racing, speed trial testing, rallies or in general by riding in places where it is not applicable to normal road Vehicles.
y) Defects caused by the use of non-origina parts, oils or grease, which are not specified (oil, fuel, brake fluid and radiator liquid, etc.).
z) Defects caused by wear and tear over time (natural fading of surface coating and rust on plated surfaces, etc.).
aa) The sensory phenomena which do not influence function (sound, vibration and oil spread, etc.).
bb)Defects caused by accidents and natural calamities such as earthquakes, typhoons, flood disasters, fires, etc.
cc) Defects caused by toxic smoke and gases, chemicals, salt-air damage, or any external factors beyond our control.
dd)Defects caused failure to respect the following page no. 3, 4 and 5 of this user manual.
k) Replacement of parts removed by other persons other than an Authorised ADIVA Dealer or Workshop.
I) Defects cause by parts which have been modified or attempted modifications
This company will not cover costs for performing maintenance checks related to regular inspections required by laws of your country.